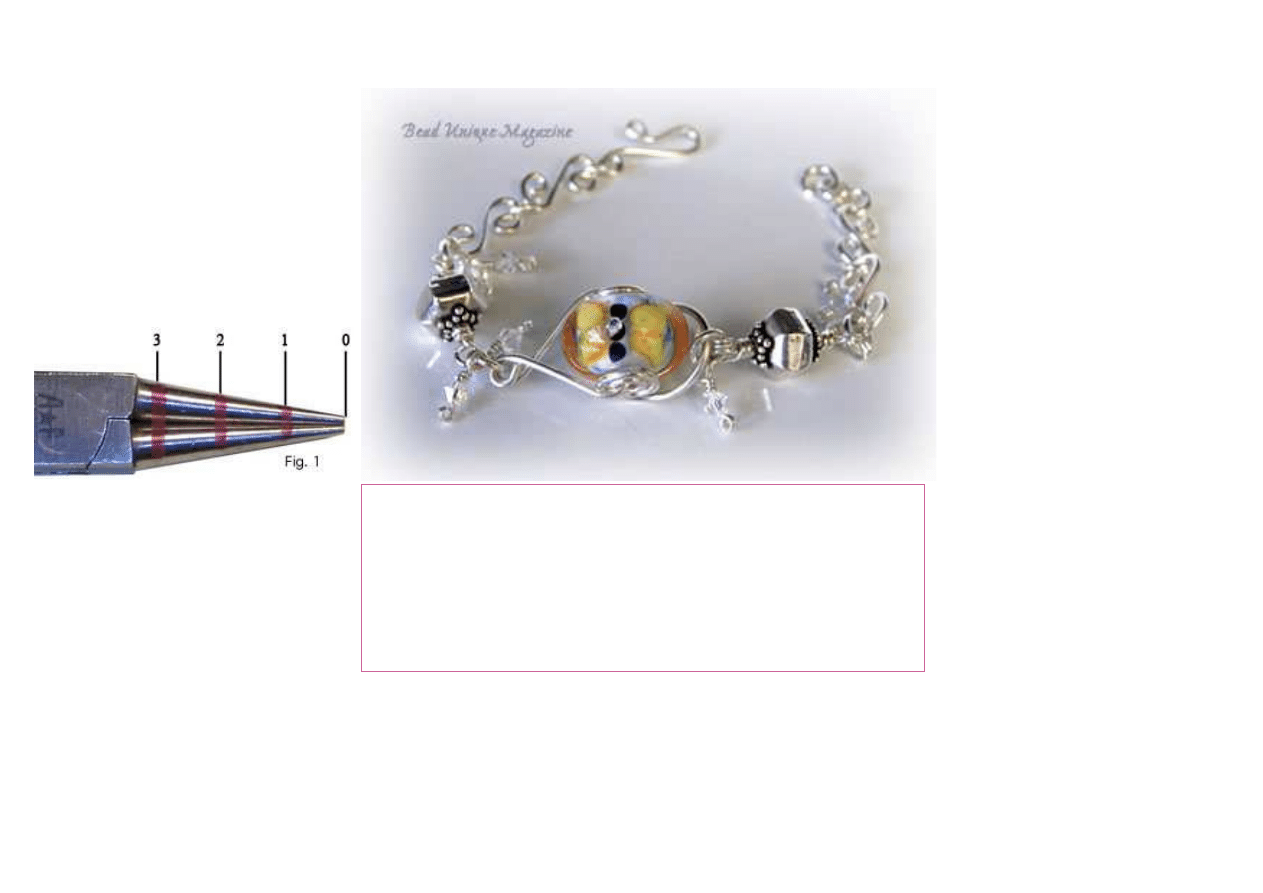
Butterfly Bead Wirework Bracelet
Designed by Laura Jannuzzi
Intermediate project
Time to complete project: an afternoon
Dimensions: approximately 8" long
Inspiration:
My longtime friend, Jennifer Ringer, makes gorgeous lampwork beads
with flowers, fish, and butterflies. When I found out that she was
doing a project for Bead Unique Magazine that shows how to make
the Butterfly Beads, I just had to share my own fun ways to use them
in jewelry.
Tips:
• To easily form wire loops and to be consistent with your wirework,
mark your round nose pliers in three spots with a Sharpie pen (Fig.
1):
Position 0
Leave unmarked—this is the very tip of the pliers.
Position 1
is in the middle of the top third of the pliers.
Position 2
is in the middle of the second third of the pliers.
Position 3
is in the middle of the bottom third of the pliers.
• To clean and help harden the wire, pull it through a ball of fine
#000 steel wool several times before cutting. File the end of the
wire flat after cutting it.
Materials:
1 15mm x 20mm Butterfly bead*
3' of 16-ga. Dead soft round wire—sterling silver
1' of 18-ga. Dead soft round wire—sterling silver
2' of 20-ga. Dead soft round wire—sterling silver
2 10mm x 10mm Accent beads—sterling silver
8 Swarovski® 4mm Bicone Crystals—Clear AB
10 5mm ID Jump rings—sterling silver
Additional Supplies:
Basic beading supplies, flat nose pliers, fine #000 steel wool, flush cutters, mandrel or Sharpie pen, needle file,
polishing cloth, round nose pliers, ruler
Instructions:
Coil harness
1.
Clean, cut, and file a 6" piece of 16-ga. wire. Using position 1 on the round nose pliers, grip the end of the wire so it is flush with the pliers, then loop the wire once. Use flat nose pliers and continue to loosely
coil another full turn. The coil should now be two full circles.
2.
Coil the other end of the wire to match the first coil. Make sure the coils are flat and are approximately the same size (Fig. 2).
3.
To make the bead harness, center the wire around a mandrel or Sharpie. Gently bend the wire to form a U-shape. Note: The flat sides of the coils should face each other (Fig. 3).
4.
Fit the coil harness to the butterfly bead, adjusting the coils equally. Note: The harness should be about 1/4" from the bead (Fig. 4).
Fig. 2
Fig. 3
Fig. 4
Triangle link
1.
Clean, cut, and file a 4" piece of 16-ga. wire. Insert the wire through the coil on one side of the harness, through the bead, then through the coil on the other side of the harness (Fig. 5). Center the wire.
2.
Bend the sides in to form a triangle. The wires should cross 5mm to 10mm from the butterfly bead (Fig. 6). Trim the wire so each side extends only 1/2" beyond where the wires cross.
3.
With the unfinished wires facing up, firmly grasp one wire at position 1 on the round nose pliers and make a loop (Fig. 7). Loop the other wire in the opposite direction. Adjust the wire so the loops are centered
over each other (Fig. 8).
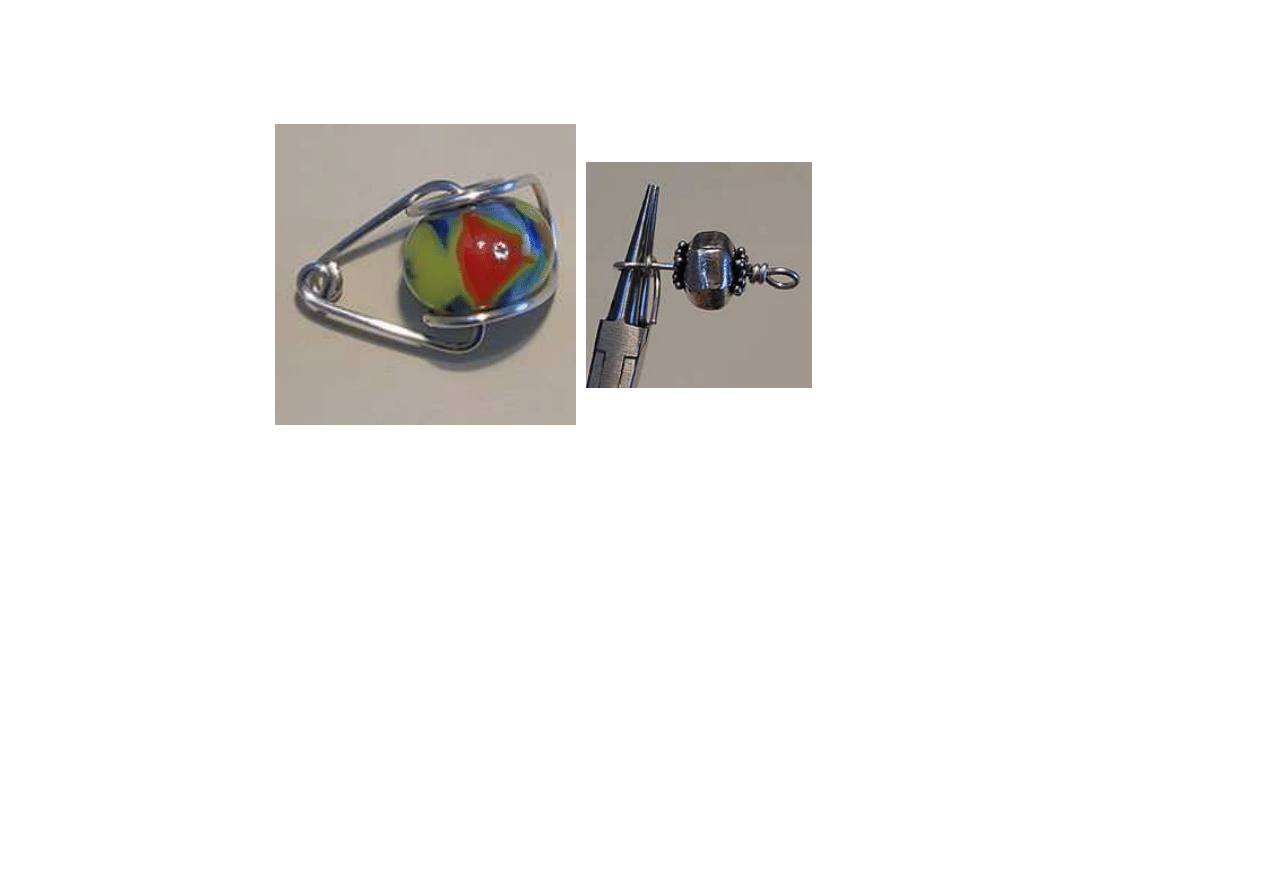
Fig. 5
Fig. 6
Fig. 7
Fig. 8
Fig. 9
Accent beads
1.
Clean, cut, and file a 4" piece of 18-ga. wire. Firmly grasp the wire about 3/4" from the end with the round nose pliers just below position 1 and make a wrapped loop.
2.
Slide a silver accent bead onto the unfinished end of the wire, then finish the end with another wrapped loop (Fig. 9).
3.
Repeat steps 1 and 2 for the second accent bead.
Silver links
1.
Clean, cut, and file a 2" piece of 16-ga. wire. Using position 1 on the round nose pliers, firmly grasp the wire and form a closed loop. Do not remove the pliers. Rotate your wrist away from you again to form a
second loop (Fig. 10).
2.
Repeat on the other end of the wire, turning the loop in the opposite direction. The link will now look like an S-link with loops inside (Fig. 11).
3.
Repeat steps 1 and 2 to make three more links.
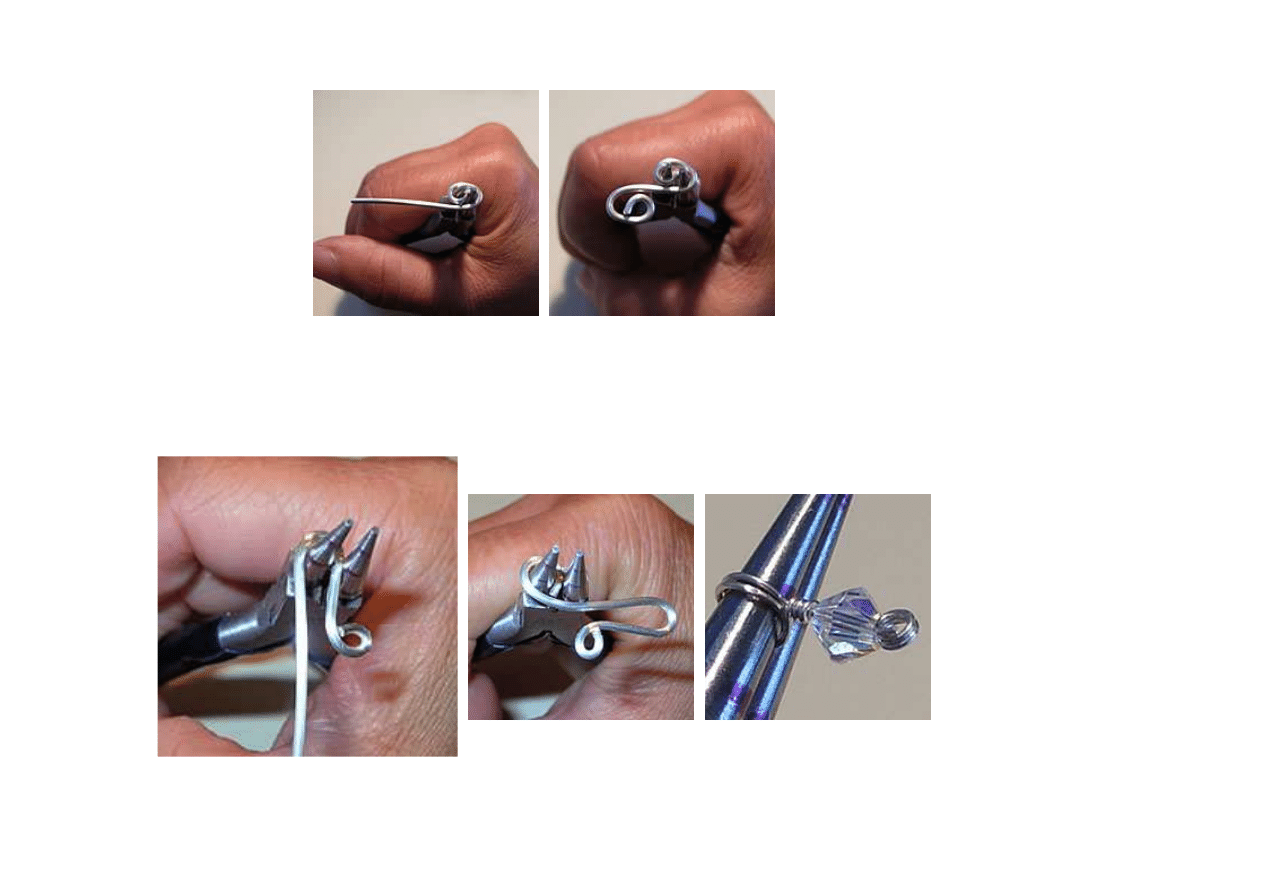
Fig. 10
Fig. 11
Hook
1.
Clean, cut, and file a 21/2" piece of 16-ga. wire. Using position 0 on the round nose pliers, firmly grasp the wire and make a closed loop on one end.
2.
Using position 3, hold the wire about 1/4" above the closed loop. Form a long U-bend in the hook (Fig. 12). Using position 2, firmly grasp the other end of the wire. Make a closed loop in the opposite direction of
the hook (Fig. 13).
Fig. 12
Fig. 13
Fig. 14

Crystal dangles
1.
Clean and cut a 2" piece of 20-ga. wire. Using position 0 on the round nose pliers, make the smallest double loop possible on one end of the wire.
2.
Slide on a Crystal. Using position 1, make a wrapped double loop (Fig. 14).
3.
Repeat steps 1 and 2 to create an additional seven Crystal dangles
Assembly
1.
Attach two Crystal dangles to each of four jump rings.
2.
Lay the bracelet components out in the following order: hook, jump ring, s-link, jump ring, s-link, jump ring with two Crystal dangles, silver accent bead link, jump ring with two Crystal dangles, butterfly focal
bead, jump ring with two Crystal dangles, silver accent bead link, jump ring with two Crystal dangles, s-link, jump ring, s-link, jump ring, jump ring, jump ring.
3.
Link each bracelet piece together using the jump rings. Use the steel wool and file to soften or remove marks in the finished piece. Note: Be careful not to scratch the Crystals or the butterfly bead with the steel
wool.
4.
Polish the finished bracelet with a sunshine cloth.
For questions concerning
Wyszukiwarka
Podobne podstrony:
Bead Loom Bracelets
bead stained glass bracelet
Bead Egyptain Geometic Bracelet
bead&button huichol bracelet
(Ebook English) Crafts Beading Triangle Bead Bracelet
Artistic Wire Green or Magenta Single Spiral Bead Necklace & Earrings
Butterworth Finite element analysis of Structural Steelwork Beam to Column Bolted Connections (2)
butterfly wire pendant a
la twins bead
motyle Polski makro, Butterflies - dokumenty
On nature Butterflies
Projektowanie filtrów cyfrowych Butterwortha i Czebyszewa
BRACELET CARRE
bead embell btn
butterfly
butterfly template
Pattern Choir of Angels Bracelet & Earrings
więcej podobnych podstron