
EXAMINATION OF THE REAL PRESTRESSING
CONDITIONS OF TOOLING SYSTEMS
A. Putz, U. Engel
Chair of Manufacturing Technology
University of Erlangen-Nuremberg
Germany
Abstract
The quality of tooling systems in cold forging can be defined by the attainable
life time and the life time scatter. These are directly influenced by the pre-
stressing conditions, whose quantity and homogeneity is of prime importance
concerning the process reliability. Particularly, in case of fatigue being the
dominant mechanism controlling tool life its scatter can be put down mainly -
besides other effects - to the state of prestressing which is in multiple respect
an unstable parameter: it depends on the geometry of the tool system compo-
nents which is defined by certain tolerances and on the process of shrinking
itself. Up to now there is no method available for the quality control of the as-
sembled prestressed tool. Since such a method demands for non-destructive
measuring the ultrasonic inspection seems to be an appropriate solution. In
this paper such a solution will be presented which is based on the measure-
ment of the locally yielding solid contact between die and shrink ring. For
the examination of the real contact pressure it is necessary to describe the
correlation between the real contact area measured by ultrasonics and the
local contact pressure which is calculated by modeling the flattening of the
surface asperities by means of FE-simulations. This paper presents basically
the determination of the contact pressure between two metallic parts by ul-
trasonics with regard to assess the prestressing conditions of tooling systems.
Keywords:
tooling systems, prestressing conditions, real contact area, real contact pres-
sure, ultrasonics
1249

1250
6TH INTERNATIONAL TOOLING CONFERENCE
INTRODUCTION
In cold forging tool life and tool life scatter characterize the cost-effectiveness
of industrial mass production [1, 2]. Especially these two criteria define the
quality of tooling systems that are used. The life time scatter can be traced
back to the fatigue properties of the tool material but also to scatter of the
prestress. The final quality of prestressing, however, is not only given by the
quality of the components but also by the quality of the assembling procedure
[2, 3]. Additional effects can be expected when a conical shrinkage is used,
since the coincidence between die and shrink ring angle has an influence
as well. These uncertainties may cause a not well defined state of prestress
which may distinctly deviate from the ideal one. The inhomogeneous pre-
stress situation between the tool components and the resulting deviation of
the different prestress conditions can be one of the main causes for huge
life time scatters [4]. Thus, as the general objective a possibility has to be
found to check the quality of a tooling system prior to its application. In this
paper an ultrasonic measurement system will be presented that enables the
assessment of the contact conditions between tooling components.
ULTRASONIC MEASUREMENT SYSTEM
MEASURING PRINCIPLE
The idea of using ultrasonics is based on the fact that the interface between
die and shrink ring consists of two portions, which are the real contact area
(by flattening of the surface asperities) and remaining gaps. The intensity
of the reflected ultrasonic signal correlates with the portion of solid contact,
which depends on the real pre-stressing level. Figure 1 shows the splitting
of an ultrasonic wave caused by the different contact conditions. The input
sound wave goes through the interface in case of solid contact and is reflected
in case of gaps [5].
The detection of the reflected ultrasonic wave can be realized by the so-
called impulse reflection method. The longitudinal input waves are emitted
by an ultrasonic transducer, which is not only able to send but also to receive.
The reflected sound wave is shown on the screen of the ultrasonic device in
terms of an intensity-runtime diagram (A-scan) from which the peak "B" can
be identified as characterizing the state of contact within the measurement
spot area, cf. Fig. 1).

Examination of the Real Prestressing Conditions of Tooling Systems
1251
Figure 1.
Splitting of an ultrasonic wave in a reflected and a transmitted portion in the
contact seam between die and shrink ring.
Several experiments have shown that this measuring method is suitable for
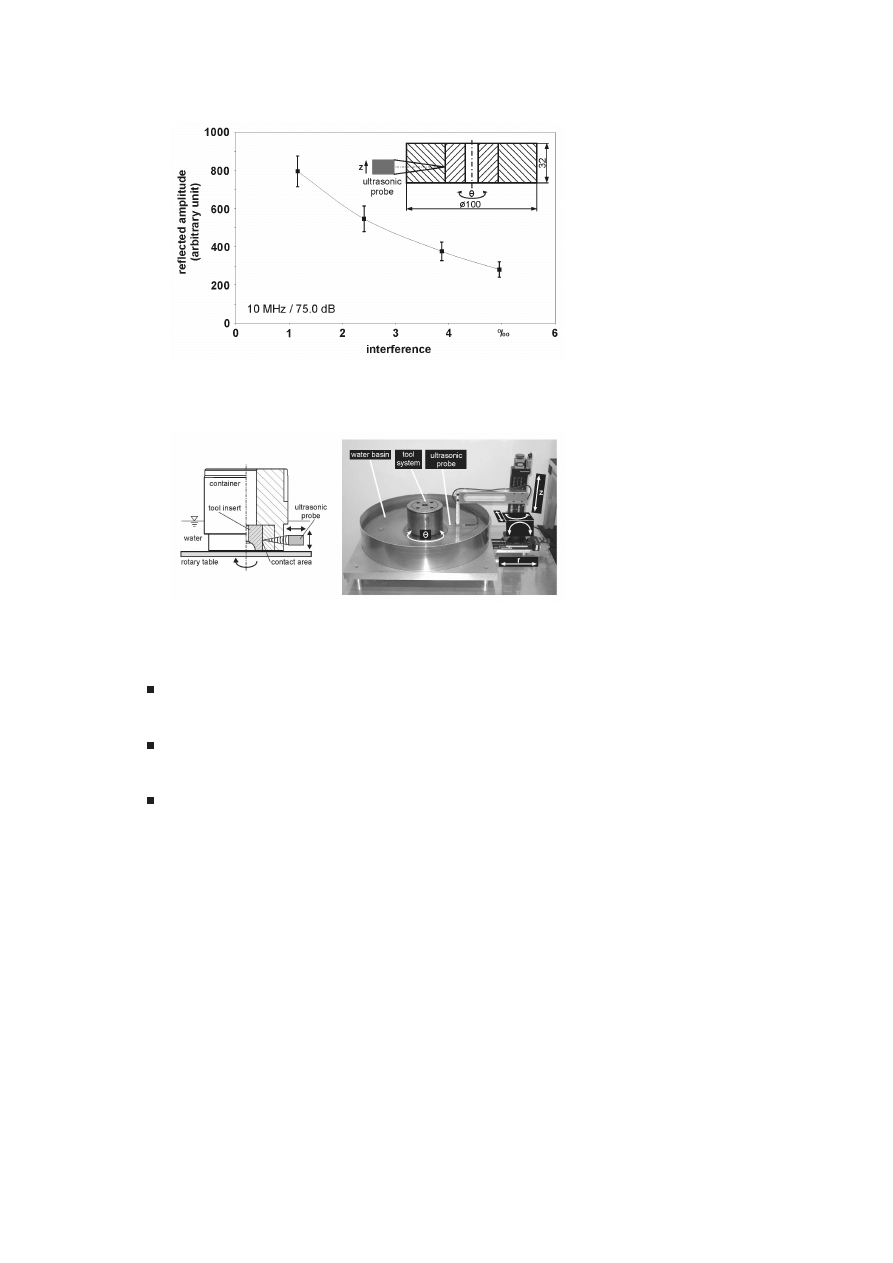
the examination of the prestressing conditions. In these test series four dif-
ferently prestressed shrink fits have been investigated (interferences: 1.16Pr
/ 2.41Pr / 3.87Pr and 4.95Pr). In each case core and ring have been as-
sembled by thermal means in order to minimize frictional effects. Figure 2
presents the construction of the shrink fits, which have been inspected over
whole the circumference angle and axial length. The technical data of the
ultrasonic probe used here are frequency 10 MHz, attenuation 75.0 dB and
focal diameter 1.65 mm. The diagram on the left shows the median of the re-
flected amplitudes with its corresponding standard deviation as a function of
interference. As a result a strong correlation between the reflected ultrasonic
signal and the interference can be stated.
EXPERIMENTAL EQUIPMENT
Figure 3 shows the principle of inspecting an axis-symmetrical tooling
system for the forging process of spheres for ball bearings. The measuring
operation requires three axes. The two linear axes (z and r) enable the axial
and radial positioning of the ultrasonic transducer. The rotational positioning
(Θ) of the tooling system is realized by a rotary table. All these three axes
are powered by NC-controlled step motors. Thus, the whole area of contact
can be scanned automatically and with high lateral resolution (z and r: 1 µm;
Θ: 18").
Supporting features of the experimental set-up are:
1252
6TH INTERNATIONAL TOOLING CONFERENCE
Figure 2.
Correlation between the reflected ultrasonic amplitude and the geometrical
interference, which represents the prestressing level.
Figure 3.
Measuring principle (left) and steep bath of the ultrasonic measurement system
(right).
measurement under water which is required to couple the ultrasonic
waves into the tool
adjustment of the ultrasonic probe by three additional manually oper-
able axes (to adjust it perpendicularly to the area of interest)
high stiffness of whole the mechanical part in order to achieve the
required positional accuracy taking into account the motion and ac-
celeration of tool and sensor during measuring
Examination of the Real Prestressing Conditions of Tooling Systems
1253
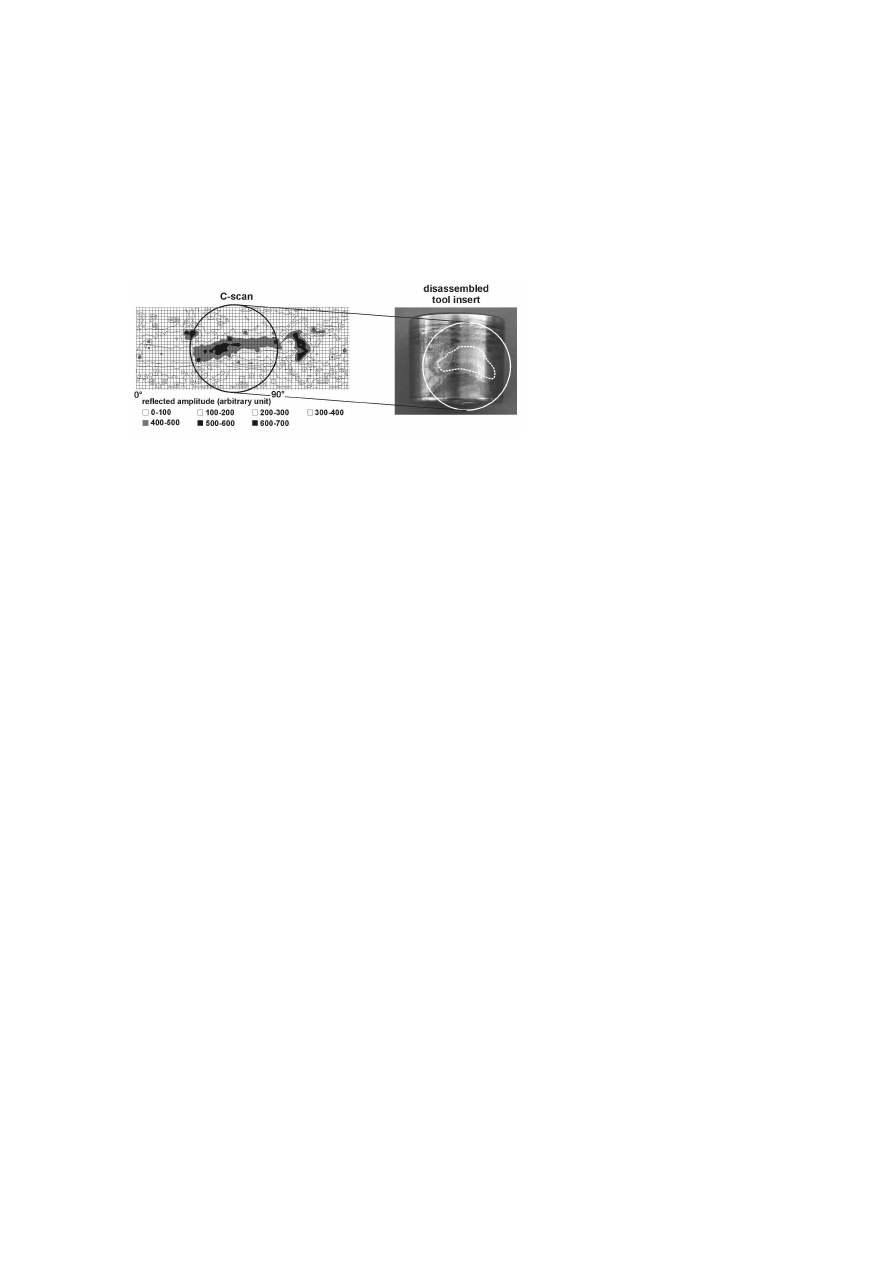
As an example the result of such a measurement, cf. Fig. 4, left, is shown
in form of a so-called C-scan mapping the intensity of the reflected signals
on the whole generated contact area. In this case a well localized region
of high intensity is identified indicating less solid contact compared to the
surrounding. Inspecting the disassembled tool insert this region can also
be found optically characterized by less modified topography in the right of
Fig. 4.
Figure 4.
Measurement results of the inspection of an industrial tooling system (10 MHz;
75.0 dB).
It is quite evident that the contact stress acting between die and ring must
have been inhomogeneous as well. Its distribution will correspond to that
of the local contact area and thus to that of the intensity of the reflected
ultrasonic signal. It should be noted that in this case the inhomogeneity is
probably caused by inaccuracies in manufacturing the die and/or the ring
(not necessarily leaving the tolerances). This information might be used
either for classifying the tooling system or for retrieving it for purpose of
remachining and reassembling. This example shows clearly the suitability of
the measurement principle to get the required information about the contact
stress and its distribution.
QUANTITATIVE EVALUATION OF THE REAL
PRESTRESSING CONDITIONS
The quantitative determination of the real contact pressure is done in two
parts. First, the determination of the real contact area (RCA) by means of
ultrasonics and second, the deduction of the relation between the RCA and
the real contact pressure by FE-modeling the deformation of the surface
1254
6TH INTERNATIONAL TOOLING CONFERENCE
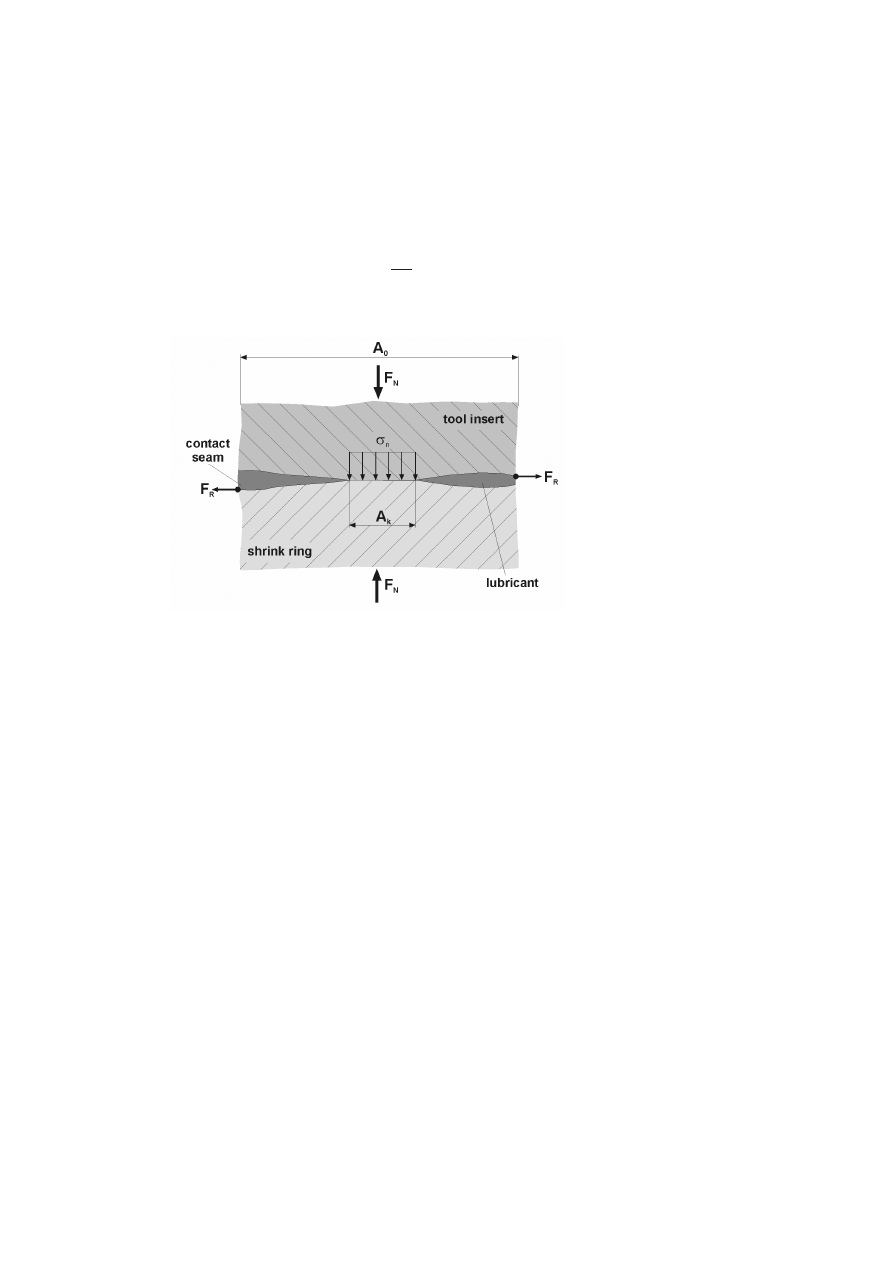
topography. Figure 5 illustrates schematically the contact situation. Due to
the elastically and plastically deformed topographies the interface is built
up by two portions: the RCA, which is able to carry the normal contact
pressure and also shear stresses, and remaining voids. The solid contact and
the nominal contact area are written as A
k
and A
0
respectively, so the RCA
is given as:
RC A =
A
k
A
0
Figure 5.
Contact seam between two metallic parts under pressure.
One of the most important contact models has been developed by Green-
wood and Williamson [6]. It describes the contact of nominally flat surfaces
and shows that the contact deformation depends not only on the load but also
on the surface topography. It even establishes the criterion – the so-called
"plasticity-index" - to distinguish surfaces which touch elastically from those
which touch plastically. The widespread idea that in general contact is elas-
tic at low loads and becomes plastic as the load increases cannot be held.
The index may be regarded as a generalized surface parameter, which takes
into consideration both the material and topography properties.

Examination of the Real Prestressing Conditions of Tooling Systems
1255
DETERMINATION OF RCA BY ULTRASONICS
Starting from the measurement principle outlined above one basic presup-
position is the knowledge of the characteristics of ultrasound propagation in
steel and the acoustic pressure distribution within the focus, which depend
on ultrasonic-probe specific parameters (e.g. the frequency, the diameter of
the transducer and the focusing). In the present investigation an ultrasonic
probe is used as specified in 2.2. In order to find the ones most suited for
specific tasks an investigation program is planned with ultrasonic probes
ranging from 1 MHz to 25 MHz and from 6.3 mm to 25.4 mm in frequency
and probe diameter, respectively. The characterization for the acoustic sound
pressure distribution is done by the sphere-reflection-method [5].
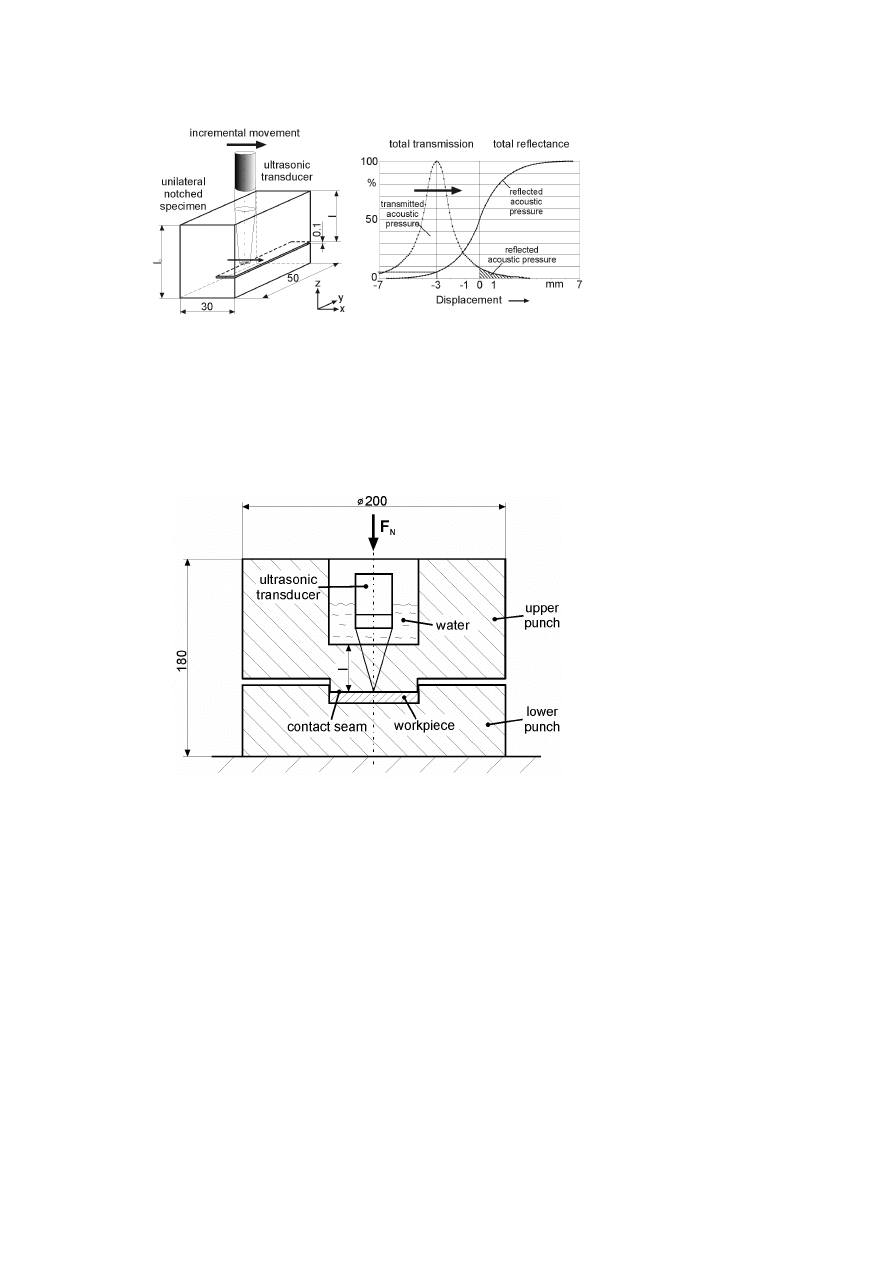
Fundamental insight into the relation between RCA the ultrasonic re-
sponse will be gained by experiments as shown in Fig. 6. Using an one-
sidedly notched specimen the ultrasonic probe is moved incrementally from
the region of total transmission to that of total reflection. Transmitting a
constant sound pressure the distribution (shown as a gaussian function in
Fig. 6, right) of which is known the response signal, i.e. the reflected sound
pressure, results in a S-shaped function starting from zero (total transmis-
sion) ending at its maximum (total reflection). This function is characteristic
for the specific ultrasonic probe that is used. With knowledge of the distri-
bution and the distance between ultrasonic probe and notch tip the portion of
the reflecting area within the effective radiation area can be determined and
directly be linked to the response function. As thus the response function is
representing the portion of the reflecting area, its complement does reflect
that of transmission which is tantamount to the RCA.
In order to verify the resulting ultrasound-RCA relation further experi-
ments on real surfaces are performed as shown in Fig. 7. The contact area
between the workpiece and the upper punch is inspected by the ultrasonic
transducer. The contacting surface of the upper punch is polished to mini-
mum roughness. The roughness of the counterpart designated by workpiece
in Fig. 7 is varied in a range as it is applied by usual manufacturing meth-
ods. Flattening the topography of the workpiece by a well defined nominal
contact pressure which is realized by integration of the set-up into a press,
results into a specific RCA which on the one hand is measured in-situ by
ultrasonics and which on the other hand can be measured post process by
optical profilometry [7]. Due to the variability of load being an independent
1256
6TH INTERNATIONAL TOOLING CONFERENCE
Figure 6.
Fundamental experiments for the sound characterization of ultrasonic transduc-
ers.
variable in generating different RCA´s, these kinds of experiments are suited
not only to verify the basic observations but also to check the modeling used
to relate RCA and real contact pressure.
Figure 7.
Ultrasonic Inspection of real contact conditions.
Examination of the Real Prestressing Conditions of Tooling Systems
1257
RELATION BETWEEN RCA AND REAL CONTACT
PRESSURE
In the practice of prestressed components, the RCA represents a depen-
dent variable yielding a specific value for given contact pressure, material,
roughness, and frictional properties. In the present case the objective is vice
versa to start from the RCA (as measured) and to ask what is the related con-
tact pressure where of course the other parameters with respect to material
properties, roughness and friction must be known. The problem is solved by
modeling the flattening of a given topography by means of FEM, Fig. 8 [8].
An important feature of the approach is to start from real surfaces as they
are used in the experiments in order to facilitate the verification. Whereas
in such a way the material and topography are fixed another demand for the
approach is that the effect of the other variables can be investigated by the
variation of these parameters.
Figure 8.
Procedure for the contact simulation.
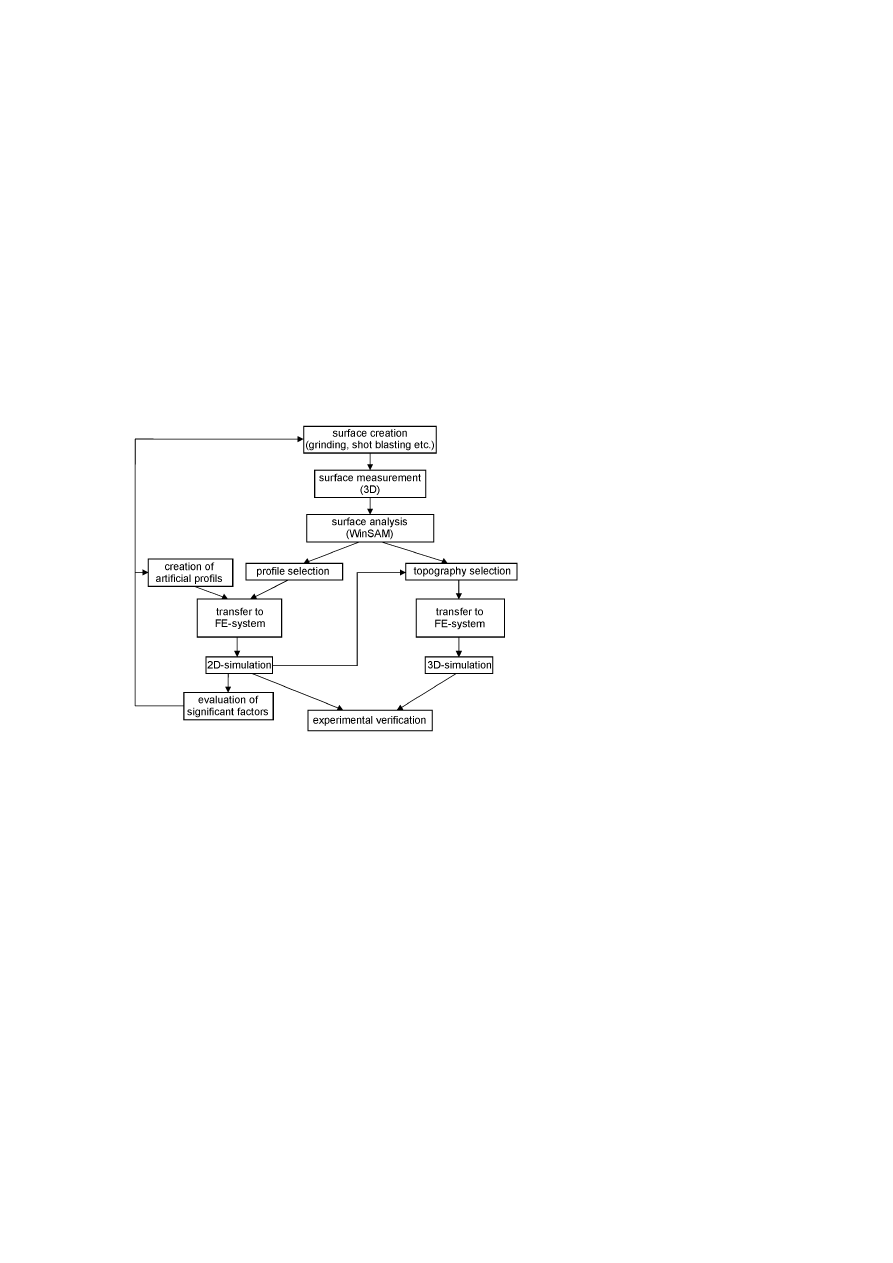
The first step is the selection and the preparation of surfaces by different
finishing methods like grinding, shot blasting etc. in order to cover a certain
range of roughness. The second step is to make the topography available for
1258
6TH INTERNATIONAL TOOLING CONFERENCE
the FE-model. This is done by an optical 3D-surface measurement yielding
the topography in digitized form further processed by a special surface anal-
ysis software. For the next step, i.e. modeling the flattening, there are two
options: the plain 2D-approach and the more demanding 3D-approach. The
former represents an efficient method to identify the parameters most signif-
icantly influencing the flattening process, e.g. by parameter variation. From
these results there is a loop to either selecting new materials and new surfaces
in order to confirm the identified significance, or alternatively, to start the
flattening analysis with synthetically generated model topographies. This
option will be used in future to investigate the effect of specific roughness
parameters such as R
a
and R
Sm
("center line average height" and "mean
distance of profile irregularity"). The second branch comprises a 3D-FE
analysis of flattening starting from digitized topographies of real surfaces.
This procedure is applied for selected 2D-simulation runs in order to check
the validity of the 2D-approach and to identify effects which can only be
described by a 3D-model. Finally the results has to be compared with the
experimental ones from the flattening test.
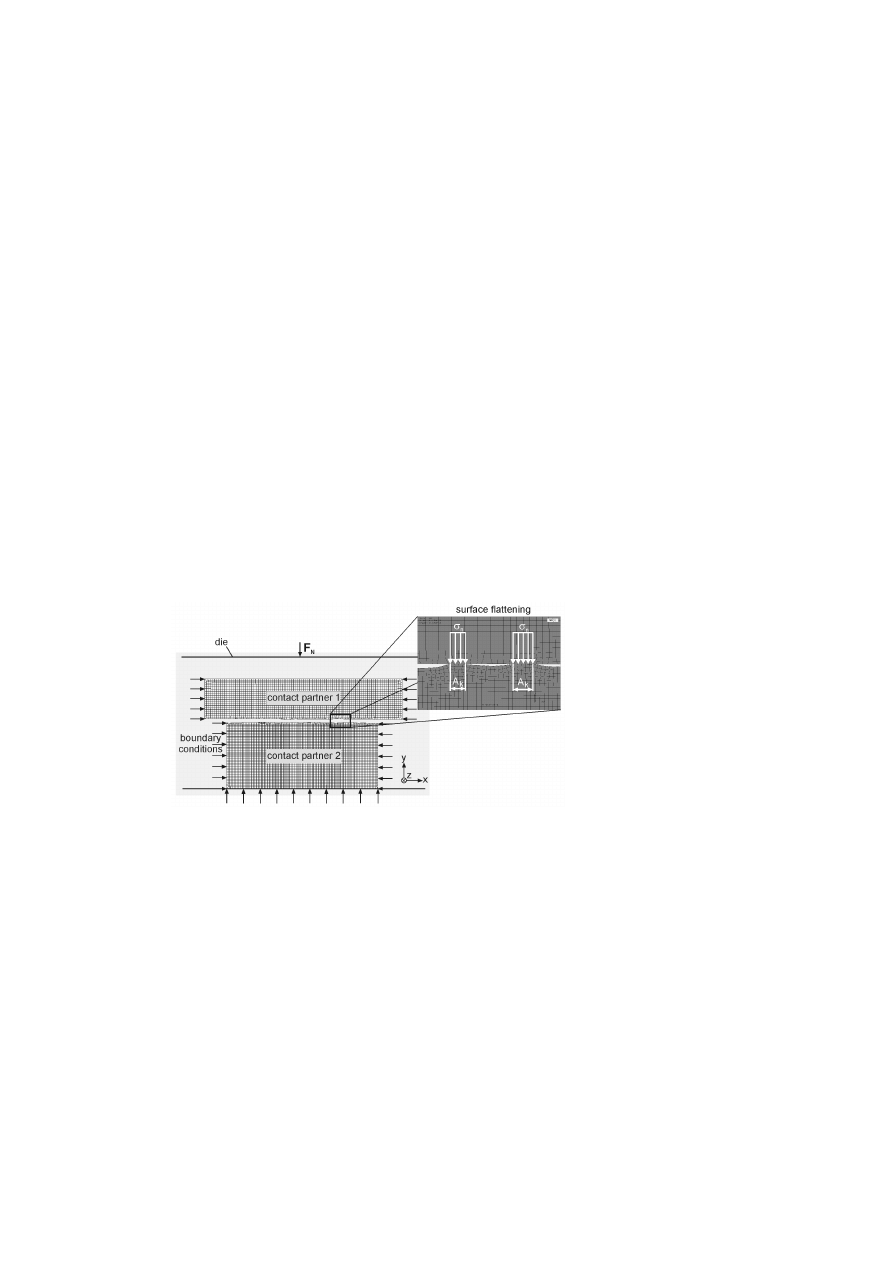
As an example the 2D-simulation of the surface flattening of two rough
surface topographies is presented in the following. The simulation itself
requires two meshed contact partners (elastic-plastic) which are fixed by
boundary conditions shown in Fig. 9. The upper die that compresses both
parts is incrementally moved in negative y-direction.
Figure 9.
FE-simulation of the contact between two rough surfaces (2D).
Examination of the Real Prestressing Conditions of Tooling Systems
1259
The length of the lower contact partner is 700 µm, divided in 100 up to
150 elements. Thus each element has a length of 0.7 until 1.0 % of the
maximum possible contact area A
0
. A series of simulations has been made
by varying the following variables:
material properties of both contact partners (C15(w); AlMgSi0.5)
surface topography (R
a
; R
Sm
)
friction factor (m)
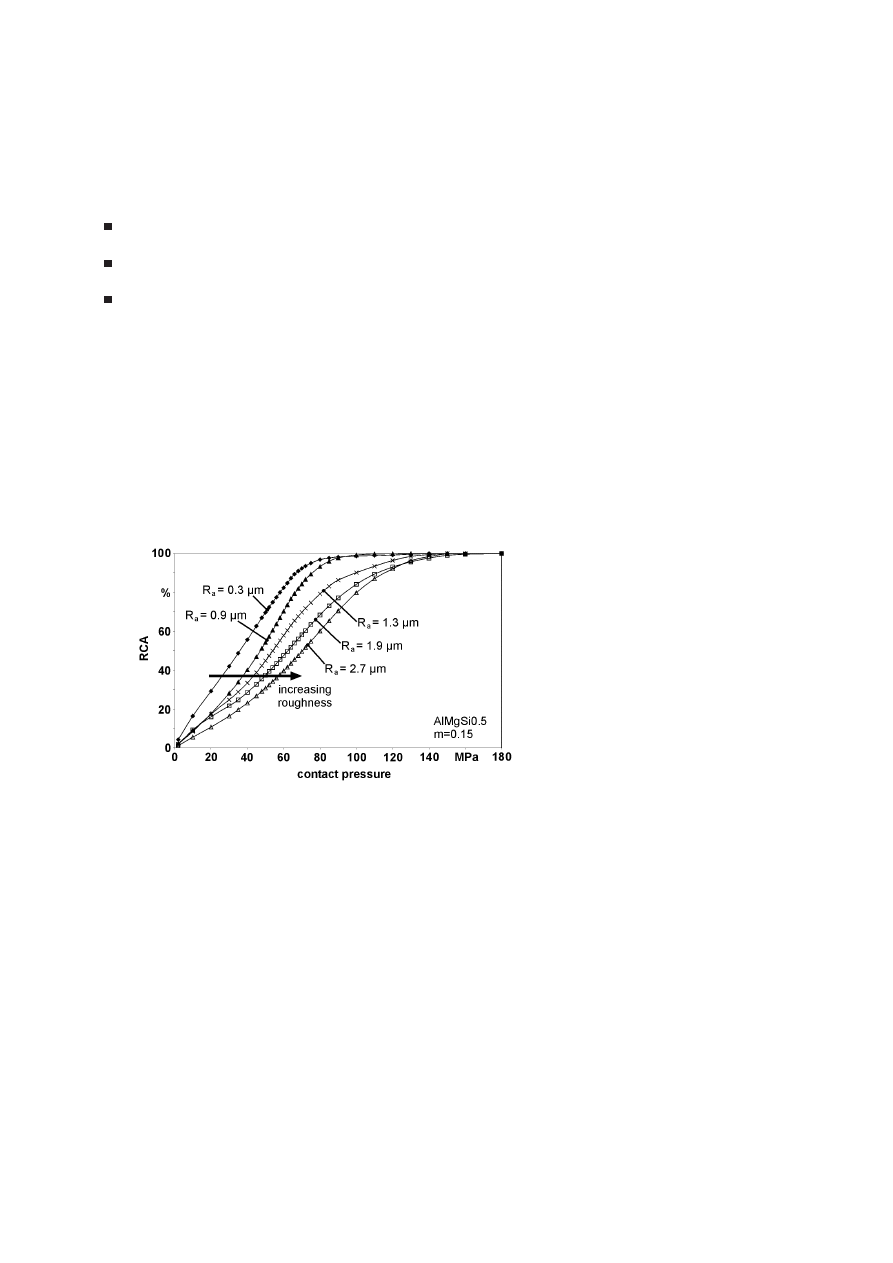
As a result, the most influencing variables of the flattening phenomena are
the material properties due to different Young‘s Moduli but also the surface
topography as presented in the Greenwood-Williamson model [6]. Figure
10 shows the flattening curves for different R
a
-values. It shows in a clear
manner that the flattening of surface asperities depends significantly on the
R
a
-value of the surface. Those with higher R
a
-values need more contact
pressure to get smoothed. With the help of this simulation method and the
experimental verification it is possible to evaluate the flattening phenomena
of rough metallic surfaces thus enabling the determination of the real contact
pressure starting from RCA.
Figure 10.
Correlation between contact pressure and RCA.

1260
6TH INTERNATIONAL TOOLING CONFERENCE
CONCLUSIONS AND OUTLOOK
In this paper an ultrasonic measurement system for the inspection and the
quality assessment of assembled tooling systems has been presented. The
measurement principle is based on ultrasonics enabling the analysis of con-
tact conditions in interstices, which are directly related to the prestressing.
The capability of the measurement system has been proved by a number of
selected shrink fits with different geometrical interferences and thus different
prestressing conditions. A specific feature of this measurement method is its
lateral resolution. The inspection of industrial tooling systems reveals that
the contact often is rather inhomogeneous influencing the load distribution
within the die during processing. This is one of the reasons for the reduction
of tool life and its distinct scatter. The quantitative determination of the
local contact pressure comprises two steps. The first is the ultrasound based
measurement of the RCA. The present promising results may be improved
by a systematic investigation of different types of ultrasonic probes. Fur-
thermore, future investigations should take into account the deviation from
ideal geometry and its effect on the ultrasonic response as e.g. non-planarity,
conicity, transitions and boundary effects. The second step is to connect the
measured RCA to the related real contact pressure. This is done by model-
ing the flattening of the topography by means of FE-analysis. First results
confirm not only the expected relation between RCA and contact pressure
but also e.g. the effect of roughness. The comparison between 2D and 3D
simulation as well as the comparison to the corresponding experiments are
well suited to validate the approach and to develop the measurement sys-
tem towards a versatile instrument for the quality assessment of prestressed
components.
REFERENCES
[1] R. Geiger, R. Woska: Fließpressen. In: Spur; Stöferle (Edtr.): Handbuch der Fertigung-
stechnik. Vol. 2, Hanser, München, 1984
[2] U.Engel: Beanspruchung und Beanspruchbarkeit von Werkzeugen der Massivumfor-
mung. Bamberg, Meisenbach, 1996
[3] M. Geiger, U. Engel, M. Pfestorf: Ultrasonic Inspection of Stress State of Prestressed
Extrusion Tools. Production Engineering 1 (1994) 2, pp.213-216
[4] B. Falk, A. Putz, U. Engel: Ultrasonic Inspection of Tooling Systems in Cold Forging.
Proceedings of the 3
rd
International Conference on Industrial Tools, 2001, pp. 251-255

Examination of the Real Prestressing Conditions of Tooling Systems
1261
[5] J. Krautkrämer, H. Krautkrämer: Werkstoffprüfung mit Ultraschall. 5
th
Edition, Berlin
/ Heidelberg / New York / Tokio, Springer, 1986
[6] J.A. Greenwood, J.B.P. Williamson: Contact of nominally flat surfaces. Proceedings of
the Royal Society of London, Vol. 295 (1966), pp. 300- 319
[7] M. Geiger, U. Engel, S. Niederkorn, M. Pfestorf, : Messtechnische Erfassung der Wirk-
flächenvorgänge in der Umformtechnik. Tribologie & Schmierungstechnik 3 (1996),
pp.113-119
[8] M. Brunner,: Simulation des Einglättungsverhaltens metallischer Oberflächen mit
stochastischer Mikrostruktur unter Druckbelastung. Diploma thesis 01/2001. Chair of
Manufacturing Technology, University of Erlangen- Nuremberg, Germany, 2001
Wyszukiwarka
Podobne podstrony:
Clinical Examination of Musculoskeletal System Assessing Rheumatic Conditions
AIDS TO THE EXAMINATION OF THE PNS ED 4TH
hao do they get there An examination of the antecedents of centrality in team networks
Brian Tracy Flight Plan The Real Secret of Success
Bob Cassidy The Real Work Of Cold Reading
E R Swanger A Preliminary Examination of the Omamori Phenomenon (Asian Ethnology, Vol 40 2, 1981)
An Examination of the Evolution of Army and Air Force
[Mises org]George,Henry Protection Or Free Trade An Examination of The Tariff Question, With
Slavoj Žižek The Real of Sexual Difference
The Real Cost of a Virus Outbreak
Where do the real dangers of genetic engineering l
Catcher in the Rye, The Holden s View of the Real World doc
The Real Value of $100 in Each State Tax Foundation
An examination of the question of the impeccability of Jesus doc
Scharnhorst Special Irreducible Matrix Repr of the Real CA C(3,1) (1998) [sharethefiles com]
How does personality matter in marriage An examination of trait anxiety, interpersonal negativity, a
WHO WAS THE REAL MONSTER spr
więcej podobnych podstron