176
ADJUSTABLE
PLANT SHELVES
Copyright 2004 Martian Auctions
803
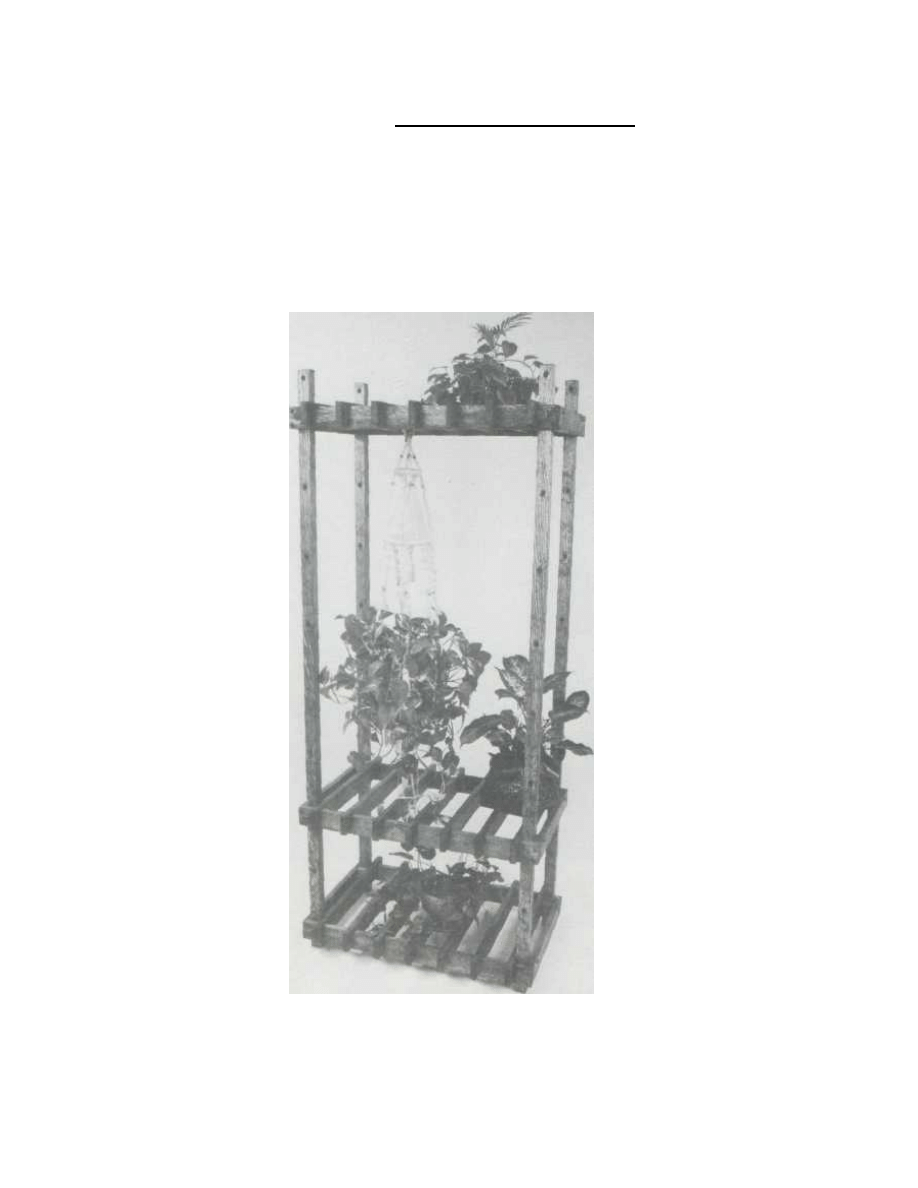
Nothing brightens up a home
better than a hanging plant. If you
have a south-facing window or
glass doors, you can bring your
garden indoors for the winter with
these attractive adjustable plant
shelves. The shelves are slatted rath-
er than solid so that the plants on
the bottom can receive more light.
If you build the shelves with cedar,
redwood, or other weather-resis-
tant lumber, you can keep the
shelves outdoors during the sum-
mer.
1. Begin by measuring the window
or door opening next to which you
will place the shelves, and adjust
the dimensions of the materials as
needed. Keep in mind that the to
tal unit should be no higher or
wider than the window or door.
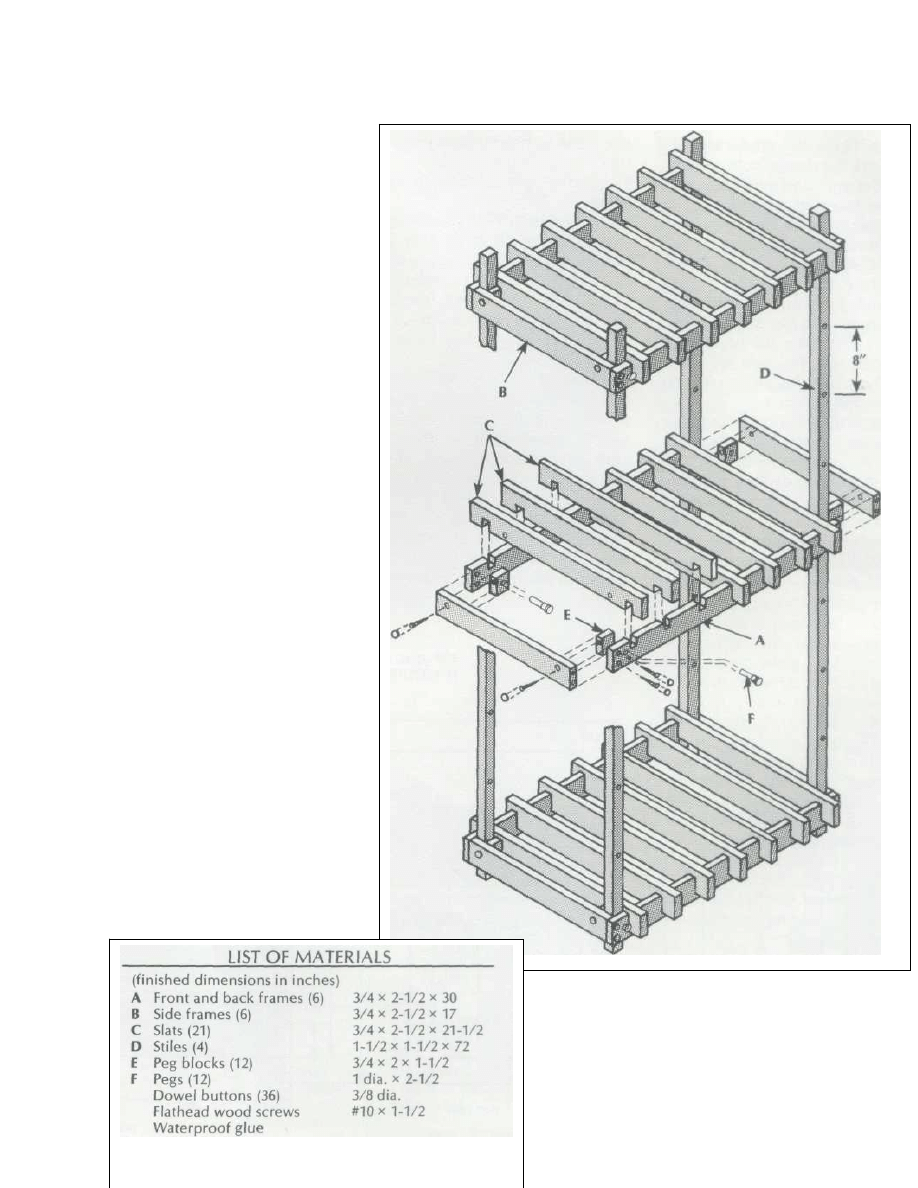
2. Begin construction of the
shelves by cutting the front and
back frames (A), side frames (B),
3.
Copyright 2004 Martian Auctions
804
slats (C), and peg blocks (E) to size
from 1 x 3 stock.
3. The slats and the front and back
frame members are joined togeth
er using cross lap joints as shown in
the exploded-view drawing. These
joints are formed by cutting 3/4"-
wide dadoes 1" deep in both sets of
pieces.
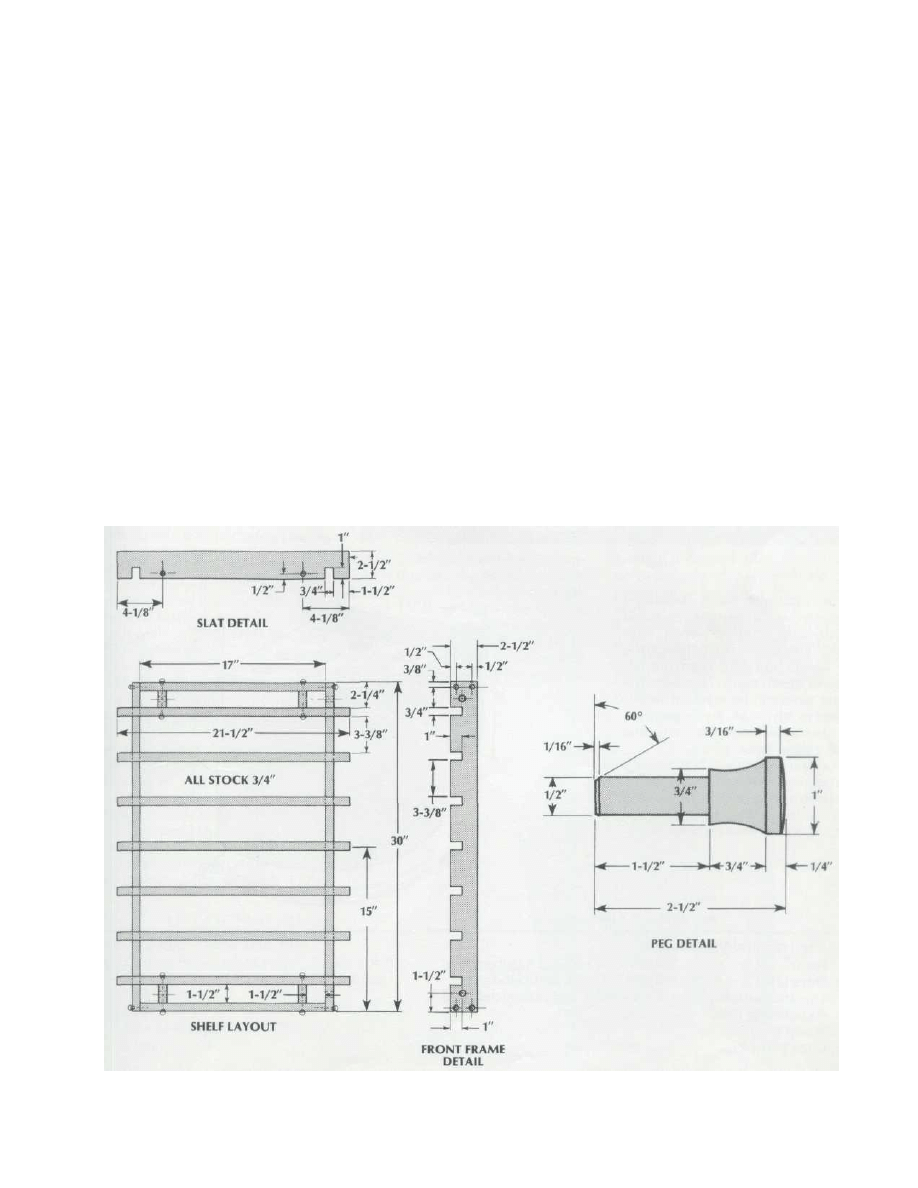
4. Lay out and cut the dadoes on
the front and back frames as
shown
in the front frame and shelf layout
drawings. Note that the middle
dado is centered along the length
of the frames and that all dadoes
are 3-3/8" apart.
5. Lay out and cut a pair of dadoes
on each slat as shown in the slat
detail drawing. Note that these da
does are set 1-1/2" from the ends of
the pieces.
6. Drill 1/2"-diameter peg holes
through the front frames and back
peg blocks. The holes in the front
frames are centered 1" below the
upper edge and 1-1/2" from each
end. The holes in the blocks are
centered on both width and length.
Counterbore screw holes in the
front and back frames, side frames,
and the outermost slats of each
shelf. Then sand all the shelf pieces.
7. Assemble the frames, using wa
terproof glue and #10 x 1-1/2" flat-
head wood screws. Do not glue in
the five middle slats of the top
shelf; with these slats left unglued
and detachable it is much easier to
put up and take down your plants.
8. Cover the counterbored screws
with 3/8"-diameter dowel buttons.
9. Cut the four stiles (D) from 2 x 2
stock. Center and drill 1/2"-diame-
ter peg holes at 8" intervals along
the length of each stile, beginning
4" from either end. Sand the stiles.
10. Turn the pegs (F) on a lathe
from scrap 2 x 2 stock to the
profile
shown in the peg detail. Sand and
finish the pegs on the lathe.
11. If you are planning to use the
shelves outdoors, finish with a good
outdoor finish such as spar varnish
or polyurethane. (If you used ce
dar, redwood, or weather-resistant
lumber, no finish is necessary.)
12. Finish the assembly by sliding
the shelves over the ends of the
stiles. Position the shelves and se
cure them with the pegs.
Copyright 2004 Martian Auctions
805
Wyszukiwarka
Podobne podstrony:
adjustable plant shelf polka na kwiaty
PLANT EVOLUTION
4 Plant Structure, Growth and Development, before ppt
plant cloning
#07 Flue Gas Plant
No 004 CCS Demonstration Plant fully integrated into new unit 858 MW
Plant Display
Sansewieria gwinejska, wężownica łac Sansevieria trifasciata ang Snake plant
Ściągi, Angielski 4, air pollution zanieczyszczenie powietrza alternative energy energia alternatywn
fitopatologia, Microarrays are one of the new emerging methods in plant virology currently being dev
Heavy metal toxicity,effect on plant growth and metal uptake
Topic 13 AHL Plants IB III Lecture 2 Plant Tissues and Organs
PLANT DIVISIONS
epigenetic control of plant dev Nieznany
Caffeine a well known but little mentioned compound in plant science
JAYAREC UNI HYDRO POWER PLANT
Lattice screen plant support
więcej podobnych podstron