How to Make a Solar Cell
Day One – Preparation of TiO
2
-Coated Glass
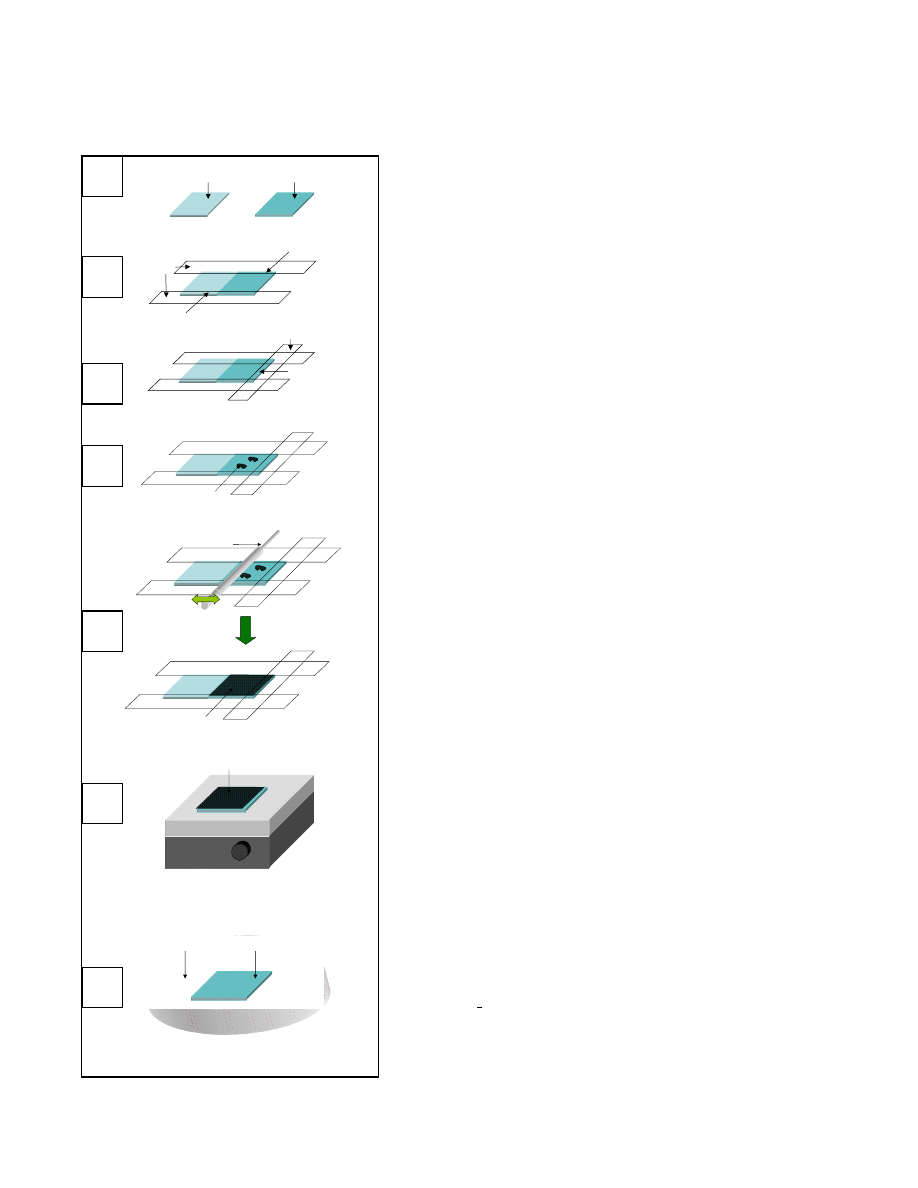
1. Obtain 2 glass plates and clean with ethanol. Do not touch the
faces of the plates once they are cleaned!
2. Determine which side of each glass plate is conducting with a
multimeter.
3. Put the glass plates side by side with one conducting side up and
one conducting side down (A).
4. Cover 1mm of each long edge of the plates with Scotch tape (B).
5. Cover 4-5 mm of the short edge of the conductive side up with
Scotch tape (C).
6. Add 2 drops of the white TiO
2
solution on the conductive side up
glass (D).
7. Quickly spread the white TiO
2
solution evenly with a glass
pipette, sweeping first away from the second slide, then sweeping
the extra TiO
2
onto the second glass slide (E).
8. Remove the tape and place the TiO
2
-coated glass on the hot
plate, keeping track of where your plate is – you will need it again
tomorrow (F).
9. Clean the TiO
2
from the other glass plate with ethanol and save it
for the next lab period. Clean the pipette and return it to your
teacher.
Day Two - Sta ning of the TiO
i
2
-Coated Glass with Raspberry
Juice and Preparing the Carbon-Coated Glass Plate
1. Get your TiO
2
-coated glass plate from the hot plate where you
left it last period.
2. Place the TiO
2
-coated glass face down in a Petri dish containing
raspberry juice. Soak for about 10 minutes (G).
3. While it is soaking, wash the other glass plate with ethanol.
G
F
C
B
Glass
Pipette
Rapid Sweeping Motion
A Uniform TiO
2
Coat
E
Apply TiO
2
Suspension
Scotch
Tape
1 mm wide
1 mm wide
Scotch Tape
4-5 mm wide
Conductive Side UP
Conductive Side DOWN
Hot Plate
TiO
2
Coated Glass Plate
D
Petri Dish
Raspberry Juice
Glass Plate with
TiO
2
Coat Side Down
A
4. Use the multimeter to figure out which side is conducting.
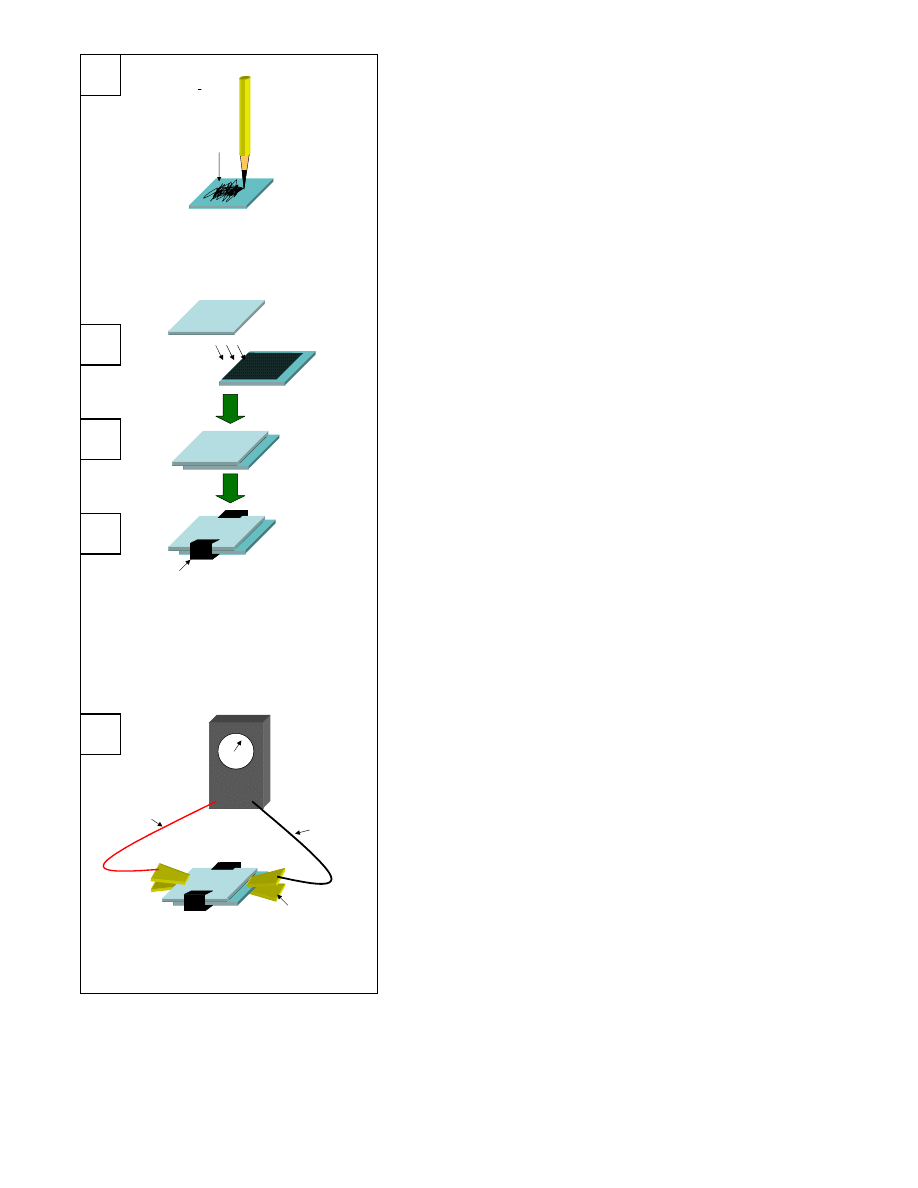
5. Use a N
o
2 pencil to apply a thin carbon coating on the conductive
side of the glass plate (H, page 2).
6. Don’t miss any spots.
Student Manual Last Updated: 2/23/06
UCLA—CNSI
1
Assembly of the Solar Cell
1. Complete steps 2-5 in less than 2 minutes.
2. Remove the first glass plate from the raspberry juice (after the
10 minutes) and rinse it with deionized water, then with ethanol.
3. Gently blot dry with a tissue.
N
o
2 Pencil
Conducting
Side
Multimeter
Alligator Clips
Black (–) Wire
On
TiO
2
-Coated
Glass
Red (+) Wire
On
Carbon-Coated
Glass
L
I
Glass Plate
With Dye
Glass Plate
With Carbon
Glass Plates
Are Offset
Assembled
Solar Cell
Binder Clips
K
J
H
4. Place the carbon-coated glass plate face down on the TiO
2
-coated
glass plate (I).
5. The two glass plates must be slightly offset (5 mm) (J).
6. Hold the plates together with binder clips on each side of the
longer edges (K).
7. Add 2 drops of the iodide solution on an offset side and allow it
to soak through.
8. Alternately open and close each side of the solar cell by releasing
and returning the binder clips.
9. Make sure that all of the stained area is contacted by the iodide
solution.
10. Wipe off excess iodide solution on the exposed area (important)
with tissue paper.
Measuring the Electrical Output
1. Fasten alligator clips to the two exposed sides of the solar cell to
make an electrical contact (L).
2. Attach the black (–) wire of the multimeter to the TiO
2
-coated
glass plate (negative electrode) (L).
3. Attach the red (+) wire of the multimeter to the carbon-coated
glass plate (positive electrode) (L).
4. Place the solar cell on top of an overhead projector.
5. Measure the current (set to mA) before and after the overhead
projector has been turned on.
6. Measure the voltage (set to volts) before and after the overhead
projector has been turned on.
Did you make a successful solar cell?
Student Manual Last Updated: 2/23/06
UCLA—CNSI
2
Experimental Data Sheet
My Name: ______________________
My Partner’s Name(s): ______________________
My Data:
Overhead Projector Off:
My Solar Cell’s Voltage: _____________V
My Solar Cell’s Current: _____________mA
Overhead Projector On:
My Solar Cell’s Voltage: _____________V
My Solar Cell’s Current: _____________mA
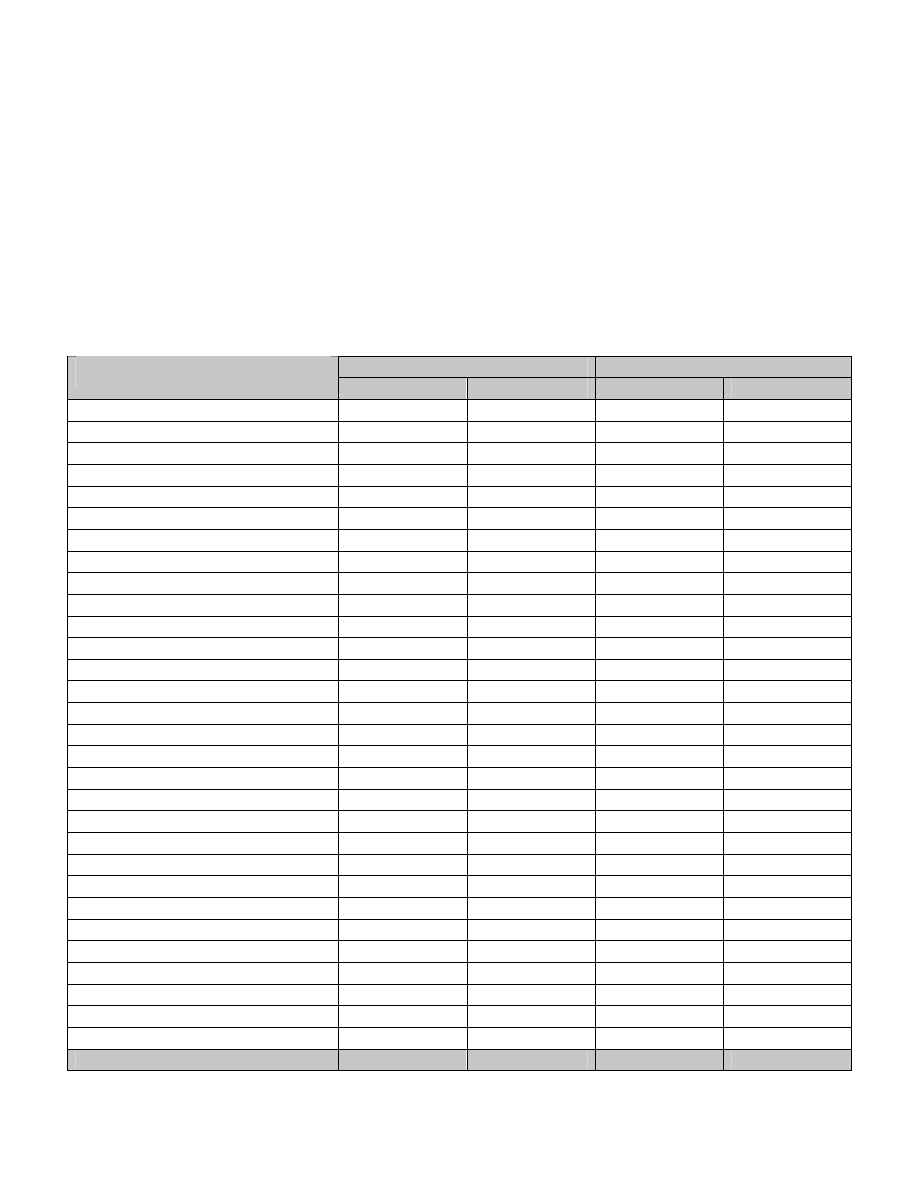
Class Data:
Overhead Projector Off
Overhead Projector On
Who Made the Solar Cell?
Voltage (V)
Current (mA)
Voltage (V)
Current (mA)
1.
2.
3.
4.
5.
6.
7.
8.
9.
10.
11.
12.
13.
14.
15.
16.
17.
18.
19.
20.
21.
22.
23.
24.
25.
26.
27.
28.
29.
30.
Class Averages:
Student Manual Last Updated: 2/23/06
UCLA—CNSI
3

Discussion Questions
1. Did your solar cell work? How can you tell? If it didn’t work, why do you think this might have
happened? If it did work, how might you be able to improve it?
2. How did your solar cell compare to the class average solar cell in each of the four categories tested?
3. Looking at the data from the entire class, which solar cells didn’t work? Eliminate these solar cells
and recalculate the class averages in all four categories tested. How does your solar cell compare to
the class average solar cell now?
4. Scientists make predictions, design experiments, and then collect and analyze data. As such, they
may have to decide which data they choose to analyze and which data they choose to ignore. When is
it ethical to ignore scientifically collected data as you may have done in question three?
5. Photosynthesis is a process in which plants generate chemical energy from light energy. How is this
similar to what happens with your solar cell? How is it different?
6. What is the function of each part of the solar cell that you built?
TiO
2
Coated Electrode
TiO
2
Nanocrystals
Electrolyte (Iodide/Triiodide)
Carbon Coated Electrode
Carbon
Dye Molecule
7. What are other sources of energy? How do these sources of energy compare to solar energy?
8. ADVANCED: Write balanced chemical equations for each of the chemical processes that happen in
the solar cell.
Student Manual Last Updated: 2/23/06
UCLA—CNSI
4
Copyright © 2003 by Sarah Tolbert. All rights reserved; revised 2007
Wyszukiwarka
Podobne podstrony:
how to write great essays id 20 Nieznany
how to make a?ke id D5O42G7A4RE7MNTMEISZ7BJSGUVLODZANAC376Y
How to build an arbor id 206318 Nieznany
How to Use a Graphic LCD id 206 Nieznany
how to write great essays id 20 Nieznany
How to make an inexpensive exte Nieznany
HOW TO INTERVIEW FOR A JOB id 2 Nieznany
How to make an inexpensive exte Nieznany
Free Energy & Technological Survival How To Make A Fake Id
How to make
How to Make an Atomic Bomb
How To Make It And Enjoy It
how to make a draino bomb 6W5PMX3CSBHVWUCD22KIJY34P667TPDLPPATGOY
How to build a solar icemaker
How to Make a German Paper Star
How to Make a Complete Map of Every Thought
How to make your own power Bleeder
How to Make Your Own Perfume
więcej podobnych podstron