A S S E M B L E T H E C H A I R
Contact the California Redwood Association for more great publica-
tions containing redwood technical and building information. Call
us toll free at 1-888-Cal-Redwood for a complete literature list or to
ask for any of the titles listed here:
Other Construction Tipsheets
Deck Over Concrete
Mendocino Bench
Freestanding Deck
Lake Tahoe Gazebo
Calistoga Spa Surround
Petaluma Planters
Windsor Shade Shelter
Sonoma Picnic Table
Monterey Potting Center
Adirondack Swing
Also Available
Deck Construction
Deck Grades, Nails and Finishes
Fences for All Reasons
Landscape Architecture
R E D W O O D
Naturally beautiful
Easy to use
Practical and economical
Durable and stable
Resistant to decay and insects
REDWOOD
B U I L D
I T
W I T H
3. Install the chair back Set the assembled chair back into
the chair frame between the rear legs, pushed back against the brace.
Lift up on the chair back so the top of the lower slat support butts
tightly against the bottom of the brace. For now, secure the chair
back to the brace with just two screws. Check the angle between the
chair back and rear legs; it should be 85°. Installing the armrests
next will hold the back at this angle allowing you to more easily
finish its installation.
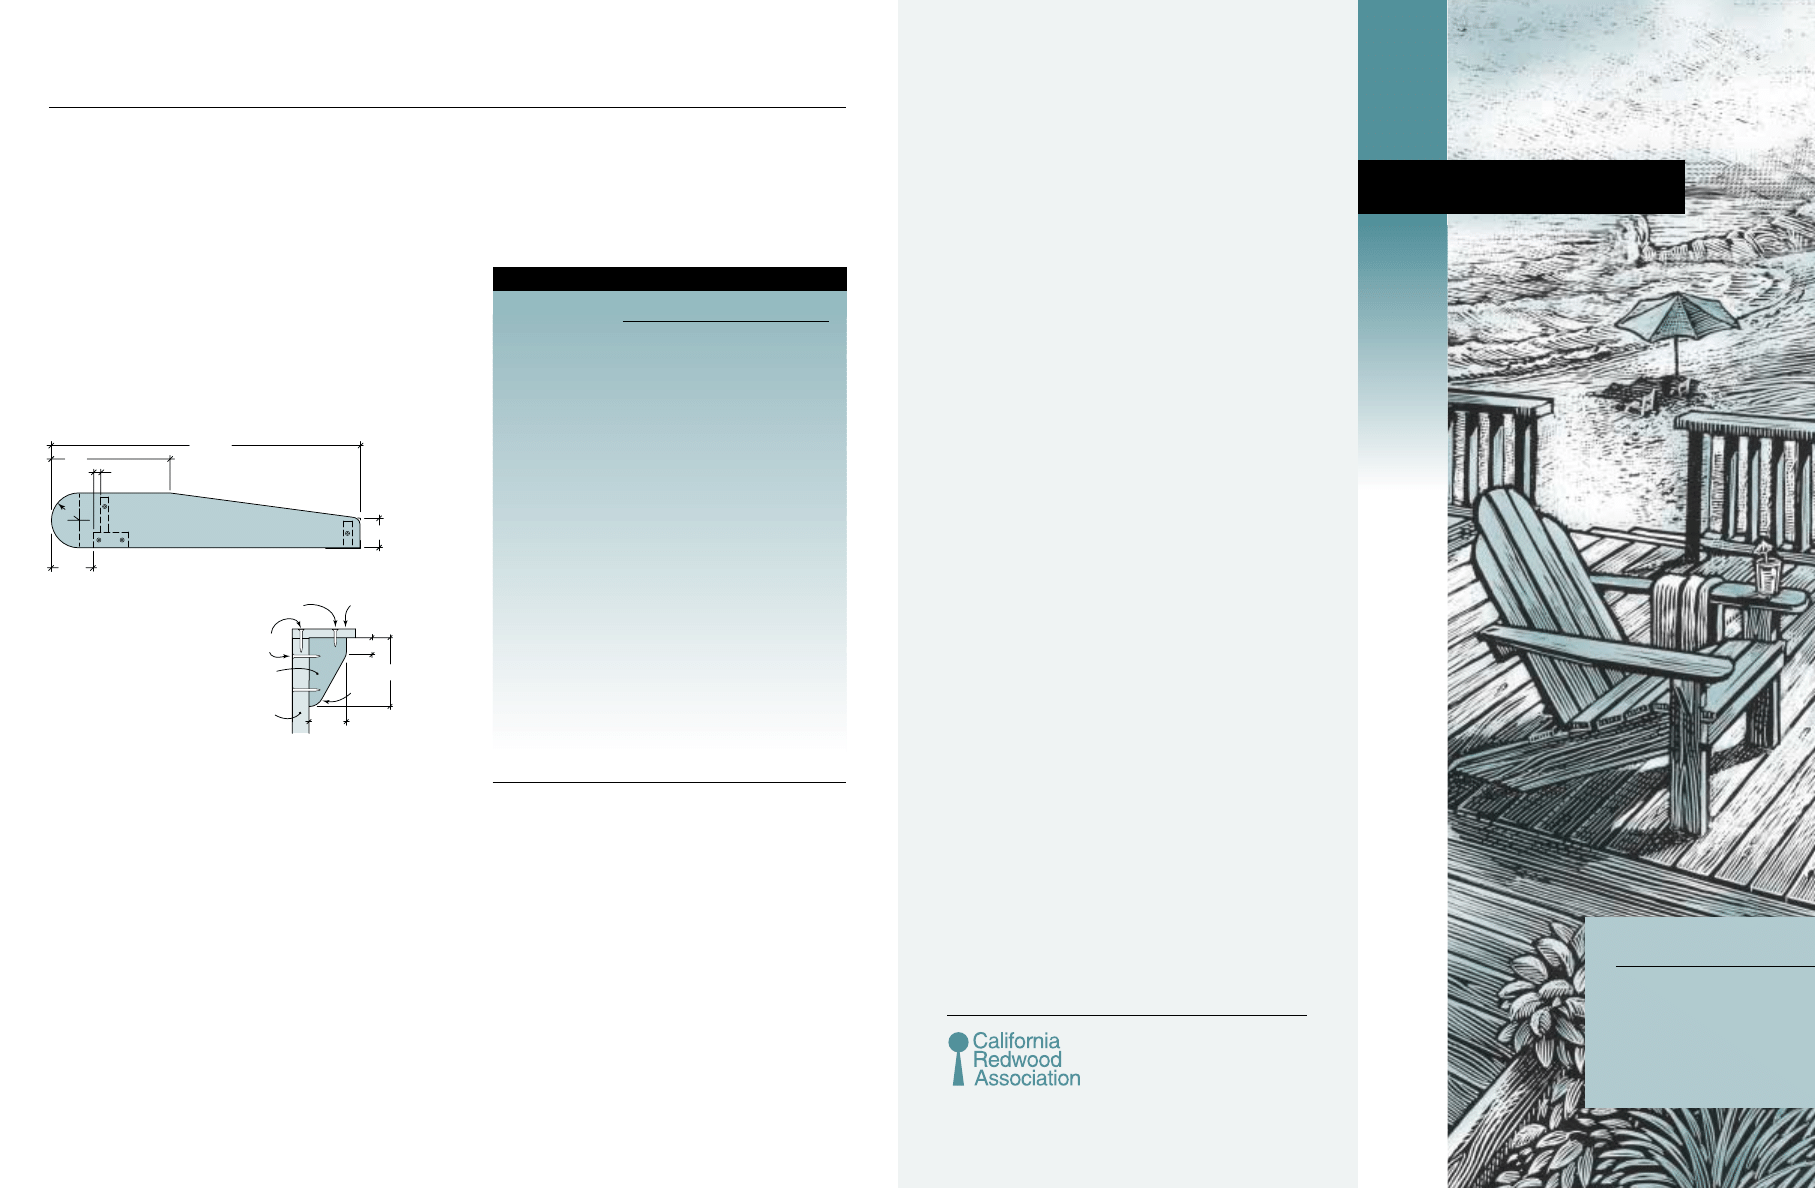
4. Armrests Cut the two 31
3
⁄
4
-inch chair armrests from a 1x6
referring to the arm pattern to trim them to their final shape.
Smooth the large round ends with 120-grit sandpaper. Use the
orbital sander or the router to ease the top edges of the armrests
for added comfort.
Cut the two short armrest
brackets from a 1x4 and attach
them flush with the tops of
the front legs. Use two screws
to secure each armrest on top
of the front legs allowing a
4
1
⁄
4
-inch overhang. Finish
attaching the armrests to the
arm brackets and to the arm supports with one 1
1
⁄
4
-inch screw each.
Once both armrests are installed, finish attaching the chair back
to the brace by driving two 1
1
⁄
4
-inch screws through the end of
each slat. Again, predrill pilot holes to prevent splitting the slats.
5. Seat slats Next, cut the five 1x4 slats for the chair seat.
The front seat slat is longer than the other four slats because
it wraps around the front legs. Cut a 1
9
⁄
16
by 2
1
⁄
8
-inch notch into
both ends of the front seat slat to allow it to fit around the front
legs (see illustration). Use the router and roundover bit or orbital
sander, if desired, to soften the top edge of the front seat slat.
6. Install the seat slats Install the seat slats onto the frame
with equal spaces and with their ends flush to the outside of the
rear legs. Leave a
3
⁄
8
-inch space between the last seat slat and the
slats of the chair back to allow rain and debris to wash through
to the ground and to not collect on the seat.
R
3"
12"
11
⁄
16
"
4
1
⁄
4
"
31
3
⁄
4
"
CL
Finishing There are a variety of ways to finish the chair, depend-
ing on the look you desire. Refer to the Finishes section on the back
of this brochure for finish formulas and their effects. You must first
sand the wood smooth. Start with 100-grit sandpaper and sand all
surfaces. Switch to 120-grit sandpaper for the final sanding.
Quantity
Size
Length
Legs and Framing
Rear legs
2
1x6
36 inches
Front legs
2
2x4
20
5
⁄
16
inches
Front rail
1
1x4
26 inches
Brace
1
1x4
22
3
⁄
8
inches
Back
Back slats
3
1x4
36 inches
Back slats
3
1x4
30 inches
Upper slat support
1
1x4
16
1
⁄
2
inches
Lower slat support
1
1x4
21 inches
Arms
Arm support
1
1x4
27
7
⁄
8
inches
Arm brackets
2
1x3
1
⁄
4
6 inches
Armrests
2
1x6
31
3
⁄
4
inches
Seat
Front seat slat
1
1x4
26 inches
Seat slats
4
1x4
22
3
⁄
8
inches
Deck screws
1 pound
1
1
⁄
4
inches
1
⁄
2
pound
1
3
⁄
4
inches
1
⁄
2
pound
2
1
⁄
2
inches
Sandpaper
as needed
100, 120 grit
Materials For Adirondack Chair
1
1
⁄
4
" screw
2
1
⁄
2
"
screws
Front
leg
3
1
⁄
4
"
1
1
⁄
2
"
1
1
⁄
4
"
radius
Arm
bracket
Armrest
6"
A d i r o n d a c k C h a i r
Redwood
For beauty and performance, redwood is naturally superior to
other woods. That’s why it’s the first choice for decks, fences and
most outdoor projects. Redwood retains its beauty outdoors, shrinks
and swells less than other woods and is less likely to warp, split,
check or cup. With relatively little or no pitch, redwood is easy to
drill, saw and shape. Redwood heartwood has natural durability and
resistance to insects and will last longer outdoors than most woods.
Grades
The knotty garden grades of redwood are ideal for outdoor projects.
These grades are beautiful, durable and economical.
Construction Heart/Deck Heart
is all heartwood and con-
tains knots; used for load-bearing applications near the ground.
Deck Heart is graded for strength and is available in 2x4 and 2x6.
Construction Common/Deck Common
contains sapwood
and knots; used for decking and above-ground uses. Deck Common
is graded for strength and is available in 2x4 and 2x6.
Merchantable Heart
is all heartwood and contains larger knots
than Construction grades; used near the soil.
Merchantable
contains sapwood and larger knots; used for
fence boards, rails and above-ground uses.
Finishes
Redwood accepts finishes better than most woods. Some heighten
redwood’s natural beauty, bringing out the color and the grain.
Others help the wood harmonize or contrast with surrounding
structures. Read the labels on all finish products before using.
No-finish option
Redwood performs better than most woods if
left unfinished. This no-maintenance option will result in redwood
weather-bleaching to a soft driftwood gray
Clear water repellent finish
is recommended to stabilize the
color at tan.
Semitransparent stains
in “redwood” shades tint the wood
without hiding the grain.
Solid-color stains or paints
should be applied over compatible
oil-based primers.
Fasteners
Use only non-corrosive hardware such as aluminum, stainless
steel or top quality hot-dipped galvanized screws or nails.
Ordinary nails and screws will cause stains.
405 Enfrente Drive, Suite 200
Novato, CA 94949-7206
Telephone 415 382-0662
Toll Free 888 Cal-Redwood
Fax 415 382-8531
www.calredwood.org

1. Back slats The seat and back of the chair are each made up
of five 1x4 slats. For the chair back, cut the three center slats to
36 inches long and the two end ones to 30 inches. Also, cut to
length the upper slat support and arm support, which get screwed
across the rear of the slats. Note that the upper edge of the arm
support must be bevel-ripped to 30°. Round off the bottom corners
of the arm support to a 1
3
⁄
4
-inch radius.
Lay out the five chair-back slats equally spaced on a flat surface
and against a straight edge, such as a secured 2x4, to keep them
aligned. Find and mark the centerline for the radius of the curved
boards. From that point, use a pencil on a string or a compass to
draw the radius across the tops of the three center slats.
Cut the rounded ends with a sabre saw, then sand them smooth
with 120-grit sandpaper. Use one of the slats as a template to mark
the radius onto the two 30-inch-long end slats.
2. Assemble the chair back Again, lay out the chair-back
slats, this time face down, on a flat surface. Secure or weight
them so that they will stay aligned and square. Space them equally
to 21 inches. Measure down eight inches from the top of the center
slat and attach the upper slat support with two 1
1
⁄
4
-inch screws
per slat; do not overdrive or counter bore these screws or their sharp
points will poke through the other side.
Attach the lower slat support across the bottom of the back slats,
making sure its 5° bevel is facing up, toward the top of the chair
back. Next, install the arm support across the slats making sure
it extends beyond the slats an equal amount at each end and that
it’s 30°-beveled edge faces up toward the top of the chair back.
1. Legs Cut the two front legs from a 2x4, making sure that both
ends of each leg are perfectly square. Next, cut two 36-inch-long
pieces of 1x6 for the rear legs. Refer to the rear-leg pattern (shown
below) and transfer the 2-inch square grid and other dimensions to
the 1x6. Trim the first leg to its final shape using a sabre saw. Use
this first leg as a template to cut the second leg to match.
Note that the ends of the legs are cut to a 25° angle and a portion
of the upper edge is trimmed away to accept the five 1x4 seat slats.
Round off the top, rear corner of the legs with the saw and then
lightly sand the edges smooth.
2. Front rail, lower slat support and brace Cut to
length the three 1x4 crosspieces that connect the right side of the
frame to the left side. These pieces include the front rail, lower slat
support and brace. Rip a 5° bevel along one edge of both the lower
slat support and the brace. This accommodates the 85° slant of
the back slats.
3. Assemble the legs Screw the front rail across the front legs,
making sure that its top edge is 14
5
⁄
16
inch up from the bottom end
of the legs. Next, place the rear legs against the inside surfaces of
the front legs; align them flush with the top of the front rail. Attach
each rear leg to the front leg with three 1
3
⁄
4
-inch deck screws.
4. Complete the frame Install the brace 16
3
⁄
4
inches
from the end of the rear legs and with its beveled edge
facing toward the front of the chair. The 1x4 lower
slat support will be installed later when
assembling the chair back.
B U I L D T H E C H A I R F R A M E
A d i r o n d a c k C h a i r
3
3
⁄
16
"
25
°
5
° bevel
25
°
36"
9
1
⁄
8
"
16
3
⁄
4
"
18"
2" squares
15"
3
⁄
8
" min.
space
21"
25
°
30
° bevel
5
° bevel
85
°
30
°
Space slats
evenly
1
3
⁄
8
"
1
1
⁄
2
"
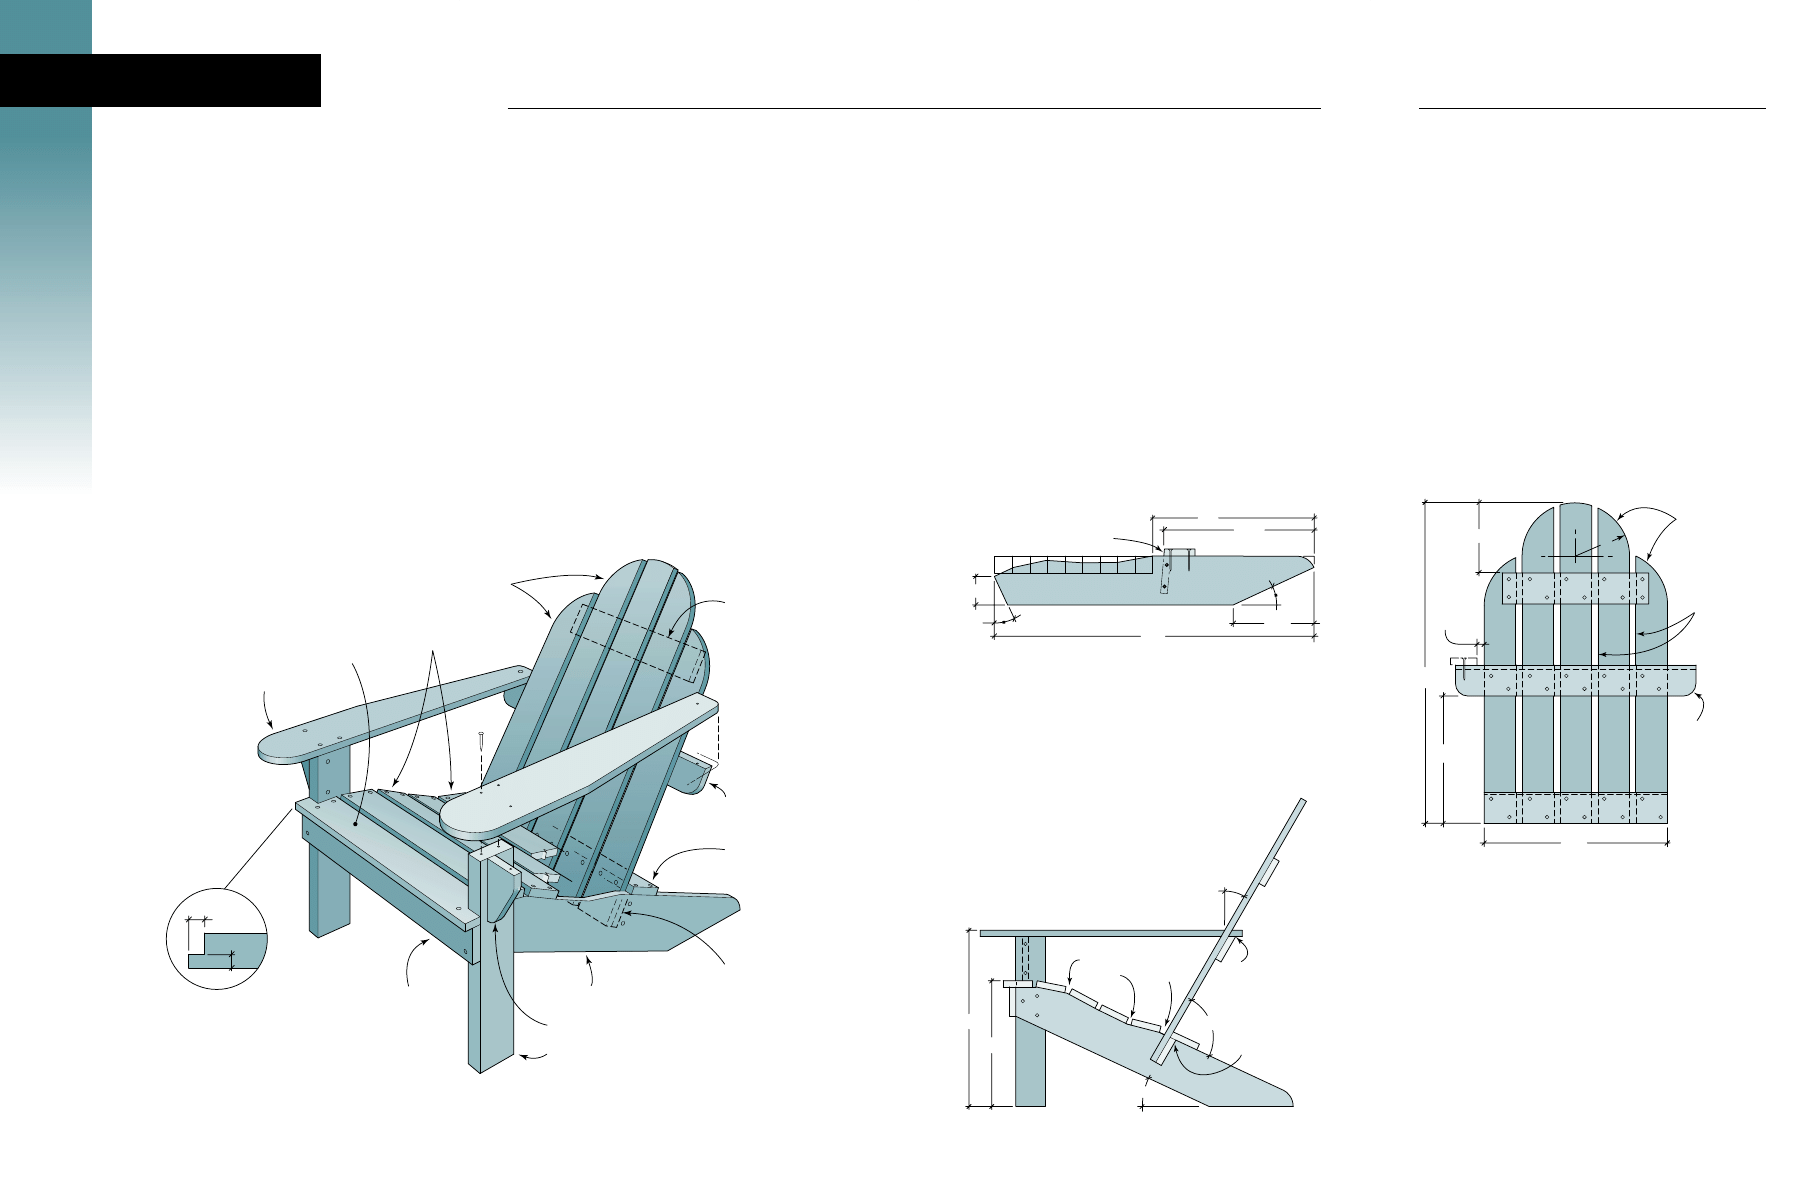
1x6 redwood armrest
1x4 redwood
front seat slat
1x4 redwood
seat slats
1x4 redwood
back slats
1x4 redwood
upper slat
support
1x4 redwood
lower slat support
1x6 redwood rear leg
1x4 redwood arm bracket
1x4 redwood
front rail
2x4 redwood front leg
1x4 redwood
arm support
1x4 redwood
brace
The rounded wooden slats, oversized
armrests and inviting slant-back
design identify the classic Adirondack
chair. Born a century ago in upstate
New York, this chair quickly became a
standard fixture at all lakeside retreats
and summer camps.
To ensure that this casually elegant
chair survives for generations to come,
use one of the all-heartwood grades
of redwood: Deck Heart or Construction
Heart. These grades are naturally
resistant to insects and decay.
1
3
⁄
4
"
radius
21"
Space
slats
evenly
12
7
⁄
16
"
36"
8"
Match
curve
C
L
Armrest
spaced
11
⁄
16
"
R
A S S E M B L E T H E C H A I R
For simplicity sake, this redwood chair is constructed almost entirely
of 1x4s and 1x6s; the front legs are cut from 2x4s for maximum
strength. You will start by assembling the frame of the chair, which
includes the front and rear legs. Then you will finish by installing
the slats that form the back and seat of the chair.
Use only corrosion-resistant screws to prevent staining. We recom-
mend that you counterbore all visible surface screw holes with a
3
⁄
8
-inch-diameter spade bit to a depth of about
1
⁄
4
inch. Fill the
holes with
3
⁄
8
-inch-diameter redwood plugs, which you can make
with a plug cutter.
Tools you will need Tape measure, combination square,
cordless drill/driver or electric drill, power miter saw or hand saw,
sabre saw with adjustable baseplate, assorted twist-drill bits,
countersink bit,
3
⁄
8
- and
7
⁄
8
-inch-diameter spade bits, hammer, orbital
sander or sanding block,
3
⁄
8
-inch-diameter plug cutter and pencil
compass. Optional: router with
1
⁄
4
-inch-radius roundover bit.
1. Back slats The seat and back of the chair are each made up
of five 1x4 slats. For the chair back, cut the three center slats to
36 inches long and the two end ones to 30 inches. Also, cut to
length the upper slat support and arm support, which get screwed
across the rear of the slats. Note that the upper edge of the arm
support must be bevel-ripped to 30°. Round off the bottom corners
of the arm support to a 1
3
⁄
4
-inch radius.
Lay out the five chair-back slats equally spaced on a flat surface
and against a straight edge, such as a secured 2x4, to keep them
aligned. Find and mark the centerline for the radius of the curved
boards. From that point, use a pencil on a string or a compass to
draw the radius across the tops of the three center slats.
Cut the rounded ends with a sabre saw, then sand them smooth
with 120-grit sandpaper. Use one of the slats as a template to mark
the radius onto the two 30-inch-long end slats.
2. Assemble the chair back Again, lay out the chair-back
slats, this time face down, on a flat surface. Secure or weight
them so that they will stay aligned and square. Space them equally
to 21 inches. Measure down eight inches from the top of the center
slat and attach the upper slat support with two 1
1
⁄
4
-inch screws
per slat; do not overdrive or counter bore these screws or their sharp
points will poke through the other side.
Attach the lower slat support across the bottom of the back slats,
making sure its 5° bevel is facing up, toward the top of the chair
back. Next, install the arm support across the slats making sure
it extends beyond the slats an equal amount at each end and that
it’s 30°-beveled edge faces up toward the top of the chair back.
1. Legs Cut the two front legs from a 2x4, making sure that both
ends of each leg are perfectly square. Next, cut two 36-inch-long
pieces of 1x6 for the rear legs. Refer to the rear-leg pattern (shown
below) and transfer the 2-inch square grid and other dimensions to
the 1x6. Trim the first leg to its final shape using a sabre saw. Use
this first leg as a template to cut the second leg to match.
Note that the ends of the legs are cut to a 25° angle and a portion
of the upper edge is trimmed away to accept the five 1x4 seat slats.
Round off the top, rear corner of the legs with the saw and then
lightly sand the edges smooth.
2. Front rail, lower slat support and brace Cut to
length the three 1x4 crosspieces that connect the right side of the
frame to the left side. These pieces include the front rail, lower slat
support and brace. Rip a 5° bevel along one edge of both the lower
slat support and the brace. This accommodates the 85° slant of
the back slats.
3. Assemble the legs Screw the front rail across the front legs,
making sure that its top edge is 14
5
⁄
16
inch up from the bottom end
of the legs. Next, place the rear legs against the inside surfaces of
the front legs; align them flush with the top of the front rail. Attach
each rear leg to the front leg with three 1
3
⁄
4
-inch deck screws.
4. Complete the frame Install the brace 16
3
⁄
4
inches
from the end of the rear legs and with its beveled edge
facing toward the front of the chair. The 1x4 lower
slat support will be installed later when
assembling the chair back.
B U I L D T H E C H A I R F R A M E
A d i r o n d a c k C h a i r
3
3
⁄
16
"
25
°
5
° bevel
25
°
36"
9
1
⁄
8
"
16
3
⁄
4
"
18"
2" squares
15"
3
⁄
8
" min.
space
21"
25
°
30
° bevel
5
° bevel
85
°
30
°
Space slats
evenly
1
3
⁄
8
"
1
1
⁄
2
"
1x6 redwood armrest
1x4 redwood
front seat slat
1x4 redwood
seat slats
1x4 redwood
back slats
1x4 redwood
upper slat
support
1x4 redwood
lower slat support
1x6 redwood rear leg
1x4 redwood arm bracket
1x4 redwood
front rail
2x4 redwood front leg
1x4 redwood
arm support
1x4 redwood
brace
The rounded wooden slats, oversized
armrests and inviting slant-back
design identify the classic Adirondack
chair. Born a century ago in upstate
New York, this chair quickly became a
standard fixture at all lakeside retreats
and summer camps.
To ensure that this casually elegant
chair survives for generations to come,
use one of the all-heartwood grades
of redwood: Deck Heart or Construction
Heart. These grades are naturally
resistant to insects and decay.
1
3
⁄
4
"
radius
21"
Space
slats
evenly
12
7
⁄
16
"
36"
8"
Match
curve
C
L
Armrest
spaced
11
⁄
16
"
R
A S S E M B L E T H E C H A I R
For simplicity sake, this redwood chair is constructed almost entirely
of 1x4s and 1x6s; the front legs are cut from 2x4s for maximum
strength. You will start by assembling the frame of the chair, which
includes the front and rear legs. Then you will finish by installing
the slats that form the back and seat of the chair.
Use only corrosion-resistant screws to prevent staining. We recom-
mend that you counterbore all visible surface screw holes with a
3
⁄
8
-inch-diameter spade bit to a depth of about
1
⁄
4
inch. Fill the
holes with
3
⁄
8
-inch-diameter redwood plugs, which you can make
with a plug cutter.
Tools you will need Tape measure, combination square,
cordless drill/driver or electric drill, power miter saw or hand saw,
sabre saw with adjustable baseplate, assorted twist-drill bits,
countersink bit,
3
⁄
8
- and
7
⁄
8
-inch-diameter spade bits, hammer, orbital
sander or sanding block,
3
⁄
8
-inch-diameter plug cutter and pencil
compass. Optional: router with
1
⁄
4
-inch-radius roundover bit.

A S S E M B L E T H E C H A I R
Contact the California Redwood Association for more great publica-
tions containing redwood technical and building information. Call
us toll free at 1-888-Cal-Redwood for a complete literature list or to
ask for any of the titles listed here:
Other Construction Tipsheets
Deck Over Concrete
Mendocino Bench
Freestanding Deck
Lake Tahoe Gazebo
Calistoga Spa Surround
Petaluma Planters
Windsor Shade Shelter
Sonoma Picnic Table
Monterey Potting Center
Adirondack Swing
Also Available
Deck Construction
Deck Grades, Nails and Finishes
Fences for All Reasons
Landscape Architecture
R E D W O O D
Naturally beautiful
Easy to use
Practical and economical
Durable and stable
Resistant to decay and insects
REDWOOD
B U I L D
I T
W I T H
3. Install the chair back Set the assembled chair back into
the chair frame between the rear legs, pushed back against the brace.
Lift up on the chair back so the top of the lower slat support butts
tightly against the bottom of the brace. For now, secure the chair
back to the brace with just two screws. Check the angle between the
chair back and rear legs; it should be 85°. Installing the armrests
next will hold the back at this angle allowing you to more easily
finish its installation.
4. Armrests Cut the two 31
3
⁄
4
-inch chair armrests from a 1x6
referring to the arm pattern to trim them to their final shape.
Smooth the large round ends with 120-grit sandpaper. Use the
orbital sander or the router to ease the top edges of the armrests
for added comfort.
Cut the two short armrest
brackets from a 1x4 and attach
them flush with the tops of
the front legs. Use two screws
to secure each armrest on top
of the front legs allowing a
4
1
⁄
4
-inch overhang. Finish
attaching the armrests to the
arm brackets and to the arm supports with one 1
1
⁄
4
-inch screw each.
Once both armrests are installed, finish attaching the chair back
to the brace by driving two 1
1
⁄
4
-inch screws through the end of
each slat. Again, predrill pilot holes to prevent splitting the slats.
5. Seat slats Next, cut the five 1x4 slats for the chair seat.
The front seat slat is longer than the other four slats because
it wraps around the front legs. Cut a 1
9
⁄
16
by 2
1
⁄
8
-inch notch into
both ends of the front seat slat to allow it to fit around the front
legs (see illustration). Use the router and roundover bit or orbital
sander, if desired, to soften the top edge of the front seat slat.
6. Install the seat slats Install the seat slats onto the frame
with equal spaces and with their ends flush to the outside of the
rear legs. Leave a
3
⁄
8
-inch space between the last seat slat and the
slats of the chair back to allow rain and debris to wash through
to the ground and to not collect on the seat.
R
3"
12"
11
⁄
16
"
4
1
⁄
4
"
31
3
⁄
4
"
CL
Finishing There are a variety of ways to finish the chair, depend-
ing on the look you desire. Refer to the Finishes section on the back
of this brochure for finish formulas and their effects. You must first
sand the wood smooth. Start with 100-grit sandpaper and sand all
surfaces. Switch to 120-grit sandpaper for the final sanding.
Quantity
Size
Length
Legs and Framing
Rear legs
2
1x6
36 inches
Front legs
2
2x4
20
5
⁄
16
inches
Front rail
1
1x4
26 inches
Brace
1
1x4
22
3
⁄
8
inches
Back
Back slats
3
1x4
36 inches
Back slats
3
1x4
30 inches
Upper slat support
1
1x4
16
1
⁄
2
inches
Lower slat support
1
1x4
21 inches
Arms
Arm support
1
1x4
27
7
⁄
8
inches
Arm brackets
2
1x3
1
⁄
4
6 inches
Armrests
2
1x6
31
3
⁄
4
inches
Seat
Front seat slat
1
1x4
26 inches
Seat slats
4
1x4
22
3
⁄
8
inches
Deck screws
1 pound
1
1
⁄
4
inches
1
⁄
2
pound
1
3
⁄
4
inches
1
⁄
2
pound
2
1
⁄
2
inches
Sandpaper
as needed
100, 120 grit
Materials For Adirondack Chair
1
1
⁄
4
" screw
2
1
⁄
2
"
screws
Front
leg
3
1
⁄
4
"
1
1
⁄
2
"
1
1
⁄
4
"
radius
Arm
bracket
Armrest
6"
A d i r o n d a c k C h a i r
Redwood
For beauty and performance, redwood is naturally superior to
other woods. That’s why it’s the first choice for decks, fences and
most outdoor projects. Redwood retains its beauty outdoors, shrinks
and swells less than other woods and is less likely to warp, split,
check or cup. With relatively little or no pitch, redwood is easy to
drill, saw and shape. Redwood heartwood has natural durability and
resistance to insects and will last longer outdoors than most woods.
Grades
The knotty garden grades of redwood are ideal for outdoor projects.
These grades are beautiful, durable and economical.
Construction Heart/Deck Heart
is all heartwood and con-
tains knots; used for load-bearing applications near the ground.
Deck Heart is graded for strength and is available in 2x4 and 2x6.
Construction Common/Deck Common
contains sapwood
and knots; used for decking and above-ground uses. Deck Common
is graded for strength and is available in 2x4 and 2x6.
Merchantable Heart
is all heartwood and contains larger knots
than Construction grades; used near the soil.
Merchantable
contains sapwood and larger knots; used for
fence boards, rails and above-ground uses.
Finishes
Redwood accepts finishes better than most woods. Some heighten
redwood’s natural beauty, bringing out the color and the grain.
Others help the wood harmonize or contrast with surrounding
structures. Read the labels on all finish products before using.
No-finish option
Redwood performs better than most woods if
left unfinished. This no-maintenance option will result in redwood
weather-bleaching to a soft driftwood gray
Clear water repellent finish
is recommended to stabilize the
color at tan.
Semitransparent stains
in “redwood” shades tint the wood
without hiding the grain.
Solid-color stains or paints
should be applied over compatible
oil-based primers.
Fasteners
Use only non-corrosive hardware such as aluminum, stainless
steel or top quality hot-dipped galvanized screws or nails.
Ordinary nails and screws will cause stains.
405 Enfrente Drive, Suite 200
Novato, CA 94949-7206
Telephone 415 382-0662
Toll Free 888 Cal-Redwood
Fax 415 382-8531
www.calredwood.org
Wyszukiwarka
Podobne podstrony:
Adirondack rocking chair krzesla
Adirondack Chair
Adirondack Chair(1) id 51566 Nieznany
Adirondack rocking chair krzesla
Adirondack Chair (2)
Adirondack Chair (3)
Adirondack Chair
Adirondack Style Folding Lawn Chair
Adirondack Chair (1)
adirondack chair 200003
Adirondack Chair
Morris Chair
Anniversary Chair krzesla
Arts and Crafts Chair
Adirondack chairs krzesla
Adirondack Glider Rocker
więcej podobnych podstron