
P R O D U C T I O N P R O C E S S
Material-related aspects of the machinability of Austempered
Ductile Iron
F. Klocke
•
M. Arft
•
D. Lung
Received: 19 January 2010 / Accepted: 16 April 2010
Ó German Academic Society for Production Engineering (WGP) 2010
Abstract
The exceptional properties of Austempered
Ductile Iron (ADI) are widely known and can be ascribed
to its austenitic-ferritic microstructure. Strain hardening of
this material is exceptional and an advantage for many
applications where high wear resistance is required, as well
as the extraordinary combination of ductility and tensile
strength. One reason which restricts the introduction of this
material in practical applications is its poor machinability.
This paper describes the material-sided influences on
machinability, especially on the acting wear mechanism.
The heat treatment factor austempering time, ADI grade
and the alloying elements nickel and molybdenum are
varied and investigated in external longitudinal turning
operations.
Keywords
Production technology
Machinability
Austempered Ductile Iron
Austempering time
1 Austempered Ductile Iron: an introduction
Austempered Ductile Iron (ADI) is one opportunity to
respond to the increasing industrial demand for cost- and
weight-efficient constructional materials. The advantages
are well known and the wide fields of applications for this
material are growing fast. The excellent mechanical prop-
erties of ADI, in particular the favourable combination of
high tensile strength, wear resistance and ductility, pre-
destine this material to act as a substitute for forged or
case-hardened materials and Ductile Iron (DI). For Ductile
Iron components, of which improved tensile strength is
required, the crank shaft is a well known example [
], ADI
presents a suitable solution, obtaining the freedom in
designing, typical for cast components, by offering an
enhanced tensile strength [
,
]. ADI is a heat treated cast
Ductile Iron. During the heat treatment process the either
ferritic or pearlitic Ductile Iron is first austenitized and then
austempered. Due to this treatment, the microstructure
changes into a mixture of stabilized austenite, acicular
ferrite and residual austenite, defining its mechanical
properties (Fig.
).
Tensile strength and ductility of ADI materials can be
varied in a wide range due to the austenitic-ferritic
microstructure generated during the heat treatment process
[
]. Besides those metallographic constituents, carbides
can be found at the grain boundaries, related on alloying
elements.
2 Production of Austempered Ductile Iron
and its influences on machinability
For the manufacturing of components made of ADI,
sophisticated processes are required. The first step for ADI
components is the casting process of a Ductile Iron. This
process must be conducted carefully. Deviations in mate-
rial properties, such as deterioration of the graphite and
material inhomogeneities could be carried along the heat
treatment process and influence the mechanical properties
of the work piece. In addition a high nodule count and
nodularity and a stable chemical composition of the alloyed
cast iron is required [
].
F. Klocke
M. Arft (
&) D. Lung
Werkzeugmaschinenlabor WZL der RWTH Aachen,
Aachen, Germany
e-mail: m.arft@wzl.rwth-aachen.de
URL: www.wzl.rwth-aachen.de
123
Prod. Eng. Res. Devel.
DOI 10.1007/s11740-010-0227-4
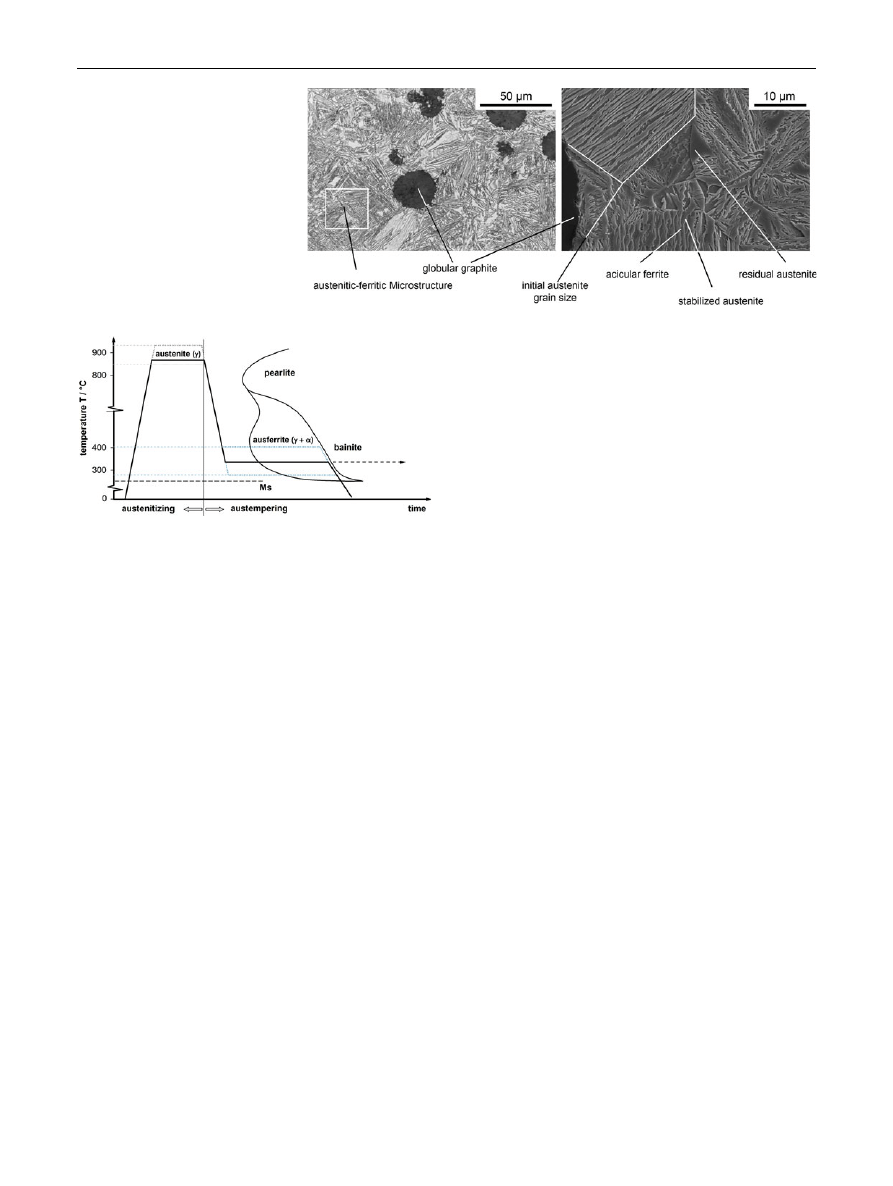
2.1 Heat treatment process
The heat treatment process consists of an austenitizing and
an austempering process (Fig.
). In the austenitizing pro-
cess, the work piece is heated up to a temperature between
875 and 920
°C and the cubic body centred microstructure
changes into cubic face centred. Maintaining at this tem-
perature, the austenitic metallic matrix is enriched with
carbon coming from the globular graphite pebble. In the
directly following austempering process the work piece is
cooled down quickly to its austempering temperature. An
insufficient cooling rate results in pearlitic structures in the
austenitic-ferritic microstructure, affecting the materials
mechanical properties tremendously. In the isothermal
austempering process, acicular ferrite arises, setting carbon
free which diffuses into the austenitic-structure and
increases the carbon content in the residual austenite.
The transformation of austenite into martensite is hindered
by an increasing level of carbon in the austenitic structure. The
ratio of austenite and acicular ferrite depends directly on the
temperature of the heat treatment process. Increasing aus-
tempering temperatures (up to 390
°C) effect a stronger dif-
fusion of carbon and therefore lead to larger areas of ferrite,
typical for ductile ADI grades like EN-GJS-900-8. On the
other side, a reduced austempering temperature, as low as to
230
°C, results in a very fine austenitic-ferritic matrix, hence
the ductility is reduced, but strength is increased up to
1,600 N/mm
2
. In addition to the temperature, the duration of
the austempering process influences the metallic matrix. If the
austempering time is too short, the austenitic-ferritic structure
is not completely enriched with carbon, and if the material is
austempered too long, bainitic structures arise in the micro-
structure of the ADI material [
].
2.2 Influence of alloying elements on material
properties
The transformation of the metallic microstructure in ADI
materials during the heat treatment process is influenced
decisively by the alloying elements Nickel and Molybde-
num. With increasing wall thickness of the ADI material,
the duration of the heat treatment process as well as the
content of alloying elements have to be adapted to guarantee
constant material properties along the whole cross section of
the material. Both Nickel and Molybdenum constrain the
transformation of austenite into pearlite in the austenitizing
process and prolong the arising of bainitic structures in the
austempering process. The duration of the heat treatment
process can be enlarged due to the alloyed elements, so that
for components with a stronger wall thickness a homoge-
nous microstructure can be produced [
,
,
The machinability of cast iron is influenced decisively
by the chemical composition [
,
]. The impact of
Molybdenum, forming carbides at the grain boundaries, and
Nickel, located intercrystalline in the microstructure, are
investigated. Varied alloying contents of Molybdenum
and Nickel, adapted on different wall thicknesses, are
considered.
3 Test facility
The external longitudinal turning tests were conducted on a
turning lathe ‘Gildemeister NEF 660’. While other cutting
Fig. 1
Microstructure of
austempered Ductile Iron
Fig. 2
Heat treatment of Ductile Iron to create austempered Ductile
Iron
Prod. Eng. Res. Devel.
123

materials, like diamond and ceramics are under investiga-
tion for the machining of cast iron [
–
], coated carbide
is still a superior cutting material. For the cutting tests, a
carbide insert K-20 coated with an Al
2
O
3
top-layer and a
Ti(C, N) bond coat with negative geometry (CNMA
120408) was used. The turning tests were conducted with
flood cooling using a 6% Rhenus FU 50 emulsion.
4 Investigated materials
For the investigation of material-related aspects of the
machinability three test series with different material
variations were cast. The influence of the microstructure
hardness on the machinability, meaning the ADI grades
900 and ADI 1200, were machined in the first series. In
addition to those two ADI grades, a pearlitic cast iron GJS
700-2 with no heat treatment after casting was investigated
in this series. Objective of the second test series was to
evaluate the influence of the austempering time on the
machinability.
For the first two test series tubular rods with an outer
diameter of 200 mm, a length of 300 mm and a wall
thickness of 30 mm were cast. To investigate the influence
of the austempering time, tubular rods from the same batch
were heat treated (ADI 900) for 5 different austempering
times (30, 60, 90, 120 and 180 min).
To investigate the influence of Molybdenum and Nickel
on the machinability in the third test series, 9 samples with
varied chemical compositions were cast and heat-treated.
These variations were subdivided into 4 different wall
thicknesses of 20, 30, 60 and 90 mm with an adapted
content of Molybdenum and Nickel. Due to different wall
thicknesses, the austempering time was varied too. The
samples with a wall thickness of 20 and 30 mm were
tubular rods, the wall thicknesses of 60 and 90 mm were
represented by solid shafts.
5 Influence of the metallic matrix on machinability
and wear mechanisms
The machining tests were conducted in dry longitudinal
turning operations on pearlitic cast iron EN-GJS 700-2,
austenitic-ferritic EN-GJS 900-8 (ADI 900) and austenitic-
ferritic EN-GJS 1200-2 (ADI 1200) under constant cutting
conditions (v
c
= 160 m/min, a
p
= 2 mm, f = 0.2 mm).
The three investigated materials for the first test series are
shown in Table
On the applied tools (HC-K20, CNMA 120408) differ-
ent wear mechanisms could be observed. Tool life in dry
machining GJS 700 was determined by abrasive flank wear
(T = 27 min). In machining ADI 900, strong crater wear
close to the cutting edge, as it was already mentioned by
Klo¨pper [
,
], was found and tool life was reduced by
50% (13.5 min) in comparison to EN-GJS-700-2. On tools
which were used for the machining of ADI 1200, delami-
nation of the coating takes place, setting particularly the
carbide substrate free, resulting finally in breakage of the
cutting edge. Therefore tool life was reduced tremendously
down to T = 3 min (Fig.
By reducing the cutting speed in machining ADI 1200
(80 m/min and 120 m/min), delamination of the coating
could be averted and tool life was increased up to 20 and
8 min. In consequence, crater wear close to the cutting
edge, comparable to the wear mechanism when machining
ADI 900, arises. When using coolant, the crater wear
caused by thermal effects on the tool rake face is avoided
for both ADI 900 and ADI 1200. Due to the use of coolant
in machining ADI 1200 tool life was increased by 100% or
the applicable cutting speed for the same tool life was
increased by 33%. Although coolant was used, the thermal
load on the cutting tool was still high and plastic defor-
mation of the cutting edge with increasing wear was
observed. Overall, flank wear was identified as main wear
mechanism if plastic deformation of the cutting edge could
be avoided. For a closer consideration of the influence of
the ADI grade on machinability, chips and chip roots were
investigated. Chip roots were produced by using the
method according to Buda [
]. In this method, chip roots
were generated in an orthogonal turning process of a web
(Fig.
).
To conduct those tests, a special preparation of the
machined rod is needed. A borehole is drilled in the web
with a defined distance from the outer diameter. In addi-
tion, a slot from the outer web-contour of the rod into the
drilled borehole is cut. In an orthogonal turning operation,
the remaining material of the machined web between the
machined surface of the web and the borehole decreases
with each rotation in the direction of the feed speed. Under
Table 1
Investigated materials
GJS-700, ADI 900 and ADI
1200
Material
Mo-content/%
Ni-content/%
Wall thickness/mm
Hardness/HB
Test series 1: machinability of ADI and Ductile Iron
GJS 700-2
0
0
30
HB 236–HB245
ADI 900
0
0.3–0.4
30
HB285
ADI 1200
0
0.3–0.4
30
HB350
Prod. Eng. Res. Devel.
123
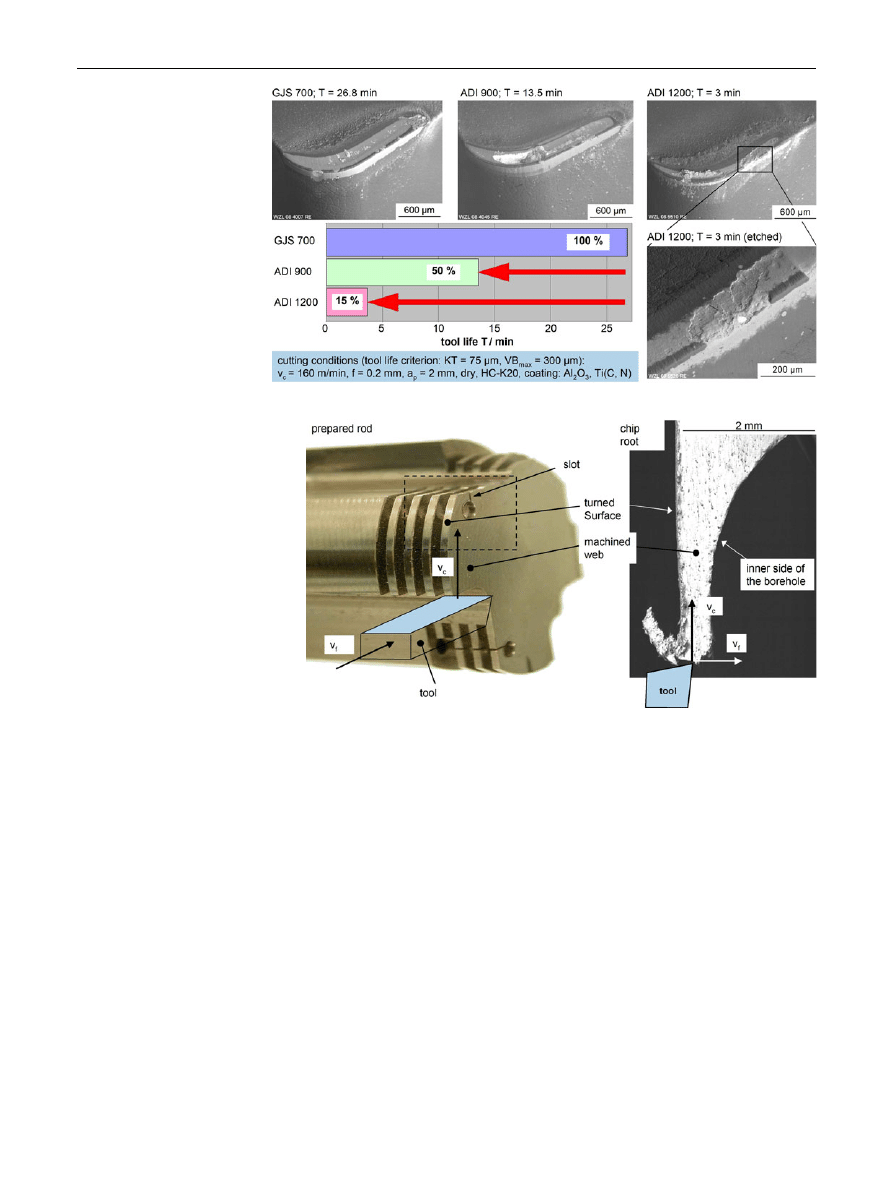
consideration of constant cutting forces and the decreasing
material cross-section between borehole and machined web
surface, stresses in this cross-section are increasing, and the
remaining material in front of the cutting edge is pushed
away in the direction of the cutting speed. At this material,
which is pushed away from the rod, the chip root in the
cutting zone can be found (Fig.
). To minimize plastic
deformation in the moment when the material in front of
the cutting edge is ripped away from the rod, the drilled
borehole in the web is sealed with a splint.
During the machining of ADI 900 under dry conditions
(v
c
= 160 m/min, a
p
= 2 mm, f = 0.2 mm), segmented
chips were observed. The chips consist of single chip
segments, which were welded together on the bottom side,
where a strong plastic deformation of the material occurs.
In Fig.
, for both ADI 900 and ADI 1200 materials some
generated chips were shown, and for each material chips
produced with a new and a worn tool. With increasing
crater wear, a stronger plastic deformation of the chip took
place, resulting in higher temperatures and in a slightly
increase of chip length.
While machining of ADI 1200 discontinuous chips were
observed, irrespective of the usage of lubricoolant. The
chip root analysis supports this conclusion, showing a
strong mechanical deformation in the shear zone in
machining ADI 900 and hardly any plastical deformation
in machining ADI 1200 and hence the chip length varies.
Furthermore, on the chip root from machining ADI 1200 it
is obvious that the spheroidical graphite grains interrupt the
metallic matrix which support chip breakage.
6 Influence of the austempering time on machinability
The influence of the austempering time on machinability
was investigated by machining 5 ADI 900 samples
Fig. 4
Chip roots according to
Buda [
Fig. 3
Wear mechanism and
tool life in dry longitudinal
turning
Prod. Eng. Res. Devel.
123

(Table
) from the same batch, each heat treated for a
different time (30, 60, 90, 120 and 180 min).
It is assumed, that due to a longer austempering time the
level of carbon in the austenite increases and therefore the
transformation of the austenite into martensite is hindered.
On the samples which were heat treated for the shortest
time, meaning 30 min, pearlitic structures in the matrix
could be observed. This could be traced back to an insuf-
ficient cooling rate between the austenitizing and the aus-
tempering process.
The machining tests were conducted under the same
cutting conditions as mentioned above (dry, v
c
= 160
m/min, f = 0.2 mm, a
p
= 2 mm). The chip shape was
comparable for all material variations in this test series,
meaning short segmented chips, and with increasing tool
wear a slightly increase of chip length. Tool life when
machining the ADI 900 grades, which were heat treated for
60 min and longer (90, 120 and 180 min) was comparable by
round about 13 min. Due to pearlitic grains in the micro-
structure of the ADI 900 samples, which were heat treated
for 30 min, tool life was reduced by 20%.
For a closer consideration of the machined surface and
the acting strain hardening mechanism, residual stresses in
both tangential and axial direction and the carbon content
of the retained austenite in the boundary zone were
measured by X-ray diffractometry. Alternatives for the
Fig. 5
Chip roots of ADI 900
and ADI 1200
Fig. 6
Chips when machining
ADI 900 and 1200 with new and
worn tools
Table 2
Investigated materials
for test series 2
Material
Mo-content/%
Ni-content/%
Wall thickness/mm
Austempering time/min
Test series 2: Influence of austempering time on machinability
ADI 900
0
0.3–0.4
30
30
ADI 900
0
0.3–0.4
30
60
ADI 900
0
0.3–0.4
30
90
ADI 900
0
0.3–0.4
30
120
ADI 900
0
0.3–0.4
30
180
Prod. Eng. Res. Devel.
123
characterization of the ADI microstructure are metallo-
graphic methods, In-Situ-dilatometry, neutron diffractom-
etry and magnetic and ultrasonic methods [
–
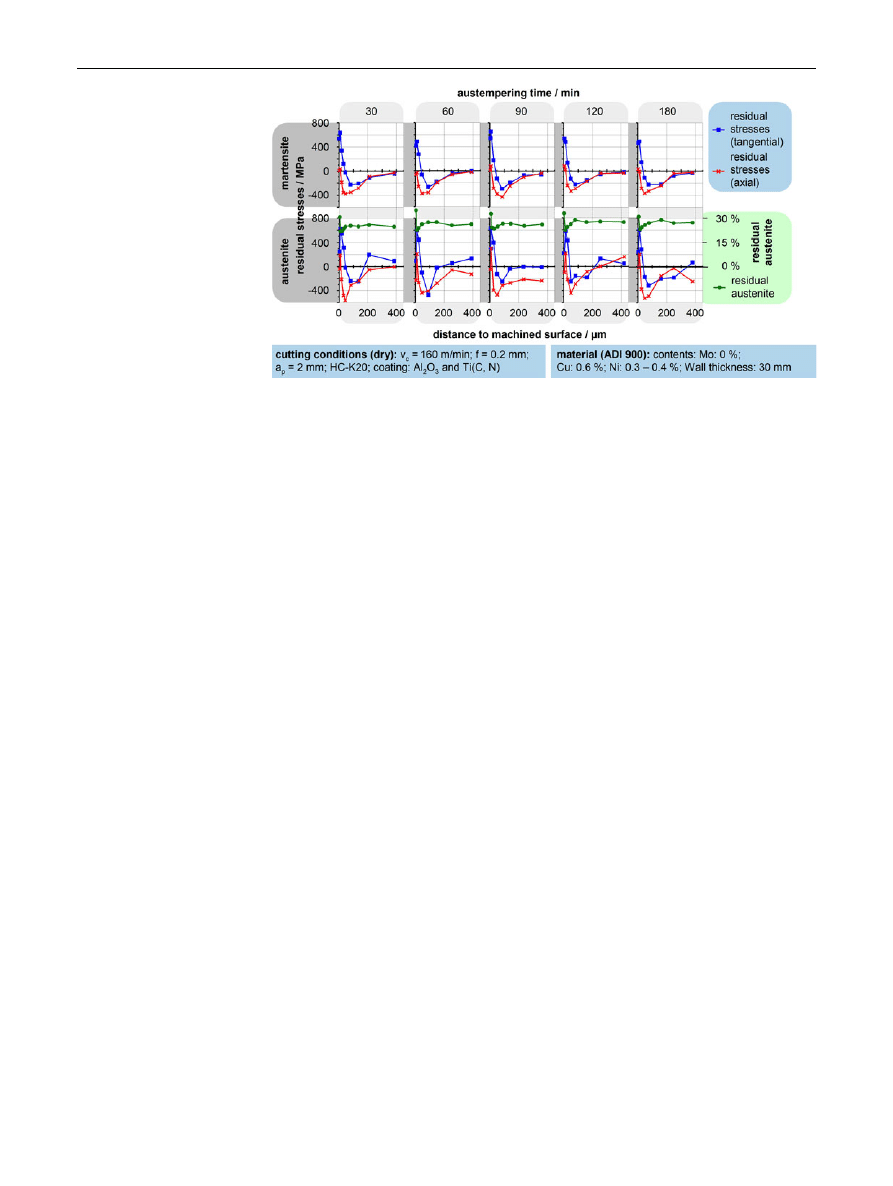
The X-ray diffraction can be traced back to the law of
Bragg:
k
¼ 2 d sin H
with k as the X-ray wave length, d as the lattice space, and
H as diffraction angle. If the crystal structure of the
material is deformed, than the lattice space d changes and
as a result of this the diffraction angle H. The X-ray
measurements were conducted in axial and tangential
direction and in both directions in the austenitic and in the
martensitic structure (Fig.
).
In the tangential direction of the martensitic structure,
tensile stresses within a depth of up to 50 lm were mea-
sured. Then the stresses change into compressive stresses,
reaching a level of up to r = -200 N/mm
2
in a depth of
100 lm. Thereupon the stresses decrease back to zero. In
axial direction, hardly any tensile stresses were found in
the boundary zone, but compressive stresses were mea-
sured into a depth of up to 400 lm.
The measurements in the austenitic structure show
comparable results. In tangential direction, tensile stresses
were measured in a depth of 50 lm, changing into com-
pressive stresses with further distance from the surface, but
dropping down to zero within a depth of 400 lm. In axial
direction compressive stresses in the face centred austenite
structure were higher than in the martensite structure, but
still on a low level and only existent within a depth of
10–20 lm.
Those measurements proof, that residual stresses as a
result of the machining operation were observed, however
an influence of the austempering time on residual stresses
could not be confirmed. Overall, it could be concluded that
comparable measurement results were found irrespective
of the austempering time.
For a closer examination of the mechanisms which
occur in the boundary zone, the level of the residual aus-
tenite is considered. Close to the boundary zone, up to a
depth of 80 lm, the content of residual austenite is
reduced. The first measurement of residual Austenite was
located too close to the boundary zone and has to be
neglected. The decrease can be explained by arising mar-
tensite due to the machining. In addition to the X-ray
analysis, the micro hardness in the material boundary zone,
neglecting the hardness of the graphite grains, was mea-
sured, and a hardened boundary zone was observed within
a depth of up to 100 lm.
Finally it can be concluded, that the influence of the
austempering time between 60 and 180 min can be
neglected, but a transformation from austenite into mar-
tensite in the boundary zone takes place and therefore the
machinability is influenced.
7 Influence of alloying elements on the machinability
The properties of ADI materials are affected by the level of
alloyed Nickel and Molybdenum. On the one side, the
transformation of the microstructure is influenced and a
homogeneous austenitic-ferritic microstructure along the
whole cross-section of the material can be produced. On
the other side, the molybdenum forms carbides at the grain
boundaries. The chemical composition and the heat treat-
ment process have to be considered carefully with respect
to the material wall thickness. With increasing wall
thickness, longer austempering times are required and the
thermal distribution in the material gets larger. The mate-
rials for this test series are shown in Table
.
Fig. 7
X-ray analysis of
machined ADI 900 samples
Prod. Eng. Res. Devel.
123
All machining investigations in this topic were con-
ducted in a dry longitudinal turning operation (v
c
=
160 m/min, f = 0.2 mm, a
p
= 2 mm). Due to the dry
cutting operation, strong crater wear close to the cutting
edge, like already mentioned above, was identified in this
test series as main wear mechanism. The chip shape was
comparable to those which were mentioned above and no
influence of the alloying elements on chip shape could be
considered.
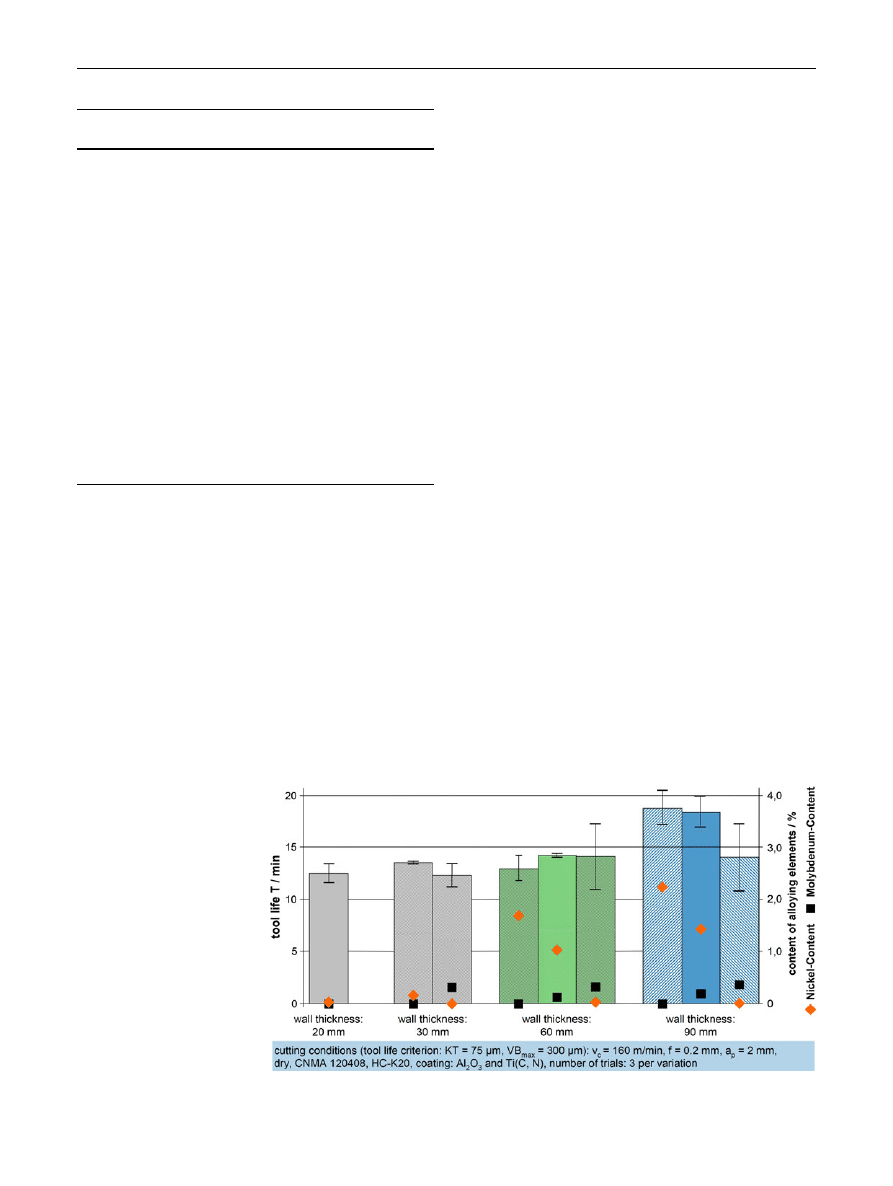
The required amount of Nickel and Molybdenum was
chosen on foundry based experiences. For the samples with
a wall thickness of 20 mm, no additional Nickel or
Molybdenum is required. For the samples with 30 mm wall
thickness, one investigated material variation was alloyed
with Nickel (Ni = 0.3–0.4%, Mo = 0%) and another one
with Molybdenum (Ni = 0%, Mo = 0.1–0.15%). For the
Nickel alloyed material variation with a wall thickness of
30 mm and for the ADI 900 sample with a wall thickness
of 20 mm, average tool life was approximately 13 min.
When machining of the Molybdenum alloyed ADI tool life
was reduced by nearly 10%. The results for the machining
operations are compared in Fig.
.
The investigated samples with a wall thickness of
60 mm were alloyed with a varying content of Molybde-
num and Nickel. The first sample was alloyed without
Molybdenum (Mo = 0%, Ni = 1.6%), the second with a
mixture of both (Mo = 0.15%, Ni = 1%) and the third
sample without Nickel (Mo = 0.3%, Ni = 0%). Average
tool life for those three material variations was comparable
by 13 min. For tool life of each single cutting test, far
scattered results could be found with respect to the chem-
ical composition of the material. While tool life for both
material variations with Molybdenum content below 0.15%
was 13 ± 1.5 min, tool life when machining the ADI 900
grade with the highest Molybdenum content ranged from
11 to 17 min. The strong variance of the tool life can
be traced back to molybdenum carbides at the grain
boundaries.
For the samples with a wall thickness of 90 mm, a
higher level of alloying elements than for the other inves-
tigated materials were required. The first material variation
was alloyed without Molybdenum (Mo = 0%, Ni =
2.2%), the second one was alloyed with both elements
(Mo = 0.2%, Ni = 1.4%) and the third one without Nickel
(Mo = 0.4%, Ni = 0%).
During the machining of these ADI-samples, the influ-
ence of Molybdenum on the machinability becomes more
obvious. An average tool life of 18 ± 1.5 min was
observed when machining the two material variations with
Table 3
Investigated ADI 900 material variations for test series 3
Material Mo-content/
%
Ni-content/
%
Wall
thickness/mm
Austempering
time/min
Test series 3: Influence of alloying elements on machinability
ADI
900
0
0
20
50
ADI
900
0
0.3–0.4
30
90
ADI
900
0.1–0.15
0
30
90
ADI
900
0
1.5–1.8
60
130
ADI
900
0.3–0.35
0
60
130
ADI
900
0.1–0.15
0.9–1.1
60
130
ADI
900
0
2.2
90
170
ADI
900
0.4
0
90
170
ADI
900
0.2
1.4
90
170
Fig. 8
Tool life for machining
of ADI 900 with varied alloying
elements and wall thicknesses
Prod. Eng. Res. Devel.
123
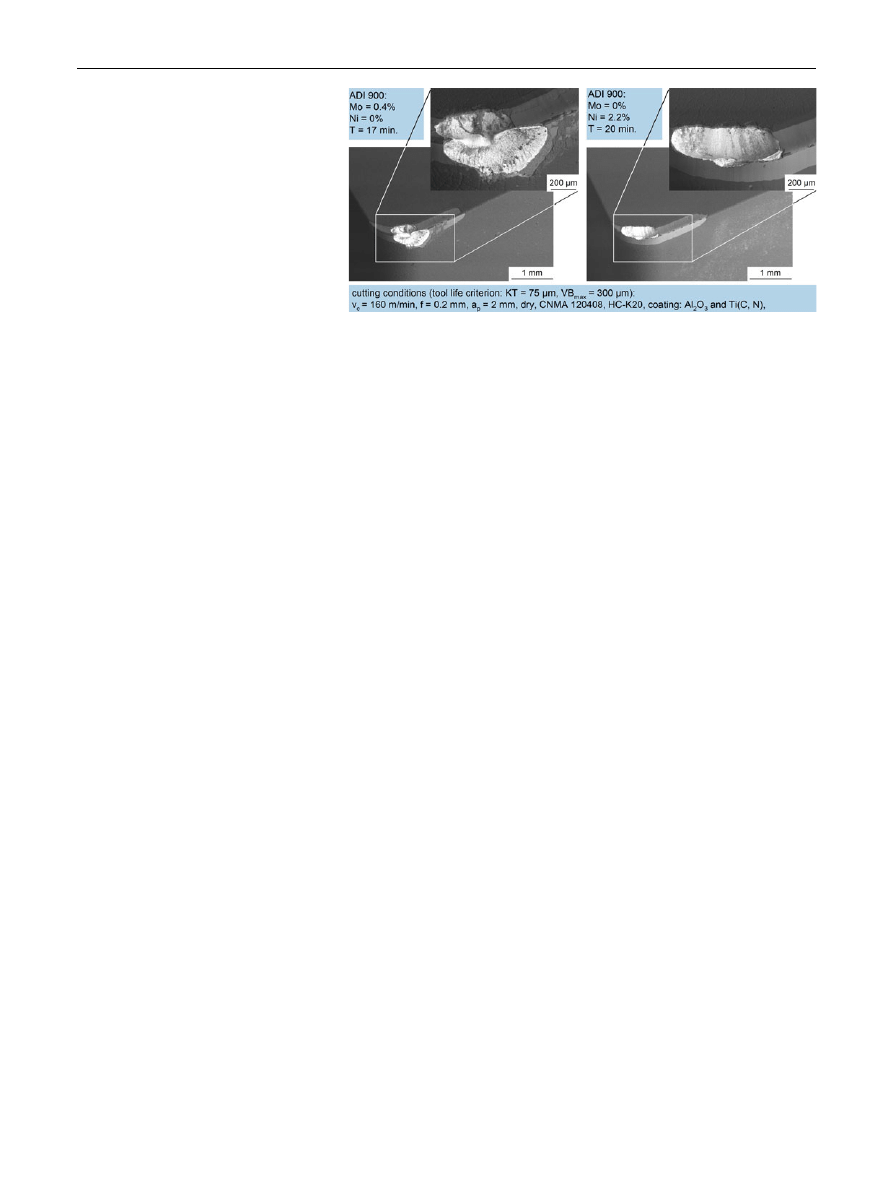
low Molybdenum content (Mo \ 0.2%). Average tool life
and the variance of tool life was decreased significantly
when machining the high Molybdenum alloyed ADI
(14 ± 4 min). Therefore it can be concluded, that due to a
high Molybdenum content ([0.3%) in the ADI 900 mate-
rial, average tool life was reduced and a strong scatter of
tool life was observed. On worn tools, with distinctive
crater wear, extensive chipping on the cutting edge was
observed (Fig.
) when machining Molybdenum alloyed
samples. This occurrence can be ascribed to molybdenum
carbides in the cast iron.
8 Conclusions
Objective of this investigation was to evaluate the mate-
rial related aspects on the machinability of ADI. It was
shown, that with regard to the ADI grade, cutting condi-
tions have to be chosen carefully. The thermal load on the
tool is high and the usage of coolant has to be preferred in
order to suppress crater wear. Flank wear is identified as
major tool life criterion while using lubricoolant as long
as no plastic deformation of the cutting edge takes place.
The shape of the generated chips depends vitally on the
material hardness. Strong plastic deformation takes place
in the shear zone during machining ADI 900 and can also
be detected on the formed chips. In machining ADI 1200
hardly any deformation in the shear zone or on the chips
was observed.
It was proven, that tool life is not influenced by the
austempering time between 60 and 180 min. However,
arising pearlite in the austenitic-ferritic microstructure
reduces tool life by about 20%. The transformation of
austenite into martensite and residual stresses in the
boundary zone could be identified by X-ray analysis.
In ADI materials, which were alloyed with a molybde-
num content of more than 0.3%, machinability is influ-
enced negatively and the risk of a breakout of the cutting
edge with increasing crater wear rises. Furthermore,
average tool life is reduced with a molybdenum content of
more than 0.3%.
Acknowledgments
The authors would like to thank the Bundes-
ministerium fu¨r Wirtschaft und Technologie for funding the project
15308 N ‘‘Machinability of ADI’’ in the program of ‘‘Industrielle
Gemeinschaftsforschung’’ (IGF).
References
1. Neugebauer
R,
Stoll
A,
Roscher
H-J
(2009)
Ultra-
schallunterstu¨tzung verbessert Tiefbohren in hochfesten Guss.
MM Das IndustrieMagazin 28:24–27
2. Rimmer A, Schiweck A (2008) ADI 101—what do the ADI
treatments do?, Seminar-Paper ‘‘Ausferritisches Gusseisen mit
Kugelgraphit ADI’’ III/13–III/31
3. Ro¨hrig K (2003) 2.Europa¨ische ADI-Entwicklungskonferenz –
Eigenschaften, Bauteilentwicklung und Anwendungen. Kon-
struieren ? Giessen I:2–14
4. Herfurth K et al (2007) Wa¨rme- und Oberfla¨chenbehandlung.
Konstruieren ? Giessen 2:27–37
5. Krause F (1989) Zerspanbarkeit von zwischenstufenvergu¨tetem
Gusseisen mit Kugelgraphit, Dissertation TU Clausthal
6. Cakic M, Baryram A, Isik Y, Salar B (2005) The effects of
austempering temperature and time onto machinability of aus-
tempered ductile iron. Mater Sci Eng A 407:147–153
7. Yang J, Putatunda S (2005) Effect of microstructure on abrasive
wear behaviour of austempered ductile iron (ADI) processed by a
novel two-step austempering process. Mater Sci Eng A 406:217–228
8. Klocke F, Klo¨pper C, Fallbo¨hmer M (2000) Fundamentals in
machining of Austempered ductile iron. Prod Eng VII/2:49–52
9. Klo¨pper C (2006) Untersuchungen zur Zerspanbarkeit von aus-
tenitisch-ferritischem Gusseisen mit Kugelgraphit (ADI), Dis-
sertation RWTH Aachen
10. Reuter U (2002) Verschleißmechanismen bei der Bearbeitung
von Gusseisen mit PCBN-Schneidstoffen, Dissertation TU
Darmstadt
11. Podolsky C (2008) Zerspanung von Gusseisen mit Vermikular-
graphit, Dissertation Leibniz Universita¨t Hannover
12. Abele E, Berger C, Scheerer H, Pfeiffer P (2009) Gussbearbei-
tung mit PKD, VDI-Z Special Werkzeuge Mai 18–21
13. Abele E, Schramm B (2007) Einsatz von Diamant zur Zerspa-
nung von Spha¨roguss. wt Werkstatttechnik online 97:41–46
14. Klocke F, Klo¨pper C, Lung D, Essig C (2007) Fundamental wear
mechanisms when machining austempered ductile iron (ADI).
Ann CIRP 56(1):73–76
Fig. 9
Chipping of the cutting
edge when machining ADI with
high level of molybdenum
Prod. Eng. Res. Devel.
123

15. Buda J, Vasilko K, Stranava J (1968) Neue Methode der Span-
wurzelgewinnung zur Untersuchung des Schneidvorganges.
Industrie-Anzeiger 90.Jg.(Nr.5):78–81 S.78
16. Hoffmann H, Meier L, Schaaf P, Cusenza S, Ho¨che D, Bam-
berger M, Amran Y, Weiss K, Hofmann M (2010) Monitoring
phase transition kinetics in austempered ductile iron (ADI). Mater
Sci Forum 638–642:3394–3398
17. Hoffmann H, Meier L (2008) Gusseisen—ein Werkstoff mit
Geschichte und Zukunft. Tagungsband Mu¨nchener Kolloquium
449–458
18. Brinksmeier E, Cammett JT, Ko¨nig W, Leskovar P, Peters J,
To¨nshoff HK (1982) Residual stresses–measurement and causes
in machining processes. Ann CIRP 31(2):491–510
19. Hoffmann H, Wasmuth U, Meier L, Hofmann M, Mu¨hlbauer M,
Stege V (2008) Optimisation of composite castings by means of
neutron measurements. Ann CIRP 57(1):579–582
Prod. Eng. Res. Devel.
123
Document Outline
- Material-related aspects of the machinability of Austempered Ductile Iron
- Abstract
- Austempered Ductile Iron: an introduction
- Production of Austempered Ductile Iron and its influences on machinability
- Test facility
- Investigated materials
- Influence of the metallic matrix on machinability and wear mechanisms
- Influence of the austempering time on machinability
- Influence of alloying elements on the machinability
- Conclusions
- Acknowledgments
- References
Wyszukiwarka
Podobne podstrony:
Aspects of Britain and the USA(1)
Presentation 5 Psychological Aspects of Treatment of the S
Aspects of the development of casting and froging techniques from the copper age of Eastern Central
Racism, Racial Discrimination, Xenophobia and Related Forms of Intolerance, Follow up and Implementa
Liberman, Anatoly Some Controversial Aspects of the Myth of Baldr
30 Pragmatic Aspects of Grammatical Constructions The Handbook of Pragmatics Blackwell Reference O
Greg Bear The Machineries of Joy
Pearl, The Aspect of Evil in the Novel doc
Sipperl The Machine in the Pastoral Imagery of 18th century utopia
The Pulse of the Machine Nina Kiriki Hoffman
Racism, Racial Discrimination, Xenophobia and Related Forms of Intolerance, Follow up and Implementa
The Dual Aspect of Wisdom by H P Blavatsky
Antheil Sonatina (Death of the Machines)
Eizo Matsuki The Crimean Tatars and Their Russian Captive Slaves An Aspect of Muscovite Crimean Rela
Jeri Smith Ready Aspect of Crow 03 The Reawakened
The Very Pulse of the Machine Michael Swanwick
Bear, Greg The Machineries of Joy, Redux
Dion Fortune The Machinery of the Mind
SCHECHNER the performance aspects of agni
więcej podobnych podstron