Excerpted with permission of the publisher from Woven Wire Jewelry by Linda L. Chandler and Christine R. Ritchey. Copyright 2004 Interweave Press, Inc.
Not to be reprinted. All rights reserved.

53
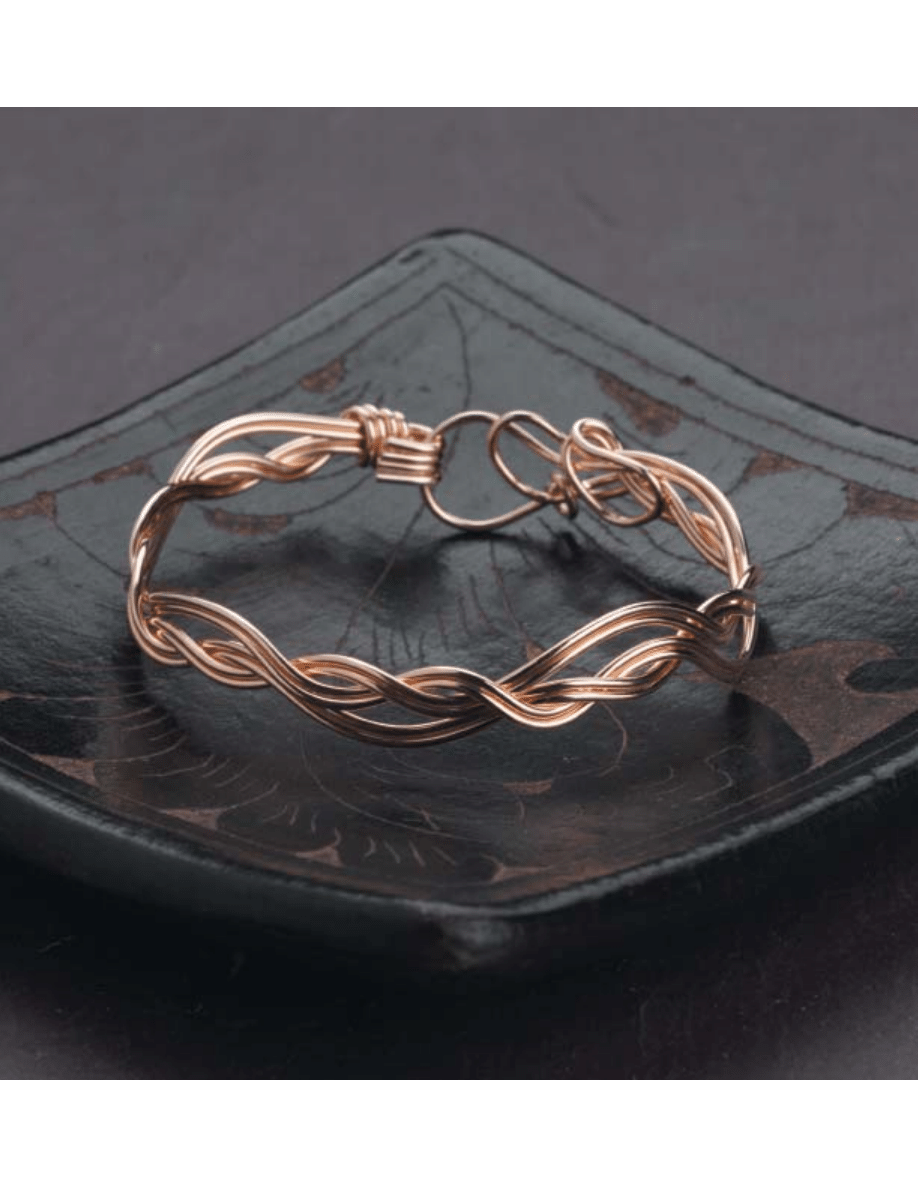
free-form bracelet
This bracelet is fun to make and begs to be customized. Once you understand the
technique, you can try various combinations of wire and materials. For example,
adding beads or wire coils to the long, curved parts can produce interesting
results. The bracelet can be lengthened to make a great ankle bracelet or choker.
You can wear it on your upper arm, Cleopatra-style. Maybe you will even invent a
new weave! It might be a good idea to make this bracelet in copper until you mas-
ter the technique.
The freedom to make mistakes provides
the best environment for creativity.
—Anonymous
M a t e r i a l s
16-gauge (1.3 mm) round dead-
soft gold-filled wire (This wire
makes a strong bracelet that
will hold its shape very well.)
T o o l s
Masking tape
Flat-nose pliers
Nylon-jaw pliers
Round-nose pliers
Stepped/chain-nose pliers
Flat file
Wire cutters
Clamp
Ruler
Sharp-pointed felt marker
SIX
Excerpted with permission of the publisher from Woven Wire Jewelry by Linda L. Chandler and Christine R. Ritchey. Copyright 2004 Interweave Press, Inc.
Not to be reprinted. All rights reserved.
These instructions are for a 7" (18-cm)
bracelet. The bracelet has seven sections
that should measure about 1" each. To
lengthen or shorten the bracelet, add or
omit one or more sections.
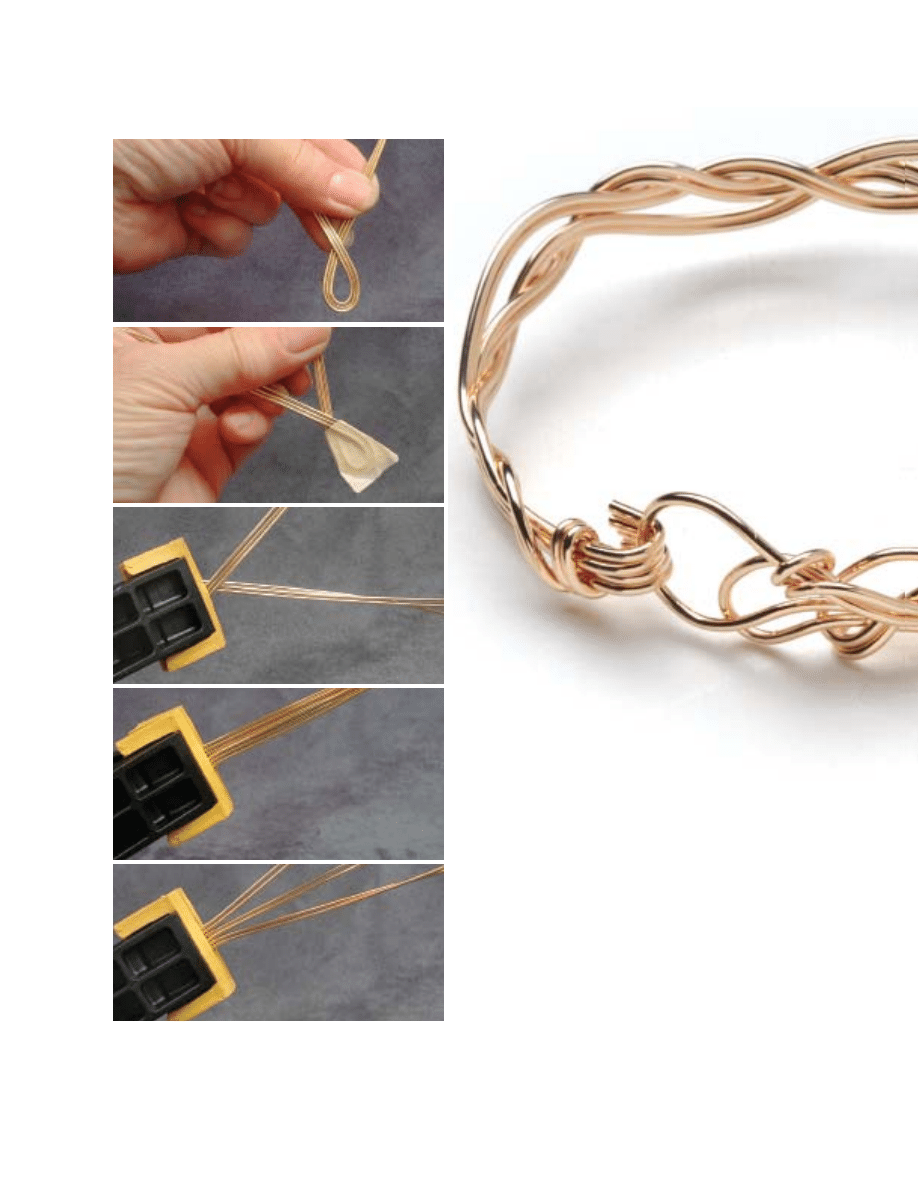
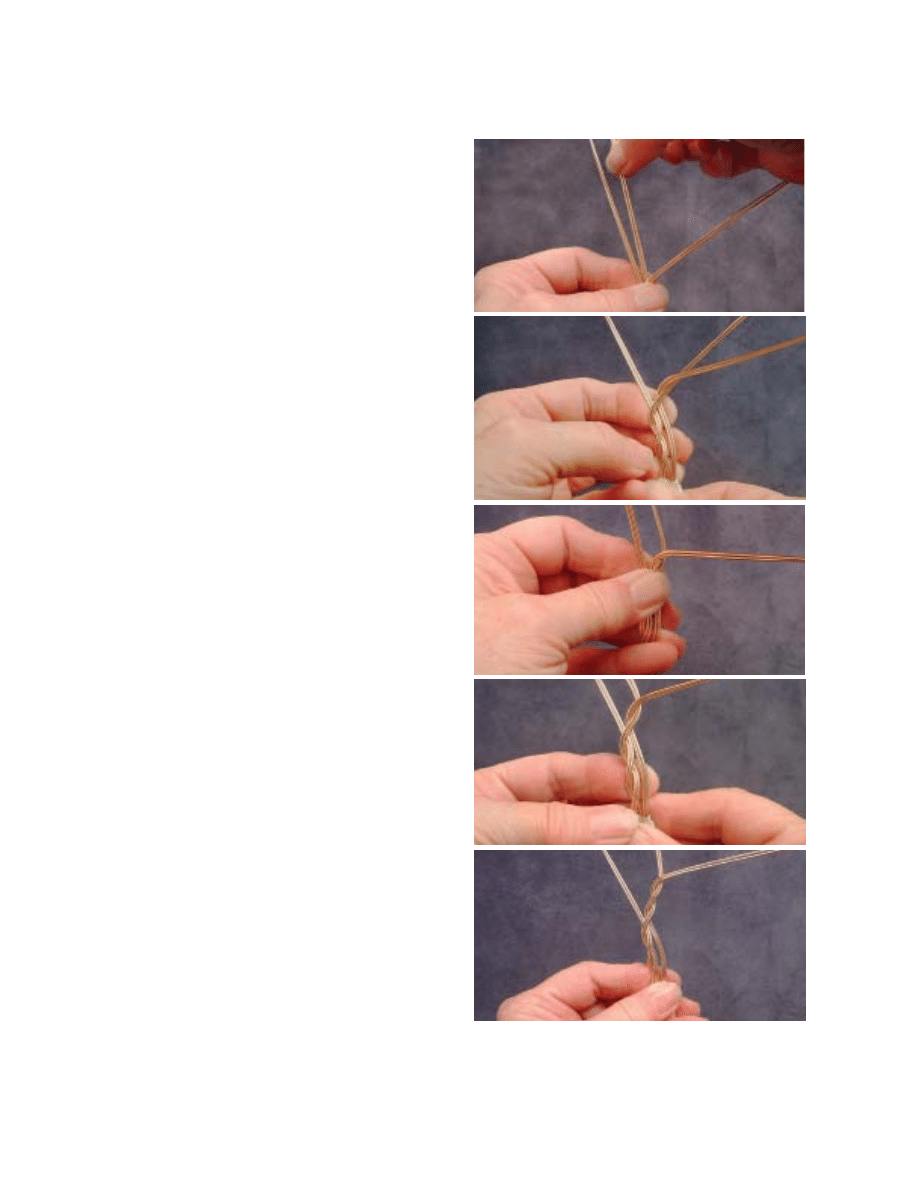
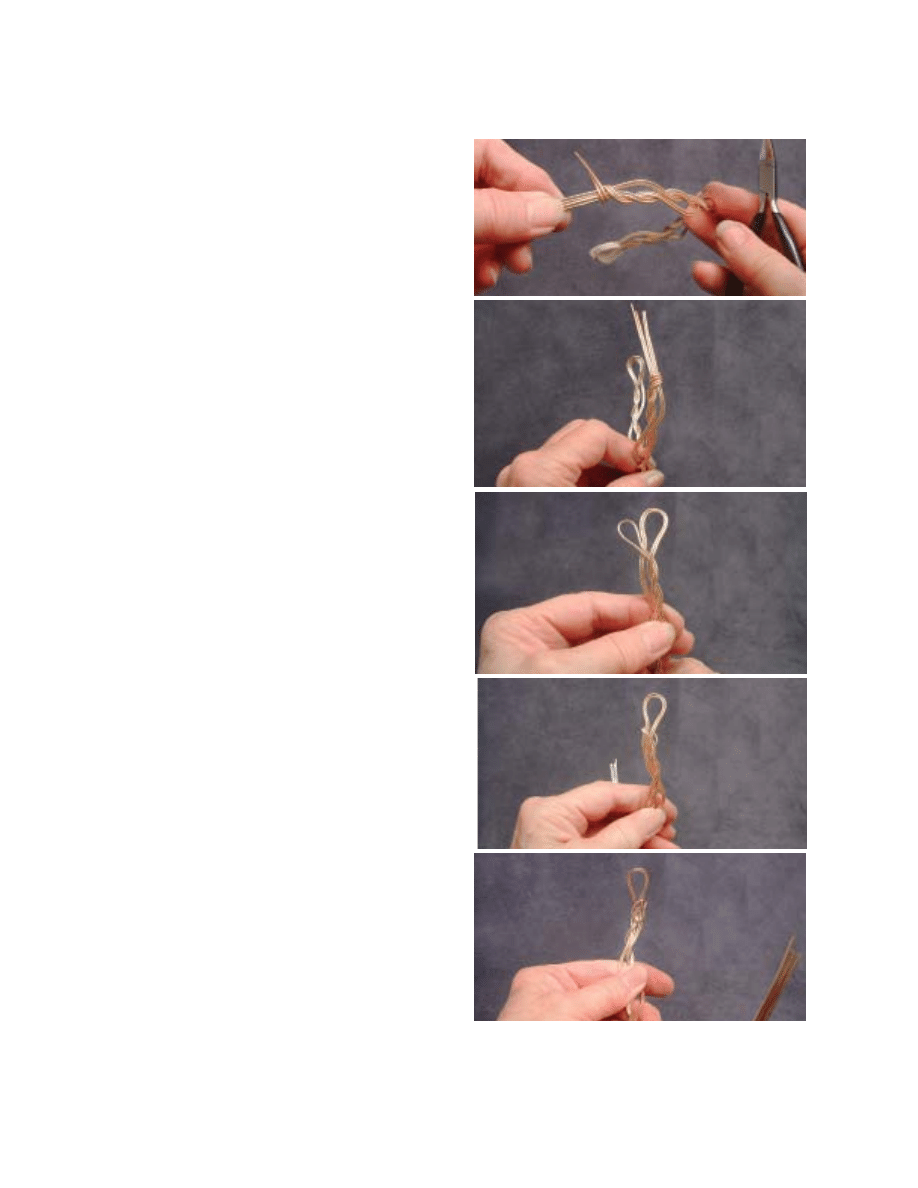
Cut the wire into three 20" (0.5 m) pieces. Find the
center and fold the wires in half with flat-nose pli-
ers. The wires should form a loop that crosses in a
graceful curve (
Figure 1
).
The loop’s inside diameter should be about
1
⁄
2
" (1.3
cm) at its widest part. Wrap this loop with masking
tape (
Figure 2
) and place the taped loop in the
clamp (
Figure 3
). Uncross the wires and straighten
them (
Figure 4
). This may sound strange, but hang
in there!
Figure 1
Make a loop.
Figure 2
Wrap the loop
with masking
tape.
Figure 3
Taped wires in
the clamp
Figure 4
Wires
uncrossed and
straightened.
Figure 5
Wires divided
into three sets
of two wires.
54
Excerpted with permission of the publisher from Woven Wire Jewelry by Linda L. Chandler and Christine R. Ritchey. Copyright 2004 Interweave Press, Inc.
Not to be reprinted. All rights reserved.
Divide the wires into three sets of
two wires (
Figure 5
). We will
call the sets the left set, the
middle set, and the right
set. As you weave, the sets
will change position
often. To avoid confu-
sion, whichever set hap-
pens to be on the left
will be called the left set,
whichever set is in the
middle will be the middle
set, and whichever set is on
the right will be the right set.
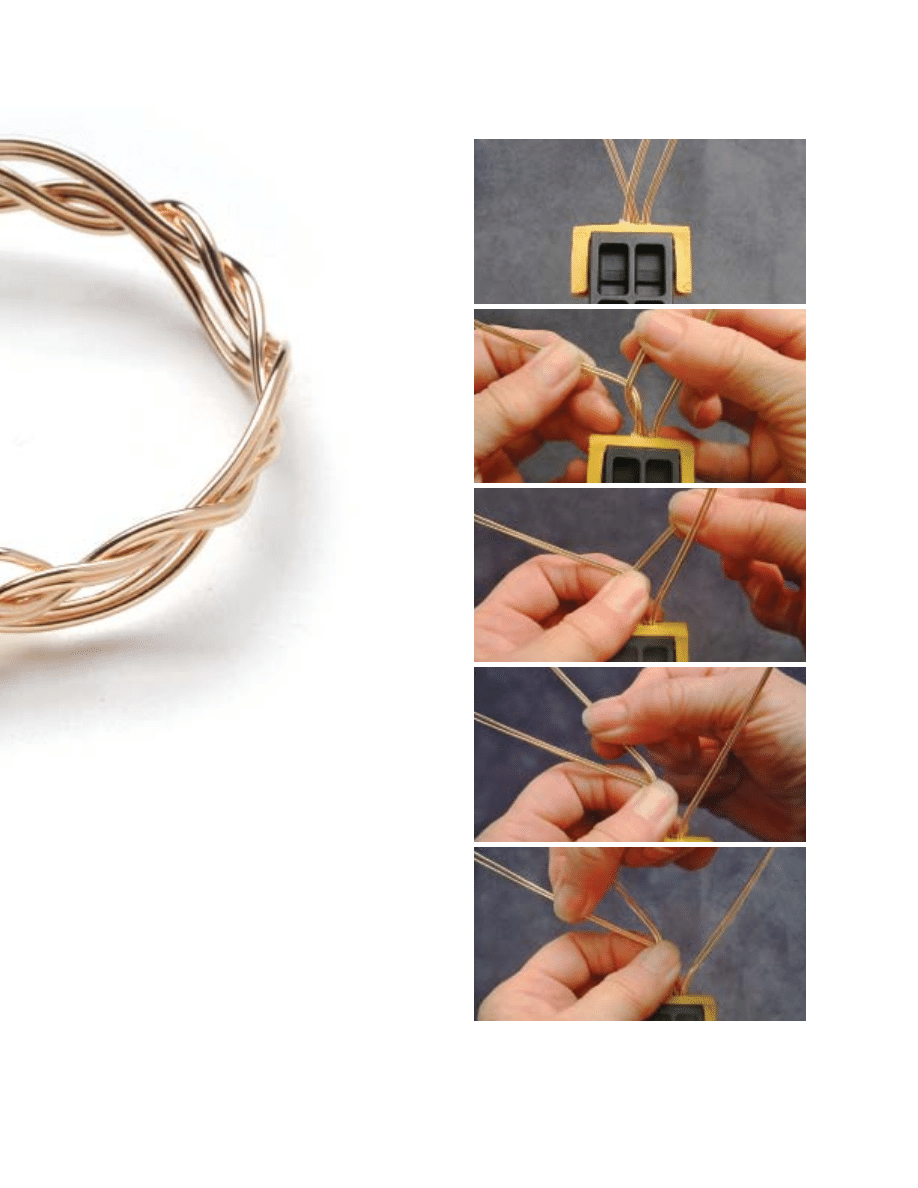
Move the middle set behind the left
set (
Figure 6
). Complete the first
twist by pulling the middle set to the
left with your left hand and the left set to the
right with your right hand (
Figure 7
). This twist
should be fairly tight. Keep the wires flat and in
line. Just let the clamp dangle.
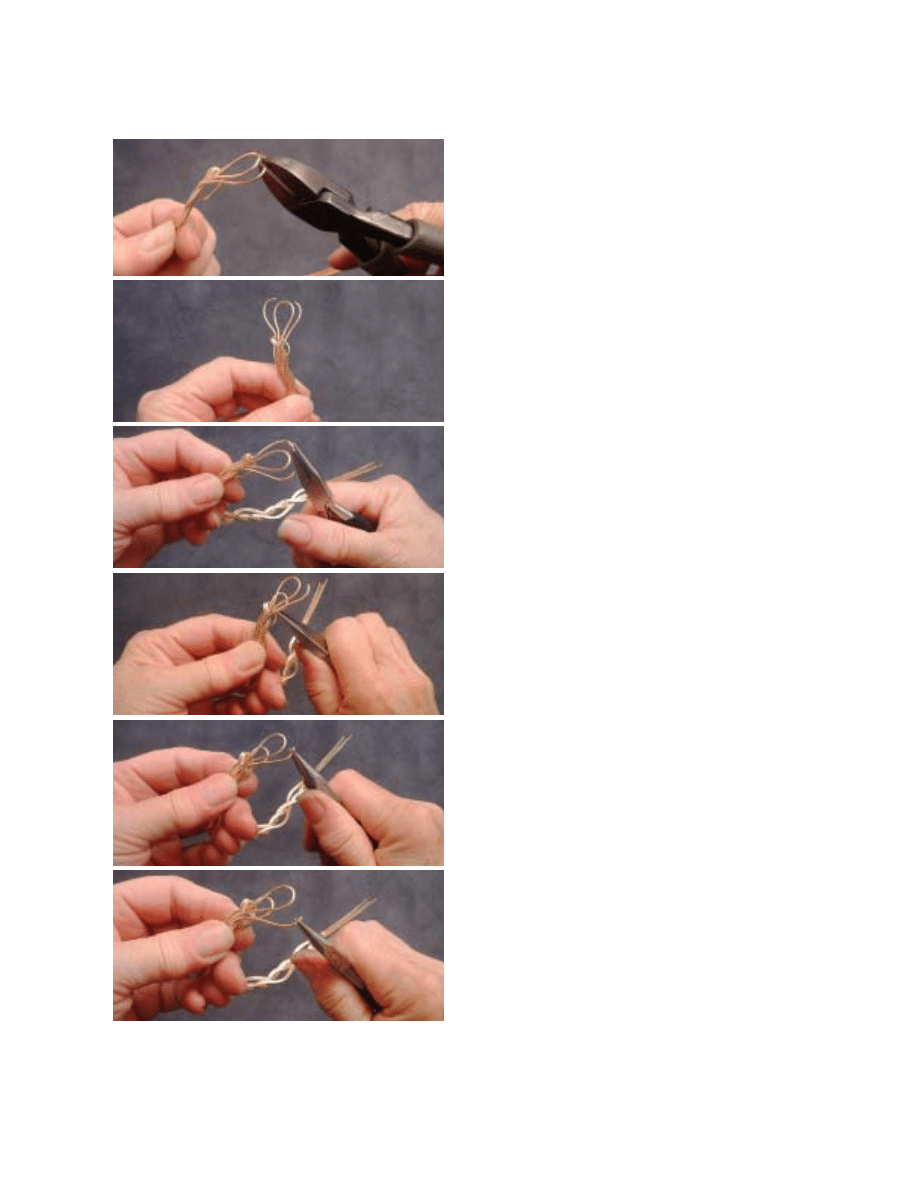
Grasp the top of the twist with your left thumb and
index finger and spread the wire sets farther apart
to prepare for the second twist (
Figure 8
). To make
the second twist, place the middle set behind the
left set (
Figure 9
) and bring the left set in front of
the middle set (
Figure 10
). Keep a tight grip on top
of the first twist throughout these steps.
Figure 6
The middle set
placed behind
the left set.
Figure 7
Making the
first twist.
Figure 8
Hold the top of
the twist very
firmly and
spread the sets
far apart.
Figure 9
Place the
middle set
behind the
left set.
Figure 10
Place the left
set in front of
the middle set.
55
Excerpted with permission of the publisher from Woven Wire Jewelry by Linda L. Chandler and Christine R. Ritchey. Copyright 2004 Interweave Press, Inc.
Not to be reprinted. All rights reserved.
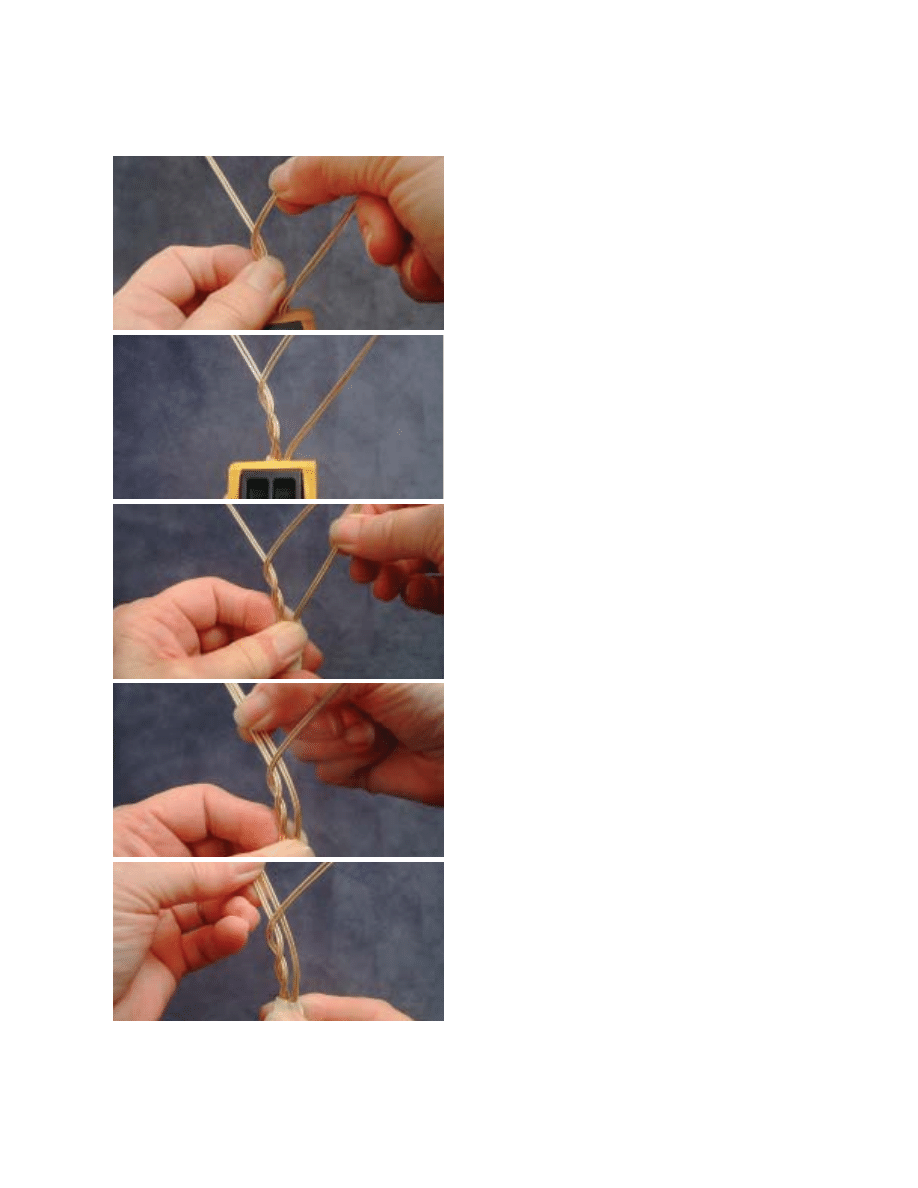
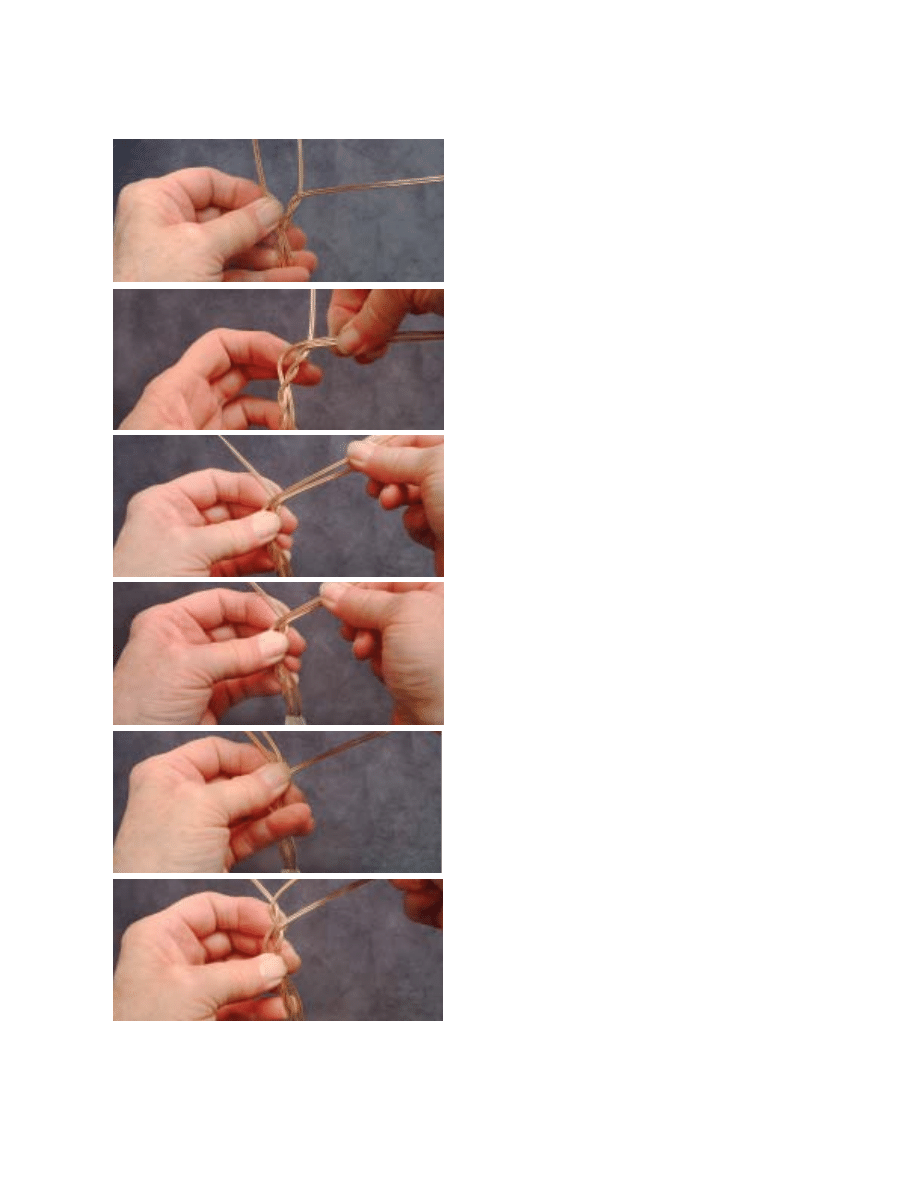
Figures 11 and 12
show the completion of the second
twist.
Bend the right set of wires to the left, behind the mid-
dle set, to join the left set (
Figures 13 and 14
). Try
for a graceful curve.
Pull what is now the left set to the right, across and in
front of the other two sets (
Figure 15
). Grasp the
place where the wires intersect (marked by the cir-
cle). Place your left hand as in
Figure 16
. This com-
pletes the first section.
Figure 11
Completing the
second twist.
Figure 12
The two twists
completed.
Figure 13
Grasp the right
set in your right
hand.
Figure 14
Curve the right
set and bring it
behind the
middle set.
Figure 15
The left set
pulled across
and in front
of the other
two sets. The
intersection
is circled.
56
Excerpted with permission of the publisher from Woven Wire Jewelry by Linda L. Chandler and Christine R. Ritchey. Copyright 2004 Interweave Press, Inc.
Not to be reprinted. All rights reserved.
Measure here to make sure this section is about 1" (2.5
cm) long. If the section is much longer than 1" (2.5
cm), you have woven too loosely. Conversely, if the
section is much shorter than 1", you have woven
too tightly. In either case, it would be a good idea to
start over. If your sections are only slightly off, just
try to keep each section the same length. Remove
the clamp.
For the second section, we will make the twists on the
right side of the bracelet. Keep a tight grasp and
spread the sets far apart. Bring the middle set to the
right and in front of the right set (
Figure 17
). Now
bring the right set to the left and behind the middle
set (
Figure 18
).
Figure 19
shows the first twist fin-
ished.
Bring the right set to the left, behind the middle set.
Bring the middle set to the right and in front of the
right set.
Figure 20
shows the two finished twists on
the right side of the bracelet.
Figure 16
Grasp the
intersection
of the wires
firmly.
Figure 17
Bring the
middle set to
the right and
in front of the
right set.
Figure 18
The right set
goes to the
left, behind
the middle
set.
Figure 19
The first twist
finished.
Figure 20
The two twists
are finished.
57
Excerpted with permission of the publisher from Woven Wire Jewelry by Linda L. Chandler and Christine R. Ritchey. Copyright 2004 Interweave Press, Inc.
Not to be reprinted. All rights reserved.
Take the left set and make another graceful curve to
the right and in front of the middle set to join to
the right set (
Figures 21 and 22
). This process com-
pletes the second section.
Move the left set farther to the left and move the mid-
dle and right sets farther to the right to prepare for
the third section (
Figures 23 and 24
).
At this point, you should begin to see a pattern emerg-
ing. The first section has two twists on the left and a
curve on the right. The second section has two twists
on the right and a curve on the left. Now you will
simply repeat the first section and the second section
until you have seven sections (or as many sections as
you need for the length you desire). Remember to
measure each section to make sure each is about one
inch long.
To begin the third set, bring the middle set to the left
and behind the left set. Bring the left set to the right
and in front of the middle set (
Figures 25 and 26
).
Figure 21
Curve the left
set to the right.
Figure 22
Bring the left
set in front of
the middle set
to join the
right set.
Figure 23
Pull the left
set farther to
the left.
Figure 24
Pull the middle
and right sets
farther to the
right.
Figure 25
Bring the
middle set to
the left behind
the left set.
Figure 26
Bring the left
set in front of
the middle set.
58
Excerpted with permission of the publisher from Woven Wire Jewelry by Linda L. Chandler and Christine R. Ritchey. Copyright 2004 Interweave Press, Inc.
Not to be reprinted. All rights reserved.
For the second twist, bring the middle set to the left
and behind the left set, and the left set to the right
and in front of the middle set. This completes the
two twists of the third set.
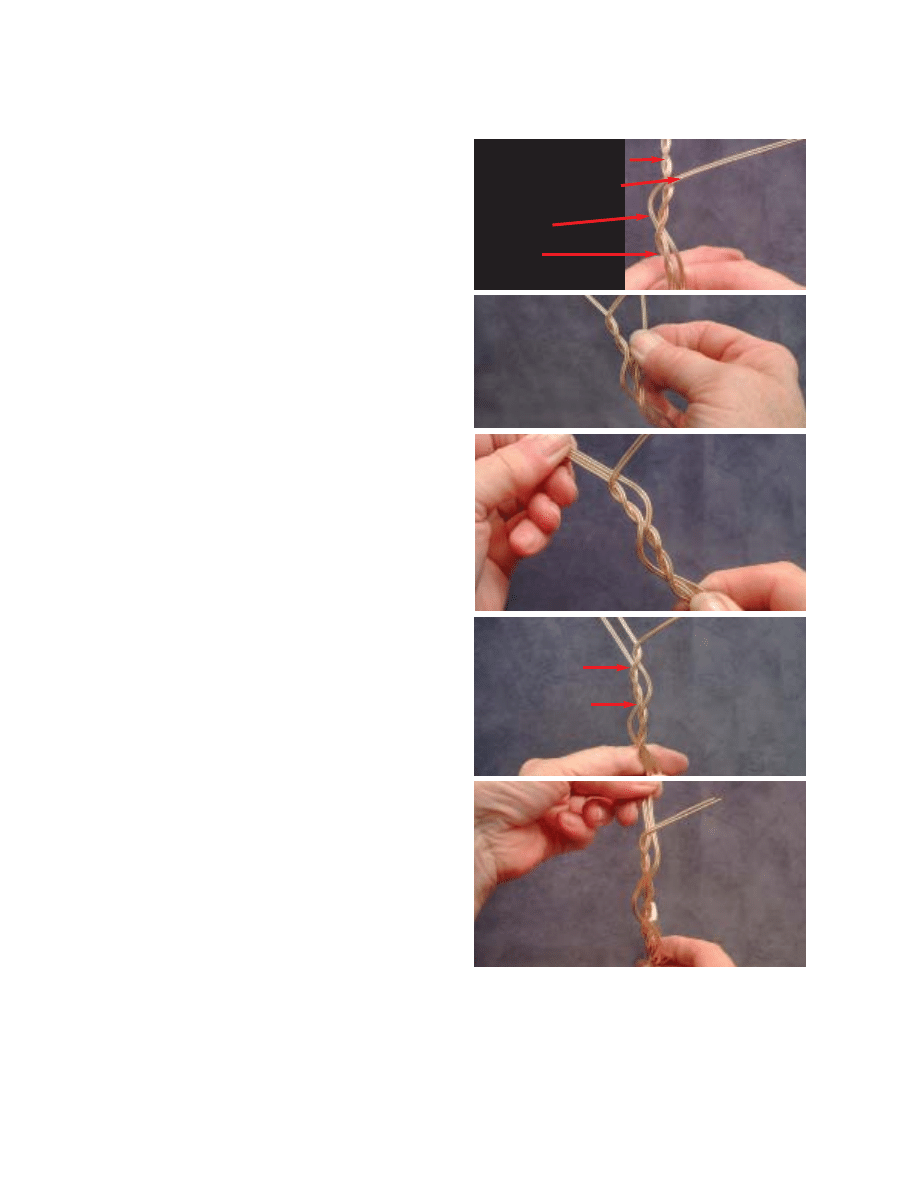
Figure 27
shows the progress at this point. You can see
that the first section has two twists on the left and a
long bend on the right. This is reversed on the sec-
ond section, and the third section will be identical
to the first section when you make another graceful
bend from right to left to complete the third sec-
tion (
Figures 28 and 29
).
Note that on the odd-numbered sections, the curve
goes under the middle set and on the even sets the
curve goes over the middle set.
Curve the bracelet slightly in the direction of its final
shape. This helps the wires lie flat and makes the
whole process easier. Every section will alternate
between having one set on top and two sets on top
(
Figure 30
).
After making the last section, cross the left set across
the other sets to the right (
Figure 31
). Use flat-nose
pliers to hold the two sets in place
Figure 27
Reviewing the
process.
Figure 28
Make a curve
to the left with
the right set.
Figure 29
The third section
completed and
ready for the
fourth section.
Figure 30
One set on top;
two sets on top.
Figure 31
The last section.
59
Third section almost completed
This set will bend to the left to
make the broad curve.
Second section
First section
One set on top
Two sets on top
Excerpted with permission of the publisher from Woven Wire Jewelry by Linda L. Chandler and Christine R. Ritchey. Copyright 2004 Interweave Press, Inc.
Not to be reprinted. All rights reserved.
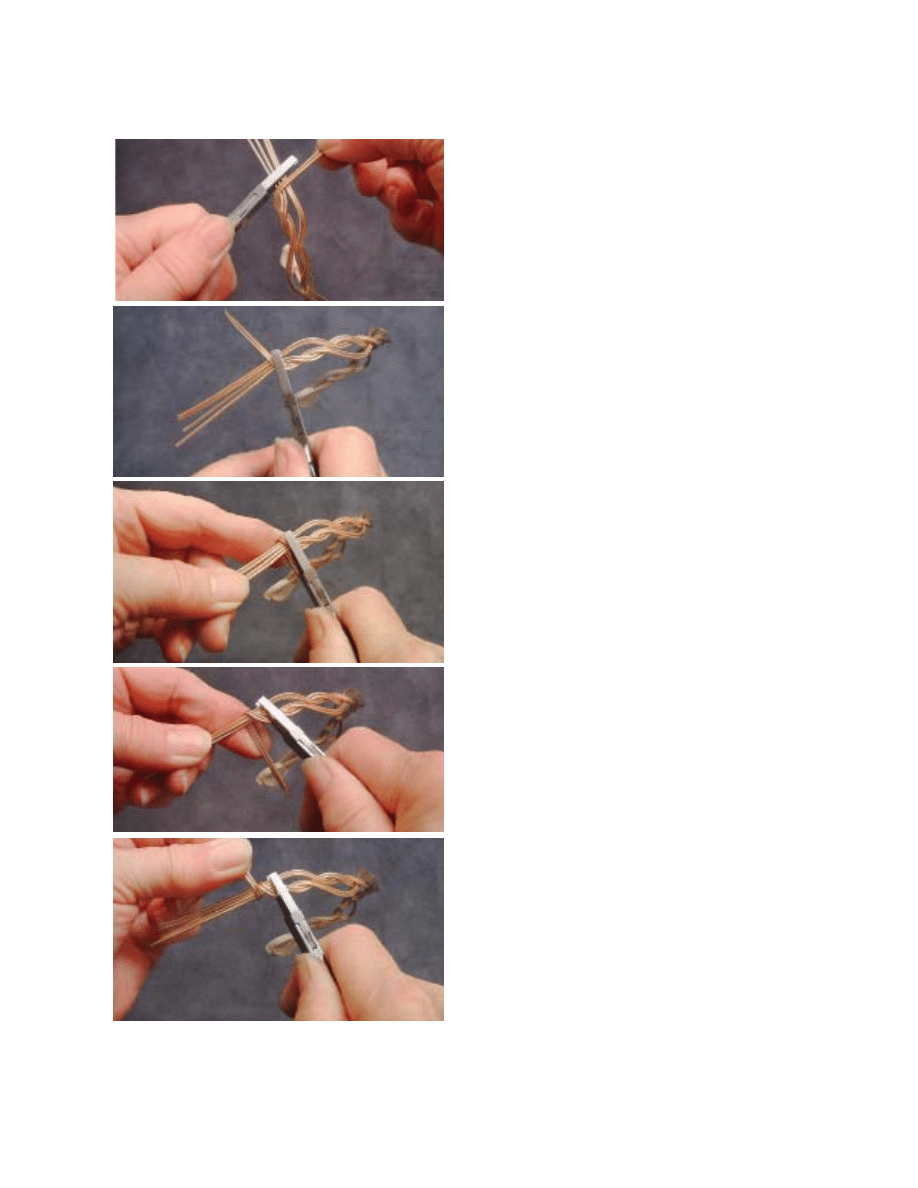
(
Figure 32
) while you begin to wrap the left set tightly
around and to the back of the two right sets. Now
hold the wires as in
Figure 33
while you continue
wrapping the left set around the other two sets.
When you have wrapped the wires to the back, tighten
the wrap securely with pliers (
Figure 34
). This end
will ultimately hold the bracelet clasp.
Make one more wrap by bringing the left set to the
front (
Figure 35
), over, and around the back (
Fig-
ure 36
). Keep the other four wires straight and close
together. When you have two wraps showing on the
front of the bracelet, cut the wrap wires only on the
back of the bracelet. File the ends and press firmly
into place with the pliers.
Figure 37
shows the wires
before cutting.
Figure 38
shows how the front of
the bracelet should look when finished.
Figure 32
Beginning to
wrap the end of
the bracelet.
Figure 33
Hold the set
with pliers to
make wrapping
easier.
Figure 34
Wrap to the
back.
Figure 35
Bring the wrap
around to the
front.
Figure 36
Making the
second wrap.
60
Excerpted with permission of the publisher from Woven Wire Jewelry by Linda L. Chandler and Christine R. Ritchey. Copyright 2004 Interweave Press, Inc.
Not to be reprinted. All rights reserved.
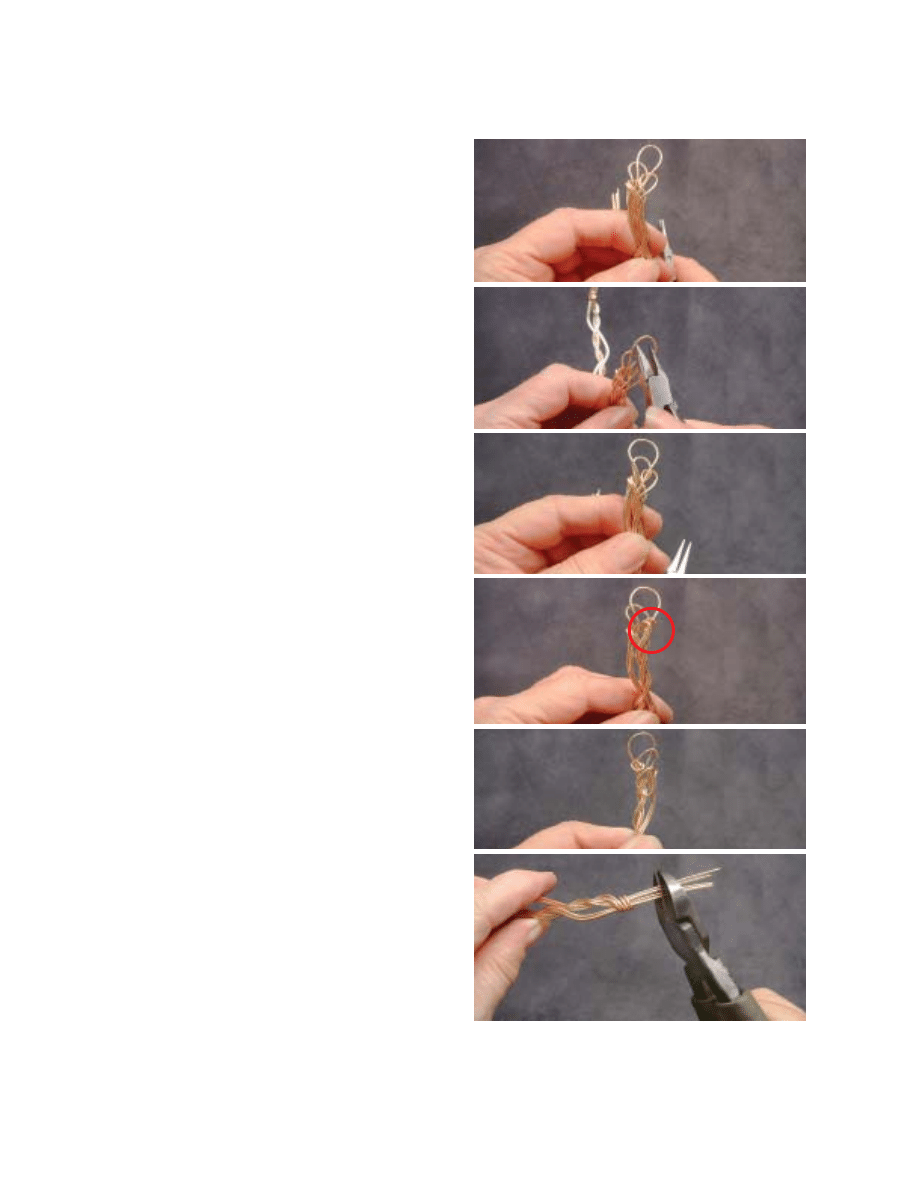
To finish the catch end of the bracelet, take the inner-
most loop and bring it to the left (
Figure 39
). Wrap
this loop to the back of the bracelet and press it
down (
Figure 40
).
Figure 41
shows the innermost
loop on the back of the bracelet. Don’t flatten it
completely, just snug it against the other wires. We
want to keep nice, flowing curves and avoid sharp
angles.
Figure 37
The back of
the bracelet
before cutting
off the wires.
Figure 38
The front of
the bracelet,
showing the
two wraps.
Figure 39
Pull the inner-
most loop to
the left.
Figure 40
The innermost
loop pressed
firmly to the
back of the
bracelet.
Figure 41
The back of
bracelet show-
ing innermost
loop pressed
into place.
61
Excerpted with permission of the publisher from Woven Wire Jewelry by Linda L. Chandler and Christine R. Ritchey. Copyright 2004 Interweave Press, Inc.
Not to be reprinted. All rights reserved.
Now cut the outermost loop somewhere near the mid-
dle. This does not have to be exact (
Figures 42 and
43
). Grasp the ends of the cut wires with needle-
nose pliers and bend them to the back of the
bracelet in wide, graceful curves (
Figure 44
). To
avoid marring, grasp only the very ends of the cut
wires with pliers or wrap the jaws of the pliers with
tape.
Tuck the left and right wires into the wrap where they
will not come out and irritate the skin (
Figures 45
and 46
).
After the wires are curved to the back of the bracelet,
play with the placement and position them so that
the front of the bracelet pleases you (
Figure 47
).
Use your imagination here. Every bracelet seems to
turn out differently, which is half the fun.
Figure 42
Cut the outer-
most wire.
Figure 43
The outermost
loop cut in half.
Figure 44
Hold the very
end of the wire
with the pliers.
Figure 45
Tuck in the
left wire.
Figure 46
Tuck in the
right wire.
Figure 47
Adjusting the
wires for the
most attractive
appearance.
62
Excerpted with permission of the publisher from Woven Wire Jewelry by Linda L. Chandler and Christine R. Ritchey. Copyright 2004 Interweave Press, Inc.
Not to be reprinted. All rights reserved.
The remaining loop will be the catch (
Figure 48
).
Widen the catch by placing needle-nose pliers
inside the loop and pressing them open (
Figure
49
).
Figure 50
shows the widened catch.
Just to prove nothing is written in stone, look at the
circled loop in
Figure 51
. We decided to untuck
that loop, bring it around to the front, and do a curl
around the two right wires of the catch.
Figure 52
shows the back of the bracelet with the new wraps
on the left. This finishes the catch.
Now go back to the other end of the bracelet to finish
the clasp. Be careful—there is only one chance to
get this right.
Keeping the wires straight and close together (
Figure
53
), cut the wires about
5
⁄
8
" (1.5 cm) long. File the
cut ends. File lightly and toward the center from
each side. Be careful, or the wires will move out of
place and it will be difficult to get them back where
they belong.
Figure 48
Wires tucked in.
One remaining
loop.
Figure 49
Widening the
catch with
needle-nose
pliers.
Figure 50
The widened
catch.
Figure 51
Be creative!
This is the front
side of the
bracelet.
Figure 52
The back side
of the bracelet
with the new
wrap on the left.
Figure 53
Cutting the
wires.
63
Excerpted with permission of the publisher from Woven Wire Jewelry by Linda L. Chandler and Christine R. Ritchey. Copyright 2004 Interweave Press, Inc.
Not to be reprinted. All rights reserved.
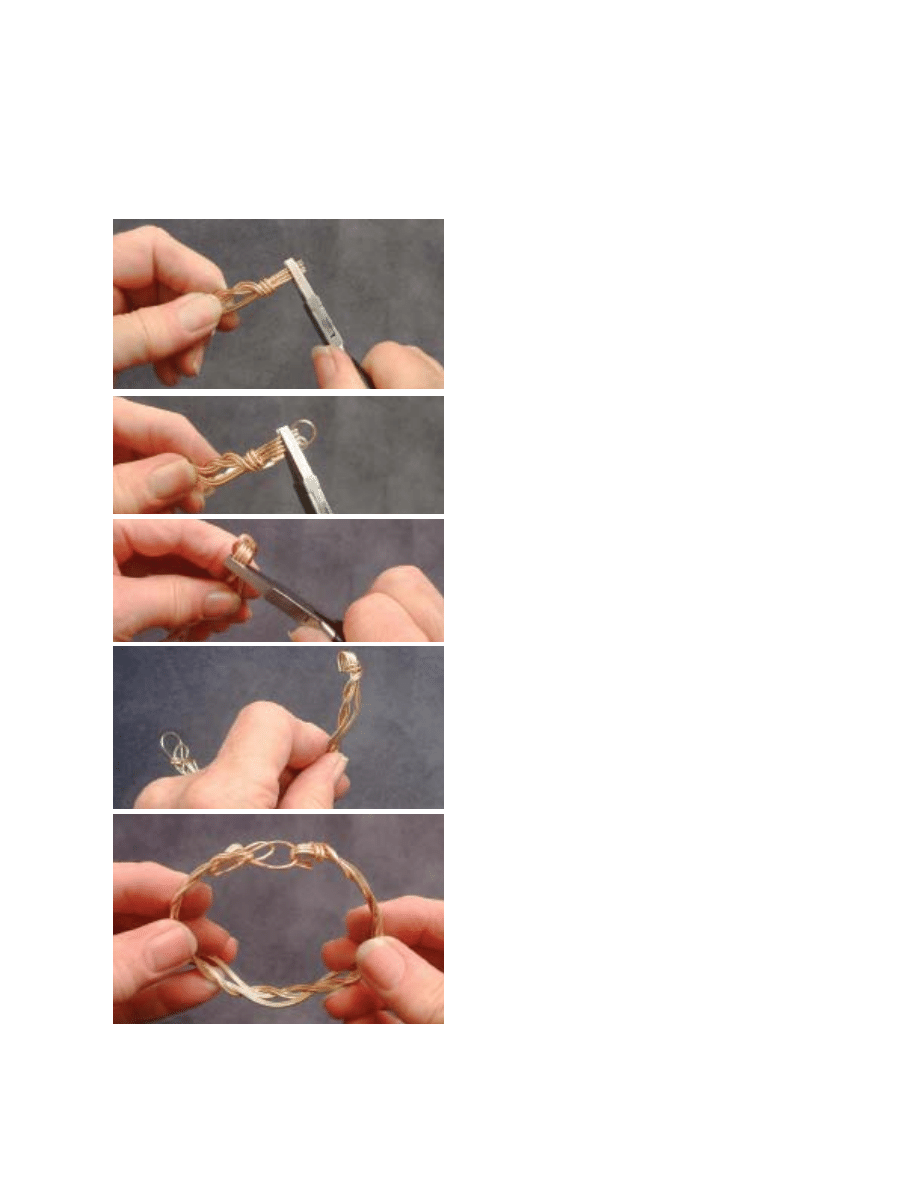
Place either flat-nose or chain-nose pliers about
halfway between the wrap and the cut ends and
bend the four wires into a hook-shaped clasp (
Fig-
ure 54
). Work slowly. If you bend the wires down
from just one side, the clasp will be crooked. Bend
the wires down from the left side a little (
Figure 55
),
then reposition the pliers on the right side and bend
down a little more (
Figure 56
). Work back and forth
until the wires form an even clasp (
Figure 57
).
Pull and form the bracelet until it is a smooth, oval
shape.
Figure 58
shows the completed bracelet. For
a nice finish, put the bracelet in the tumbler for sev-
eral hours or overnight.
Figure 54
Place the pliers
about halfway
between the
wrap and the
cut ends.
Figure 55
Bend the wires
slowly.
Figure 56
Bend a little
on the right
and a little on
the left.
Figure 57
The finished
clasp.
Figure 58
Bracelet formed
into a smooth
oval, catch and
clasp joined.
64
Excerpted with permission of the publisher from Woven Wire Jewelry by Linda L. Chandler and Christine R. Ritchey. Copyright 2004 Interweave Press, Inc.
Not to be reprinted. All rights reserved.
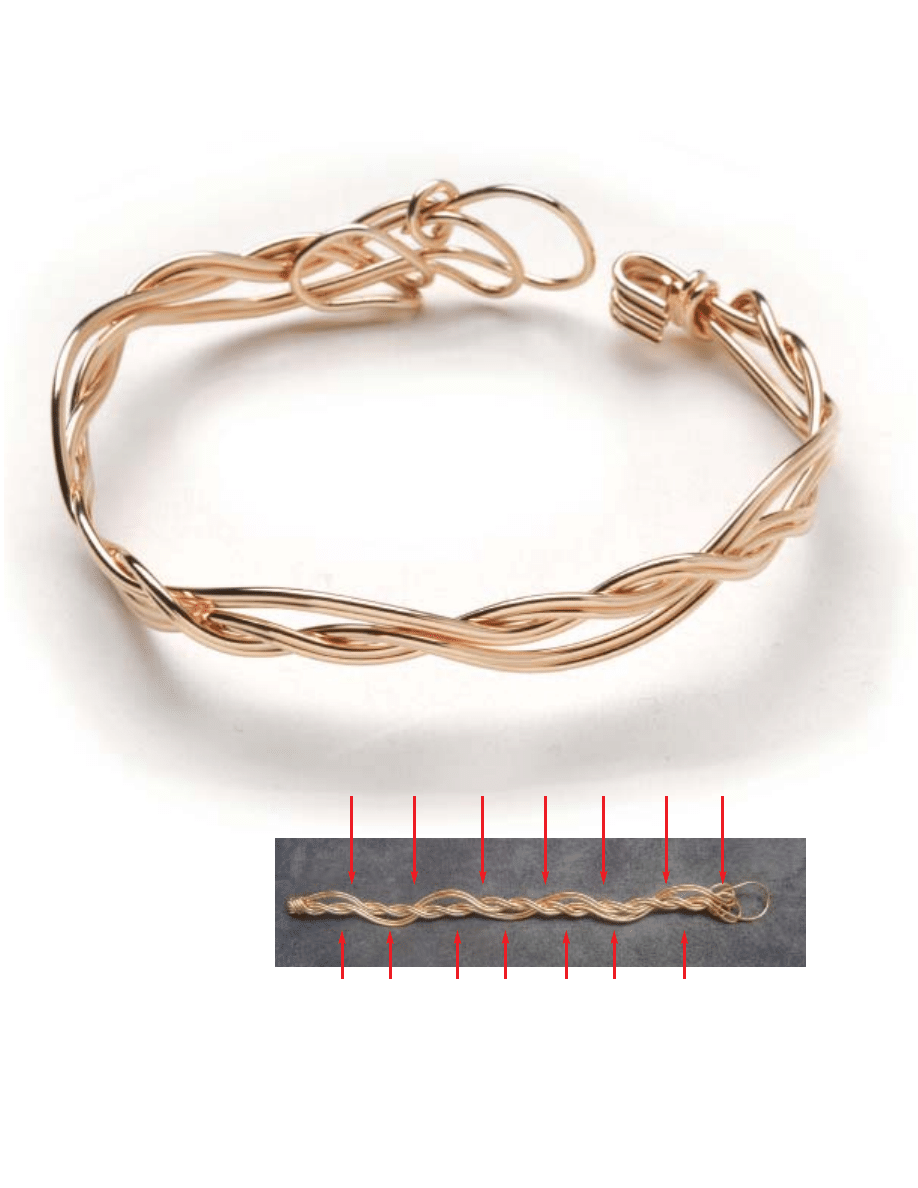
A N A T O M Y O F T H E
F R E E - F O R M B R A C E L E T
Starting at the catch end of the bracelet,
Figure
59
shows the seven sections and how they alter-
nate overlapping and underlapping. We have
flattened the bracelet for demonstration pur-
poses only. Don’t do this yourself—you’d never
get the bracelet to look normal again.
There are so many things that can be done with
this free-form technique. Play with the many
possibilities and have fun!
65
Figure 59
The sets and
how they over-
and under-lap.
2 over
2 under
2 over
2 under
2 over
2 over
2 under
7th set
6th set
5th set
4th set
3rd set
2nd set
1st set
Excerpted with permission of the publisher from Woven Wire Jewelry by Linda L. Chandler and Christine R. Ritchey. Copyright 2004 Interweave Press, Inc.
Not to be reprinted. All rights reserved.

RISK-FREE
TRIAL OFFER
Discover the inner bead artist in you.
You don’t have to be a designer or a beading pro to make
beautiful jewelry, and you don’t have to hunt all over for
inspiring designs.
From cover to cover, Beadwork magazine gives you great
projects, from the beginner to the advanced. Every issue is
packed full of step-by-step instructions, easy-to-under-
stand illustrations, plus well-written, lively articles sure to
inspire. Each article brings you all the bead news to keep in
the know and in fashion.
Take advantage of this special risk-free offer today!
Wyszukiwarka
Podobne podstrony:
initiation au free form
intiation free form la technigue
NX Free Form Modeling
NX Free Form Modeling
krs form za
13 Modelowanie form odziezy dla Nieznany (2)
OBE Gods of the Shroud Free Preview
Free Energy Projects 2
free sap tutorial on goods reciept
Fringeworthy Star System Survey Form
500 GB Free Transferu
krs form zr 1
Beijing Language University Press HSK Answer Form A
BLOOG, ● Wiersze moje ♥♥♥ for Free, ☆☆☆Filozofia, refleksja, etc
Rozwój form kancelaryjnych 09.11.2014 Sroka, Zarządzanie dokumentacją, archiwistyka i infobrokerstwo
Pokaż mi swój obraz, ● Wiersze moje ♥♥♥ for Free, ☆☆☆Filozofia, refleksja, etc
Pochód nocnych myśli, ● Wiersze moje ♥♥♥ for Free, ☆☆☆Filozofia, refleksja, etc
jap-ta-form, pjwstk PJLinka.pl, materialy pliki
więcej podobnych podstron