
T
ete-a-Tete
OVERVIEW
Introduction
With contoured seat and backs and timeless design, the classic Tete a Tete offers an ideal combination of
comfort, elegance and quality in outdoor living.
•
Beginner - About 2 to 3 days
•
Intermediate - About 2 days
•
Advanced - About 1 to 2 days
STEPS
1.
Cut the 7 seat slats to 52" lengths. The top slat will be thicker than the
others, so you'll cut this one from a 2X4. Cut the remaining slats from
1X6 stock. All of the slats will to cut to 2-1/2" widths.
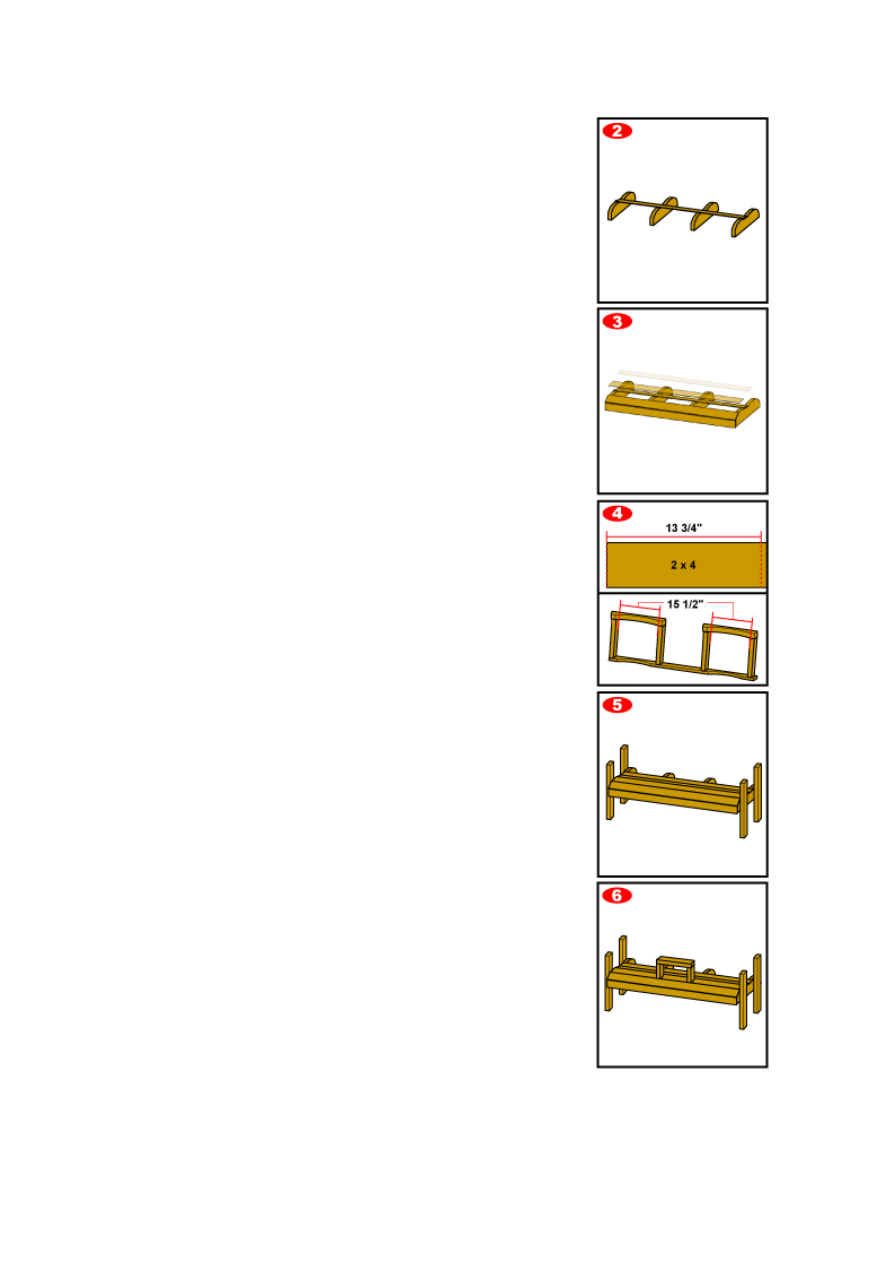
2.
Next, position the four pre-shaped sides to accommodate the 52" slats.
Install the thicker top seat slat first into the slots in the sides, using
glue and 3" deck screws. Only use one screw per joint, and countersink
them flush with the surface.
3.
Now drop the remaining slats into position. After spacing by eye, install
the slats using 1-1/2" deck screws. But don't attach the template-cut
rear slat yet.
4.
Cut four 13-3/4" long uprights from the 2X4 stock and attach them to
the bottom back brace already cut from your template. One upright
should be placed at either end of the brace, with the space of 15-1/2"
between each upright and its mate. Install with glue and 3" screws.
5.
Cut the four legs to 21-3/4" lengths, then, with the seat surface
elevated onto saw horses, clamp the legs into position with C clamps.
Since you will have traced the leg outlines from the template onto the
outer surface of the two side pieces, use those markings to show where
the legs should be placed.
Stand the clamped assembly onto the floor to make sure that legs are
vertical and the seat doesn't rock. When ready, unclamp the legs one at
a time and apply glue and 3" screws from underneath.
6.
Cut two trestle supports from 4 1/4" long 2X4 sections, and a trestle
top from a 13 3/4" section. Fasten the trestle top over its supports with
glue and screws. Then center the trestle on the top seat slat, and fasten
it with glue and screws driven in from underneath.
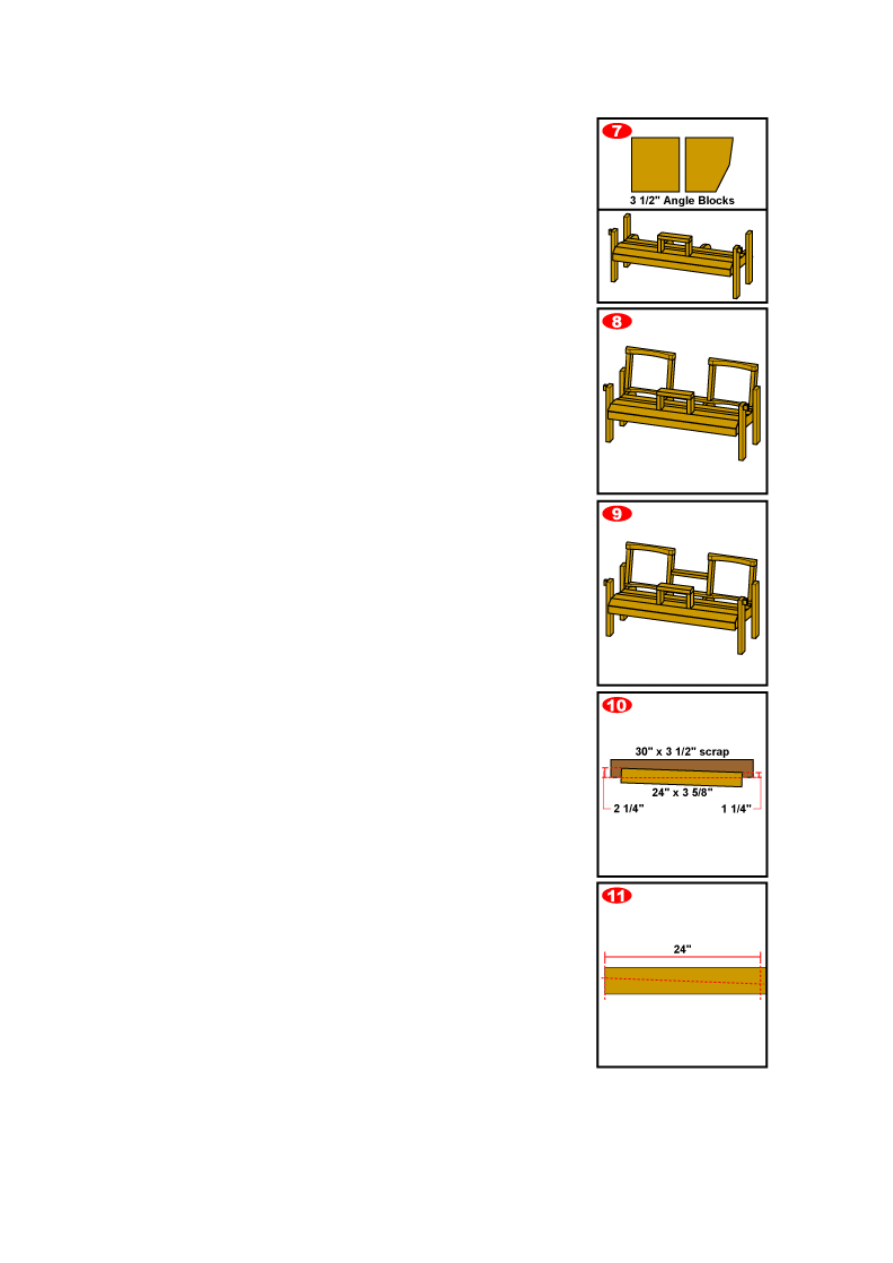
7.
Cut two angle blocks from 3 1/2" lengths of 2X4. Shape them as you
wish, and install them at the tops of the front legs with glue and
screws.
8.
Install the completed back assembly into the angled slots at the back of
the completed seat assembly. Use glue, and 3" screws driven into the
rear legs.
9.
Cut a 15" length of 2X4 for the rear table support. For positioning, place
a straight piece of wood across the tops of the two rear legs, and install
the rear table support at the height of the straightedge and parallel to
the floor. Secure it against the two inside sections of uprights with glue
and 3" screws.
10.
Make a ripping jig for cutting the tapered back slats on your table saw.
The jig should be cut from a straight piece of scrap stock 28 to 30" long
and at least 3 1/2" wide. Cut out the opening exactly as shown.
11.
Form your back slats from seven 1X6s cut to 3 5/8" X 24" dimensions.
Then set your table saw fence to the width of the jig, insert each back
slat piece into the jig to rip it into two tapered slats. When done, you
should have 14 identical slats. Round them over slightly.
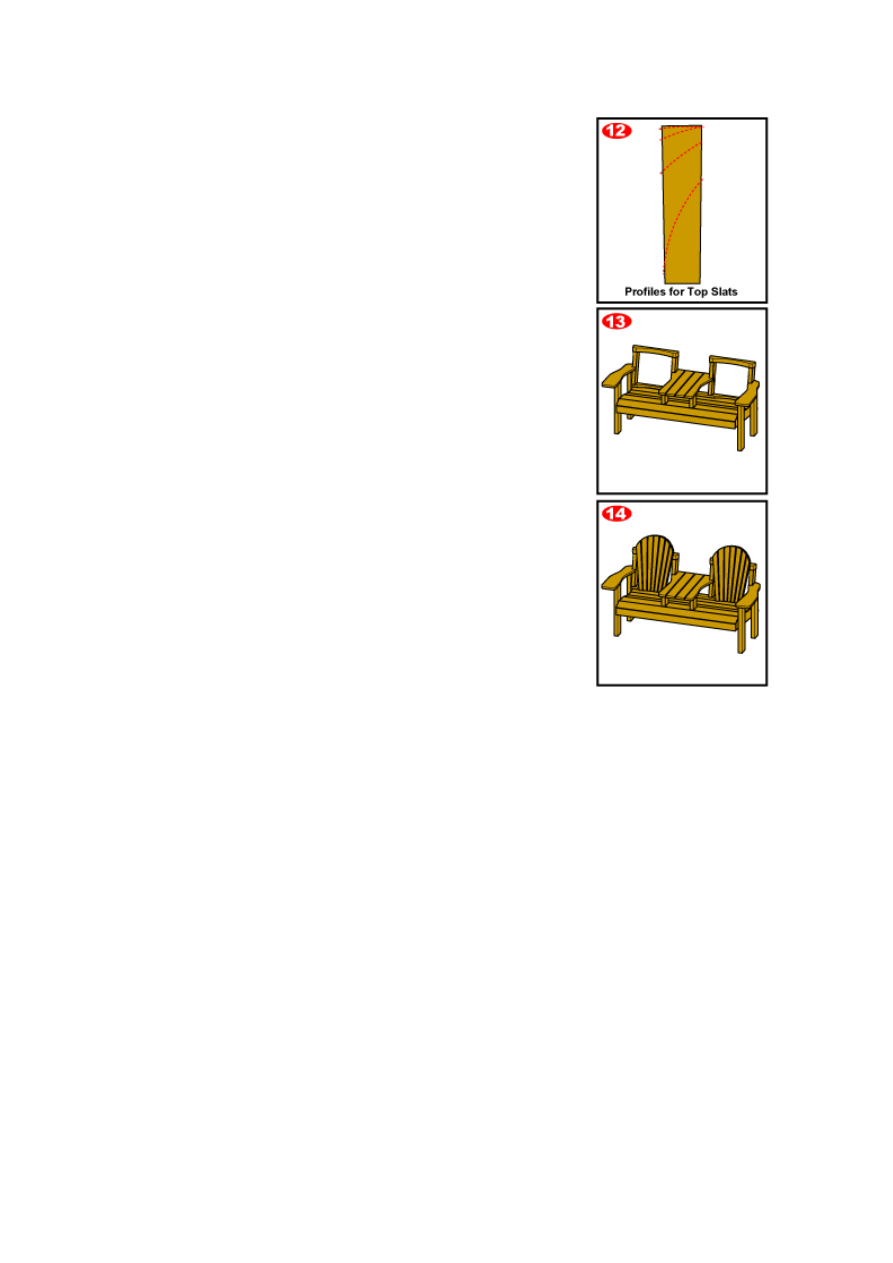
12.
Using the 14 tapered slats, transfer these curved profiles to the tops,
and cut with a jigsaw or bandsaw.
13.
Round over the outer edges of the template-formed arms and the fronts
of the table slats with a router. Then space them evenly and fasten
them down with 1-1/2" screws, which should be countersunk. Each
table slat gets two screws, lined up visually, into the support assembly.
Each arm gets one screw into the front and back leg, and one into the
angle block.
14.
Next, install the back slats, starting with each center slat. Then install
the remaining slats in half-circle patterns, using 1-1/2" screws into the
top back braces, leaving about a 1/4" gap between slats. Then install
the rear seat slat with screws.
Now just varnish, stain or paint your completed tete a tete as desired,
and you've have an elegant addition to any outdoor area.
SHOP LIST
Materials List
(1) 10' 2X6
(1) 5' 1X8
(4) 8' 2X4s
(9) 6' 1X6 cedar fence boards
(34) 1-1/2" bras deck screws
(56) 3" brass deck screws
Tools List
Jigsaw
Drill
Belt sander (recommended)
Table saw (recommended)
C clamps
Saw horses
B
asic hand tools
Wyszukiwarka
Podobne podstrony:
Bench Straight Tete a Tete (Part 2)
Bench Straight Tete a Tete (Part 1)
pendentif tete de fleche
claudia casse tete
Chair Corner Tete a Tete (Part 2)
Chair Corner Tete a Tete (Part 1)
potting bench
Arbor Bench id 67571 Nieznany
Bench Outdoor
planter bench
Build a Garden Bench(1)
Gardening Bench
Boot Bench(1)
Bridgewater Bench Swing lawka
Outdoor Table and Bench
planter bench plan
Classic Cedar Garden Bench
0 50V 2A LM10C, 0 50V 2A Bench power supply circuit diagrams, schematics, electronic projects
Planter Bench another
więcej podobnych podstron