
Project 14550EZ:
Horizontal Boring Jig
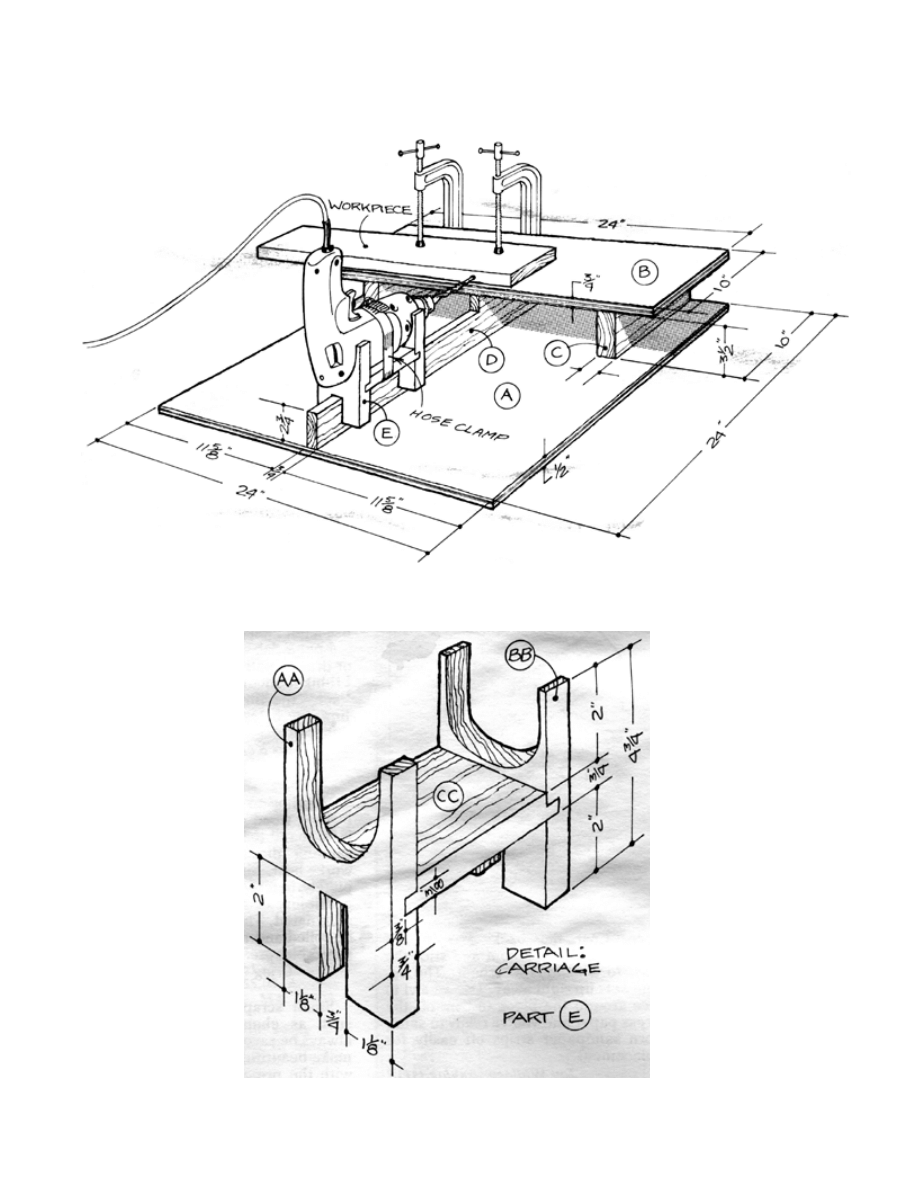
A well-built homemade horizontal boring jig won’t sit idly in the workshop, it’s a tool
that will be put to use over and over again. The sliding carriage (E) permits it to edge-
drill holes easily and accurately, with little set-up time required.
Although there are a number of specific dimensions shown on the drawing, they are
offered more as general guidelines rather than rigid requirements that must be strictly
adhered to. The shape of the carriage saddle (parts AA and BB) is left undimensioned
since readers will need to cut it to the contour of their own electric drill. A 3/8" inch
Rockwell drill was used with the jig shown in the sketch. Readers with drills that have a
different shape may find that even the general carriage dimensions may require some
revision.
The jig is designed to edge-drill the center of a 3/4" thick board, the size most commonly
used. Thicker stock can be drilled by adding a spacer along the top edge of part D where
the carriage (part E) rides. Cut the spacer to a thickness that will position the drill to the
desired height.
Construction of most of the jig is relatively straightforward, however, keep in mind that
in order for this tool to have any value it must be made accurately.
Horizontal Boring Jig Complete Schematic

Horizontal Boring Jig Step-by-Step Instruc-
tions
1. Cut the base (A) to length and width from 1-1/8" hardwood plywood.
2. Cut the table (B) to length and width from 3/4" hardwood plywood.
3. Cut the supports (C) to a 10" length from standard 2" x 4" stock.
4. Glue a 3/4" x 3/4" x 10" inch strip to a piece of stock measuring 3/4" x 2-3/4" x
24" to make the guide (E).
5. Lay out all parts carefully to prepare for assembly.
6. Make sure that the corners of part B are cut square and also that part B is perpen-
dicular to part D. Assemble the parts with 1-3/4" x #8 countersunk wood screws.
7. Cut cradles AA and BB to size.
8. Apply the 3/8" x 3/8" dado.
9. Wrap a short length of soft solder around the profile of your drill to serve as a
template to mark the shape on the cradle. NOTE: Since drill profiles will differ
from front to back, you’ll need to make two templates.
10. Use a band or saber saw to cut just inside the line.
11. Add a drum sander attachment to the drill press.
12. Sand down to the line.
13. Position the drill in the two cradles.
14. Check to be sure it is level.
15. Cut the spreader (CC) to the dimensions shown.
16. Glue the spreader to the two cradles.
17. Set the table saw blade to a depth of 2".
18. Locate the rip fence to make a 1-1/18" wide cut.
19. Use a push stick and, with the sides of the carriage bearing against the rip fence,
run the carriage over the blade to begin cutting the 3/4" x 2" notch in the spreader.
20. Turn the carriage so that its other side bears against the fence.
21. Make the same cut to establish the 3/4" wide groove.
22. Move the fence 1/8" further from the blade.
23. Repeat the process and continue until all waste stick is removed from the groove.
24. Secure the drill to the carriage with a hose clamp of adequate size.
25. Add a small amount of wax to the carriage for a smooth sliding action.
These plans were originally published in Volume 6, Issue 5 of The Woodworker’s Jour-
nal (Sept./Oct. 1982, page 45).
Wyszukiwarka
Podobne podstrony:
Jig For Mitre Joint Gluing
Jig For Frame And Panel Gluing
narrow stock jig
Layout Jig
Jig for Router Dadoes
Jig Pocket Hole Jig
arthur darleys swedish jig
whiskey jig the
Jig tablesaw accessories
swedish jig the
chorus jig the
Mitre Gauge Setup Jig
gullane jig the
sergt earlys jig
travers jig
blue bonnets jig
(Ebooks) Woodworking Workshop Tips Knife Sharpening Drillpress Jig To Grind Your Own Knives by Am
cuil aodha jig
więcej podobnych podstron