KAREL THE ROBOT
LEARNS JAVA
Eric Roberts
Department of Computer Science
Stanford University
September 2005

Chapter 1
Introducing Karel the Robot
In the 1970s, a Stanford graduate student named Rich Pattis decided that it would be
easier to teach the fundamentals of programming if students could somehow learn the
basic ideas in a simple environment free from the complexities that characterize most
programming languages. Drawing inspiration from the success of Seymour Papert’s
LOGO project at MIT, Rich designed an introductory programming environment in
which students teach a robot to solve simple problems. That robot was named Karel,
after the Czech playwright Karel Capek, whose 1923 play R.U.R. (Rossum’s Universal
Robots) gave the word robot to the English language.
Karel the Robot was quite a success. Karel was used in introductory computer science
courses all across the country, to the point that Rich’s textbook sold well over 100,000
copies. Many generations of CS106A students learned how programming works by
putting Karel through its paces. But nothing lasts forever. In the middle of the 1990s, the
simulator we had been using for Karel the Robot stopped working. We were, however,
soon able to get a version of Karel up and running in the Thetis interpreter we were using
at the time. But then, a year ago, CS106A switched to Java, and Karel again vanished
from the scene. For the last three quarters, the hole in the curriculum left by Karel’s
departure has been competently filled by Nick Parlante’s Binky world, but it seems about
time to bring Karel back. The new implementation of Karel is designed to be compatible
with both Java and the Eclipse programming environment, which means that you’ll get to
practice using the Eclipse editor and debugger from the very beginning of the course.
What is Karel?
Karel is a very simple robot living in a very simple world. By giving Karel a set of
commands, you can direct it to perform certain tasks within its world. The process of
specifying those commands is called programming. Initially, Karel understands only a
very small number of predefined commands, but an important part of the programming
process is teaching Karel new commands that extend its capabilities.
When you program Karel to perform a task, you must write out the necessary
commands in a very precise way so that the robot can correctly interpret what you have
told it to do. In particular, the programs you write must obey a set of syntactic rules that
define what commands and language forms are legal. Taken together, the predefined
commands and syntactic rules define the Karel programming language. The Karel
programming language is designed to be as similar as possible to Java so as to ease the
transition to the language you will be using all quarter. Karel programs have much the
same structure and involve the same fundamental elements as Java programs do. The
critical difference is that Karel’s programming language is extremely small, in the sense
that it has very few commands and rules. It is easy, for example, to teach the entire Karel
language in just a couple of hours, which is precisely what we do in CS106A. At the end
of that time, you will know everything that Karel can do and how to specify those actions
in a program. The details are easy to master. Even so, you will discover that solving a
problem can be extremely challenging. Problem solving is the essence of programming;
the rules are just a minor concern along the way.
In sophisticated languages like Java, there are so many details that learning these
details often becomes the focus of the course. When that happens, the much more critical
issues of problem solving tend to get lost in the shuffle. By starting with Karel, you can
concentrate on solving problems from the very beginning. And because Karel encourages
imagination and creativity, you can have quite a lot of fun along the way.
2
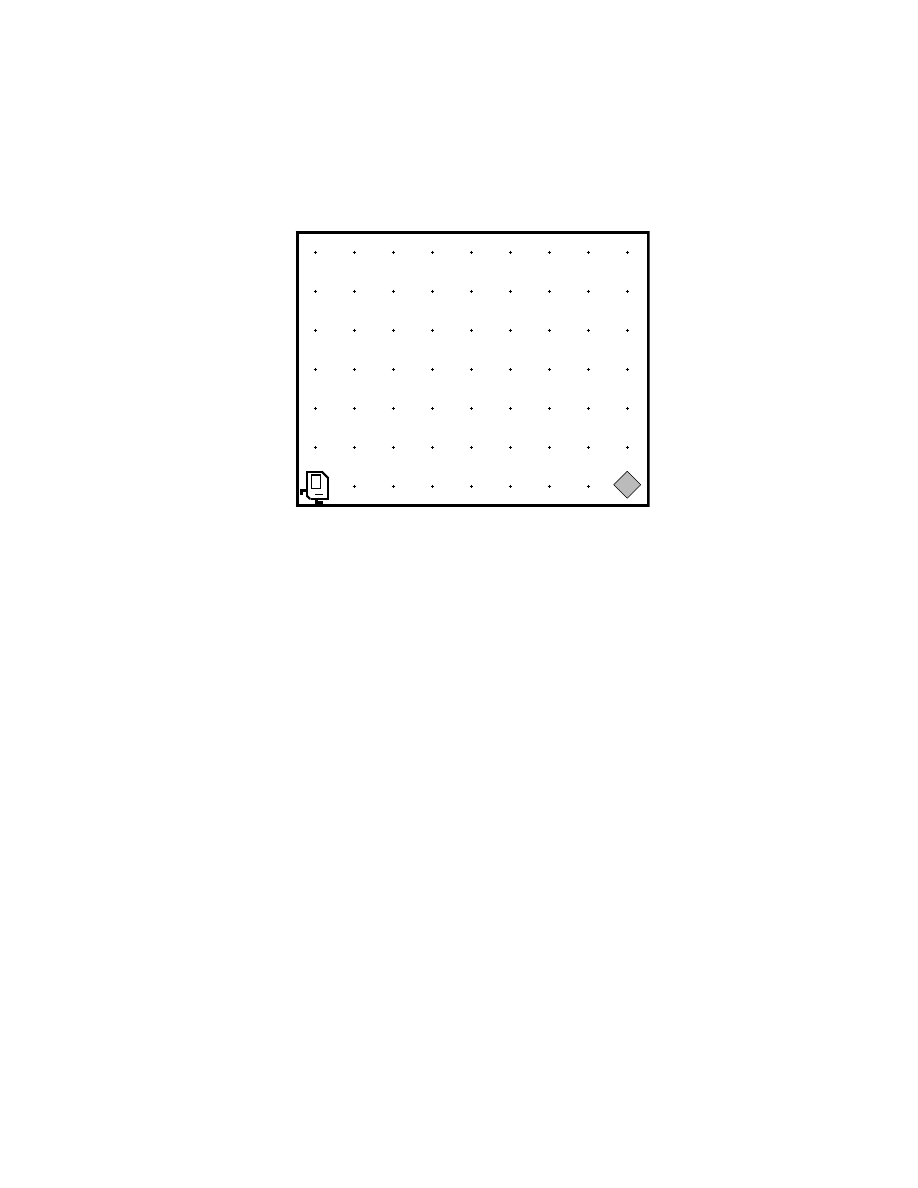
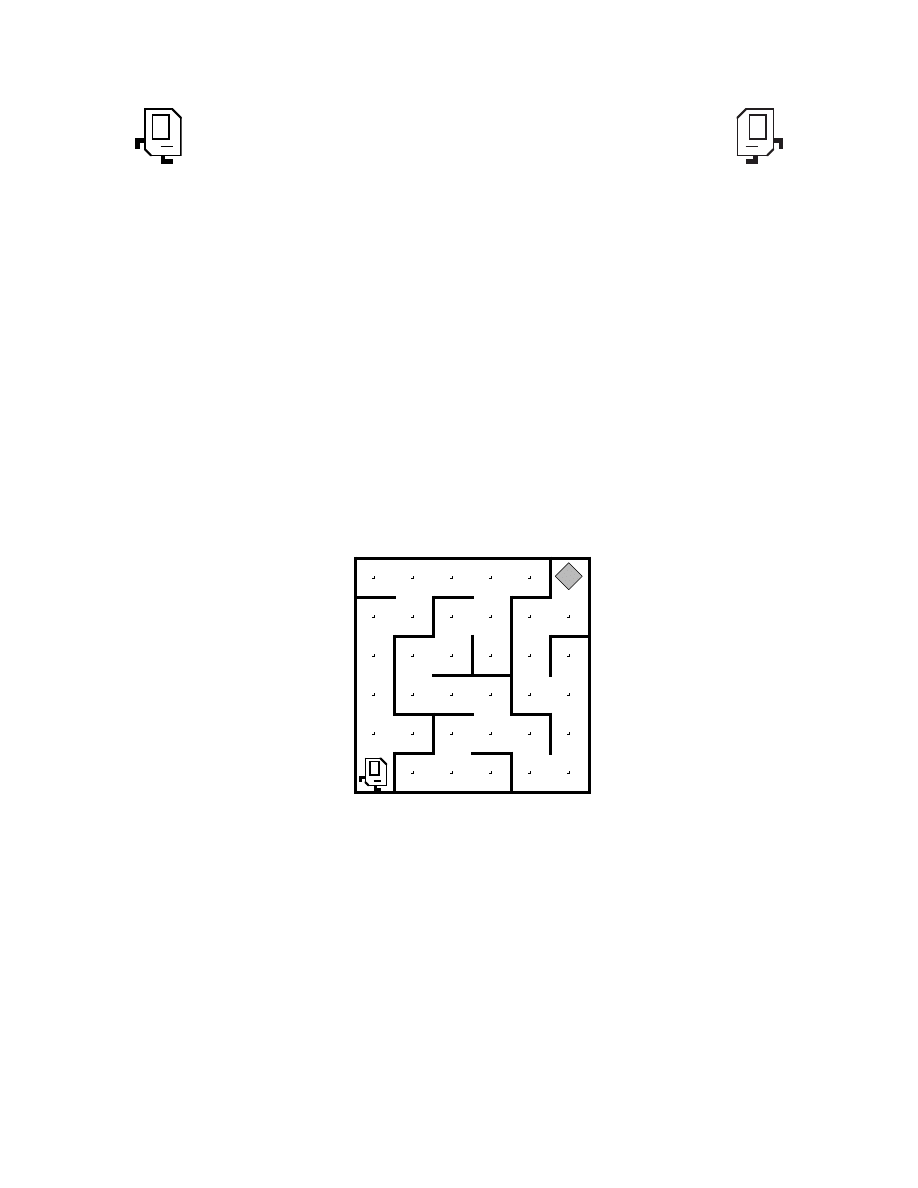
Karel’s world
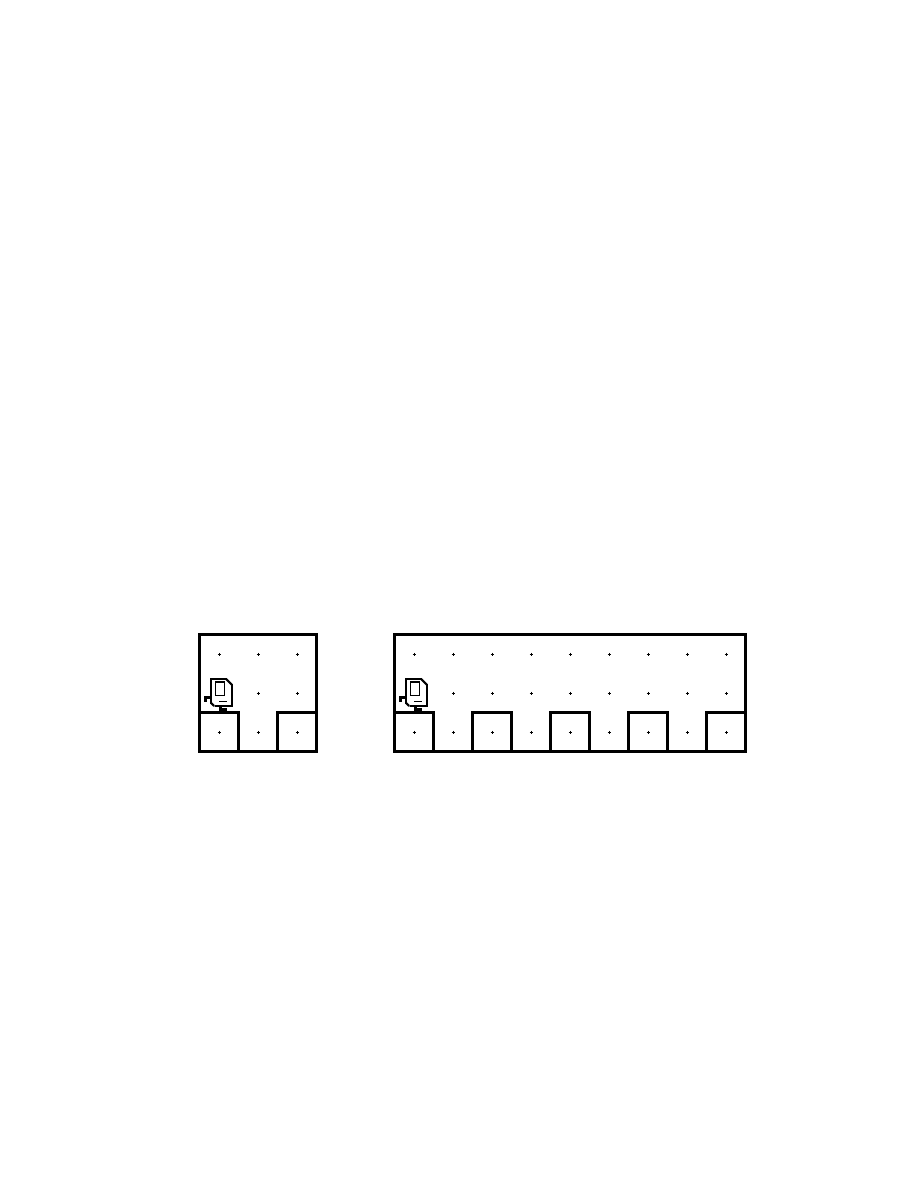
Karel’s world is defined by streets running horizontally (east-west) and avenues running
vertically (north-south). The intersection of a street and an avenue is called a corner.
Karel can only be positioned on corners and must be facing one of the four standard
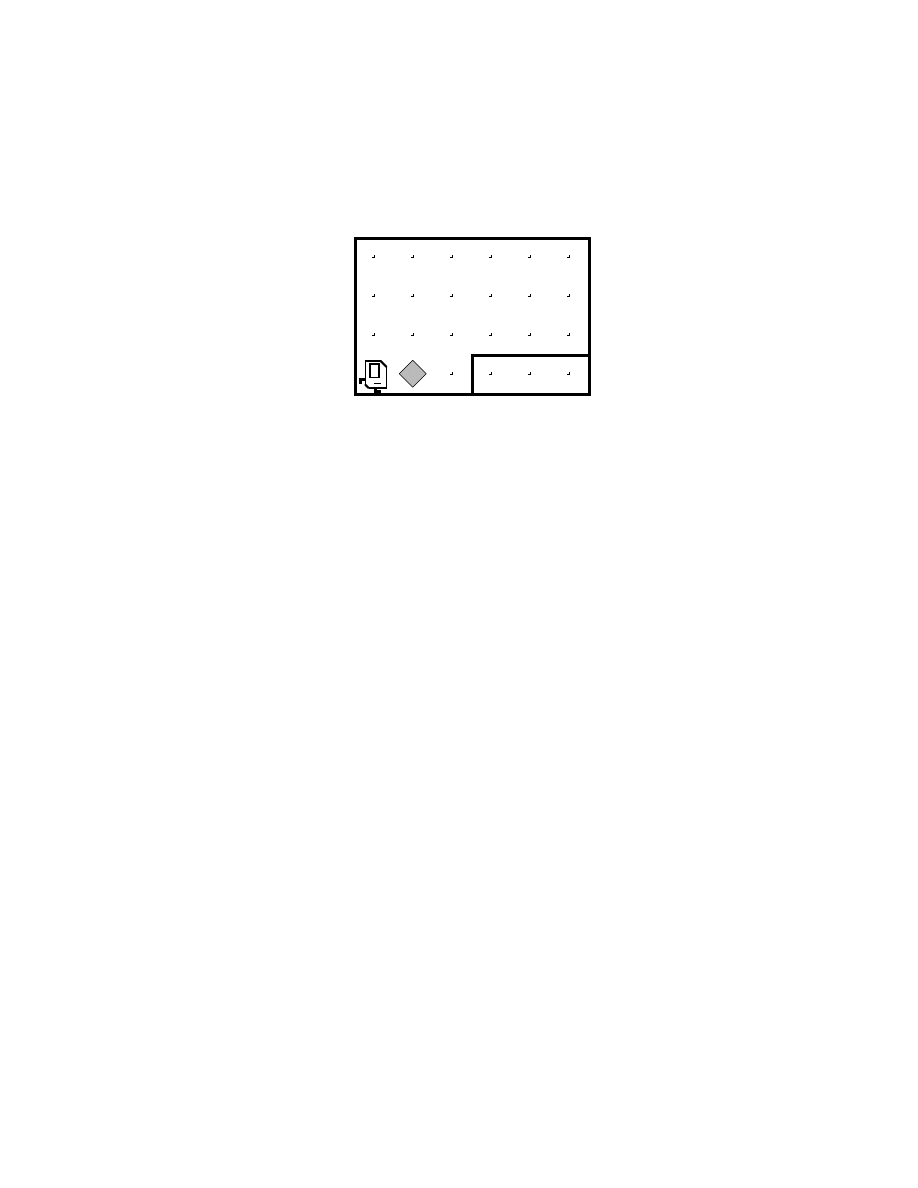
compass directions (north, south, east, west). A sample Karel world is shown below. Here
Karel is located at the corner of 1st Street and 1st Avenue, facing east.
1
2
3
4
5
6
1
2
3
4
Several other components of Karel’s world can be seen in this example. The object in
front of Karel is a beeper. As described in Rich Pattis’s book, beepers are “plastic cones
which emit a quiet beeping noise.” Karel can only detect a beeper if it is on the same
corner. The solid lines in the diagram are walls. Walls serve as barriers within Karel’s
world. Karel cannot walk through walls and must instead go around them. Karel’s world
is always bounded by walls along the edges, but the world may have different dimensions
depending on the specific problem Karel needs to solve.
What can Karel do?
When Karel is shipped from the factory, it responds to a very small set of commands:
move()
Asks Karel to move forward one block. Karel cannot respond to a
move()
command if there is a wall blocking its way.
turnLeft()
Asks Karel to rotate 90 degrees to the left (counterclockwise).
pickBeeper()
Asks Karel to pick up one beeper from a corner and stores the beeper
in its beeper bag, which can hold an infinite number of beepers. Karel
cannot respond to a
pickBeeper()
command unless there is a beeper
on the current corner.
putBeeper()
Asks Karel to take a beeper from its beeper bag and put it down on
the current corner. Karel cannot respond to a
putBeeper()
command
unless there are beepers in its beeper bag.
The empty pair of parentheses that appears in each of these commands is part of the
common syntax shared by Karel and Java and is used to specify the invocation of the
command. Eventually, the programs you write will include additional information in the
space between the parentheses, but such information is not part of the Karel’s primitive
world. These parentheses will therefore be empty in standard Karel programs, but you
must remember to include them nonetheless.
It is also important to recognize that several of these commands place restrictions on
Karel’s activities. If Karel tries to do something illegal, such as moving through a wall or
picking up a nonexistent beeper, an error condition occurs. At this point, Karel displays
an error message and does not execute any remaining commands.
Karel’s commands, however, cannot be executed on their own. Before Karel can
respond to any of these commands, you need to incorporate them into a Karel program.

3
You will have a chance to see a few simple Karel programs in Chapter 2, but before
doing so, it is useful to make a few general remarks about the programming philosophy
that underlies this particular implementation of the Karel programming language.
Karel and the object-oriented paradigm
When Karel was introduced in the 1970s, the prevailing approach to writing computer
programs was the procedural paradigm. To a large extent, procedural programming is
the process of decomposing a large programming problem into smaller, more manageable
units called procedures that define the necessary operations. Although the strategy of
breaking programs down into smaller units remains a vital part of any style of
programming, modern languages like Java emphasize a different approach called the
object-oriented paradigm. In object-oriented programming, the programmer’s attention
shifts away from the procedural specification of operations and focuses instead on
modeling the behavior of conceptually integrated units called objects. Objects in a
programming language sometimes correspond to physical objects in the real world, but
just as often represent more abstract concepts. The central feature of any object—real or
abstract—is that it must make sense as a unified whole.
One of the primary advantages of the object-oriented paradigm is that it encourages
programmers to recognize the fundamental relationship between the state of an object and
its behavior. The state of an object consists of a set of attributes that pertain to that object
and might change over time. For example, an object might be characterized by its
location in space, its color, its name, and a host of other properties. The behavior of an
object refers to the ways in which that object responds to events in its world or
commands from other objects. In the language of object-oriented programming, the
generic word for anything that triggers a particular behavior in an object is called a
message (although it generally seems clearer to use the word command in the context of
Karel). The response to a message typically involves changing the state of an object. For
example, if one of the properties defining the state of an object is its color, then it would
presumably respond to a
setColor(BLUE)
message by changing its color to blue.
In many ways, Karel represents an ideal environment for illustrating the object-
oriented approach. Although no one has actually built a mechanical implementation of
Karel, it is nonetheless easy to imagine Karel as a real-world object. Karel is, after all, a
robot, and robots are real-world entities. The properties that define Karel’s state are its
location in the world, the direction it is facing, and the number of beepers in its beeper
bag. Karel’s behavior is defined by the commands to which it responds:
move()
,
turnLeft()
,
pickBeeper()
, and
putBeeper()
. The
move()
command changes Karel’s
location,
turnLeft()
changes its direction, and the remaining two affect both the number
of beepers in Karel’s bag and the number of beepers on the current corner.
The Karel environment also provides a useful framework for defining one of the
central concepts of object-oriented programming. In both Karel and Java, it is essential to
differentiate the notion of an object from that of a class. The easiest way to understand
the distinction is to think about a class as a pattern or template for objects that share a
common behavior and collection of state attributes. As you will see in the next chapter,
the word
Karel
in a Karel program represents the entire class of robots that know how to
respond to the
move()
,
turnLeft()
,
pickBeeper()
, and
putBeeper()
commands.
Whenever you have an actual robot in the world, that robot is an object that represents a
specific instance of the
Karel
class. Although you won’t have occasion to do so in
CS 106A , it is possible to have more than one instance of the
Karel
class running in the
same world. Even when there is only a single robot, however, it is important to remember
that object and class are different concepts and to keep those ideas straight in your mind.

4
The importance of practical experience
Programming is very much a learn-by-doing activity. As you will continually discover in
your study of computer science, reading about some programming concept is not the
same thing as using that concept in a program. Things that seem very clear on the page
can be difficult to put into practice.
Given the fact that writing programs on your own and getting them to run on the
computer are essential to learning about programming, it may seem surprising to discover
that this book does not include much discussion of the hands-on aspects of using Karel on
your computer. The reason for that omission is that the steps you need to run a Karel
program depend on the environment you’re using. Running Karel programs on a
Macintosh is somewhat different from running it under Windows. Even though the
programming environment you use has a great deal of influence on the nitty-gritty details
you need to run programs, it has no influence whatsoever on the general concepts. This
book describes the general concepts; the details pertinent to each platform will be
distributed as handouts during the course.
The fact that this book omits the practical details, however, should in no sense be
interpreted as minimizing their importance. If you want to understand how programming
works—even in an environment as simple as that provided by Karel—it is essential to
“get your hands dirty” and start using the computer. Doing so is by far the most effective
introduction into the world of programming and the excitement that it holds.
Chapter 2
Programming Karel
In its new object-oriented implementation, the simplest style of Karel program consists of
a definition of a new Karel class that specifies a sequence of built-in commands that
should be executed when the program is run. A very simple Karel program is shown in
Figure 1.
Figure 1. Simple Karel example to pick up a single beeper
/*
* File: BeeperPickingKarel.java
* -----------------------------
* The BeeperPickingKarel class extends the basic Karel class
* by defining a "run" method with three commands. These
* commands cause Karel to move forward one block, pick up
* a beeper, and then move ahead to the next corner.
*/
import stanford.karel.*;
public class BeeperPickingKarel extends Karel {
public void run() {
move();
pickBeeper();
move();
}
}
The program in Figure 1 is composed of several parts. The first part consists of the
following lines:
/*
* File: BeeperPickingKarel.java
* -----------------------------
* The BeeperPickingKarel class extends the basic Karel class
* by defining a "run" method with three commands. These
* commands cause Karel to move forward one block, pick up
* a beeper, and then move ahead to the next corner.
*/
These lines are an example of a comment, which is simply text designed to explain the
operation of the program to human readers. Comments in both Karel and Java begin with
the characters
/*
and end with the characters
*/
. Here, the comment begins on the first
line and ends several lines later. The stars on the individual lines that make up the text of
the comment are not required, but make it easier for human readers to see the extent of
the comment. In a simple program, extensive comments may seem silly because the
effect of the program is obvious, but they are extremely important as a means of
documenting the design of larger, more complex programs.
The second part of the program is the line
import stanford.karel.*;
This line requests the inclusion of all definitions from the
stanford.karel
library. This

6
library contains the basic definitions necessary for writing Karel programs, such as the
definitions of the standard operations
move()
and
pickBeeper()
. Because you always
need access to these operations, every Karel program you write will include this
import
command before you write the actual program.
The final part of the Karel program consists of the following class definition:
public class BeeperPickingKarel extends Karel {
public void run() {
move();
pickBeeper();
move();
}
}
To understand this definition, it is useful to look more carefully at its structure. The
definition of the
BeeperPickingKarel
class consists of the line beginning with
public
class
and encompasses everything between the curly brace at the end of that line
and the corresponding closing brace on the last line of the program. The single line that
introduces the new class is called the header of the definition; the code between the
braces is called the body.
In programming, it is often very useful to think about a particular definition and its
body as separable ideas. In this example, the definition of
BeeperPickingKarel
has the
following form, where the entire body of the definition has been replaced by a box that
you can put out of your mind for the moment:
public class BeeperPickingKarel extends Karel {
body of the class definition
}
The header line at the top tells you quite a bit about the
BeeperPickingKarel
class, even
before you have looked to see what the body contains. The key new concept in the class
header is embodied in the word
extends
, which is used in both Karel and Java to indicate
that a new class is an extension of an existing one. Here, the class header line indicates
that
BeeperPickingKarel
is an extension of the standard
Karel
class imported from the
stanford.karel
library.
In object-oriented languages, defining a new class by extension means that the new
class (here,
BeeperPickingKarel
) builds on the facilities provided by the existing class
(in this case,
Karel
). In particular, the fact that it extends
Karel
guarantees that the new
BeeperPickingKarel
class will have the following properties :
1. Any instance of the class
BeeperPickingKarel
is also an instance of the class
Karel
.
Any instance of the class
Karel
represents a robot that lives in a world of streets,
avenues, beepers, and walls whose state consists of its location, direction, and the
number of beepers in its bag. Because
BeeperPickingKarel
is an extension of
Karel
, you know that an instance of
BeeperPickingKarel
will also be a robot that
lives in the same type of world and has the same state properties.
2. Any instance of the
BeeperPickingKarel
class will automatically respond to the
same commands as an instance of the
Karel
class. Because every robot in the
Karel
class knows how to respond to the commands
move()
,
turnLeft()
,
pickBeeper()
,
and
putBeeper()
, it follows that a instance of
BeeperPickingKarel
will understand
that same set of commands.

7
In other words, the new
BeeperPickingKarel
class automatically acquires the state
attributes and the behavior of the
Karel
class from which it is derived. The process of
taking on the structure and behavior of the parent class is called inheritance.
When a class is defined by extension, the new class is said to be a subclass of the
original. In this example,
BeeperPickingKarel
is therefore a subclass of
Karel
.
Symmetrically,
Karel
is said to be a superclass of
BeeperPickingKarel
. Unfortunately,
this terminology can be confusing for new programmers, who are likely to make the
intuitive inference that a subclass is somehow less powerful that its superclass when in
fact the opposite is true. A subclass inherits the behavior of its superclass and can
therefore respond to the entire set of commands available to that superclass. A subclass,
however, usually defines additional commands that are unavailable to the superclass.
Thus, the typical subclass actually has more functionality than the class from which it
was derived. This idea is expressed much more clearly by the notion of extension: a
subclass extends its superclass and can therefore add new capabilities to it.
Now that you have some idea about what class extension means, it now makes sense to
look at the body of the
BeeperPickingKarel
class. That body consists of the following
lines:
public void run() {
move();
pickBeeper();
move();
}
These lines represent the definition of a new method, which specifies the sequence of
steps necessary to respond to a command. As in the case of the
BeeperPickingKarel
class itself, the method definition consists of two parts that can be considered separately:
The first line constitutes the method header and the code between the curly braces is the
method body. If you ignore the body for now, the method definition looks like this:
public void run() {
body of the method definition
}
The first two words in the method header,
public
and
void
, are part of Java’s syntactic
structure, and you should pretty much feel free to ignore them at this point. The next
word on the header line specifies the name of the new method, which in this case is the
method
run
. Defining a method means that the new Karel subclass can respond to a new
command with that name. The built-in
Karel
class responds to the commands
move()
,
turnLeft()
,
pickBeeper()
, and
putBeeper()
; a
BeeperPickingKarel
responds to that
same set of commands plus a new command called
run
. The
run
command plays a
special role in a Karel program. When you start a Karel program in the Eclipse
environment, it creates a new Karel instance of the appropriate subclass, adds that Karel
to a world that you specify, and then issues the
run
command. The effect of issuing that
command is defined by the body of the
run
method, which is a sequence of commands
that the robot will execute in order. For example, the body of the
run
method for the
BeeperPickingKarel
class is
move();
pickBeeper();
move();
8
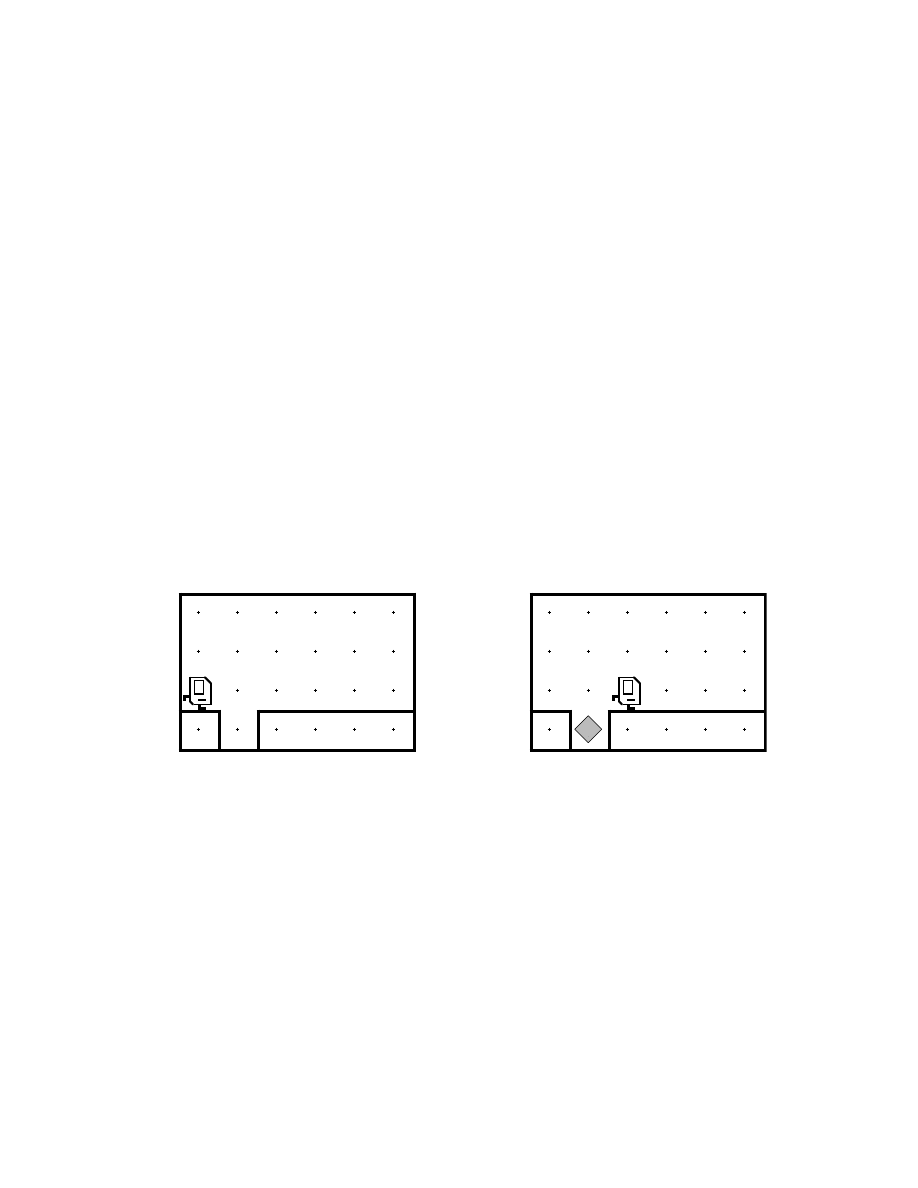
Thus, if the initial state of the world matches the example given in Chapter 1, Karel first
moves forward into the corner containing the beeper, picks up that beeper, and finally
moves forward to the corner just before the wall, as shown in the following before-and-
after diagram:
1
2
3
4
5
6
1
2
3
4
Before
1
2
3
4
5
6
1
2
3
4
After
Solving a more interesting problem
The
BeeperPickingKarel
class defined in Figure 1 doesn’t do very much as yet. Let’s
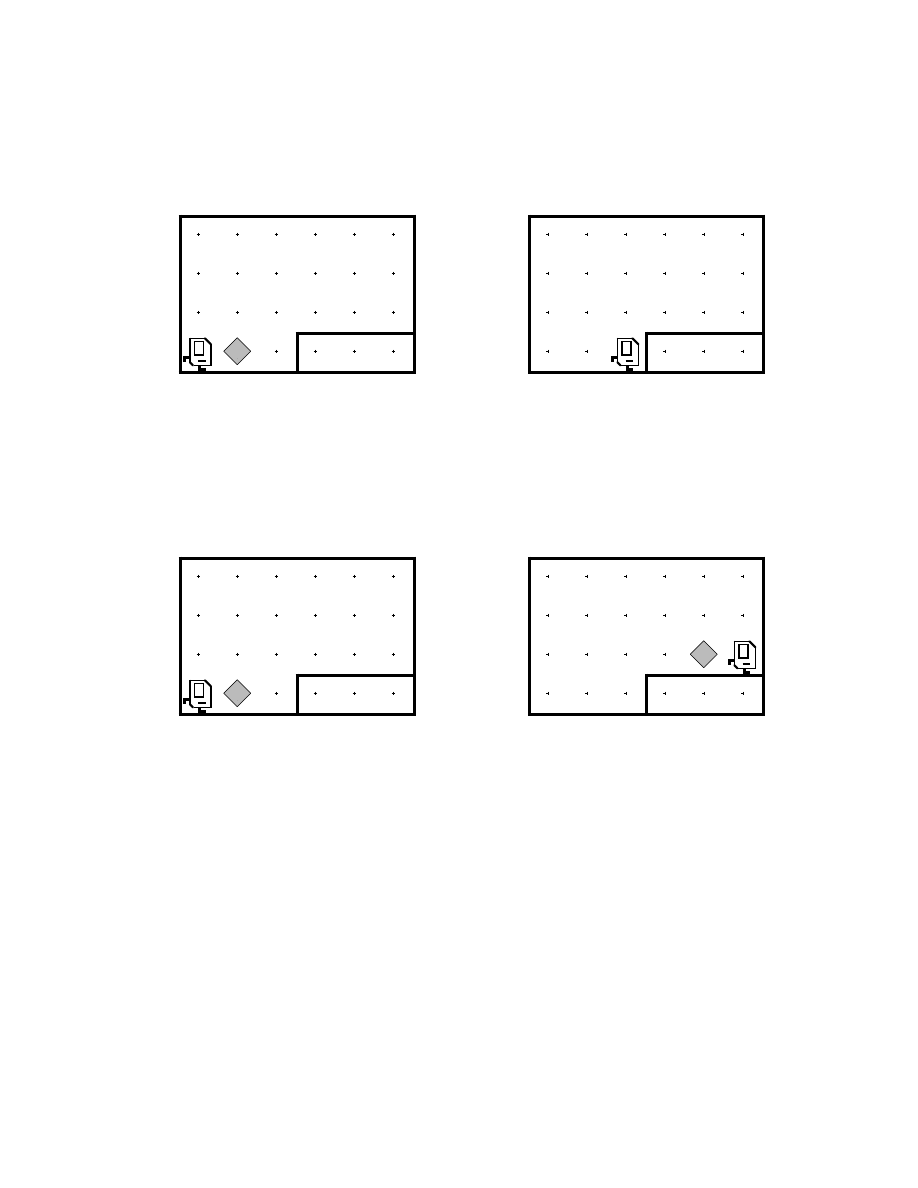
try to make it a little more interesting. Suppose that the goal is not simply to get Karel to
pick up the beeper but to move the beeper from its initial position on 2nd Avenue and 1st
Street to the center of the ledge at 5th Avenue and 2nd Street. Thus, your next assignment
is to define a new Karel subclass that accomplishes the task illustrated in this diagram:
1
2
3
4
5
6
1
2
3
4
Before
1
2
3
4
5
6
1
2
3
4
After
The first three commands in the new program—the ones that move forward, pick up
the beeper, and then move up to the ledge—are the same as before:
move();
pickBeeper();
move();
From here, the next step is to turn left to begin climbing the ledge. That operation is easy,
because Karel has a
turnLeft
command in its standard repertoire. Executing a
turnLeft
command at the end of the preceding sequence of commands leaves Karel facing north on
the corner of 3rd Avenue and 1st Street. If Karel then executes a
move
command, it will
move north to reach the following position:
9
1
2
3
4
5
6
1
2
3
4
From here, the next thing you need to do is get Karel to turn right so that it is again facing
east. While this operation is conceptually just as easy as getting Karel to turn left, there is
a slight problem: Karel’s language includes a
turnLeft
command, but no
turnRight
command. It’s as if you bought the economy model and have now discovered that it is
missing some important features.
At this point, you have your first opportunity to begin thinking like a programmer. You
have one set of commands, but not exactly the set you need. What can you do? Can you
accomplish the effect of a
turnRight
command using only the capabilities you have?
The answer, of course, is yes. You can accomplish the effect of turning right by turning
left three times. After three left turns, Karel will be facing in the desired direction. From
here, all you need to do is program Karel to move over to the center of the ledge, drop the
beeper and then move forward to the final position. A complete implementation of a
BeeperTotingKarel
class that accomplishes the entire task is shown in Figure 2.
Figure 2. Program to carry a beeper to the top of a ledge
/*
* File: BeeperTotingKarel.java
* ----------------------------
* The BeeperTotingKarel class extends the basic Karel class
* so that Karel picks up a beeper from 1st Street and then
* carries that beeper to the center of a ledge on 2nd Street.
*/
import stanford.karel.*;
public class BeeperTotingKarel extends Karel {
public void run() {
move();
pickBeeper();
move();
turnLeft();
move();
turnLeft();
turnLeft();
turnLeft();
move();
move();
putBeeper();
move();
}
}

10
Defining new methods
Even though the
BeeperTotingKarel
class in Figure 2 demonstrates that it is possible to
perform the
turnRight
operation using only Karel’s built-in commands, the resulting
program is not particularly clear conceptually. In your mental design of the program,
Karel turns right when it reaches the top of the ledge. The fact that you have to use three
turnLeft
commands to do so is annoying. It would be much simpler if you could simply
say
turnRight
and have Karel understand this command. The resulting program would
not only be shorter and easier to write, but also significantly easier to read.
Fortunately, the Karel programming language makes it possible to define new
commands simply by including new method definitions. Whenever you have a sequence
of Karel commands that performs some useful task—such as turning right—you can
define a new method that executes that sequence of commands. The format for defining a
new Karel method has much the same as the definition of
run
in the preceding examples,
which is a method definition in its own right. A typical method definition looks like this:
private void name() {
commands that make up the body of the method
}
In this pattern,
name
represents the name you have chosen for the new method. To
complete the definition, all you have to do is provide the sequence of commands in the
lines between the curly braces. For example, you can define
turnRight
as follows:
private void turnRight() {
turnLeft();
turnLeft();
turnLeft();
}
Similarly, you could define a new
turnAround
method like this:
private void turnAround() {
turnLeft();
turnLeft();
}
You can use the name of a new method just like any of Karel’s built-in commands. For
example, once you have defined
turnRight
, you could replace the three
turnLeft
commands in the
BeeperTotingKarel
class with a single call to the
turnRight
method.
A revised implementation of the program that uses
turnRight
is shown in Figure 3.
There is, of course, one obvious difference between the definitions of the
run
and
turnRight
methods shown in Figure 3: the
run
method is marked as
public
in contrast
to
t u r n R i g h t
, which is marked as
private
. The difference between these two
designations is that public methods can be invoked from outside the class, while private
methods cannot. The
run
method needs to be public because the Karel environment
needs to be able to issue a
run
command to get things going. By contrast,
turnRight
is
used only inside the other code appearing within this class. That definition, therefore, can
be private, and it is generally good programming practice to keep definitions private
whenever possible. The reasons for this rule are difficult to appreciate until you have had
a chance to work with larger programs, but the basic idea is that classes should try as
much as possible to encapsulate information, which means not only to gather it together
but also to restrict access to that information if possible. Large programs quickly become
very complex in terms of the volume of detail that they encompass. If a class is well
designed, it will seek to reduce that complexity by hiding as much extraneous detail as it
11
Figure 3. Revised implementation of BeeperTotingKarel that includes a turnRight method
/*
* File: BeeperTotingKarel.java
* ----------------------------
* The BeeperTotingKarel class extends the basic Karel class
* so that Karel picks up a beeper from 1st Street and then
* carries that beeper to the center of a ledge on 2nd Street.
*/
import stanford.karel.*;
public class BeeperTotingKarel extends Karel {
public void run() {
move();
pickBeeper();
move();
turnLeft();
move();
turnRight();
move();
move();
putBeeper();
move();
}
/**
* Turns Karel 90 degrees to the right.
*/
private void turnRight() {
turnLeft();
turnLeft();
turnLeft();
}
}
can. This property is known as information hiding and is a cornerstone of the object-
oriented philosophy.
At this point in your study of programming, you are not likely to find these arguments
about encapsulation particularly convincing. Defining
turnRight
and
turnAround
in
every program is certainly a bit of a pain, particularly in light of the fact that they are so
useful. The difficulty, however, in making them more easily available lies in figuring out
where to put those definitions. Declaring
turnRight
to be public in the definition of
BeeperTotingKarel
would not be much help. In an object-oriented language, the
methods that specify the behavior of a class are encapsulated within that class. The
turnRight
method that appears within that class knows how to turn an instance of
BeeperTotingKarel
90 degrees to the right, but that method cannot be applied to an
instance of the
Karel
class or any its subclasses.
In some sense, what you really want to do is add
turnRight
and
turnAround
to the
Karel
class so that all subclasses will be able to use these undeniably useful commands.
The problem with that strategy is that you don’t necessarily have the access to the
Karel
class necessary to make such a change. The
Karel
class is part of the Stanford library,
which is used by all students in this CS106A. If you were to go and make changes to it,
you might end up breaking someone else’s program, which would not endear you to the
other students. Similarly, if you at some point later in the quarter decide that you really
want to add something to one of the standard Java classes, you won’t actually be able to
12
change that class because it is under the control of Sun Microsystems. What you can do,
however, is define a new class that includes your new features as extensions. Thus, if you
want to use
turnRight
and
turnAround
in several different Karel programs, you could
define a new class that included these method definitions and then create your programs
by extending that class. This technique is illustrated in Figure 4, which consists of two
program files. The first contains a class definition called
NewImprovedKarel
that
includes the
turnRight
and
turnAround
definitions as public methods so that other
classes can use them. The second is yet another implementation of
BeeperTotingKarel
that extends
NewImprovedKarel
, thereby giving itself access to these methods.
The
stanford.karel
package does not include the
NewImprovedKarel
class as it
appears here but does include a
SuperKarel
class that includes the methods
turnRight
and
turnAround
along with several other extensions that will make it possible for you to
write much more exciting programs. The examples that follow extend
SuperKarel
to
ensure that these methods are available. The other extensions are described in Chapter 6.
Decomposition
As a way of illustrating more of the power that comes with being able to define new
methods, it’s useful to have Karel do something a little more practical than move a beeper
from one place to another. The roadways around Palo Alto often seem to be in need of
repair, and it might be fun to see if Karel can fill potholes in its abstract world. For
example, imagine that Karel is standing on the “road” shown in the left-hand figure, one
corner to the left of a pothole in the road. Karel’s job is to fill the hole with a beeper and
proceed to the next corner. The diagram on the right illustrates how the world should look
after the program execution.
Before
After
1
2
3
4
5
6
1
2
3
4
1
2
3
4
5
6
If you are limited to the four predefined commands, the
run
method to solve this problem
would look like this:
public void run() {
move();
turnLeft();
turnLeft();
turnLeft();
move();
putBeeper();
turnLeft();
turnLeft();
move();
turnLeft();
turnLeft();
turnLeft();
move();
}
13
Figure 4. Defining a NewImprovedKarel class that understands turnRight and turnAround
/*
* File: NewImprovedKarel.java
* ---------------------------
* The NewImprovedKarel class extends the basic Karel class
* so that any subclasses have access to the turnRight and
* turnAround methods. It does not define any run method
* of its own.
*/
import stanford.karel.*;
public class NewImprovedKarel extends Karel {
/**
* Turns Karel 90 degrees to the right.
*/
public void turnRight() {
turnLeft();
turnLeft();
turnLeft();
}
/**
* Turns Karel around 180 degrees.
*/
public void turnAround() {
turnLeft();
turnLeft();
}
}
/*
* File: BeeperTotingKarel.java
* ----------------------------
* The BeeperTotingKarel class extends the basic Karel class
* so that Karel picks up a beeper from 1st Street and then
* carries that beeper to the center of a ledge on 2nd Street.
*/
import stanford.karel.*;
public class BeeperTotingKarel extends NewImprovedKarel {
public void run() {
move();
pickBeeper();
move();
turnLeft();
move();
turnRight();
move();
move();
putBeeper();
move();
}
}
14
You can, however, make the main program easier to read by extending
SuperKarel
and
then making use of the
turnAround
and
turnRight
methods. This version of the
program appears in Figure 5.
The initial motivation for defining the
turnRight
method was that it was cumbersome
to keep repeating three
turnLeft
commands to accomplish a right turn. Defining new
methods has another important purpose beyond allowing you to avoid repeating the same
command sequences every time you want to perform a particular task. The power to
define methods unlocks the most important strategy in programming—the process of
breaking a large problem down into smaller pieces that are easier to solve. The process of
breaking a program down into smaller pieces is called decomposition, and the
component parts of a large problem are called subproblems.
As an example, the problem of filling the hole in the roadway can be decomposed into
the following subproblems:
1. Move up to the hole
2. Fill the hole by dropping a beeper into it
3. Move on to the next corner
If you think about the problem in this way, you can use method definitions to create a
program that reflects your conception of the program structure. The
run
method would
look like this:
public void run() {
move();
fillPothole();
move();
}
Figure 5. Karel program to fill a single pothole
/*
* File: PotholeFillingKarel.java
* ------------------------------
* The PotholeFillingKarel class puts a beeper into a pothole
* on 2nd Avenue. This version of the program uses no
* decomposition other than turnRight and turnAround,
* which are inherited from SuperKarel.
*/
import stanford.karel.*;
public class PotholeFillingKarel extends SuperKarel {
public void run() {
move();
turnRight();
move();
putBeeper();
turnAround();
move();
turnRight();
move();
}
}
15
The correspondence with the outline is immediately clear, and everything would be great
if only you could get Karel to understand what you mean by
fillPothole
. Given the
power to define methods, implementing
fillPothole
is extremely simple. All you have
to do is define a
fillPothole
method whose body consists of the commands you have
already written to do the job, like this:
private void fillPothole() {
turnRight();
move();
putBeeper();
turnAround();
move();
turnRight();
}
The complete program is shown in Figure 6.
Figure 6. Program to fill a single pothole using a fillPothole method for decomposition
/*
* File: PotholeFillingKarel.java
* ------------------------------
* The PotholeFillingKarel class puts a beeper into a pothole
* on 2nd Avenue. This version of the program decomposes
* the problem so that it makes use of a fillPothole method.
*/
import stanford.karel.*;
public class PotholeFillingKarel extends SuperKarel {
public void run() {
move();
fillPothole();
move();
}
/**
* Fills the pothole beneath Karel's current position by
* placing a beeper on that corner. For this method to
* work correctly, Karel must be facing east immediately
* above the pothole. When execution is complete, Karel
* will have returned to the same square and will again
* be facing east.
*/
private void fillPothole() {
turnRight();
move();
putBeeper();
turnAround();
move();
turnRight();
}
}

16
Choosing the correct decomposition
There are, however, other decomposition strategies you might have tried. For example,
you could have written the program as
public void run() {
approachAndFillPothole();
move();
}
where the
approachAndFillPothole
method is simply
private void approachAndFillPothole() {
move();
turnRight();
move();
putBeeper();
turnAround();
move();
turnRight();
}
Alternatively, you might have written the program as
public void run() {
move();
turnRight();
move();
fillPotholeYouAreStandingIn();
turnAround();
move();
turnRight();
move();
}
where the body of
fillPotholeYouAreStandingIn
consists of a single
putBeeper
command. Each of these programs represents a possible decomposition. Each program
correctly solves the problem. Given that all three versions of this program work, what
makes one choice of breaking up the problem better than another?
In general, deciding how to decompose a program is not easy. In fact, as the problems
become more complex, choosing an appropriate decomposition will turn out to be one of
the more difficult aspects of programming. You can, however, rely to some extent on the
following guidelines:
1. Each subproblem should perform a conceptually simple task. The solution of a
subproblem may require many commands and may be quite complex in terms of its
internal operation. Even so, it should end up accomplishing some conceptual task that
is itself easy to describe. A good indication of whether you have succeeded in
identifying a reasonable task comes from the name you give to the method. If you can
accurately define its effect with a simple descriptive name, you have probably chosen
a good decomposition. On the other hand, if you end up with complex names such as
approachAndFillPothole
, the decomposition does not seem as promising.
2. Each subproblem should perform a task that is as general as possible, so that it can
be used in several different situations. If one decomposition results in a program that
is only useful in the exact situation at hand and another would work equally well in a
variety of related situations, you should probably choose the more general one.

Chapter 3
Control Statements in Karel
The technique of defining new methods—as useful as it is—does not actually enable
Karel to solve any new problems. Because each method name is merely a shorthand for a
specific set of commands, it is always possible to expand a program written as a series of
method calls into a single main program that accomplishes the same task, although the
resulting program is likely to be long and difficult to read. The commands—no matter
whether they are written as a single program or broken down into a set of methods—are
still executed in a fixed order that does not depend on the state of Karel’s world. Before
you can solve more interesting problems, you need to discover how to write programs in
which this strictly linear, step-by-step order of operations does not apply. In particular,
you need to learn several new features of the Karel programming language that make it
possible for Karel to examine its world and change its execution pattern accordingly.
Statements that affect the order in which a program executes commands are called
control statements. Control statements generally fall into the following two classes:
1. Conditional statements. Conditional statements specify that certain statements in a
program should be executed only if a particular condition holds. In Karel, you specify
conditional execution using an
if
statement.
2. Iterative statements. Iterative statements specify that certain statements in a program
should be executed repeatedly, forming what programmers call a loop. Karel supports
two different iterative statements: a
for
statement that is useful when you want to
repeat a set of commands a predetermined number of times and a
while
statement
that is useful when you want to repeat an operation as long as some condition holds.
This chapter introduces each of these control statement forms in the context of Karel
problems that illustrate the need for each statement type.
Conditional statements
To get a sense of where conditional statements might come in handy, let’s go back to the
fillPothole
program presented at the end of Chapter 2. Before filling the pothole in the
fillPothole
method, there are a few conditions that Karel might want to check. For
example, Karel might want to check to see if some other repair crew has already filled the
hole, which means that there is already a beeper on that corner. If so, Karel does not need
to put down a second one. To represent such checks in the context of a program, you need
to use the
if
statement, which ordinarily appears in the following form:
if (conditional test) {
statements to be executed only if the condition is true
}
The conditional test shown in the first line of this pattern must be replaced by one of the
tests Karel can perform on its environment. The result of that conditional test is either
true or false. If the test is true, Karel executes the statements enclosed in braces; if the test
is false, Karel does nothing.
The tests that Karel can perform are listed in Table 1. Note that each test includes an
empty set of parentheses, which is used as a syntactic marker in Karel’s programming
language to show that the test is being applied. Note also that every condition in the list
has a corresponding opposite. For example, you can use the
frontIsClear
condition to
check whether the path ahead of Karel is clear or the
frontIsBlocked
condition to see if
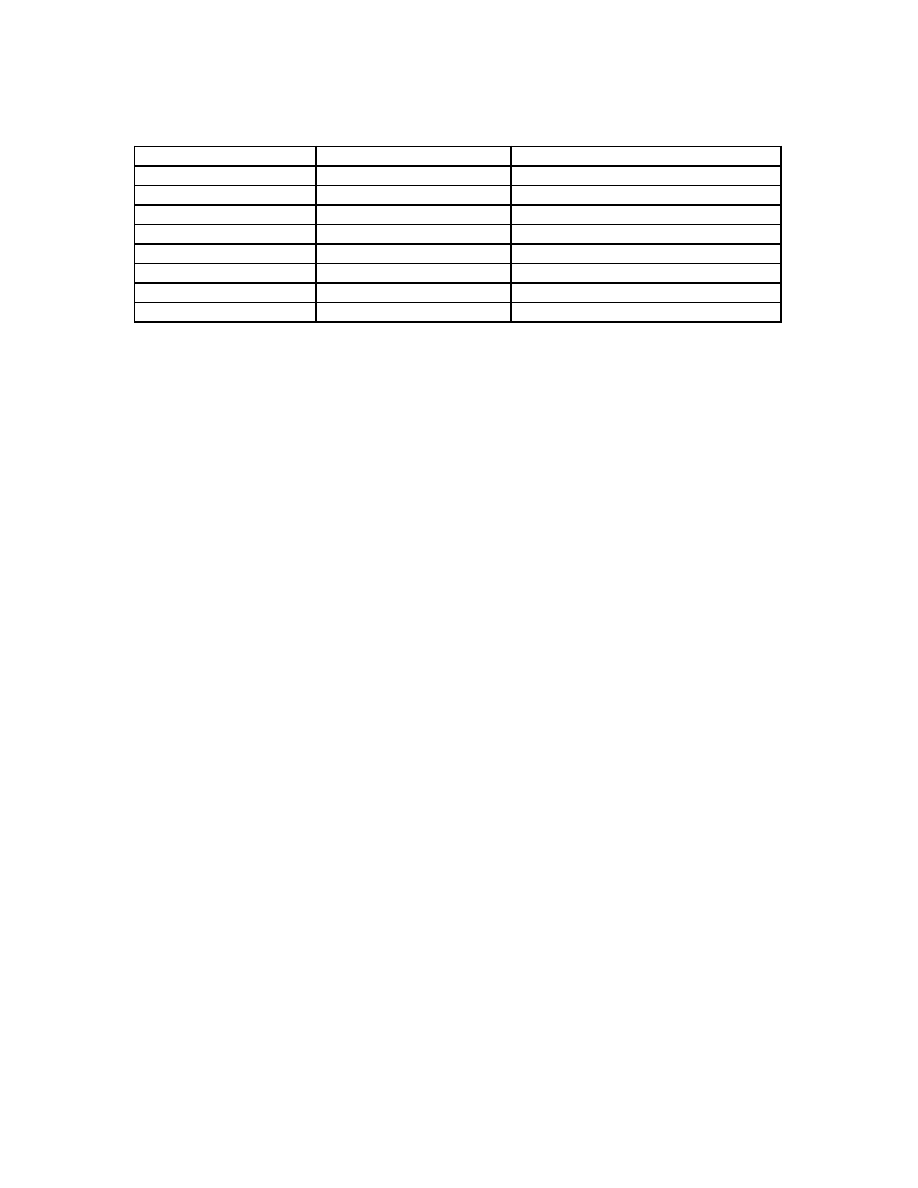
18
Table 1. Conditions that Karel can test
Test
Opposite
What it checks
frontIsClear()
frontIsBlocked()
Is there a wall in front of Karel?
leftIsClear()
leftIsBlocked()
Is there a wall to Karel’s left?
rightIsClear()
rightIsBlocked()
Is there a wall to Karel’s right?
beepersPresent()
noBeepersPresent()
Are there beepers on this corner?
beepersInBag()
noBeepersInBag()
Any there beepers in Karel’s bag?
facingNorth()
notFacingNorth()
Is Karel facing north?
facingEast()
notFacingEast()
Is Karel facing east?
facingSouth()
notFacingSouth()
Is Karel facing south?
facingWest()
notFacingWest()
Is Karel facing west?
there is a wall blocking the way. The
frontIsClear
condition is true whenever
frontIsBlocked
is false and vice versa. Choosing the right condition to use in a program
requires you to think about the logic of the problem and see which condition is easiest to
apply.
You can use the
if
statement to modify the definition of the
fillPothole
method so
that Karel puts down a beeper only if there is not already a beeper on that corner. To do
so, the conditional test you need is
noBeepersPresent
. If there are no beepers present on
the corner, Karel should put down a new one. If there is already a beeper there, Karel
should do nothing. The new definition of
fillPothole
, which checks to make sure that
there is not already a beeper in the hole, looks like this:
private void fillPothole() {
turnRight();
move();
if (noBeepersPresent()) {
putBeeper();
}
turnAround();
move();
turnRight();
}
The
if
statement in this example illustrates several features common to all control
statements in Karel. The control statement begins with a header, which indicates the type
of control statement along with any additional information to control the program flow.
In this case, the header is
if (noBeepersPresent())
which shows that the statements enclosed within the braces should be executed only if the
noBeepersPresent
test is true. The statements enclosed in braces represent the body of
the control statement.
By convention, the body of any control statement is indented with respect to the
statements that surround it. The indentation makes it much easier to see exactly which
statements will be affected by the control statement. Such indentation is particularly
important when the body of a control statement contains other control statements. For
example, you might want to make an additional test to see whether Karel had any beepers
before trying to put one down. To do so, all you would need to do is add a new
if
statement inside the existing one, like this:

19
if (noBeepersPresent()) {
if (beepersInBag()) {
putBeeper();
}
}
In this example, the
putBeeper
command is executed only if there is no beeper on the
corner and there are beepers in Karel’s bag. Control statements that occur inside other
control statements are said to be nested.
The outcome of a decision in a program is not always a matter of whether to do
nothing or perform some set of operations. In some cases, you need to choose between
two alternative courses of action. For these cases, the
if
statement in Karel has an
extended form that looks like this:
if (conditional test) {
statements to be executed if the condition is true
} else {
statements to be executed if the condition is false
}
This form of the
if
statement is illustrated by the method
invertBeeperState
, which
picks up a beeper if there is one and puts down a beeper if the corner is empty.
private void invertBeeperState() {
if (beepersPresent()) {
pickBeeper();
} else {
putBeeper();
}
}
Iterative statements
In solving Karel problems, you will often find that repetition is a necessary part of your
solution. If you were really going to program a robot to fill potholes, it would hardly be
worthwhile to have it fill just one. The value of having a robot perform such a task comes
from the fact that the robot could repeatedly execute its program to fill one pothole after
another.
To see how repetition can be used in the context of a programming problem, consider
the following stylized roadway in which the potholes are evenly spaced along 1st Street
at every even-numbered avenue:
1
2
3
4
5
6
7
8
9
1 0
1 1
1
2
3
Your mission is to write a program that instructs Karel to fill all the holes in this road.
Note that the road reaches a dead end after 11th Avenue, which means that you have
exactly five holes to fill.
20
Since you know from this example that there are exactly five holes to fill, the control
statement that you need is a
for
statement, which specifies that you want to repeat some
operation a predetermined number of times. The structure of the
for
statement appears
complicated primarily because it is actually much more powerful than anything Karel
needs. The only version of the
for
syntax that Karel uses is
for (int i = 0; i < count; i++) {
statements to be repeated
}
where
count
is an integer indicating the number of repetitions. For example, if you want
to change the
fillPothole
program so that it solves the more complex problem of filling
five evenly-spaced holes, all you have to do is change the
run
method as follows:
public void run() {
for (int i = 0; i < 5; i++) {
move();
fillPothole();
move();
}
}
The
for
statement is useful only when you know in advance the number of repetitions
you need to perform. In most applications, the number of repetitions is controlled by the
specific nature of the problem. For example, it seems unlikely that a pothole-filling robot
could always count on there being exactly five potholes. It would be much better if Karel
could continue to fill holes until it encountered some condition that caused it to stop, such
as reaching the end of the street. Such a program would be more general in its application
and would work correctly in either of the following worlds as well as any other world in
which the potholes were evenly spaced exactly two corners apart:
1
2
3
4
5
6
7
8
9
1
2
3
1
2
3
1
2
3
To write a general program that works with any of these worlds, you need to use a
while
statement. In Karel, a
while
statement has the following general form:
while (test) {
statements to be repeated
}
The test in the header line is chosen from the set of conditions listed in Table 1 earlier in
this chapter. In this case, Karel needs to check whether the path in front is clear by
invoking the condition
frontIsClear
. If you use the
frontIsClear
condition in a
while
loop, Karel will repeatedly execute the loop until it hits a wall. The
while
statement
therefore makes it possible to solve the more general problem of repairing a roadway, as
long as the potholes appear at every even-numbered corner and the end of the roadway is
marked by a wall. The
RoadRepairKarel
class that accomplishes this task is shown in
Figure 7.
21
Figure 7. Program to fill regularly spaced potholes in a roadway
/*
/*
* File: RoadRepairKarel.java
* --------------------------
* The RoadRepairKarel class fills a series of regularly
* spaced potholes until it reaches the end of the roadway.
*/
import stanford.karel.*;
public class RoadRepairKarel extends SuperKarel {
public void run() {
while (frontIsClear()) {
move();
fillPothole();
move();
}
}
/**
* Fills the hole beneath Karel's current position by
* placing a beeper in the hole. For this method to
* work correctly, Karel must be facing east immediately
* above the hole. When execution is complete, Karel
* will have returned to the same square and will again
* be facing east. This version of fillPothole checks to
* see if there is already a beeper present before putting
* a new one down.
*/
private void fillPothole() {
turnRight();
move();
if (noBeepersPresent()) {
putBeeper();
}
turnAround();
move();
turnRight();
}
}
Solving general problems
So far, the various pothole-filling programs have not been very realistic, because they
rely on specific conditions—such as evenly spaced potholes—that are unlikely to be true
in the real world. If you want to write a more general program to fill potholes, it should
be able to work with fewer constraints. In particular,
• The program should be able to work with roads of arbitrary length. It does not make
sense to design a program that works only for roads with a predetermined number of
corners. Instead, you want to make the same program work for roads of any length.
Such programs, however, do need to know when they have come to the end of the
road, so it makes sense to require that the end of the roadway is marked by a wall.
• The potholes may occur at any position in the roadway. There should be no limits on
the number of potholes or any restrictions on their spacing. A pothole is identified
simply by an opening in the wall representing the road surface.
22
• Existing potholes may already have been repaired. Any of the potholes may already
contain a beeper left by a previous repair crew. In such cases, Karel should not put
down an additional beeper.
To change the program so that it solves this more general problem requires you to
think about the overall strategy in a different way. Instead of having the loop in the main
program cycle through each pothole, you need to have it check each corner as it goes. If
there is an opening at that corner, Karel needs to try and fill the pothole. If there is a wall,
Karel can simply move ahead to the next corner.
This strategic analysis suggests that the solution to the general problem may require
nothing more than making the following change to the
run
method from Figure 7:
public void run() {
while (frontIsClear()) {
if (rightIsClear()) {
fillPothole();
}
move();
}
}
However, as the bug symbol off to the side suggests, this program is not quite right. It
contains a logical flaw—the sort of error that programmers call a bug. On the other hand,
the particular bug in this example is relatively subtle and would be easy to miss, even if
you tested the program. For example, the program works correctly on the following
world, as shown in the following before-and-after diagrams:
Before
1
2
3
4
5
6
1
2
3
4
7
After
1
2
3
4
5
6
1
2
3
4
7
From this example, things look pretty good. If you ended your testing here, however,
you would never notice that the program fails if you change the world so that there is a
pothole on 7th Avenue. In this case, the before-and-after pictures look like this:
Before
1
2
3
4
5
6
1
2
3
4
7
After
1
2
3
4
5
6
1
2
3
4
7
23
Karel stops without filling the last pothole. In fact, if you watch the execution carefully,
Karel never even goes down into that last pothole to check whether it needs filling.
What’s the problem here?
If you follow through the logic of the program carefully, you’ll discover that the bug
lies in the loop within the
run
method, which looks like this:
public void run() {
while (frontIsClear()) {
if (rightIsClear()) {
fillPothole();
}
move();
}
}
As soon as Karel finishes filling the pothole on 6th Avenue, it executes the
move
command and returns to the top of the
while
loop. At that point, Karel is standing at the
corner of 7th Avenue and 2nd street, where it is blocked by the boundary wall. Because
the
frontIsClear
test now fails, the
while
loop exits without checking the last segment
of the roadway.
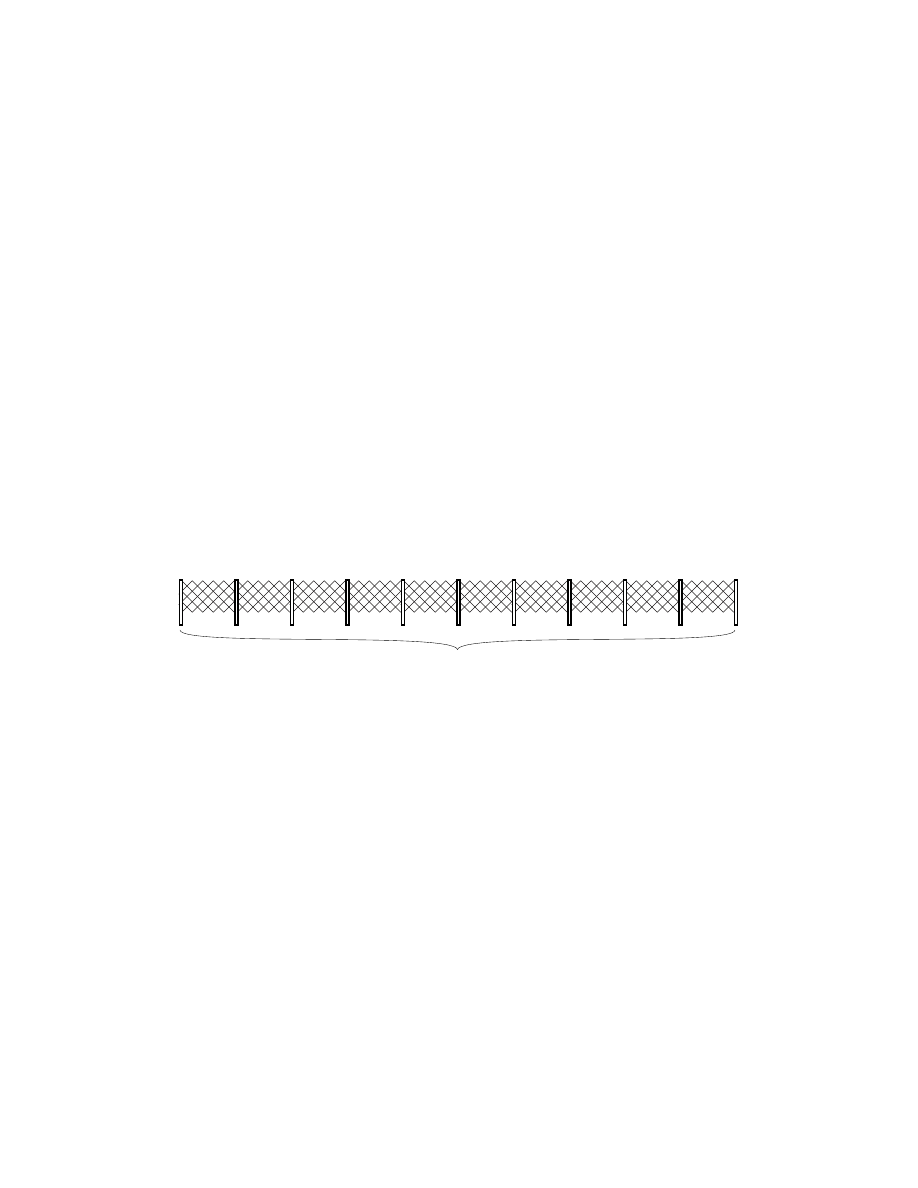
The bug in this program is an example of a programming problem called a fencepost
error. The name comes from the fact that it takes one more fence post that you might
think to fence off a particular distance. How many fence posts, for example, do you need
to build a 100-foot fence if the posts are always positioned 10 feet apart? The answer is
11, as illustrated by the following diagram:
100 feet, 11 fenceposts
The situation in Karel’s world has much the same structure. In order to fill potholes in a
street that is seven corners long, Karel has to check for seven potholes but only has to
move six times. Because Karel starts and finishes at an end of the roadway, it needs to
execute one fewer
move
command than the number of corners it has to check.
Once you discover it, fixing this bug is actually quite easy. Before Karel stops at the
end of the roadway, all that the program has to do is make a special check for a pothole at
the final intersection, as shown in the program in Figure 8.
24
Figure 8. Program to fill irregularly spaced potholes
/*
/*
* File: RoadRepairKarel.java
* --------------------------
* This version of the RoadRepairKarel class fills an
* arbitrary sequence of potholes in a roadway.
*/
import stanford.karel.*;
public class RoadRepairKarel extends SuperKarel {
public void run() {
while (frontIsClear()) {
checkForPothole();
move();
}
checkForPothole();
}
/**
* Checks for a pothole immediately beneath Karel's current
* looking for a wall to the right. If a pothole exists,
* Karel calls fillPothole to repair it.
*/
private void checkForPothole() {
if (rightIsClear()) {
fillPothole();
}
}
/**
* Fills the pothole beneath Karel's current position by
* placing a beeper on that corner. For this method to
* work correctly, Karel must be facing east immediately
* above the pothole. When execution is complete, Karel
* will have returned to the same square and will again
* be facing east. This version of fillPothole checks to
* see if there is already a beeper present before putting
* a new one down.
*/
private void fillPothole() {
turnRight();
move();
if (noBeepersPresent()) {
putBeeper();
}
turnAround();
move();
turnRight();
}
}

Chapter 4
Stepwise Refinement
To a large extent, programming is the science of solving problems by computer. Because
problems are often difficult, solutions—and the programs that implement those
solutions—can be difficult as well. In order to make it easier for you to develop those
solutions, you need to adopt a methodology and discipline that reduces the level of that
complexity to a manageable scale.
In the early years of programming, the concept of computing as a science was more or
less an experiment in wishful thinking. No one knew much about programming in those
days, and few thought of it as an engineering discipline in the conventional sense. As
programming matured, however, such a discipline began to emerge. The cornerstone of
that discipline is the understanding that programming is done in a social environment in
which programmers must work together. If you go into industry, you will almost certainly
be one of many programmers working to develop a large program. That program,
moreover, is almost certain to live on and require maintenance beyond its originally
intended application. Someone will want the program to include some new feature or
work in some different way. When that occurs, a new team of programmers must go in
and make the necessary changes in the programs. If programs are written in an individual
style with little or no commonality, getting everyone to work together productively is
extremely difficult.
To combat this problem, programmers began to develop a set of programming
methodologies that are collectively called software engineering. Using good software
engineering skills not only makes it easier for other programmers to read and understand
your programs, but also makes it easier for you to write those programs in the first place.
One of the most important methodological advances to come out of software engineering
is the strategy of top-down design or stepwise refinement, which consists of solving
problems by starting with the problem as a whole. You break the whole problem down
into pieces, and then solve each piece, breaking those down further if necessary.
An exercise in stepwise refinement
To illustrate the concept of stepwise refinement, let’s teach Karel to solve a new problem.
Imagine that Karel is now living in a world that looks something like this:
1
2
3
4
5
6
7
8
9
1
2
3
4
5
6
7
26
On each of the avenues, there is a tower of beepers of an unknown height, although
some avenues (such as 1st, 7th, and 9th in the sample world) may be empty. Karel’s job
is to collect all the beepers in each of these towers, put them back down on the
easternmost corner of 1st Street, and then return to its starting position. Thus, when Karel
finishes its work in the example above, all 21 beepers currently in the towers should be
stacked on the corner of 9th Avenue and 1st Street, as follows:
1
2
3
4
5
6
7
8
9
1
2
3
4
5
6
7
2 1
The key to solving this problem is to decompose the program in the right way. This
task is more complex than the others you have seen, which makes choosing appropriate
subproblems more important to obtaining a successful solution.
The principle of top-down design
The key idea in stepwise refinement is that you should start the design of your program
from the top, which refers to the level of the program that is conceptually highest and
most abstract. At this level, the beeper tower problem is clearly divided into three
independent phases. First, Karel has to collect all the beepers. Second, Karel has to
deposit them on the last intersection. Third, Karel has to return to its home position. This
conceptual decomposition of the problem suggests that the
run
method for this program
will have the following structure:
public void run() {
collectAllBeepers();
dropAllBeepers();
returnHome();
}
At this level, the problem is easy to understand. Of course, there are a few details left
over in the form of methods that you have not yet written. Even so, it is important to look
at each level of the decomposition and convince yourself that, as long as you believe that
the methods you are about to write will solve the subproblems correctly, you will then
have a solution to the problem as a whole.
Refining the first subproblem
Now that you have defined the structure for the program as a whole, it is time to move on
to the first subproblem, which consists of collecting all the beepers. This task is itself
more complicated than the simple problems from the preceding chapters. Collecting all
the beepers means that you have to pick up the beepers in every tower until you get to the
27
final corner. The fact that you need to repeat an operation for each tower suggests that
you need a
while
loop here.
But what does this
while
loop look like? First of all, you should think about the
conditional test. You want Karel to stop when it hits the wall at the end of the row. Thus,
you want Karel to keep going as long as the space in front is clear. Thus, you know that
the
collectAllBeepers
method will include a
while
loop that uses the
frontIsClear
test. At each position, you want Karel to collect all the beepers in the tower beginning on
that corner. If you give that operation a name, which might be something like
collectOneTower
, you can go ahead and write a definition for the
collectAllBeepers
method even though you haven’t yet filled in the details.
You do, however, have to be careful. The code for
collectAllBeepers
does not look
like this:
private void collectAllBeepers {
while (frontIsClear()) {
collectOneTower();
move();
}
}
This implementation is buggy for exactly the same reason that the first version of the
general
RoadRepairKarel
from the previous chapter failed to do its job. There is a
fencepost error in this version of the code, because Karel needs to test for the presence of
a beeper tower on the last avenue. The correct implementation is
private void collectAllBeepers {
while (frontIsClear()) {
collectOneTower();
move();
}
collectOneTower();
}
Note that this method has precisely the same structure as the main program from the
RoadRepairKarel
program presented at the end of the last chapter. The only difference is
that this program calls
collectOneTower
where the other called
checkForPothole
.
These two programs are each examples of a general strategy that looks like this:
while (frontIsClear()) {
Perform some operation.
move();
}
Perform the same operation for the final corner.
You can use this strategy whenever you need to perform an operation on every corner as
you move along a path that ends at a wall. If you remember the general structure of this
strategy, you can use it whenever you encounter a problem that requires such an
operation. Reusable strategies of this sort come up frequently in programming and are
referred to as programming idioms or patterns. The more patterns you know, the easier
it will be for you to find one that fits a particular type of problem.
Coding the next level
Even though the code for the
collectAllBeepers
method is itself complete, you can’t
actually execute the program until you solve the
collectOneTower
subproblem. When

28
collectOneTower
is called, Karel is either standing at the base of a tower of beepers or
standing on an empty corner. In the former case, you need to collect the beepers in the
tower. In the latter, you can simply move on. This situation sounds like an application for
the
if
statement, in which you would write something like this:
if (beepersPresent()) {
collectActualTower();
}
Before you add such a statement to the code, you should think about whether you need to
make this test. Often, programs can be made much simpler by observing that cases that at
first seem to be special can be treated in precisely the same way as the more general
situation. In the current problem, what happens if you decide that there is a tower of
beepers on every avenue but that some of those towers are zero beepers high? Making use
of this insight simplifies the program because you no longer have to test whether there is
a tower on a particular avenue.
The
collectOneTower
method is still complex enough that an additional level of
decomposition is in order. To collect all the beepers in a tower, Karel needs to undertake
the following steps:
1. Turn left to face the beepers in the tower.
2. Collect all the beepers in the tower, stopping when no more beepers are found.
3. Turn around to face back toward the bottom of the world.
4. Return to the wall that represents the ground.
5. Turn left to be ready to move to the next corner.
Once again, this outline provides a model for the
collectOneTower
method, which looks
like this:
private void collectOneTower() {
turnLeft();
collectLineOfBeepers();
turnAround();
moveToWall();
turnLeft();
}
Preconditions and postconditions
The
turnLeft
commands at the beginning and end of the
collectOneTower
method are
both critical to the correctness of this program. When
collectOneTower
is called, Karel
is always somewhere on 1st Street facing east. When it completes its operation, the
program as a whole will work correctly only if Karel is again facing east at that same
corner. Conditions that must be true before a method is called are referred to as
preconditions; conditions that must apply after the method finishes are known as
postconditions.
When you define a method, you will get into far less trouble if you write down exactly
what the pre- and postconditions are. Once you have done so, you then need to make sure
that the code you write always leaves the postconditions satisfied, assuming that the
preconditions were satisfied to begin with. For example, think about what happens if you
call
collectOneTower
when Karel is on 1st Street facing east. The first
turnLeft
command leaves Karel facing north, which means that Karel is properly aligned with the
column of beepers representing the tower. The
collectLineOfBeepers
method—which
29
has yet to be written but nonetheless performs a task that you understand conceptually—
simply moves without turning. Thus, at the end of the call to
collectLineOfBeepers
,
Karel will still be facing north. The
turnAround
call therefore leaves Karel facing south.
Like
collectLineOfBeepers
, the
moveToWall
method does not involve any turns but
instead simply moves until it hits the boundary wall. Because Karel is facing south, this
boundary wall will be the one at the bottom of the screen, just below 1st Street. The final
turnLeft
command therefore leaves Karel on 1st Street facing east, which satisfies the
postcondition.
Finishing up
Although the hard work has been done, there are still several loose ends that need to be
resolved. The main program calls two methods—
dropAllBeepers
and
returnHome
—
that are as yet unwritten. Similarly,
collectOneTower
calls
collectLineOfBeepers
and
moveToWall
. Fortunately, all four of these methods are simple enough to code without
any further decomposition, particularly if you use
moveToWall
in the definition of
returnHome
. The complete implementation appears in Figure 9.
Figure 9. Program to solve the collect towers of beepers
/*
* File: BeeperCollectingKarel.java
* --------------------------------
* The BeeperCollectingKarel class collects all the beepers
* in a series of vertical towers and deposits them at the
* rightmost corner on 1st Street.
*/
import stanford.karel.*;
public class BeeperCollectingKarel extends SuperKarel {
/**
* Specifies the program entry point.
*/
public void run() {
collectAllBeepers();
dropAllBeepers();
returnHome();
}
/**
* Collects the beepers from every tower by moving along 1st
* Street, calling collectOneTower at every corner. The
* postcondition for this method is that Karel is in the
* easternmost corner of 1st Street facing east.
*/
private void collectAllBeepers() {
while (frontIsClear()) {
collectOneTower();
move();
}
collectOneTower();
}
30
/**
* Collects the beepers in a single tower. When collectOneTower
* is called, Karel must be on 1st Street facing east. The
* postcondition for collectOneTower is that Karel must again
* be facing east on that same corner.
*/
private void collectOneTower() {
turnLeft();
collectLineOfBeepers();
turnAround();
moveToWall();
turnLeft();
}
/**
* Collects a consecutive line of beepers. The end of the beeper
* line is indicated by a corner that contains no beepers.
*/
private void collectLineOfBeepers() {
while (beepersPresent()) {
pickBeeper();
if (frontIsClear()) {
move();
}
}
}
/**
* Drops all the beepers on the current corner.
*/
private void dropAllBeepers() {
while (beepersInBag()) {
putBeeper();
}
}
/**
* Returns Karel to its initial position at the corner of 1st
* Avenue and 1st Street, facing east. The precondition for this
* method is that Karel must be facing east somewhere on 1st
* Street, which is true at the conclusion of collectAllBeepers.
*/
private void returnHome() {
turnAround();
moveToWall();
turnAround();
}
/**
* Moves Karel forward until it is blocked by a wall.
*/
private void moveToWall()
{
while (frontIsClear()) {
move();
}
}
}
Chapter 5
Algorithms
Although top-down design is a critical strategy for programming, it cannot be applied
mechanically without thinking about problem-solving strategies. Figuring out how to
solve a particular problem by computer generally requires considerable creativity. The
process of designing a solution strategy is traditionally called algorithmic design.
The word algorithm comes from the name of a ninth-century Persian mathematician,
Abu Ja’far Mohammed ibn Mûsâ al-Khowârizmî, who wrote an influential treatise on
mathematics. Today, the notion of an algorithm has been formalized so that it refers to a
solution strategy that meets the following conditions:
• The strategy is expressed in a form that is clear and unambiguous.
• The steps in the strategy can be carried out.
• The strategy always terminates after a finite number of steps.
You will learn much more about algorithms as you continue your study of programming,
but it is useful to look at a few simple algorithms in Karel’s world.
Solving a maze
As an example of algorithmic design, suppose that you wanted to teach Karel to escape
from a maze. In Karel’s world, a maze might look like this:
1
2
3
4
5
6
1
2
3
4
5
6
The exit to the maze is marked by a beeper, so that Karel’s job is to navigate the corridors
of the maze until it finds the beeper indicating the exit. The program, however, must be
general enough to solve any maze, and not just the one pictured here.
There are several strategies you could use for solving such a maze. When Theseus
needed to escape from the Labyrinth of Crete, he adopted—at the suggestion of King
Minos’s daughter Ariadne, whom Theseus promptly abandoned on the next island he
reached—the strategy of unwinding a ball of string as he explored the maze. You could
devise a similar strategy for Karel, in which beepers serve the same function.
For most mazes, however, you can use a simpler strategy called the right-hand rule,
in which you begin by putting your right hand on the adjacent wall and then go through
the maze without ever taking your hand off the wall. Another way to express this strategy
is to proceed through the maze one step at a time, always taking the rightmost available
path.
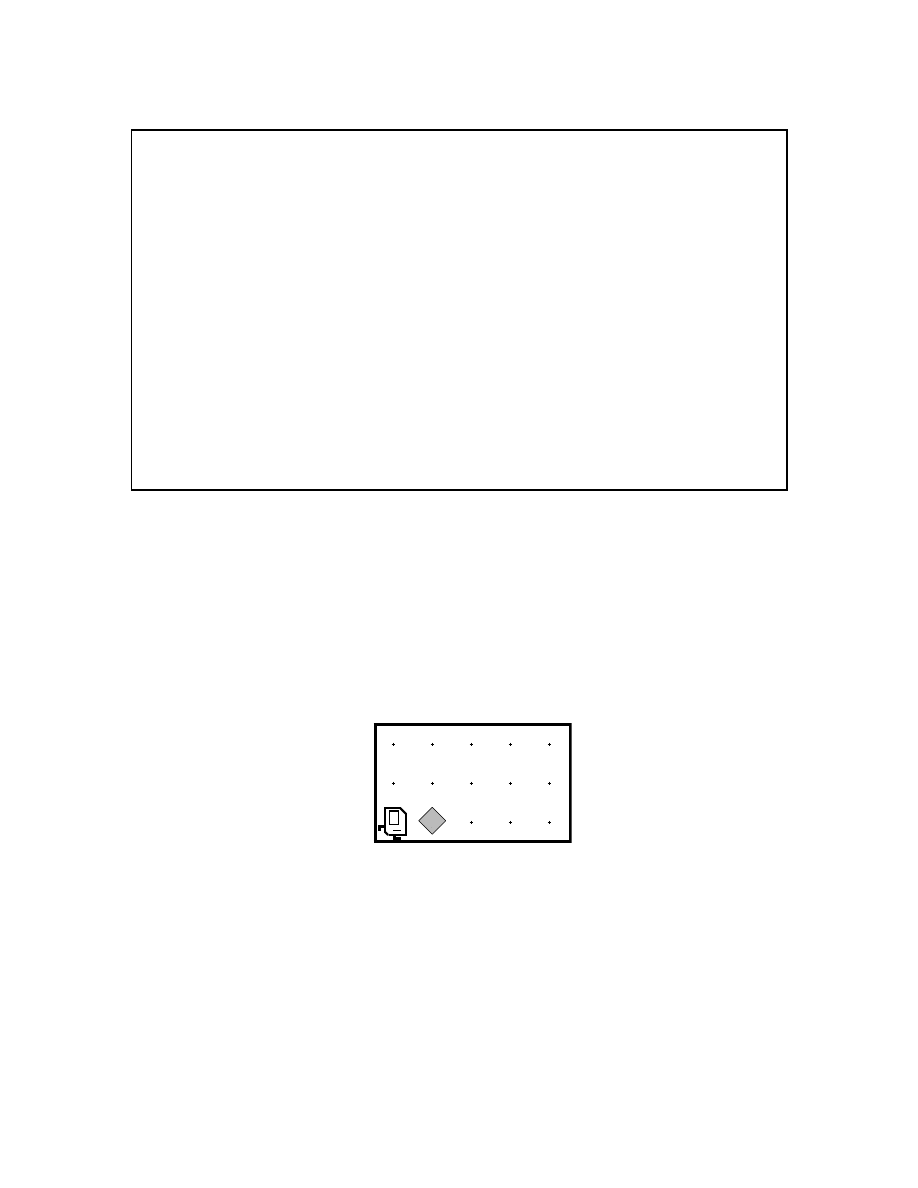
32
Figure 10. Program to solve a maze
/*
/*
* File: MazeRunningKarel.java
* ---------------------------
* This program extends Karel so that it can solve a maze
* using the right-hand rule.
*/
import stanford.karel.*;
public class MazeRunningKarel extends SuperKarel {
public void run() {
while (noBeepersPresent()) {
turnRight();
while (frontIsBlocked()) {
turnLeft();
}
move();
}
}
}
You can easily write a Karel program to apply the right-hand rule. The program in
Figure 10, for example, expresses the algorithm for the right-hand rule in a particularly
compact form. You should work through the logic of this algorithm and convince
yourself that it indeed accomplishes the task. It is important to note that the code that
implements an algorithm may not be very complicated. Indeed, coming up with the right
algorithm often leads to extremely simple code.
Doubling the number of beepers
Another programming task that leads to interesting algorithmic choices is the problem of
getting Karel to double the number of beepers on a corner. For example, suppose that
Karel starts out in the world
1
2
3
4
5
1
2
3
4
where there are some number of beepers—in this case four—on the corner of 1st Street
and 2nd Avenue and an infinite number of beepers in Karel’s beeper bag. The goal in this
problem is to write a method
doubleBeepers
that doubles the number of beepers on the
current square. Thus, if you execute the method
public void run() {
move();
doubleBeepers();
move();
}
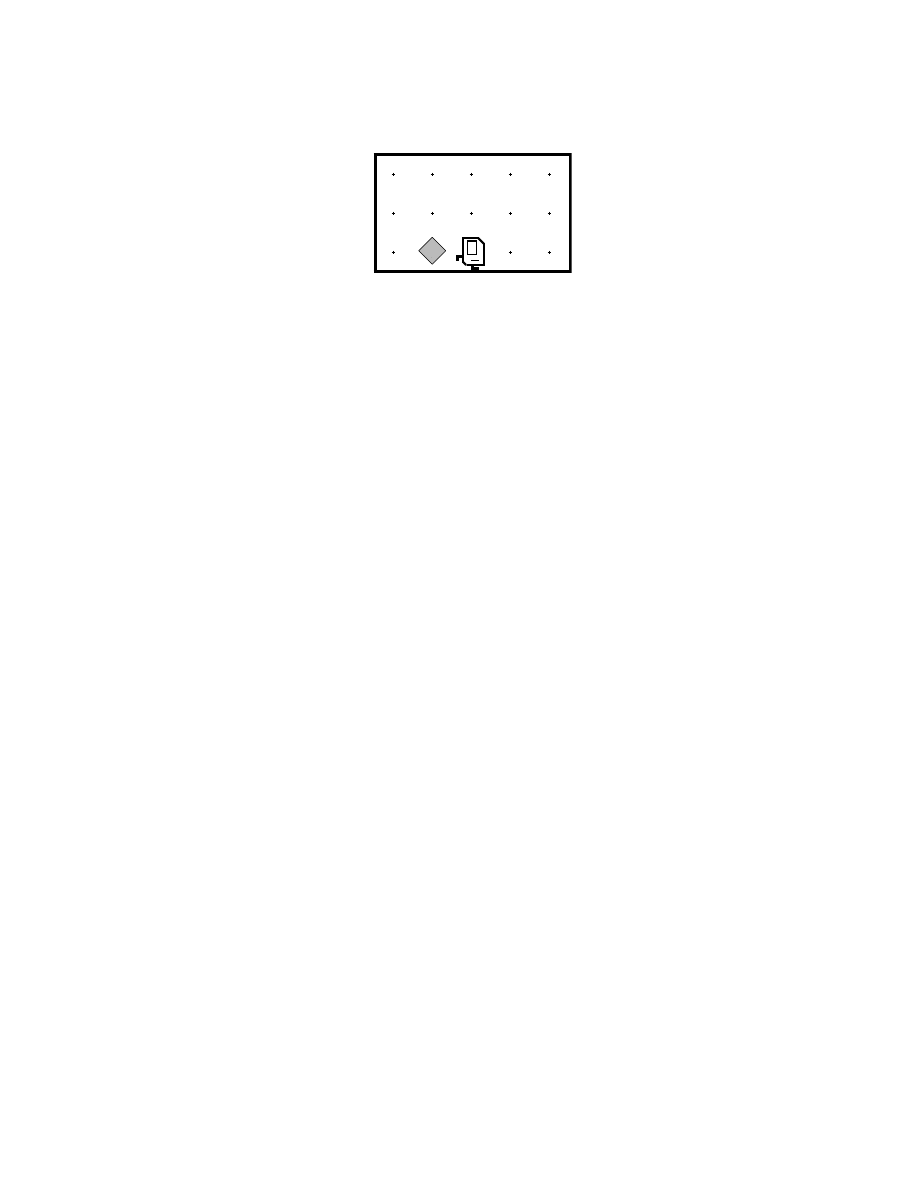
33
on the world shown in the preceding diagram, the final state of the world should look like
this:
1
2
3
4
5
1
2
3
8
The program should be general enough to work for any number of beepers. For example,
if there had originally been 21 beepers on the corner of 1st Street and 2nd Avenue, the
program should end with 42 beepers on that corner.
Writing the
doubleBeepers
method is harder than it initially appears. Your first step is
to devise an algorithmic strategy to solve the problem. You can’t start by picking up all
the beepers on the corner, because you would then have no way of telling how many
beepers to put down. As with most algorithms in Karel’s world, you need to process the
beepers one at a time. You can pick one up from the corner, but you then have to keep
track somehow of the fact that you have to add two beepers to the result.
The easiest strategy to devise involves the use of a temporary storehouse on some
corner that is initially empty, such as the corner at 1st Street and 3rd Avenue. If every
time you pick up a beeper from the original pile on 2nd Avenue you put down two
beepers in the storehouse on 3rd Avenue, you will have twice the original number of
beepers when the first pile is exhausted. Thus, you can create the correct value in the
storehouse by calling the following method:
private void doubleIntoStorehouse() {
while (beepersPresent()) {
pickBeeper();
move();
putBeeper();
putBeeper();
turnAround();
move();
turnAround();
}
}
The precondition for this method is that Karel is standing on a corner containing a pile of
N beepers facing a corner with no beepers. The postcondition is that Karel winds up in its
original position with no beepers on that corner but 2N beepers on the corner Karel is
facing.
This method does the interesting algorithmic work, but does not entirely satisfy the
constraints of the problem as stated because the final pile of beepers is not on the original
square. To get it there, you need to implement a similar method that simply transfers the
pile back to the adjacent square. This method has almost exactly the same structure,
except that it deposits only one beeper for each one it collects. If you design a
transferBeepersBack
method to work with the same precondition as that used for
doubleIntoStorehouse
, it will look like this:

34
private void transferBeepersBack() {
while (beepersPresent()) {
pickBeeper();
move();
putBeeper();
turnAround();
move();
turnAround();
}
}
The
doubleBeepers
method itself then consists of the following code:
private void doubleBeepers() {
doubleIntoStorehouse();
move();
turnAround();
transferBeepersBack();
move();
turnAround();
}
This strategy, however, is not the only one you might use. In many cases, there are
algorithms that work much better than the obvious ones, although they are often difficult
to discover. Many such algorithms depend on sophisticated programming techniques that
you will encounter later in your study of computer science. For example, the
doubleBeepers
problem can be solved quite easily if you use a technique called
recursion, which is simply the process of having a method call itself. The following
implementation of
doubleBeepers
gets the job done without needing a storehouse or any
moving around:
private void doubleBeepers() {
if (beepersPresent()) {
pickBeeper();
doubleBeepers();
putBeeper();
putBeeper();
}
}
Although it is fun to try and figure out what this program is doing, you shouldn’t
worry at this point if you find it hard to understand. The point of showing this solution is
simply to demonstrate that there are many different algorithms for solving problems,
some of which can be very compact and efficient. As you study computer science, you
will learn a great deal more about algorithmic techniques and gain the skills you need to
write this type of program on your own.
Chapter 6
SuperKarel
As it comes from the factory, Karel is a bit on the boring side. The world—reflecting the
nature of hardware at the time Karel was invented—is entirely black and white.
Moreover, Karel always behaves in a strictly deterministic fashion. Each of these
limitations makes it harder to program Karel to perform exciting tasks. To make it easier
to write more interesting Karel programs, the
stanford.karel
package includes a
SuperKarel
that includes several new features. Those features are described in the
sections that follow.
The
turnRight
and
turnAround
methods
As you already know from Chapter 2, the
SuperKarel
class includes definitions for
turnRight
and
turnAround
. Although it certainly easy to define these methods on your
own, it is inconvenient to do so in every Karel program. Moreover, the
SuperKarel
implementations of these methods tie into the internal workings of Karel to implement
these operations more efficiently. If you use
turnRight
in a
SuperKarel
subclass, your
program will make an immediate right turn and not go through the process of turning left
three times.
Using color
The
SuperKarel
class allows Karel to paint the corner on which it is standing using the
instruction
paintCorner(color);
The value enclosed in the parentheses—which is called an argument in the terminology
of programming languages—may be any of the following:
BLACK
BLUE
CYAN
DARK_GRAY
GRAY
GREEN
LIGHT_GRAY
MAGENTA
ORANGE
PINK
RED
WHITE
YELLOW
null
The
null
color value indicates that a corner has no color, which means that the little
cross in the center shows through. When you create a new Karel world, all corners
initially have
null
as their color.
SuperKarel
also understands a new condition
cornerColorIs(color)
, which is true if
the current corner has been painted with the specified color. For example, you could paint
the current corner red by executing the instruction
paintCorner(RED);
and later perform operations only on red corners by using the following
if
statement:
if (cornerColorIs(RED)) {
Statements to execute only if the corner is painted red
}

36
Random behavior
SuperKarel
also defines a new condition
random
, which is true half the time, but in an
unpredictable way. For example, if you execute the statements
if (random()) {
paintCorner(YELLOW);
} else {
paintCorner(MAGENTA);
}
Karel will paint the current corner yellow or magenta, each with equal probability.
If you need greater control over how often Karel executes a random event, the
random
condition takes an argument, which is the a number specifying the probability of the
condition returning true. As in statistics, probabilities are numbers between 0.0 and 1.0,
where 0.0 indicates that the condition will always be false and 1.0 indicating that it will
always be true. If, for example, you wanted to have Karel put down a beeper 25 percent
of the time, you could use the following code:
if (random(0.25)) {
putBeeper();
}
Logical operations
As you write more sophisticated Karel programs, you will discover that it is sometimes
difficult to express certain conditional tests whose English equivalents include
conjunctions like and and or. As an example, try to write a Karel
while
statement that
moves Karel forward until it is either blocked by a wall or encounters a beeper. To make
it easier to write interesting programs, the Karel language allows you to use the following
logical operators, which are actually part of Java and not a
SuperKarel
extension:
&&
Equivalent to the English word and.
||
Equivalent to the English word or (in the formal sense of either or both).
!
Equivalent to the English word not.
With these operators, it is easy to write the
while
statement suggested earlier in this
section, because you can combine the conditions into a single test:
while (frontIsClear() && noBeepersPresent()) {
move();
}
The fact that these operators work in Karel programs reveals a notable fact about the
way such programs are implemented. The Karel programs that you write turn out to be
simply Java programs in disguise. There is no separate Karel language; everything that
you’ve seen in Karel is actually just part of standard Java or implemented using standard
Java as part of one of the classes in the
stanford.karel
package. While this strategy
makes the Karel simulator much easier to implement and means that you will be using the
same tools that you will use throughout the quarter, it does have a downside. The logical
operators
&&
,
| |
, and
!
are not the only pieces of standard Java that you might
incorporate into a Karel program. Given the way Karel is implemented, you could include
anything from standard Java in a Karel program, and the Java compiler would not
complain at all. Doing so, however, defeats the purpose of Karel, which is intended to
provide a simple platform for learning programming. So even though the Java compiler
won’t complain if you use more advanced Java structures, your section leader will.
Acceptable Karel programs must limit themselves to the features described in this book.
Appendix A
Karel Reference Card
This appendix defines the structure of the Karel programming language on a single page.
Built-in Karel commands:
move();
turnLeft();
putBeeper();
pickBeeper();
Karel program structure:
/*
* Comments may be included anywhere in
* the program between a slash-star and
* the corresponding star-slash characters.
*/
import stanford.karel.*;
/*
Definition
of
the
new
class
*/
public class name extends Karel {
public void run() {
statements in the body of the method
}
definitions of private methods
}
Karel condition names:
frontIsClear()
frontIsBlocked()
leftIsClear()
leftIsBlocked()
rightIsClear()
rightIsBlocked()
beepersPresent() noBeepersPresent()
beepersInBag()
noBeepersInBag()
facingNorth()
notFacingNorth()
facingEast()
notFacingEast()
facingSouth()
notFacingSouth()
facingWest()
notFacingWest()
Conditional statements:
if (condition) {
statements executed if condition is true
}
if (condition) {
statements executed if condition is true
} else {
statements executed if condition is false
}
Iterative statements:
for (int
i
=
0; i
<
count; i++) {
statements to be repeated
}
while (condition) {
statements to be repeated
}
Method definition:
private void name () {
statements in the method body
}
New commands in the
SuperKarel
class:
turnRight();
turnAround();
paintCorner(color);
New conditions in the
SuperKarel
class:
random()
random(p)
cornerColorIs(color)
Wyszukiwarka
Podobne podstrony:
The Robot Is Running Away from Terry Dowling
Ron Goulart The Robot In The Closet
The Robot s Twilight Companion Tony Daniel
The Robot Rocket Carey Rockwell
Asimov, Isaac Robot 08 Pebble In The Sky(1)
Harrison, Harry Bill 2 Bill on the Planet of Robot Slaves
Generics in the Java Programming Language
Henry Kuttner The Proud Robot
Harry Harrison Bill 02 On The Planet Of Robot Slaves
Asimov, Isaac Robot 08 Pebble In The Sky
(Ebook Pdf Jsf) Sun The Java Server Faces Technology Tutorial
w aaaa165 The Java Virtual Appliance—No OS Required
Kuttner, Henry The Proud Robot
Isaac Asimov Robot 08 Pebble In The Sky
Asimov, Isaac Robot 2 The Naked Sun(1)
Kuttner, Henry The Proud Robot
Asimov, Isaac Robot 07 The Stars Like Dust(1)
Asimov, Isaac Robot 2 The Naked Sun
Isaac Asimov The Complete Robot
więcej podobnych podstron