
http://www.instructables.com/id/Solar-Thermal-Water-Heater-For-Less-Than-Five-Doll/
Solar Thermal Water Heater For Less Than Five Dollars
on August 9, 2007
Table of Contents
intro: Solar Thermal Water Heater For Less Than Five Dollars
.
.
.
.
.
.
.
.
.
.
.
.
.
.
.
.
.
.
.
.
.
.
.
.
.
.
.
.
.
.
.
.
.
.
.
.
.
.
.
.
.
.
.
.
.
.
.
.
.
.
.
.
.
.
.
.
.
.
.
.
.
.
.
.
.
.
.
.
.
.
.
.
.
.
.
.
.
.
.
.
.
.
.
.
.
.
.
.
.
.
.
.
.
.
.
.
.
.
.
.
.
.
.
.
.
.
.
.
.
.
.
.
.
.
.
.
.
.
.
.
.
.
.
.
.
.
.
.
.
.
.
.
.
.
.
.
.
.
.
.
.
.
.
.
.
.
.
.
.
.
.
.
.
.
.
.
.
.
.
.
.
.
.
.
.
.
.
.
.
.
.
.
.
.
.
.
.
.
.
.
.
.
.
.
step 2: Collection Of Materials
.
.
.
.
.
.
.
.
.
.
.
.
.
.
.
.
.
.
.
.
.
.
.
.
.
.
.
.
.
.
.
.
.
.
.
.
.
.
.
.
.
.
.
.
.
.
.
.
.
.
.
.
.
.
.
.
.
.
.
.
.
.
.
.
.
.
.
.
.
.
.
.
.
.
.
.
.
.
.
.
.
.
.
.
.
.
.
.
.
.
.
.
.
.
.
.
.
.
.
.
.
.
.
.
.
.
.
.
.
.
.
.
.
.
.
.
.
.
.
.
.
.
.
.
.
.
.
.
.
.
.
.
.
.
.
.
.
.
.
.
.
.
.
.
.
.
.
.
.
.
.
.
.
.
.
.
.
.
.
.
.
.
.
.
.
.
.
.
.
.
.
.
.
.
.
.
.
.
.
.
.
.
.
.
.
.
.
.
.
.
.
.
.
.
.
.
.
.
.
.
.
.
.
.
.
.
.
.
.
.
.
.
.
.
.
.
.
.
.
.
.
.
.
.
.
.
.
.
.
.
.
.
.
.
.
.
.
.
.
.
.
.
.
.
.
.
.
.
.
.
.
.
.
.
.
.
.
.
.
.
.
.
.
.
.
.
.
.
.
.
.
.
.
.
.
.
.
.
.
.
.
.
.
.
.
.
.
.
.
.
.
.
.
.
.
.
.
.
.
.
.
.
.
.
.
.
.
.
.
.
.
.
.
.
.
.
.
.
.
.
.
.
.
.
.
.
.
.
.
.
.
.
.
.
.
.
.
.
.
.
.
.
.
.
.
.
.
.
.
.
.
.
.
.
.
.
.
.
.
.
.
.
.
.
.
.
.
.
.
.
.
.
.
.
.
.
.
.
.
.
.
.
.
.
.
.
.
.
.
.
.
.
.
.
.
.
.
.
.
.
.
.
.
.
.
.
.
.
.
.
.
.
.
.
.
.
.
.
.
.
.
.
.
.
.
.
.
.
.
.
.
.
.
.
.
.
.
.
.
.
.
.
.
.
.
.
.
.
.
.
.
.
.
.
.
.
.
.
.
.
.
.
.
.
.
.
.
.
.
.
.
.
.
.
.
.
.
.
.
.
.
.
.
.
.
.
.
.
.
.
.
.
.
.
.
.
.
.
.
.
.
.
.
step 7: Attaching Collector To Frame
.
.
.
.
.
.
.
.
.
.
.
.
.
.
.
.
.
.
.
.
.
.
.
.
.
.
.
.
.
.
.
.
.
.
.
.
.
.
.
.
.
.
.
.
.
.
.
.
.
.
.
.
.
.
.
.
.
.
.
.
.
.
.
.
.
.
.
.
.
.
.
.
.
.
.
.
.
.
.
.
.
.
.
.
.
.
.
.
.
.
.
.
.
.
.
.
.
.
.
.
.
.
.
.
.
.
.
.
.
.
.
.
.
.
.
.
.
.
.
.
.
.
.
.
.
.
.
.
.
.
.
.
.
.
.
.
.
.
.
.
.
.
.
.
.
.
.
.
.
.
.
.
.
.
.
.
.
.
.
.
.
.
.
.
.
.
.
.
.
.
.
.
.
.
.
.
.
.
.
.
.
.
.
.
.
.
.
.
.
.
.
.
.
.
.
.
.
.
.
.
.
.
.
.
.
.
.
.
.
.
.
.
.
.
.
.
.
.
.
.
.
.
.
.
.
.
.
.
.
.
.
.
.
.
.
.
.
.
.
.
.
.
.
.
.
.
.
.
.
.
.
.
.
.
.
.
.
.
.
.
.
.
.
.
.
.
.
.
.
.
.
.
.
.
.
.
.
.
.
.
.
.
.
.
.
.
.
.
.
.
.
.
.
.
.
.
.
.
.
.
.
.
.
.
.
.
.
.
.
.
.
.
.
.
.
.
.
.
.
.
.
.
.
.
.
.
.
.
.
.
.
.
.
.
.
.
.
.
.
.
.
.
.
.
.
.
.
.
.
.
.
.
.
.
.
.
.
.
.
.
.
.
.
.
.
.
.
.
.
.
.
.
.
.
.
.
.
.
.
.
.
.
.
.
.
.
.
.
.
.
.
.
.
.
.
.
.
.
.
.
.
.
.
.
.
.
.
.
.
.
.
.
.
.
.
.
.
.
.
.
.
.
.
.
.
.
.
.
.
.
.
.
.
.
.
.
.
.
.
.
.
.
.
.
.
.
.
.
.
.
.
.
.
.
.
.
.
.
.
.
.
.
.
.
.
.
.
.
.
.
.
.
.
.
.
.
.
.
.
.
.
.
.
.
.
.
.
.
.
.
.
.
.
.
.
.
.
.
.
.
.
.
.
.
.
.
.
.
.
.
.
.
.
.
.
.
.
.
.
.
.
.
.
.
.
.
.
.
.
.
.
.
.
.
.
.
.
.
.
.
.
.
.
.
.
.
.
.
.
.
.
.
.
.
.
.
.
.
.
.
.
.
.
.
.
.
.
.
.
.
.
.
.
.
.
.
.
.
.
.
.
.
.
.
.
.
.
.
.
.
.
.
.
.
.
.
.
.
.
.
.
.
.
.
.
.
.
.
.
.
.
.
.
.
.
.
.
.
.
.
.
.
.
.
.
.
.
.
.
.
.
.
.
.
.
.
.
.
.
.
.
.
.
.
.
.
.
.
.
.
.
.
.
.
.
.
.
.
.
.
.
.
.
.
.
.
.
.
.
.
.
.
.
.
.
.
.
.
.
.
.
.
.
.
.
.
.
.
.
.
.
.
.
.
.
.
.
.
.
.
.
.
.
.
.
.
.
.
.
.
.
.
.
.
.
.
.
.
.
.
.
.
.
.
.
.
.
.
.
.
.
.
.
.
.
.
.
.
http://www.instructables.com/id/Solar-Thermal-Water-Heater-For-Less-Than-Five-Doll/
intro:
Solar Thermal Water Heater For Less Than Five Dollars
This project will create a DIY solar hot water heater for less than five dollars (if you have access to a garbage dump). It will allow you to see the principles of solar water
heating in action, and is highly customizable.
Its a great way to learn about using the renewable energy of the sun to produce useful effects, in this case hot water. You can use these instructions to build a device that
will actually heat enough water to use in the home, but it would require modifications.
This device is more useful for camping or as a science experiment and teaching tool. A word of caution it is possible to create very hot water with this technique and you
should be careful not to burn yourself. You can find this and more great DIY projects relating to renewable energy, solar cooking, and sustainable design at
By using the sun instead of fossil fuels to heat your water you will be preventing dangerous greenhouse gasses from being released into the atmosphere, helping to
prevent global warming.
step 1:
Materials
Materials needed:
Water
2 buckets
Drill (with both drill bits and screw bits)
Some scissors
A saw (a simple hand saw will do)
Some wood
A pane of glass.
The back of a small refrigerator.
12 feet of air pump hose used in fish tanks
Backing material (we used an old door mat)
A box of wood screws
Aluminum Foil
Role of duct tape
Angle Cutter (or hack saw)
Time:
This project took about 3 hours of constructions time. It took a couple weeks to find all the parts.
step 2:
Collection Of Materials
at a home built proof of concept solar thermal panel, we were a bit disappointed with the results. It took about 4 hours before the thing started work,
and was a bit costly (at over 50 dollars) to make.
I knew it could be done better and cheaper. My first mistake with the first one was purchasing everything new. With ample reusable resources at the local town dump I
knew it could be done on the cheap.
Another flaw from the first panel was using pond liner as our collection medium. Pond liner is plastic, does not absorb heat as well as other materials (like metal) and is
harder to work with as you have to use glue or tape to create an air pocket to hold the water. It leaked the first couple of times we used it and took extensive repairs to
make it work.
We solved this problem by using a ready made collector. Something that was already designed to distribute heat, and made of metal.
The last major flaw in our first panel was using plexiglas for the cover. Its hard to work with as it will crack, and using two pieces left a hard to close crack in the middle.
We solved this problem by using good old fashion window glass.
Now onto the project. The first thing we did was collect all of the parts.
Our local dump has a coolant removal program that has refrigerators and dehumidifiers that they remove old freon from. With this in mind I found the perfect heat
collector. The back of a fridge is basically a heat dispersal system, with a slight modification is can be used to collect large amounts of heat.
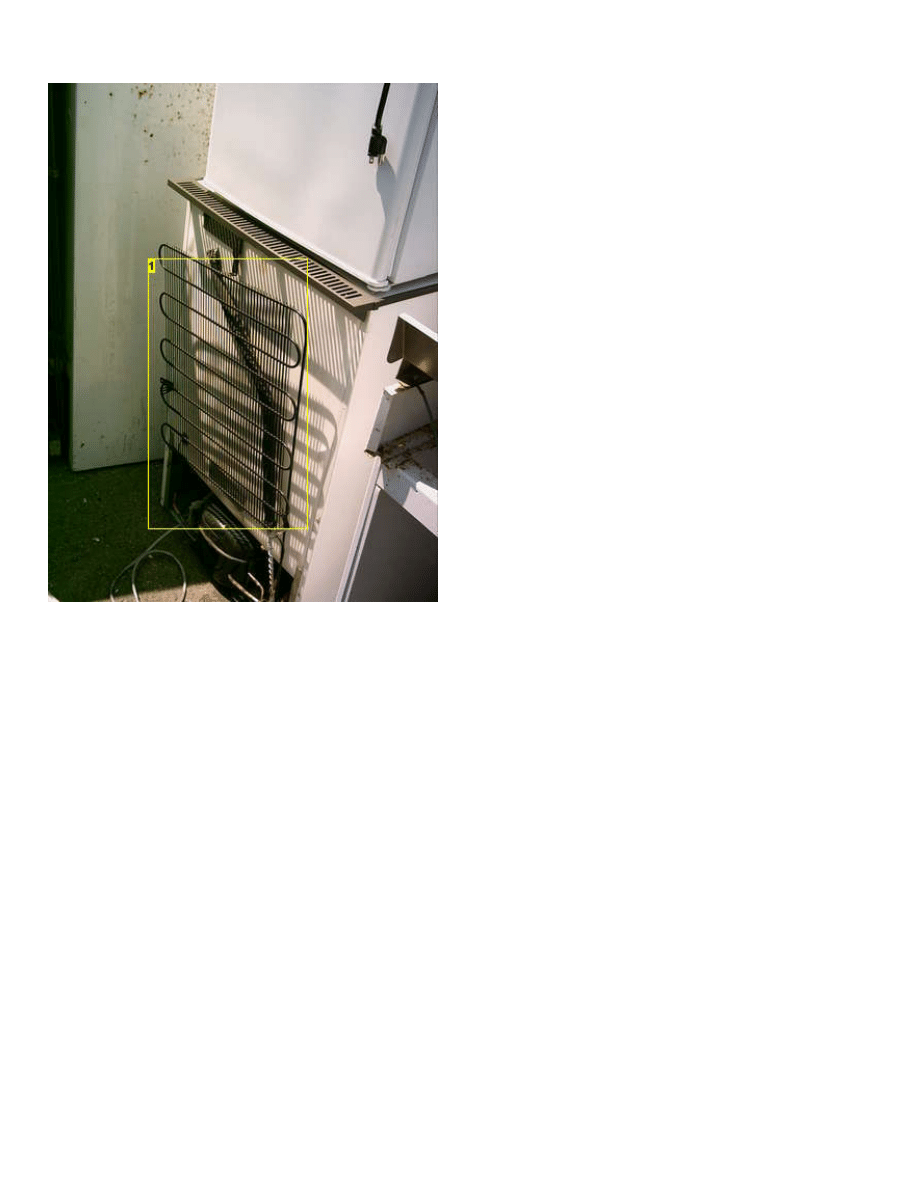
http://www.instructables.com/id/Solar-Thermal-Water-Heater-For-Less-Than-Five-Doll/
Make sure that the freon, or other coolant has been removed, and cut the grill off at the base, near the large coolant holder.
Image Notes
1. This is what you want
step 3:
Collector Prepaired
This is what it looks like after you have it off the fridge. Note the two tubes, make sure you leave ample leads on the end for attaching the water hoses to later.
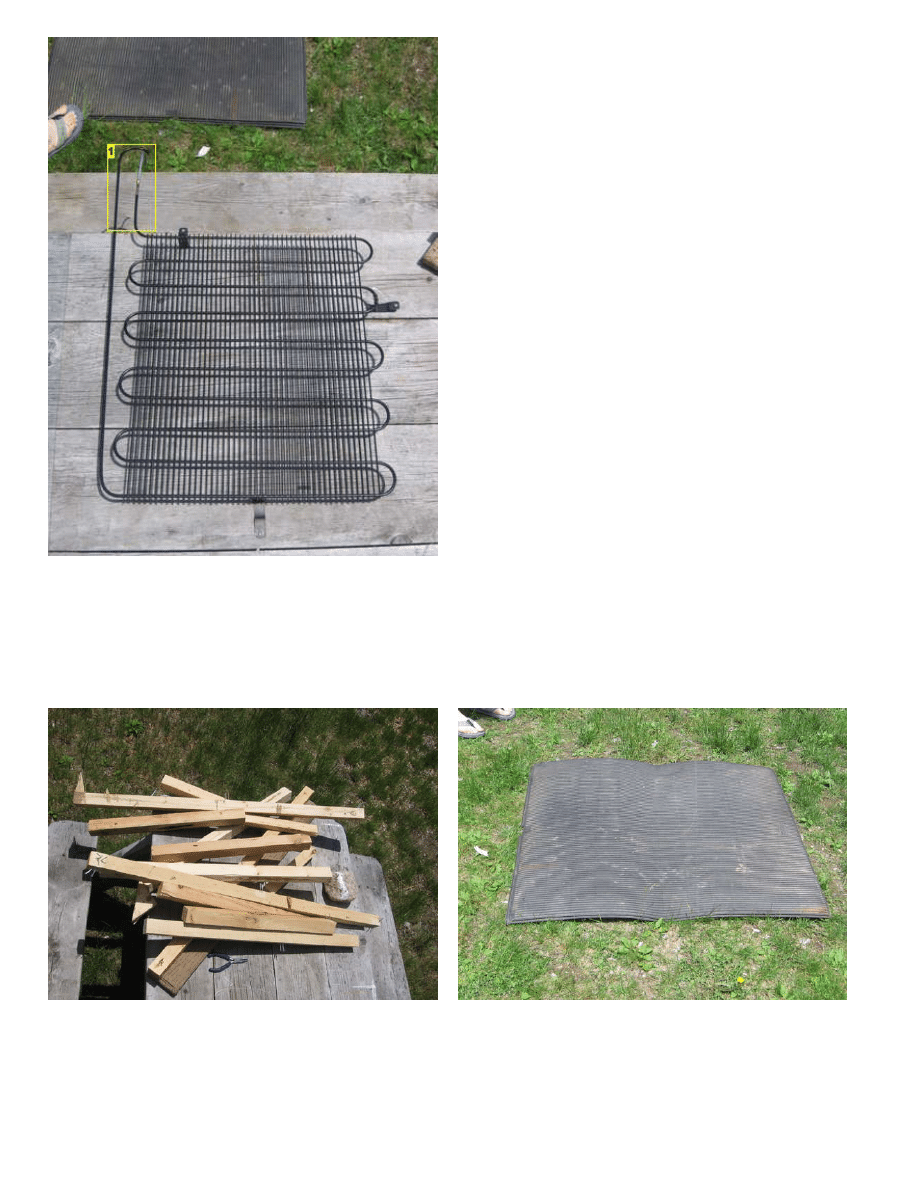
http://www.instructables.com/id/Solar-Thermal-Water-Heater-For-Less-Than-Five-Doll/
Image Notes
1. Leave enough pipe here for later
step 4:
The Rest Of The Parts
There was an old couch that had been run over by one of the large dump plows, the inside wood was the perfect size for the frame. I found a pane of glass and an old
rubber door mat that made the perfect backing and front. The glass was a real find, and may be the only part of the panel that may need to be purchased. Make sure your
glass is big enough to fit over your collector and have enough room to attach it to the frame.
http://www.instructables.com/id/Solar-Thermal-Water-Heater-For-Less-Than-Five-Doll/
Image Notes
1. Be sure to clean the glass before you use it, dirt blocks the light.
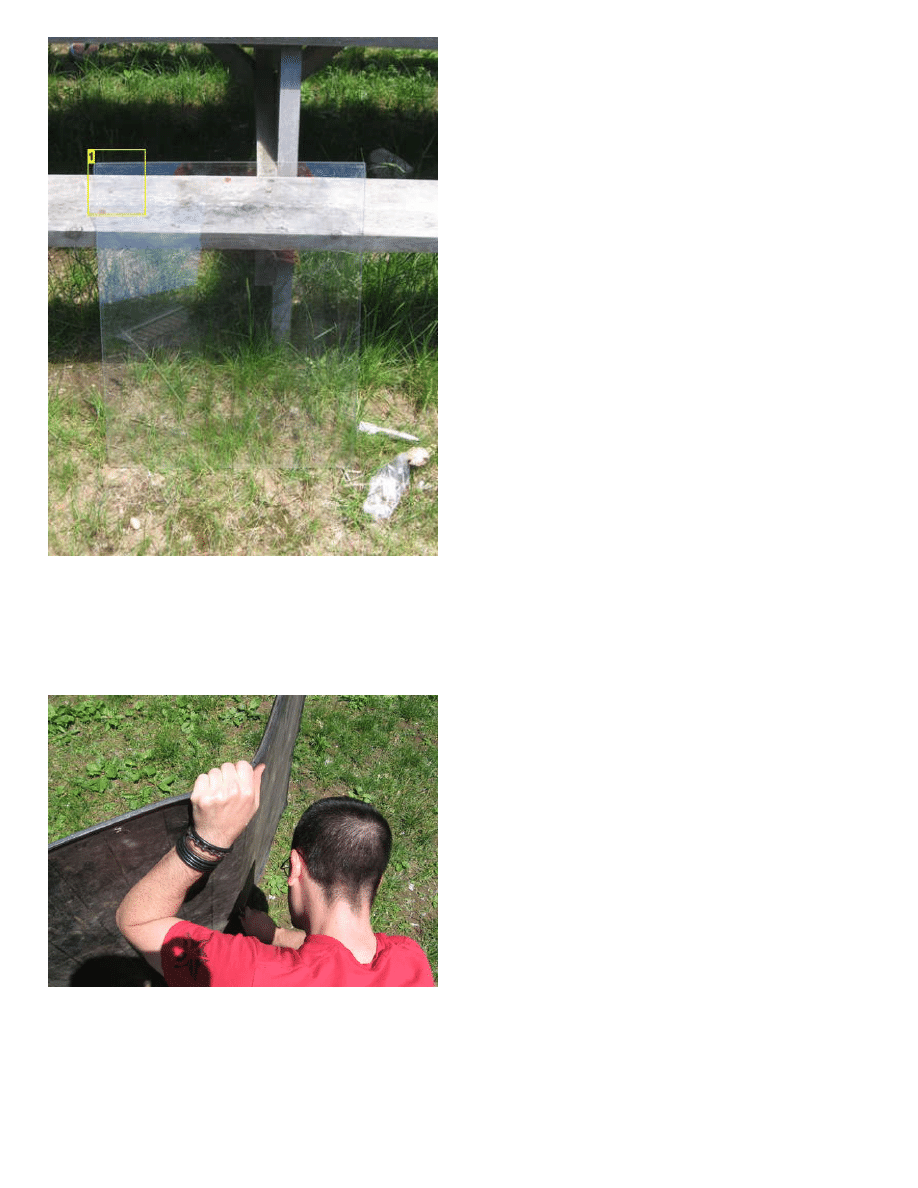
step 5:
Preparing The Back
The door mat was HUGE, so I had to cut it in half. Funny thing seems there was a lot of nasty black goo, and a metal sheet in the middle. Who knew. Remove the metal
plate (or cut it in half as well) and leave the goo.

http://www.instructables.com/id/Solar-Thermal-Water-Heater-For-Less-Than-Five-Doll/
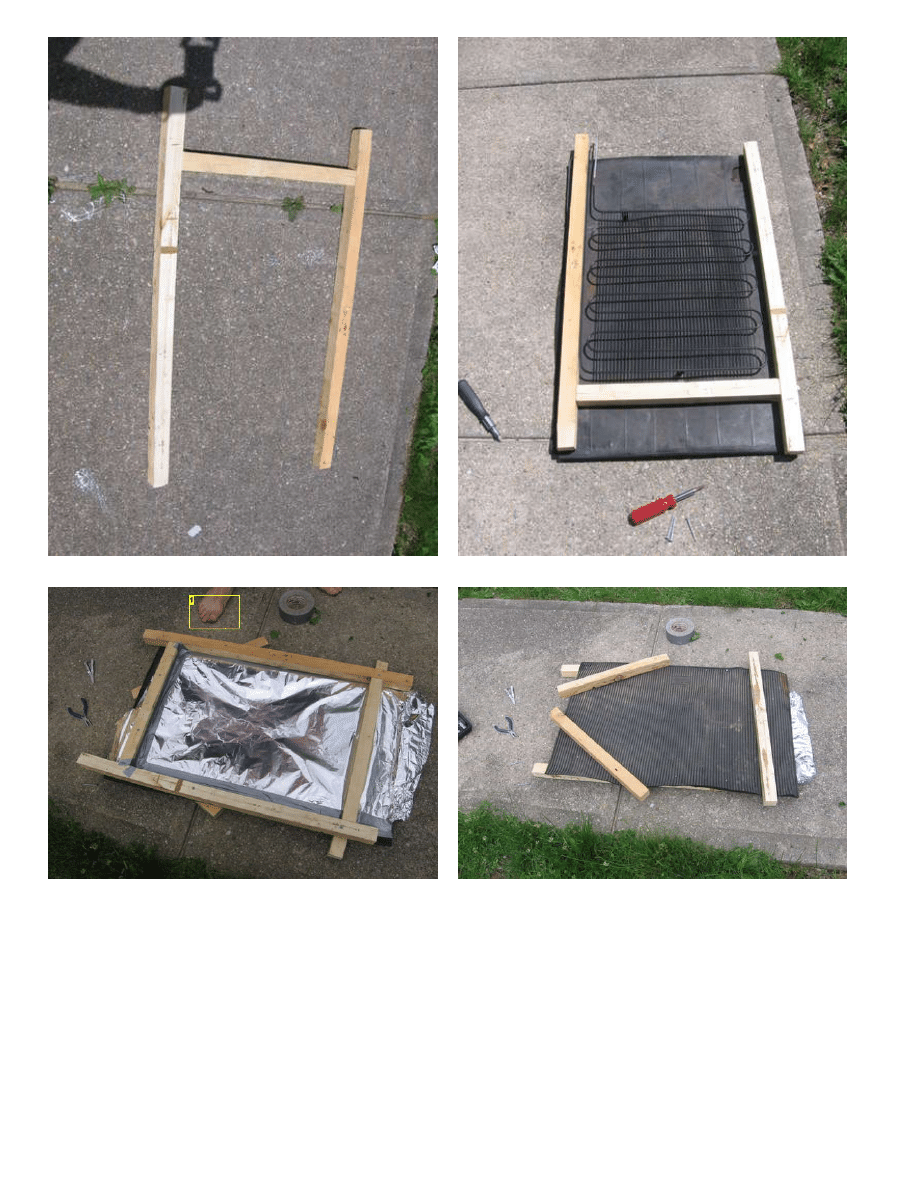
step 6:
Making The Frame
Once The backing was cut to size, it was time to start building the frame. As you can see I sort of built the frame around the collector, leaving enough backing to hold it all
together.
The frame is held on by building a similar frame on the back and driving large wood screws through the front frame, the backing and into the back frame.
I added some foil to the backing. The reason for this is that counter to what you would think, you do not want the backing to warm up. You only want the collector to
absorb heat (it was so nice of the fridge company to paint it black for us). The foil will take any sun that was not absorbed by the collector on the first pass and bounce it
back over the collector for another try at absorption. The glass cover will help keep the heat inside the panel for further absorption.
Light can pass through glass, but heat has a hard time getting through glass, think greenhouse. If you were going to make your backing out of metal instead of rubber,
you would skip the foil and instead attach the collector directly to the metal backing. The reason for this is that the metal back (painted black) would absorb heat and
transfer it to the collector, the rubber mat however is not a very good heat transfer agent. If you use a metal backing consider using insulation on the back of the panel to
try and keep as much heat in your collector box as possible.
Notice how duct tape was used on the inside to seal all cracks, you could use caulk but I didn't have any so I used the cheapest option. It worked well, and held the foil in
place.
http://www.instructables.com/id/Solar-Thermal-Water-Heater-For-Less-Than-Five-Doll/
Image Notes
1. All projects should be done barefoot :)
http://www.instructables.com/id/Solar-Thermal-Water-Heater-For-Less-Than-Five-Doll/
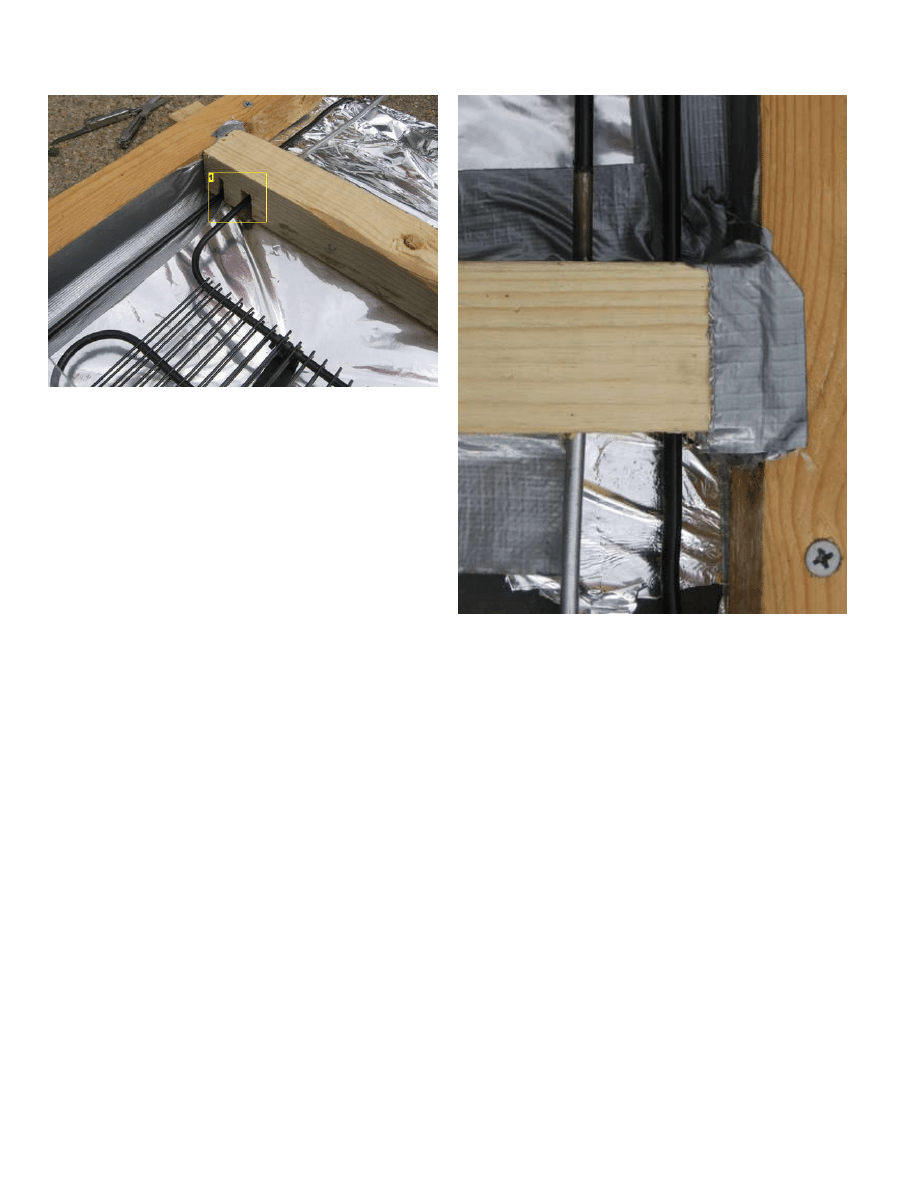
step 7:
Attaching Collector To Frame
Next we cut some notches for the entry and return ports to the collector. Note again the use of duct tape to seal cracks.
Image Notes
1. You could close this hole up with putty for a more efficient panel.
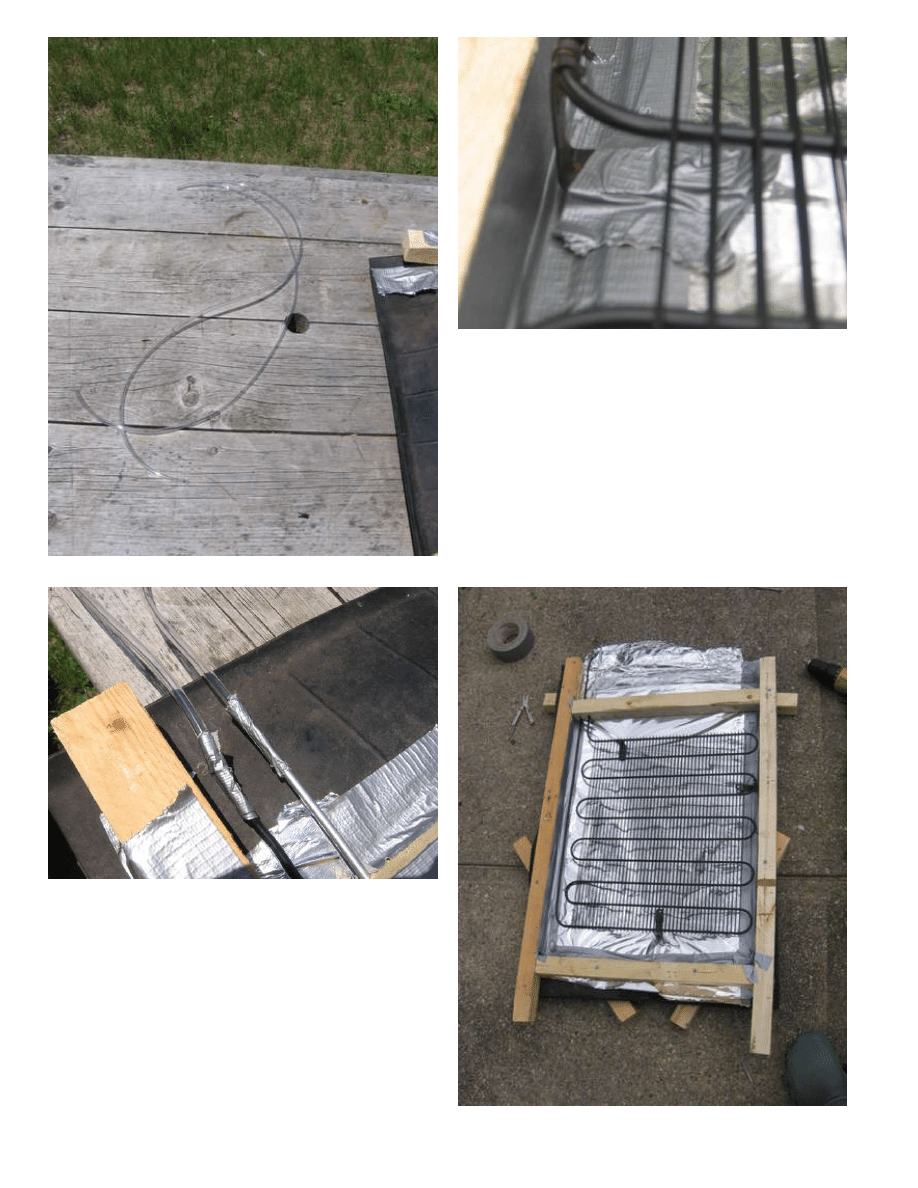
step 8:
Finshing Touches
I got some air pump hose from the local fish store and attached them to the end of the entry and return ports.
The duct tape was applied to make sure it was a tight fit, it was later removed as it was not needed.
Next we attached the collector to the backing, using the mounting brackets that came on the fridge and some duct tape. If you wanted you could use some screws and
wood, but I found the tape and the natural tension of the construction to be enough to hold it in place.
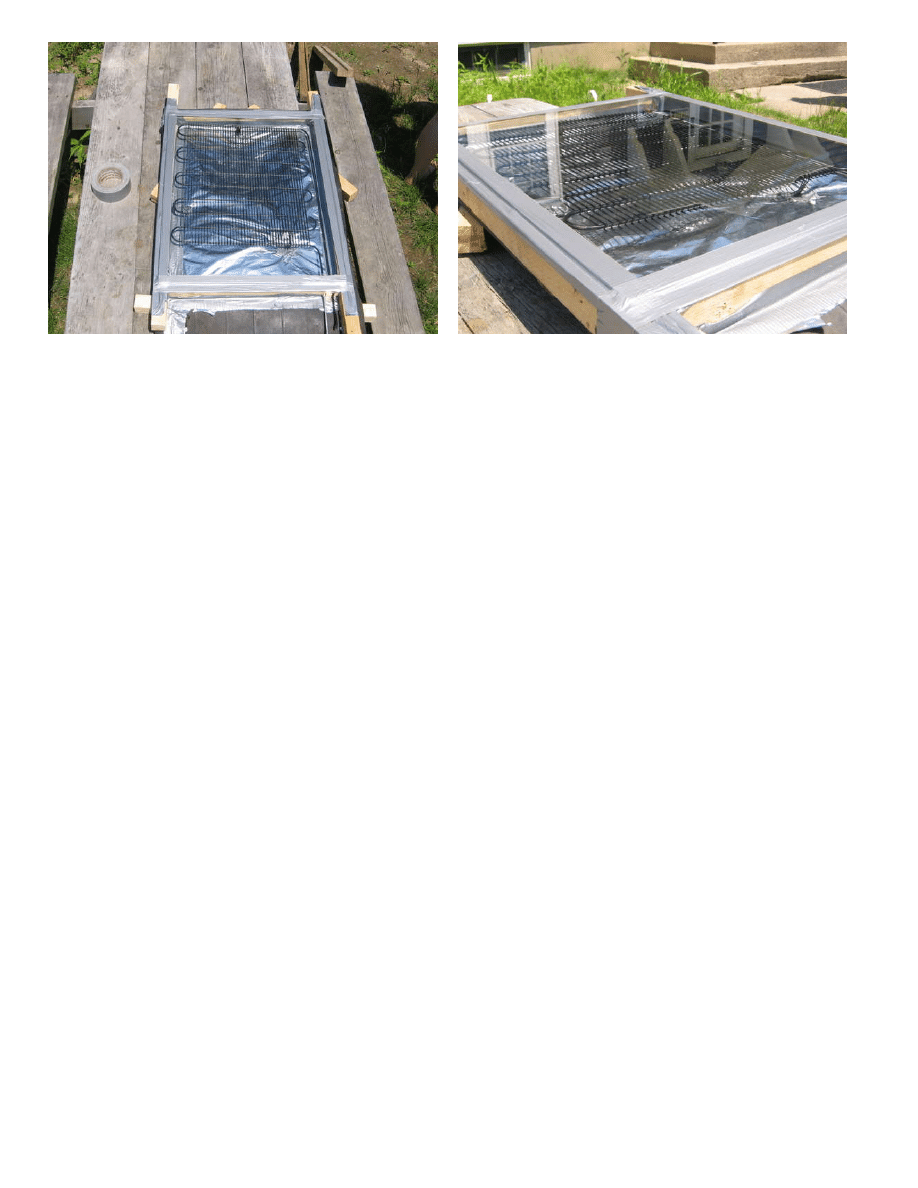
Lastly we attach the glass to the top. This serves to trap all the infrared radiation from the sun inside our panel where our collector will absorb it. Again light can pass
through glass, but heat can not easily escape
As you can see simple duct tape is enough to hold it on. I would recommend using some sort of mounting bracket however as after a couple days in the sun the tape
started to droop allowing the glass to slide off. A few screws would solve this, but I am cheap so I just put new tape on.
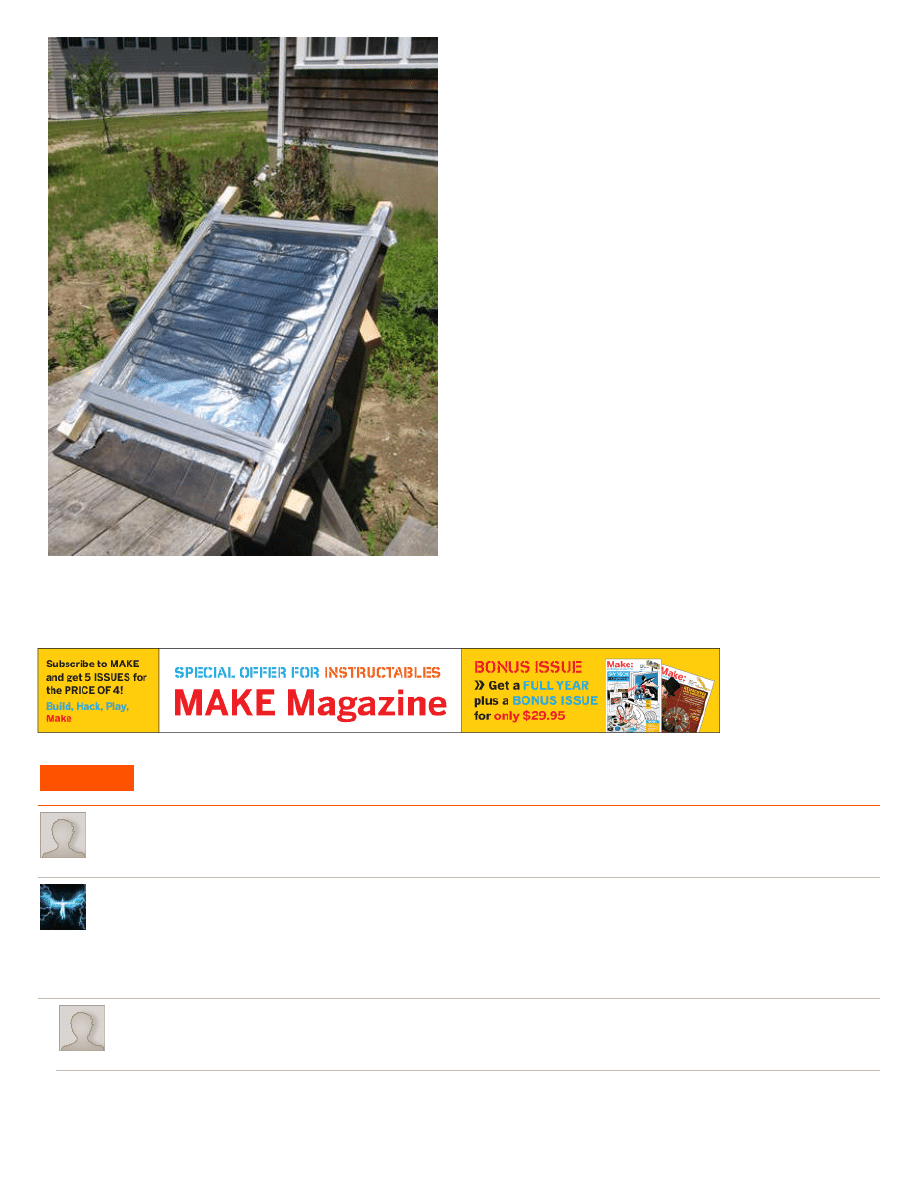
Set your panel up at an angle so that it catches the most sun.
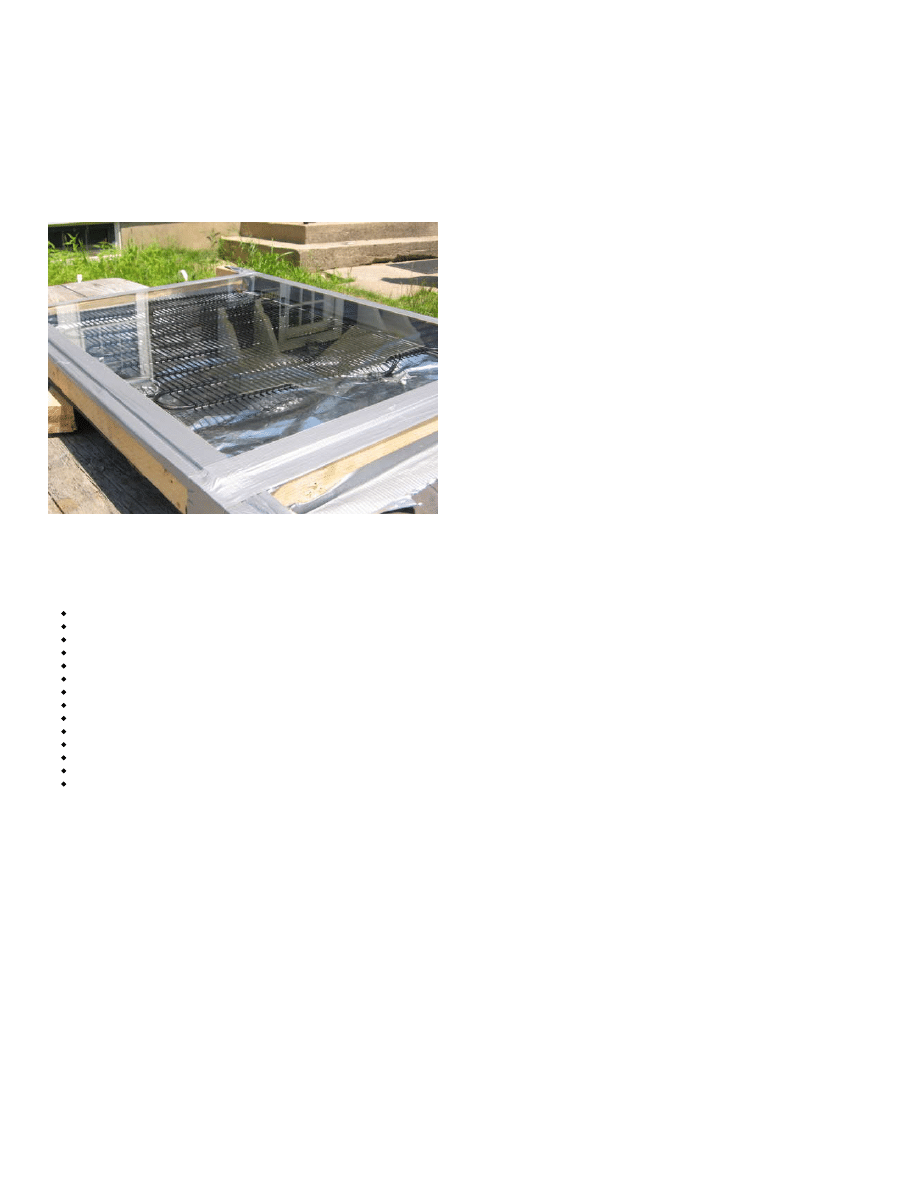
http://www.instructables.com/id/Solar-Thermal-Water-Heater-For-Less-Than-Five-Doll/
http://www.instructables.com/id/Solar-Thermal-Water-Heater-For-Less-Than-Five-Doll/
step 9:
Wrapup
Here is the gross part, put one end of the hose into your bucket of cold water, and make sure it is at the bottom of the bucket, next grab the return hose and start sucking.
That's right, unfortunately you have to prime the panel by getting some water into it. This can be done without getting water in your mouth, but inevitably I sucked just a
little too hard and ended up with a mouth full of nasty water. I would recommend having a friend do this part. :)
Set your cold water bucket (source) up higher than your warm water bucket (return) and the whole thing will gravity siphon.
A word of warning, this panel works VERY WELL. We tested it on a very sunny day and within seconds the water coming out of the panel was hot enough TO SCALD. I
burned my fingers. This very hot water is only formed when the water inside the panel is allowed to sit for about a minute without moving. If the water is moving (do to the
gravity siphon) the water exiting the return pipe is about 110 degrees, and while hot, will not burn you.
The water does not flow through the panel very fast (as the pipes are very small) but that is sort of a good thing as it allows the water to heat up a lot on its journey
through the collector. It does take a while to heat up a 5 gallon bucket of water, I ended up building an insulated return bucket that was all black and sealed on the top
except for the port where the water tube enters. This kept the returned hot water hot long enough to be of use. Simply pour the heated water back into the "cold" bucket
and send it through the collector a second time for even hotter water.
I let this guy run for a couple of hours one hot sunny day and heated up a five gallon bucket of cold water (measured at 70 degrees F) to over 110 degrees F. The temp
that day was about 76 degrees F. If the water is allowed to sit in the panel for several minutes and then forced out (by blowing in one of the hoses) the water was
measure at 170 degrees F. All in all we are much happier with the performance (and cost) of this panel. It performs much better than the previous one.
Our next modifications to this design will be to alter the return port so that it will thermo siphon, in this way the return hose can be fed into the source bucket and the water
will continually circulate in the panel getting hotter and hotter. We have also talked about adding mirrors to the panel to concentrate more heat. Our goal is to boil water.
This entire project cost less than five dollars, as I already had the screws, and the duct tape. The only thing I purchased was the air hose, which cost $3.76.
Enjoy the hot water.
http://www.instructables.com/id/Solar-Thermal-Water-Heater-For-Less-Than-Five-Doll/
Related Instructables
Advertisements
Make Magazine Special Offer
Comments
50 comments
says:
JinYi is a professional solar water heater manufacturers, suppliers, solar water heater in one company, main products : vacuum
tube solar water heaters, solar collectors, solar water heating systems
says:
I think this is a good set up accept the black background is prefered for me.
I am thinking that a small box like this (useing a bar fridge rad.) made of more non-flammable material, and placed in a focal point of a parabolic dish (say 6'
diameter could get things really rockin'.
Thanks.
says:
maybe instead of using a mat,we can use a junk galvanized sheet paint with black and use the mylar or aluminum foil as reflector...just like the solar
oven...

http://www.instructables.com/id/Solar-Thermal-Water-Heater-For-Less-Than-Five-Doll/
says:
I saw something neat the other day on YouTube. They were using steel wool in water to show how fast they could get the water to boil with a
parabolic mirror. Under 3 minutes. It has to be in a vacuum or a liquid or it will burn the wool though.
Greenscience.com - a couple actors who put together a lot of videos. I believe they sell plans and parts too. Pretty good ideas and a lot of 'green
science' know-how.
says:
I think that aluminium paper reflects the solar energy outside faster than a simple inside painted in black.
says:
i agree, maybe it is best to use the aluminum foil as a reflector of the sun from outside the frame,just like doing on the solar oven
says:
Yeah, if you paint the back black instead, that thing will get extremely hot (I live in Israel, and most of the houses use solar water heat, they are all built
with black backings)
says:
Sucking on the hose for the water everytime it is needed to be heated is difficult. Is there no way to get this done with some device that is cheap? Say some
kind of hand pump or something?
says:
you can use a pump from aquarium,it doesn't need priming.
says:
what if you run the hot water to a discarded water heater to store the heated water in? i'm not sure how to keep it in the loop til you need it. some one out
there will have to fill in that one. by the way you just need a friend who does remodels or scavenge. i have 9 old sliding glass doors that i got paid to take out
and haul off. i was planning on a green house but i like this idea better. i think the refridgerant coils would be better for radiant heating rather than putting the
wate ron you or in you.
says:
You can use a fluidyne engine to creat the pumping cycle. This lquid engin turns heat differences in to pumping power.
So when the heatr will be wormr the the out side the engine will circulate the water throw the systam (this my couse some heat lose in the system but im
not sure how much).
says:
See my solar car here
http://www.instructables.com/id/Mini-Solar-Car/
says:
Apr 25, 2009. 10:36 PM
isnt there usually freon in that tube? and when you release that doesnt it put a hole straight through the ozone lair? and isnt it poisonous?
says:
TOTALLY HOT IDEA!
thanks for the great idea!
says:
correct me if i'm wrong--it looks like the coils are sandwiched between the rubber mat and aluminum foil, with the V-shape frame behind the rubber mat and
the rectangular-frame over the aluminum foil side, so the layer would be:
V-frame
rubber mat
coil
foil
rectangular-frame
says:
Be VERY careful not to use PVC where it will heat up-- heated PVC will release dioxin, probably the most carcinogenic compound known. (Another reason
not to install vinyl windows in your house).
"Real" solar panels use copper tubing with "fins" on them to create more surface area to absorb the sunlight & therefore heat. Total tubing capacity in a 4' x
8' panel is only about a gallon, so really it's the storage of the heated water that becomes critical. In a pumped, closed-loop recirculating system, the heated
water transfers its heat to a tank of water, which heats up gradually as the system continues to pump the water through. Usually after a short period of time,

http://www.instructables.com/id/Solar-Thermal-Water-Heater-For-Less-Than-Five-Doll/
the water in the tank is about125 F, suitable for showering, etc. For swimming pools, you won't need to get the water that hot (unless you have a spa).
Whatever you do, make sure the components will not release toxins. I've seen people trying to use black rubber or vinyl garden hoses, and the results have
been really stinky, nasty spa water that had to be drained out.
says:
is there such thing as stainless stell tubing?
i heard copper also has some toxicity when used as piping.
guess we cant get away from it all.
thanks for pointing out the nasties of pvc.
says:
Copper pipes with soldered joints pose a toxicity problem also. Other forms of plastic pipe besides pve are considered safest. Wonder if they would work
in a hot water collection system?
says:
Feb 27, 2008. 10:26 PM
wow! i didnt know that
thanks for sharing
says:
my friend grand father built a house in a hill and his completly off grid through solar thermal and wind power
says:
Very nice. My dad made one very similar once, only built round an old domestic heating radiator. I remember how steam came out as soon as the water was
introduced!
says:
Another alternative would be to get a coil of black pipe with a reflector. Probably simpler, if you don't use the toxic pvc pipe.
Why not use the existing heat exchanger of your fridge and freezer to heat water, recirculate back to the water heater or keep the hot water in the lines hot?
This would require making an air/water exchanger intstead of air/air.
says:
Mar 29, 2009. 12:58 AM
Is there a way I can contact the author directly, anyone?
says:
I can't understant how it's all layered. Is it that first is the backing material. Over that is the back of refrigerator. Over that is the aluminium foil and over that is
the glass pane and then the wooden frame?
says:
How or where can you get the freon or other coolant removed from the back? Is it costly to get this removed?
says:
Does "drill" mean a drill machine? And what if I don't have the screw bits? I don't think we get it where I live.
Can the rubber mats used in cars be used for the backing material?
What is "A box of wood screws" ?
says:
Mar 28, 2009. 12:56 PM
would it work to place a plastic pane over the coils instead of glass?
says:
Aug 16, 2007. 9:02 AM
Our local dump has a coolant removal program that has refrigerators and dehumidifiers that they remove old freon from. With this in mind I found the perfect
heat collector. The back of a fridge is basically a heat dispersal system, with a slight modification is can be used to collect large amounts of heat.
Your warning could be stronger on the freon removal. This requires a connection to the system and a vacuum pump and receiver for the used freon gas.
A better heat collector is soft copper on a metal back plate, painted flat black.

http://www.instructables.com/id/Solar-Thermal-Water-Heater-For-Less-Than-Five-Doll/
says:
Aug 26, 2007. 2:57 PM
Where could I buy a pump and reveiver for the freon?
says:
Aug 26, 2007. 6:35 PM
sry i ment receiver
says:
It is not practical to recover refrigerant yourself. You can buy recovery pumps on ebay, but they're in the range of $500, and like liquidsands says,
the recovery should be performed by a licensed professional. Make sure the refrigerator has already had the refrigerant professionally recovered.
says:
Dec 28, 2008. 2:55 PM
These are sold by refrigeration repair suppliers but it requires a universal refrigerant license to buy. The reason is that if done wrong, incompletely
or not stored properly the same kind of damage we have been doing with CFC's(chloroflourocarbons) to the ozone layer for 40+ years would
continue.
One bright spot though. To dispose of a fridge @ a legal dump facility usually the dumper is required to pay a fee that covers the freon
evacuation cost before the unit can be placed in the general salvage area.
says:
Freeon has two amazing properties. First, it destroys ozone layer like there's no tomorrow. Second, it is so impressive as a coolant that it can
be used to freeze and shatter hardened steel - like the kind that's used to make bike locks (or so goes the legend in crackhead circles).
Thanks to this combination, freeon is a highly controlled substance. In some ares, it's as controlled or more than cocaine, which means you
should probably look into your local situation before you messing around with old refrigerators (especially if you're putting it on your credit
card). Sadly, you'd probably be safer, both physically and legally, simply pulling copper piping out of construction projects and painting it
black...which really says something.
says:
get a tank from an electric water heater and put it in a defunct refrigerator. Lay the fridge on its back on the south side of your house and hook up the pipes.
Open the door in the morning and close it in the evening. Oh, and paint the tank black!
says:
Feb 27, 2009. 10:01 PM
Here's a possible further development:
-make a shallow, waterproof, insulated trough that's black on the inside, install level, and fill it
-put the refrigerator coil in the trough, hooked up to your tubing
-lay some clear plastic right down on the water and tape in place
-glass over that with a little space, tape down but not really tight as we don't want any condensation in there. A bit of venting may be required
-set up a big reflector above to reflect light into the trough. Could be just cardboard or something painted flat white, or something silver pointed just right
-this way you will use almost all the heat, although it might not get QUITE as hot if left to sit with no circulation. The water in the trough is to transport the
heat from the trough sides to the coil.
says:
Hi there. This looks like a do-able project, cause I have a couple of fridge radiators on hand. What I'd like to get is a pump that would move the glycol very
slowly through the system. Anyone out there with some specs?
says:
On the what to do with this cool experiment front... A few years ago I built a freestanding shower stall from conduit w/ a shower head and single value shut-
off that connected to a12-volt on-demand RV pump, (powered by and auto cigarette lighter) for primitive camping in the Smokies. I would put my dual 6 gal.
water jugs by the fire ring and when they were warm enough I'd move them over to my nature stall, slide in the supply lines and scrub off my daily dirt in 12
gallons of warm wonderment. I can see how using your solar heater with a nice slow 12 volt fish tank pump in a closed loop could generate a nice quantity of
warm water. Especially if I wrap my tanks with a moving blanket to retain the heat. Initially I put black trash bags over them and put them in the sun during
the day.
says:
Found this interesting. I can attest that the water would indeed heat up to a very warm temp even on the coldest of days. I ran a test to see what kind of
temps I could get. I used 2" thick blue construction foam insulation and made a box of about 1 foot square. I placed Lexan on the top and duct taped closed.
I poked a thermometer through the top and placed in the sun. The outside temp was about 20 degrees F. The temp inside the box rose within 5-10 min to
about 130 degrees F. The box inside was blue. I then placed some black armaflex insulation inside to see if a black inside would make a difference. The
temp that day was 10 degrees F. The temp inside the box left in the sun for less than 10 min was over 160 degrees F. I cannot say what the real temp was
as it went beyond the calibration of the thermometer I had. Add to this some copper tubeing and you could have some very hot water indeed. If you are not
careful you could not only burn yourself or others but in a sealed system create steam and possibly rupture the system causing danger to any in the area. Be
advised, the sun is a work horse and can hurt you if not careful. My reservation in using this is not will I get enough hot water but how do I keep it from
getting "too" hot to be practical and safe to me and anyone else in the area.

http://www.instructables.com/id/Solar-Thermal-Water-Heater-For-Less-Than-Five-Doll/
says:
Great project, trouble is though in the winter when you have a bigger need for hot water these things are not so good. And winter days aren't known for being
sunny.
Tie this into a hot water tank system and save money on energy bill.
says:
For 13 months I lived in an old camper about 5 miles back in the woods. I love a hot shower and didn't even cold running water. So,
With two large tarps, the cheap blue kind, suspended in the trees, I was able to collect the rain in a large stock-tank.
With a small hand-pump, I pumped the water into an old striped down hot water heater that was in the sun all day. This was suspended up off the ground
with a trypod made of 10 foot 1x4's. I caped off the "hot water out" hole and pumped into the "cold water in". Then I could use the drain spiket on the bottom
of the tank as my " water out" valve. From there, the water was run into 250 feet of 1/2 inch, green ( I had heard some place that green makes hoter water
then black) garden hose that was just laid back and forth on the grass in the yard. From there it went up to my shower head (this was right by the pump).
With full sun for 5 or 6 hours, the water was so hot, I had to add a buy-pass hose to mix in some cooler water. As long as I pumped the pump handle, I got
hot water. The day didn't have to be too warm to make hot water, as long as there was lots of sun. I only used this shower a dozen or so times because it
took most of the Minnesota summer to think it up.
Cost? Maybe $6 for the tarps.
says:
Wonderfully simple and effective project!
I wonder if adding another coil in the box (slightly offsetting it) and making the water flow through both coils would increase the efficiency. The problem I see
with your current arrangement is that the tubing and connecting wires let a lot of the sunlight go through without adding to the heating. Even with the foil
bouncing the light back, I think you may be losing 25-35% of the potential heating.
Another approach would be to paint the foil black and bring it in close contact with the tubes/wires so the heat it absorbs is transmitted to the water. You
would need to insulate underneath the foil to prevent heat loss out the back using fiberglass insulation or foam or even scrunched up paper.
says:
Nov 13, 2008. 8:12 PM
I reckon if you replaced the foil with black bin liner it would work better. The foil just reflects the the heat rather than containing it. but a great idea none the
less
Aaron
says:
the foil is meant to reflect the heat onto the pipes
says:
small black water water pipe is also good for collecting heat, just make a big flat coil out of it, much larger heat absorption capacity and perhaps easier to use
as you can use standard stuff from a hardware / garden store. several meters of it only costs afew dollars.
quite possibly easier to find and cheaper, also bending and joining is not a problem.
hope this is helpful
says:
the idea the same as mine ,but i think that Heat loss is a two-way.Tank temperature down very easily, the best point of difference circulating pump.
http://www.cnsolarwaterheater.com
http://www.prcsolar.com
sales@prcsolar.com
says:
Aug 23, 2007. 3:20 PM
(removed by author or community request)
says:
Jan 10, 2009. 8:58 AM
I agree with coyotehope,
i don't see YOU making one of these without tools. If you are going to criticize something why don't you make your own instructable, and then say "your
design is cool, but i just made one modification to your instructable" and then put the link to it in your comment. Or at the very least please don't insult the
other persons hard work, make a constructive response like, "this is an awesome instructable but, i think it could be better if it used less tools." see how
that seems less offending than, "ummm sorry to say why do we need so many tool materials????? you should make a design that doesn't use so many
drill-beds and saws" all i'm trying to say is be nice and have fun on instructables.
-simharry
says:
that is cool dude! if i had the need I would so do this!

http://www.instructables.com/id/Solar-Thermal-Water-Heater-For-Less-Than-Five-Doll/
says:
get a life Drewbe94
they come up with a great inexpensive way to heat water, which i for one badly needed, and your such a green dork you criticize the tools? wow.
says:
Jun 12, 2008. 8:58 AM
When i was a boy our water was heated by the wood cook stove in the kitchen. A water jacket in the firebox was plumbed to a 40 gal steel tank made
especially for this "side arm" heater. The greatest advantage of this type of heater is that the thermal siphon will heat the water in the tank from t he top down
and hot water is available even when 80% of the water is cold. Replacing the water jacket with a solar collector will give the same results. A very simple
collector made from a coil of inexpensive black plastic water line(50') will heat 40 gal of water to 120 deg F on a sunny summer day. I can draw up the design
if anyone is interested.
Wyszukiwarka
Podobne podstrony:
Solar Thermal Water Heater For Less Than Five Doll
Home Power Magazine Extract Installation Basics For Solar Domestic Water Heating Systems Part 2
Home Power Magazine Extract Installation Basics For Solar Domestic Water Heating Systems Part 1
Human & Animal Powered Water Lifters for Irrigation
Cementless Ceramic Hip Arthroplasties in Patients Less Than 30 Years Old
Powiew weny, konkurs, For longer than forever
Human & Animal Powered Water Lifters for Irrigation
LESS THAN JAKE My Money Is On The Long
2007 04 Picture Perfect Enhance Less than Perfect Images with the Gimp
Comparative study based on exergy analysis of solar air heater collector using thermal energy storag
Simple Retrofitted Flat Plate Solar Water and Air Heaters
Garret Water Carburator Plans For Water Powered Vehicles
How To Build an Acid Alkaline Water Charger health healing search for [!B!]
Garret Water Carburator Plans For Water Powered Vehicles
DIY Combination Solar Water and Nieznany
więcej podobnych podstron