To learn more about this book, visit Microsoft Learning at
http://www.microsoft.com/MSPress/books11297.aspx
9780735624313
© 2008 Dan Holme. All rights reserved.
Windows
®
Administration Resource
Kit: Productivity
Solutions for IT
Professionals
Dan Holme
xi
www.microsoft.com/learning/booksurvey
Microsoft is interested in hearing your feedback so we can continually improve our books and
learning resources for you. To participate in a brief online survey, please visit:
What do you think of this book? We want to hear from you!
Table of Contents
Introduction . . . . . . . . . . . . . . . . . . . . . . . . . . . . . . . . . . . . . . . . . . . . . . . . . . . . . . . . . . . . . . xiii
Document Conventions. . . . . . . . . . . . . . . . . . . . . . . . . . . . . . . . . . . . . . . . . . . . . . . . . . . .xiii
System Requirements. . . . . . . . . . . . . . . . . . . . . . . . . . . . . . . . . . . . . . . . . . . . . . . . . . . . . .xiii
Web-Based Content. . . . . . . . . . . . . . . . . . . . . . . . . . . . . . . . . . . . . . . . . . . . . . . . . . . . . . .xiii
Find Additional Content Online . . . . . . . . . . . . . . . . . . . . . . . . . . . . . . . . . . . . . . . . . . . . .xiv
Companion Media . . . . . . . . . . . . . . . . . . . . . . . . . . . . . . . . . . . . . . . . . . . . . . . . . . . . . . . .xiv
Using the Scripts. . . . . . . . . . . . . . . . . . . . . . . . . . . . . . . . . . . . . . . . . . . . . . . . . . . . . . . . . . xv
Resource Kit Support Policy . . . . . . . . . . . . . . . . . . . . . . . . . . . . . . . . . . . . . . . . . . . . . . . .xvi
Solution Collection 1: Role-Based Management . . . . . . . . . . . . . . . . . . . . . . . . . . .1
Scenarios, Pain, and Solution . . . . . . . . . . . . . . . . . . . . . . . . . . . . . . . . . . . . . . . . . . . . . . . . 2
The 80/20 rule. . . . . . . . . . . . . . . . . . . . . . . . . . . . . . . . . . . . . . . . . . . . . . . . . . . . . . . 8
Scripts and tools on the companion media . . . . . . . . . . . . . . . . . . . . . . . . . . . . . . 8
Microsoft and third-party tools . . . . . . . . . . . . . . . . . . . . . . . . . . . . . . . . . . . . . . . . 9
The Windows Administration Resource Kit online community . . . . . . . . . . . . 10
Enough, already!. . . . . . . . . . . . . . . . . . . . . . . . . . . . . . . . . . . . . . . . . . . . . . . . . . . . 11
1-1: Enumerate a User’s (or Computer’s) Group Memberships . . . . . . . . . . . . . . . . . . 11
Solution overview. . . . . . . . . . . . . . . . . . . . . . . . . . . . . . . . . . . . . . . . . . . . . . . . . . . 11
Introduction . . . . . . . . . . . . . . . . . . . . . . . . . . . . . . . . . . . . . . . . . . . . . . . . . . . . . . . 12
Active Directory Users and Computers. . . . . . . . . . . . . . . . . . . . . . . . . . . . . . . . . 12
DS commands. . . . . . . . . . . . . . . . . . . . . . . . . . . . . . . . . . . . . . . . . . . . . . . . . . . . . . 13
Creating a batch script . . . . . . . . . . . . . . . . . . . . . . . . . . . . . . . . . . . . . . . . . . . . . . 14
Enumerating group membership with VBScript . . . . . . . . . . . . . . . . . . . . . . . . . 15
Why VBScript?. . . . . . . . . . . . . . . . . . . . . . . . . . . . . . . . . . . . . . . . . . . . . . . . . . . . . . 25
Next steps . . . . . . . . . . . . . . . . . . . . . . . . . . . . . . . . . . . . . . . . . . . . . . . . . . . . . . . . . 25
For more information . . . . . . . . . . . . . . . . . . . . . . . . . . . . . . . . . . . . . . . . . . . . . . . 26
Solution summary . . . . . . . . . . . . . . . . . . . . . . . . . . . . . . . . . . . . . . . . . . . . . . . . . . 26

xii
Table of Contents
1-2: Create a GUI Tool to Enumerate Group Memberships . . . . . . . . . . . . . . . . . . . . . 26
Solution overview . . . . . . . . . . . . . . . . . . . . . . . . . . . . . . . . . . . . . . . . . . . . . . . . . . 26
Introduction . . . . . . . . . . . . . . . . . . . . . . . . . . . . . . . . . . . . . . . . . . . . . . . . . . . . . . . 27
HTML Applications . . . . . . . . . . . . . . . . . . . . . . . . . . . . . . . . . . . . . . . . . . . . . . . . . 27
Create an HTA . . . . . . . . . . . . . . . . . . . . . . . . . . . . . . . . . . . . . . . . . . . . . . . . . . . . . 28
For more information . . . . . . . . . . . . . . . . . . . . . . . . . . . . . . . . . . . . . . . . . . . . . . . 35
Solution summary . . . . . . . . . . . . . . . . . . . . . . . . . . . . . . . . . . . . . . . . . . . . . . . . . . 35
1-3: Extend Active Directory Users and Computers to Enumerate
Group Memberships . . . . . . . . . . . . . . . . . . . . . . . . . . . . . . . . . . . . . . . . . . . . 35
Solution overview . . . . . . . . . . . . . . . . . . . . . . . . . . . . . . . . . . . . . . . . . . . . . . . . . . 35
Introduction . . . . . . . . . . . . . . . . . . . . . . . . . . . . . . . . . . . . . . . . . . . . . . . . . . . . . . . 36
Arguments and HTAs . . . . . . . . . . . . . . . . . . . . . . . . . . . . . . . . . . . . . . . . . . . . . . . 36
Integrating a custom HTA with an MMC snap-in using tasks . . . . . . . . . . . . . 38
Integrating a custom HTA with an MMC snap-in using
display specifiers . . . . . . . . . . . . . . . . . . . . . . . . . . . . . . . . . . . . . . . . . . . . . . . . . . . 42
Tasks or display specifiers. . . . . . . . . . . . . . . . . . . . . . . . . . . . . . . . . . . . . . . . . . . . 46
Solution summary . . . . . . . . . . . . . . . . . . . . . . . . . . . . . . . . . . . . . . . . . . . . . . . . . . 46
1-4: Understand Role-Based Management . . . . . . . . . . . . . . . . . . . . . . . . . . . . . . . . . . . 46
Solution overview . . . . . . . . . . . . . . . . . . . . . . . . . . . . . . . . . . . . . . . . . . . . . . . . . . 46
Introduction . . . . . . . . . . . . . . . . . . . . . . . . . . . . . . . . . . . . . . . . . . . . . . . . . . . . . . . 47
Role groups. . . . . . . . . . . . . . . . . . . . . . . . . . . . . . . . . . . . . . . . . . . . . . . . . . . . . . . . 48
Capability management groups . . . . . . . . . . . . . . . . . . . . . . . . . . . . . . . . . . . . . . 49
Role groups are nested into capability management groups . . . . . . . . . . . . . 51
Other nesting . . . . . . . . . . . . . . . . . . . . . . . . . . . . . . . . . . . . . . . . . . . . . . . . . . . . . . 52
Data, business logic, and presentation. . . . . . . . . . . . . . . . . . . . . . . . . . . . . . . . . 53
Third-party tools . . . . . . . . . . . . . . . . . . . . . . . . . . . . . . . . . . . . . . . . . . . . . . . . . . . 54
Solution summary . . . . . . . . . . . . . . . . . . . . . . . . . . . . . . . . . . . . . . . . . . . . . . . . . . 54
1-5: Implement Role-Based Access Control. . . . . . . . . . . . . . . . . . . . . . . . . . . . . . . . . . . 55
Solution overview . . . . . . . . . . . . . . . . . . . . . . . . . . . . . . . . . . . . . . . . . . . . . . . . . . 55
Introduction . . . . . . . . . . . . . . . . . . . . . . . . . . . . . . . . . . . . . . . . . . . . . . . . . . . . . . . 55
Role groups. . . . . . . . . . . . . . . . . . . . . . . . . . . . . . . . . . . . . . . . . . . . . . . . . . . . . . . . 55
Capability management groups . . . . . . . . . . . . . . . . . . . . . . . . . . . . . . . . . . . . . . 61
Representing business requirements . . . . . . . . . . . . . . . . . . . . . . . . . . . . . . . . . . 64
Implementing capabilities . . . . . . . . . . . . . . . . . . . . . . . . . . . . . . . . . . . . . . . . . . . 65
Automating and provisioning . . . . . . . . . . . . . . . . . . . . . . . . . . . . . . . . . . . . . . . . 65
Solution summary . . . . . . . . . . . . . . . . . . . . . . . . . . . . . . . . . . . . . . . . . . . . . . . . . . 65
1-6: Reporting and Auditing RBAC and Role-Based Management . . . . . . . . . . . . . . . 66
Solution overview . . . . . . . . . . . . . . . . . . . . . . . . . . . . . . . . . . . . . . . . . . . . . . . . . . 66

Table of Contents
xiii
Introduction . . . . . . . . . . . . . . . . . . . . . . . . . . . . . . . . . . . . . . . . . . . . . . . . . . . . . . . 66
My Memberships . . . . . . . . . . . . . . . . . . . . . . . . . . . . . . . . . . . . . . . . . . . . . . . . . . . 67
Access Report . . . . . . . . . . . . . . . . . . . . . . . . . . . . . . . . . . . . . . . . . . . . . . . . . . . . . . 71
Auditing internal compliance of your role-based access control . . . . . . . . . . . 73
Solution summary . . . . . . . . . . . . . . . . . . . . . . . . . . . . . . . . . . . . . . . . . . . . . . . . . . 76
1-7: Getting to Role-Based Management. . . . . . . . . . . . . . . . . . . . . . . . . . . . . . . . . . . . . 77
Solution overview. . . . . . . . . . . . . . . . . . . . . . . . . . . . . . . . . . . . . . . . . . . . . . . . . . . 77
Introduction . . . . . . . . . . . . . . . . . . . . . . . . . . . . . . . . . . . . . . . . . . . . . . . . . . . . . . . 77
A review of role-based management . . . . . . . . . . . . . . . . . . . . . . . . . . . . . . . . . . 77
Discussing and selling role-based management. . . . . . . . . . . . . . . . . . . . . . . . . 79
The road to role-based management. . . . . . . . . . . . . . . . . . . . . . . . . . . . . . . . . . 81
Token size . . . . . . . . . . . . . . . . . . . . . . . . . . . . . . . . . . . . . . . . . . . . . . . . . . . . . . . . . 83
Solution summary . . . . . . . . . . . . . . . . . . . . . . . . . . . . . . . . . . . . . . . . . . . . . . . . . . 87
Solution Collection 2: Managing Files, Folders, and Shares . . . . . . . . . . . . . . . . 89
Scenarios, Pain, and Solution . . . . . . . . . . . . . . . . . . . . . . . . . . . . . . . . . . . . . . . . . . . . . . . 90
2-1: Work Effectively with the ACL Editor User Interfaces . . . . . . . . . . . . . . . . . . . . . . . 92
Solution overview. . . . . . . . . . . . . . . . . . . . . . . . . . . . . . . . . . . . . . . . . . . . . . . . . . . 92
Introduction . . . . . . . . . . . . . . . . . . . . . . . . . . . . . . . . . . . . . . . . . . . . . . . . . . . . . . . 92
The ACL editor . . . . . . . . . . . . . . . . . . . . . . . . . . . . . . . . . . . . . . . . . . . . . . . . . . . . . 92
Evaluating effective permissions . . . . . . . . . . . . . . . . . . . . . . . . . . . . . . . . . . . . . . 96
Solution summary . . . . . . . . . . . . . . . . . . . . . . . . . . . . . . . . . . . . . . . . . . . . . . . . . . 99
2-2: Manage Folder Structure. . . . . . . . . . . . . . . . . . . . . . . . . . . . . . . . . . . . . . . . . . . . . . . 99
Solution overview. . . . . . . . . . . . . . . . . . . . . . . . . . . . . . . . . . . . . . . . . . . . . . . . . . . 99
Introduction . . . . . . . . . . . . . . . . . . . . . . . . . . . . . . . . . . . . . . . . . . . . . . . . . . . . . . 100
Create a folder structure that is wide rather than deep. . . . . . . . . . . . . . . . . . 100
Use DFS namespaces to present shared folders in a logical hierarchy . . . . . 103
Solution summary . . . . . . . . . . . . . . . . . . . . . . . . . . . . . . . . . . . . . . . . . . . . . . . . . 103
2-3: Manage Access to Root Data Folders . . . . . . . . . . . . . . . . . . . . . . . . . . . . . . . . . . . 104
Solution overview. . . . . . . . . . . . . . . . . . . . . . . . . . . . . . . . . . . . . . . . . . . . . . . . . . 104
Introduction . . . . . . . . . . . . . . . . . . . . . . . . . . . . . . . . . . . . . . . . . . . . . . . . . . . . . . 104
Create one or more consistent root data folders on each file server . . . . . . 104
Use Group Policy to manage and enforce ACLs on root data folders . . . . . 105
Solution summary . . . . . . . . . . . . . . . . . . . . . . . . . . . . . . . . . . . . . . . . . . . . . . . . . 107
2-4: Delegate the Management of Shared Folders. . . . . . . . . . . . . . . . . . . . . . . . . . . . 107
Solution overview. . . . . . . . . . . . . . . . . . . . . . . . . . . . . . . . . . . . . . . . . . . . . . . . . . 107
Introduction . . . . . . . . . . . . . . . . . . . . . . . . . . . . . . . . . . . . . . . . . . . . . . . . . . . . . . 107

xiv
Table of Contents
Dedicate servers that perform a file server role . . . . . . . . . . . . . . . . . . . . . . . . 107
Manage the delegation of administration of shared folders . . . . . . . . . . . . . 108
Solution summary . . . . . . . . . . . . . . . . . . . . . . . . . . . . . . . . . . . . . . . . . . . . . . . . . 110
2-5: Determine Which Folders Should Be Shared. . . . . . . . . . . . . . . . . . . . . . . . . . . . . 110
Solution overview . . . . . . . . . . . . . . . . . . . . . . . . . . . . . . . . . . . . . . . . . . . . . . . . . 110
Introduction . . . . . . . . . . . . . . . . . . . . . . . . . . . . . . . . . . . . . . . . . . . . . . . . . . . . . . 110
Determine which folders should be shared. . . . . . . . . . . . . . . . . . . . . . . . . . . . 111
Solution summary . . . . . . . . . . . . . . . . . . . . . . . . . . . . . . . . . . . . . . . . . . . . . . . . . 112
2-6: Implement Folder Access Permissions Based on Required Capabilities . . . . . . 112
Solution overview . . . . . . . . . . . . . . . . . . . . . . . . . . . . . . . . . . . . . . . . . . . . . . . . . 112
Introduction . . . . . . . . . . . . . . . . . . . . . . . . . . . . . . . . . . . . . . . . . . . . . . . . . . . . . . 112
Implement a Read capability . . . . . . . . . . . . . . . . . . . . . . . . . . . . . . . . . . . . . . . . 113
Implement a Browse To capability . . . . . . . . . . . . . . . . . . . . . . . . . . . . . . . . . . . 114
Implement an Edit capability. . . . . . . . . . . . . . . . . . . . . . . . . . . . . . . . . . . . . . . . 116
Implement a Contribute capability. . . . . . . . . . . . . . . . . . . . . . . . . . . . . . . . . . . 117
Implement a Drop capability . . . . . . . . . . . . . . . . . . . . . . . . . . . . . . . . . . . . . . . . 118
Implementing a Support capability . . . . . . . . . . . . . . . . . . . . . . . . . . . . . . . . . . 118
Create scripts to apply permissions consistently . . . . . . . . . . . . . . . . . . . . . . . 119
Manage folder access capabilities using role-based access control . . . . . . . 119
Solution summary . . . . . . . . . . . . . . . . . . . . . . . . . . . . . . . . . . . . . . . . . . . . . . . . . 120
2-7: Understand Shared Folder Permissions (SMB Permissions). . . . . . . . . . . . . . . . . 120
Solution overview . . . . . . . . . . . . . . . . . . . . . . . . . . . . . . . . . . . . . . . . . . . . . . . . . 120
Introduction . . . . . . . . . . . . . . . . . . . . . . . . . . . . . . . . . . . . . . . . . . . . . . . . . . . . . . 121
Scripting SMB permissions on local and remote systems . . . . . . . . . . . . . . . . 123
Solution summary . . . . . . . . . . . . . . . . . . . . . . . . . . . . . . . . . . . . . . . . . . . . . . . . . 123
2-8: Script the Creation of an SMB Share. . . . . . . . . . . . . . . . . . . . . . . . . . . . . . . . . . . . 124
Solution overview . . . . . . . . . . . . . . . . . . . . . . . . . . . . . . . . . . . . . . . . . . . . . . . . . 124
Introduction . . . . . . . . . . . . . . . . . . . . . . . . . . . . . . . . . . . . . . . . . . . . . . . . . . . . . . 124
Using Share_Create.vbs. . . . . . . . . . . . . . . . . . . . . . . . . . . . . . . . . . . . . . . . . . . . . 124
Customizing Share_Create.vbs. . . . . . . . . . . . . . . . . . . . . . . . . . . . . . . . . . . . . . . 124
Understanding Share_Create.vbs . . . . . . . . . . . . . . . . . . . . . . . . . . . . . . . . . . . . 125
Solution summary . . . . . . . . . . . . . . . . . . . . . . . . . . . . . . . . . . . . . . . . . . . . . . . . . 126
2-9: Provision the Creation of a Shared Folder . . . . . . . . . . . . . . . . . . . . . . . . . . . . . . . 126
Solution overview . . . . . . . . . . . . . . . . . . . . . . . . . . . . . . . . . . . . . . . . . . . . . . . . . 126
Introduction . . . . . . . . . . . . . . . . . . . . . . . . . . . . . . . . . . . . . . . . . . . . . . . . . . . . . . 127
Using Folder_Provision.hta. . . . . . . . . . . . . . . . . . . . . . . . . . . . . . . . . . . . . . . . . . 127
Basic customization of Folder_Provision.hta . . . . . . . . . . . . . . . . . . . . . . . . . . 130

Table of Contents
xv
Understanding the code behind Folder_Provision.hta and
advanced customization . . . . . . . . . . . . . . . . . . . . . . . . . . . . . . . . . . . . . . . . 131
Solution summary . . . . . . . . . . . . . . . . . . . . . . . . . . . . . . . . . . . . . . . . . . . . . . . . . 135
2-10: Avoid the ACL Inheritance Propagation Danger
of File and Folder Movement . . . . . . . . . . . . . . . . . . . . . . . . . . . . . . . . . . . . 136
Solution overview. . . . . . . . . . . . . . . . . . . . . . . . . . . . . . . . . . . . . . . . . . . . . . . . . . 136
Introduction . . . . . . . . . . . . . . . . . . . . . . . . . . . . . . . . . . . . . . . . . . . . . . . . . . . . . . 136
See the bug-like feature in action . . . . . . . . . . . . . . . . . . . . . . . . . . . . . . . . . . . . 137
What in the world is going on? . . . . . . . . . . . . . . . . . . . . . . . . . . . . . . . . . . . . . . 138
Solving the problem . . . . . . . . . . . . . . . . . . . . . . . . . . . . . . . . . . . . . . . . . . . . . . . 139
Change the culture, change the configuration . . . . . . . . . . . . . . . . . . . . . . . . . 140
Solution summary . . . . . . . . . . . . . . . . . . . . . . . . . . . . . . . . . . . . . . . . . . . . . . . . . 140
2-11: Preventing Users from Changing Permissions on Their Own Files. . . . . . . . . . 141
Solution overview. . . . . . . . . . . . . . . . . . . . . . . . . . . . . . . . . . . . . . . . . . . . . . . . . . 141
Introduction . . . . . . . . . . . . . . . . . . . . . . . . . . . . . . . . . . . . . . . . . . . . . . . . . . . . . . 141
What about object lockout? . . . . . . . . . . . . . . . . . . . . . . . . . . . . . . . . . . . . . . . . . 143
Solution summary . . . . . . . . . . . . . . . . . . . . . . . . . . . . . . . . . . . . . . . . . . . . . . . . . 143
2-12: Prevent Users from Seeing What They Cannot Access. . . . . . . . . . . . . . . . . . . . 143
Solution overview. . . . . . . . . . . . . . . . . . . . . . . . . . . . . . . . . . . . . . . . . . . . . . . . . . 143
Introduction . . . . . . . . . . . . . . . . . . . . . . . . . . . . . . . . . . . . . . . . . . . . . . . . . . . . . . 143
One perspective: Don’t worry about it . . . . . . . . . . . . . . . . . . . . . . . . . . . . . . . . 144
A second perspective: Manage your folders . . . . . . . . . . . . . . . . . . . . . . . . . . . 144
A third perspective and a solution: Access-based Enumeration. . . . . . . . . . . 144
Solution summary . . . . . . . . . . . . . . . . . . . . . . . . . . . . . . . . . . . . . . . . . . . . . . . . . 145
2-13: Determine Who Has a File Open . . . . . . . . . . . . . . . . . . . . . . . . . . . . . . . . . . . . . . 145
Solution overview. . . . . . . . . . . . . . . . . . . . . . . . . . . . . . . . . . . . . . . . . . . . . . . . . . 145
Introduction . . . . . . . . . . . . . . . . . . . . . . . . . . . . . . . . . . . . . . . . . . . . . . . . . . . . . . 145
Using FileServer_OpenFile.vbs . . . . . . . . . . . . . . . . . . . . . . . . . . . . . . . . . . . . . . . 146
Understanding FileServer_OpenFile.vbs . . . . . . . . . . . . . . . . . . . . . . . . . . . . . . . 146
Solution summary . . . . . . . . . . . . . . . . . . . . . . . . . . . . . . . . . . . . . . . . . . . . . . . . . 146
2-14: Send Messages to Users . . . . . . . . . . . . . . . . . . . . . . . . . . . . . . . . . . . . . . . . . . . . . 147
Solution overview. . . . . . . . . . . . . . . . . . . . . . . . . . . . . . . . . . . . . . . . . . . . . . . . . . 147
Introduction . . . . . . . . . . . . . . . . . . . . . . . . . . . . . . . . . . . . . . . . . . . . . . . . . . . . . . 147
Using Message_Notification.vbs . . . . . . . . . . . . . . . . . . . . . . . . . . . . . . . . . . . . . 147
Understanding Message_Notification.vbs . . . . . . . . . . . . . . . . . . . . . . . . . . . . . 148
Using PSExec to execute a script on a remote machine . . . . . . . . . . . . . . . . . 148
Listing the open sessions on a server . . . . . . . . . . . . . . . . . . . . . . . . . . . . . . . . . 150

xvi
Table of Contents
Using and customizing FileServer_NotifyConnectedUsers.vbs . . . . . . . . . . . 150
Solution summary . . . . . . . . . . . . . . . . . . . . . . . . . . . . . . . . . . . . . . . . . . . . . . . . . 151
2-15: Distribute Files Across Servers . . . . . . . . . . . . . . . . . . . . . . . . . . . . . . . . . . . . . . . . 151
Solution overview . . . . . . . . . . . . . . . . . . . . . . . . . . . . . . . . . . . . . . . . . . . . . . . . . 151
Introduction . . . . . . . . . . . . . . . . . . . . . . . . . . . . . . . . . . . . . . . . . . . . . . . . . . . . . . 151
Using Robocopy to distribute files . . . . . . . . . . . . . . . . . . . . . . . . . . . . . . . . . . . 151
Using DFS Replication to distribute files . . . . . . . . . . . . . . . . . . . . . . . . . . . . . . 152
Solution summary . . . . . . . . . . . . . . . . . . . . . . . . . . . . . . . . . . . . . . . . . . . . . . . . . 154
2-16: Use Quotas to Manage Storage . . . . . . . . . . . . . . . . . . . . . . . . . . . . . . . . . . . . . . 154
Solution overview . . . . . . . . . . . . . . . . . . . . . . . . . . . . . . . . . . . . . . . . . . . . . . . . . 154
Introduction . . . . . . . . . . . . . . . . . . . . . . . . . . . . . . . . . . . . . . . . . . . . . . . . . . . . . . 154
What’s new in quota management. . . . . . . . . . . . . . . . . . . . . . . . . . . . . . . . . . . 155
Quota templates . . . . . . . . . . . . . . . . . . . . . . . . . . . . . . . . . . . . . . . . . . . . . . . . . . 155
Apply a quota to a folder . . . . . . . . . . . . . . . . . . . . . . . . . . . . . . . . . . . . . . . . . . . 156
Solution summary . . . . . . . . . . . . . . . . . . . . . . . . . . . . . . . . . . . . . . . . . . . . . . . . . 157
2-17: Reduce Help Desk Calls to Recover Deleted or Overwritten Files . . . . . . . . . . 157
Solution overview . . . . . . . . . . . . . . . . . . . . . . . . . . . . . . . . . . . . . . . . . . . . . . . . . 157
Introduction . . . . . . . . . . . . . . . . . . . . . . . . . . . . . . . . . . . . . . . . . . . . . . . . . . . . . . 157
Enabling shadow copies . . . . . . . . . . . . . . . . . . . . . . . . . . . . . . . . . . . . . . . . . . . . 158
Understanding and configuring shadow copies. . . . . . . . . . . . . . . . . . . . . . . . 160
Accessing previous versions. . . . . . . . . . . . . . . . . . . . . . . . . . . . . . . . . . . . . . . . . 161
Solution summary . . . . . . . . . . . . . . . . . . . . . . . . . . . . . . . . . . . . . . . . . . . . . . . . . 162
2-18: Create an Effective, Delegated DFS Namespace. . . . . . . . . . . . . . . . . . . . . . . . . 163
Solution overview . . . . . . . . . . . . . . . . . . . . . . . . . . . . . . . . . . . . . . . . . . . . . . . . . 163
Introduction . . . . . . . . . . . . . . . . . . . . . . . . . . . . . . . . . . . . . . . . . . . . . . . . . . . . . . 163
Creating DFS namespaces . . . . . . . . . . . . . . . . . . . . . . . . . . . . . . . . . . . . . . . . . . 164
Delegating DFS namespaces . . . . . . . . . . . . . . . . . . . . . . . . . . . . . . . . . . . . . . . . 164
Linking DFS namespaces . . . . . . . . . . . . . . . . . . . . . . . . . . . . . . . . . . . . . . . . . . . 166
Presenting DFS namespaces to users . . . . . . . . . . . . . . . . . . . . . . . . . . . . . . . . . 168
Solution summary . . . . . . . . . . . . . . . . . . . . . . . . . . . . . . . . . . . . . . . . . . . . . . . . . 169
Solution Collection 3: Managing User Data and Settings . . . . . . . . . . . . . . . . . 171
Scenarios, Pain, and Solution . . . . . . . . . . . . . . . . . . . . . . . . . . . . . . . . . . . . . . . . . . . . . . 172
3-1: Define Requirements for a User Data and Settings Framework. . . . . . . . . . . . . 174
Solution overview . . . . . . . . . . . . . . . . . . . . . . . . . . . . . . . . . . . . . . . . . . . . . . . . . 174
Introduction . . . . . . . . . . . . . . . . . . . . . . . . . . . . . . . . . . . . . . . . . . . . . . . . . . . . . . 174
Understand the business requirements definition exercise . . . . . . . . . . . . . . 174
Define the high-level business requirements . . . . . . . . . . . . . . . . . . . . . . . . . . 177

Table of Contents
xvii
Determine key design decision that is derived from high-level business
requirements . . . . . . . . . . . . . . . . . . . . . . . . . . . . . . . . . . . . . . . . . . . . . . . . . . 180
Define requirements derived from key design decisions. . . . . . . . . . . . . . . . . 181
Solution summary . . . . . . . . . . . . . . . . . . . . . . . . . . . . . . . . . . . . . . . . . . . . . . . . . 184
3-2: Design UDS Components That Align Requirements and Scenarios
with Features and Technologies (Part I). . . . . . . . . . . . . . . . . . . . . . . . . . . . 185
Solution overview. . . . . . . . . . . . . . . . . . . . . . . . . . . . . . . . . . . . . . . . . . . . . . . . . . 185
Introduction . . . . . . . . . . . . . . . . . . . . . . . . . . . . . . . . . . . . . . . . . . . . . . . . . . . . . . 185
Understand UDS options . . . . . . . . . . . . . . . . . . . . . . . . . . . . . . . . . . . . . . . . . . . 186
Align user data and settings options with requirements and scenarios . . . . 189
Validate the outcome for desktop, roaming, relocated,
and traveling users . . . . . . . . . . . . . . . . . . . . . . . . . . . . . . . . . . . . . . . . . . . . . 191
Solution summary . . . . . . . . . . . . . . . . . . . . . . . . . . . . . . . . . . . . . . . . . . . . . . . . . 192
3-3: Create, Secure, Manage, and Provision Server-Side User Data Stores . . . . . . . . 193
Solution overview. . . . . . . . . . . . . . . . . . . . . . . . . . . . . . . . . . . . . . . . . . . . . . . . . . 193
Introduction . . . . . . . . . . . . . . . . . . . . . . . . . . . . . . . . . . . . . . . . . . . . . . . . . . . . . . 193
Create the user data store root folder . . . . . . . . . . . . . . . . . . . . . . . . . . . . . . . . 195
Align physical namespace with management requirements
such as quotas . . . . . . . . . . . . . . . . . . . . . . . . . . . . . . . . . . . . . . . . . . . . . . . . . 200
Provision the creation of data stores. . . . . . . . . . . . . . . . . . . . . . . . . . . . . . . . . . 208
Configure file screens . . . . . . . . . . . . . . . . . . . . . . . . . . . . . . . . . . . . . . . . . . . . . . 210
Solution summary . . . . . . . . . . . . . . . . . . . . . . . . . . . . . . . . . . . . . . . . . . . . . . . . . 210
3-4: Create the SMB and DFS Namespaces for User Data Stores . . . . . . . . . . . . . . . . 211
Solution overview. . . . . . . . . . . . . . . . . . . . . . . . . . . . . . . . . . . . . . . . . . . . . . . . . . 211
Introduction . . . . . . . . . . . . . . . . . . . . . . . . . . . . . . . . . . . . . . . . . . . . . . . . . . . . . . 211
Create the SMB namespace for user data and settings stores . . . . . . . . . . . . 212
Design the logical view of user data and settings stores with
DFS Namespaces. . . . . . . . . . . . . . . . . . . . . . . . . . . . . . . . . . . . . . . . . . . . . . . 215
Build a DFS namespace to support thousands of users . . . . . . . . . . . . . . . . . . 217
Understand the impact of data movement and namespace changes. . . . . . 218
Consider the impact of %username% changes . . . . . . . . . . . . . . . . . . . . . . . . . 220
Build an abstract DFS namespace for user data and settings (no
site-based namespace, preferably no human names). . . . . . . . . . . . . . . . 221
Automate and provision the creation of user data stores and
DFS namespaces . . . . . . . . . . . . . . . . . . . . . . . . . . . . . . . . . . . . . . . . . . . . . . . 222
Solution summary . . . . . . . . . . . . . . . . . . . . . . . . . . . . . . . . . . . . . . . . . . . . . . . . . 223
3-5: Design and Implement Folder Redirection. . . . . . . . . . . . . . . . . . . . . . . . . . . . . . . 224
Solution overview. . . . . . . . . . . . . . . . . . . . . . . . . . . . . . . . . . . . . . . . . . . . . . . . . . 224
Introduction . . . . . . . . . . . . . . . . . . . . . . . . . . . . . . . . . . . . . . . . . . . . . . . . . . . . . . 224

xviii
Table of Contents
Understand the role of folder redirection . . . . . . . . . . . . . . . . . . . . . . . . . . . . . 225
Configure folder redirection policies . . . . . . . . . . . . . . . . . . . . . . . . . . . . . . . . . 227
Configure folder redirection targets. . . . . . . . . . . . . . . . . . . . . . . . . . . . . . . . . . 228
Configure folder redirection settings . . . . . . . . . . . . . . . . . . . . . . . . . . . . . . . . . 232
Support redirection for users on both Windows XP and Windows Vista. . . 236
Redirect without Group Policy: Favorites, Music, Pictures, and Videos. . . . . 238
Achieve a unified redirected folder environment for Windows XP
and Windows Vista . . . . . . . . . . . . . . . . . . . . . . . . . . . . . . . . . . . . . . . . . . . . 242
Solution summary . . . . . . . . . . . . . . . . . . . . . . . . . . . . . . . . . . . . . . . . . . . . . . . . . 245
3-6: Configure Offline Files . . . . . . . . . . . . . . . . . . . . . . . . . . . . . . . . . . . . . . . . . . . . . . . 245
Solution overview . . . . . . . . . . . . . . . . . . . . . . . . . . . . . . . . . . . . . . . . . . . . . . . . . 245
Introduction . . . . . . . . . . . . . . . . . . . . . . . . . . . . . . . . . . . . . . . . . . . . . . . . . . . . . . 245
Understand the cache. . . . . . . . . . . . . . . . . . . . . . . . . . . . . . . . . . . . . . . . . . . . . . 246
Understand caching . . . . . . . . . . . . . . . . . . . . . . . . . . . . . . . . . . . . . . . . . . . . . . . 246
Understand synchronization . . . . . . . . . . . . . . . . . . . . . . . . . . . . . . . . . . . . . . . . 247
Understand offline mode . . . . . . . . . . . . . . . . . . . . . . . . . . . . . . . . . . . . . . . . . . . 247
Leverage offline files for the UDS framework . . . . . . . . . . . . . . . . . . . . . . . . . . 248
Put offline files to use . . . . . . . . . . . . . . . . . . . . . . . . . . . . . . . . . . . . . . . . . . . . . . 256
Solution summary . . . . . . . . . . . . . . . . . . . . . . . . . . . . . . . . . . . . . . . . . . . . . . . . . 257
3-7: Design and Implement Roaming Profiles . . . . . . . . . . . . . . . . . . . . . . . . . . . . . . . 257
Solution overview . . . . . . . . . . . . . . . . . . . . . . . . . . . . . . . . . . . . . . . . . . . . . . . . . 257
Introduction . . . . . . . . . . . . . . . . . . . . . . . . . . . . . . . . . . . . . . . . . . . . . . . . . . . . . . 257
Analyze the structure of the Windows Vista user profile . . . . . . . . . . . . . . . . 258
Review the components that create the user profile. . . . . . . . . . . . . . . . . . . . 260
Configure the folders that will not roam . . . . . . . . . . . . . . . . . . . . . . . . . . . . . . 262
Configure roaming profiles . . . . . . . . . . . . . . . . . . . . . . . . . . . . . . . . . . . . . . . . . 263
Recognize the “V2” of Windows Vista roaming profiles . . . . . . . . . . . . . . . . . 263
Unify the experience of Windows XP and Windows Vista users . . . . . . . . . . 264
Work through the FOLKLORE of roaming profiles . . . . . . . . . . . . . . . . . . . . . . 264
Identify the benefit of roaming profiles . . . . . . . . . . . . . . . . . . . . . . . . . . . . . . 266
Manage the Application Data (AppData\Roaming) folder . . . . . . . . . . . . . . . 266
Solution summary . . . . . . . . . . . . . . . . . . . . . . . . . . . . . . . . . . . . . . . . . . . . . . . . . 267
3-8: Manage User Data That Should Not Be Stored on Servers. . . . . . . . . . . . . . . . . 267
Solution overview . . . . . . . . . . . . . . . . . . . . . . . . . . . . . . . . . . . . . . . . . . . . . . . . . 267
Introduction . . . . . . . . . . . . . . . . . . . . . . . . . . . . . . . . . . . . . . . . . . . . . . . . . . . . . . 267
Identify the types of data you want to manage as local only . . . . . . . . . . . . 269
Design a local-only data folder structure . . . . . . . . . . . . . . . . . . . . . . . . . . . . . 269
Implement local-only file folders . . . . . . . . . . . . . . . . . . . . . . . . . . . . . . . . . . . . 271

Table of Contents
xix
Ensure that applications will find relocated media folders . . . . . . . . . . . . . . . 271
Redirect Windows XP media folders that you are treating as local only. . . . 272
Provide a way for users to find relocated folders . . . . . . . . . . . . . . . . . . . . . . . 272
Communicate to users and train them regarding local-only data . . . . . . . . . 274
Solution summary . . . . . . . . . . . . . . . . . . . . . . . . . . . . . . . . . . . . . . . . . . . . . . . . . 274
3-9: Manage User Data That Should Be Accessed Locally . . . . . . . . . . . . . . . . . . . . . . 274
Solution overview. . . . . . . . . . . . . . . . . . . . . . . . . . . . . . . . . . . . . . . . . . . . . . . . . . 274
Introduction . . . . . . . . . . . . . . . . . . . . . . . . . . . . . . . . . . . . . . . . . . . . . . . . . . . . . . 274
Determine the name for a local files folder . . . . . . . . . . . . . . . . . . . . . . . . . . . . 275
Option 1: Use a roaming profile folder. . . . . . . . . . . . . . . . . . . . . . . . . . . . . . . . 276
Option 2: Leverage offline files (Windows Vista only) . . . . . . . . . . . . . . . . . . . 276
Option 3: Create a local folder that is backed up to a network store . . . . . . 278
Solution summary . . . . . . . . . . . . . . . . . . . . . . . . . . . . . . . . . . . . . . . . . . . . . . . . . 279
3-10: Back Up Local Data Stores for Availability, Mobility, and Resiliency. . . . . . . . . 279
Solution overview. . . . . . . . . . . . . . . . . . . . . . . . . . . . . . . . . . . . . . . . . . . . . . . . . . 279
Introduction . . . . . . . . . . . . . . . . . . . . . . . . . . . . . . . . . . . . . . . . . . . . . . . . . . . . . . 279
Define the goals of a synchronization solution. . . . . . . . . . . . . . . . . . . . . . . . . 280
Utilize Robocopy as a backup engine. . . . . . . . . . . . . . . . . . . . . . . . . . . . . . . . . 281
Leverage Folder_Synch.vbs as a wrapper for Robocopy . . . . . . . . . . . . . . . . . 282
Deploy Folder_Synch.vbs and Robocopoy . . . . . . . . . . . . . . . . . . . . . . . . . . . . . 283
Determine how and when to run Folder_Synch.vbs for each local store . . . 284
Launch Folder_Synch.vbs manually . . . . . . . . . . . . . . . . . . . . . . . . . . . . . . . . . . . 284
Enable users to right-click a folder and back it up using
a shell command. . . . . . . . . . . . . . . . . . . . . . . . . . . . . . . . . . . . . . . . . . . . . . . 286
Compare manual options for Folder_Synch.vbs . . . . . . . . . . . . . . . . . . . . . . . . 288
Run Folder_Synch.vbs automatically . . . . . . . . . . . . . . . . . . . . . . . . . . . . . . . . . . 288
Run Folder_Synch.vbs as a scheduled task . . . . . . . . . . . . . . . . . . . . . . . . . . . . . 289
Run Folder_Synch.vbs as a logon, logoff, startup, or shutdown script. . . . . . 290
Log and monitor synchronization . . . . . . . . . . . . . . . . . . . . . . . . . . . . . . . . . . . . 291
Solution summary . . . . . . . . . . . . . . . . . . . . . . . . . . . . . . . . . . . . . . . . . . . . . . . . . 292
3-11: Design UDS Components That Align Requirements and Scenarios
with Features and Technologies (Part II) . . . . . . . . . . . . . . . . . . . . . . . . . . . 293
Solution overview. . . . . . . . . . . . . . . . . . . . . . . . . . . . . . . . . . . . . . . . . . . . . . . . . . 293
Introduction . . . . . . . . . . . . . . . . . . . . . . . . . . . . . . . . . . . . . . . . . . . . . . . . . . . . . . 293
Recognize the crux of the challenge. . . . . . . . . . . . . . . . . . . . . . . . . . . . . . . . . . 293
Identify the desired classes of data stores . . . . . . . . . . . . . . . . . . . . . . . . . . . . . 294
Analyze and classify your user data stores and data . . . . . . . . . . . . . . . . . . . . 294
Solution summary . . . . . . . . . . . . . . . . . . . . . . . . . . . . . . . . . . . . . . . . . . . . . . . . . 297

xx
Table of Contents
Solution Collection 4: Implementing Document Management
and Collaboration with SharePoint . . . . . . . . . . . . . . . . . . . . . . . . . . . . . 299
Scenarios, Pain, and Solution . . . . . . . . . . . . . . . . . . . . . . . . . . . . . . . . . . . . . . . . . . . . . . 300
4-1: Create and Configure a Document Library . . . . . . . . . . . . . . . . . . . . . . . . . . . . . . 301
Solution overview . . . . . . . . . . . . . . . . . . . . . . . . . . . . . . . . . . . . . . . . . . . . . . . . . 301
Introduction . . . . . . . . . . . . . . . . . . . . . . . . . . . . . . . . . . . . . . . . . . . . . . . . . . . . . . 302
Create a site . . . . . . . . . . . . . . . . . . . . . . . . . . . . . . . . . . . . . . . . . . . . . . . . . . . . . . 302
Create a document library . . . . . . . . . . . . . . . . . . . . . . . . . . . . . . . . . . . . . . . . . . 303
Configure document library settings . . . . . . . . . . . . . . . . . . . . . . . . . . . . . . . . . 304
Configure the document library title . . . . . . . . . . . . . . . . . . . . . . . . . . . . . . . . . 306
Enable or disable folders within the document library . . . . . . . . . . . . . . . . . . 307
Change the default template for the library . . . . . . . . . . . . . . . . . . . . . . . . . . . 307
Configure security for a document library . . . . . . . . . . . . . . . . . . . . . . . . . . . . 309
Solution summary . . . . . . . . . . . . . . . . . . . . . . . . . . . . . . . . . . . . . . . . . . . . . . . . . 311
4-2: Manage Document Metadata Using Library and Site Columns. . . . . . . . . . . . . 312
Solution overview . . . . . . . . . . . . . . . . . . . . . . . . . . . . . . . . . . . . . . . . . . . . . . . . . 312
Introduction . . . . . . . . . . . . . . . . . . . . . . . . . . . . . . . . . . . . . . . . . . . . . . . . . . . . . . 312
Create a column. . . . . . . . . . . . . . . . . . . . . . . . . . . . . . . . . . . . . . . . . . . . . . . . . . . 313
Work with custom columns from Microsoft Office clients . . . . . . . . . . . . . . . 314
Work with document properties from the SharePoint Web interface . . . . . 316
Modify or delete library columns . . . . . . . . . . . . . . . . . . . . . . . . . . . . . . . . . . . . 318
Reorder columns . . . . . . . . . . . . . . . . . . . . . . . . . . . . . . . . . . . . . . . . . . . . . . . . . . 319
Manage site columns . . . . . . . . . . . . . . . . . . . . . . . . . . . . . . . . . . . . . . . . . . . . . . 319
Create site columns . . . . . . . . . . . . . . . . . . . . . . . . . . . . . . . . . . . . . . . . . . . . . . . . 319
Use a site column in a list or library . . . . . . . . . . . . . . . . . . . . . . . . . . . . . . . . . . 320
Modify and delete site columns . . . . . . . . . . . . . . . . . . . . . . . . . . . . . . . . . . . . . 320
Solution summary . . . . . . . . . . . . . . . . . . . . . . . . . . . . . . . . . . . . . . . . . . . . . . . . . 321
4-3: Implement Managed Content Types . . . . . . . . . . . . . . . . . . . . . . . . . . . . . . . . . . . 321
Solution overview . . . . . . . . . . . . . . . . . . . . . . . . . . . . . . . . . . . . . . . . . . . . . . . . . 321
Introduction . . . . . . . . . . . . . . . . . . . . . . . . . . . . . . . . . . . . . . . . . . . . . . . . . . . . . . 321
Create a content type . . . . . . . . . . . . . . . . . . . . . . . . . . . . . . . . . . . . . . . . . . . . . . 322
Add one or more content types to a list or library . . . . . . . . . . . . . . . . . . . . . 324
Understand child site and list content types. . . . . . . . . . . . . . . . . . . . . . . . . . . 324
Protect a content type by making it read-only. . . . . . . . . . . . . . . . . . . . . . . . . 326
Do not change default SharePoint content types . . . . . . . . . . . . . . . . . . . . . . 326
Solution summary . . . . . . . . . . . . . . . . . . . . . . . . . . . . . . . . . . . . . . . . . . . . . . . . . 326

Table of Contents
xxi
4-4: Configure Multiple Templates for a Document Library . . . . . . . . . . . . . . . . . . . . 327
Solution overview. . . . . . . . . . . . . . . . . . . . . . . . . . . . . . . . . . . . . . . . . . . . . . . . . . 327
Introduction . . . . . . . . . . . . . . . . . . . . . . . . . . . . . . . . . . . . . . . . . . . . . . . . . . . . . . 327
Create a central library for templates . . . . . . . . . . . . . . . . . . . . . . . . . . . . . . . . . 327
Configure a content type for a template . . . . . . . . . . . . . . . . . . . . . . . . . . . . . . 328
Configure a library to support the content types. . . . . . . . . . . . . . . . . . . . . . . 328
Solution summary . . . . . . . . . . . . . . . . . . . . . . . . . . . . . . . . . . . . . . . . . . . . . . . . . 329
4-5: Add, Save, and Upload Documents to a Document Library . . . . . . . . . . . . . . . . 329
Solution overview. . . . . . . . . . . . . . . . . . . . . . . . . . . . . . . . . . . . . . . . . . . . . . . . . . 329
Introduction . . . . . . . . . . . . . . . . . . . . . . . . . . . . . . . . . . . . . . . . . . . . . . . . . . . . . . 329
Create a new document with the New command . . . . . . . . . . . . . . . . . . . . . . 330
Upload documents with the Upload commands . . . . . . . . . . . . . . . . . . . . . . . 330
Add documents to document libraries with Windows Explorer. . . . . . . . . . . 331
Save to a document library from a SharePoint-compatible application . . . . 332
E-mail–enable a document library . . . . . . . . . . . . . . . . . . . . . . . . . . . . . . . . . . . 332
Solution summary . . . . . . . . . . . . . . . . . . . . . . . . . . . . . . . . . . . . . . . . . . . . . . . . . 333
4-6: Create Shortcuts to Document Libraries for End Users . . . . . . . . . . . . . . . . . . . . 334
Solution overview. . . . . . . . . . . . . . . . . . . . . . . . . . . . . . . . . . . . . . . . . . . . . . . . . . 334
Introduction . . . . . . . . . . . . . . . . . . . . . . . . . . . . . . . . . . . . . . . . . . . . . . . . . . . . . . 334
Create Network Places (Windows XP). . . . . . . . . . . . . . . . . . . . . . . . . . . . . . . . . 334
Create Network Locations (Vista) . . . . . . . . . . . . . . . . . . . . . . . . . . . . . . . . . . . . 335
Solution summary . . . . . . . . . . . . . . . . . . . . . . . . . . . . . . . . . . . . . . . . . . . . . . . . . 336
4-7: Quarantine and Manage Uploads to a Document Library
with Multiple Content Types . . . . . . . . . . . . . . . . . . . . . . . . . . . . . . . . . . . . . 336
Solution overview. . . . . . . . . . . . . . . . . . . . . . . . . . . . . . . . . . . . . . . . . . . . . . . . . . 336
Introduction . . . . . . . . . . . . . . . . . . . . . . . . . . . . . . . . . . . . . . . . . . . . . . . . . . . . . . 336
Solution summary . . . . . . . . . . . . . . . . . . . . . . . . . . . . . . . . . . . . . . . . . . . . . . . . . 337
4-8: Work with Documents in a Document Library . . . . . . . . . . . . . . . . . . . . . . . . . . . 338
Solution overview. . . . . . . . . . . . . . . . . . . . . . . . . . . . . . . . . . . . . . . . . . . . . . . . . . 338
Introduction . . . . . . . . . . . . . . . . . . . . . . . . . . . . . . . . . . . . . . . . . . . . . . . . . . . . . . 338
View a document in a document library . . . . . . . . . . . . . . . . . . . . . . . . . . . . . . 338
Edit a document in a document library . . . . . . . . . . . . . . . . . . . . . . . . . . . . . . . 338
Open a document with Office 2007 clients installed . . . . . . . . . . . . . . . . . . . . 338
Solution summary . . . . . . . . . . . . . . . . . . . . . . . . . . . . . . . . . . . . . . . . . . . . . . . . . 339
4-9: Monitor Changes to Libraries or Documents with Alerts and RSS . . . . . . . . . . . 339
Solution overview. . . . . . . . . . . . . . . . . . . . . . . . . . . . . . . . . . . . . . . . . . . . . . . . . . 339
Introduction . . . . . . . . . . . . . . . . . . . . . . . . . . . . . . . . . . . . . . . . . . . . . . . . . . . . . . 339

xxii
Table of Contents
Subscribe to e-mail alerts for a library or document. . . . . . . . . . . . . . . . . . . . 340
Monitor library activity using RSS. . . . . . . . . . . . . . . . . . . . . . . . . . . . . . . . . . . . 341
Solution summary . . . . . . . . . . . . . . . . . . . . . . . . . . . . . . . . . . . . . . . . . . . . . . . . . 341
4-10: Control Document Editing with Check Out. . . . . . . . . . . . . . . . . . . . . . . . . . . . . 341
Solution overview . . . . . . . . . . . . . . . . . . . . . . . . . . . . . . . . . . . . . . . . . . . . . . . . . 341
Introduction . . . . . . . . . . . . . . . . . . . . . . . . . . . . . . . . . . . . . . . . . . . . . . . . . . . . . . 341
Require document checkout . . . . . . . . . . . . . . . . . . . . . . . . . . . . . . . . . . . . . . . . 342
Check out a document . . . . . . . . . . . . . . . . . . . . . . . . . . . . . . . . . . . . . . . . . . . . . 342
Understand the user experience while a document is checked out . . . . . . . 343
Manage document check in . . . . . . . . . . . . . . . . . . . . . . . . . . . . . . . . . . . . . . . . 343
Solution summary . . . . . . . . . . . . . . . . . . . . . . . . . . . . . . . . . . . . . . . . . . . . . . . . . 345
4-11: Implement and Maintain Document Version History . . . . . . . . . . . . . . . . . . . . 345
Solution overview . . . . . . . . . . . . . . . . . . . . . . . . . . . . . . . . . . . . . . . . . . . . . . . . . 345
Introduction . . . . . . . . . . . . . . . . . . . . . . . . . . . . . . . . . . . . . . . . . . . . . . . . . . . . . . 345
Configure version history. . . . . . . . . . . . . . . . . . . . . . . . . . . . . . . . . . . . . . . . . . . 346
Manage the creation of major and minor versions . . . . . . . . . . . . . . . . . . . . . 346
Manage document versions. . . . . . . . . . . . . . . . . . . . . . . . . . . . . . . . . . . . . . . . . 347
Compare document versions. . . . . . . . . . . . . . . . . . . . . . . . . . . . . . . . . . . . . . . . 347
Solution summary . . . . . . . . . . . . . . . . . . . . . . . . . . . . . . . . . . . . . . . . . . . . . . . . . 347
4-12: Implement Content Approval . . . . . . . . . . . . . . . . . . . . . . . . . . . . . . . . . . . . . . . . 347
Solution overview . . . . . . . . . . . . . . . . . . . . . . . . . . . . . . . . . . . . . . . . . . . . . . . . . 347
Introduction . . . . . . . . . . . . . . . . . . . . . . . . . . . . . . . . . . . . . . . . . . . . . . . . . . . . . . 347
Configure content approval . . . . . . . . . . . . . . . . . . . . . . . . . . . . . . . . . . . . . . . . 348
Understand the interaction of content approval, versioning,
and checkout . . . . . . . . . . . . . . . . . . . . . . . . . . . . . . . . . . . . . . . . . . . . . . . . . 348
Solution summary . . . . . . . . . . . . . . . . . . . . . . . . . . . . . . . . . . . . . . . . . . . . . . . . . 348
4-13: Implement a Three-State Workflow . . . . . . . . . . . . . . . . . . . . . . . . . . . . . . . . . . . 349
Solution overview . . . . . . . . . . . . . . . . . . . . . . . . . . . . . . . . . . . . . . . . . . . . . . . . . 349
Introduction . . . . . . . . . . . . . . . . . . . . . . . . . . . . . . . . . . . . . . . . . . . . . . . . . . . . . . 349
Configure the choice field for the state. . . . . . . . . . . . . . . . . . . . . . . . . . . . . . . 349
Configure the three-state workflow . . . . . . . . . . . . . . . . . . . . . . . . . . . . . . . . . . 350
Launch and manage workflows. . . . . . . . . . . . . . . . . . . . . . . . . . . . . . . . . . . . . . 352
Solution summary . . . . . . . . . . . . . . . . . . . . . . . . . . . . . . . . . . . . . . . . . . . . . . . . . 352
4-14: Organize and Manage Documents with Folders and Views. . . . . . . . . . . . . . . 353
Solution overview . . . . . . . . . . . . . . . . . . . . . . . . . . . . . . . . . . . . . . . . . . . . . . . . . 353
Introduction . . . . . . . . . . . . . . . . . . . . . . . . . . . . . . . . . . . . . . . . . . . . . . . . . . . . . . 353
Use folders to scope document management . . . . . . . . . . . . . . . . . . . . . . . . . 353

Table of Contents
xxiii
Use views to scope the presentation and management of documents. . . . . 354
Solution summary . . . . . . . . . . . . . . . . . . . . . . . . . . . . . . . . . . . . . . . . . . . . . . . . . 354
4-15: Configure WSS Indexing of PDF Files . . . . . . . . . . . . . . . . . . . . . . . . . . . . . . . . . . 355
Solution overview. . . . . . . . . . . . . . . . . . . . . . . . . . . . . . . . . . . . . . . . . . . . . . . . . . 355
Introduction . . . . . . . . . . . . . . . . . . . . . . . . . . . . . . . . . . . . . . . . . . . . . . . . . . . . . . 355
Disable search within a library . . . . . . . . . . . . . . . . . . . . . . . . . . . . . . . . . . . . . . . 355
Enable indexing of PDFs . . . . . . . . . . . . . . . . . . . . . . . . . . . . . . . . . . . . . . . . . . . . 355
Assign an icon to unrecognized file types . . . . . . . . . . . . . . . . . . . . . . . . . . . . . 358
Solution summary . . . . . . . . . . . . . . . . . . . . . . . . . . . . . . . . . . . . . . . . . . . . . . . . . 359
4-16: Work with SharePoint Files Offline . . . . . . . . . . . . . . . . . . . . . . . . . . . . . . . . . . . . 359
Solution overview. . . . . . . . . . . . . . . . . . . . . . . . . . . . . . . . . . . . . . . . . . . . . . . . . . 359
Introduction . . . . . . . . . . . . . . . . . . . . . . . . . . . . . . . . . . . . . . . . . . . . . . . . . . . . . . 359
Download a copy of a file. . . . . . . . . . . . . . . . . . . . . . . . . . . . . . . . . . . . . . . . . . . 360
Provide offline access to files using the local cache . . . . . . . . . . . . . . . . . . . . . 360
Use Outlook 2007 to take libraries and lists offline . . . . . . . . . . . . . . . . . . . . . 361
Other options for offline use of SharePoint document libraries. . . . . . . . . . . 362
Solution summary . . . . . . . . . . . . . . . . . . . . . . . . . . . . . . . . . . . . . . . . . . . . . . . . . 362
Solution Collection 5: Active Directory Delegation and Administrative
Lock Down . . . . . . . . . . . . . . . . . . . . . . . . . . . . . . . . . . . . . . . . . . . . . . . . . 363
Scenarios, Pain, and Solution . . . . . . . . . . . . . . . . . . . . . . . . . . . . . . . . . . . . . . . . . . . . . . 363
5-1: Explore the Components and Tools of Active Directory Delegation . . . . . . . . . 365
Solution overview. . . . . . . . . . . . . . . . . . . . . . . . . . . . . . . . . . . . . . . . . . . . . . . . . . 365
Introduction . . . . . . . . . . . . . . . . . . . . . . . . . . . . . . . . . . . . . . . . . . . . . . . . . . . . . . 365
Use Active Directory object ACLs and ACL editor interfaces. . . . . . . . . . . . . . 365
Manage access control entries on Active Directory objects . . . . . . . . . . . . . . 367
Adhere to the golden rules of delegation . . . . . . . . . . . . . . . . . . . . . . . . . . . . . 369
Apply permissions with a friend: The Delegation Of Control Wizard . . . . . . 370
Manage the presentation of your delegation . . . . . . . . . . . . . . . . . . . . . . . . . . 372
Solution summary . . . . . . . . . . . . . . . . . . . . . . . . . . . . . . . . . . . . . . . . . . . . . . . . . 373
5-2: Customize the Delegation Of Control Wizard. . . . . . . . . . . . . . . . . . . . . . . . . . . . 373
Solution overview. . . . . . . . . . . . . . . . . . . . . . . . . . . . . . . . . . . . . . . . . . . . . . . . . . 373
Introduction . . . . . . . . . . . . . . . . . . . . . . . . . . . . . . . . . . . . . . . . . . . . . . . . . . . . . . 373
Locate and understand Delegwiz.inf. . . . . . . . . . . . . . . . . . . . . . . . . . . . . . . . . . 374
Customize Delegwiz.inf . . . . . . . . . . . . . . . . . . . . . . . . . . . . . . . . . . . . . . . . . . . . . 377
Use Microsoft’s super-duper Delegwiz.inf . . . . . . . . . . . . . . . . . . . . . . . . . . . . . 378
Solution summary . . . . . . . . . . . . . . . . . . . . . . . . . . . . . . . . . . . . . . . . . . . . . . . . . 379

xxiv
Table of Contents
5-3: Customize the Permissions Listed in the ACL Editor Interfaces . . . . . . . . . . . . . 380
Solution overview . . . . . . . . . . . . . . . . . . . . . . . . . . . . . . . . . . . . . . . . . . . . . . . . . 380
Introduction . . . . . . . . . . . . . . . . . . . . . . . . . . . . . . . . . . . . . . . . . . . . . . . . . . . . . . 380
Recognize that some permissions are hidden. . . . . . . . . . . . . . . . . . . . . . . . . . 380
Modify Dssec.dat . . . . . . . . . . . . . . . . . . . . . . . . . . . . . . . . . . . . . . . . . . . . . . . . . . 381
Ensure the visibility of permissions that you are delegating. . . . . . . . . . . . . . 383
Solution summary . . . . . . . . . . . . . . . . . . . . . . . . . . . . . . . . . . . . . . . . . . . . . . . . . 383
5-4: Evaluate, Report, and Revoke Active Directory Permissions . . . . . . . . . . . . . . . . 384
Solution overview . . . . . . . . . . . . . . . . . . . . . . . . . . . . . . . . . . . . . . . . . . . . . . . . . 384
Introduction . . . . . . . . . . . . . . . . . . . . . . . . . . . . . . . . . . . . . . . . . . . . . . . . . . . . . . 384
Use Dsacls to report Active Directory permissions. . . . . . . . . . . . . . . . . . . . . . 384
Use ACLDiag to report Active Directory permissions . . . . . . . . . . . . . . . . . . . 385
Use ADFind to report Active Directory permissions . . . . . . . . . . . . . . . . . . . . 386
Use DSRevoke to report Active Directory permissions . . . . . . . . . . . . . . . . . . 387
Evaluate permissions assigned to a specific user or group. . . . . . . . . . . . . . . 388
Revoke Active Directory permissions with DSRevoke . . . . . . . . . . . . . . . . . . . 389
Revoke Active Directory permissions with Dsacls. . . . . . . . . . . . . . . . . . . . . . . 389
Reset permissions to Schema defaults . . . . . . . . . . . . . . . . . . . . . . . . . . . . . . . . 390
Solution summary . . . . . . . . . . . . . . . . . . . . . . . . . . . . . . . . . . . . . . . . . . . . . . . . . 391
5-5: Assign and Revoke Permissions with Dsacls . . . . . . . . . . . . . . . . . . . . . . . . . . . . . 391
Solution overview . . . . . . . . . . . . . . . . . . . . . . . . . . . . . . . . . . . . . . . . . . . . . . . . . 391
Introduction . . . . . . . . . . . . . . . . . . . . . . . . . . . . . . . . . . . . . . . . . . . . . . . . . . . . . . 391
Identify the basic syntax of Dsacls . . . . . . . . . . . . . . . . . . . . . . . . . . . . . . . . . . . 392
Delegate permissions to manage computer objects . . . . . . . . . . . . . . . . . . . . 392
Grant permissions to manage other common object classes. . . . . . . . . . . . . 394
Use Dsacls to delegate other common tasks . . . . . . . . . . . . . . . . . . . . . . . . . . 394
Solution summary . . . . . . . . . . . . . . . . . . . . . . . . . . . . . . . . . . . . . . . . . . . . . . . . . 400
5-6: Define Your Administrative Model . . . . . . . . . . . . . . . . . . . . . . . . . . . . . . . . . . . . . 401
Solution overview . . . . . . . . . . . . . . . . . . . . . . . . . . . . . . . . . . . . . . . . . . . . . . . . . 401
Introduction . . . . . . . . . . . . . . . . . . . . . . . . . . . . . . . . . . . . . . . . . . . . . . . . . . . . . . 401
Define the tasks that are performed . . . . . . . . . . . . . . . . . . . . . . . . . . . . . . . . . 401
Define the distinct scopes of each task . . . . . . . . . . . . . . . . . . . . . . . . . . . . . . . 402
Bundle tasks within a scope . . . . . . . . . . . . . . . . . . . . . . . . . . . . . . . . . . . . . . . . . 402
Identify the rules that currently perform task bundles . . . . . . . . . . . . . . . . . . 402
Solution summary . . . . . . . . . . . . . . . . . . . . . . . . . . . . . . . . . . . . . . . . . . . . . . . . . 402
5-7: Role-Based Management of Active Directory Delegation . . . . . . . . . . . . . . . . . 403
Solution overview . . . . . . . . . . . . . . . . . . . . . . . . . . . . . . . . . . . . . . . . . . . . . . . . . 403
Introduction . . . . . . . . . . . . . . . . . . . . . . . . . . . . . . . . . . . . . . . . . . . . . . . . . . . . . . 403

Table of Contents
xxv
Identify the pain points of an unmanaged delegation model . . . . . . . . . . . . 403
Create capability management groups to manage delegation . . . . . . . . . . . 405
Assign permissions to capability management groups . . . . . . . . . . . . . . . . . . 405
Delegate control by adding roles to capability management groups. . . . . . 406
Create granular capability management groups . . . . . . . . . . . . . . . . . . . . . . . 406
Report permissions in a role-based delegation. . . . . . . . . . . . . . . . . . . . . . . . . 407
Solution summary . . . . . . . . . . . . . . . . . . . . . . . . . . . . . . . . . . . . . . . . . . . . . . . . . 408
5-8: Scripting the Delegation of Active Directory . . . . . . . . . . . . . . . . . . . . . . . . . . . . . 408
Solution overview. . . . . . . . . . . . . . . . . . . . . . . . . . . . . . . . . . . . . . . . . . . . . . . . . . 408
Introduction . . . . . . . . . . . . . . . . . . . . . . . . . . . . . . . . . . . . . . . . . . . . . . . . . . . . . . 409
Recognize the need for scripted delegation . . . . . . . . . . . . . . . . . . . . . . . . . . . 409
Script delegation with Dsacls . . . . . . . . . . . . . . . . . . . . . . . . . . . . . . . . . . . . . . . . 410
Solution summary . . . . . . . . . . . . . . . . . . . . . . . . . . . . . . . . . . . . . . . . . . . . . . . . . 410
5-9: Delegating Administration and Support of Computers. . . . . . . . . . . . . . . . . . . . 411
Solution overview. . . . . . . . . . . . . . . . . . . . . . . . . . . . . . . . . . . . . . . . . . . . . . . . . . 411
Introduction . . . . . . . . . . . . . . . . . . . . . . . . . . . . . . . . . . . . . . . . . . . . . . . . . . . . . . 411
Define scopes of computers. . . . . . . . . . . . . . . . . . . . . . . . . . . . . . . . . . . . . . . . . 411
Create capability management groups to represent
administrative scopes. . . . . . . . . . . . . . . . . . . . . . . . . . . . . . . . . . . . . . . . . . . 412
Implement the delegation of local administration . . . . . . . . . . . . . . . . . . . . . . 412
Manage the scope of delegation. . . . . . . . . . . . . . . . . . . . . . . . . . . . . . . . . . . . . 414
Get the Domain Admins group out of the local Administrators groups . . . . 416
Solution summary . . . . . . . . . . . . . . . . . . . . . . . . . . . . . . . . . . . . . . . . . . . . . . . . . 416
5-10: Empty as Many of the Built-in Groups as Possible . . . . . . . . . . . . . . . . . . . . . . . 416
Solution overview. . . . . . . . . . . . . . . . . . . . . . . . . . . . . . . . . . . . . . . . . . . . . . . . . . 416
Introduction . . . . . . . . . . . . . . . . . . . . . . . . . . . . . . . . . . . . . . . . . . . . . . . . . . . . . . 417
Delegate control to custom groups . . . . . . . . . . . . . . . . . . . . . . . . . . . . . . . . . . 417
Identify protected groups. . . . . . . . . . . . . . . . . . . . . . . . . . . . . . . . . . . . . . . . . . . 417
Don’t bother trying to un-delegate the built-in groups . . . . . . . . . . . . . . . . . 418
Solution summary . . . . . . . . . . . . . . . . . . . . . . . . . . . . . . . . . . . . . . . . . . . . . . . . . 418
Solution Collection 6: Improving the Management and Administration
of Computers . . . . . . . . . . . . . . . . . . . . . . . . . . . . . . . . . . . . . . . . . . . . . . . 419
Scenarios, Pain, and Solution . . . . . . . . . . . . . . . . . . . . . . . . . . . . . . . . . . . . . . . . . . . . . . 419
6-1: Implement Best Practices for Managing Computers in Active Directory . . . . . 421
Solution overview. . . . . . . . . . . . . . . . . . . . . . . . . . . . . . . . . . . . . . . . . . . . . . . . . . 421
Introduction . . . . . . . . . . . . . . . . . . . . . . . . . . . . . . . . . . . . . . . . . . . . . . . . . . . . . . 421
Establish naming standards for computers . . . . . . . . . . . . . . . . . . . . . . . . . . . . 422

xxvi
Table of Contents
Identify requirements for joining a computer to the domain . . . . . . . . . . . . 423
Design Active Directory to delegate the management
of computer objects. . . . . . . . . . . . . . . . . . . . . . . . . . . . . . . . . . . . . . . . . . . . 423
Delegate permissions to create computers in the domain . . . . . . . . . . . . . . . 425
Create a computer object in Active Directory. . . . . . . . . . . . . . . . . . . . . . . . . . 425
Delegate permissions to join computers using existing
computer objects . . . . . . . . . . . . . . . . . . . . . . . . . . . . . . . . . . . . . . . . . . . . . . 426
Join a computer to the domain. . . . . . . . . . . . . . . . . . . . . . . . . . . . . . . . . . . . . . 428
Ensure correct logon after joining the domain. . . . . . . . . . . . . . . . . . . . . . . . . 429
Solution summary . . . . . . . . . . . . . . . . . . . . . . . . . . . . . . . . . . . . . . . . . . . . . . . . . 430
6-2: Control the Addition of Unmanaged Computers to the Domain . . . . . . . . . . . 431
Solution overview . . . . . . . . . . . . . . . . . . . . . . . . . . . . . . . . . . . . . . . . . . . . . . . . . 431
Introduction . . . . . . . . . . . . . . . . . . . . . . . . . . . . . . . . . . . . . . . . . . . . . . . . . . . . . . 431
Configure the default computer container . . . . . . . . . . . . . . . . . . . . . . . . . . . . 432
Solution summary . . . . . . . . . . . . . . . . . . . . . . . . . . . . . . . . . . . . . . . . . . . . . . . . . 435
6-3: Provision Computers . . . . . . . . . . . . . . . . . . . . . . . . . . . . . . . . . . . . . . . . . . . . . . . . . 435
Solution overview . . . . . . . . . . . . . . . . . . . . . . . . . . . . . . . . . . . . . . . . . . . . . . . . . 435
Introduction . . . . . . . . . . . . . . . . . . . . . . . . . . . . . . . . . . . . . . . . . . . . . . . . . . . . . . 436
Use Computer_JoinDomain.hta. . . . . . . . . . . . . . . . . . . . . . . . . . . . . . . . . . . . . . 436
Provision computer accounts with Computer_JoinDomain.hta . . . . . . . . . . . 438
Create an account and join the domain with
Computer_JoinDomain.hta . . . . . . . . . . . . . . . . . . . . . . . . . . . . . . . . . . . . . . 440
Understand Computer_JoinDomain.hta. . . . . . . . . . . . . . . . . . . . . . . . . . . . . . . 441
Distribute Computer_JoinDomain.hta . . . . . . . . . . . . . . . . . . . . . . . . . . . . . . . . 441
Solution summary . . . . . . . . . . . . . . . . . . . . . . . . . . . . . . . . . . . . . . . . . . . . . . . . . 442
6-4: Manage Computer Roles and Capabilities. . . . . . . . . . . . . . . . . . . . . . . . . . . . . . . 442
Solution overview . . . . . . . . . . . . . . . . . . . . . . . . . . . . . . . . . . . . . . . . . . . . . . . . . 442
Introduction . . . . . . . . . . . . . . . . . . . . . . . . . . . . . . . . . . . . . . . . . . . . . . . . . . . . . . 442
Automate the management of desktop and laptop groups . . . . . . . . . . . . . 442
Deploy software with computer groups . . . . . . . . . . . . . . . . . . . . . . . . . . . . . . 445
Identify and manage other computer roles and capabilities . . . . . . . . . . . . . 445
Solution summary . . . . . . . . . . . . . . . . . . . . . . . . . . . . . . . . . . . . . . . . . . . . . . . . . 446
6-5: Reset and Reassign Computers . . . . . . . . . . . . . . . . . . . . . . . . . . . . . . . . . . . . . . . . 447
Solution overview . . . . . . . . . . . . . . . . . . . . . . . . . . . . . . . . . . . . . . . . . . . . . . . . . 447
Introduction . . . . . . . . . . . . . . . . . . . . . . . . . . . . . . . . . . . . . . . . . . . . . . . . . . . . . . 447
Rejoin a domain without destroying a computer’s group memberships. . . 447
Replace a computer correctly by resetting and renaming
the computer object . . . . . . . . . . . . . . . . . . . . . . . . . . . . . . . . . . . . . . . . . . . 448

Table of Contents
xxvii
Replace a computer by copying group memberships and attributes . . . . . . 449
Solution summary . . . . . . . . . . . . . . . . . . . . . . . . . . . . . . . . . . . . . . . . . . . . . . . . . 450
6-6: Establish the Relationship Between Users and Their Computers
with Built-in Properties. . . . . . . . . . . . . . . . . . . . . . . . . . . . . . . . . . . . . . . . . . 450
Solution overview. . . . . . . . . . . . . . . . . . . . . . . . . . . . . . . . . . . . . . . . . . . . . . . . . . 450
Introduction . . . . . . . . . . . . . . . . . . . . . . . . . . . . . . . . . . . . . . . . . . . . . . . . . . . . . . 450
Use the managedBy attribute to track asset assignment of a computer
to a single user or group . . . . . . . . . . . . . . . . . . . . . . . . . . . . . . . . . . . . . . . . 451
Use the manager attribute to track asset assignment of computers
to a user . . . . . . . . . . . . . . . . . . . . . . . . . . . . . . . . . . . . . . . . . . . . . . . . . . . . . . 452
Solution summary . . . . . . . . . . . . . . . . . . . . . . . . . . . . . . . . . . . . . . . . . . . . . . . . . 453
6-7: Track Computer-to-User Assignments by Extending the Schema . . . . . . . . . . . 454
Solution overview. . . . . . . . . . . . . . . . . . . . . . . . . . . . . . . . . . . . . . . . . . . . . . . . . . 454
Introduction . . . . . . . . . . . . . . . . . . . . . . . . . . . . . . . . . . . . . . . . . . . . . . . . . . . . . . 454
Understand the impact of extending the schema. . . . . . . . . . . . . . . . . . . . . . . 454
Plan the ComputerAssignedTo attribute and ComputerInfo object class. . . 455
Obtain an OID. . . . . . . . . . . . . . . . . . . . . . . . . . . . . . . . . . . . . . . . . . . . . . . . . . . . . 456
Register the Active Directory schema snap-in. . . . . . . . . . . . . . . . . . . . . . . . . . 456
Make sure you have permission to change the schema . . . . . . . . . . . . . . . . . 457
Connect to the schema master . . . . . . . . . . . . . . . . . . . . . . . . . . . . . . . . . . . . . . 457
Create the ComputerAssignedTo attribute . . . . . . . . . . . . . . . . . . . . . . . . . . . . 457
Create the ComputerInfo object class. . . . . . . . . . . . . . . . . . . . . . . . . . . . . . . . . 459
Associate the ComputerInfo object class with the Computer
object class. . . . . . . . . . . . . . . . . . . . . . . . . . . . . . . . . . . . . . . . . . . . . . . . . . . . 461
Give the ComputerAssignedTo attribute a friendly display name . . . . . . . . . 462
Allow the changes to replicate. . . . . . . . . . . . . . . . . . . . . . . . . . . . . . . . . . . . . . . 462
Delegate permission to modify the attribute . . . . . . . . . . . . . . . . . . . . . . . . . . 463
Integrate the Computer_AssignTo.hta tool with Active Directory Users
and Computers . . . . . . . . . . . . . . . . . . . . . . . . . . . . . . . . . . . . . . . . . . . . . . . . 463
Add other attributes to computer objects . . . . . . . . . . . . . . . . . . . . . . . . . . . . . 467
Solution summary . . . . . . . . . . . . . . . . . . . . . . . . . . . . . . . . . . . . . . . . . . . . . . . . . 467
6-8: Establish Self-Reporting of Computer Information. . . . . . . . . . . . . . . . . . . . . . . . 468
Solution overview. . . . . . . . . . . . . . . . . . . . . . . . . . . . . . . . . . . . . . . . . . . . . . . . . . 468
Introduction . . . . . . . . . . . . . . . . . . . . . . . . . . . . . . . . . . . . . . . . . . . . . . . . . . . . . . 468
Determine the information you wish you had. . . . . . . . . . . . . . . . . . . . . . . . . . 468
Decide where you want the information to appear . . . . . . . . . . . . . . . . . . . . . 469
Report computer information with Computer_InfoToDescription.vbs . . . . . 469
Understand Computer_InfoToDescription.vbs. . . . . . . . . . . . . . . . . . . . . . . . . . 469

xxviii
Table of Contents
Expose the report attributes in the Active Directory Users and Computers
snap-in . . . . . . . . . . . . . . . . . . . . . . . . . . . . . . . . . . . . . . . . . . . . . . . . . . . . . . . 470
Delegate permissions for computer information reporting . . . . . . . . . . . . . . 470
Automate computer information reporting with startup and logon
scripts or scheduled tasks . . . . . . . . . . . . . . . . . . . . . . . . . . . . . . . . . . . . . . . 472
Take it to the next level. . . . . . . . . . . . . . . . . . . . . . . . . . . . . . . . . . . . . . . . . . . . . 473
Solution summary . . . . . . . . . . . . . . . . . . . . . . . . . . . . . . . . . . . . . . . . . . . . . . . . . 473
6-9: Integrate Computer Support Tools into Active Directory Users
and Computers . . . . . . . . . . . . . . . . . . . . . . . . . . . . . . . . . . . . . . . . . . . . . . . . 474
Solution overview . . . . . . . . . . . . . . . . . . . . . . . . . . . . . . . . . . . . . . . . . . . . . . . . . 474
Introduction . . . . . . . . . . . . . . . . . . . . . . . . . . . . . . . . . . . . . . . . . . . . . . . . . . . . . . 474
Add a “Connect with Remote Desktop” command . . . . . . . . . . . . . . . . . . . . . 474
Add an “Open Command Prompt” command . . . . . . . . . . . . . . . . . . . . . . . . . 475
Execute any command remotely on any system . . . . . . . . . . . . . . . . . . . . . . . 476
Use Remote_Command.hta to create specific command tasks
for remote administration. . . . . . . . . . . . . . . . . . . . . . . . . . . . . . . . . . . . . . . 477
Solution summary . . . . . . . . . . . . . . . . . . . . . . . . . . . . . . . . . . . . . . . . . . . . . . . . . 478
Solution Collection 7: Extending User Attributes
and Management Tools . . . . . . . . . . . . . . . . . . . . . . . . . . . . . . . . . . . . . . 479
Scenarios, Pain, and Solution . . . . . . . . . . . . . . . . . . . . . . . . . . . . . . . . . . . . . . . . . . . . . . 479
7-1: Best Practices for User Names . . . . . . . . . . . . . . . . . . . . . . . . . . . . . . . . . . . . . . . . . 481
Solution overview . . . . . . . . . . . . . . . . . . . . . . . . . . . . . . . . . . . . . . . . . . . . . . . . . 481
Introduction . . . . . . . . . . . . . . . . . . . . . . . . . . . . . . . . . . . . . . . . . . . . . . . . . . . . . . 481
Establish best practice standards for user object name attributes . . . . . . . . 481
Implement manageable user logon names. . . . . . . . . . . . . . . . . . . . . . . . . . . . 487
Prepare to add the second “John Doe” to your Active Directory . . . . . . . . . 490
Solution summary . . . . . . . . . . . . . . . . . . . . . . . . . . . . . . . . . . . . . . . . . . . . . . . . . 491
7-2: Using Saved Queries to Administer Active Directory Objects . . . . . . . . . . . . . . 491
Solution overview . . . . . . . . . . . . . . . . . . . . . . . . . . . . . . . . . . . . . . . . . . . . . . . . . 491
Introduction . . . . . . . . . . . . . . . . . . . . . . . . . . . . . . . . . . . . . . . . . . . . . . . . . . . . . . 491
Create a custom console that shows all domain users . . . . . . . . . . . . . . . . . . 492
Control the scope of a saved query . . . . . . . . . . . . . . . . . . . . . . . . . . . . . . . . . . 493
Build saved queries that target specific objects . . . . . . . . . . . . . . . . . . . . . . . . 494
Understand LDAP query syntax. . . . . . . . . . . . . . . . . . . . . . . . . . . . . . . . . . . . . . 496
Identify some useful LDAP queries . . . . . . . . . . . . . . . . . . . . . . . . . . . . . . . . . . . 497
Transfer saved queries between consoles and administrators . . . . . . . . . . . . 498
Leverage saved queries for most types of administration . . . . . . . . . . . . . . . 499
Solution summary . . . . . . . . . . . . . . . . . . . . . . . . . . . . . . . . . . . . . . . . . . . . . . . . . 499

Table of Contents
xxix
7-3: Create MMC Consoles for Down-Level Administrators . . . . . . . . . . . . . . . . . . . . 499
Solution overview. . . . . . . . . . . . . . . . . . . . . . . . . . . . . . . . . . . . . . . . . . . . . . . . . . 499
Introduction . . . . . . . . . . . . . . . . . . . . . . . . . . . . . . . . . . . . . . . . . . . . . . . . . . . . . . 499
Create a console with saved queries . . . . . . . . . . . . . . . . . . . . . . . . . . . . . . . . . . 500
Create a taskpad with tasks for each delegated ability . . . . . . . . . . . . . . . . . . 500
Add productive tools and scripts to the taskpads. . . . . . . . . . . . . . . . . . . . . . . 503
Add procedures and documentation to the console . . . . . . . . . . . . . . . . . . . . 503
Create an administrative home page within the console . . . . . . . . . . . . . . . . 503
Add each taskpad to the MMC favorites . . . . . . . . . . . . . . . . . . . . . . . . . . . . . . 504
Create navigation tasks . . . . . . . . . . . . . . . . . . . . . . . . . . . . . . . . . . . . . . . . . . . . . 504
Save the console in User mode . . . . . . . . . . . . . . . . . . . . . . . . . . . . . . . . . . . . . . 504
Lock down the console view. . . . . . . . . . . . . . . . . . . . . . . . . . . . . . . . . . . . . . . . . 505
Distribute the console . . . . . . . . . . . . . . . . . . . . . . . . . . . . . . . . . . . . . . . . . . . . . . 505
Solution summary . . . . . . . . . . . . . . . . . . . . . . . . . . . . . . . . . . . . . . . . . . . . . . . . . 506
7-4: Extending the Attributes of User Objects . . . . . . . . . . . . . . . . . . . . . . . . . . . . . . . . 506
Solution overview. . . . . . . . . . . . . . . . . . . . . . . . . . . . . . . . . . . . . . . . . . . . . . . . . . 506
Introduction . . . . . . . . . . . . . . . . . . . . . . . . . . . . . . . . . . . . . . . . . . . . . . . . . . . . . . 506
Leverage unused and unexposed attributes of user objects. . . . . . . . . . . . . . 507
Extend the schema with custom attributes and object classes. . . . . . . . . . . . 509
Create an attribute that exposes the computer to which a user
is logged on . . . . . . . . . . . . . . . . . . . . . . . . . . . . . . . . . . . . . . . . . . . . . . . . . . . 511
Create an attribute that supports users’ software requests. . . . . . . . . . . . . . . 512
Solution summary . . . . . . . . . . . . . . . . . . . . . . . . . . . . . . . . . . . . . . . . . . . . . . . . . 513
7-5: Creating Administrative Tools to Manage Unused and Custom Attributes . . . 513
Solution overview. . . . . . . . . . . . . . . . . . . . . . . . . . . . . . . . . . . . . . . . . . . . . . . . . . 513
Introduction . . . . . . . . . . . . . . . . . . . . . . . . . . . . . . . . . . . . . . . . . . . . . . . . . . . . . . 513
Display and edit the value of an unexposed attribute . . . . . . . . . . . . . . . . . . . 514
Use the Object_Attribute.vbs script to display or edit any single-valued
attribute . . . . . . . . . . . . . . . . . . . . . . . . . . . . . . . . . . . . . . . . . . . . . . . . . . . . . . 521
Use Object_Attribute.hta to view or edit single-valued or multivalued
attributes . . . . . . . . . . . . . . . . . . . . . . . . . . . . . . . . . . . . . . . . . . . . . . . . . . . . . 522
Solution summary . . . . . . . . . . . . . . . . . . . . . . . . . . . . . . . . . . . . . . . . . . . . . . . . . 523
7-6: Moving Users and Other Objects. . . . . . . . . . . . . . . . . . . . . . . . . . . . . . . . . . . . . . . 523
Solution overview. . . . . . . . . . . . . . . . . . . . . . . . . . . . . . . . . . . . . . . . . . . . . . . . . . 523
Introduction . . . . . . . . . . . . . . . . . . . . . . . . . . . . . . . . . . . . . . . . . . . . . . . . . . . . . . 524
Understand the permissions required to move an object in Active
Directory. . . . . . . . . . . . . . . . . . . . . . . . . . . . . . . . . . . . . . . . . . . . . . . . . . . . . . 524
Recognize the denial-of-service exposure . . . . . . . . . . . . . . . . . . . . . . . . . . . . . 524

xxx
Table of Contents
Carefully restrict the delegation to move (delete) objects . . . . . . . . . . . . . . . 524
Delegate highly sensitive tasks such as object deletion to tertiary
administrative credentials . . . . . . . . . . . . . . . . . . . . . . . . . . . . . . . . . . . . . . . 525
Proxy the task of moving objects . . . . . . . . . . . . . . . . . . . . . . . . . . . . . . . . . . . . 525
Solution summary . . . . . . . . . . . . . . . . . . . . . . . . . . . . . . . . . . . . . . . . . . . . . . . . . 525
7-7: Provisioning the Creation of Users . . . . . . . . . . . . . . . . . . . . . . . . . . . . . . . . . . . . . 526
Solution overview . . . . . . . . . . . . . . . . . . . . . . . . . . . . . . . . . . . . . . . . . . . . . . . . . 526
Introduction . . . . . . . . . . . . . . . . . . . . . . . . . . . . . . . . . . . . . . . . . . . . . . . . . . . . . . 526
Examine a user-provisioning script . . . . . . . . . . . . . . . . . . . . . . . . . . . . . . . . . . . 526
Create graphical provisioning tools . . . . . . . . . . . . . . . . . . . . . . . . . . . . . . . . . . 529
Solution summary . . . . . . . . . . . . . . . . . . . . . . . . . . . . . . . . . . . . . . . . . . . . . . . . . 529
Solution Collection 8: Reimagining the Administration of Groups
and Membership . . . . . . . . . . . . . . . . . . . . . . . . . . . . . . . . . . . . . . . . . . . . 531
Scenarios, Pain, and Solution . . . . . . . . . . . . . . . . . . . . . . . . . . . . . . . . . . . . . . . . . . . . . . 531
8-1: Best Practices for Creating Group Objects. . . . . . . . . . . . . . . . . . . . . . . . . . . . . . . 533
Solution overview . . . . . . . . . . . . . . . . . . . . . . . . . . . . . . . . . . . . . . . . . . . . . . . . . 533
Introduction . . . . . . . . . . . . . . . . . . . . . . . . . . . . . . . . . . . . . . . . . . . . . . . . . . . . . . 533
Create groups that document their purpose . . . . . . . . . . . . . . . . . . . . . . . . . . 533
Protect groups from accidental deletion . . . . . . . . . . . . . . . . . . . . . . . . . . . . . . 535
Consider the group type: security vs. distribution . . . . . . . . . . . . . . . . . . . . . . 536
Consider group scope: global, domain local, and universal . . . . . . . . . . . . . . 539
Solution summary . . . . . . . . . . . . . . . . . . . . . . . . . . . . . . . . . . . . . . . . . . . . . . . . . 540
8-2: Delegate Management of Group Membership. . . . . . . . . . . . . . . . . . . . . . . . . . . 541
Solution overview . . . . . . . . . . . . . . . . . . . . . . . . . . . . . . . . . . . . . . . . . . . . . . . . . 541
Introduction . . . . . . . . . . . . . . . . . . . . . . . . . . . . . . . . . . . . . . . . . . . . . . . . . . . . . . 541
Examine the member and memberOf attributes . . . . . . . . . . . . . . . . . . . . . . . 541
Delegate permission to write the member attribute . . . . . . . . . . . . . . . . . . . . 543
Solution summary . . . . . . . . . . . . . . . . . . . . . . . . . . . . . . . . . . . . . . . . . . . . . . . . . 549
8-3: Create Subscription Groups . . . . . . . . . . . . . . . . . . . . . . . . . . . . . . . . . . . . . . . . . . . 549
Solution overview . . . . . . . . . . . . . . . . . . . . . . . . . . . . . . . . . . . . . . . . . . . . . . . . . 549
Introduction . . . . . . . . . . . . . . . . . . . . . . . . . . . . . . . . . . . . . . . . . . . . . . . . . . . . . . 549
Examine scenarios suited to the use of subscription groups . . . . . . . . . . . . . 550
Delegate the Add/Remove Self As Member validated write . . . . . . . . . . . . . 551
Provide tools with which to subscribe or unsubscribe. . . . . . . . . . . . . . . . . . . 552
Solution summary . . . . . . . . . . . . . . . . . . . . . . . . . . . . . . . . . . . . . . . . . . . . . . . . . 554
8-4: Create an HTA for Subscription Groups . . . . . . . . . . . . . . . . . . . . . . . . . . . . . . . . . 555
Solution overview . . . . . . . . . . . . . . . . . . . . . . . . . . . . . . . . . . . . . . . . . . . . . . . . . 555

Table of Contents
xxxi
Introduction . . . . . . . . . . . . . . . . . . . . . . . . . . . . . . . . . . . . . . . . . . . . . . . . . . . . . . 555
Use Group_Subscription.hta . . . . . . . . . . . . . . . . . . . . . . . . . . . . . . . . . . . . . . . . . 555
Understand Group_Subscription.hta . . . . . . . . . . . . . . . . . . . . . . . . . . . . . . . . . . 556
Take away lessons in the value of group standards . . . . . . . . . . . . . . . . . . . . . 557
Solution summary . . . . . . . . . . . . . . . . . . . . . . . . . . . . . . . . . . . . . . . . . . . . . . . . . 558
8-5: Create Shadow Groups . . . . . . . . . . . . . . . . . . . . . . . . . . . . . . . . . . . . . . . . . . . . . . . 559
Solution overview. . . . . . . . . . . . . . . . . . . . . . . . . . . . . . . . . . . . . . . . . . . . . . . . . . 559
Introduction . . . . . . . . . . . . . . . . . . . . . . . . . . . . . . . . . . . . . . . . . . . . . . . . . . . . . . 559
Shadow groups and fine-grained password and account
lockout policies . . . . . . . . . . . . . . . . . . . . . . . . . . . . . . . . . . . . . . . . . . . . . . . . 559
Understand the elements of a shadow group framework . . . . . . . . . . . . . . . . 560
Define the group membership query. . . . . . . . . . . . . . . . . . . . . . . . . . . . . . . . . 560
Define the base scopes of the query . . . . . . . . . . . . . . . . . . . . . . . . . . . . . . . . . 561
Develop a script to manage the group’s member attribute based
on the query, while minimizing the impact on replication . . . . . . . . . . . 561
Execute the script on a regular interval . . . . . . . . . . . . . . . . . . . . . . . . . . . . . . . 563
Trigger the script based on changes to an OU . . . . . . . . . . . . . . . . . . . . . . . . . 563
Solution summary . . . . . . . . . . . . . . . . . . . . . . . . . . . . . . . . . . . . . . . . . . . . . . . . . 564
8-6: Provide Friendly Tools for Group Management . . . . . . . . . . . . . . . . . . . . . . . . . . 564
Solution overview. . . . . . . . . . . . . . . . . . . . . . . . . . . . . . . . . . . . . . . . . . . . . . . . . . 564
Introduction . . . . . . . . . . . . . . . . . . . . . . . . . . . . . . . . . . . . . . . . . . . . . . . . . . . . . . 564
Enumerate memberOf and member. . . . . . . . . . . . . . . . . . . . . . . . . . . . . . . . . . 565
Report direct, indirect, and primary group memberships . . . . . . . . . . . . . . . . 565
List a user’s membership by group type. . . . . . . . . . . . . . . . . . . . . . . . . . . . . . . 566
Display all members of a group. . . . . . . . . . . . . . . . . . . . . . . . . . . . . . . . . . . . . . 567
Add or remove group members with Group_ChangeMember.hta . . . . . . . . 568
Give users control over the groups they manage . . . . . . . . . . . . . . . . . . . . . . . 569
Identify notes and next steps for group management tools. . . . . . . . . . . . . . 569
Solution summary . . . . . . . . . . . . . . . . . . . . . . . . . . . . . . . . . . . . . . . . . . . . . . . . . 570
8-7: Proxy Administrative Tasks to Enforce Rules and Logging. . . . . . . . . . . . . . . . . . 570
Solution overview. . . . . . . . . . . . . . . . . . . . . . . . . . . . . . . . . . . . . . . . . . . . . . . . . . 570
Introduction . . . . . . . . . . . . . . . . . . . . . . . . . . . . . . . . . . . . . . . . . . . . . . . . . . . . . . 571
Understand proxying . . . . . . . . . . . . . . . . . . . . . . . . . . . . . . . . . . . . . . . . . . . . . . . 572
Explore the components of the Proxy Framework . . . . . . . . . . . . . . . . . . . . . . 573
Imagine what proxying can do for you . . . . . . . . . . . . . . . . . . . . . . . . . . . . . . . 581
Delegate group management to users with increased confidence
and security . . . . . . . . . . . . . . . . . . . . . . . . . . . . . . . . . . . . . . . . . . . . . . . . . . . 582

xxxii
Table of Contents
Solution Collection 9: Improving the Deployment and Management
of Applications and Configuration . . . . . . . . . . . . . . . . . . . . . . . . . . . . . 583
Scenarios, Pain, and Solution . . . . . . . . . . . . . . . . . . . . . . . . . . . . . . . . . . . . . . . . . . . . . . 583
9-1: Providing Software Distribution Points. . . . . . . . . . . . . . . . . . . . . . . . . . . . . . . . . . 585
Solution overview . . . . . . . . . . . . . . . . . . . . . . . . . . . . . . . . . . . . . . . . . . . . . . . . . 585
Introduction . . . . . . . . . . . . . . . . . . . . . . . . . . . . . . . . . . . . . . . . . . . . . . . . . . . . . . 585
Rationalize your software folder namespace . . . . . . . . . . . . . . . . . . . . . . . . . . 586
Manage access to software distribution folders . . . . . . . . . . . . . . . . . . . . . . . . 588
Share the Software folder, and abstract its location
with a DFS namespace. . . . . . . . . . . . . . . . . . . . . . . . . . . . . . . . . . . . . . . . . . 589
Replicate software distribution folders to remote sites
and branch offices . . . . . . . . . . . . . . . . . . . . . . . . . . . . . . . . . . . . . . . . . . . . . 591
Create a place for your own tools and scripts. . . . . . . . . . . . . . . . . . . . . . . . . . 593
Solution summary . . . . . . . . . . . . . . . . . . . . . . . . . . . . . . . . . . . . . . . . . . . . . . . . . 593
9-2: New Approaches to Software Packaging. . . . . . . . . . . . . . . . . . . . . . . . . . . . . . . . 594
Solution overview . . . . . . . . . . . . . . . . . . . . . . . . . . . . . . . . . . . . . . . . . . . . . . . . . 594
Introduction . . . . . . . . . . . . . . . . . . . . . . . . . . . . . . . . . . . . . . . . . . . . . . . . . . . . . . 594
Determine how to automate the installation of an application. . . . . . . . . . . 595
Identify the success codes produced by application installation. . . . . . . . . . 597
Use Software_Setup.vbs to install almost any application . . . . . . . . . . . . . . . 597
Separate the configuration from the application installation . . . . . . . . . . . . 599
Install the current version of an application . . . . . . . . . . . . . . . . . . . . . . . . . . . 601
Solution summary . . . . . . . . . . . . . . . . . . . . . . . . . . . . . . . . . . . . . . . . . . . . . . . . . 602
9-3: Software Management with Group Policy . . . . . . . . . . . . . . . . . . . . . . . . . . . . . . . 603
Solution overview . . . . . . . . . . . . . . . . . . . . . . . . . . . . . . . . . . . . . . . . . . . . . . . . . 603
Introduction . . . . . . . . . . . . . . . . . . . . . . . . . . . . . . . . . . . . . . . . . . . . . . . . . . . . . . 603
Prepare an application for deployment with GPSI. . . . . . . . . . . . . . . . . . . . . . 603
Configure a GPO to deploy an application. . . . . . . . . . . . . . . . . . . . . . . . . . . . 603
Scope the deployment of an application using application groups . . . . . . . 605
Filter the software deployment GPO with the application group . . . . . . . . . 606
Link the GPO as high as necessary to support its scope . . . . . . . . . . . . . . . . . 607
When to use GPSI . . . . . . . . . . . . . . . . . . . . . . . . . . . . . . . . . . . . . . . . . . . . . . . . . 608
GPSI and Microsoft Office 2007 . . . . . . . . . . . . . . . . . . . . . . . . . . . . . . . . . . . . . 608
Take it to the next level. . . . . . . . . . . . . . . . . . . . . . . . . . . . . . . . . . . . . . . . . . . . . 609
Solution summary . . . . . . . . . . . . . . . . . . . . . . . . . . . . . . . . . . . . . . . . . . . . . . . . . 609
9-4: Deploy Files and Configuration Using Group Policy Preferences . . . . . . . . . . . 609
Solution overview . . . . . . . . . . . . . . . . . . . . . . . . . . . . . . . . . . . . . . . . . . . . . . . . . 609
Introduction . . . . . . . . . . . . . . . . . . . . . . . . . . . . . . . . . . . . . . . . . . . . . . . . . . . . . . 609

Table of Contents
xxxiii
Deploy files with Group Policy Files preferences. . . . . . . . . . . . . . . . . . . . . . . . 610
Push registry changes using Registry preferences . . . . . . . . . . . . . . . . . . . . . . 612
Solution summary . . . . . . . . . . . . . . . . . . . . . . . . . . . . . . . . . . . . . . . . . . . . . . . . . 615
9-5: A Build-It-Yourself Software Management Infrastructure . . . . . . . . . . . . . . . . . . 615
Solution overview. . . . . . . . . . . . . . . . . . . . . . . . . . . . . . . . . . . . . . . . . . . . . . . . . . 615
Introduction . . . . . . . . . . . . . . . . . . . . . . . . . . . . . . . . . . . . . . . . . . . . . . . . . . . . . . 616
Identify the challenges of deploying applications such as
Microsoft Office 2007 . . . . . . . . . . . . . . . . . . . . . . . . . . . . . . . . . . . . . . . . . . 616
Prepare a software distribution folder for Microsoft Office 2007 . . . . . . . . . 617
Create a setup customization file . . . . . . . . . . . . . . . . . . . . . . . . . . . . . . . . . . . . 618
Launch an unattended installation of Office 2007 . . . . . . . . . . . . . . . . . . . . . . 619
Identify the requirements for a build-it-yourself software
management framework . . . . . . . . . . . . . . . . . . . . . . . . . . . . . . . . . . . . . . . . 619
Customize Software_Deploy.vbs to enable application deployment. . . . . . . 620
Manage change using group membership . . . . . . . . . . . . . . . . . . . . . . . . . . . . 625
Deploy an application using a scheduled task . . . . . . . . . . . . . . . . . . . . . . . . . 628
Give users control over the timing of installation . . . . . . . . . . . . . . . . . . . . . . . 628
Solution summary . . . . . . . . . . . . . . . . . . . . . . . . . . . . . . . . . . . . . . . . . . . . . . . . . 630
9-6: Automate Actions with SendKeys . . . . . . . . . . . . . . . . . . . . . . . . . . . . . . . . . . . . . . 630
Solution overview. . . . . . . . . . . . . . . . . . . . . . . . . . . . . . . . . . . . . . . . . . . . . . . . . . 630
Introduction . . . . . . . . . . . . . . . . . . . . . . . . . . . . . . . . . . . . . . . . . . . . . . . . . . . . . . 630
Use SendKeys to automate an action sequence . . . . . . . . . . . . . . . . . . . . . . . . 630
Understand and customize Config_QuickLaunch_Toggle.vbs. . . . . . . . . . . . . 633
Set the default folder view to Details for all folders . . . . . . . . . . . . . . . . . . . . . 634
Automate with AutoIt . . . . . . . . . . . . . . . . . . . . . . . . . . . . . . . . . . . . . . . . . . . . . . 634
Solution summary . . . . . . . . . . . . . . . . . . . . . . . . . . . . . . . . . . . . . . . . . . . . . . . . . 634
Solution Collection 10: Implementing Change, Configuration,
and Policies . . . . . . . . . . . . . . . . . . . . . . . . . . . . . . . . . . . . . . . . . . . . . . . . . 635
Scenarios, Pain, and Solution . . . . . . . . . . . . . . . . . . . . . . . . . . . . . . . . . . . . . . . . . . . . . . 636
10-1: Create a Change Control Workflow . . . . . . . . . . . . . . . . . . . . . . . . . . . . . . . . . . . 637
Solution overview. . . . . . . . . . . . . . . . . . . . . . . . . . . . . . . . . . . . . . . . . . . . . . . . . . 637
Introduction . . . . . . . . . . . . . . . . . . . . . . . . . . . . . . . . . . . . . . . . . . . . . . . . . . . . . . 637
Identify the need for change . . . . . . . . . . . . . . . . . . . . . . . . . . . . . . . . . . . . . . . . 638
Translate the change to Group Policy settings . . . . . . . . . . . . . . . . . . . . . . . . . 638
Test the change in a lab environment. . . . . . . . . . . . . . . . . . . . . . . . . . . . . . . . . 639
Communicate the change to users . . . . . . . . . . . . . . . . . . . . . . . . . . . . . . . . . . . 639
Test the change in the production environment. . . . . . . . . . . . . . . . . . . . . . . . 639

xxxiv
Table of Contents
Migrate users and computers in the production environment
to the scope of the change. . . . . . . . . . . . . . . . . . . . . . . . . . . . . . . . . . . . . . 639
Implement more GPOs with fewer settings. . . . . . . . . . . . . . . . . . . . . . . . . . . . 639
Establish a GPO naming convention . . . . . . . . . . . . . . . . . . . . . . . . . . . . . . . . . 640
Ensure a new GPO is not being applied while you are configuring
its settings . . . . . . . . . . . . . . . . . . . . . . . . . . . . . . . . . . . . . . . . . . . . . . . . . . . . 641
Back up a GPO prior to and after changing it . . . . . . . . . . . . . . . . . . . . . . . . . 642
Document the settings and the GPO . . . . . . . . . . . . . . . . . . . . . . . . . . . . . . . . . 642
Carefully implement the scope of a GPO . . . . . . . . . . . . . . . . . . . . . . . . . . . . . 642
Establish a change management workflow with service levels . . . . . . . . . . . 642
Understand the behavior of client-side Group Policy application. . . . . . . . . 642
Solution summary . . . . . . . . . . . . . . . . . . . . . . . . . . . . . . . . . . . . . . . . . . . . . . . . . 644
10-2: Extend Role-Based Management to the Management
of Change and Configuration . . . . . . . . . . . . . . . . . . . . . . . . . . . . . . . . . . . 644
Solution overview . . . . . . . . . . . . . . . . . . . . . . . . . . . . . . . . . . . . . . . . . . . . . . . . . 644
Introduction . . . . . . . . . . . . . . . . . . . . . . . . . . . . . . . . . . . . . . . . . . . . . . . . . . . . . . 645
Scope GPOs to security groups . . . . . . . . . . . . . . . . . . . . . . . . . . . . . . . . . . . . . . 645
Manage exemptions from an entire GPO . . . . . . . . . . . . . . . . . . . . . . . . . . . . . 649
Manage exemptions from some settings of a GPO . . . . . . . . . . . . . . . . . . . . . 649
Link group-filtered GPOs high in the structure . . . . . . . . . . . . . . . . . . . . . . . . 649
Maximize group management techniques to control GPO scoping. . . . . . . 650
Solution summary . . . . . . . . . . . . . . . . . . . . . . . . . . . . . . . . . . . . . . . . . . . . . . . . . 651
10-3: Implement Your Organization’s Password and Account Lockout Policies . . . 651
Solution overview . . . . . . . . . . . . . . . . . . . . . . . . . . . . . . . . . . . . . . . . . . . . . . . . . 651
Introduction . . . . . . . . . . . . . . . . . . . . . . . . . . . . . . . . . . . . . . . . . . . . . . . . . . . . . . 652
Determine the password policies that are appropriate for your
organization . . . . . . . . . . . . . . . . . . . . . . . . . . . . . . . . . . . . . . . . . . . . . . . . . . 652
Customize the default GPOs to align with your enterprise policies . . . . . . . 655
Implement your password, lockout, and Kerberos policies . . . . . . . . . . . . . . 656
Implement fine-grained password policies to protect sensitive and
privileged accounts . . . . . . . . . . . . . . . . . . . . . . . . . . . . . . . . . . . . . . . . . . . . 657
Understand PSO precedence. . . . . . . . . . . . . . . . . . . . . . . . . . . . . . . . . . . . . . . . 659
Solution summary . . . . . . . . . . . . . . . . . . . . . . . . . . . . . . . . . . . . . . . . . . . . . . . . . 661
10-4: Implement Your Authentication and Active Directory Auditing Policies . . . . 662
Solution overview . . . . . . . . . . . . . . . . . . . . . . . . . . . . . . . . . . . . . . . . . . . . . . . . . 662
Introduction . . . . . . . . . . . . . . . . . . . . . . . . . . . . . . . . . . . . . . . . . . . . . . . . . . . . . . 662
Implement your auditing policies by modifying the Default Domain
Controllers Policy GPO . . . . . . . . . . . . . . . . . . . . . . . . . . . . . . . . . . . . . . . . . 662

Table of Contents
xxxv
Consider auditing failure events . . . . . . . . . . . . . . . . . . . . . . . . . . . . . . . . . . . . . 665
Align auditing policies, corporate policies, and reality. . . . . . . . . . . . . . . . . . . 665
Audit changes to Active Directory objects. . . . . . . . . . . . . . . . . . . . . . . . . . . . . 665
View audit events in the Security log . . . . . . . . . . . . . . . . . . . . . . . . . . . . . . . . . 667
Leverage Directory Service Changes auditing. . . . . . . . . . . . . . . . . . . . . . . . . . 667
Solution summary . . . . . . . . . . . . . . . . . . . . . . . . . . . . . . . . . . . . . . . . . . . . . . . . . 669
10-5: Enforce Corporate Policies with Group Policy . . . . . . . . . . . . . . . . . . . . . . . . . . . 669
Solution overview. . . . . . . . . . . . . . . . . . . . . . . . . . . . . . . . . . . . . . . . . . . . . . . . . . 669
Introduction . . . . . . . . . . . . . . . . . . . . . . . . . . . . . . . . . . . . . . . . . . . . . . . . . . . . . . 670
Translate corporate policies to security and nonsecurity settings . . . . . . . . . 670
Create GPOs to configure settings derived from corporate policies . . . . . . . 670
Scope GPOs to the domain . . . . . . . . . . . . . . . . . . . . . . . . . . . . . . . . . . . . . . . . . 670
Enforce corporate security and configuration policies . . . . . . . . . . . . . . . . . . 671
Proactively manage exemptions . . . . . . . . . . . . . . . . . . . . . . . . . . . . . . . . . . . . . 672
Provide a managed migration path to policy implementation . . . . . . . . . . . 672
Determine whether you need more than one GPO for corporate
policy implementation . . . . . . . . . . . . . . . . . . . . . . . . . . . . . . . . . . . . . . . . . . 673
Solution summary . . . . . . . . . . . . . . . . . . . . . . . . . . . . . . . . . . . . . . . . . . . . . . . . . 673
10-6: Create a Delegated Group Policy Management Hierarchy . . . . . . . . . . . . . . . . 674
Solution overview. . . . . . . . . . . . . . . . . . . . . . . . . . . . . . . . . . . . . . . . . . . . . . . . . . 674
Introduction . . . . . . . . . . . . . . . . . . . . . . . . . . . . . . . . . . . . . . . . . . . . . . . . . . . . . . 674
Delegate permissions to link existing GPOs to an OU . . . . . . . . . . . . . . . . . . . 674
Delegate the ability to manage an existing GPO . . . . . . . . . . . . . . . . . . . . . . . 676
Delegate permission to create GPOs. . . . . . . . . . . . . . . . . . . . . . . . . . . . . . . . . . 677
Understand the business and technical concerns of Group Policy
delegation . . . . . . . . . . . . . . . . . . . . . . . . . . . . . . . . . . . . . . . . . . . . . . . . . . . . 678
Solution summary . . . . . . . . . . . . . . . . . . . . . . . . . . . . . . . . . . . . . . . . . . . . . . . . . 679
10-7: Testing, Piloting, Validating, and Migrating Policy Settings . . . . . . . . . . . . . . . 679
Solution overview. . . . . . . . . . . . . . . . . . . . . . . . . . . . . . . . . . . . . . . . . . . . . . . . . . 679
Introduction . . . . . . . . . . . . . . . . . . . . . . . . . . . . . . . . . . . . . . . . . . . . . . . . . . . . . . 679
Create an effective scope of management for a pilot test . . . . . . . . . . . . . . . 680
Prepare for and model the effects of the pilot test . . . . . . . . . . . . . . . . . . . . . 680
Create a rollback mechanism . . . . . . . . . . . . . . . . . . . . . . . . . . . . . . . . . . . . . . . . 681
Implement the pilot test . . . . . . . . . . . . . . . . . . . . . . . . . . . . . . . . . . . . . . . . . . . . 682
Migrate objects to the scope of the new GPO . . . . . . . . . . . . . . . . . . . . . . . . . 682
Solution summary . . . . . . . . . . . . . . . . . . . . . . . . . . . . . . . . . . . . . . . . . . . . . . . . . 683
xxxvi
Table of Contents
10-8: No-Brainer Group Policy Tips . . . . . . . . . . . . . . . . . . . . . . . . . . . . . . . . . . . . . . . . 683
Solution overview . . . . . . . . . . . . . . . . . . . . . . . . . . . . . . . . . . . . . . . . . . . . . . . . . 683
Introduction . . . . . . . . . . . . . . . . . . . . . . . . . . . . . . . . . . . . . . . . . . . . . . . . . . . . . . 683
Deploy registry changes with templates or registry preferences. . . . . . . . . . 683
Use loopback policy processing in merge mode . . . . . . . . . . . . . . . . . . . . . . . 684
Run GPUpdate on a remote system to push changes . . . . . . . . . . . . . . . . . . . 684
Delegate permissions to perform RSoP reporting . . . . . . . . . . . . . . . . . . . . . . 685
Scope network-related settings using sites or shadow groups . . . . . . . . . . . 685
Avoid WMI filters and targeting when possible:
Use shadow groups instead . . . . . . . . . . . . . . . . . . . . . . . . . . . . . . . . . . . . . 685
No-brainer Group Policy settings . . . . . . . . . . . . . . . . . . . . . . . . . . . . . . . . . . . . 686
Index. . . . . . . . . . . . . . . . . . . . . . . . . . . . . . . . . . . . . . . . . . . . . . . . . . . . . . . . . . . . . . . . . . . . 6
89
www.microsoft.com/learning/booksurvey
Microsoft is interested in hearing your feedback so we can continually improve our books and
learning resources for you. To participate in a brief online survey, please visit:
What do you think of this book? We want to hear from you!

89
Solution Collection 2
Managing Files, Folders,
and Shares
In this chapter:
Scenarios, Pain, and Solution . . . . . . . . . . . . . . . . . . . . . . . . . . . . . . . . . . . . . . . . . . . . 90
2-1: Work Effectively with the ACL Editor User Interfaces . . . . . . . . . . . . . . . . . . . 92
2-2: Manage Folder Structure . . . . . . . . . . . . . . . . . . . . . . . . . . . . . . . . . . . . . . . . . . . 99
2-3: Manage Access to Root Data Folders . . . . . . . . . . . . . . . . . . . . . . . . . . . . . . . . 104
2-4: Delegate the Management of Shared Folders. . . . . . . . . . . . . . . . . . . . . . . . . 107
2-5: Determine Which Folders Should Be Shared. . . . . . . . . . . . . . . . . . . . . . . . . . 110
2-6: Implement Folder Access Permissions Based on Required Capabilities . . . 112
2-7: Understand Shared Folder Permissions (SMB Permissions) . . . . . . . . . . . . . 120
2-8: Script the Creation of an SMB Share. . . . . . . . . . . . . . . . . . . . . . . . . . . . . . . . . 124
2-9: Provision the Creation of a Shared Folder . . . . . . . . . . . . . . . . . . . . . . . . . . . . 126
2-10: Avoid the ACL Inheritance Propagation Danger
of File and Folder Movement . . . . . . . . . . . . . . . . . . . . . . . . . . . . . . . . . . 136
2-11: Preventing Users from Changing Permissions on Their Own Files . . . . . . 141
2-12: Prevent Users from Seeing What They Cannot Access . . . . . . . . . . . . . . . . 143
2-13: Determine Who Has a File Open . . . . . . . . . . . . . . . . . . . . . . . . . . . . . . . . . . . 145
2-14: Send Messages to Users . . . . . . . . . . . . . . . . . . . . . . . . . . . . . . . . . . . . . . . . . . 147
2-15: Distribute Files Across Servers . . . . . . . . . . . . . . . . . . . . . . . . . . . . . . . . . . . . . 151
2-16: Use Quotas to Manage Storage. . . . . . . . . . . . . . . . . . . . . . . . . . . . . . . . . . . . 154
2-17: Reduce Help Desk Calls to Recover Deleted or Overwritten Files . . . . . . . 157
2-18: Create an Effective, Delegated DFS Namespace . . . . . . . . . . . . . . . . . . . . . . 163
Since the beginning of Microsoft Windows networking time, one of the key roles of Windows
servers has been to provide a centralized location for users to share files. And 15 years later,
you would think we, the information technology (IT) professional community, would have file
servers figured out—and that Microsoft would have met all of our needs for file servers. But
alas, fundamental gaps remain in the toolset with which we manage file servers, and poten-
tially serious gaps in implementation lead to environments in which data is, at best, under-
managed and, at worst, exposed to security violations and denial-of-service or data-loss
scenarios.

90
Windows Administration Resource Kit: Productivity Solutions for IT Professionals
Solutions in this chapter will equip you to manage data on file servers more consistently and
more securely with less effort. I’ll address common questions about Windows file servers,
shared folders, access control lists (ACLs), Access-based Enumeration (ABE), shadow copies,
and more. We’ll also look at exciting new features of Windows Server 2008, including changes
to the capabilities of file owners.
Scenarios, Pain, and Solution
Chances are that you have experience managing files and folders within shared folders on
Windows servers. And I’ll assume you understand components of security such as NTFS per-
missions, inheritance, and share permissions. “What could there possibly be left to learn
about a Windows file server?” you might ask. Consider the following scenarios, and the com-
mon gaps in implementation of the file server role:
■
The Finance department of Blue Yonder Airlines maintains a share that is used for
employees in that department to collaborate on files, primarily Microsoft Office Excel
worksheets. The network administrator secured the share with a permission that allows
the users Modify permission on the root folder, which, of course, all subfolders inherit.
Early Monday morning, before his coffee has kicked in, Mark Bebbington, a Finance
manager for Blue Yonder Airlines, opens an Excel budget spreadsheet from the folder to
prepare it for a presentation to the CEO. He then clicks the parent folder to look at its
contents so that he can decide if he needs to change any other worksheet. He turns his
eyes to Excel and the spreadsheet, where he sees a number that does not belong. He
presses the Delete key. Not noticing that the Windows Explorer folder still has focus,
and not paying attention to the message that pops up in front of his still-bleary eyes, he
clicks a button and then realizes—too late—that he has just deleted the contents of the
entire Finance share.
Important
If you have ever given a group the Allow::Modify NTFS permission, you
have set yourself up for just this kind of scenario: an accidental or intentional denial of
service. Any user in the group can delete all items in the shared folder.
■
Engineers at Trey Research require access to engineering documents. The network archi-
tecture and the nature of the engineering applications have led the IT organization to
determine that a hub-and-spoke model is most appropriate. In this model, changes are
made only to the master documents in the shared folder in the datacenter, and those
changes are distributed to read-only replicas on servers in distributed geographical
offices. Because the replication technology also replicates NTFS ACLs, the IT organiza-
tion needs to determine how to enable modification of the documents in the hub share
while preventing changes to the documents in the spoke shares.
■
As part of its effort to decrease costs, increase responsiveness to customers, and improve
user productivity, the IT department of Proseware, Inc., wants to enable users to recover

Solution Collection 2: Managing Files, Folders, and Shares
91
accidentally deleted, modified, or overwritten documents without requiring a call to the
help desk to restore items from tape backup.
■
Administrators of Litware, Inc., want to prevent nontechnical users, and nonapproved
users, from changing permissions of files or folders, even if they created those files or
folders.
■
The IT professionals at Contoso, Ltd., want to make it easier to locate data through a log-
ical namespace that organizes folders the way users think about them, rather than pre-
senting users with a server-based view of folder storage.
As we explore solutions for these and other scenarios, we’ll address the following questions
and needs:
■
What has changed with Windows Server 2008 file services?
■
How can you facilitate moving folders to a new server without having to “touch” every
shortcut, mapped drive, and link that points to the original location?
■
How is quota management different in Windows Server 2008 than in Windows 2000
and Windows Server 2003?
■
Now that the NET SEND command is no longer available, how can you notify users con-
nected to a server before taking the server offline?
■
What is the danger of moving files between two folders with different permissions?
■
How can a user be prevented from changing permissions on a file he or she created?
The components of solutions in this chapter will include the following:
■
NTFS files and folders and their permissions: access control entries, which are stored as
part of the discretionary ACL (DACL) in the security descriptor of the file or folder
■
Shared folders, including their permissions and settings: the share name (including hid-
den shares), Server Message Block (SMB) ACLs on the share, the share description, and
caching settings
■
Access-based Enumeration (ABE)
■
The Creator Owner entry in the security descriptor
■
The new Owner Rights identity
■
Group Policy
■
Quota management
■
Distributed File System (DFS) namespaces
■
Symbolic links and network places
■
Shadow copies of shared folders
■
Robocopy

92
Windows Administration Resource Kit: Productivity Solutions for IT Professionals
2-1: Work Effectively with the ACL Editor User Interfaces
Solution overview
Type of solution
Guidance and tips
Features and tools
The ACL editor user interfaces: the Properties dialog box on the Secu-
rity tab, Advanced Security Settings dialog box, and Permission Entry
dialog box
Solution summary
Ensure that you are fully up to speed on the nuances of ACL editor
user interfaces.
Benefits
Use ACL editor user interfaces more effectively.
Introduction
Security permissions are implemented as access control entries (ACEs) in the DACL within
the security descriptor (SD) of a securable resource. The SD also contains the system ACL
(SACL), which stores auditing entries.
An important feature of the NTFS file system is that it supports SDs for files and folders. The
SD is, in fact, just one attribute of a file or folder, along with data attributes that contain the
actual data of a file. All of these attributes make up what we think of as the file or folder on the
NTFS volume.
The ACL is the basis for determining which users can access resources and at what level. The
security token that is generated by the server’s local security subsystem to represent the user
upon his or her authentication contains the security identifiers (SIDs) not only of the user’s
account but also of all the groups of which that user is a member. When a user attempts to
access a resource, the SIDs in the token are compared to the SIDs in the ACL, and access is cal-
culated based on granular permissions that are allowed or denied.
In Windows 2000, ACLs determine access regardless of whether the resource is being
accessed locally or over the network. Windows Server 2003 added the ability to specify differ-
ent permissions based on local versus over-the-network access.
The ACL editor
The ACL of a resource is exposed in the graphical user interface (GUI) by the ACL editor user
interfaces. Following is a list of these interfaces:
■
The Security tab of the resource’s Properties dialog box
■
The Advanced Security Settings dialog box
■
The Permission Entry dialog box
Each of these interfaces is described in more detail in the following sections.
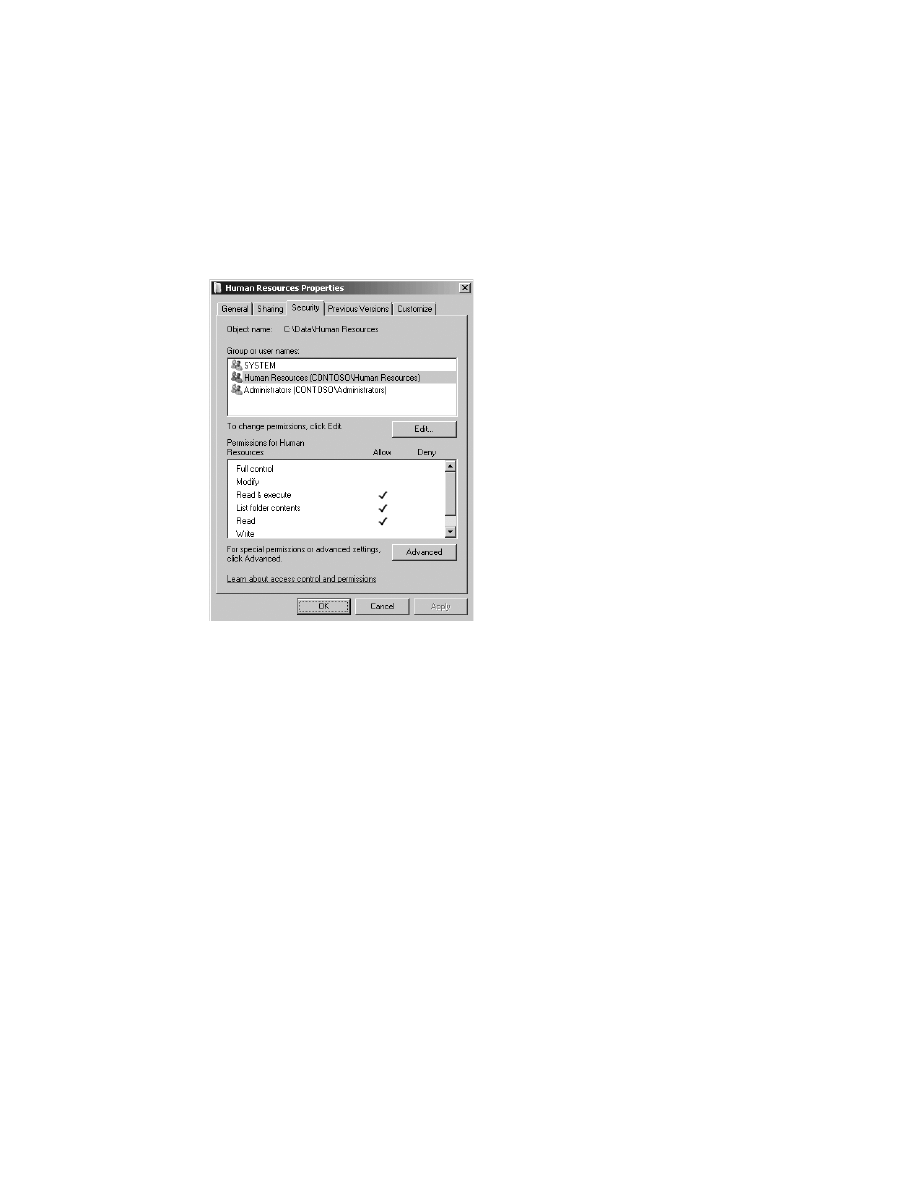
Solution Collection 2: Managing Files, Folders, and Shares
93
The Security tab of the Properties dialog box
Right-click any resource, choose Properties, and select the Security tab. You will see a general
overview of the SD on the Security tab, also called the Security Settings dialog box, which is
shown in Figure 2-1.
Figure 2-1
The Security Settings dialog box
On the Security tab of a securable object’s Properties dialog box, permission templates appear
in the lower half of the tab. These templates support typical access scenarios such as Read,
Write, Modify, and Full Control. They represent a collection of the more granular permissions
that can be explored on the Permissions tab of the Advanced Security Settings dialog box and
in the Permission Entry dialog boxes. The type of permission template is indicated by the
state of the check boxes next to the permission. A check mark in the box next to a permission
template indicates that it is in force. Allow and Deny templates appear under the Allow and
Deny columns, respectively. Templates selected with a disabled (gray) check box are inherited
from a parent folder or volume, whereas check boxes that are selected and enabled (with a
white background) are assigned explicitly to the selected file or folder.
Generally, these permission templates do not tell the full story. When there are ACEs for a
security principal that do not fit nicely into the templates shown in the Security Settings dia-
log box, the template labeled “Special” at the bottom of the permissions list is selected. In this
case, you must click Advanced to see more detail regarding the permissions in the ACL. How-
ever, it is recommended that you always click Advanced to view the details of the SD displayed
on the Permissions tab of the Advanced Security Settings dialog box.
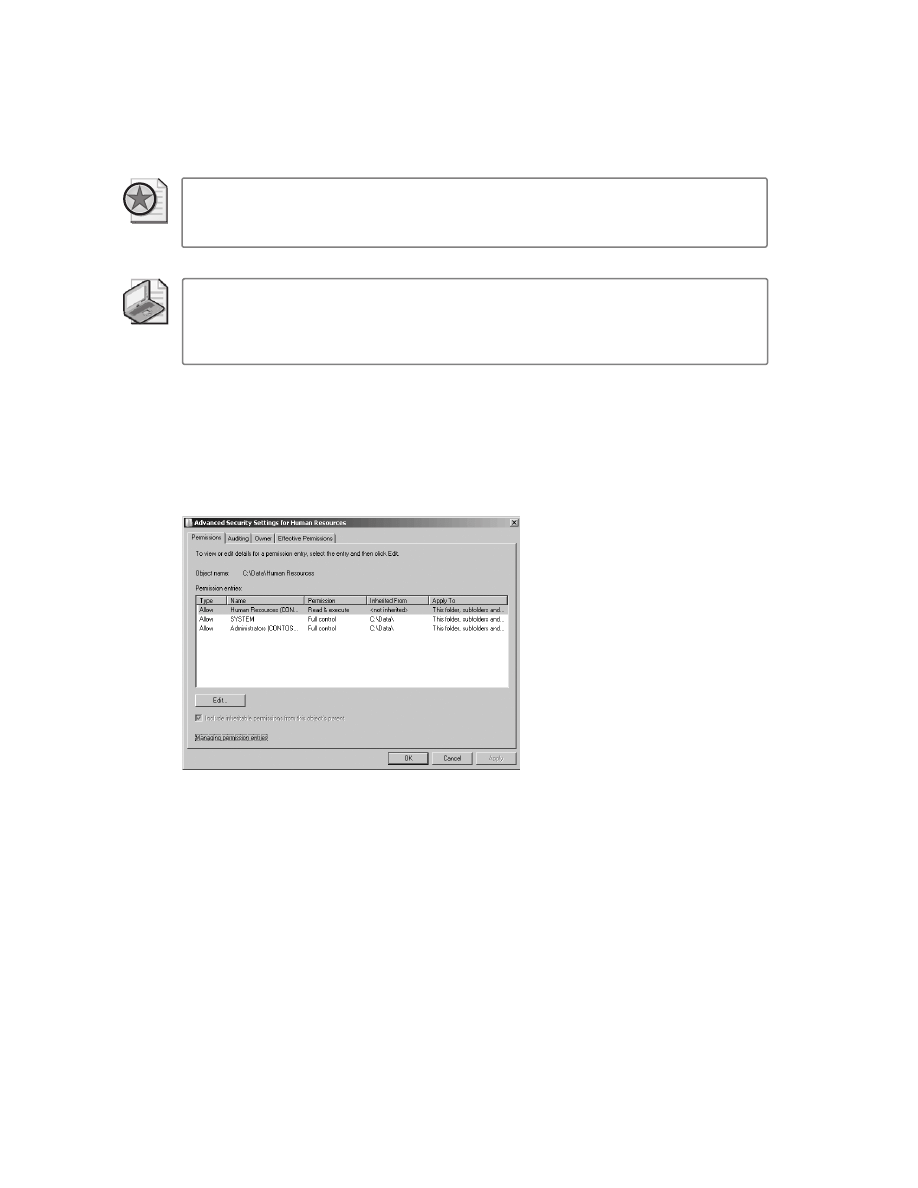
94
Windows Administration Resource Kit: Productivity Solutions for IT Professionals
Best Practices
Always click the Advanced button on the Security tab of the Properties dia-
log box to view the details of the security descriptor displayed in the Advanced Security Set-
tings dialog box.
Note
The Advanced button does not appear on the Security tab of the Properties dialog
box of a volume accessed from the Share and Storage Management snap-in. You must go to
the properties of the volume from Windows Explorer to access the Advanced Security Settings
dialog box.
The Permissions tab of the Advanced Security Settings dialog box
From the Security tab of the Properties dialog box, click the Advanced button to see more
detailed information about the SD. This interface, called the Advanced Security Settings
dialog box, shown in Figure 2-2, has tabs for permissions, auditing, ownership, and effective
permissions.
Figure 2-2
The Advanced Security Settings dialog box
The Permissions tab of the Advanced Security Settings dialog box has the following important
features, some of which might not be familiar to you:
■
In Windows Server 2008 and Windows Vista, each tab of the dialog box is in view
mode. You must click the Edit button on a tab (which will be enabled only if your cre-
dentials enable you to make a change) to modify settings on that tab.
■
Unlike the Security tab of the Properties dialog box, you can identify the source of inher-
ited permissions: The Inherited From column indicates the parent folder or volume
where the permissions are explicitly defined. Permissions assigned explicitly to the
selected object show “<not inherited>” in the Inherited From column.
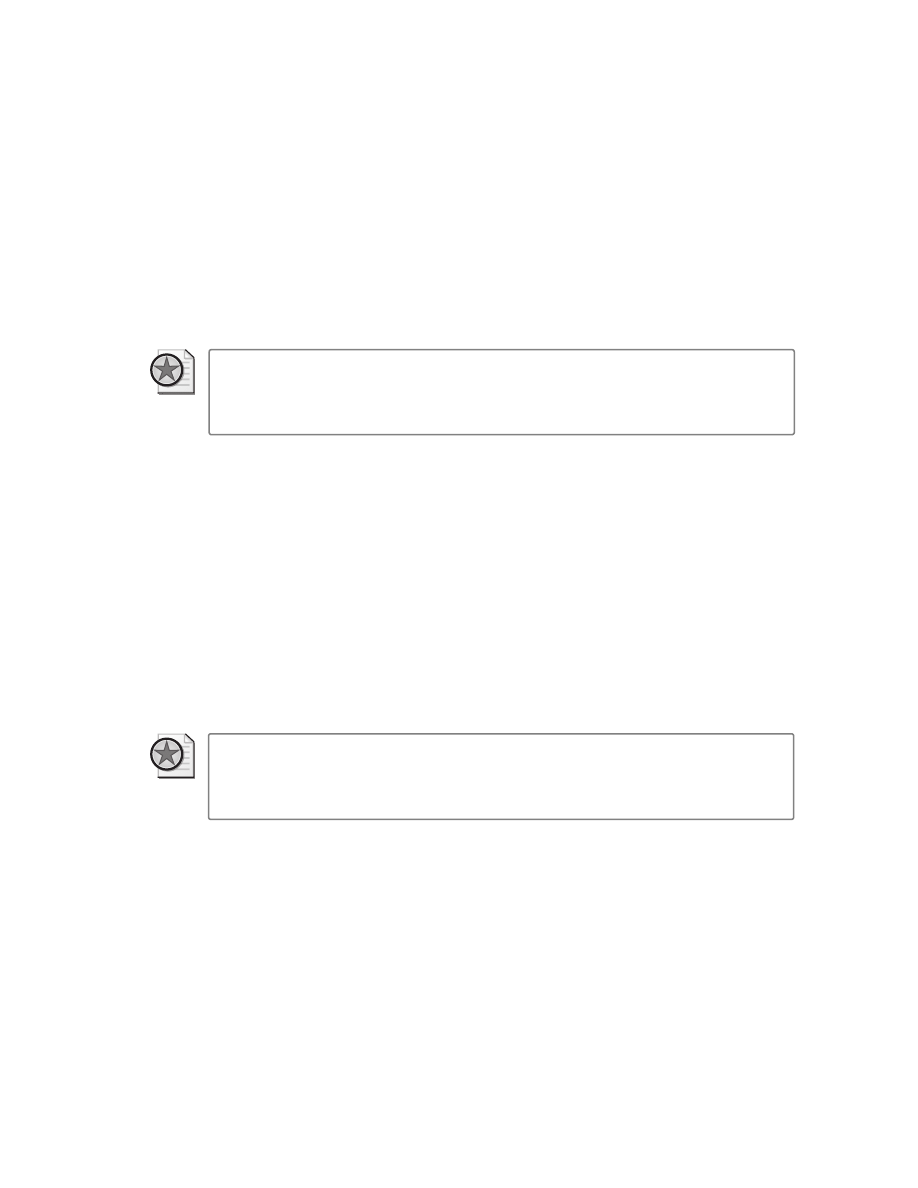
Solution Collection 2: Managing Files, Folders, and Shares
95
■
The initial view of permission entries is in canonical order. This means the ACEs are
listed in the order in which the local security subsystem analyzes them against the SIDs
in the security token. The first match that is found—allow or deny—for the specific type
of access that is being requested is used to determine whether that access is permitted.
Therefore, the “more important” or “winning” permissions are at the top of the list. You
can sort the list by clicking any column header, and therefore change the list from
canonical order. However, when you close and reopen the Advanced Security Settings
dialog box, you will again see the ACEs in canonical order.
Best Practices
Recognize the importance of the canonical listing of permissions in
the default view of the Advanced Security Settings dialog box. Interpreting canonical
order can facilitate an understanding of how permissions are applied to a user attempt-
ing to access the resource.
■
Permission sets (ACEs) that cannot be summarized correctly in the Permission column
display “Special” in the Permission column. Windows Server 2008 also shows “Special”
in the Permission column if the selected object is a folder and the inheritance setting of
the permission is not “This folder, subfolders and files.”
We’ll explore additional features and uses of the Advanced Security Settings dialog box later
in this chapter.
The Permission Entry dialog box
The permissions as listed on the Permissions tab of the Advanced Security Settings dialog box
are certainly more informative than the Security tab of the Properties dialog box, but they’re
still not fully enumerated. To identify all the granular ACEs that make up a permission, you
must view the ACEs in the Permission Entry dialog box.
Best Practices
Whenever a permission displays as “Special” in the Permission column of
the Permissions tab of the Advanced Security Settings dialog box, or whenever you want a
complete understanding of a particular permission, view the permission in the Permission
Entry dialog box.
To access the Permission Entry dialog box, follow these steps:
1. If the Permissions tab of the Advanced Security Settings dialog box is in view mode
(indicated by the presence of an Edit button but no Add or Remove buttons), click Edit.
2. Select a permission entry from the Permission entries list.
3. Click Edit. The Permission Entry dialog box, shown in Figure 2-3, appears.
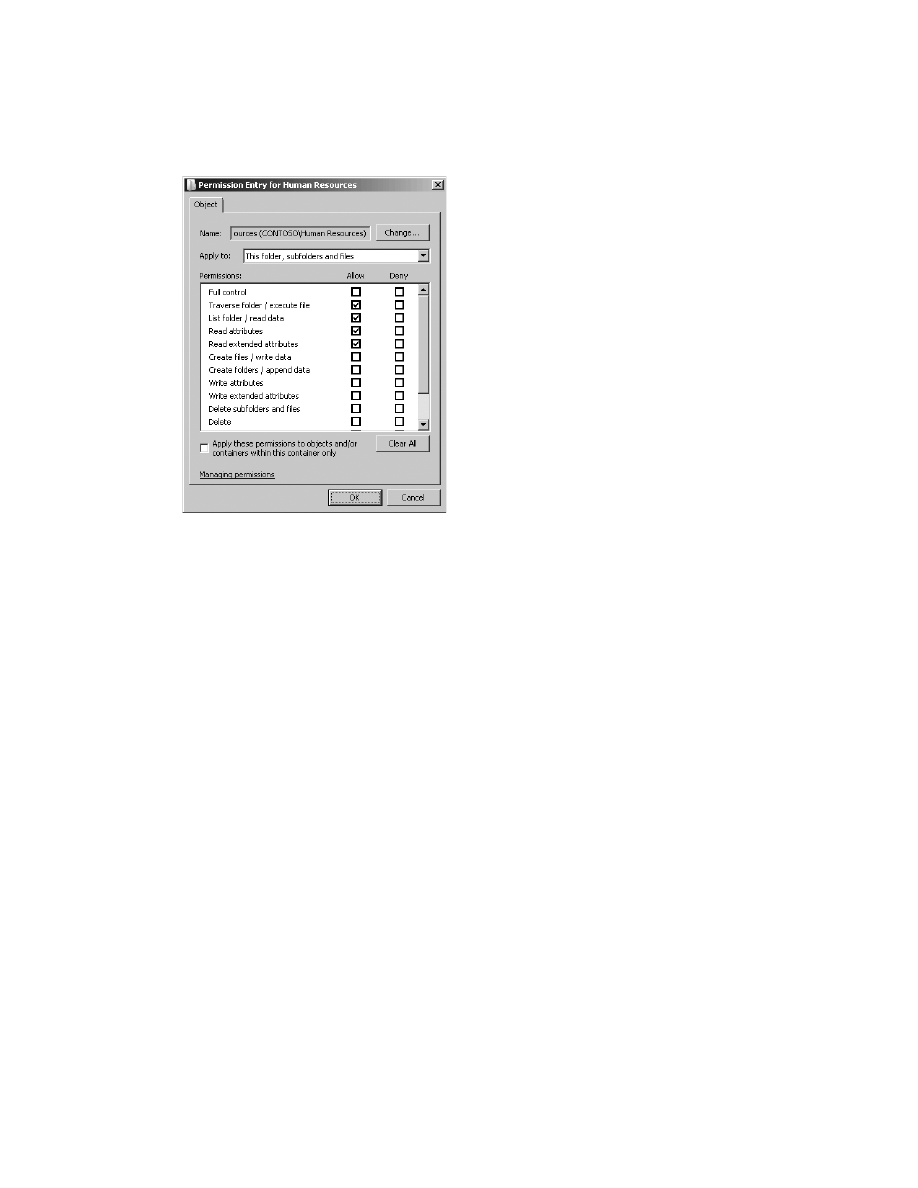
96
Windows Administration Resource Kit: Productivity Solutions for IT Professionals
Figure 2-3
The Permission Entry dialog box
The permission that is displayed in the Permission Entry dialog box is broken down into the
individual permissions (ACEs) that it comprises. Each permission’s status is further broken
down to Allow and Deny ACEs. If the ACE is inherited, the check box is disabled (grey). If it
is explicit, the check box is enabled (white). Finally, the inheritance flags are displayed in the
Apply To drop-down list. Inheritance will be discussed in later solutions in this Solutions
Collection.
Evaluating effective permissions
Whether a request for access to a file or folder is allowed or denied is determined by the local
security subsystem, which evaluates the ACEs in the ACL in canonical order against the SIDs
in the user’s security token. The first ACE for the particular type of access (for example, read,
write, or delete) that is applied to a SID found in the token decides whether the access request
is allowed or denied. The effective permissions for a user are evaluated by the cumulative effect
of allowed, denied, explicit, and inherited permissions applied to the user account and the
groups in which those accounts are members.
To understand how the effective permissions are derived, we must look at the hierarchy of per-
mission settings and their precedence on an ACL. Following are the golden rules of ACEs:
File permissions override folder permissions.
The only ACL that matters is the ACL for the
object that is being accessed. When a user has only Read permission on a folder and
when Full Control permissions are given to a child object (such as a file), the user will
have Full Control over that object. The same is true in reverse. So when the user has Full

Solution Collection 2: Managing Files, Folders, and Shares
97
Control for a folder but only Read permission on the file, the user can read but not mod-
ify the file.
ACEs have one of five possible states.
❑
Not Specified: Neither the Allow nor Deny check box is selected.
❑
Explicit Allow: The Allow check box is selected.
❑
Inherited Allow: The Allow check box is gray and selected—which means the per-
mission is inherited from the parent folder or volume.
❑
Explicit Deny: The Deny check box is selected.
❑
Inherited Deny: The Deny check box is gray and selected—which means the per-
mission is inherited from the parent folder or volume.
Allow permissions are cumulative.
Whether you assign permissions to a user or to a group or
groups to which a user belongs, all the permissions apply to the user. For example,
when a user is individually given Read permissions to a file and is a member of a group
that has Write permissions, the user has both Read and Write permissions. If that user
is also a member of another group that has Full Control of the parent folder and inher-
itance is in use, the user has Full Control of the resource.
Deny overrides Allow.
A Deny permission takes precedence over an Allow permission—so
even when a user is a member of seven groups that have Allow permissions to a resource
specified, the user is denied access if one group is assigned a Deny permission. Remem-
ber, however, that access is evaluated per ACE. If a user has Allow permissions that give
her Read and Write access, and a Deny Write permission, she is unable to change the
file, but she can continue to read it.
Explicit permissions override inherited permissions.
A selected gray check box in the ACL edi-
tor indicates that permissions are being inherited from a parent folder or multiple par-
ent folders. Although the default condition is that the permissions are cumulative
between inherited permissions and explicit permissions (indicated by a white check
box with a check mark in it), in the event the two settings contradict one another, the
explicit permission overrides the inherited one. For example, suppose a user has an
inherited Deny Read permission, but a group to which that user belongs has an explicit
Allow Read permission. The Allow permission takes precedence and the user will be
able to read the file.
Access is often not determined by NTFS ACEs alone.
ACEs on NTFS files and folders deter-
mine the maximum available access to the resource. However, resource access might be
further modified by permissions that are applied by the service through which access is
obtained. For example, shared folder permissions (SMB permissions) will, if more lim-
ited than effective NTFS permissions, further restrict access. Resources served through
an IIS application can have access limited by more restrictive security settings on the
Web site or virtual directory.
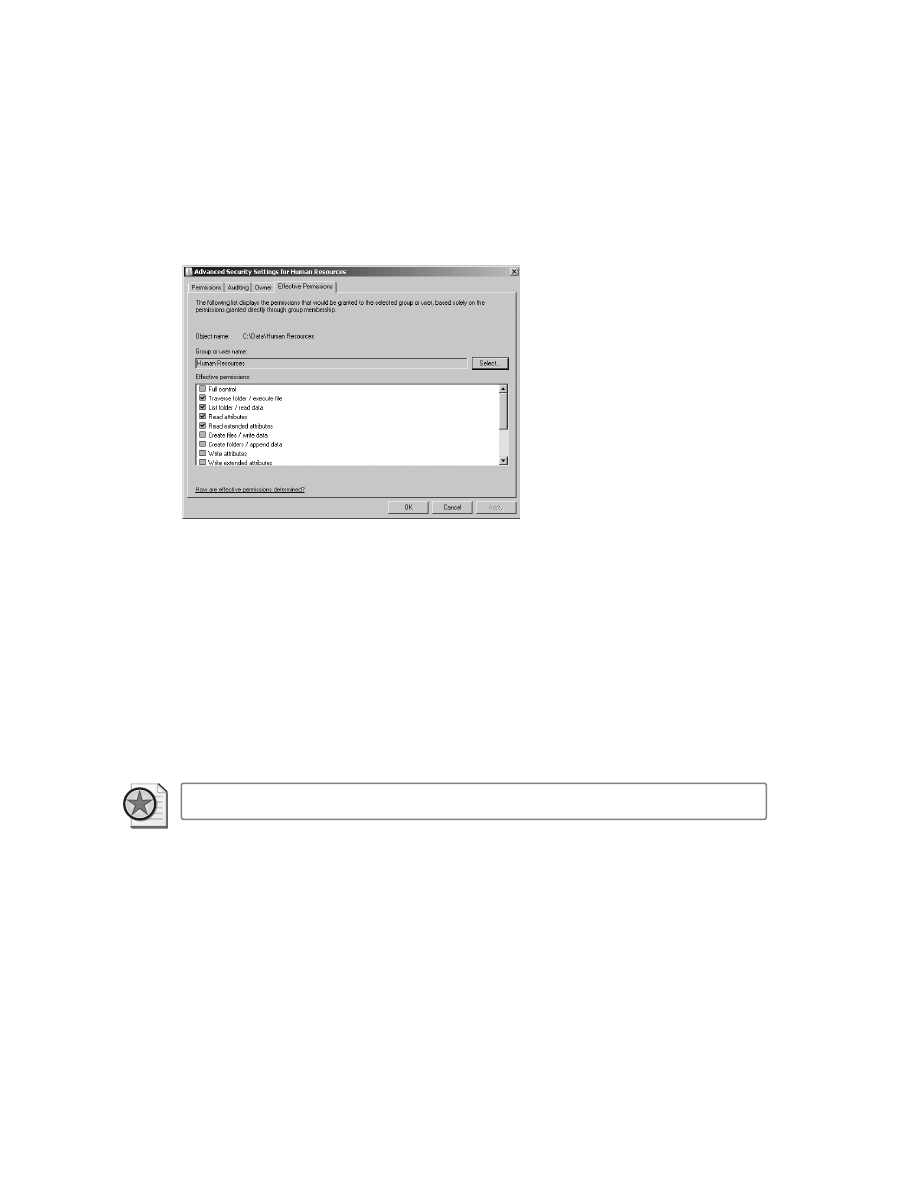
98
Windows Administration Resource Kit: Productivity Solutions for IT Professionals
Evaluating effective permissions can be tricky. The Effective Permissions tab of the Advanced
Security Settings dialog box, shown in Figure 2-4, can be helpful. To use it, select the user or
group for which you want to evaluate effective permissions; a rough estimate of the security
principal’s effective permissions is displayed.
Figure 2-4
The Effective Permissions tab
However, this tool has its weaknesses. It does not account for the following:
■
Whether the user accesses the file while logged on locally or via Remote Desktop, or
remotely through a shared folder. These access modalities are represented by well-
known SIDs such as Interactive, Network, or Remote Interactive User.
■
Other well-known SIDs, including Restricted, Anonymous Logon, and Limited User.
You can learn more about the Effective Permissions tab, how it works, and what its weak-
nesses are by clicking the How Are Effective Permissions Determined? link. This will take you
to the Access Control User Interface help file, then to the How Effective Permissions Are
Determined topic.
Best Practices
Understand the limitations of the Effective Permissions tab.
In the end, it is difficult and time consuming to evaluate resource access at the level of individ-
ual ACLs. In Solutions Collection 1, “Role-Based Management,” I presented a database-driven
approach to managing an enterprise environment that used Active Directory groups to imple-
ment both the database and business logic components of role-based management (RBM). I
suggested creating groups with names such as ACL_Budget_Read and ACL_Budget_Edit to
establish a one-to-one relationship between a database object (the group) and a point of
management (the ACLs on a collection of resources, such as the budget). Doing so provides a
visible, easily managed approach to the security of distributed resources.
Solution Collection 2: Managing Files, Folders, and Shares
99
Best Practices
Unless business requirements mandate otherwise, do not use well-known
SIDs—such as Interactive, Network, Remote, Terminal Services User, Restricted, Anonymous
Logon, or Limited User—to configure ACEs on a securable resource. Doing so makes the eval-
uation of effective permissions much more difficult. Instead, elevate the management of ACLs
to a managed level by applying the concepts and tools of role-based access control I presented
in Solutions Collection 1.
Solution summary
The ACL editor user interfaces can be used to view or edit permissions on a securable
resource, such as a file or folder. Although you might be very familiar with the Security tab of
the Properties dialog box, the Advanced Security Settings dialog box, and the Permission
Entry dialog box, it is worth ensuring that you know and follow these best practices:
■
When viewing permissions, always click the Advanced button on the Security tab and
evaluate permissions using the Advanced Security Settings dialog box. In most situa-
tions, the permissions templates on the Security tab will not provide a complete picture
of the resource’s ACL.
■
Understand the importance of the canonical listing of permissions on the Advanced
Security Settings dialog box. Permissions at the top of the list override permissions
below them. Knowing that fact can facilitate the evaluation of effective permissions.
■
When a permission displays “Special” in the Permission column of the Permissions tab
of the Advanced Security Settings dialog box, view that permission in the Permission
Entry dialog box to fully understand its ACEs and inheritance flags.
■
Recognize that the results of the Effective Permissions tab are an approximation of effec-
tive permissions and that they ignore a number of special identities.
■
To reduce the burden of security management, implement the concepts and tools of
role-based access control presented in Solutions Collection 1.
2-2: Manage Folder Structure
Solution overview
Type of solution
Guidance
Features and tools
NTFS volumes
Solution summary
Maintain a wide and shallow folder structure, enabling the manage-
ment of folder security using inheritance, with minimal levels of
explicit ACLs.
Benefits
Increased manageability and security

100
Windows Administration Resource Kit: Productivity Solutions for IT Professionals
Introduction
“Beauty is only skin deep,” the saying goes. And life is beautiful when the scopes of manage-
ment of security are only skin deep as well. Said another way, “Go wide, not deep.”
Folders serve two purposes. A folder organizes content—files and subfolders—in a single con-
tainer. And a folder, by maintaining an ACL with inheritable ACEs, establishes the scope of
security for its contents.
Typically, file servers are characterized by multilevel hierarchies of folders. For example, a
top-level folder named “Data” might have subfolders for each department. A departmental
subfolder is further divided into projects and teams. Those folders contain many levels of
subfolders.
Create a folder structure that is wide rather than deep
Such deep folder structures are relatively harmless with regard to those folders’ role of orga-
nizing content. However, if you are having to scope security by managing ACLs on folders
more than a few levels down, you are likely to start feeling pain. The deeper you go to scope a
particular level of access for a specific user or group, the more difficult security management
becomes. You begin to deal with increasing numbers of exceptions to the rule, where “the
rule” is a level of access scoped by ACLs on a parent folder, and you find yourself having to
open up or lock down access on a subfolder. You might also find yourself with mutually exclu-
sive access needs. For example, a user named Joe might need access to a folder four levels
down when he should not be accessing files in the folder above it, only three levels down.
Although such a requirement can be met using Traverse Folder permissions and rights, that
doesn’t mean it should be met that way.
Instead, it is a best practice to configure permissions on a high-level folder, for those permis-
sions to be sufficient to describe security for all subfolders and files, and to allow ACL inherit-
ance to apply those permissions down the tree.
Best Practices
It is best practice to manage security with inheritance wherever possible so
that permissions can be administered at a single point, higher in the folder hierarchy.
A quick review of inheritance fundamentals
ACLs, like several other Windows components, are characterized by the concept of inherit-
ance. With ACL inheritance, you can configure permissions of a container, such as a volume or
folder, and those permissions propagate automatically to that container’s contents.

Solution Collection 2: Managing Files, Folders, and Shares
101
When you assign permissions for a folder, most of those permissions are inheritable by
default and will be passed down to all the objects in that folder. This inheritance happens
because child objects are configured to allow inheritable permissions from the parent to prop-
agate to the child ACLs by default. Therefore, an administrator needs to set permissions only
once at the parent folder, and those permissions will propagate automatically to child files and
folders.
Managing inheritance
Inheritance is the combined effect of inheritance flags of ACEs of a parent volume or folder
and a child file or folder that allows inheritance. Therefore, inheritance is configured at two
points of management: a parent folder or volume, and a child file or folder. At the parent,
inheritance flags of ACEs are configured using the Permission Entry dialog box, shown earlier
in Figure 2-3.
Specifically, the Apply To drop-down list allows you to specify that a permission entry affects
one of the following scenarios:
■
This folder, subfolders and files (Default)
■
This folder only
■
This folder and subfolders (not files)
■
This folder and files (but not subfolders)
■
Subfolders and files only (but not this folder)
■
Subfolders only (but not this folder or any files)
■
Files only (in this folder only, not in subfolders)
Additionally, inheritance is affected by the Apply These Permissions To Objects And/Or Con-
tainers Within This Container Only check box. This option modifies the scope inheritance so
that it applies only one level down, rather than applying to an entire branch of a folder tree.
Configuring whether a child file or folder allows inheritance is done in the object’s Advanced
Security Settings dialog box, on the Permissions tab. On Windows XP and Windows Server
2003 systems, shown in Figure 2-5, the inheritance option is labeled “Inherit from parent the
permission entries that apply to child objects. Include these with entries explicitly defined
here.” On Windows Vista and Windows Server 2008 systems, shown earlier in Figure 2-2,
the same inheritance option is labeled, “Include inheritable permissions from this object’s
parent.”
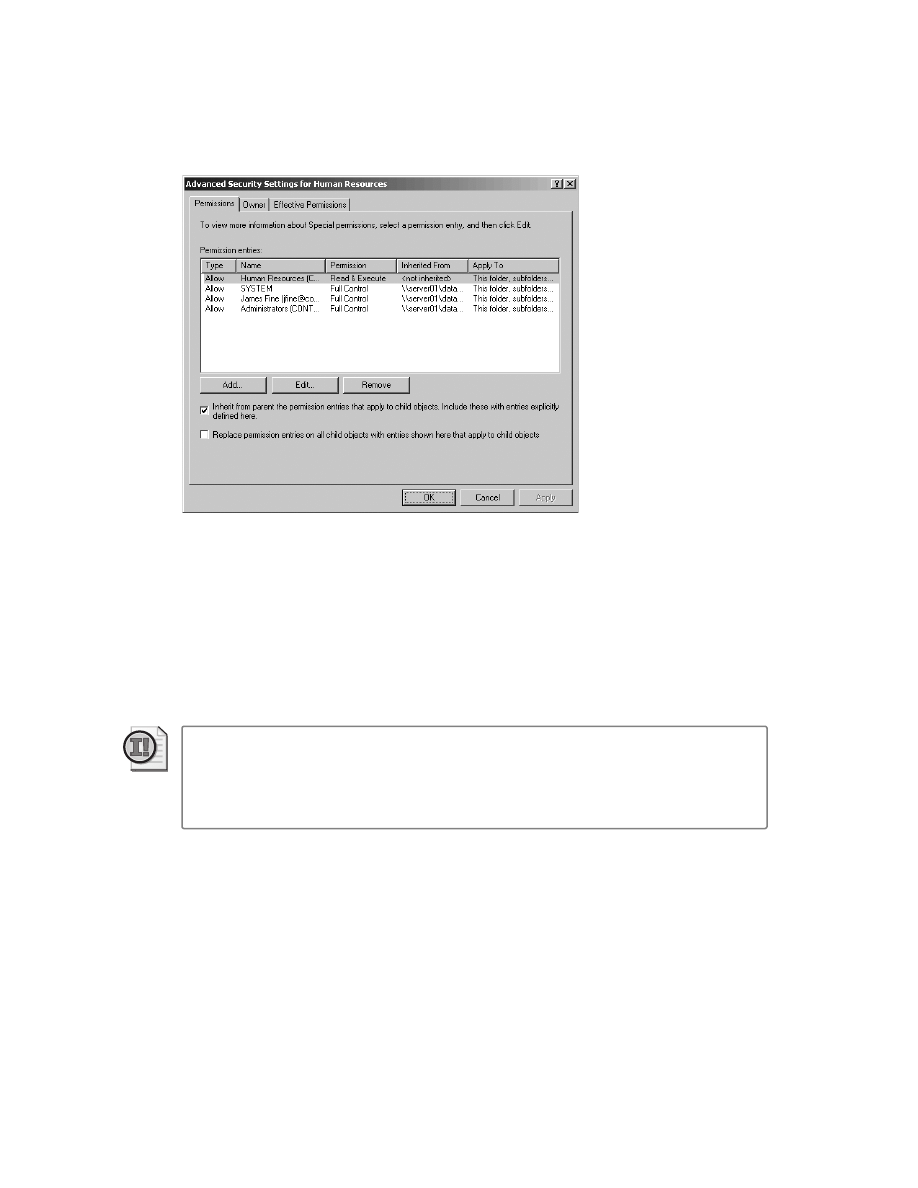
102
Windows Administration Resource Kit: Productivity Solutions for IT Professionals
Figure 2-5
The Windows XP and Windows Server 2003 Advanced Security Settings dialog box
ACE inheritance is granular and dynamic. If a child object is configured to allow inheritance,
any changes to inheritable permissions on the parent folder or volume propagates to the child
without any user intervention. Inherited permissions do not remove permissions assigned
explicitly to the child object. The fact that ACEs are propagated is an important concept:
Adding, removing, or changing an inheritable ACE causes the NTFS file system to reconfigure
ACLs on child objects that allow inheritance. This behavior leads to challenges we’ll address
elsewhere in this Solutions Collection. In a container with a large number of objects, this
propagation can take some time.
Important
If you are experiencing an emergency situation in which access to resources
must be quickly restricted, change permissions on the SMB share rather than NTFS permis-
sions. SMB share permission changes take effect immediately for the entire share, whereas
NTFS permission changes need to propagate to each object, which can take a significant
amount of time.
The impact of inheritance on folder hierarchy
Because it is best practice to manage security with inheritance wherever possible, it is also best
practice to avoid, whenever possible, configuring explicit permissions on folders more than a
few levels deep in the folder hierarchy. In an ideal world, only the first-level folders (the
departmental folders) or maybe the second-level folders (the team or project folders) require
explicit ACEs. It is unlikely this ideal will be achievable in every shared folder, but it is worth
aiming for that goal.
Solution Collection 2: Managing Files, Folders, and Shares
103
Generally speaking, then, from an access control management standpoint, you should adhere
to the following best practice.
Best Practices
You will be best served with a folder structure that is wide rather than deep.
By having a larger number of folders at higher levels, you will be able to more effectively man-
age ACLs on those folders.
Use DFS namespaces to present shared folders in a logical hierarchy
You might be concerned that by flattening and widening your folder structure, your users will
have trouble navigating to locate resources they require. In Solution 2-15, “Distribute Files
Across Servers,” on page 151, we’ll explore the following best practice in detail.
Best Practices
Use the DFS Namespaces feature to present your shared folders to users in
a hierarchy that reflects the logical organization of information in your enterprise, rather than
forcing users to navigate the physical storage structure of servers and folders.
The DFS Namespaces feature enables you to abstract the physical structure of shared folders—
the servers on which shared folders are hosted and the paths to those folders—and to present
shared folders in a virtual namespace. That means you can have a physical structure of folders
on your servers that provide for effective scopes of management for access to resources (that
is, a wide folder structure rather than deep) and still expose those folders to users in what
appears to be a deep, organized hierarchy. If you are familiar with data management concepts,
you know that the management of the files and folders (the physical storage of your files and
folders) is separated from the presentation of the folders to users (the logical organization of
the folders in a DFS namespace).
As a pleasant side effect, NTFS volumes perform better when the directory structure is wide
rather than deep. So not only will you be able to manage access more effectively, you’ll also get
a performance increase, albeit a small one.
Solution summary
Create a folder structure that is wide rather than deep. Use high-level folders—preferably, first-
level or second-level folders—to scope the management of access by applying an ACL with
inheritable ACEs that will not need to be overridden, opened up, or locked down below.
Present the shared folders to users in a DFS namespace that reflects the logical organization of
content in your enterprise.

104
Windows Administration Resource Kit: Productivity Solutions for IT Professionals
2-3: Manage Access to Root Data Folders
Solution overview
Type of solution
Guidance
Features and tools
NTFS volumes, Group Policy File System policy settings
Solution summary
Create consistent root data folders on each file server, and manage
support teams’ access to those root data folders using Group Policy to
apply and maintain ACLs.
Benefits
Increased manageability and security
Introduction
Throughout this resource kit, I’ll emphasize that consistency and manageability are funda-
mental building blocks of security. I’ll also remind you to manage security on a least-privilege
basis, giving users only the rights and permissions they require to perform their job. This
solution provides a manageable way to achieve consistency and least privilege for root, or top-
level, data folders on file servers.
Create one or more consistent root data folders on each file server
File servers will be accessed remotely, not just by users as they connect to shared folders, but
also by support personnel who need to perform tasks such as creating, removing, and secur-
ing folders.
Too often, I see a data volume on a file server with top-level folders acting as shares for users.
But what happens if support people need to modify permissions on one of those top-level
shared folders? They cannot. When you connect to a shared folder remotely, you cannot
change its NTFS permissions. You can change permissions only on folders within the shared
folder. To change the NTFS permissions of the shared folder, you must either use MMC snap-
ins or open the folder’s Properties dialog box with Windows Explorer. Typically, the latter
approach is desirable. But that means the support people are either connecting to the server
with Remote Desktop (which might not be desirable given the two-connection limit of Remote
Desktop Protocol [RDP] used for remote administration) or connecting to the hidden admin-
istrative share of the server (which means they are in the Administrators group on the server,
which means it’s likely they have more rights than they really need). Personnel who support
shared folders are not necessarily (or should not necessarily be) administrators of the server,
so they will not always be able to connect to the server using its hidden drive share.
Therefore, you should create a folder on the server’s data volume that will host shared folders,
and you should secure that folder so that users and support personnel can perform tasks
required for first-level folders within that root. We’ll call such folders root data folders.
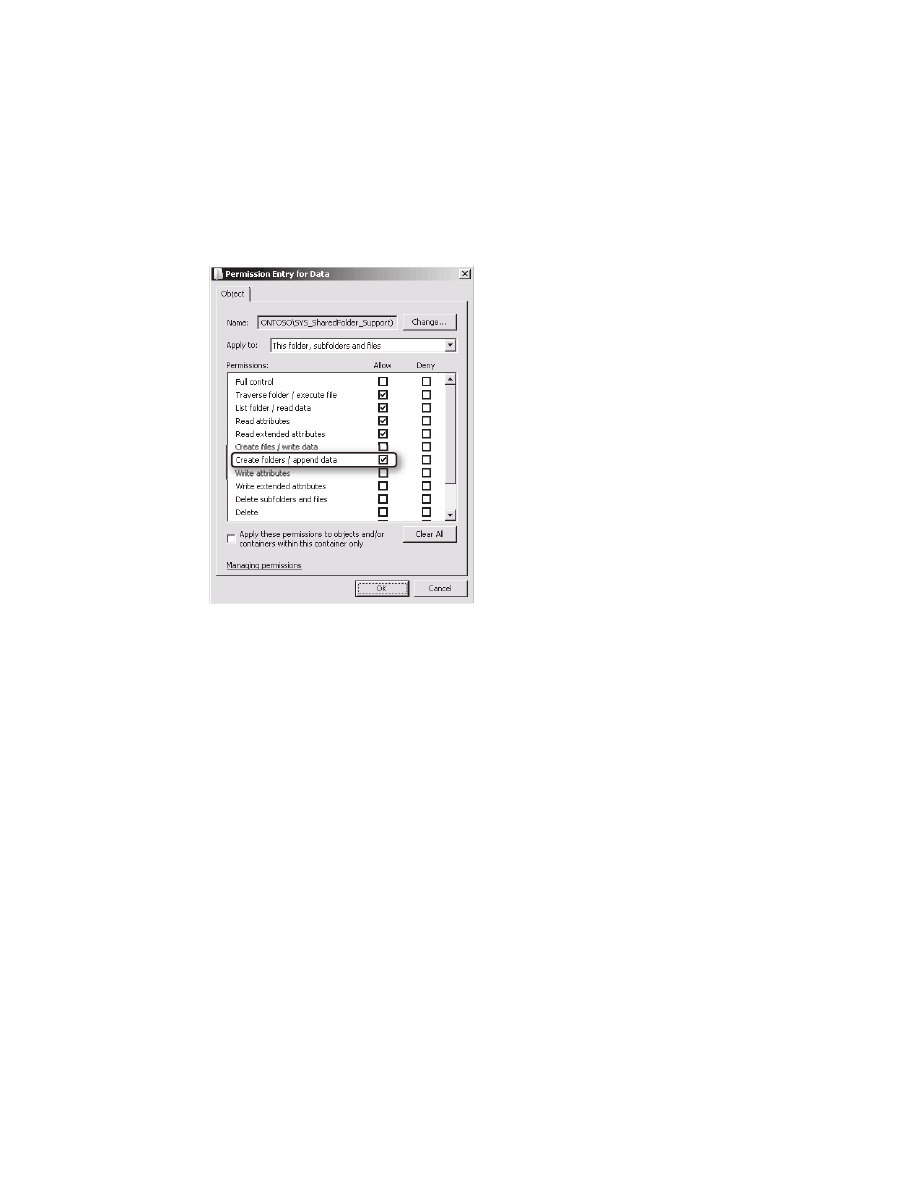
Solution Collection 2: Managing Files, Folders, and Shares
105
For example, if two servers will host shared folders for projects and teams on their E:\ drive,
create a folder on each server named E:\Data. Support personnel require the ability to create
a top-level folder for a new project or team: Assign the Create Folders ACE to an appropriate
group. The Create Folders permission is shown in Figure 2-6.
Figure 2-6
The Create Folders ACE
Create additional root data folders if one the types of data stored in shared folders mandates
delegation to unique support teams. If three different IT support teams are responsible for
administering subfolders, create three different root data folders with ACLs that enable the
functionality required by each team.
Wherever possible, keep data volumes and root-level data folders consistent on file servers.
This approach enables you to more effectively manage security on those folders.
Use Group Policy to manage and enforce ACLs on root data folders
When root data folders are provisioned consistently, Group Policy can be leveraged to manage
and enforce the ACLs on those folders. The following steps show how this is done:
1. Create a Group Policy object (GPO) scoped to your file servers. Name the GPO accord-
ing to your naming conventions—for example, GPO_File Server Configuration. For
more information on scoping and naming GPOs, see Solutions Collection 10, “Imple-
menting Change, Configuration, and Policies.”
2. Open the GPO in the Group Policy Management Editor (which is called the Group Pol-
icy Object Editor in Windows Server 2003).
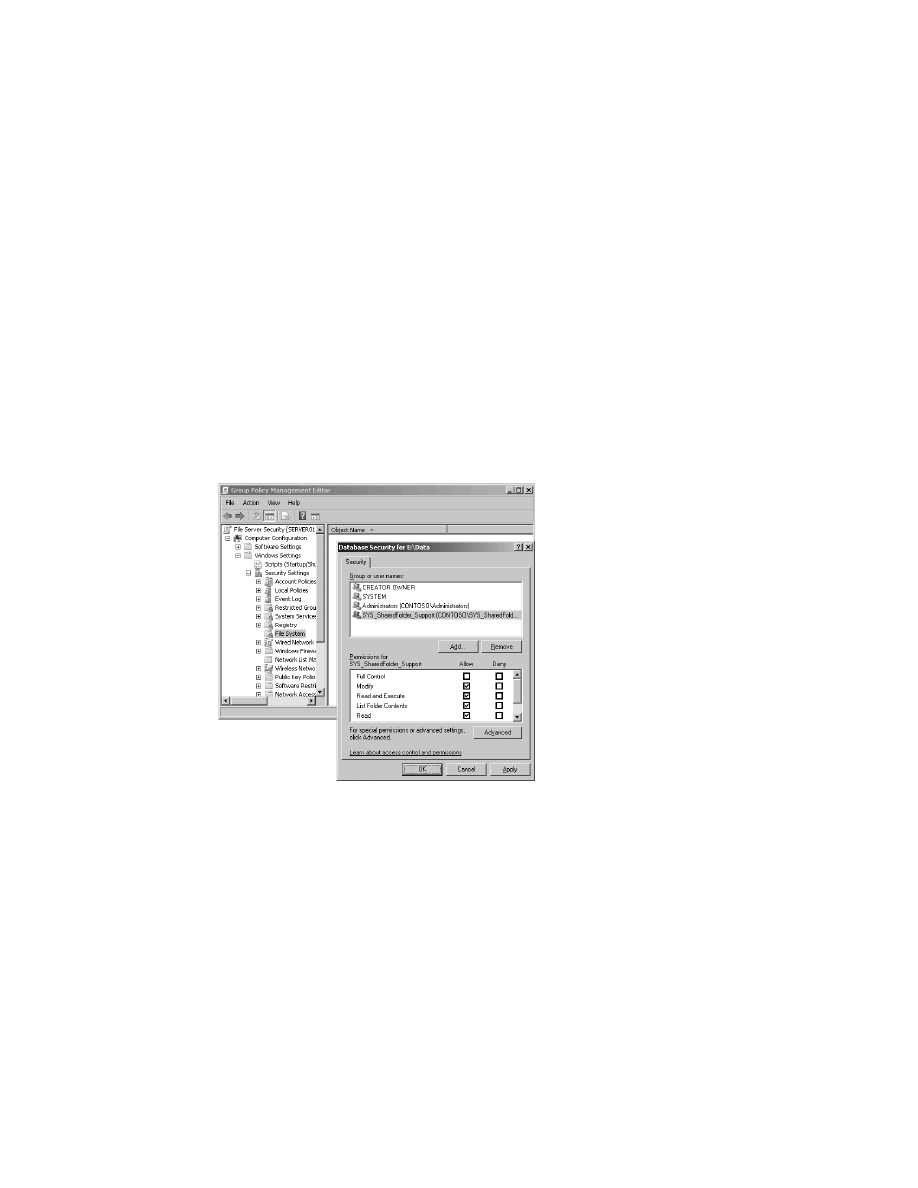
106
Windows Administration Resource Kit: Productivity Solutions for IT Professionals
3. Navigate to Computer Configuration, Windows Settings, Security Settings, File System.
4. Right-click File System and choose Add File.
Note that the Add File command allows you to manage files or folders.
5. In the Folder box, type the path to the root data folder as it exists on the local volumes
of the file server or servers that will be managed by the GPO—for example, E:\Data.
Note that you can type the path—the folder does not have to exist on the system from
which you are editing the GPO.
6. Click OK.
7. The Database Security dialog box opens, as shown in Figure 2-7. This dialog box is
equivalent to the Security tab of the Properties dialog box for a folder. Use it to configure
the appropriate ACL for the specified root data folder. Be particularly careful to manage
the inheritance flags of ACEs in this ACL. Detailed guidance and sample ACLs are pro-
vided later in this chapter.
Figure 2-7
Group Policy configuration of folder security
8. Click OK to close the Database Security dialog box.
9. In the Add Object dialog box, select Configure This File Or Folder Then and select Prop-
agate Inheritable Permissions To All Subfolders And Files. If, in fact, all subfolders and
files should contain an ACL identical to that of the root data folder, select Replace Exist-
ing Permissions On All Subfolders And Files With Inheritable Permissions.
10. Click OK.

Solution Collection 2: Managing Files, Folders, and Shares
107
The GPO will now enforce the specified ACL for any system that is within the scope of the
ACL and contains a folder matching the specified path. Because File System policy settings are
applied by the Security Configuration Engine (SCE) extension, those settings will be reap-
plied every 16 hours, by default, even if the GPO has not changed. Therefore, if an administra-
tor modifies the folder’s ACL directly on the server, the ACL will be reset to the specified
configuration, on average, within eight hours.
Solution summary
Create a root data folder—a top-level folder on the data volume of a file server—to support each
unique top-level access requirement (for example, different support teams responsible for
subfolders). Use File System Group Policy settings to configure and enforce the ACLs of root
data folders.
2-4: Delegate the Management of Shared Folders
Solution overview
Type of solution
Guidance
Features and tools
Group Policy Restricted Groups policy settings
Solution summary
Where possible, dedicate the File Server role and manage the member-
ship of the Administrators group using Restricted Groups policy
settings.
Benefits
Managed delegation of the capability to create, delete, and modify
shared folders
Introduction
Shared folders can be managed, by default, only by members of the server’s Administrators
group. It is not possible to specify that certain users can create shared folders in certain loca-
tions on the server: It is a system privilege.
Dedicate servers that perform a file server role
If a server performs mixed roles, anyone who requires the ability to create shared folders will
be an administrator, and therefore, they’ll be able to affect other services on the server. For this
reason, it is often necessary to dedicate servers that perform a file server role.
Best Practices
Dedicate servers that perform a file server role.

108
Windows Administration Resource Kit: Productivity Solutions for IT Professionals
Manage the delegation of administration of shared folders
To delegate the management of shared folders, you must add a user to the Administrators
group. The easiest way to manage this delegation is to use Restricted Groups settings in Group
Policy to add a capability management group into the local Administrators group:
1. Create a group to centrally manage and represent the capability to administer shared
folders. Name the group based on your naming conventions—for example, SYS_Shared
Folder_Admins. For more information on capability management groups and naming
conventions, see Solutions Collection 1.
2. Create a Group Policy object (GPO) scoped to your file servers. Name the GPO accord-
ing to your naming conventions—for example, File Server Configuration. For more infor-
mation on scoping and naming GPOs, see Solutions Collection 10.
3. Open the GPO in the Group Policy Management Editor (which is called the Group Pol-
icy Object Editor in Windows Server 2003).
4. Navigate to Computer Configuration, Windows Settings, Security Settings, Restricted
Groups.
5. Right-click Restricted Groups and choose Add Group.
6. Click Browse and search for the group you created.
Although you can type the group name (in the format domain\groupname), if you make
a mistake the setting will not take effect correctly. Therefore, it is recommended that you
search for and select the group. Click OK when you’ve selected the group.
7. Click OK to close the Add Group dialog box.
8. In the Properties dialog box for the group, click the Add button next to the This Group
Is A Member Of section.
9. In the Group Membership dialog box, type Administrators and click OK. The result
should look like Figure 2-8.
10. Click OK to close the Properties dialog box.
This GPO will now ensure that the selected group is a member of the local Administrators
group on all servers within the scope of the GPO. It will not remove members from, or other-
wise manage, membership of the Administrators group.
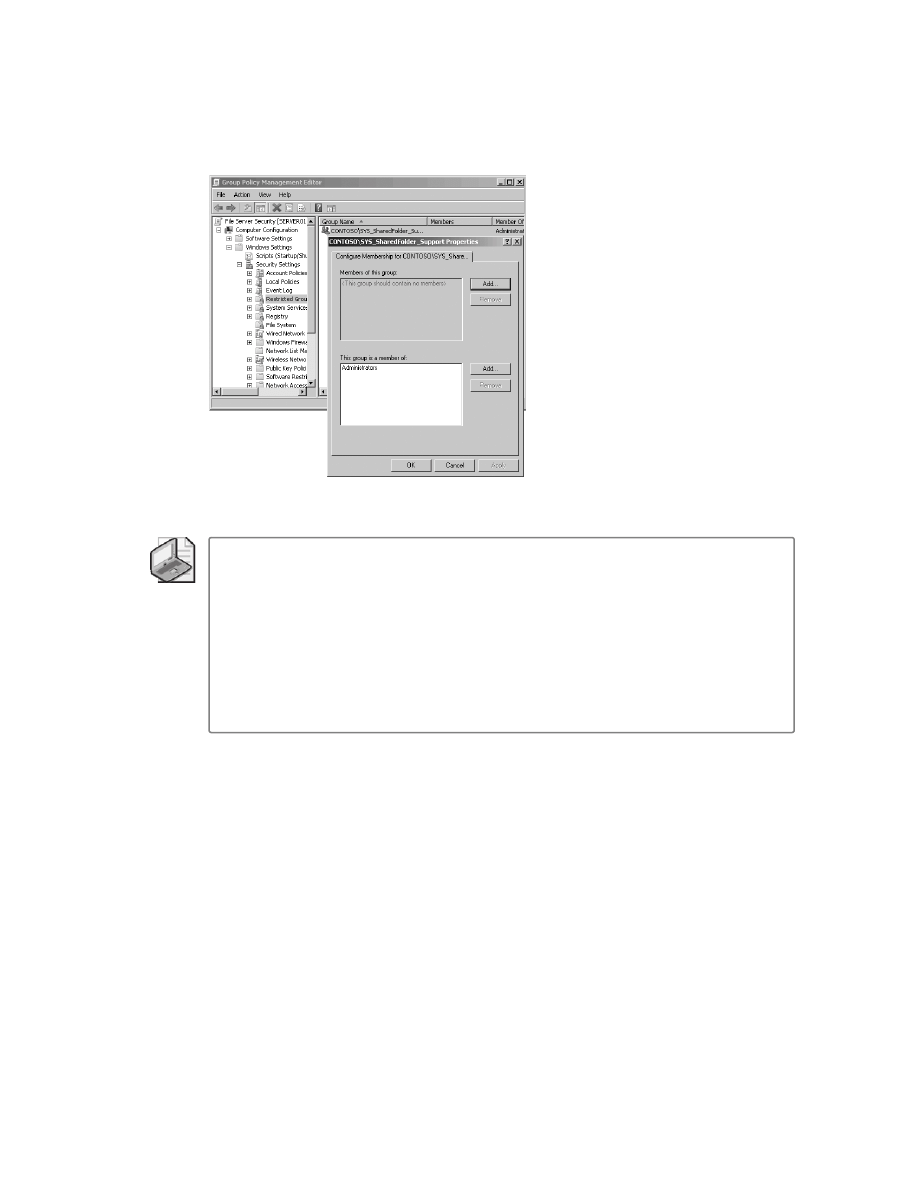
Solution Collection 2: Managing Files, Folders, and Shares
109
Figure 2-8
Group Policy Restricted Groups policy placing a group into the local Administrators
group
Note
If the local Administrators group should contain only the capability management
group (SYS_Shared Folders_Administer), perform the procedure just described, but in step 6
type Administrators, and in step 8 click the Add button next to the Members Of This Group
section and select the group—SYS_Shared Folders_Administer, for example. Doing so will result
in the list of members being the complete and authoritative membership of the Administrators
group. The server will remove any members of the Administrators group not provided for by
the GPO.
The tricky part about this approach to group management is that if more than one GPO
attempts to specify group membership for a group with the Members Of This Group list, only
the most authoritative GPO’s setting will be applied.
It is unfortunate that Windows does not enable an enterprise to delegate the management of
shared folders with a user right or ACL. The only supported method for allowing a user to cre-
ate or manage shares is for that user’s token to include the Administrators SID. Therefore, you
must take either of the following courses of action:
■
Accept the fact that support personnel who should be able to manage shared folders will
be administrators of the file server. This means they have a number of avenues with
which to access, modify, delete, or otherwise damage the integrity of the file server and
all of its data.
■
Provide a tool that provisions shares using alternative credentials. Such tools are
described in Solutions Collection 8, “Reimagining the Administration of Groups and
Membership.” Given the security-sensitive nature of data on file servers, this approach is
highly recommended.

110
Windows Administration Resource Kit: Productivity Solutions for IT Professionals
Solution summary
Create a group in Active Directory that represents and manages the capability to administer
shared folders (for example, SYS_Shared Folders_Administer). Implement the capability by
nesting that group in the local Administrators group of file servers using Restricted Group set-
tings in a GPO scoped to file servers.
2-5: Determine Which Folders Should Be Shared
Solution overview
Type of solution
Guidance
Features and tools
Shared folders
Solution summary
Understand the design criteria that determine whether a folder should
be shared and how many shares are required.
Benefits
Optimize the number of shared folders in your environment.
Introduction
There are best practices for determining whether and how to share a folder. The best practices,
which will be laid out later in this solution, require consideration of the following settings:
■
NTFS permissions. A folder should be configured with the correct permissions with
NTFS ACLs prior to being made available as a shared folder.
■
Share protocols. Windows Server 2008 enables you to share folders using SMB, the stan-
dard share protocol for Windows clients, and Network File System (NFS), which is used
for compatibility with Unix and Linux clients. In this Solutions Collection, we’ll exam-
ine only SMB shared folders.
■
The name for the SMB shared folder.
■
An optional description for the shared folder.
■
A limit to the number of concurrent users that the shared folder will allow.
■
SMB permissions, also known as share permissions.
■
Caching settings that determine whether files and folders within the shared folder can
be taken offline.
■
Access-based Enumeration (ABE), which, if configured, hides the contents of a shared
folder to which users do not have Read permission when accessing the shared folder
remotely. ABE is available for download and installation on Windows Server 2003 Ser-
vice Pack 1 (SP1) or later, and it is installed by default on Windows Server 2008. ABE is

Solution Collection 2: Managing Files, Folders, and Shares
111
discussed in Solution 2-12, “Prevent Users from Seeing What They Cannot Access,” on
page 143.
■
Whether and how the shared folder will be presented in a DFS namespace. The DFS
Namespaces role service is discussed in Solution 2-18, “Create an Effective, Delegated
DFS Namespace,” on page 163.
Determine which folders should be shared
From a design perspective, the art and science of deciding what to share boils down to two key
factors, which are discussed in the following sections.
Presentation of information to users
Shared folders provide a unique connection to a collection of files and folders. The Universal
Naming Convention (UNC) to the share is, of course, \\servername\sharename. Therefore, if
you want to have separate entry points to a collection of Finance documents and a collection
of Marketing documents, you can create a shared folder for each, such as \\servername\
finance and \\servername\marketing. If you organized the information in your enterprise in
this manner, you could end up with a large number of shares. Unfortunately, this is exactly
what most enterprises have done, and it is not the best practice.
Since the introduction of Windows 2000, Windows clients have the ability to connect below
a share. Therefore, you could have a single root data folder shared as Departments$, within
which folders exist for Finance and Marketing. UNCs can target \\servername\departments$\
finance and \\servername\departments$\marketing. If those UNCs are used to map a net-
work drive to Marketing or Finance, or if the UNCs are used as targets for folders in a DFS
namespace (discussed in Solution 2-18 on page 163), users will not be able to go up to the
Departments folder from their own department. The dollar sign at the end of the share name,
Departments$, prevents the share from appearing on network browse lists. Hidden shares are
one way to discourage users from poking around the network. Of course, more important are
the NTFS permissions you set on the Department folder itself.
The combination of client connections to subfolders of a shared folder and the implementa-
tion of the DFS Namespaces feature enables an enterprise to share only top-level data folders,
rather than sharing each subfolder.
Management of SMB settings
Shared folders also provide a scope of management for settings described earlier: user limits,
SMB permissions, ABE, and caching settings. It is for these reasons that you might need to cre-
ate additional shared folders. If, for example, two departments require different caching set-
tings, those two departments must be in two separate shared folders in order to provide two
unique scopes of management.

112
Windows Administration Resource Kit: Productivity Solutions for IT Professionals
Interestingly, this does not mean they need to be in separate folders on the file system. In a sce-
nario requiring Marketing users to be able to take files offline but restricting Sales users from
doing the same, you could create a file system hierarchy with two folders: E:\Data\Sales and
E:\Data\Marketing. You could, if you so chose, share each folder separately with appropriate
caching settings. Alternately, you could share E:\Sales and Marketing as Sales$ with caching
disabled and SMB permissions allowing only Sales users to connect to the share. The exact
same folder could be shared a second time as Marketing$ with caching enabled and SMB per-
missions allowing only Marketing users to connect to the share. The properties of the SMB
shared folder are enforcing caching settings, not properties of the NTFS folder.
Solution summary
Create a shared folder for a top-level data folder. Create additional shared folders wherever a
scope of management is required for SMB permissions, caching, connection limits, or ABE.
2-6: Implement Folder Access Permissions Based on
Required Capabilities
Solution overview
Type of solution
Guidance, scripts
Features and tools
NTFS folders, ACLs, icacls
Solution summary
Support folder access scenarios by applying thoughtful, nuanced col-
lections of NTFS permissions.
Benefits
Manageable, automated, and consistent application of least-privilege
access to folders.
Introduction
Prior to creating a shared folder, you must ensure that the folder’s NTFS permissions are con-
figured correctly. NTFS ACLs should be the primary, if not the sole, method with which
access levels are implemented.
Some organizations refer to a user having the “role” to access a folder at a particular level. I pre-
fer to reserve the word role to describe a user or computer based on business-driven character-
istics, such as location, department, team, or function. Several user roles (for example,
departments) might each require the capability to read files in a folder. In keeping with the ter-
minology set forth in Solutions Collection 1, we’ll refer to access levels as capabilities—in this
case, capabilities to access a file or folder at a particular level.
This solution examines specific access capabilities that might be desired and the ACLs that
must be implemented to enable those capabilities. I’ll describe how capabilities can be
Solution Collection 2: Managing Files, Folders, and Shares
113
implemented in the user interface, and I’ll use icacls.exe to apply the permissions. Icacls.exe is
available on Windows Server 2003 SP2, Windows Vista, and Windows Server 2008. It
replaces and enhances commands from previous versions of Windows, including cacls.exe,
xcacls.exe, and xcacls.vbs.
Best Practices
It is always a best practice to assign permissions to groups, not to individual
users.
Implement a Read capability
Read access is the simplest to implement. The Read permission template can be assigned on
the Security tab of the Properties dialog box for a file or folder, as detailed by the following
steps:
1. Open the Security tab of the Properties dialog box for a folder or file.
2. Click the Add button. If it is not visible on a Windows Vista or Windows Server 2008
system, click Edit and then click Add.
3. Select a security principal, preferably a group.
The default permissions that are applied include Read & Execute, Read, and, if the object is a
folder, List Folder Contents. In the Advanced Security Settings dialog box, on the Permissions
tab, the three permissions templates that are applied by default when you add a security prin-
cipal to the ACL are listed simply as Read & Execute in the Permission column. The specific
ACEs that make up this permission, which can be viewed in the Permission Entry dialog box,
are as follows:
■
Traverse folder/execute file
■
List folder/read data
■
Read attributes
■
Read extended attributes
■
Read permissions
Note
You can learn more about what each permission provides by clicking the Managing
Permissions link at the bottom of the Permission Entry dialog box.
These permissions make up an effective and secure Read capability.
To implement a Read capability using icacls.exe, use the following command:
icacls.exe <path to folder> /grant <security principal>:(CI)(OI)RX
114
Windows Administration Resource Kit: Productivity Solutions for IT Professionals
Or use this to assign the read capability for a single file:
icacls.exe <path to file> /grant <security principal>:RX
For example, to implement a capability to read Team A’s folder, use the following command:
icacls.exe "e:\data\team a" /grant "ACL_Team A_Read":(CI)(OI)RX
Note
The parameters (CI) and (OI) implement the inheritance flags of a permission. (CI)
means apply to this folder and subfolders. (OI) means apply to files in this folder and in sub-
folders. To apply a permission one level deep, add the (NP) parameter, which means “no prop-
agation.” To configure a permission to apply to objects within this folder but not to the folder
itself, use the parameter (IO), or “inherit only.” Because we are assuming that you are managing
ACLs at a high-level folder for all of its files and subfolders, we’ll be using (CI) and (OI) switches.
The default Read & Execute permission template—which includes the Read template and, if
the object is a folder, the List Folder Contents template—allows users to open all file types. You
can prevent users from opening and running executables by removing the Execute File per-
mission entry. The easiest way to do this is to clear the Allow::Read & Execute check box, leav-
ing only Allow::Read and, if the object is a folder, Allow::List Folder Contents.
This resulting ACL should be tested to ensure it does not overly restrict users and prevent
them from opening file types they require for business reasons. With the File Server Resource
Manager (FSRM) service, it is more effective to implement file screening to prevent the storage
of executables in the first place.
To implement a Read capability while restricting executables, use the following command:
icacls.exe <path to folder> /grant <security principal>:(CI)RX <security principal>:(CI)(OI)R
Implement a Browse To capability
There might be scenarios that require a user to connect to a resource deep within a folder hier-
archy that the user should otherwise not be able to browse. Imagine a folder structure such as
E:\Data\Finance\Team A\Communications. A user in the Communications department
requires access to the files in the Communications folder. We need the user to be able to
browse to the Communications folder, but we do not want the user to be able to browse par-
ent folders.
To understand what the solution entails, you must know that if a user enters a path to a
folder—for example, \\servername\departments$\finance\team a\communications—they
require two capabilities for Windows Explorer to successfully display the folder. First, they
require the ability to view the contents of the Communications folder.

Solution Collection 2: Managing Files, Folders, and Shares
115
This can be implemented as a Read capability, as described previously. The least-privilege
ACEs required to support the Browse To capability are two permission entries: List Folder and
Read Attributes. These can be allowed in the Permission Entry dialog box or by using icacls, as
follows:
icacls <folder path> /grant <security principal>:(CI)(RD,RA)
Note this permission is not enough to enable users to open subfolders or files—it allows them
only to view the contents of this folder. To allow users to actually open files, implement a Read
capability on the target folder, Communications.
The second capability users require is to traverse parent folders in the path to the folder they
are opening. In our example, that means users require the ability to traverse the folder shared
as Departments$, the Finance folder, and the Team A folder. This capability can be imple-
mented two ways: using a system privilege or an NTFS permission.
There is a system privilege, also known as a user right, called Bypass Traverse Checking, which
is granted to Everyone by default. With this default user right in place, a user requires only the
aforementioned permissions on the target folder, Communications. The ability to traverse par-
ent folders is provided by the user right.
The second way to implement the capability to traverse folders is to grant the Allow::Traverse
Folder ACE on each parent folder, using the Permission Entry dialog box or, again, icacls:
icacls.exe <folder path> /grant <security principal>:(CI)(X)
If you change the default configuration of the Bypass Traverse Checking system privilege so
that users do not have the right to traverse folders, the NTFS Traverse Folder ACE must be
granted on all parent folders, starting with the shared folder.
On subfolders that you do want users to browse to and open, apply the List Folder and Read
Attributes permissions or the full Read or Read & Execute permission sets. To get them to
those folders, the Traverse Folder, List Folder, and Read Attributes ACEs are part of the Read
& Execute permission template. However, if you want to prevent a user from opening a parent
folder—such as \\servername\departments$\finance—or its Team A subfolder, you need to
grant the user only the Traverse Folder ACE on those parent folders. Using icacls, the Browse
To capability is implemented as shown here:
icacls.exe <path to shared folder> /grant <security principal>:(CI)(X)
icacls.exe <path to target folder> /grant <security principal>:(CI)(RD,RA)
Again, this enables users to open the target folder when it is a subfolder in a folder hierarchy.
To enable users to open files within that target, implement a Read capability:
icacls.exe <path to target folder> /grant <security principal>:(OI)[R or RX]

116
Windows Administration Resource Kit: Productivity Solutions for IT Professionals
Implement an Edit capability
The edit capability is commonly implemented for scenarios in which a team of users should
be able to open each other’s documents and make modifications to those documents. The
problem is that most enterprises implement the edit capability using the Modify permission
template. The Modify template includes the Delete permission entry. When a group is given
Modify permission to a folder, any user in that group can, accidentally or intentionally, delete
the folder and all of its contents or any subset of the folder’s contents. This creates at best a
denial of service: For a period of time, users cannot access the files they require while data is
restored. At worst, data is lost—particularly data that has not yet been backed up or captured
by Shadow Copies.
Even more dangerous is the Full Control permission template, which adds the Delete Sub-
folders and Files, Change Permissions, and Take Ownership permission entries. Each of these
entries opens up new opportunities for any member of the group to damage or destroy data in
the folder tree, up to and including the entire folder tree. The Delete Subfolders and Files ACE
is a unique container permission that enables a user to delete a folder and all of its contents,
even if the user has explicit Deny::Delete permissions on those contents. It is an especially
dangerous permission to apply to a group.
Best Practices
Unless required by business needs, do not allow a group the Modify or Full
Control permission templates on a folder, as both of those templates enable any user in the
group to cause denial of service or data loss within the folder.
In many business scenarios, it is not appropriate for users to be able to delete each other’s doc-
uments—it is only necessary for them to be able to change each other’s documents. Thus, the
edit capability should be implemented using one or more of the following:
The Write permission template for the group
The Write permission template, applied to a
folder and assigned to a group, gives any member of the group the ability to make
changes to, but not delete, other users’ documents. It also enables any member of the
group to create new files or folders.
The Delete permission for a more restricted group
Consider granting Allow::Delete to a sub-
set of users on the team. Implement a folder cleanup or folder management capability
that includes the Allow::Delete ACE or the Allow::Modify permissions template.
The Modify permission template scoped to files, not folders
Alternatively, grant a group the
Allow::Modify permission on a folder, but change the inheritance flag so that it applies
only to files, not to folders. The effect of doing this will be that users can still delete each
other’s documents, but folders will be protected.

Solution Collection 2: Managing Files, Folders, and Shares
117
The appropriate permissions for Creator Owner
When a user creates a file or folder using the
Create File or Create Folder ACE (both of which are included in the Write permission
template), that user becomes the Owner of the new object, and the user’s account is
given explicit ACEs equivalent to the inheritable ACEs assigned to the Creator Owner
special identity on the parent folder. So, if you give the Creator Owner identity the Mod-
ify permissions template (which includes an Allow::Delete ACE, on the parent folder)
and apply that template to Files, whoever creates a new file in the folder will be given
Modify and, therefore, Delete permission on the new file. This is, in fact, the best prac-
tice for most business scenarios. Thereby, the person who created a file will have the
ability to delete her own file, but users in the group cannot delete each other’s files.
If you grant the Creator Owner identity Full Control (which is a standard practice and is,
in fact, the Windows default), you take two risks. First, users can change permissions on
the objects they create without such action triggering a Failure audit. We’ll explore this
issue in Solution 2-11, “Preventing Users from Changing Permissions on Their Own
Files,” on page 141. Second, if a user creates a folder, and thus inherits Full Control of
that folder, the user can effectively take ownership of, change permissions of, or com-
pletely delete any files or folders that are later added to the folder he created.
When implementing an Edit capability, the best practice is to grant the Creator Owner
the Modify permissions template, inheritable to files only; however, this is a squishy best
practice that applies primarily to team shared folders, and even then should be fully
evaluated to determine whether it works with your business requirements. The bottom
line is that you need to carefully consider permissions granted to Creator Owner. Do so
in light of the guidance in Solution 2-11 on page 141.
The method you use to implement an Edit capability will vary based on the business require-
ments for the data in a folder. A reasonbly secure Edit capability—implemented in such a way
that users can change but not delete each others’ documents and only the creator of a docu-
ment can delete the document—can be implemented using icacls.exe:
icacls.exe <folder path> /grant <security principal>:(CI)(OI)(RX)
icacls.exe <folder path> /grant <security principal>:(CI)(WD,AD)
icacls.exe <folder path> /grant <security principal>:(OI)(IO)W
icacls.exe <folder path> /grant "CREATOR OWNER":(CI)(OI)M
Implement a Contribute capability
An Edit capability enables users to modify each others’ documents. A Contribute capability
enables users to create or save documents in the shared folder, and to read but not change
each others’ documents.
Implement this capability by granting a group the ability to create files and folders within a
folder and to read the contents of the folder. Here’s how you do it using icacls.exe:
icacls.exe <folder path> /grant <security principal>:(CI)(WD,AD) <security
principal>:(CI)(OI)[R | RX]

118
Windows Administration Resource Kit: Productivity Solutions for IT Professionals
Additionally, you must determine the capabilities you want users to obtain when they create a
new file or folder. Refer to the earlier discussion of the Creator Owner permissions. For exam-
ple, you can use the following command:
icacls.exe <folder path> /grant "Creator Owner":(CI)(OI)(IO)M
Implement a Drop capability
A drop folder allows users to add files to the folder but not to access those files once they have
been added. This is implemented by giving users the Create Files permission entry on a folder,
but not the List Folder Contents permission:
icacls.exe <folder path> /grant <security principal>:(CI)(WD)
Because users don’t have Read permission to the drop folder, the folder will not appear if you
have ABE configured for the shared folder. ABE must be disabled for the share in which such
a drop folder exists.
A variation of this capability allows users to drop files into the folder and then to have the abil-
ity to access their own files, but not to see files from other users:
icacls.exe <folder path> /grant <security principal>:(CI)(WD) <security principal>:(NP)[R | RX]
icacls.exe <folder path> /grant "Creator Owner":(OI)(IO)[R | RX | W | M]
This set of permissions gives a group the ability to add files to the folder and see the contents
of the folder. The tricky part is that you enable ABE so that users will see only the files that
they added. The user who added a file will have read, write, or modify permission, according
to the permission switch you used on the second icacls.exe command.
Implementing a Support capability
The support capability enables a user to perform administrative tasks on files and folders,
including renaming, moving, or deleting. The capability is often implemented using the Full
Control permission template. As discussed earlier, this template contains several dangerous
permission entries, so it should be granted with extreme caution. If you do want to use a Full
Control permission template, the following icacls.exe command enables you to do so:
icacls.exe <folder path> /grant <security principal>:(CI)(OI)F
Often, support personnel do not require the ability to take ownership or change permissions
on a file or folder, and they rarely require the Delete Subfolders and Files permission. So you
should consider implementing the support capability using the Modify permission template:
icacls.exe <folder path> /grant <security principal>:(CI)(OI)M
If you want to add any of the remaining three granular permissions that distinguish the
Modify and Full Control permission templates, add the WO (write owner), WDAC (write

Solution Collection 2: Managing Files, Folders, and Shares
119
discretionary access control), or DC (delete child) permissions. For example, to allow the sup-
port organization to modify and to take ownership, use the following command:
icacls.exe <folder path> /grant <security principal>:(CI)(OI)M(WO)
The Support capability might be called “support,” “administer,” or even “own.” All three of
those descriptions convey an ability to perform actions on resources in a shared folder.
Create scripts to apply permissions consistently
To facilitate consistent application of ACLs to support the capabilities you implement in your
organization, create scripts to ensure the correct permissions are applied. For example, the
following script creates a Contribute capability for a folder by giving a group the correct
permissions:
Folder_Capability_Contribute.bat
@echo off
Set GROUP=%1
Set FOLDER=%2
icacls.exe %FOLDER% /grant %GROUP%:(CI)(WD,AD) %GROUP%:(CI)(OI)R
icacls.exe %FOLDER% /grant "Creator Owner":(CI)(OI)(IO)M
@echo on
The script can be called with two parameters, the first specifying the group that should be
given the Contribute capability and the second specifying the folder—for example:
Folder_Capability_Contribute.bat ACL_MyFolder_Contribute
"\\server01.contoso.com\departments$\finance\team a"
Similar scripts, each using the icacls.exe commands described in this solution, can be pre-
pared to implement capabilities you require.
Manage folder access capabilities using role-based access control
Role-based access control (RBAC) is a common way to describe role-based management
(RBM) as it applies to the management of resource access. Nowhere does RBM provide a big-
ger bang for the buck in terms of IT productivity than RBAC. Many organizations can benefit
from the agility that is enabled by RBM: When a user is hired, the definition of that user’s roles
by HR and the user’s manager results in instant and consistent resource access the day the
user reports to work. When a user is promoted or moved within the organization, the redefi-
nition of the user’s roles (moving them between groups) results in a seamless transition from
the resource access required by the previous roles and that required by the new roles.
Additionally, RBAC enables an IT organization to answer two critical questions: “What can the
user access?” and “Who can access the resource?” Traditionally, when the first question is
asked, it requires an administrator to scan multitudes of ACLs to locate ACEs assigned to

120
Windows Administration Resource Kit: Productivity Solutions for IT Professionals
groups to which the user belongs or directly to the user account. When the second question
is asked, an administrator must make sense of ACEs such as Traverse Folder, Append Data,
and Delete Subfolders and Files. RBAC revolutionizes your ability to analyze and audit
resource security.
Solution 1-5, “Implement Role-Based Access Control,” discussed RBAC implementation in
detail, in the context of role-based management as a whole. The following list summarizes the
best practices for RBAC:
■
Role groups are implemented as global security groups. They define collections of users
and computers based on common business characteristics.
■
Resource access capabilities are implemented by adding permissions to ACLs.
■
Those capabilities are managed by creating domain local security groups that represent
a specific capability for a specific collection of resources—for example,
ACL_Budget_Read and ACL_Budget_Contribute.
■
Role groups and, occasionally, individual users or computers are given capabilities not
by being added directly to the ACL, but by being nested within the appropriate capabil-
ity management group.
Solution summary
Grant a folder permissions based on the capabilities required by users for that folder. Unfor-
tunately, capabilities required by today’s information workers cannot be implemented with
least-privilege access without managing granular permission entries (ACEs) and inheritance
properties of those ACEs. Although these permissions can be applied using the user interface,
you’ll often be better served using icacls.exe to configure security, particularly because you can
then automate icacls.exe using scripts to ensure consistent application of permissions. Be sure
to manage resource access capabilities by creating a capability management group to repre-
sent a specific type of access to a collection of resources. That will enable you to leverage role-
based management to implement role-based access control.
2-7: Understand Shared Folder Permissions (SMB
Permissions)
Solution overview
Type of solution
Guidance
Features and tools
Shared folders, net share
Solution summary
In most scenarios, share permissions should be Everyone::Allow::Full
Control, and NTFS permissions should be used to secure the folder
according to business requirements. Unfortunately, the default SMB

Solution Collection 2: Managing Files, Folders, and Shares
121
permissions applied to a new shared folder are usually Every-
one::Allow::Read, which is too restrictive to be useful in most scenarios.
The net share command can create a share with specific permissions,
such as Everyone::Allow::Full Control.
Benefits
Increased manageability of shared folder security
Introduction
The permissions associated with a shared folder have long been called share permissions.
Because Windows Server 2008 natively supports sharing folders with NFS, these permissions
are now referred to more specifically as SMB permissions. SMB permissions are challenging to
use for the implementation of security because they affect resource access in unusual ways.
First, if the effective SMB permission for a user is more restrictive than the user’s effective
NTFS permission, the SMB permission will win out. So, even if a user has Allow::Full Control
NTFS permissions, if the folder is shared as Everyone::Allow::Read, the user will only be able
to read items when accessing the folder through the SMB share. And Everyone::Allow::Read is
the default permission applied when you create a share with user-interface tools in Windows
Server 2003 and later operating systems. Therefore, even Administrators creating the share
will be unable to access the share with anything more than Read permissions.
Second, SMB permissions affect resource access only if the resource is accessed through that
shared folder’s UNC. If resources are accessed locally by logging on to the server interactively,
or if resources are accessed by a user logging on with Remote Desktop and finding the
resource on the file system, SMB permissions do not apply. The same physical folder can be
shared several times, each with unique share permissions. So users accessing a file within that
folder could have completely different effective permissions depending on which shared
folder UNC they accessed.
Third, SMB permissions are weak. They are stored in the registry, not in the security descrip-
tor of the shared folder itself. If the folder is moved or renamed, the share permissions are
effectively lost because they now refer to a folder that no longer exists.
There are a number of other reasons why share permissions are not used by many organiza-
tions. Instead, these organizations set forth a policy under which every share is created with
Everyone::Allow::Full Control SMB permission. Doing so does not expose any data within the
shared folder because the same folder is secured using NTFS permissions to configure least-
privilege access.
There are, in my experience, only a handful of salient scenarios under which SMB permissions
should be anything other than Everyone::Allow::Full Control. Here is a list of those scenarios:
Prevent users (even object owners) from changing permissions.
Setting the SMB permission
to Allow::Change prevents users from changing the permissions of resources in the
shared folder, even if they are the owner of the object. Of course, the restriction applies only
to remote access through the shared folder’s UNC, not to local or remote-desktop access

122
Windows Administration Resource Kit: Productivity Solutions for IT Professionals
to the folder. Starting with Windows Server 2008, this business requirement can be met
using the Owner Rights identity, which is described in Solution 2-11 on page 141.
Create a hub-and-spoke distribution of resources.
Some organizations want to distribute a
copy of resources to multiple locations. DFS Replication (DFS-R) or the Robocopy com-
mand can be used to do just that. If your organization wants to ensure that changes are
made to original documents in only one location, you have a challenge. DFS-R replicates
NTFS permissions, and Robocopy can and should be configured to replicate permis-
sions using the /copy:s or /copyall switches. Therefore, to allow changes in one place but
not others, you must give users Write or Modify NTFS permissions and then further
restrict such changes by applying an Allow::Read share permission to the shared folders
that act as copies. This scenario is addressed in Solution 2-15 on page 151.
Apply different SMB settings to different users for the same folder structure.
SMB settings
include ABE and caching settings. Suppose you have a departmental folder and you
want to prevent all but a few users from taking files offline. You can achieve this by shar-
ing the folder twice. The first share would have caching disabled. On the second share,
enable caching and configure the share permissions so that only selected users can
access the folder through the share’s UNC name. Similarly, you might have a folder
structure that should appear to some users with ABE enabled, but other users, such as
the support staff, should see all files. Two separate shares, with two separate configura-
tions and permissions would achieve this goal.
Temporary lockdown.
Typically, a shared folder is configured with Everyone::Allow::Full
Control SMB permission, and access capabilities are implemented using more restrictive
NTFS permissions. A scenario might arise that requires locking down a resource. Per-
haps a security trigger requires freezing a folder—that is, preventing access or perhaps
allowing only Read access. Changing the share permission from Allow::Full Control to
Allow::Read or even Deny::Full Control can instantly prevent further changes to data in
the shared folder. Changing the root-level folder’s NTFS permission, however, would
result in an ACL propagation that could be problematic for the following reasons:
❏
ACL propagation to all objects requires that all child objects inherit permissions,
which might not be the case.
❏
An explicit permission on a child object might enable the very type of access that
you want to prevent.
❏
ACL propagation touches files, which might affect the ability to effectively audit or
perform forensic investigation on the files.
❏
ACL propagation takes time and, when a large number of files are affected, might
allow access to files at the previous level for an undesirable length of time.
Locking down a folder using SMB permissions takes effect immediately, does not touch
files or folders within the share, and can be easily reverted. Just remember the weak-
nesses of SMB permissions, such as the fact that they will not limit access to files by
users logged on interactively or using Remote Desktop to access the file server.

Solution Collection 2: Managing Files, Folders, and Shares
123
Scripting SMB permissions on local and remote systems
The easiest way to implement SMB permissions is to use the net share command to create the
share:
net share
sharename
=
path
/GRANT:
user or group
,[READ | CHANGE | FULL]
Because of its ability to create a share and apply SMB permissions simultaneously and effi-
ciently, I recommend using the net share command, rather than the GUI, to create a share. But
what if you need to create a share on a remote system? PSExec comes to our rescue. Originally
developed by Mark Russinovich and friends at Sysinternals, which was subsequently acquired
by Microsoft, PSExec is an extraordinarily important component of the administrator’s tool-
set, as it lets you execute commands on a remote machine. If you have not been fortunate
enough to have been exposed to the tool previously, you’re in for a happy day. You can
download this tool from http://www.microsoft.com/technet/sysinternals. The basic syntax of
PSExec is
psexec
\\computername
command
In this simple form, the PSExec command takes two arguments. The first is the computer
name, preceded by two backslashes: \\computername—for example, \\server01. The second is
the command you want to execute. You can use PSExec, to execute the net share command on
a remote system with this command:
psexec
\\computername
net share
sharename
=
path
/GRANT:
user or group
,[READ | CHANGE | FULL]
The net share command allows you to assign permissions only when creating a share. You can-
not modify permissions on an existing share using net share—you must delete and re-create the
share. Custom scripts, such as those written in VBScript, can attach to the security descriptor
for the SMB shared folder and modify its ACL at any time. Solution 2-9, “Provision the Cre-
ation of a Shared Folder,” (on page 126) presents just such a script.
Solution summary
Shared folders should be secured for least-privilege access using NTFS permissions. There-
fore, SMB permissions can be set to Everyone::Allow::Full Control. This best practice is in
place in most organizations. There are only a handful of scenarios, some of which were
detailed in this solution, that require setting share permissions to anything more restrictive.
Because the Windows default share permission is Everyone::Allow::Read, when creating
a share using GUI tools, it is recommended to use the net share command with the
/grant:everyone, full switch to create a share and set its permissions simultaneously.

124
Windows Administration Resource Kit: Productivity Solutions for IT Professionals
2-8: Script the Creation of an SMB Share
Solution overview
Type of solution
Script
Features and tools
VBScript, PSExec, net share
Solution summary
Customize and use the Share_Create.vbs script to script the creation of
an SMB share, including all of its properties.
Benefits
Increased manageability of shared folder security
Introduction
Because the Shared Folder user interfaces apply default share permissions and caching set-
tings that are not desirable in most situations, I recommend creating a script that can be used
to deploy shared folders based on your specifications.
Using Share_Create.vbs
The Share_Create.vbs script, in the Scripts folder of the companion media, creates a share and
assigns the Everyone::Allow::Full Control permission. The usage of the script is as follows:
cscript Share_Create.vbs /server:
ServerName
/path: "
Path to folder on server’s file system
"
/sharename:"
Share name
" [/cache:
CacheSettings
]
[/username:
AltCredsUsername
/password:
AltCredsPassword
In this script, CacheSettings specifies the caching settings and can be one of the following:
Manual, Documents, Programs, or None; AltCredsUsername and AltCredsPassword are the user
name and password, respectively, for credentials to be used for creating the share. If alternate
credentials are not specified, the script runs under the security context of the currently
logged-on user.
Customizing Share_Create.vbs
Unfortunately, caching settings are not exposed in a way that can be accessed using VBScript.
Therefore, we have to execute the net share command to configure caching settings. The
Share_Create.vbs script relies on psexec.exe to run net share on remote machines.
You must specify, in the script’s Configuration block, the full path to psexec.exe. The path is
not required if psexec.exe is in the same folder as the script.
Optionally, you might want to change the share permissions assigned by the script to a new
shared folder. By default, the script grants the Everyone::Allow::Full Control permission. You
can modify this default or configure additional permissions to be applied to the new share.

Solution Collection 2: Managing Files, Folders, and Shares
125
Understanding Share_Create.vbs
The core functional components of the script are described here:
Set oWMIService = ConnectWMI(sServer, "root\cimv2", sUsername, sPassword)
This line calls the ConnectWMI function to connect to the root\cimv2 Windows Management
Instrumentation (WMI) namespace on the server specified by the /server: argument you spec-
ify on the command line when you run the Share_Create.vbs script file. Before creating a new
shared folder, any previous share by the same name is removed:
Set oOutParams = oWMIService.ExecMethod("Win32_Share.Name='" & sShareName & "'", "Delete")
Then a security descriptor is generated that contains the SMB ACL for the shared folder. These
lines of code can be modified to specify a different default ACL:
Set oSecDescClass = oWMIService.Get("Win32_SecurityDescriptor")
Set oSecDesc = oSecDescClass.SpawnInstance_()
Set oTrustee = oWMIService.Get("Win32_Trustee").SpawnInstance_
Set oACE = oWMIService.Get("Win32_Ace").SpawnInstance_
' CONFIGURATION (Optional)
' Use these three lines of code for "EVERYONE"
oTrustee.Domain = Null
oTrustee.Name = "EVERYONE"
oTrustee.Properties_.Item("SID") = Array(1, 1, 0, 0, 0, 0, 0, 1, 0, 0, 0, 0)
' For a user/group other than Everyone, use the following line
' instead of the previous three lines
' Set oTrustee = Trustee_Get("<domain>", "<name", "user | group")
' CONFIGURATION (Optional)
oACE.Properties_.Item("AccessMask") = 2032127
' 2032127 = "Full"
' 1245631 = "Change"
' 1179817 = "Read"
oACE.Properties_.Item("AceFlags") = 3
oACE.Properties_.Item("AceType") = 0
oACE.Properties_.Item("Trustee") = oTrustee
oSecDesc.Properties_.Item("DACL") = Array(oACE)
After the security descriptor has been prepared, the shared folder can be created:
Set oWin32Share = oWMIService.Get("Win32_Share")
Set oInParam = oWin32Share.Methods_("Create").InParameters.SpawnInstance_()
oInParam.Properties_.Item("Access") = oSecDesc
oInParam.Properties_.Item("Description") = sRemark
oInParam.Properties_.Item("Name") = sShareName
oInParam.Properties_.Item("Path") = sPath
oInParam.Properties_.Item("Type") = 0
Set oOutParams = oWin32Share.ExecMethod_("Create", oInParam)
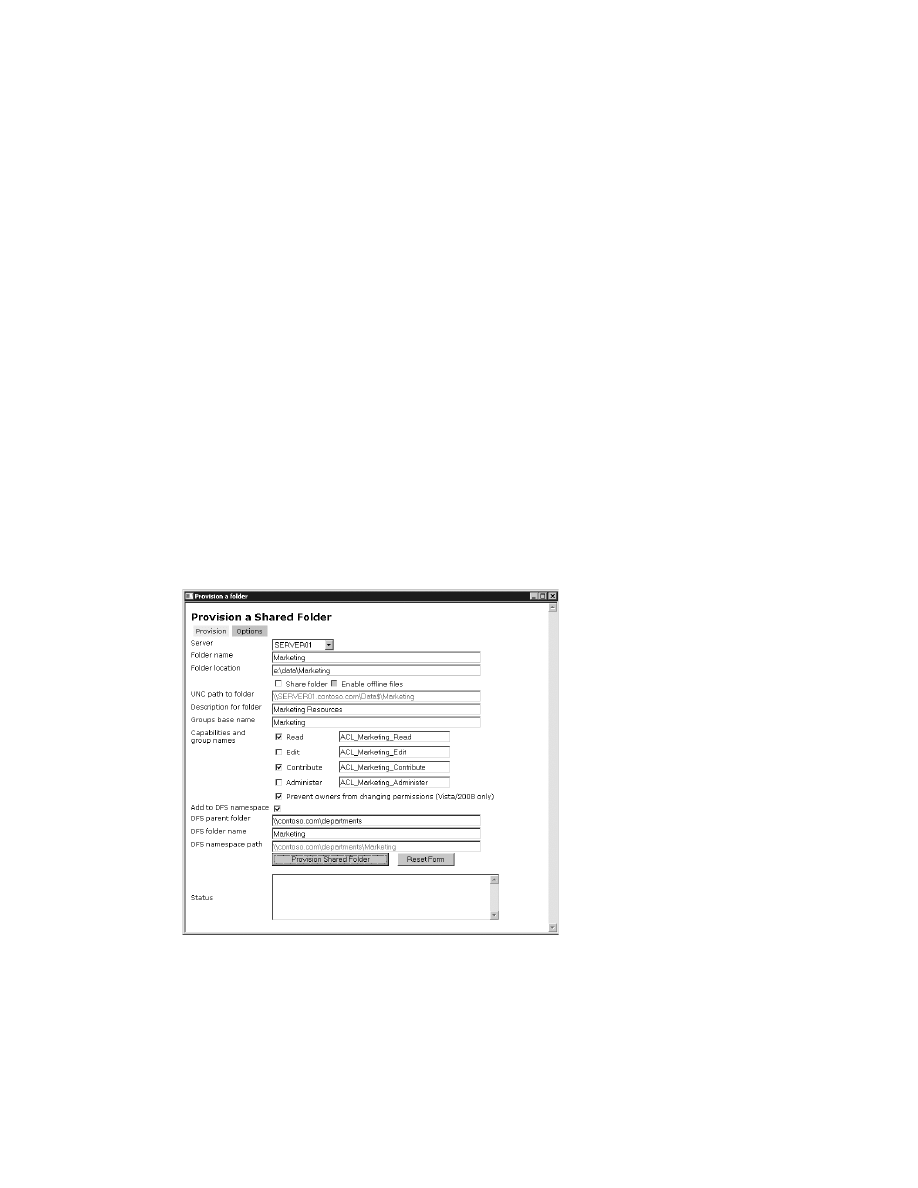
126
Windows Administration Resource Kit: Productivity Solutions for IT Professionals
Finally, the net share command is launched to configure caching settings for the shared folder:
sCommandLine = "net share """ & sShareName & """ /CACHE:" & sCache
PSExec_Run sCommandLine, sServer
Solution summary
The Share_Create.vbs script provisions the creation of a shared folder including its ACL,
description, share name, and more.
2-9: Provision the Creation of a Shared Folder
Solution overview
Type of solution
Tool
Features and tools
HTA, VBScript, PSExec, net share
Solution summary
Customize and use Folder_Provision.hta to fully provision the creation
of a shared folder including role-based access control (RBAC).
Benefits
Automated, role-based provisioning of shared folders and security
Preview
Figure 2-9 shows a preview of the solution.
Figure 2-9
The Provision a Shared Folder tool

Solution Collection 2: Managing Files, Folders, and Shares
127
Introduction
Provisioning a shared folder is not a one-step process. To provision a shared folder, you must
do the following:
1. Create the folder if it does not exist.
2. Create resource access capability management groups with which to secure the folder, if
you are following principles of RBAC and if the groups do not already exist.
3. Implement resource access by modifying the ACL of the folder to include appropriate
ACEs assigned to the capability management groups.
4. Create an SMB share.
5. Assign SMB share permissions.
6. Modify properties of the SMB share, such as the description and caching settings.
Throughout this resource kit, we are applying the concept of provisioning to automate multi-
step processes and to ensure consistent application of business rules. A process with as many
moving parts as the provisioning of a shared folder is an ideal candidate for a custom admin-
istrative tool.
Figure 2-9 shows the interface for Folder_Provision.hta, located in the Scripts folder of the
companion media. Folder_Provision.hta is an HTML Application (HTA) that provisions fold-
ers, automating all the steps just listed. It will require a moderate amount of customization to
reflect your enterprise configuration and business logic. In this solution, we’ll examine
Folder_Provision.hta to understand its use, its customization, and the code that it leverages to
achieve its task.
Using Folder_Provision.hta
Folder_Provision.hta is located in the Scripts folder of the companion media. It requires the
script Share_Create.vbs, discussed in the previous solution. It also requires psexec.exe, which
can be downloaded from http://www.microsoft.com/technet/sysinternals, and icacls.exe, which
is a native tool on Windows Server 2003 SP2, Windows Vista, and Windows Server 2008 sys-
tems. Place the script and HTA in the same folder. You’ll also need to configure the HTA to
know the path to psexec.exe unless you put it in the same folder as the HTA itself. We’ll look
at how to configure the HTA later in this solution.
To use the tool to provision a folder, you must have permission to do the following:
■
Create a folder in the specified location (unless the folder already exists).
The folder you specify in the tool will be created beneath a root data folder. The root
data folder must already exist. If the root folder doesn’t exist, create it before running
this tool.

128
Windows Administration Resource Kit: Productivity Solutions for IT Professionals
■
Create a share on the selected server (unless the share exists or you are not sharing the
folder).
■
Modify ACLs on the folder.
■
Create groups in the organizational unit (OU) specified on the Options tab (unless the
groups already exist).
When the tool opens, as shown in Figure 2-9, it displays a number of input controls that
enable you to provision a shared folder.
To provision a folder, follow these steps:
1. Select a server from the Server drop-down list.
This list can be customized to display your file servers.
2. Enter a name for the folder in the Folder Name text box.
3. The Folder Location field is populated automatically.
The default location will be a first-level folder beneath a root data folder. The root data
folder can be configured on the Options tab, accessed by clicking the Options button.
You must have created and shared the root data folder prior to specifying it here.
The folder must be created beneath the root data folder on the Options tab. However, it
does not have to be a first-level folder beneath the root—it can be a folder several levels
down.
You can customize the HTA code to change the logic with which the folder location is
populated, or to prevent the user from manually overriding the prepopulated Folder
Location. See the next sections for details regarding customization of the tool.
4. Select the Share Folder check box to create a new SMB share for the new folder.
5. If you are creating a share, you can specify whether to enable offline files for the share by
selecting the Enable Offline Files check box (cleared by default).
6. If you are creating a share, the UNC Path To Folder text box is populated automatically.
❑
By default, the UNC is a hidden share in the form \\server name\folder name$. You
can configure whether or not the HTA creates hidden shares (the default) on the
Options tab.
❑
You can customize the HTA code to change the logic with which the UNC path is
created. See the next sections for details regarding customization of the tool.
7. Enter a description for the share in the Description For Folder text box.
8. Enter a name in the Groups Base Name text box.
The HTA provisions the folder using RBAC. It creates capability management groups for
selected capabilities, such as Read, Edit, Contribute, or Administer. Each group’s name

Solution Collection 2: Managing Files, Folders, and Shares
129
is in the form ACL_Folder Name_Capability. As soon as you change the value in the
Groups Base Name box, the group names for each capability are automatically
generated.
On the Options tab, you can change the prefix (ACL_ by default) used for the naming
standard for resource access capability management groups. You can also specify the
OU within which the groups are created.
You can customize the HTA code to change the logic with which group names are gen-
erated. See the next sections for details regarding customization of the tool.
9. In the Capabilities And Group Names section, select the capabilities you want to imple-
ment for the folder.
Only capabilities that are selected (checked) will be provisioned.
When a capability is provisioned, the script modifies the ACL of the folder to add appro-
priate ACEs for the specified groups.
You can override the prepopulated group name. This is particularly useful when you are
creating a new folder in a collection of resources that have already been provisioned, so
there are already appropriate groups in Active Directory. If a capability is being provi-
sioned to a group that does not exist in Active Directory, the group will be created in the
OU specified on the Options tab.
You can customize the HTA to add or remove supported capabilities.
In addition to the ACEs assigned to the selected groups, the HTA code assigns several
default ACEs: Administrators::Allow::Full Control, System::Allow Full Control. If the
Contribute capability is selected, Creator Owner is assigned the Modify permission. All
of these additional permissions can be modified or removed in the HTA code.
10. If you want the folder to prevent the owner of a file or folder from changing the permis-
sion on that object, select Prevent Owners From Changing Permissions.
This option is supported only if the system on which the folder is provisioned is run-
ning Windows Vista or Windows Server 2008. If you are creating the folder on a system
running a previous version of Windows, do not select this option.
The permission that makes this possible is discussed in Solution 2-11 on page 141.
11. To add the new folder to a DFS namespace, select the Add To DFS Namespace check
box. You can then do the following:
❑
Enter the path of the DFS parent folder, which can be either an existing
namespace or an existing DFS folder. The DFS Parent Folder text box is prepopu-
lated with the DFS Namespace option on the Options tab.
❑
Enter the name of the new DFS folder that will target the folder you are provision-
ing. The DFS Folder Name text box is prepopulated with the name of the folder.
12. Click the Provision Shared Folder button.

130
Windows Administration Resource Kit: Productivity Solutions for IT Professionals
13. Several command windows will open as the HTA calls the Share_Create.vbs scripts,
along with psexec.exe and icacls.exe.
The first time you run the HTA, you might be prompted to agree to the license agree-
ment for psexec.exe.
14. The Status window will alert you to any errors, and a message box will appear indicating
that the folder has been provisioned successfully.
To override the HTA defaults, click the Options button. The Options tab allows you to change
the default behavior of the HTA until the HTA is closed. The defaults are themselves driven by
the code in the HTA, so if you want to permanently change the defaults, you can customize the
HTA code itself.
Basic customization of Folder_Provision.hta
The folder provisioning tool will certainly require customization for your enterprise. There is
a configuration block near the top of the script that contains values such as the domain name
and paths to supporting scripts and tools.
Customizing the behavior of option defaults
There is also a block labeled Option Defaults, which controls the default behaviors of the tool,
such as the default root data share location, whether unique shares are created for each new
folder, whether shares are hidden, the prefix used for the group naming convention, and so
on. Each of these values is explained in comments in the code.
Each value in the Option Defaults section is displayed on the Options tab of the HTA and can
be overridden when using the tool. The HTML for the Options tab of the tool is near the bot-
tom of the HTA code.
There might be situations in which you don’t want a user to be able to override one of the
default values. For example, the HTA does not allow a user to change the prefix used in the
group naming standard (ACL_, by default). The justification is that an administrator has con-
figured the value of the prefix in the code of the HTA to enforce a naming convention. Some-
one using the tool should not be able to go outside of the naming convention.
To lock down a default value, you can delete the table row that displays the value in the
Options tab by deleting the entire table row tag, from the <tr> opening tag up to and including
the </tr> closing tag. Alternatively, you can allow the value to be displayed but not modified
on the Options tab by adding an attribute to the <input> tag:
disabled="true"

Solution Collection 2: Managing Files, Folders, and Shares
131
You can see an example of this on the line of HTML that displays the group name prefix. This
latter method is recommended over deleting the table row because, by disabling the control,
a user of the tool can continue to see what is configured, which can be useful. That user just
can’t change it.
Customizing the list of servers
The drop-down list of servers should display appropriate file servers in your enterprise. The
list is hard-coded near the bottom of the HTA:
<select name="cboServer" />
<option value="">Select a server</option>
<option value="SERVER01.contoso.com">SERVER01</option>
<option value="SERVER02.contoso.com">SERVER02</option>
</select>
The <select> tag creates a drop-down list. Each <option> tag creates an item in the drop-down
list. To modify, add, or remove servers, simply change, create, or delete <option> tags. It is
important that the value attribute be set to the server’s name. I recommend that you always
use fully qualified domain names (FQDNs) when referring to any computer by name. The text
between the opening <option> and closing </option> tags is the text that appears in the drop-
down list. This is simply the user-friendly name of the server displayed in the form. You can
use simpler (flat NetBIOS or host) names if you so desire.
Understanding the code behind Folder_Provision.hta and advanced
customization
To perform more advanced customization of the folder provisioning tool, you need to under-
stand how the tool works. This section will be useful for you if you are experienced in script-
ing with HTML and VBScript. There are three major components of the HTA’s functionality
that we’ll examine: the way the application is displayed, the form controls’ behavior, and the
code that actually provisions the folder.
Application display
The application has two tabs: Provision and Options. Each tab is represented by a button gen-
erated by HTML code:
<table border="0" cellpadding="3" cellspacing="5">
<tr><td id="btnProvision" onclick="ShowProvision()" style="background-color: #CCCCCC;
width:60px; text-align:center;">Provision</td>
<td id="btnOptions" onclick="ShowOptions()" style="background-color: #CCCCCC;
width:60px; text-align:center;">Options</td>
</tr>
</table>

132
Windows Administration Resource Kit: Productivity Solutions for IT Professionals
Each tab is contained within a division (<div> tag), for example:
<div id="divOption" name="divOption">
<table border="0" cellpadding="0" cellspacing="0">
<!-- OPTIONS PAGE of the HTA is below. If you don't want a user to be able to override the
default value of one of these options, either delete the table row <tr>...</tr> entirely or
add disabled="true" within the <input> tag -->
<tr><td class="frmlabel">Root data folder</td><td><input type="text" name="txtRootPath"
size="60" /></td></tr>
...
</table>
</div>
The <div> tag contains a table that lays out input controls for the tab’s form.
When you click a button, such as the Options button, an OnClick event is fired. The OnClick
event is wired up in the <td> tag for the button, shown earlier, and calls a subroutine such as
the following one:
Sub ShowOptions()
divProvision.style.display = "none"
btnProvision.style.backgroundcolor = "#CCCCCC"
divOption.style.display = "inline"
btnOptions.style.backgroundcolor = "#EEEEEE"
End Sub
This simple VBscript turns on the tab represented by the button (divOption.style.display =
“inline”) and turns off the other tab. It also changes the color of the buttons so that the lighter
colored button represents the current tab.
When the application launches, the Window_OnLoad subroutine is automatically called. That
subroutine resizes the application window to appropriate dimensions and then calls the
subroutine that makes the Provision tab visible. Then it sets the values of the controls on the
hidden Options tab.
No customization should be necessary to the code that controls the display of the application
unless you add more controls and require a larger horizontal or vertical dimension for the
HTA window.
Form controls
The two forms of the HTA are the Options tab and the Provision tab. As I just described, each
form is contained in a <div> tag that is displayed when the corresponding button is clicked.
Each <div> contains a table that lays out input controls: text boxes, drop-down lists, and check
boxes. Each input control has a name that can be used to refer to the control and its values.
If you decide to create additional input parameters, simply add table rows to the appropriate
form and insert new input controls.

Solution Collection 2: Managing Files, Folders, and Shares
133
The default values on the Options form are hard-coded in the Option Defaults section of the
script. You should configure the defaults in the code to reflect the correct values for your
enterprise.
To make those values easier to override by a user of the HTA, each value is exposed in an input
control on the Options tab. The default values are inserted into the controls by the SetDefault-
Options() subroutine, which is called by the Window_OnLoad event when the HTA is opened
and is also called when the Reset Options To Defaults button is clicked.
You can change the way options are displayed on the Options tab. For example, as described
earlier, you can add a disabled="true" attribute to an <input> tag to disable the control and
thereby prevent a user from overriding one of the defaults. You can also change a control type.
If you have several OUs in which a resource access capability group can be created, you can
change the txtGroupOU control to a drop-down list (<select> tag). Just be sure to modify other
locations in the code that refer to txtGroupOU.
If you add new parameters to control the behavior of the tool, I recommend that you follow
the model that is in place. Define a variable with the default value in the Option Defaults sec-
tion of the script, add an input control to the Options <div>, and add a line of code to inject the
default value into the control in the SetDefaultOptions() subroutine. You obviously need to
modify other code in the HTA to actually use your new parameter to achieve your goals.
The values on the Provision form are displayed using input controls in a table in the Provision
<div>. Controls are set to their default value (blank) by the ResetControls() subroutine, except
for the folder name and server name controls. All controls, including the folder name and
server name, are initialized by the ResetForm() subroutine, which is called when the Reset
Form button is clicked. If you add any controls to the form, be sure to set them to their default
value in the ResetControls() subroutine.
Some controls, when changed, trigger the autopopulation of values in other controls. This is
achieved by using an OnChange event or, in the case of check boxes, an OnClick event. For
example, if you change the value of the Groups Base Name box, all the names of the capability
groups are autopopulated. The Groups Base Name box on the form is named txtGroupBase-
Name in the HTML code. The following script wires up the OnChange event for that text box:
Sub txtGroupBaseName_OnChange()
' When the base name is changed, reconfigure the values in the capability group name boxes
' Here is where you can modify the code to reflect your capability gorup naming conventions
If txtGroupBaseName.value > "" Then
txtReadGroup.Value = txtGroupPrefix.Value & txtGroupBaseName.Value & "_Read"
txtEditGroup.Value = txtGroupPrefix.Value & txtGroupBaseName.Value & "_Edit"
txtContributeGroup.Value = txtGroupPrefix.Value & txtGroupBaseName.Value & "_Contribute"
txtAdministerGroup.Value = txtGroupPrefix.Value & txtGroupBaseName.Value & "_Administer"
Else
txtReadGroup.Value = ""
txtEditGroup.Value = ""
txtContributeGroup.Value = ""
txtAdministerGroup.Value = ""
End If
End Sub

134
Windows Administration Resource Kit: Productivity Solutions for IT Professionals
If the new value of the text box is not blank, the code constructs the four capability group
names by taking the prefix from the txtGroupPrefix text box on the Options tab, appending
the value entered into the Group Base Name box, and then appending the capability. On the
other hand, if the value in the Group Base Name text box is blank, all the capability group text
boxes are set to blank as well.
If you want to change any of the logic that determines how values are autopopulated, look for
the appropriate OnChange or OnClick event in the HTA’s code.
Folder provisioning
The code that manages the provisioning process is the ProvisionIt() subroutine, called when
the Provision Shared Folder button is clicked.
ProvisionIt() first calls the CreateFolder() function, which simply determines the path of the
new folder and calls the FolderPath_Create subroutine, which then creates the specified folder.
The CreateFolder() function takes values from input controls on the form, such as the folder
name and path. CreateFolder() returns its results as a string, and ProvisionIt is able to examine
the results to determine whether an error was encountered.
ProvisionIt() then applies default permissions to the folder. Administrators and System are
each allowed Full Control. The permissions are assigned to the string variable named
sPermission. sPermission is in the same syntax as switches for the icacls.exe command. In fact,
sPermission is passed—along with the UNC to the folder—to the ACLit() subroutine, which sim-
ply calls icacls with sPermission as its switch.
If you want to change the default permissions applied to every folder created by the HTA,
change the assignment of sPermission.
After default permissions have been applied, ProvisionIt() then looks at each capability that
has been selected (checked). It first calls the CreateGroup() subroutine to create the group in
Active Directory. There is business logic in CreateGroup that provisions the Description prop-
erty of the group as the UNC to the resource controlled by the group. CreateGroup also is
coded to create the group as a domain local security group.
ProvisionIt again assigns permissions by configuring sPermission as the switch for icacls and,
again, calls ACLit() to execute icacls.exe.
As each selected capability is implemented, a variable named sRolesConfigured is appended
with the friendly name of the capability. This variable is then used to create a summary event
in the event logs.

Solution Collection 2: Managing Files, Folders, and Shares
135
If you want to modify the way capabilities are implemented, change the permissions assigned
to sPermission. If you want to add capabilities to the existing four, you need to do the following:
■
Add a row to the HTML table for the new capability. Use the existing capabilities as a
template.
■
Add code to the txtGroupBaseName_OnChange event to prepopulate the group name for
the new capability.
■
Add code to ProvisionIt() to evaluate whether the new capability is selected and, if so, to
send the appropriate sPermission string to ACLit().
The last permission applied by ProvisionIt() assigns the Modify permission to the Owner
Rights identity. The effect of this permission, which is available only when you are provision-
ing a folder that is on a Windows Vista or Windows Server 2008 system, is to prevent the user
who owns the file from being able to change permissions on the file. This permission is dis-
cussed in detail in Solution 2-11 on page 141.
ProvisionIt() then looks to see whether the check box is selected to indicate that an SMB share
should be created. If so, the ShareFolder() function is called. ShareFolder() examines values on
the form and creates a command line to call the Share_Create.vbs script.
Finally, ProvisionIt() determines whether the folder should be added to a DFS namespace, and
then calls the AddToDFS() function. This function creates a DFS namespace folder targeting
the UNC of the provisioned folder.
As ProvisionIt performs each major step, it updates the status box on the form, named txtStatus
in the code. If the process is successful, a message box is generated informing the user of the
successful provisioning of the shared folder.
Solution summary
Folder_Provision.hta is an example of a powerful provisioning tool that automates a multistep
procedure and encourages or enforces business logic and process. The tool also demonstrates
some useful approaches to configuring default values, displaying separate tabs within an
HTA, autopopulating input controls, and leveraging external scripts and tools. With basic cus-
tomization, you can configure the HTA to provision folders, including the creation of RBAC.
With slightly more advanced customization, you can leverage the approach to create a perfect
solution for your enterprise.
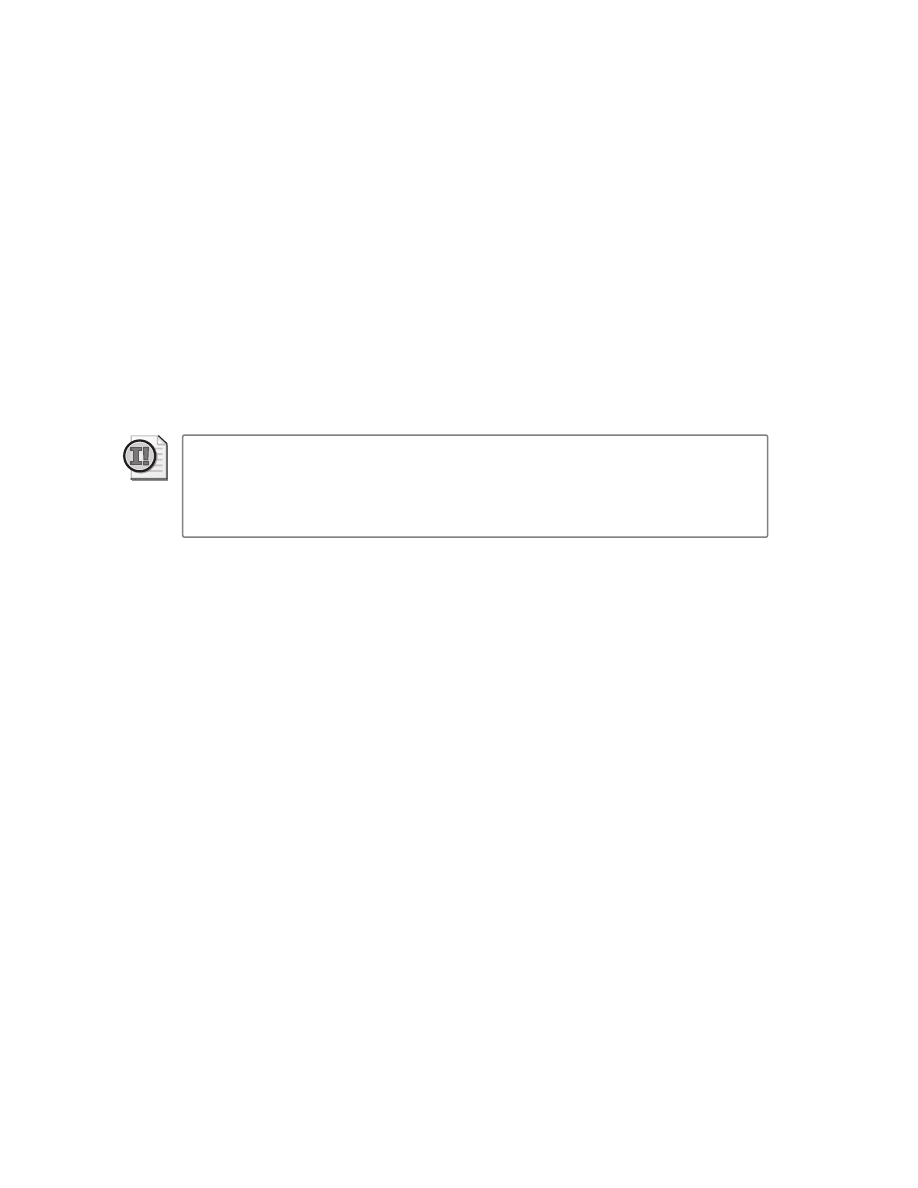
136
Windows Administration Resource Kit: Productivity Solutions for IT Professionals
2-10: Avoid the ACL Inheritance Propagation Danger
of File and Folder Movement
Solution overview
Type of solution
Guidance
Features and tools
Robocopy.exe
Solution summary
Never use Windows Explorer to move files or folders between two
locations in the same namespace with different permissions. Instead,
use Robocopy or an alternative.
Benefits
Correct application of permissions
Important
This solution addresses what many (including all of my customers) consider to
be a bug or design flaw in the security of files on Windows systems. Microsoft has documented
the problem as the result of a known feature of the NTFS file system, but it has changed it
nonetheless in Windows Server 2008. Whether you call it a “feature” or a “bug,” you must edu-
cate your administrators to avoid the security implications. Do not skip over this solution.
Introduction
Imagine that you have configured a shared folder for a department. Beneath that shared folder
are folders for departmental teams. Each team folder is secure so that only members of that
team can access the folder’s contents. The departmental manager, who has access to all the
team folders, accidentally puts a sensitive file into the wrong team’s folder. She notifies you
immediately, and you connect to the share and drag and drop the file into the correct folder.
Unfortunately, you discover that members of the wrong team are still able to access the file in
its new location, and members of the correct team are unable to access the file. You have cre-
ated a security problem.
The bottom line of this solution is that you cannot use Windows Explorer to move a file
between two folders with different permissions in the same namespace (for example, within
the same share or on the same disk volume of a system you are logged on to interactively or
through remote desktop). Moving a file using drag and drop, cut and paste, or any number of
other methods can lead to the incorrect application of security permissions. Windows Server
2008 has corrected the problem, and, not surprisingly, Microsoft is not highlighting the
potential security concern that was fixed eight years after it was introduced. But I’m glad,
nonetheless, that it is fixed.
I’ll go into some of the details of why this happens and how to avoid it. I will not cover every
detail or exception to the rule, but you will understand the problem and a variety of solutions.
You’ll also learn best practices for moving files between folders on any Windows operating
system.

Solution Collection 2: Managing Files, Folders, and Shares
137
See the bug-like feature in action
A hands-on experience is worth a thousand words sometimes, and in this case the adage is
absolutely true. The easiest way for you to understand the problem is to experience it yourself.
Follow these steps to replicate the scenario on an NTFS volume on a Windows Server 2003 or
Windows XP system:
1. Create a parent folder—for example, C:\Data.
2. Create a subfolder—for example, C:\Data\TeamA.
3. Apply permissions to that folder so that TeamA has Modify permission.
4. Create another subfolder—for example, C:\Data\TeamB.
5. Apply permissions to this second folder so that TeamB has Modify permission.
6. Add a file to the TeamA folder—for example, C:\Data\TeamA\TeamAInfo.txt.
7. Add a permission to the file giving a user or group Full Control of that specific file.
8. Drag the file into C:\Data\TeamB.
What do you expect the permission on the file to be after you’ve moved it? Common sense
suggests that the explicit permission you added in step 7 would remain attached to the file,
but that the file would now inherit its permissions from the new parent folder, TeamB. So
TeamB would have inherited Modify permission, and TeamA would no longer have access.
Not so! Open the Security tab of the file’s property dialog box and click Advanced. In the
Advanced Security Settings dialog box, shown in Figure 2-10, you’ll notice that TeamA still has
access and TeamB does not. Even more interesting, the Permission Entries list cannot display
where the permission is being inherited from.
Now let’s make it even more interesting. Open the Security tab of the Properties dialog box of
the TeamB folder. Clear the check box that allows TeamB Modify permission, click Apply, re-
select the Allow Modify permission, and click Apply again. All you have done is removed and
then reapplied the Modify permission for TeamB.
Open the Advanced Security Settings dialog box for the file. Notice, now, that TeamB does
have inherited Modify permission, and TeamA no longer has permission.
The practical implication of this experiment is that, if you move files between two differently-
permissioned folders in the same namespace (in this case, the C:\ volume) using Windows
Explorer, the file will have an unexpected permission set until something happens to fix it! In
short, whether it’s a bug or a feature, it’s both unexpected and inconsistent.
138
Windows Administration Resource Kit: Productivity Solutions for IT Professionals
Figure 2-10
Permissions inherited from a file’s previous parent
The same thing happens in a variety of scenarios, including moving files between two sub-
folders of a remote share, or using tools other than Windows Explorer. Scary, huh?
What in the world is going on?
This odd and potentially disturbing phenomenon is a result of the way ACLs are applied to
NTFS resources. An object, such as our file, has a flag that enables the object to inherit permis-
sions from its parent container that are themselves inheritable. The ACL on the file has spe-
cific, individual ACEs for each permission that applies to the file, including the inherited
permissions.
But what actually applies those inherited permissions? Well, there’s a process that I’ll call the
ACL propagator that, when triggered, goes from a folder to its subfolders and files and applies
the inheritable ACEs into the ACLs of the child objects.
When you created the file in the TeamA folder, the instantiation (or creation) of the new object
triggered the ACL propagator to apply inheritable permissions from the parent to the file. So
the file’s ACL contained ACEs allowing TeamA Modify permission. You then applied an
explicit ACE to the file.
When you move a file in a namespace, you are basically renaming it, not moving it physically.
So when you moved the file into the new folder, nothing triggered the ACL propagator to
apply inheritable permissions (from the new parent folder) to the file. So its ACL kept its pre-
viously applied ACEs.
Solution Collection 2: Managing Files, Folders, and Shares
139
Then you made a change to the second parent folder. Changing permissions on a container
triggers the ACL propagator, so the ACLs of child objects were opened and modified correctly.
Important
Until the ACL propagator is triggered, permissions will be incorrect on the
moved object.
Windows Server 2008 corrects the problem by triggering an ACL propagation when a file or
folder is added to a folder.
Solving the problem
There are several ways to solve this problem. One is to ensure that, whenever a file is moved
into a new folder with different permissions in the same namespace, the ACL propagator is
triggered. Use the following steps to do this:
1. Move the object.
2. Open the Advanced Security Settings dialog box for the object.
3. Clear the Include Inheritable Permissions check box (Windows Server 2008 or
Windows Vista) or the Inherit From Parent check box (Windows Server 2003 or
Windows XP), and click Apply.
If you are using a Windows Vista or Windows Server 2008 system with User Account
Control enabled, you need to click the Edit button before you are able to clear the
check box.
4. When you are prompted to Copy or Remove inherited permissions, choose Remove.
5. Re-select the same check box, and click Apply. This triggers the ACL propagator to apply
inheritable permissions from the parent folder to the object.
That’s a lot of steps, isn’t it?
Another option is to copy rather than move the object. When you copy an object, you create a
new instance of the object, which immediately triggers the ACL propagator. You then simply
delete the original item.
The only potential pitfall with this method is that you might have explicit permissions
assigned to the original object that you will need to maintain when you move the object.
Therefore, rather than use copy and paste, use a command that can copy the object including
its security descriptor. You can use xcopy.exe with the /x switch to copy a file with its security
descriptor intact. On Windows Server 2008, you can also use robocopy.exe with the /copyall
switch. By copying the entire security descriptor, you also maintain auditing and ownership
information. Then delete the original file.

140
Windows Administration Resource Kit: Productivity Solutions for IT Professionals
Any utility that can copy or back up and restore an NTFS object while maintaining its security
descriptor will similarly solve this unusual feature of NTFS permissions.
Change the culture, change the configuration
It is important to inform appropriate users and support personnel about the dangers of mov-
ing files between two folders with different permissions in the same namespace. Education
can go a long way toward avoiding the inherited permissions trap.
You can also enforce success by aiming for a configuration in which each folder with unique
permissions is, in fact, its own share. A connection to a share creates a unique namespace. So
if you move a file between two folders in two different shares, you are in fact copying the file—
so the inherited permissions problem will not rear its ugly head. Unfortunately, in these situ-
ations you might run into another challenge: By copying the file, you are not keeping the secu-
rity descriptor (ownership, auditing, and explicit ACEs) unless you again use a security-
descriptor-friendly tool such as xcopy /x or robocopy /copyall.
But aiming for a unique share for each folder with unique permissions is a decent idea. You
might ask, “But won’t that make my resource namespace very flat and wide?” To which I will
reply, “Yes, except that users won’t be going directly to shares—they’ll view your resource
namespace with DFS Namespaces, which create a virtual hierarchy within which you can orga-
nize your shares in any structure that aligns with your business.”
You begin to see why even a question as seemingly simple as, “How should I organize the fold-
ers on my servers?” can only be answered by a consultant with the truism, “It depends.” There
are a lot of moving parts in Windows that must be aligned to your business requirements.
Solution summary
NTFS permissions that are inherited from a parent folder will stick to a file (or folder) when
you move it to another folder. The permissions of the new parent folder won’t apply to the
object until something triggers the ACL propagator. Therefore, it’s critical for security that you
do not just move files between folders with different permissions. You must either move the
object and then remove and re-enable inheritance to the object; or you must use a security-
descriptor-friendly tool—such as xcopy /x or robocopy /copyall—to copy the object to its new
location and then delete the original. Although Windows Server 2008 has addressed the prob-
lem by triggering propagation immediately when a file is added to a folder, it is nevertheless
important to follow best practices to ensure that security descriptors are moved correctly.

Solution Collection 2: Managing Files, Folders, and Shares
141
2-11: Preventing Users from Changing Permissions on
Their Own Files
Solution overview
Type of solution
Guidance
Features and tools
The Owner Rights identity
Solution summary
New to Windows Server 2008, the Owner Rights identity enables
administrators to prevent object owners from changing the permis-
sions of objects.
Benefits
Decreased help desk calls, and reduced exposure to denial of service
on file servers
Introduction
For as long as I can remember, Windows administrators have fought a battle to prevent users
from changing permissions on their own files or folders. When a user creates a file on a
Windows system, the user becomes the owner of the object. An object’s owner has a built-in
right to modify the security descriptor of the object. The idea behind that design is that there
is always someone (the owner) who can unlock a resource, even if Deny permissions are pre-
venting all other access.
A problem arises when users accidentally or intentionally change the ACL on an object they’ve
created and thereby open an object to users who should not (based on the organization’s
information security policy) have access to the file or thereby restrict an object from users who
should have access and thus generate a support call from those users.
Earlier in this Solutions Collection, I emphasized the importance of least-privilege access. In
reality, the only users who should set permissions on files or folders in most organizations are
IT or data security personnel. Restricting the ability to set permissions enables the organiza-
tion to follow the best practices of configuring ACLs only on the first levels of a folder hierar-
chy and allowing inheritance to manage security below that.
Unfortunately, until recent versions of Windows, the only way to restrict an object owner from
changing the ACL on the object was to restrict the SMB (share) permission to Change. With-
out a share permission of Full Control, an owner cannot modify the ACL. The problems with
this approach are, first, not every Windows administrator knew that it was possible to do this,
and second, share permissions have significant limitations, some of which were discussed in
Solution 2-4, “Delegate the Management of Shared Folders,” on page 110.
Windows Server 2008 solves the problem. A new well-known SID—the built-in identity called
Owner Rights—was added specifically to address this scenario. ACEs assigned to the Owner
Rights identity override the system rights assigned to the Owner of an object.
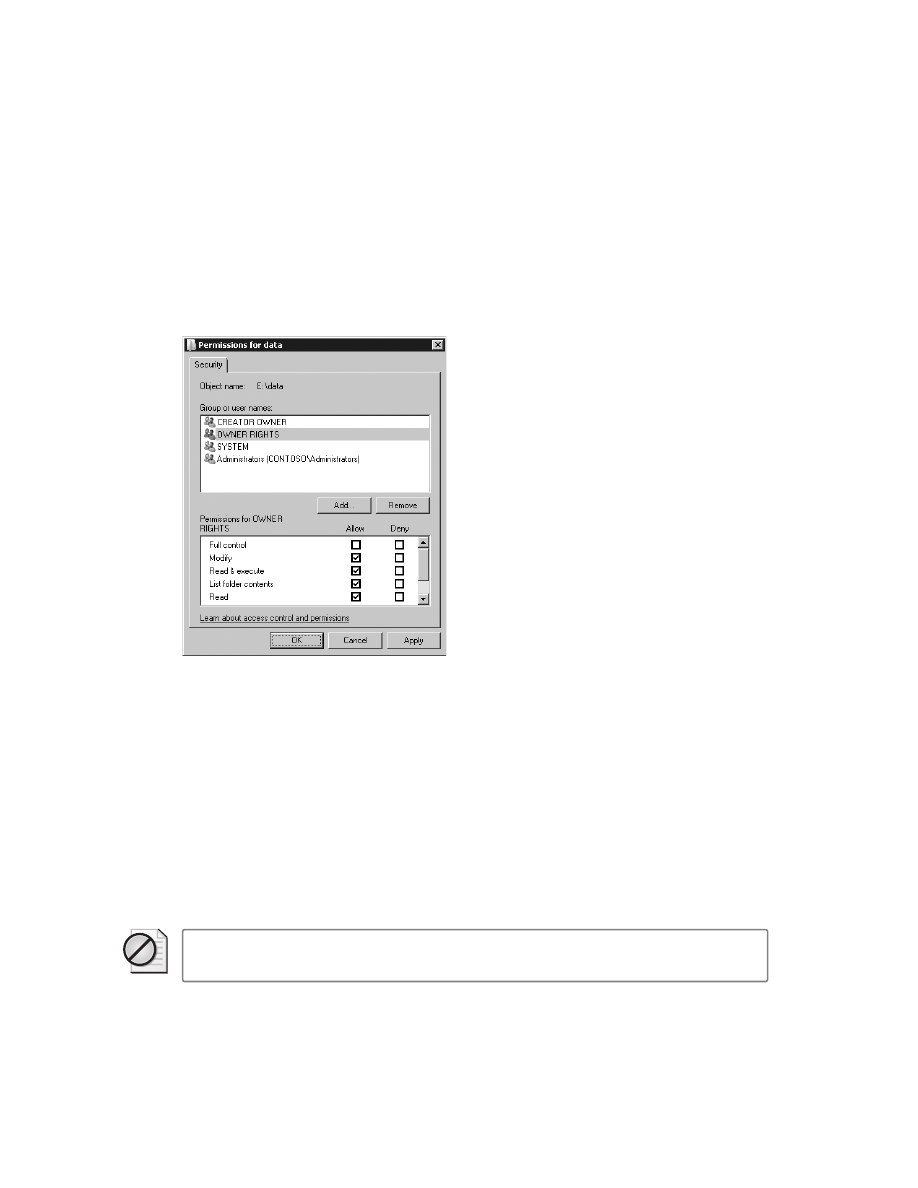
142
Windows Administration Resource Kit: Productivity Solutions for IT Professionals
Imagine that you have created a shared folder with the default permission that allows the Cre-
ator Owner identity Full Control. When a user creates an object, an ACE is added to the object
granting that user Full Control permission. If in any way the user is denied access to the
object, the user can, as the object’s owner, change permissions to grant himself or herself
access.
Now, we make one small change to the ACL of the shared folder. We create an ACE with a sin-
gle permission: Owner Rights::Allow::Modify. This is shown in Figure 2-11.
Figure 2-11
Denying the owner the right to change permissions by assigning the Owner Rights
identity the Modify permission
If the owner attempts to change permissions, one of two things will happen, depending on the
user’s credentials and operating system. Either the controls that would enable the user to edit
permissions are disabled, or if the controls are enabled, the user will receive an “Access
Denied” error when attempting to change permissions. The permission assigned to the
Owner Rights identity, which does not allow Change Permissions, is now overriding even the
built-in system privilege that allows an owner to modify an object’s ACL.
And as ownership of the object is transferred to another user, the new owner is similarly
restricted by the Owner Rights ACE.
Now that is a great, new, small, important feature!
Caution
You, the administrator, can likewise lock yourself out of resources! If you are the
owner of a file or folder, you will also be unable to change permissions. Use this feature wisely.

Solution Collection 2: Managing Files, Folders, and Shares
143
What about object lockout?
You might be wondering now, if an object owner cannot change the ACL, isn’t it possible to
lock all users out of a resource? Apparently not. According to my testing, if you are a member
of the Administrators group and are the owner of an object, you are not restricted by the
Owner Rights ACEs. That caveat makes sense.
Solution summary
In earlier versions of Windows, the only way to prevent users from changing permissions on
their own files was to restrict the Share Permission to Change. Now a better solution, based on
NTFS permissions, is available. Any permission assigned to the Owner Rights identity over-
rides the permissions and system rights assigned to the owner of an object. So by configuring
a folder with the ACE Deny::Owner Rights::Change permissions, you can effectively prevent
any user who creates a file or subfolder from being able to alter that object’s ACL.
2-12: Prevent Users from Seeing What They Cannot
Access
Solution overview
Type of solution
Guidance
Features and tools
Access-based Enumeration (ABE)
Solution summary
The Windows Server 2008 file server role includes ABE, which enables
you to hide from users the folders and files that they cannot access in
a shared folder.
Benefits
Decreased help desk calls, and a security-trimmed view of shared
folders
Introduction
On a traditional Windows folder, the List Folder Contents and Read Attributes permissions
enable a user to see what the folder contains. The user sees all files and subfolders, whether or
not the user can actually open those objects. The ability to open the object itself is managed by
the Read or Read & Execute permissions.
When I began providing consulting and training to Windows IT professionals back in the
early days of Windows NT Server, most administrators were approaching Windows network-
ing after their experiences with Novell NetWare. That platform, as well as some other network
operating systems, exposes shared folders differently than Windows. When you looked at a
mounted volume on a Novell server, you would see only the files and subfolders to which you
had permission. Those that you couldn’t open were hidden from your view.

144
Windows Administration Resource Kit: Productivity Solutions for IT Professionals
So for as long as I’ve been working with Windows, one of the most frequent questions I’ve
been asked has been, “How do I hide files from users?”
This solution addresses that question.
One perspective: Don’t worry about it
One answer to the question, “How do I hide files from users?” is not to worry about it. Here’s
my take on the problem: If I were to tell one of your users that somewhere on your network
there was a folder with the performance reviews of your company’s employees, that would
probably not surprise the user. Users know that on your network there is information—in fact,
sensitive information and even information to which they cannot gain access. They know it’s
there.
So seeing the file really isn’t that big of a deal, perhaps. It’s not news to your users that it exists.
What really matters is whether they can get to it or not. So the user shouldn’t be able to open
it, and, if you’ve applied your permissions correctly, they can’t.
A second perspective: Manage your folders
When a customer frequently runs into the problem of users being able to see a file they can’t
access, it suggests to me that the folder structure is not ideal. If users can see a lot of things
they can’t get to, those things should probably be somewhere else—in another folder—which
itself cannot be accessed by users.
Folders should, ideally, contain objects that share common access requirements. That’s the
whole point, really: A folder is a container of like objects, controlled by one ACL that is inher-
ited by all of those objects, with ACEs that define users’ access to those objects based on least
privilege. If you are having to manage multiple ACLs within a single folder, you probably
should be rethinking your folder structure.
A third perspective and a solution: Access-based Enumeration
Windows Server 2003 SP1 introduced Access-based Enumeration (ABE). ABE can be down-
loaded from the Microsoft Downloads site (www.microsoft.com/downloads) for Windows
Server 2003, and it is available as a feature of the File Server role in Windows Server 2008.
ABE can be enabled for an entire server, affecting all of its shares, or for individually specified
shares. When ABE applies to a share, users cannot see items to which they do not have Read
permission. It’s that simple! About time!
Figure 2-12 shows the same share, viewed by James Fine. On the left, he is viewing the share
without ABE enabled. After an administrator enables ABE on the share, he cannot see the file
or folder to which he does not have Read permission, as shown on the right.
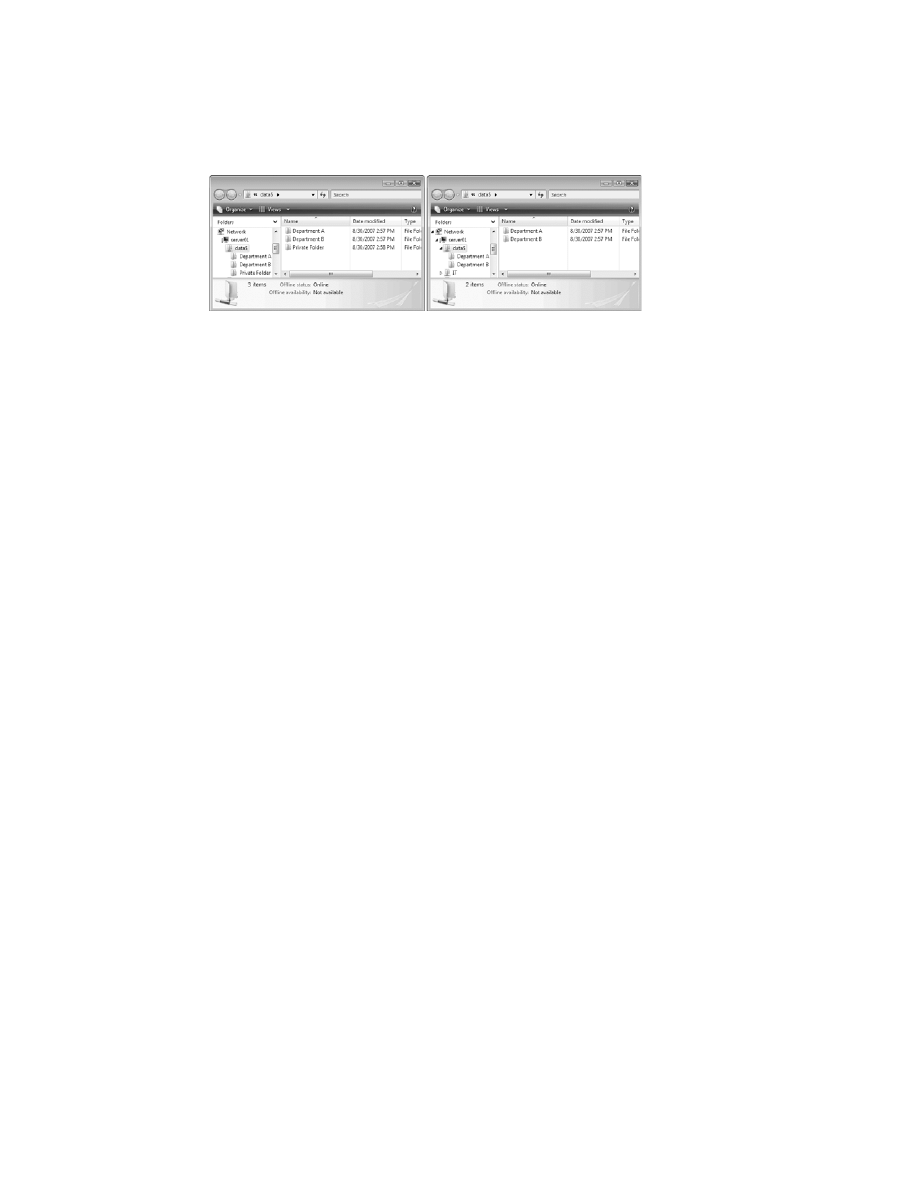
Solution Collection 2: Managing Files, Folders, and Shares
145
Figure 2-12
A share viewed without (left) and with (right) ABE enabled
Note that ABE applies to an entire share, and it applies only when the share is accessed over
an SMB connection. If James were to log on to the server with Remote Desktop and look at the
folder directly on the local file system, he would see all files and folders.
Solution summary
If you want to hide items from users, you have three options. The first is not to worry about it
and, instead, focus on ensuring that the items are properly assigned permissions to prevent
users from opening or viewing the items. The second option is to move the items to another
folder to which the user does not have access. The third—a simple and elegant solution—is to
enable ABE on shared folders. ABE will hide files and folders to which the user doesn’t have
Read access.
2-13: Determine Who Has a File Open
Solution overview
Type of solution
Script
Features and tools
VBScript
Solution summary
The FileServer_OpenFile.vbs script enables you to determine who has
a file open on a file server.
Introduction
When you administer a file server with shared resources for users, it is not uncommon for
multiple users to need a file at the same time. Some applications don’t support multiple users
opening a file concurrently. So occasionally one user will need a file and be unable to access
it, and typically that user contacts the help desk.
If the user needs the file badly enough, the help desk might need to determine who is cur-
rently accessing the file so that person can be contacted and asked to close the file.
FileServer_OpenFile.vbs, located in the Scripts folder of the companion media, enables you to
do just that.

146
Windows Administration Resource Kit: Productivity Solutions for IT Professionals
Using FileServer_OpenFile.vbs
The script requires two parameters, ServerName and FileName. ServerName is the name of the
server that contains the file—a fully qualified domain name is preferred but not required. File-
Name is any part of the file name or file path—the script performs the equivalent of a wildcard
search to locate matching files. Following is the syntax of the script:
cscript //nologo FileServer_OpenFile.vbs /server:
ServerName
/file:
FileName
Understanding FileServer_OpenFile.vbs
The script itself is straightforward and simple:
FileServer_OpenFile.vbs
sComputerName = WScript.Arguments.Named("server")
sFileName = WScript.Arguments.Named("file")
if sComputerName = "" or sFileName = "" then
WScript.Echo "Usage: cscript FileServer_OpenFile.vbs " &_
" /server:SERVERNAME /file:FILENAME"
WScript.Quit (501)
end if
Set oServer = GetObject("WinNT://" & sComputerName & "/LanmanServer")
for each oResource in oServer.resources
on error resume next
if (Not oResource.User="") AND (Not Right(oResource.User,1) = "$") Then
if Instr(1, oResource.Path, sFileName, 1) >0 then
WScript.echo "Path: " & oResource.path
Wscript.echo "User: " & oResource.user
wscript.echo "Lock: " & oResource.lockcount
Wscript.echo
end if
end if
next
First, the script parses the arguments passed to the script. If one of the arguments is missing,
the script prompts for better input.
Then the script connects to the file services (the LanmanServer service) on the server speci-
fied by the server argument. LanmanServer exposes a collection of resources—open files. We
loop through that collection looking for any resource that contains a match for the file name
provided to the script. If a match is found, the information about the matching resource is
outputted.
Solution summary
That was easy, wasn’t it? A simple script looking for a match in the resources collection of the
LanmanServer service enables us to answer the question, “Who has this file open?”

Solution Collection 2: Managing Files, Folders, and Shares
147
2-14: Send Messages to Users
Solution overview
Type of solution
Script
Features and tools
VBScript, PSExec
Solution summary
Leveraging PSExec and the Message_Notification.vbs script, you can
once again send messages to users, which is particularly useful to
notify users that a server will be taken offline.
Introduction
Back in the good old days, the Messenger and Alerter services allowed you to send a message
to a user or computer. Then some bad guys got ahold of those services and started sending my
mother messages, over her Internet connection, encouraging her to purchase their wares.
Microsoft subsequently locked down those two services so that they now do not start auto-
matically. OK, my mother probably wasn’t the only person troubled by the security vulnera-
bilities exposed by the Messenger and Alerter services, but you get the idea.
If you’re going to take a server offline or want (for some other reason) to send a network mes-
sage to users, you can no longer expect the NET SEND command to succeed, because depen-
dent services are not running. We need an alternative. In this solution, we’ll assemble tools
that allow us to notify users that they should close files that they have open from a server
before we take the server offline. The tools will also help you send network messages in any
other situation.
Using Message_Notification.vbs
On the companion media, in the Scripts folder, you’ll find a script named
Message_Notification.vbs. To use the script, enter the following command:
cscript //nologo Message_Notification.vbs /message:"
Message Text
"
[/title:"
Title Bar Text
"] [/time:[0 | n]
The message is a required parameter and must not be blank. The title parameter sets the text
of the title bar, which, if the parameter is omitted, will be Notification. The time parameter can
be zero, which causes the dialog box to appear until the user clicks the OK button, or it can be
a number representing the number of seconds to display the message. If omitted, a default of
60 seconds is used. Because of the nature of this script, you can also easily use wscript.exe to
execute the script, rather than cscript.exe.
This script can be used to create a message, but it’s not quite enough to display a message on
a remote machine. We’ll solve that problem in a moment.

148
Windows Administration Resource Kit: Productivity Solutions for IT Professionals
Understanding Message_Notification.vbs
Here is the body of Message_Notification.vbs:
Message_Notification.vbs
Const PopupOK = 0
Const PopupWarning = 48
sMessage = WScript.Arguments.Named("message")
sTitle = WScript.Arguments.Named("title")
iWait = WScript.Arguments.Named("time")
if sMessage = "" then WScript.Quit(0)
if sTitle = "" then sTitle = "NOTIFICATION"
if iWait = "" then iWait = 60
Set WSHShell = CreateObject("WScript.Shell")
Call WSHShell.Popup (sMessage, iWait, sTitle, PopupWarning + PopupOK)
The script is a simple wrapper around an existing method of the Shell object: a method called
Popup. The Popup method creates a dialog box that can have a title bar, message, buttons (such
as OK, or Yes and No, or Retry and Cancel), and an icon (stop sign, question mark, exclama-
tion point, or information mark). The dialog box can be set to time out so that after a specific
time it disappears. Or you can configure the message to wait for user input. The Popup dialog
box can also hold more than 1023 characters (the limit of messages produced by the MsgBox
statement). This makes Popup an ideal candidate for communicating a message to a user in
many situations.
In this particular script, we define the button that will be available (the OK button) and the
icon (an exclamation point) at the beginning of the script. The script’s arguments are then
located and processed: If the message is empty, the script exits; if either of the other two argu-
ments are missing, the values are set to defaults. Then a reference to the Shell object is created,
and the Popup method is called.
If you want to adapt this script for popup messages with other buttons or icons, see the doc-
umentation of the Popup method at http://msdn2.microsoft.com/en-us/library/x83z1d9f.aspx.
Using PSExec to execute a script on a remote machine
To send a message to a remote computer, we’ll use PSExec to execute our
Message_Notification.vbs script on the remote system. This requires you to be an administra-
tor of the remote system and to be able to connect to the remote system (ports 445 and 139
must be open).
Solution Collection 2: Managing Files, Folders, and Shares
149
Note
I am sure I’m not the only one who tests scripts on virtual machines. To save you the
pain I encountered, let me warn you: This script does not seem to work when sending a notifi-
cation to a Windows Vista installation within VMware Workstation 6.0. There appears to be a
problem rendering the Popup message, so the script appears in the task bar or only the title
bar appears. The script runs perfectly against Windows XP within VMware Workstation 6.0, and
against Windows Vista on a physical box. So please don’t bang your head against a wall (or e-
mail me) if you have challenges in a virtual environment with testing this script.
Place the Message_Notification.vbs script in a shared folder on a server so that it can be
accessed from the remote computer. Then use the following command:
psexec.exe \\
computername
–i –u
DOMAIN\username
–p
Password
–d wscript.exe
"\\
server
\
share
\
path
\message_notification.vbs" /message:"
Message
"
[/title:"
Title
"] [-time:0|n]
That’s a lot of switches! Let’s examine each:
\\computername
This specifies the computer on which to execute the script. The popup
message will appear on this computer.
-i
The script runs under credentials that are for an administrator on the machine, but you
want the message to appear to the currently logged-on user. The –i switch enables the
process to interact with the user’s session.
-u DOMAIN\username
and
–p Password
These two switches provide the credentials with
which to execute the process. The credentials must be for a member of the local Admin-
istrators group on the remote computer. This member also must have read permission
to the script in the network shared folder. You must provide credentials explicitly
because you are passing the credentials to the remote system, which must then reuse
those credentials to access the network.
-d
The -d switch instructs PSExec not to wait for the process to complete. This prevents
PSExec from waiting for the amount of time specified and also prevents interference if
the script does not run on the target computer.
wscript.exe
PSExec launches the process wscript.exe on the remote machine. Because
wscript.exe is in the command path of Windows systems, no path is required. We’re
using wscript because if we use cscript, a black command-prompt window opens, which
is not the aesthetic effect we want.
"\\server\share\path\message_notification.vbs"
This is the UNC to the script that will be exe-
cuted by wscript.exe.
The remainder of the switches are arguments for the script, which were described earlier in
this solution.
As a result of combining PSExec with a simple VBScript wrapper around the Shell object’s
Popup method, we have a useful replacement for the NET SEND command! And because

150
Windows Administration Resource Kit: Productivity Solutions for IT Professionals
PSExec does its work securely and requires local administrative credentials on the remote
machine to execute, it’s a reasonably robust and secure solution!
Listing the open sessions on a server
Now that we have a tool with which to send a network message, we simply have to identify
which users to notify. In the previous Solutions Collection, we examined a script that looked at
the open files on a server using the LanmanServer’s resources collection. LanmanServer also
has a collection for open sessions, which can be enumerated by the following code:
sComputerName = "SERVER02.contoso.com"
Set oServer = GetObject("WinNT://" & sComputerName & "/LanmanServer")
for each oSession in oServer.sessions
wscript.echo "User: " & oSession.user
wscript.echo "Computer: " & oSession.computer
next
Using this approach, we are able to identify the computer from which each user has con-
nected to the server. That is the computer to which we send our notification.
Using and customizing FileServer_NotifyConnectedUsers.vbs
By combining the code just shown that finds which computers are connected to a server with
our PSExec command that launches the Message_Notification.vbs script, we are able to create
the solution we require. The result is FileServer_NotifyConnectedUsers.vbs in the Scripts
folder on the companion media.
Before you use the script, be sure to modify the configuration block with the path to
Message_Notification.vbs and the path to PSExec.exe. (No path is required if PSExec.exe is in
the same folder as the FileServer_NotifyConnectedUsers.vbs script.) You can also modify the
title bar text and timeout that is used for the notification message.
The syntax used to run the script is as follows:
cscript FileServer_NotifyConnectedUsers.vbs /user:
DOMAIN
\
username
/password:
password
/server:
SERVERNAME
/message:"
Message to send to users
"
The username and password provided must be for an administrator on all systems to which
messages will be sent. If it is not, those systems will not receive notifications, but the script will
continue. The server name you provide points to the server that will be analyzed for open ses-
sions. The message is what you want to communicate to users connected to the server.
The script determines which computers have open sessions with the server, and then it sends
the specified message to each computer. As it does so, the script reports each computer name.
Some computers might not respond as quickly as others—give the script time to execute.

Solution Collection 2: Managing Files, Folders, and Shares
151
The result is a reasonable effort to notify users. There is no guarantee that the user is paying
any attention. Nor is there a guarantee that PSExec will be able to connect to each computer
and successfully run the script. Firewall and other issues can prevent connections. The same
concerns were characteristic of the old NET SEND notifications.
Solution summary
It is common for network administrators to need to send a message to users. E-mail is an
option, assuming users are checking their Inboxes. But there’s nothing like a popup message,
right in the middle of the desktop, to catch a user’s attention. This solution leveraged a simple
VBScript wrapper around the Shell object’s Popup method and an incredibly useful tool,
PSExec.exe, to execute that script on a remote machine.
In the event that you must take a server offline, you can notify all connected users of the
impending change by running FileServer_NotifyConnectedUsers.vbs. This script identifies all
open sessions on the server and then automates the execution of PSExec to run the notifica-
tion script on the computer of each connected user.
2-15: Distribute Files Across Servers
Solution overview
Type of solution
Command and procedure
Features and tools
schtasks.exe, robocopy.exe, DFS-Replication, SMB (Share)
permissions
Solution summary
Create a master/mirrors topology to distribute files from a single
(master) source to multiple (mirror) destinations using Robocopy or
DFS Replication.
Introduction
In a distributed organization, it is often necessary to distribute files to servers that are local to
users. For example, you might need to copy a folder that contains drivers or applications to
servers in branch offices; or you might need to distribute commonly accessed corporate doc-
uments to multiple servers. In such scenarios, organizations often desire a single-source model,
where changes made to a folder in one location are distributed but changes cannot be made to
the distributed copies. We’ll refer to the single source as the master and to the distributed cop-
ies as mirrors. We’ll solve the problem two ways: using Robocopy and using DFS Replication.
Using Robocopy to distribute files
Robocopy.exe is available in the native, out-of-box toolset for Windows Vista and Windows
Server 2008. It is a resource kit utility for previous versions of Windows. Many organizations

152
Windows Administration Resource Kit: Productivity Solutions for IT Professionals
have leveraged Robocopy to distribute or replicate files. Here is the most straightforward syn-
tax for mirroring a folder to another location:
robocopy.exe
Source
Destination
/copyall /mir
The source and destination parameters are the paths to the source and destination folders.
You’ll typically execute Robocopy on the source server, so the source parameter will be a local
path and the destination will be a UNC, but both paths can be either local or UNC paths, as
appropriate. The /copyall switch specifies that all file attributes—including security, auditing,
and ownership—should be copied. The /mir switch directs Robocopy to mirror the source
folder: Any file that is newer in the source will overwrite an older file in the destination; files
that are missing in the destination are added; and any file that exists in the destination but not
in the source will be deleted.
To create a master/mirror file distribution topology, simply create a scheduled task to execute
the Robocopy command at a desired repetition interval. The schtasks.exe command can be
used as follows:
schtasks.exe /create /RU
DOMAIN\Username
/RP
password
/TN
TaskName
/TR
"robocopy.exe
source destination
/copyall /mir" /sc MINUTE /mo
Interval
The domain username and password are used to execute the Robocopy task. They must have
NTFS Full Control permission on the source and destination folder and files. The taskname is
a friendly name for the scheduled task. The interval is the number of minutes between repeti-
tions. From a command prompt, type schtasks.exe /create /? for more detail about the
parameters available for the schtasks command.
To ensure that the source (the master) is the only location where files can be added for distri-
bution, you must use share permissions to control access. You should not use NTFS permis-
sions because Robocopy replicates NTFS permissions to the mirrors. Instead, on the mirrors,
configure share permissions so that only the account used by the scheduled task has Full Con-
trol. All other users requiring access to the mirrors should have Read share permission. The
schtasks.exe account and other users requiring access to the master should have Full Control
share permission on the master. Because a user’s effective access is the most restrictive combi-
nation of NTFS permissions and share permissions, users who can create, change, or delete
files based on their NTFS permissions will be able to do so only on the master share.
Using DFS Replication to distribute files
DFS Replication (DFS-R), introduced in Windows Server 2003 R2, provides highly efficient
and manageable replication, leveraging differential compression and bandwidth controls to
ensure that replication of data has as small an impact on the network as possible.
One of the common misconceptions about a hub-and-spoke replication topology for DFS-R is
that it provides a master/mirror functionality. That is not the case. With a hub-and-spoke

Solution Collection 2: Managing Files, Folders, and Shares
153
topology, changes made at a spoke are replicated to the hub and then replicated to other
spokes. To create a master/mirror topology, you start by creating the DFS-R topology, and
then you change share permissions. The steps are as follows:
1. Open the DFS Management console.
2. Select and expand the Replication node.
3. Right-click Replication and choose New Replication Group.
4. The New Replication Group Wizard appears.
5. On the Replication Group Type page, select Multipurpose Replication Group. Click
Next.
6. On the Name And Domain page, enter a name for the replication group, such as Master-
Mirror File Distribution. Optionally, enter a description. Click Next.
7. On the Replication Group Members page, click the Add button and enter the name of
the master server. Click OK. Repeat the process for each mirror server. Click Next after
all servers are listed in the Members box.
8. On the Topology Selection page, select Hub And Spoke if you have at least three mem-
bers. If you have two members, select Full Mesh. Then click Next. If you are using Full
Mesh topology, skip to step 11.
9. On the Hub Members page, select the master server from the Spoke Members list and
click the Add button to move the master server to the Hub members list. Click Next.
10. Accept the defaults on the Hub And Spoke Connections page, and click Next.
11. On the Replication Group Schedule And Bandwidth page, you can accept the default
bandwidth (Full), or you can configure the bandwidth utilization for the replication.
Remember that DFS-R is a highly efficient replication mechanism, so even at Full band-
width usage it is unlikely that all available bandwidth will be used when replication
occurs. Click Next.
12. On the Primary Member page, select the master server and click Next.
13. On the Folders To Replicate page, click the Add button and enter the path to the folder
you want to replicate. All subfolders will be included in the replication. Optionally, give
the folder a custom name, and then click OK. Repeat this step for each folder you want
to replicate. Then click Next.
14. On the Local Path Of Shared Data On Other Members page, select the first mirror
server, click Edit, and select Enabled. Enter the path to the folder on that server, and
click OK. Repeat for each mirror server. Then click Next.
15. Review the settings you have configured.
16. Click Create.

154
Windows Administration Resource Kit: Productivity Solutions for IT Professionals
17. Confirm that the tasks completed successfully.
18. Click Close to close the New Replication Group Wizard.
On the master, ensure that share permissions allow Full Control for all users who might
require access to the folder. On the mirrors, users who might require access to the mirrors
should be allowed only Read permission on the share. Unlike Robocopy, which uses an
account to copy files between shared folders, DFS-R is a service, so no other changes to share
permissions are required.
Important
The process just described is the supported method to create one-way replica-
tion, from the master to the mirror. Numerous Web sites recommend deleting replication con-
nections. This is not recommended, as it can have unintended side effects on DFS-R. Microsoft
does not support deleting replication connections.
Solution summary
Using a scheduled task that executes Robocopy, or using DFS-R, you can replicate files from
a master to mirrors of a shared folder. To ensure that changes cannot be made directly to the
mirrors, use share permissions on the mirrored copies that enable only Read access. NTFS
permissions should not be modified on the mirrors, as the master’s NTFS permissions will be
replicated out to the mirrors and will thus override any modifications you might have made.
Deleting DFS-R links is also not recommended.
2-16: Use Quotas to Manage Storage
Solution overview
Type of solution
Guidance
Features and tools
Quotas
Solution summary
Understand changes to the quota management capabilities of
Windows Server 2008.
Introduction
The quota management capability of Windows servers was overhauled in Windows Server
2003 R2. Like that predecessor, Windows Server 2008 enables a powerful, flexible, and effec-
tive set of features for monitoring or enforcing storage utilization. This solution provides an
overview of Windows quota management and highlights key concepts and tricks. Refer to the
Help and Support Center for detailed documentation regarding quota management.

Solution Collection 2: Managing Files, Folders, and Shares
155
What’s new in quota management
The following discussion highlights changes to quotas compared to Windows Server 2003
and Windows 2000. No changes in functionality have been introduced since Windows Server
2003 R2.
Perhaps the most significant change is that quotas can now be enforced at the folder level as
well as the volume level, and when a folder quota is configured, all users are subject to the
quota. In other words, if you specify that the Marketing folder’s quota is 100 MB, that is the
maximum storage allocated to that folder, regardless of who has created files in the folder. As
soon as 100 MB of data is in the folder, the next user who attempts to create a new file in the
folder will be denied access.
The quota is also now based on the physical disk usage rather than the logical disk usage. So
if a file is compressed using NTFS compression, the resulting (compressed) size counts
against the quota.
Quota behavior is very flexible. Quotas can be defined as hard quotas, which prevent all users
from adding data once the quota is reached, or soft quotas, which continue to allow data to be
added to a folder that has reached its quota but can be used to monitor storage utilization.
Each quota can have multiple notification thresholds, which define what happens at specific
percentages of the quota. And at each threshold, one or more of the following actions can be
triggered:
E-mail Message
An e-mail message can be sent to one or more administrators and/or to the
user whose modifications to the folder caused the threshold to be breached. The mes-
sage to the user is definable and can include a number of variables.
Event Log
A warning can be added to the event log. As with the e-mail message, you can
define any text for the warning, and several variables can be included to ensure a
detailed and understandable log entry.
Command
You can configure a threshold to execute any command. This makes the quota
actions infinitely extensible.
Report
Storage utilization reports can be generated and sent by e-mail to administrators
and/or to the user who exceeded the threshold. Reports are also saved in the %system-
drive%\StorageReports\Incident folder on the server.
Quota templates
Although Windows’ quota management functionality offers innumerable options for configu-
ration, the chances are very good that you’ll determine a small number of configurations that
are desirable for quota management in your enterprise. You can decide, for example, that a
departmental folder will have a certain quota, and, when 85 percent of the quota is reached,
users will begin to receive e-mail messages instructing them to remove outdated files and
administrators will be notified that the folder is nearing capacity. When 100 percent of the
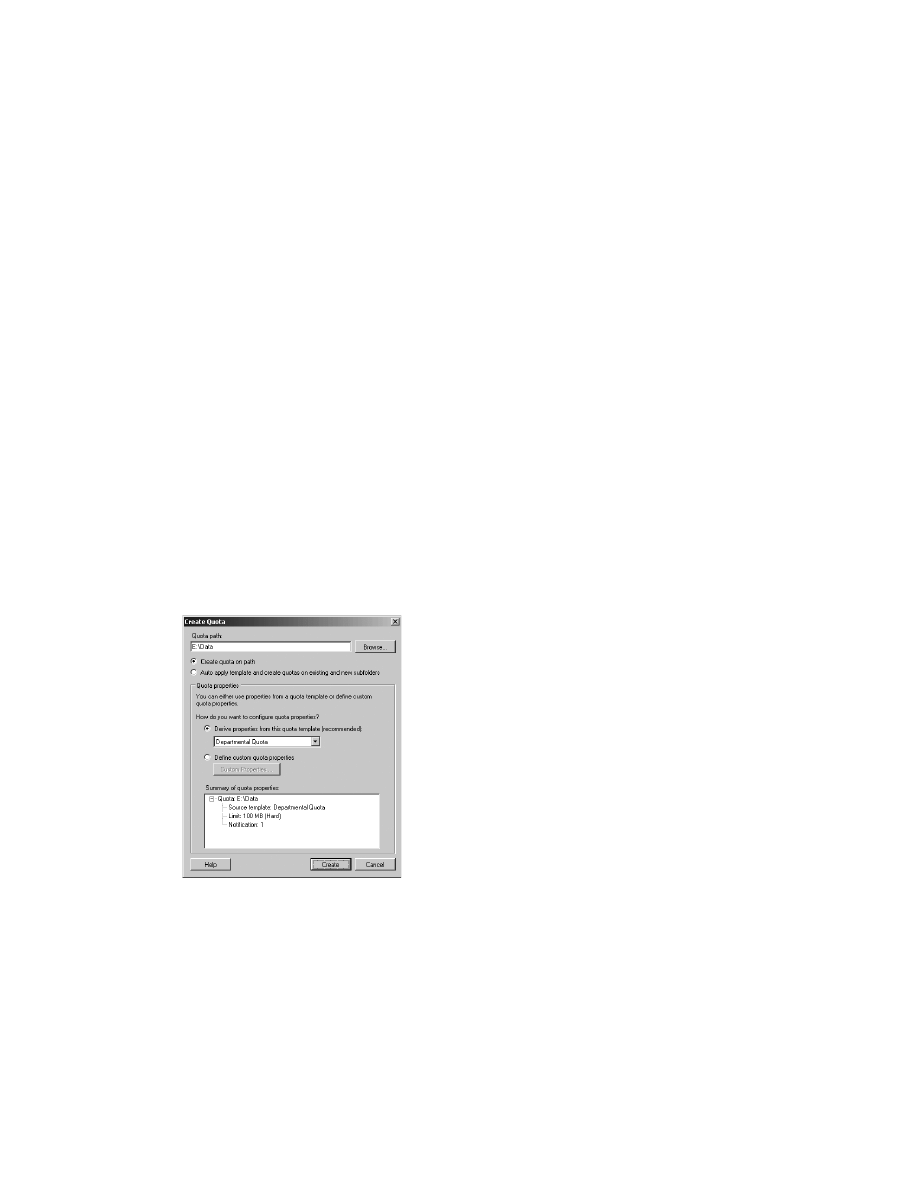
156
Windows Administration Resource Kit: Productivity Solutions for IT Professionals
quota is reached, you can disallow further additions of files. You can define other configura-
tions for a handful of various storage scenarios in your organization.
To implement your quota design decisions, you should create quota templates. A handful of
default quota templates are available initially. You can create new templates in the File Server
Resource Manager snap-in. Expand Quota Management, select and then right-click Quota
Templates, and choose Create Quota Template. The new template can start as a copy of an
existing template, or you can create all properties from scratch. Name the template, and spec-
ify the maximum size of the quota. Configure the quota as hard or soft, and then add notifi-
cation thresholds. For each threshold, configure the e-mail messages, log entry, command, or
reports to be triggered.
After you’ve defined a quota template, you’ll apply that quota template to folders. You are
likely to want to use similar quota templates across multiple servers. Use the dirquota.exe
command with the /export and /import switch to transfer quotas between systems.
Apply a quota to a folder
After you’ve created the appropriate quota templates, you can create quotas for specific paths.
Select and right-click the Quotas node in the Quota Management branch of the File Server
Resource Management snap-in. Choose Create Quota. Enter the path to which you want to
apply the quota: It can be to a folder or an entire volume. Then select your template from the
drop-down list in the middle of the Create Quota dialog box, as shown in Figure 2-13.
Figure 2-13
The Create Quota dialog box
Note that you are allowed to define a custom quota in the Create Quota dialog box, but by
using quota templates you are able to manage quotas more effectively than using a one-off
approach. In addition to simplifying the application of quota properties, quota templates also
give you long-term flexibility. If you modify the properties of a quota template, all folders to
which that template was applied are immediately updated to reflect the changes you have made.

Solution Collection 2: Managing Files, Folders, and Shares
157
The Create Quota dialog box has an Auto Apply Template option. This option is particularly
useful when you have a top-level folder (typically with no quota) that will contain subfolders
and, as each subfolder is created, you want to automatically apply a specific quota to the new
subfolder. Consider a scenario in which a departmental folder will have subfolders for func-
tions or teams within the department. You want each subfolder to have a specific quota. This
option supports that goal. Another common scenario for this option is user data folders: A
root folder exists above folders for each user. As user data folders are created, you want to
apply a specific quota to them. This Auto Apply Template option will be discussed in detail in
Solutions Collection 3, “Managing User Data and Settings.”
Solution summary
Windows Server 2003 R2 completely revamped the quota management capability of the
Windows Server product line. You can now configure storage allocation using quotas that
support threshold-based actions such as e-mail notification, event log entries, report genera-
tion, and command execution. Quotas are applied to a folder, rather than to a user, and quota
templates provide a single point of management for defining and revising quota properties.
2-17: Reduce Help Desk Calls to Recover Deleted or
Overwritten Files
Solution overview
Type of solution
Guidance
Features and tools
Shadow Copies of Shared Folders
Solution summary
Enable Shadow Copies, and provide users a method to recover previ-
ous versions of files in shared folders.
Introduction
When a user accidentally deletes or overwrites a file, the support intervention that is required
can be significant—locating a backup, mounting the backup, and retrieving the file. Windows
Server 2003 introduced the Shadow Copies of Shared Folders feature, which enables point-in-
time snapshots of disk volumes, and the Previous Versions client, which allows users to
restore files from those snapshots without administrative intervention.
The underlying Shadow Copies technology is important to understand in detail, so I recom-
mend that you read the following Microsoft documentation:
■
Feature documentation: http://technet2.microsoft.com/windowsserver/en/library/
77a571cc-a360-468a-ad99-6c80049530db1033.mspx?mfr=true
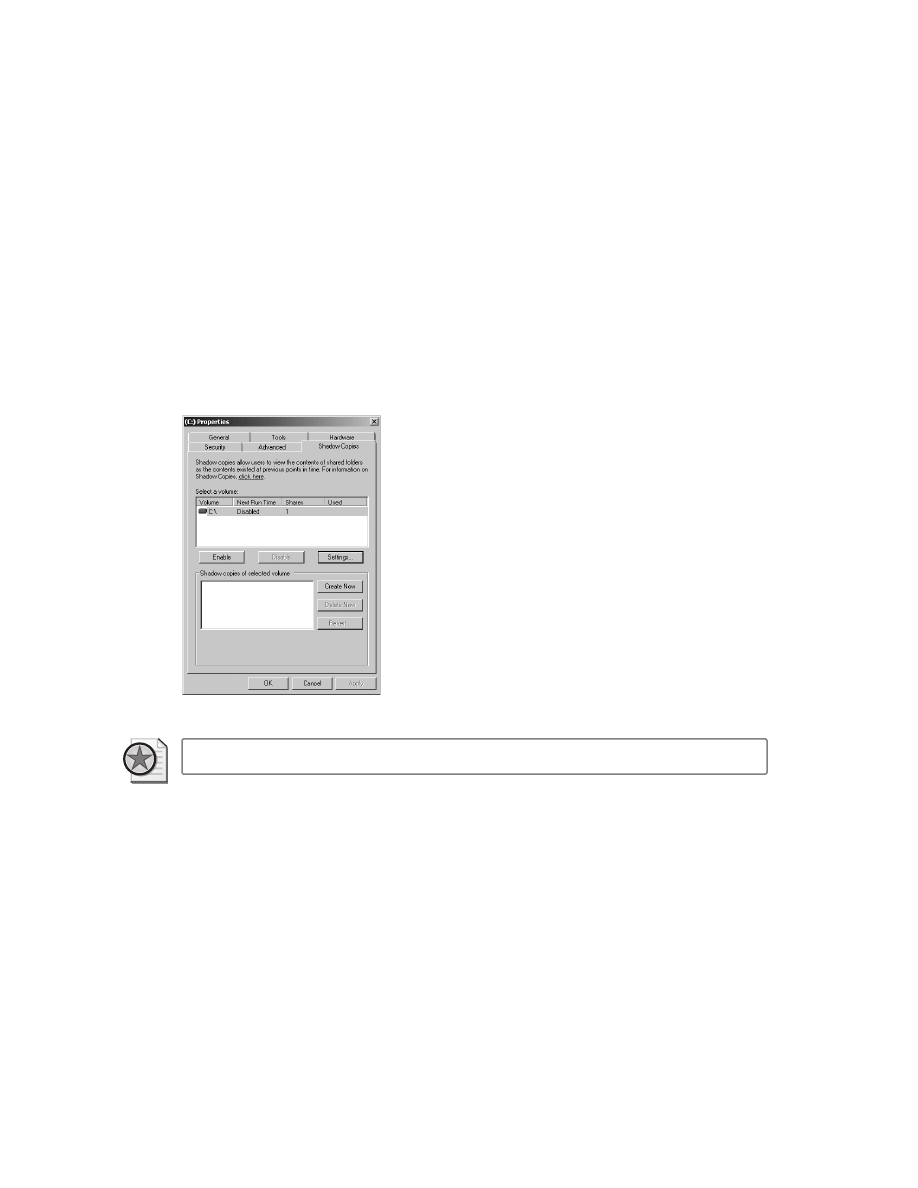
158
Windows Administration Resource Kit: Productivity Solutions for IT Professionals
■
Technical reference: http://technet2.microsoft.com/windowsserver/en/library/
2b0d2457-b7d8-42c3-b6c9-59c145b7765f1033.mspx?mfr=true
■
White paper: http://www.microsoft.com/windowsserver2003/techinfo/overview/scr.mspx
This solution provides guidance in specific areas to help you align the feature with your busi-
ness requirements.
Enabling shadow copies
Shadow copies must be enabled on Windows servers—they are not enabled by default. The
feature is enabled per volume, not per folder or share. On the Shadow Copies tab on a vol-
ume’s Properties dialog box, shown in Figure 2-14, click the Settings button.
Figure 2-14
The Shadow Copies tab of the volume Properties dialog box
Best Practices
Do not click the Enable button.
The Enable button is a quick fix. It configures Shadow Copies with all default settings, and the
default settings will not be appropriate for every scenario. Instead, click the Settings button.
The Settings dialog box appears, as shown in Figure 2-15. After you configure the settings and
click OK in the Settings dialog box, you simultaneously enable shadow copies and enforce
your specific settings.
A shadow copy requires a storage area, which does not have to be on the same volume for
which you are enabling shadow copies. In fact, it is a best practice to locate the shadow copy
storage area on another volume that, itself, is not being shadow copied.
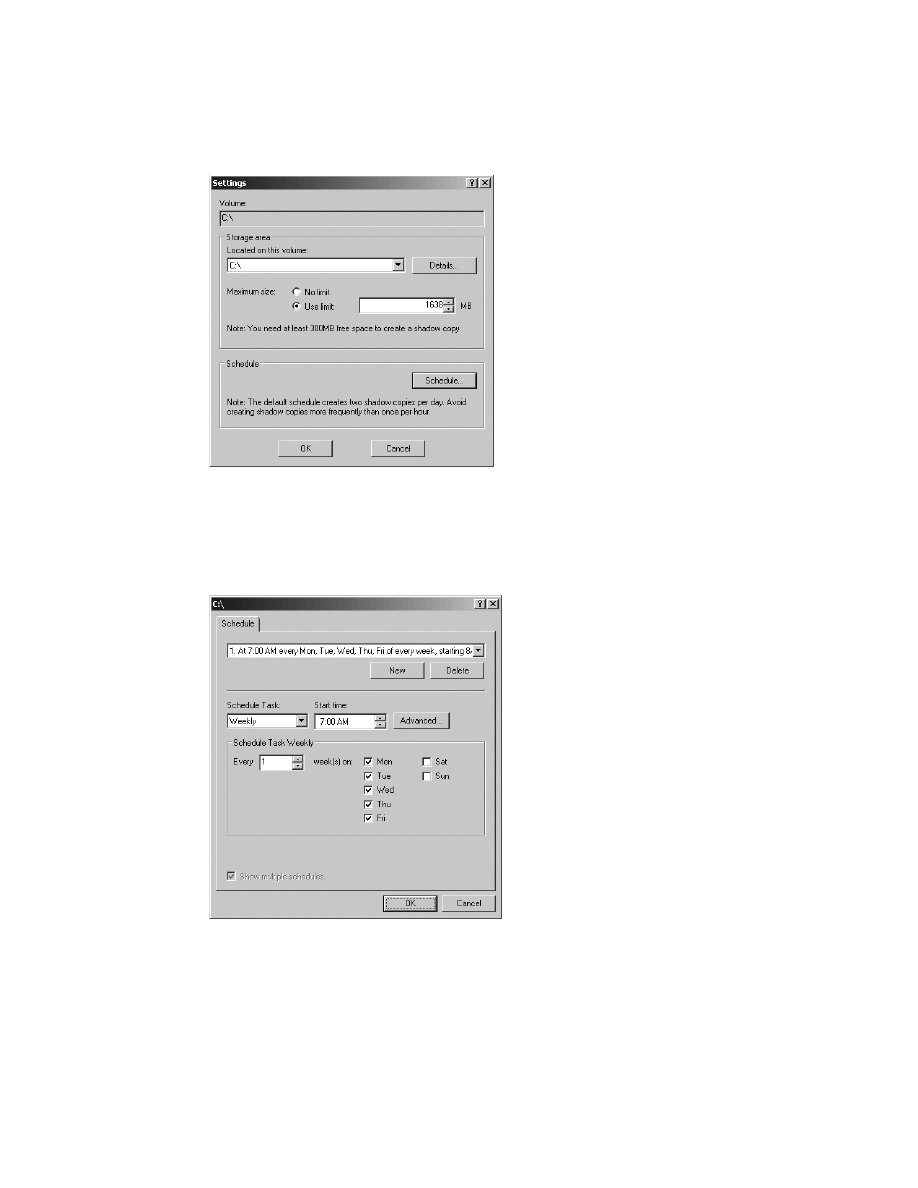
Solution Collection 2: Managing Files, Folders, and Shares
159
Figure 2-15
The Shadow Copies Settings dialog box
Click the Schedule button in the Settings dialog box to modify the schedule of shadow copies,
also called snapshots. Using the Schedule tab, shown in Figure 2-16, you can configure multi-
ple schedules. For example, you might create a snapshot at the end of each day, plus a snap-
shot at lunch time during weekdays.
Figure 2-16
Shadow Copies Schedule dialog box

160
Windows Administration Resource Kit: Productivity Solutions for IT Professionals
Understanding and configuring shadow copies
The art and science of configuring shadow copies is detailed in the Microsoft references listed
earlier. It boils down to balancing the desired functionality—specifically, a user’s ability to
restore a file—with performance and storage. We’ll discuss how a user restores a previous ver-
sion later in this solution, but to summarize, a user is able to restore a version as of the last
snapshot time. Not every change or version is available to restore—only versions captured at each
scheduled snapshot are available.
You might think to yourself, “I should configure frequent snapshots, then.” But not so fast!
You must also consider performance and storage. First, the good news: When a snapshot is
created, Windows does not create a copy of the entire volume at that moment in time. Each
shadow copy does not take an amount of storage equivalent to the size of the volume. Instead,
a snapshot in effect freezes a volume’s current state and creates a cache (in the snapshot stor-
age area) for the snapshot. From that point forward, when a change needs to be written to the
disk, the Volume Shadow Copy Service (VSS) intercepts the change and, before writing the
change to the disk, takes what is currently on the disk and moves the information into the
cache of the most recent snapshot. Then the new information is written to disk. So if snap-
shots are scheduled at 7:00 a.m. and 12:00 p.m., all changes written to the disk between
7:00 a.m. and 12:00 p.m. are intercepted, the current data (that existed at 7:00 a.m.) is moved
into the storage area for the 7:00 a.m. snapshot, and then the change is made. The changes are
at the block level, so they can be very efficient, depending on the application that is making
the change to the disk. So the size of a snapshot reflects the amount of disk activity between
the snapshot and the next snapshot.
Now, the bad news. You can maintain a maximum of 64 snapshots. So if you take one snap-
shot a day, you could possibly maintain 64 days worth of snapshots. On the sixty-fifth day, the
first (oldest) snapshot would be deleted to make room for the next. A snapshot every three
hours would mean eight per day, so you could possibly maintain eight days worth of snap-
shots. I say “possibly” because the amount of activity could be such that the storage area fills
up before the sixty-fourth snapshot is taken. When the storage area fills, the oldest snapshot
is removed. Now, perhaps, you can see the need for art and science to determine your snap-
shot schedule.
There are some additional guidelines I’d like to highlight:
■
Select a volume that is not being shadow copied for the shadow copy storage area when-
ever possible, and particularly on heavily used file servers.
■
Mount points and symbolic links (folders that expose data that is in another location)
are not included in shadow copies. You must enable shadow copies on the volumes that
host the data that is being mounted or linked to if you want to use the shadow copy fea-
ture on that data.
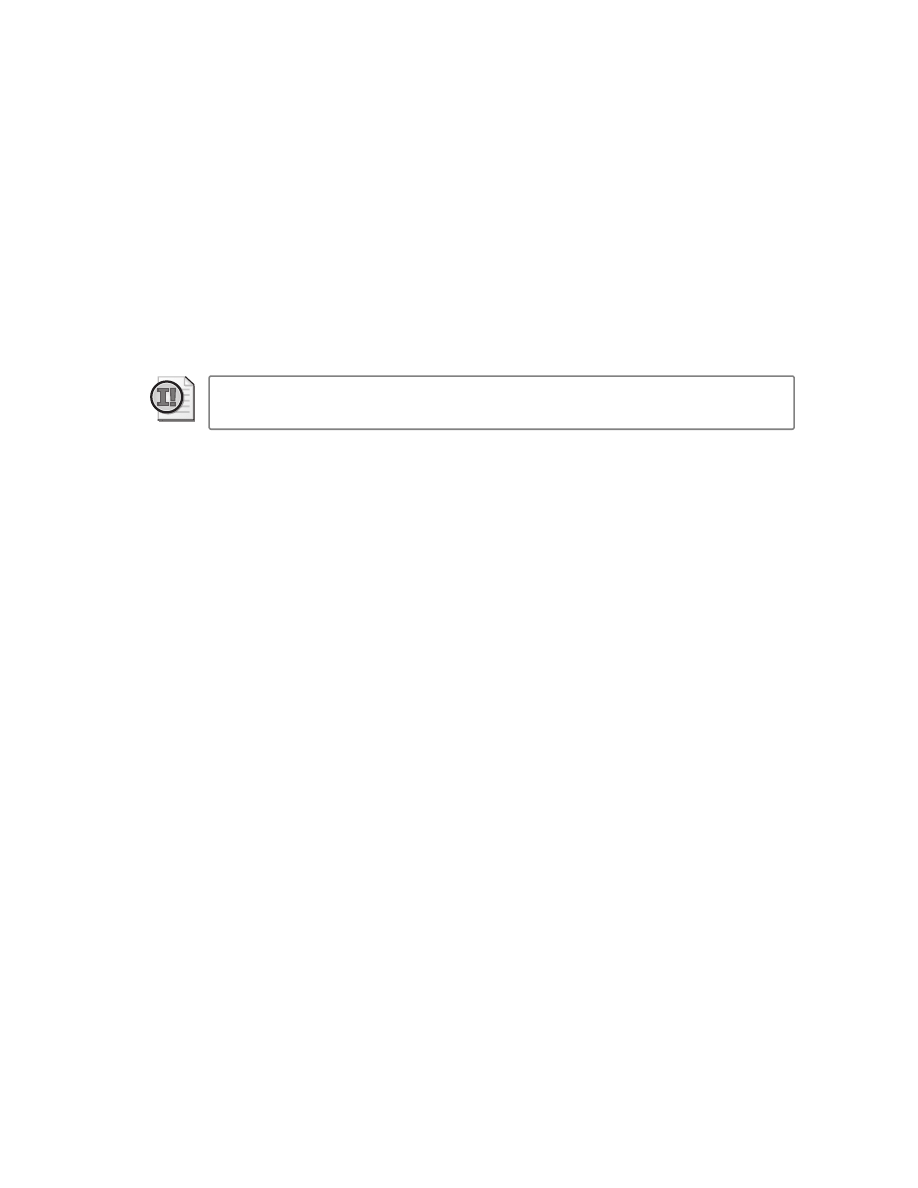
Solution Collection 2: Managing Files, Folders, and Shares
161
■
Do not schedule copies more than once per hour, as it will have an impact on
performance.
■
If a volume will use the shadow copy service, format the source volume with an alloca-
tion unit size of 16 KB or larger. The shadow copy service stores changes in 16-KB
blocks. Smaller allocation unit sizes will lead to inefficient storage. This is particularly
important if you regularly defragment the volume. Sadly, this 16-KB cluster size recom-
mendation means you cannot use NTFS compression on the volume. NTFS compres-
sion cannot be used with an allocation unit size larger than 4 KB. Put simply, format
your volumes with 16-KB clusters and forget NTFS compression. Sorry for the bad news.
Important
Shadow Copies of Shared Folders (Previous Versions or snapshots) should not
be considered as an alternative to a comprehensive backup and recovery strategy.
Because shadow copies are not maintained indefinitely, you should use shadow copies only
for these purposes:
■
Recovering a file that was accidentally deleted
■
Recovering a file that has been overwritten
■
Comparing a version of a file to a recent version captured by a snapshot
Make sure you have designed, implemented, and (most importantly) validated your server
backup and recovery procedures.
Accessing previous versions
To access previous versions of files for the purposes just listed, you must use the Previous Ver-
sions client, also known as the Shadow Copies client. The client is built in to Windows XP SP2
and later. It is available from the Microsoft Web site for download to Windows 2000 and
Windows XP clients. It is also found in the %systemroot%\System32\Clients\Twclient folder
on a Windows Server 2003 or Windows Server 2008 server.
Clients work differently on various versions of Windows. Windows Vista and Windows
Server 2008 allow you to go to the properties of any file and click the Previous Versions tab, as
shown in Figure 2-17.
If a previous version exists, it will be listed. You can then click Open to open the file in its
default application, or you can right-click the file to select an application with which to open
the file. This allows you to view the file, and, of course, you could use the application to save a
copy of the file to a specific location. From the Previous Versions tab, you can also click Copy
to copy the file to a specific location. Finally, you can click Restore to restore the version to the
original location, thereby restoring a deleted file or overwriting the current version.
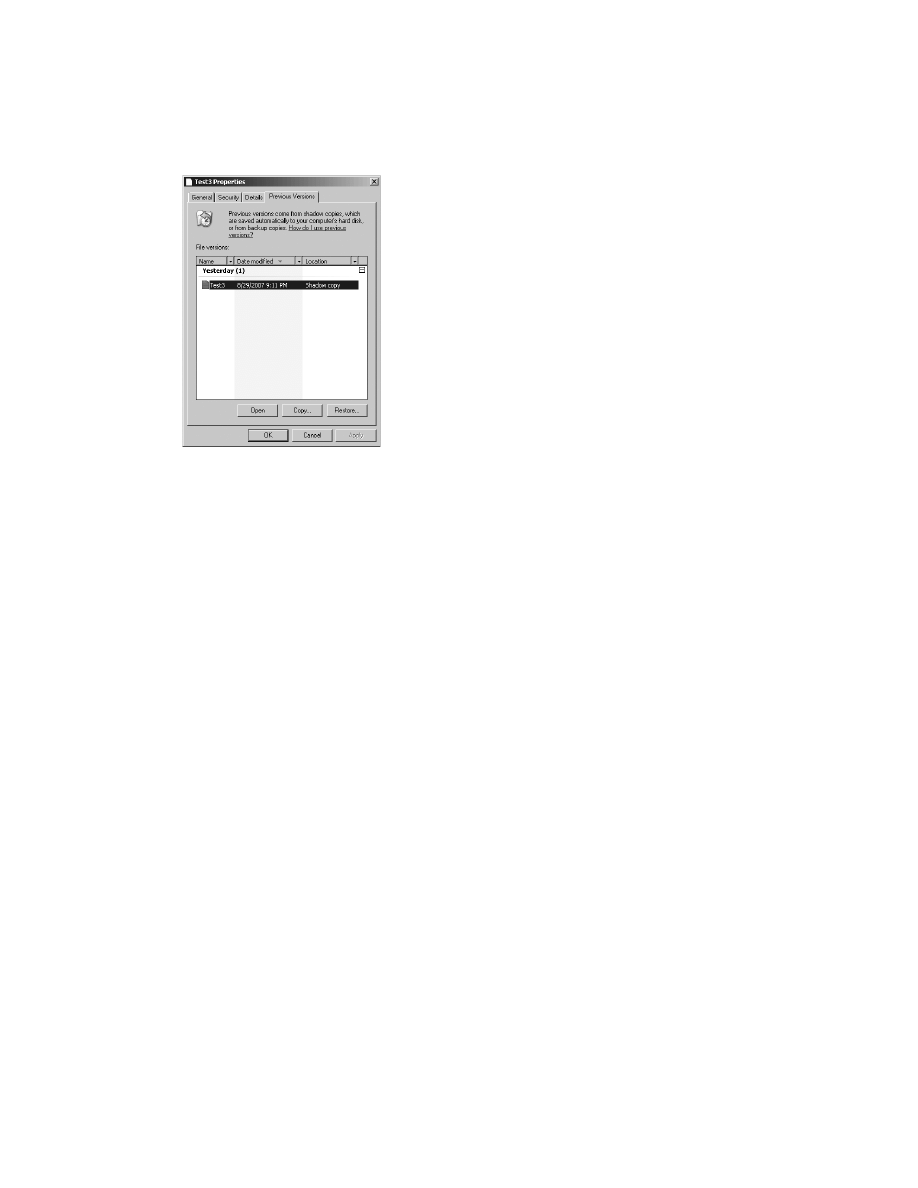
162
Windows Administration Resource Kit: Productivity Solutions for IT Professionals
Figure 2-17
The Previous Versions tab of a file’s Properties dialog box
Windows 2000, Windows XP, and Windows Server 2003 support accessing previous versions
only through a shared folder. If you have opened a folder using a UNC—that is, \\server\share\
[path]—you can go to the properties and see Previous Versions. You can then perform the
actions described previously. You cannot get to Previous Versions from the properties of a
local file on Windows 2000, Windows XP, or Windows Server 2003.
Here are some notes about Previous Versions:
■
If a file has not changed since the first snapshot, you will not see any previous version
listed. Recall that shadow copies works when changes are made after a snapshot. So only
files that have been changed at least once since the first snapshot will have previous ver-
sions listed.
■
If you rename a file, it will no longer display its previous versions.
■
When you restore a file, you are not restoring the permissions of the file. If you are restor-
ing a deleted file, it will inherit its ACL from the parent folder. If you are restoring a file
over the current version, it will use the ACL of the current version.
Solution summary
Caveats and all, Shadow Copies of Shared Folders is a fantastic feature to address the solution
we’re discussing: reducing help desk calls that result from a deleted or overwritten file. Spend
time reading Microsoft’s documentation so that you can configure shadow copies effectively
on your servers, deploy the Previous Versions client to any computers running Windows XP
SP1 or earlier, and communicate to users the process with which to restore previous versions.

Solution Collection 2: Managing Files, Folders, and Shares
163
2-18: Create an Effective, Delegated DFS Namespace
Solution overview
Type of solution
Guidance
Features and tools
DFS Namespaces
Solution summary
Address business and technical intricacies of DFS namespace design.
Introduction
If you are familiar with the DFS Namespaces feature, you can skip this overview. If you are not,
let me introduce you to DFS Namespaces, a component I like to call “The Role Service Previ-
ously Known as Distributed File System (DFS) and Known Before That as Distributed File
System (Dfs).”
As you’ll discover in this solution, the benefits provided by the DFS Namespaces feature make
it as close to a no-brainer solution as anything Microsoft has provided. DFS Namespaces—and
DFS before it, and Dfs before it—have, since Windows NT 4.0, provided the capability to
abstract the physical location of files and folders from any pointer to those resources.
The fundamental challenge is that if you have a pointer—such as a shortcut, mapped drive, or
other UNC to a share, folder, or file—it takes the form \\server\share\[path]\[file]. If you
restructure the physical storage of the file in any way, such as change the share name or move
the folder tree to another share or server, you have to reconfigure the shortcut, mapped drive,
or other UNC pointer. If there are numerous pointers, the management headaches increase
exponentially. In a business of any size whatsoever, if data is moved between servers, it takes
a mammoth effort to reconfigure everything that refers to the files and folders and shares.
DFS Namespaces solves this problem by creating a separate namespace—a folder hierarchy
that can present enterprise resources in a logical, rather than physical, structure. For example,
you might choose to represent the path to the Marketing department share as
\\contoso.com\departments\marketing. Each folder in the DFS Namespace is a virtual
entity. It points to, or refers to, the physical location of the folder. So the \\contoso.com\
departments\marketing folder in the DFS namespace refers to the current location of the
folder, \\server01\data$\marketing. All other references to the marketing folder—mapped
drives, shortcuts, links between files, and so on—will use the DFS namespace. When a
Windows client requests \\contoso.com\departments\marketing, the DFS client (built in to
every recent version of Windows) contacts a DFS Namespace server. The DFS namespace
server refers the client to the current location of the folder, and the client then connects to that
server. All of this happens transparently to the user.
If the marketing folder is moved to server02, the only change that must be made is to the ref-
erence of the DFS namespace folder, pointing it now to \\server02\data$\marketing. Clients

164
Windows Administration Resource Kit: Productivity Solutions for IT Professionals
will continue to request \\contoso.com\departments\marketing, but now they will be
referred to the new location.
Because the physical location of resources is abstracted, administration of those resources is
significantly easier. In addition, it’s easier for users to locate data they require as the data is
presented in a logical format. Users can more easily determine that a Marketing folder is
within a Departments folder than they can figure out that it must be on Server02.
Additionally, DFS namespace folders can refer to more than one target. In other words, the
Marketing folder in DFS can point to copies of the folder that exist both on Server01 and
Server02. The folders can be replicated using a closely related feature, DFS Replication. A
folder that refers to more than one target provides a form of load sharing, as clients will get
alternating referrals to the two servers. Or, if the servers are in different Active Directory sites,
clients will be referred to the server that is closest, from a site link cost perspective, to the client.
And as if that is not enough, if one of the servers fails, clients will be referred to the other
server—producing a level of fault tolerance I refer to as “poor man’s clustering.”
Creating DFS namespaces
Microsoft has documented DFS Namespaces in great detail, and I recommend that you check
out the following resources:
■
Feature documentation: http://technet2.microsoft.com/windowsserver/en/library/
77a571cc-a360-468a-ad99-6c80049530db1033.mspx?mfr=true
■
Technical reference: http://technet2.microsoft.com/windowsserver/en/library/77a571cc-
a360-468a-ad99-6c80049530db1033.mspx?mfr=true
You should certainly read the documentation prior to implementing DFS Namespaces, but as
with the other solutions in this resource kit, I would like to provide guidance in several spe-
cific areas that I have seen trip up many an experienced administrator.
Creating a DFS Namespace is detailed in the feature documentation. To summarize, open the
DFS Management console, right-click the Namespaces node, and choose New Namespace. A
wizard will step you through each task required to create the namespace. For the sake of
example in the following sections, let’s assume you create a namespace called “Human
Resources.”
Delegating DFS namespaces
The Enterprise and Datacenter editions of Windows Server 2003 R2 and Windows Server
2008 can host multiple DFS namespaces. If your DFS server is a Standard or Web edition, you
are limited to one DFS namespace. If you have more than one namespace, you’ll likely want to
delegate management of the namespaces.

Solution Collection 2: Managing Files, Folders, and Shares
165
This is where I see organizations make the first mistake—which is, in my experience, not to del-
egate the management of DFS namespaces. The typical argument I hear in such situations is,
“Corporate wants to maintain control of the namespace to ensure a logical hierarchy of fold-
ers.” That is, in my opinion, shortsighted to say the least, unless you are working with the Stan-
dard or Web editions and therefore can have only one namespace.
The DFS Namespaces feature is just that: namespaces—or if you prefer, a hierarchy or a folder
tree. Does Corporate maintain control over what folders are on a file server? Do you have to
call up a vice president before adding a subfolder to a share? Probably not. The organization of
data should generally be pushed out to those who “own” the data and who can best evaluate
how it should be presented.
Now, I’m not suggesting that Corporate doesn’t have a good point: There is a lot of value in a
centrally driven namespace that stays more consistent over time. We’ll solve that problem in
the next section, “Linking DFS namespaces.” So Corporate will get its way also. But I highly
recommend that those who know the data and the servers on which data is stored—and, most
importantly, know how and why the data is accessed—will best be able to organize the data in
a logical namespace.
Let’s assume that you have a significant number of resources related to Human Resources,
such as corporate policies, information about benefits, and so on. One or more individuals
has been tasked with determining how that data is used and accessed, and that person creates
a logical hierarchy of folders such as the following one:
I recommend that you delegate to that individual or team the ability to manage the
namespace, so if new resources need to be added to the namespace, they can do it. To delegate
a namespace, right-click the namespace in the DFS Management console and choose Delegate
Management Permissions. Enter the name of the user or, preferably, of the group that should
be given permission to manage the namespace. It’s that simple! In previous versions of DFS,
HR
Benefits
Vacation
Medical
Retirement
Corporate Discounts
Policies
Diversity Statement
Information Technology Usage
Sexual Harassment Policy
Compensation
Payroll Calendar
Direct Deposit Forms

166
Windows Administration Resource Kit: Productivity Solutions for IT Professionals
a delegation of namespace management required that the user or group be a member of the
local Administrators group on the namespace server. That is no longer the case. The team can
now manage the namespace.
From a change control perspective, you should manage a DFS namespace carefully. The whole
point of a DFS namespace is to provide a stable, logical view of enterprise resources. Any
change to the DFS namespace itself requires changing the references (mapped drives, short-
cuts, and so on) to the namespace. So good planning should result in a structure that doesn’t
need to be changed regularly, or at all. However, new resources are likely to be added to the
enterprise, and they can certainly be added to the namespace as long as existing structure
(folders) remain stable.
Linking DFS namespaces
Now let’s address the concern we raised about Corporate, which wanted control of the
namespace. Typically, that requirement arises from the desire to maintain a very stable
namespace that creates a taxonomy—a way of organizing enterprise resources. This section
employs a trick that will address this, and other, business requirements.
Earlier I presented a scenario in which the Human Resources department maintains a DFS
namespace. Let’s assume other departments also have unique, delegated DFS namespaces,
including IT.
It is quite useful to present your enterprise application distribution points within a DFS
namespace. For example, the path from which Microsoft Office is installed might be a UNC
through a DFS namespace called “Software,” such as \\contoso.com\software\microsoft\
office\2007\. That DFS namespace folder might refer to several copies of the software
throughout the enterprise, such as \\denverserver\software$\office2007. Using DFS folders
for software distribution UNCs makes software management (including installation, repair,
and removal) much more efficient. We’ll discuss this further in Solutions Collection 9,
“Improving the Deployment and Managementt of Applications and Configuration.”
You might delegate the management of the Software namespace to a limited number of admin-
istrators who manage software installation. But because the software folders are often thought
of as IT resources, you want to be able to locate software through the IT namespace.
That’s where the trick comes in. Create a DFS namespace folder in the IT namespace—for
example, \\contoso.com\it\software. The target of that folder is another DFS namespace—
specifically, \\contoso.com\software. If a client navigates to the IT namespace, the client sees
“Software” within it. When the client navigates to that folder, the client is actually (transpar-
ently) navigating an entirely different DFS namespace!
Figure 2-18 shows an example, as seen by a client, of the resulting namespace.
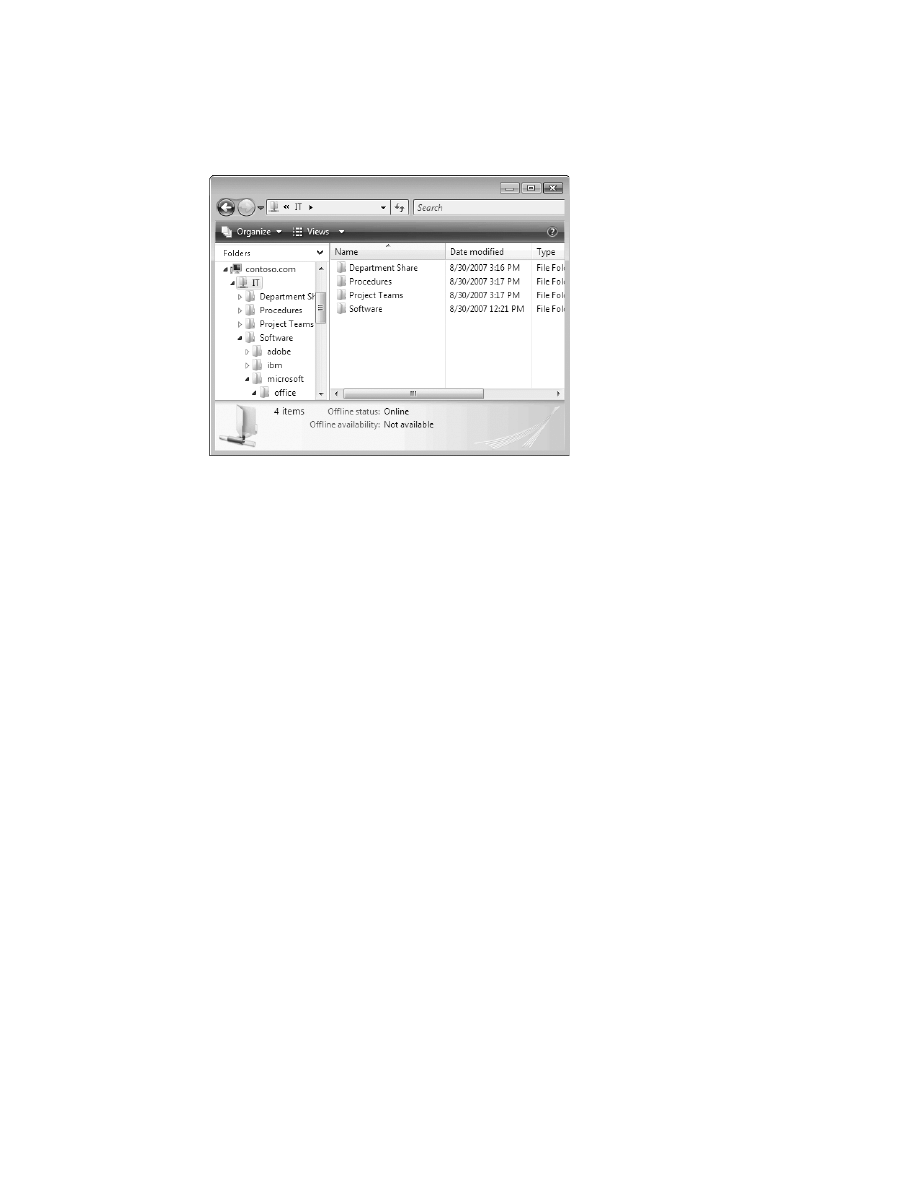
Solution Collection 2: Managing Files, Folders, and Shares
167
Figure 2-18
The IT namespace with a folder, Software, that exposes another DFS namespace
With that trick in mind, you can imagine a solution to Corporate’s request. Corporate can cre-
ate a namespace that it maintains, at a high level, such as this one:
The folders in the corporate namespace target the departmental namespaces that have been
delegated to the personnel who are best equipped to manage them.
This concept also can solve a common dilemma within an organization: Should the name-
space be departmental or geographical? Why not both? You can certainly create a DFS
namespace with multiple paths to the same resource. The goal is to make your resources easy
to manage and, for users, easy to find. The only caveat I’d mention here is that if you do pro-
vide multiple paths to the same resource, you should train users to know that even though
they see a file in two paths, it is still one file, and they should not delete the file because they
believe it is a copy.
\\Contoso.com\Corporate
Departments
HR
IT
Finance
Marketing
…

168
Windows Administration Resource Kit: Productivity Solutions for IT Professionals
Presenting DFS namespaces to users
Because DFS namespaces create a logical view of enterprise resources, it is reasonable to pro-
vide a way for users to navigate the namespace as a more intelligent form of browsing. There
are several ways to incorporate DFS namespaces into the client user interface:
Shortcuts
Shortcuts, with location properties that reference a DFS namespace folder, can be
placed in any location within the user’s experience: the desktop, the Documents folder,
the Start menu, and so on. Shortcuts provide access to users running any recent version
of Windows.
Mapped drives
Similarly, network drives mapped to a DFS namespace folder can be accessed
by users running any recent version of Windows. The advantage of a mapped drive over
a shortcut is that the mapped drive exposes an expandable node within the Explorer
folder tree. Additionally, it is easy to reference the S:\ drive as the location where users
can find software, for example. But mapped drives are limited to the number of available
letters and are in many ways a legacy form of connection to network resources.
Network places and network locations
Network places and network locations provide the
best of both worlds for Windows XP and Windows Vista users, respectively. You can cre-
ate a network place in the Windows XP My Network Places folder. Windows Vista
replaced network places with network locations, which you can create by opening the
Computer folder, not the Network and Sharing Center. After you create a network place
or network location, you can move it to any other location, just as you can a shortcut.
And, like a shortcut, the network place or network location can have any name. Like a
mapped drive, a network place or network location expands within the Explorer folder
tree, giving easy visibility to the hierarchy of the DFS namespace to which the network
place points. I recommend that you move the network places and network locations
that users need most regularly on their desktops, and leave links to less commonly
accessed targets in the My Network Places and Computer folders where they were cre-
ated. The companion Web site, www.intelliem.com/resourcekit, provides scripts to gener-
ate network places and network locations automatically.
Symbolic links
Symbolic links, new to Windows Vista, provide an additional option. You can
create a symbolic link to a DFS namespace. The link can be created in any folder—for
example, Desktop, Documents—or in the user’s profile; and it can have any name. When
viewed in the Explorer folder tree, the symbolic link expands to show the DFS hierarchy.
To create a symbolic link, use the mklink.exe command. You must be an administrator
to create a directory link, which is necessary to refer to a DFS namespace. For example,
to create a symbolic link for a user, James Fine, called Corporate that points to the Cor-
porate DFS namespace, the syntax would be as follows:
mklink.exe /d "c:\users\jfine\Corporate" \\contoso.com\corporate
An example of the Corporate DFS namespace, exposed within the user profile of James Fine,
is displayed in Figure 2-19.
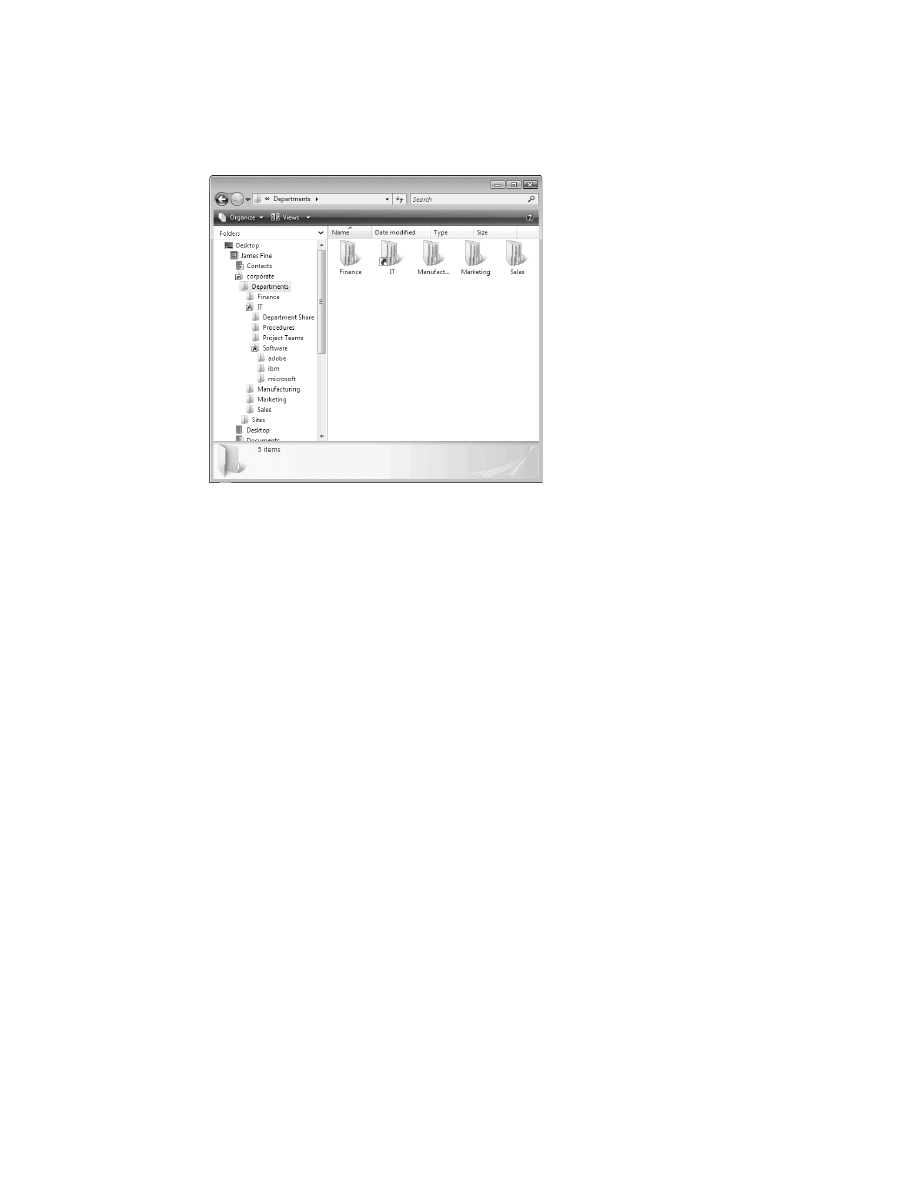
Solution Collection 2: Managing Files, Folders, and Shares
169
Figure 2-19
A DFS namespace exposed, through a symbolic link, within a User’s profile
Both network locations and symbolic links appear as an expandable node in the Explorer
shell. Symbolic links add the capability to refer to the DFS namespace within the local path.
So you could refer to a folder in the Corporate DFS namespace as C:\Users\jfine\Corporate\
subfolder. Symbolic links are new to Windows Vista, so the use and benefits they provide are
terra nova. I think they are worth testing! I’ll be interested to hear about your experiences
using symbolic links to present DFS namespaces—use the companion Web site, www.intel-
liem.com/resourcekit to discuss this and other solutions.
Solution summary
DFS Namespaces is a phenomenally useful feature of Windows servers that you can use to
facilitate administration, user access to resources, and performance across servers and sites. If
you haven’t looked at DFS Namespaces yet, look now. It is a no-brainer, in my opinion. Refer to
the Microsoft documentation listed earlier in this section to learn about the technology. If you
are using the Enterprise edition of Windows Server, you can have multiple domain
namespaces, and you can therefore create delegated namespaces that are managed by admin-
istrators who understand the data, its use, and its location. To create centralized or hierarchi-
cal namespaces, you can create a high-level DFS namespace with folders that target other DFS
namespaces.
After you’ve created the perfect enterprise DFS Namespaces implementation, you can present
the namespaces, or portions thereof, to users. Features such as shortcuts, mapped drives, net-
work places (Windows XP), network locations (Windows Vista), and symbolic links
(Windows Vista) will empower users to browse for resources efficiently, through the logical
namespace you have designed.

Document Outline
- Cover
- Table of Contents
- Solution Collection 2: Managing Files, Folders, and Shares
- Scenarios, Pain, and Solution
- 2-1: Work Effectively with the ACL Editor User Interfaces
- 2-2: Manage Folder Structure
- 2-3: Manage Access to Root Data Folders
- 2-4: Delegate the Management of Shared Folders
- 2-5: Determine Which Folders Should Be Shared
- 2-6: Implement Folder Access Permissions Based on Required Capabilities
- Solution overview
- Introduction
- Implement a Read capability
- Implement a Browse To capability
- Implement an Edit capability
- Implement a Contribute capability
- Implement a Drop capability
- Implementing a Support capability
- Create scripts to apply permissions consistently
- Manage folder access capabilities using role-based access control
- Solution summary
- 2-7: Understand Shared Folder Permissions (SMB Permissions)
- 2-8: Script the Creation of an SMB Share
- 2-9: Provision the Creation of a Shared Folder
- 2-10: Avoid the ACL Inheritance Propagation Danger of File and Folder Movement
- 2-11: Preventing Users from Changing Permissions on Their Own Files
- 2-12: Prevent Users from Seeing What They Cannot Access
- 2-13: Determine Who Has a File Open
- 2-14: Send Messages to Users
- 2-15: Distribute Files Across Servers
- 2-16: Use Quotas to Manage Storage
- 2-17: Reduce Help Desk Calls to Recover Deleted or Overwritten Files
- 2-18: Create an Effective, Delegated DFS Namespace
Wyszukiwarka
Podobne podstrony:
9780735624467 IPv62E SampleChapters
9780735625143 GPRK SampleChapters
9780735624375 WS08APC SampleChapters
9780735624221 NetworkingGuide SampleChapters
9780735624382 WindowsServerIO SampleChapters
9780735625167 PKI Cert SampleChapters
9780735625167 PKI Cert SampleChapters
First 2015 Writing sample paper Nieznany
AIRBORNE SAMPLES SOLID PHASE extraction
ibt writing sample responses
HAM Sample and Hold SDR 30Khz 70Mhz
SAMPLE, segregacja, poszkodowany
więcej podobnych podstron