HOW TO:
INSTALL GUTTERING
INTRODUCTION
Changing your own guttering can be a simple and straightforward exercise when you have the
right products
and you know how to select the few simple tools required
Two sizes of guttering cover most domestic situations:
•
75mm half-round gutters and 50mm circular down pipes for sheds, greenhouses and small
detached
garages.
•
112mm half-round gutters and 68mm circular downpipe for houses and large detached garages.
If you live in a large house or in an area of high rainfall, you may need a gutter which has a
greater capacity
- either 116 x 60mm 'square' guttering (used with 65mm square downpipe) or 120 x 75mm 'ogee'
guttering
(used with square or round downpipe).
SKILL LEVEL
Care is needed in setting out the guttering accurately, but actually fitting it is relatively easy.
SAFETY FIRST
Before you climb a ladder, make sure it is stable and fixed securely to the structure of the house. Don't
allow children
to play under ladders or scaffold towers.
Pre-treated wood is perfectly safe and poses no risk to people, animals and plants, and is safe
enough for
children to play on.
TO COMPLETE THIS PROJECT
YOU WILL NEED...
• El
ectric Drill
• Exterior Paint
• File
• Hacksaw
• Hammer
• Masonry Drill Bit
• Paint Brush
• Plastic Wall Plugs
• Screwdriver
• Screws No. 10 Bzp - 25mm)
• Spirit Level
• Tape Measure
• Extension Ladder
• Guttering Components As Required
• Padsaw
• Plumbline
• String Line

1 - PLANNING THE WORK
Whether you are planning to replace the entire
guttering on a house, or just one side of a garden
shed, following these few simple tips will make
the job much easier.
Make a sketch plan of the house or outbuilding,
and write down all the relevant dimensions. Work
in metric units as this is how guttering is sold.
If you have difficulty measuring the height of a
house, simply count the number of brick courses
from the ground to the eaves and divide the
answer by 13 to get the length of downpipe you
need in meters.
Work out the lengths of guttering and downpipe
you need (different standard lengths of both are
available), and fill in a checklist for the necessary
components.
Some gutter fittings (for example, union clips)
need to be fitted with a separate strap to make
the joint between the fitting and the gutter (these
should be fitted before you start); other types
have integral straps.
Fascia brackets should be placed no more then
1m apart; stopend outlets, running outlets, union
clips, angles and stopends need a supporting
fascia bracket within 150mm of the fitting. Some
running outlets, union clips and stopend outlets
are designed to be screwed directly to the fascia,
but also require support brackets within 150mm.
Some 'ogee' guttering fittings are 'handed' - for internal or external corners
or to fit on to the left- or right-hand end of the gutter.
Always over-estimate when ordering. It is better to have too much rather
than too little.
2 - REMOVE THE OLD GUTTERING
Unless you are fitting guttering to a new building, you will need to remove
the old guttering. Old plastic guttering is simple to remove, but you should
take great care with cast-iron guttering as it is extremely heavy, and can
have sharp edges. Wear stout gloves to handle it and lower it to the ground
with a rope.
If the screws holding the old gutter or gutter brackets to the fascia have
rusted in place, saw through them with a padsaw fitted with a thin metalcutting
blade. To remove brackets secured to the rafters, you may need to
lift the edge of the roof covering.
If the bolts holding cast iron guttering together are rusted in place, saw them
off with a hacksaw .
Take the opportunity to refurbish the existing fascia board, filling all screw
holes, stripping off flaking paint and re-painting or re-staining as required.
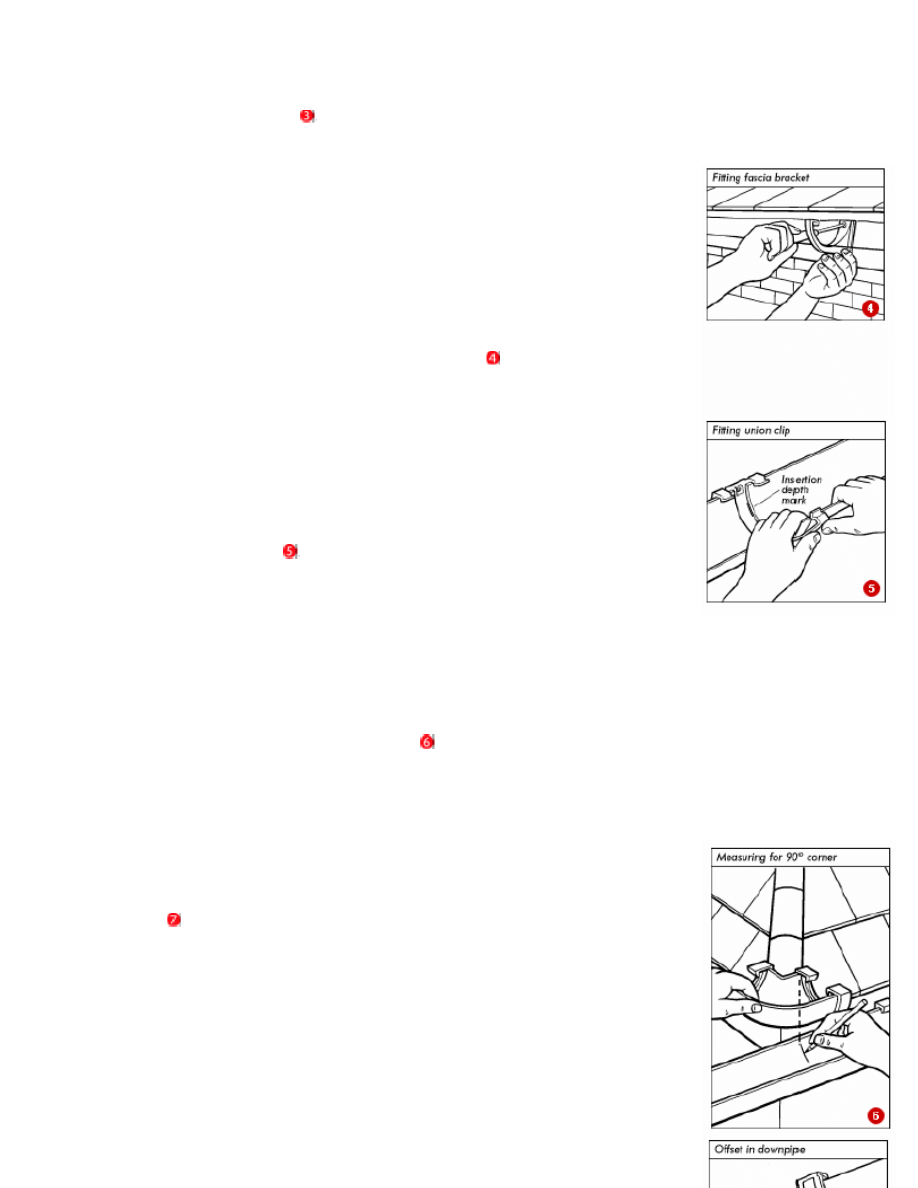
3 - FITTING THE OUTLET AND BRACKETS
Start by fitting the outlet (running outlet in the middle of a gutter run,
stopend outlet at the end of a run) directly over the drain position - use a
plumbline to check this .
Using 25mm x 5mm (1in x No. 10) screws, fix the outlet to the fascia,
allowing for the fact that the far end of the gutter must be higher than the
outlet by 10mm for every 6m of gutter (a fall of 1:600).
Now fit the end fascia bracket furthest away from the outlet, allowing for the
required 1:600 fall. Check that the fascia board itself is level (it should be)
and then use this as a reference line to position the bracket. Repeat with
the other end fascia bracket if the outlet is in the middle of the gutter.
Tie a string line tightly from the end fascia bracket(s) to the outlet and use
this as a guide for installing the remaining fascia brackets, which should be
placed no more than 1m apart, working outwards from the outlet. Screw
each bracket to the fascia with two or three screws .
4 - INSTALLING THE GUTTER
Once all the brackets are in place, you can install the main guttering.
Push the first gutter length into the outlet and then clip it into its fascia
brackets. This is done most easily by tilting the gutter to fit under the back
clip and then straightening it under the front clip. To allow for expansion in
hot weather, care should be taken to ensure the gutter end is in line with the
insertion depth mark .
All fittings provide for expansion and contraction of the gutter. When
installing the gutter, make sure it does not go past the insertion depth mark
in the fitting.
Use a union clip to join the first and second lengths. The joint is made by
clipping the two ends into the union clip, which is also secured to the fascia
with a single screw.
At a corner, hold a 90º angle (or 45º angle for a bay) in place to mark where the
gutter is to be cut before you fit the angle .
Cut the last length of gutter to the correct size. At the end of the gutter run, fit an
external stopend, clipped in place in the same way as outlets, angles and
unions. If the new guttering has to join up with an existing gutter, fit the
appropriate ogee or half-round adaptor.
5 - FITTING A DOWNPIPE
The distance between the gutter and the wall is bridged by an offset. This
consists of two 67.5º offset bends and an appropriate offcut of downpipe cut to
size
,with 65mm square downpipe, a ready-made 50mm offset is available).
The offset bends can be push-fit or solvent-weld; if push-fit, ensure a pipe clip is
fitted under the socket on the pipe immediately below the offset. When using
solvent cement, follow the safety instructions on the tube.
To keep the cut square, wrap a piece of plain paper round the downpipe at the
place to be cut, and use this as a guide for a hacksaw. Clean up the cut edges
with a file.
Fit the first length of downpipe with its socket uppermost, securing it to the wall
with a socket pipe clip at the top and one-piece barrel clips (where available) for
holding the pipe to the wall. For masonry walls, use an electric drill fitted with an
appropriate bit to make holes to take wallplugs for the securing screws. The
maximum spacing of pipe clips is 1.8m (6ft).
Continue to fit the remainder of the pipe in the same way, fitting the open end of
one pipe into the socket of the pipe below, allowing a 10mm gap between the
end of the pipe and the bottom of the socket for expansion in warm weather.
Some downpipes are fitted with a hopper head to receive waste from another
pipe. Secure the hopper head to the wall. Adaptors are available for square
downpipes.
If necessary, the downpipe can be run at an angle across the wall, using pairs of
45º, 67.5º or 87.5º bends. On angled or near-horizontal runs, fit pipe clips every 1m (3ft).
Where the downpipe from a second gutter (around a bay, for example) joins the
main downpipe, use a 67.5º branch pipe. If you need to cut both ends of a pipe,
fit a loose pipe socket (available with wall-fixing lugs for 65mm square pipe) to
the end of the pipe.
With 65mm square and 68mm circular downpipe, you can fit an access branch
into the downpipe. This makes future downpipe cleaning easier.
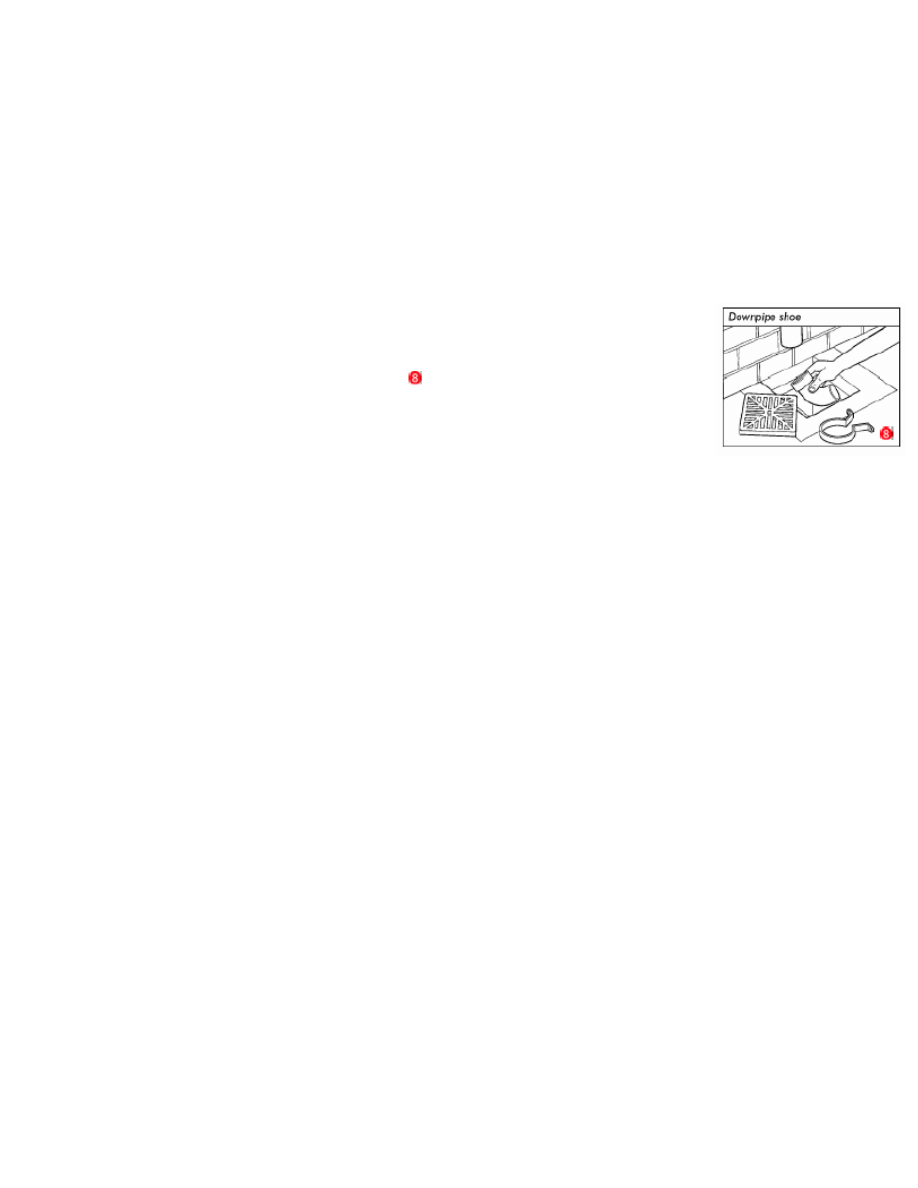
At the bottom of the downpipe, fit a downpipe shoe if the water is to discharge
onto a flat surface or into an open gully .
Down pipe shoes on round pipe
need supporting with pipe clips.
For direct connection to the underground drainage, ensure that you have the
correct connector (or adaptor for 65mm square pipe); to connect to a back inlet
gully, remove the old mortar and replace with fresh mortar with the pipe in place.
Wyszukiwarka
Podobne podstrony:
więcej podobnych podstron