Copyright Interweave Press LLC. Not to be reprinted. All rights reserved.
page 1
project
library
R R R R R R R R R R R R R R R R R R R R R R R
publishers of Step by Step Wire Jewelry…join the online beading community at
BeadingDaily.com
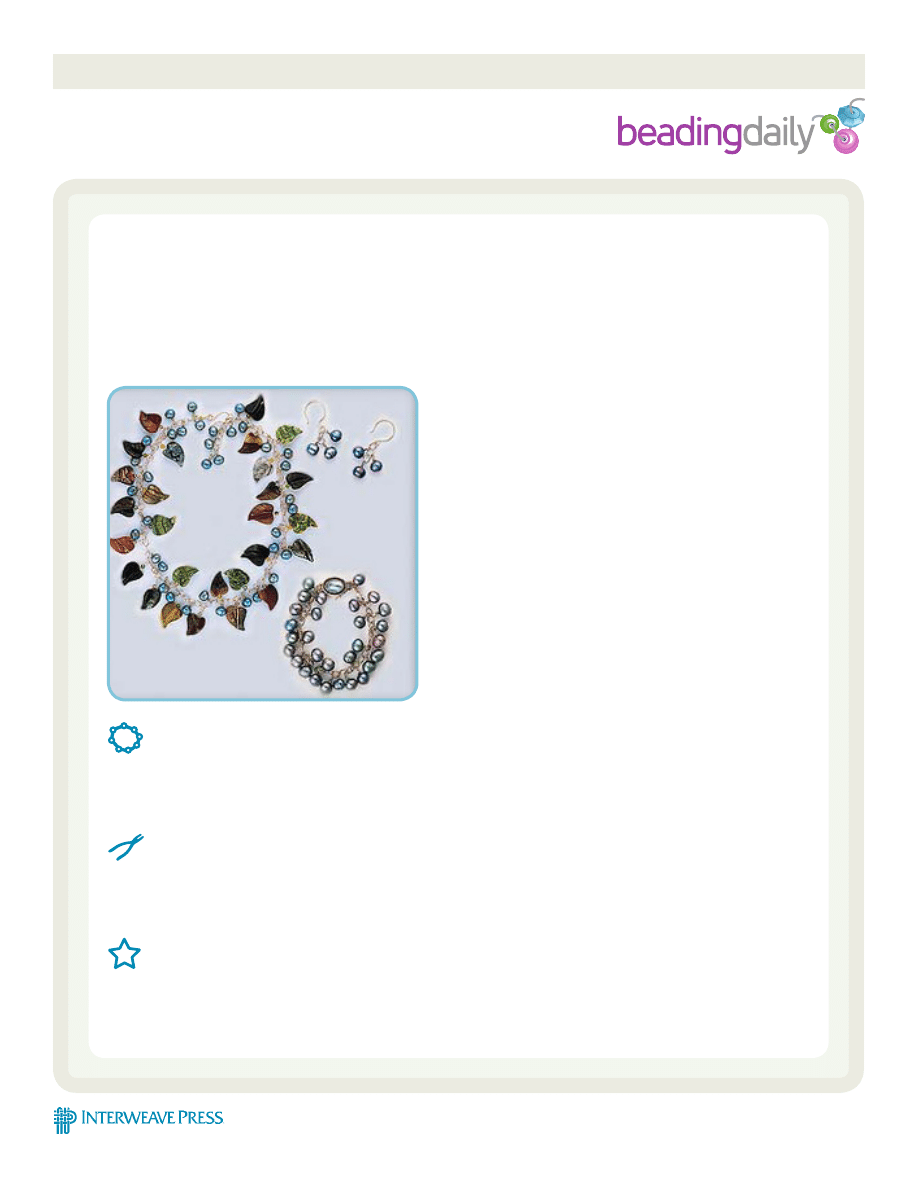
Pearl, Agate and Silver Set
by Kate McKinnon
This is a wonderful and simple technique that
you can use to create fabulous, one-of-a-kind
jewelry in little time. You can use any drilled
elements, in any combination, and wire them
to any type of chain that you wish. This gives
you almost unlimited design possibilities, and,
depending on your choice of clasp, your piece
will be adjustable to fit any wrist or neck.
In this project I will show you how to make the
necklace and how to apply the same techniques
to create the bracelet and earrings to complete
the set. I chose to use pearls paired with
gemstone leaves for the necklace and used the
same pearls to create the matching bracelet
and earrings.
Wire necklace, bracelet and earrings
MAteriAlS:
Length of Open Chain, 3/4” Shorter than Finished Length
30-100 Headpins, of the Appropriate Gauge to Fit Through Your Pearls or Beads
Clasp of Your Choice
Ear Wires or Posts
toolS:
Round Nose Pliers
Flat Nose Pliers
Chain Nose or Crimping Pliers
Flush Cutters
techniqueS
Wirework
Step 1
Cut a length of chain about 3/4” shorter than your desired
finished length. Standard necklace sizes range from 16” to 30”.
If you are wiring on a standard clasp you need to be certain of your
finished length. If you choose to use a hook or a lobster clasp at one
end instead, and your links are large enough to accommodate it, then
your finished piece will be adjustable and the cut length of the chain
is not as important.
Copyright Interweave Press LLC. Not to be reprinted. All rights reserved.
page 2
PeArl, AgAte AnD Silver Set
publishers of Step by Step Wire Jewelry…join the online beading community at
BeadingDaily.com
Step 2
Step 3
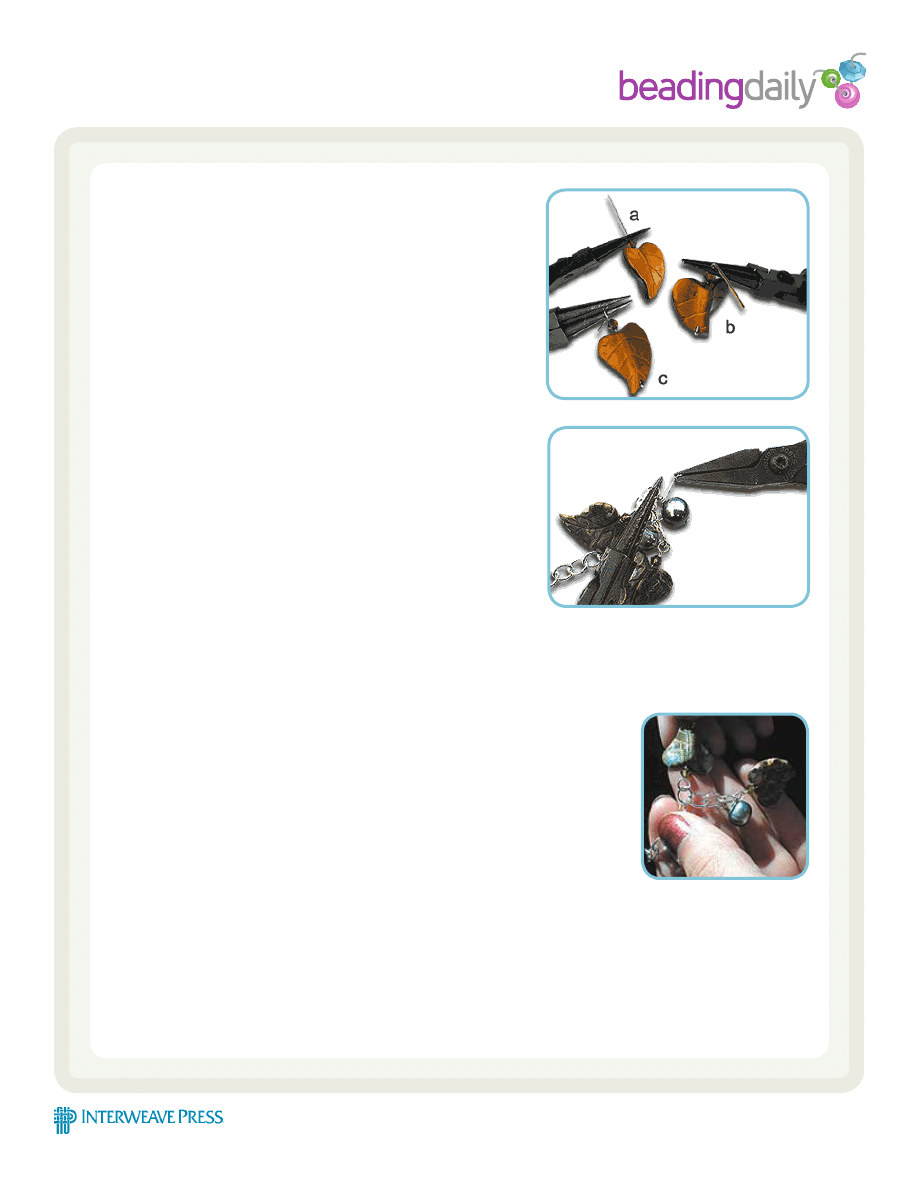
Assemble your beads and insert a headpin into each one. (You
may wish to put more than one element onto each headpin.) I used
4 mm Swarovski crystals on top of my gemstone leaves, but left
the pearls to stand alone. For the pearls I used 21-gauge sterling
headpins, for the leaves I used 18-gauge headpins, finished with a
ball end. Thicker wire will of course result in a stronger piece, both in
appearance and durability.
Use your round nose pliers to turn a basic loop in each headpin,
leaving a tail, but do not close the loop yet. When creating the loop
try to place the wire onto the pliers at the same place each time so
you will have consistently sized loops.
Arrange your wired beads into a pleasing pattern. Starting at
one end, begin to place the elements onto the chain by slipping each
wired loop onto a single link of the chain. Grasp the wire loop with
your round nose pliers and the tail of the wire with your flat or chain
nose pliers, and gently bend the wire into a coil around the shank of
the wire that goes through your bead. I recommend this method for
any wire finer then 19-gauge.
For heavier wire I recommend cutting the wire right at the turned loop.
Open the loop to put it on the chain link and reclose the loop gently
with your chain nose or crimping pliers. Snip the excess wire as close
as possible with your flush cutters.
Continue attaching elements along the length of the chain. You may choose to add a bead to each link, or skip one or
more links; I skipped a link after every two elements.
Step 4
Step 5
To attach the clasp of your choice, you can use the same loop and coil technique
used in Step 3. Cut a 3” piece of wire and make a nice open loop at one end. Slip the
loop over the last link on your chain and turn a few twists of coil. Snip the excess
wire.
Place your round nose pliers right up against the coil. Bend a right angle, turn another
open loop and slip on your lobster clasp or one half of your decorative, two-part clasp.
Turn the wire into another nice little coil, right up to the first one and snip the excess
wire. Round off the cut ends with your crimping or chain nose pliers. You should now
have two loops, one attached to the chain portion, the other attached to the clasp.
If you chose a lobster clasp you are finished. If you chose a decorative two-part clasp, repeat the wiring for the other
half of the clasp on the opposite side of the piece.
Take your chain nose or crimping pliers and go back through your piece, gently rounding any cut wire ends. This
is an important step for a professional finish — you don’t want any sharp points showing or catching your clothing.

Copyright Interweave Press LLC. Not to be reprinted. All rights reserved.
page 3
PeArl, AgAte AnD Silver Set
publishers of Step by Step Wire Jewelry…join the online beading community at
BeadingDaily.com
Step 6
Step 7
To make the bracelet repeat Steps 1-5. When stringing the pearls, instead of skipping links as I did in the
necklace, hang a pearl on every link of the chain. You can use any clasp you like to complete the bracelet. I frequently
use lobster clasps because it enables me to adjust the bracelets I sell at shows. By using a lobster clasp and a chain
that can accommodate the clasp’s size, the bracelet can be made longer but able to be worn shorter, if necessary.
To make the matching pair of earrings, cut two to four links of chain, wire your beads to those links, and attach
the top link of chain to an ear wire. I find that three links of chain, with one bead in each link, works very nicely.
I never tire of using this technique and I hope you enjoy it as much as I do.
KATE McKINNON is a self-taught artist who combines
her love of nature, pattern, shape, and color with her
attraction to sparkle and movement. She lives and
operates her business in St. Louis, Missouri, and travels
all over to teach and exhibit her work. She can be
contacted at www.modernnymph.com.
Wyszukiwarka
Podobne podstrony:
więcej podobnych podstron