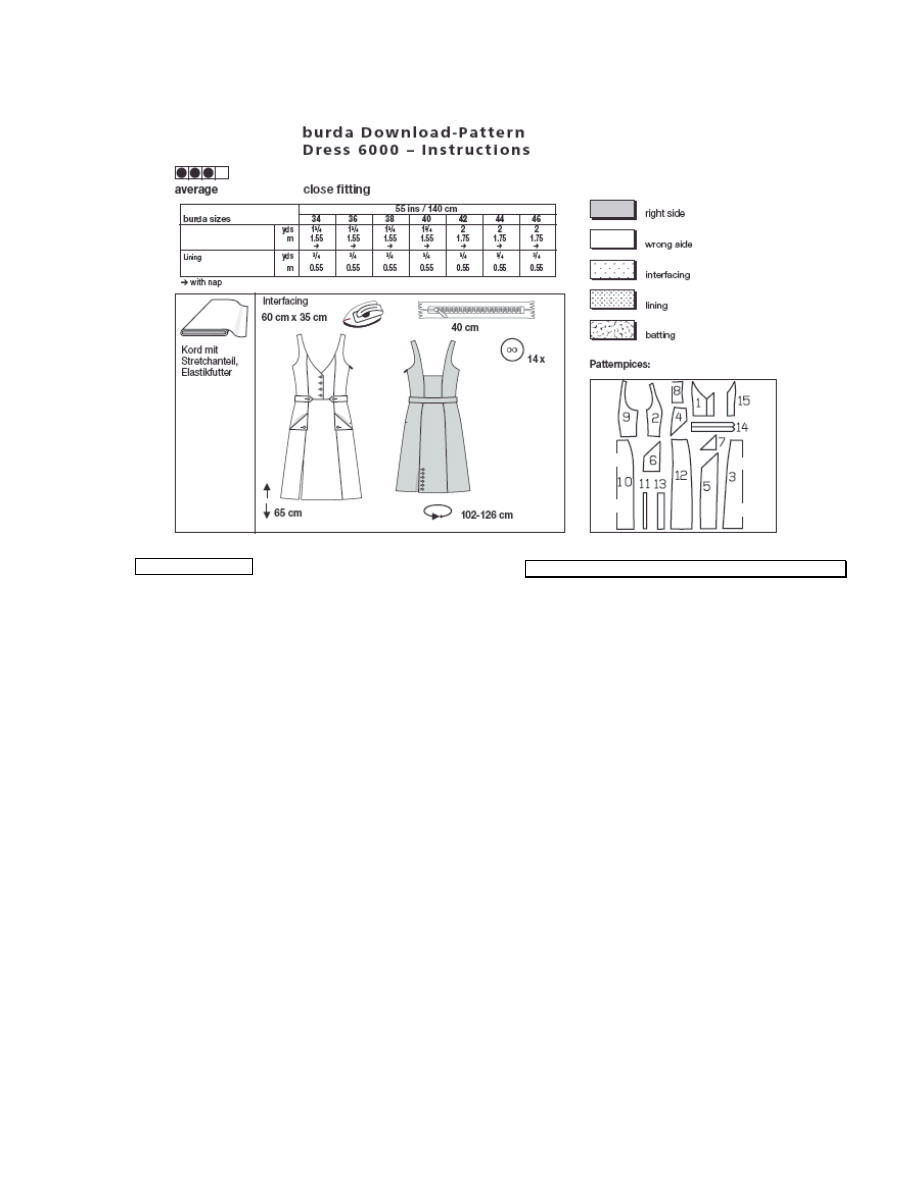
PATTERN PIECES
1 Middle Front Piece
2x
2 Side Front Piece
2x
3 Front Middle Skirt
1x
4 Hip Yoke Piece
2x
5 Front Side Skirt
2x
6 Pocket/Lining
4x
7 Flap
2x
8 Middle Back Piece
1x
9 Side Skirt Piece
2x
10 Back Middle Skirt
1x
11 Facing
12 Back Side Skirt Piece
2x
13 Underlap
14 Belt
1x
15 Middle Front Piece/Lining
2x
Cutting the Print Outs (Print at home version):
The pattern pieces are printed onto
27
sheets
of paper, each with a thin frame. Wait until all sheets have
printed. Arrange the pattern sheets according to the
layout provided.
Cut each sheet at the upper and right edge along the
thin frame lines. Start with the lower left sheet and
glue the sheets together neatly at the thin frame line.
Choose your size according to the Burda size chart:
dresses, blouses, jackets and coats according to
your bust size, pants and skirts according to your hip size.
Cut the pattern pieces for the design you wish to sew
according to your size.
LENGTHENING OR SHORTENING THE PATTERN
Our pattern is designed for a height of 5’ 6” (168 cm). If
you are taller or shorter, you can adjust the cut to your
height at the lines that say “shorten or lengthen here”. That
way the fit remains the same.
→ Always change all parts at the same line and the same
amount.
How to: Cut the pattern pieces at the provided lines.
To Lengthen: push the parts apart as necessary.
To Shorten: overlap the part as much as necessary.
Adjust the side edges. Redistribute the buttonholes.

CUTTING THE FABRIC
Fabric Fold (- - - -) means: This is the middle
of a pattern piece, but never an edge or a seam.
The piece is cut so that it is twice the size of
the pattern piece, with the fabric fold in the
middle.
Pattern pieces with dotted outlines are placed
onto the fabric with the printed side facing
downward.
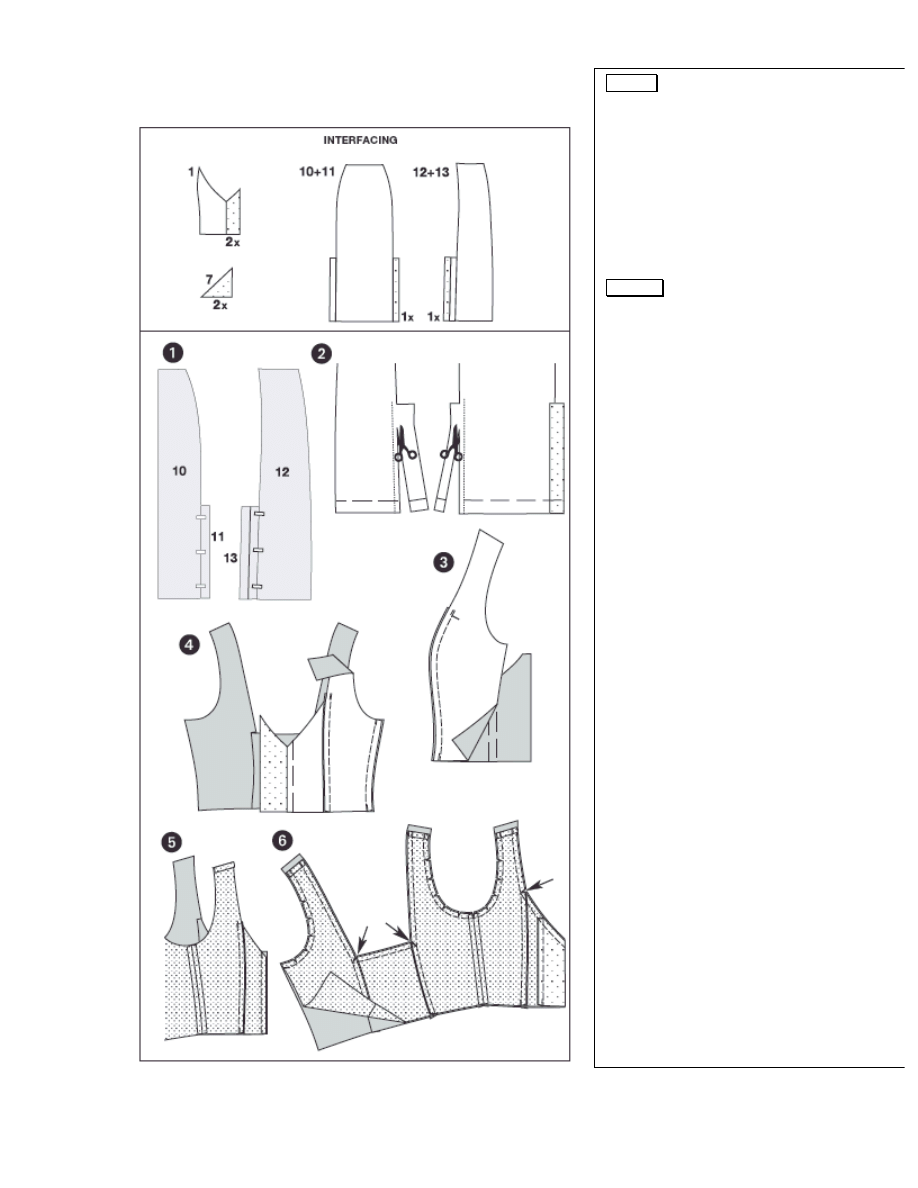
1.) ATTENTION: Before you cut, glue
part 11 to part 10 and part 13 to part
12 (see page 2).
Facing and underlap are only needed
at the LEFT dividing seam. After
cutting the pattern piece, they are
going to be trimmed at the right seam
(see drawing 2 on page 2).
The pattern shows you how to place the
pattern pieces on the fabric.
If the fabric is not folded, pin the pattern pieces
onto the RIGHT side of the fabric. If the fabric
is folded, the right side is facing inward. Pin the
pieces onto the WRONG side of the fabric.
Those pieces that cover the fabric fold should
be cut last with the fabric not folded.
SEAM AND HEM ALLOWANCES are
included in the pattern:
1 5/8” (4 cm) at the seam,
5/8” (1.5 cm)
at all edges and seams.
Using Burda tracing paper, transfer all lines and
markings of the pattern onto the wrong side of
the pattern. Instructions are included in the
pattern.
LINING
Cut lining according to pattern pieces 2, 6, 7, 8, 9
and 15
→See pattern
Hem and seam allowances are included in the
pattern:
5/8” at all edges and seams
INTERFACING
Cut the interfacing according to the drawing and iron
onto the wrong side of the fabric.
SEWING
When sewing, the right sides of the fabric are facing.
Transfer all lines in the pattern pieces onto the right
side of the fabric with basting stitches.
DRESS
Trimming the back right side seam (skirt)
2.) Cut the underlap at the back right side skirt piece.
Cut the facing at the middle skirt on the right side.
Bodice/ Seams
3.) Place side front pieces right sides facing onto the
middle front pieces, pin the front dividing seams
(seam number 1) and stitch.
Pin the back dividing seams in the same way (seam
number 2) and stitch. Trim seam allowances and iron
toward the front middle and back middle.
Right Side Seam
4.) Place right front piece right sides facing onto the
backpiece, stitch the right side seam (seam number
3), fold apart and iron the seam allowances.
LINING
Stitch and iron the front side seams and side seams
of the lining as you did with the fabric. At the lining,
iron the seam allowance of the shoulder edges to the
inside.
Doubling the Bodice with Lining
5.) Stitch the lining right sides facing onto the cut
facing of the front pieces (seam number 5). Iron the
seam allowances into the lining.
6.) Turn the cut facings to the outside at the
SELVAGE LINE. Pin the lining onto the bodice,
right sides facing. Pin the neckline’s edges and the
sleeve line’s edges together and stitch. Trim seam
allowances, cut in at the rounded edges. Cut into the
edges at the front and back neckline (arrows).
Turn bodice. Pin lining wrong sides facing onto the
bodice. Pin edges. Pin the open side and lower edges
together. Debaste the side edges (fabric and lining).
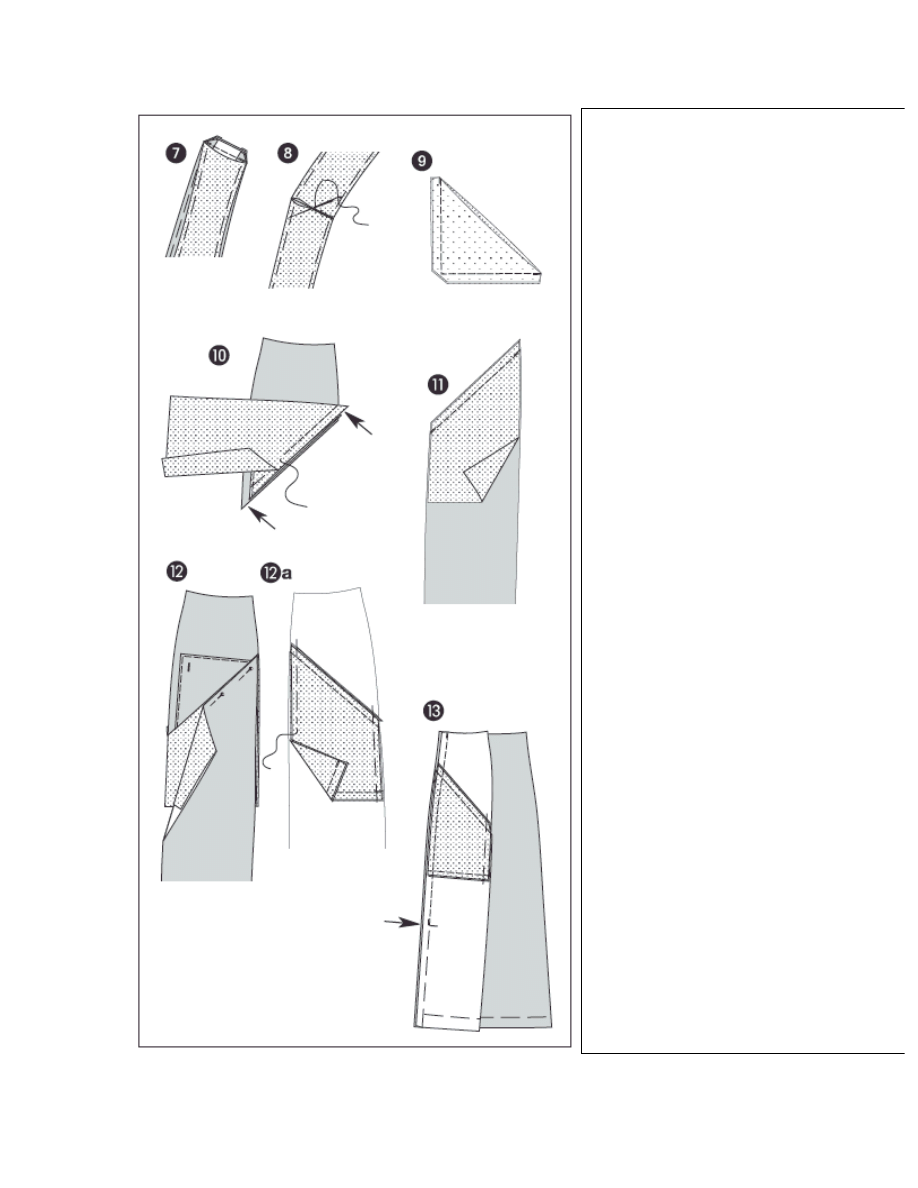
Shoulder Seams
7.) Place front pieces right sides facing onto the back
piece, stitch shoulder seams (seam number 4), do not
take in lining.
8.) Trim seam allowances and cut diagonally at edges.
Push the seam allowances under the lining, fold apart
and iron. Sew edges of the lining together by hand.
Stitch front edges, neck line edges and sleeve line
edges neatly.
SKIRT
Pockets/Flaps
9.) Place one fabric flap each onto a lining flap, right
sides facing. Pin edges according to the drawing and
stitch. Trim seam allowances, cut edges diagonally.
Turn flaps. Pin edges, iron and stitch neatly. Add in
BUTTON HOLE.
10.) Pin the flap with the upper end right sides facing
onto the hip yoke piece (seam number 6). Pin the
pocket above the flap. The seam allowances of the
pocket and the hip yoke pieces should overlap at the
flap (arrows). Stitch edges onto each other, taking in
the flap. Trim seam allowances.
Iron flap and pocket downward, seam allowances
upward.
11.) Stitch the second pocket right sides facing onto the
pocket opening of the front skirt piece.
Pin pocket toward the inside. Iron edge.
12.) Place the flap up. Pin the pocket opening at the
flap base seam onto the pocket.
Stitch the lower edges of the pocket right sides facing
onto each other. Pin the side pocket edges onto the skirt
(12a).
Front Side Seams/ Right Slit
13.) Place the front side skirt pieces right sides facing
onto the front middle skirt piece, pin dividing seams
(seam number 7). Stitch seams, end right of the arrow
mark (arrow). Secure seam ends. Leave the slit pinned
.
Trim seam allowances, fold them apart and iron them
from the bottom to the pockets. Cut in the seam
allowances at the lower pocket edges of the side skirt
piece on both sides. Iron the seam allowances starting
at the cuts into the middle front skirt piece (see also
drawing 16).
Back Side Seams/ Left Slit
Place the right backside skirt right sides facing onto the
back middle skirt, pin the dividing seam (seam number
8) and stitch. Fold apart and iron seam allowances.
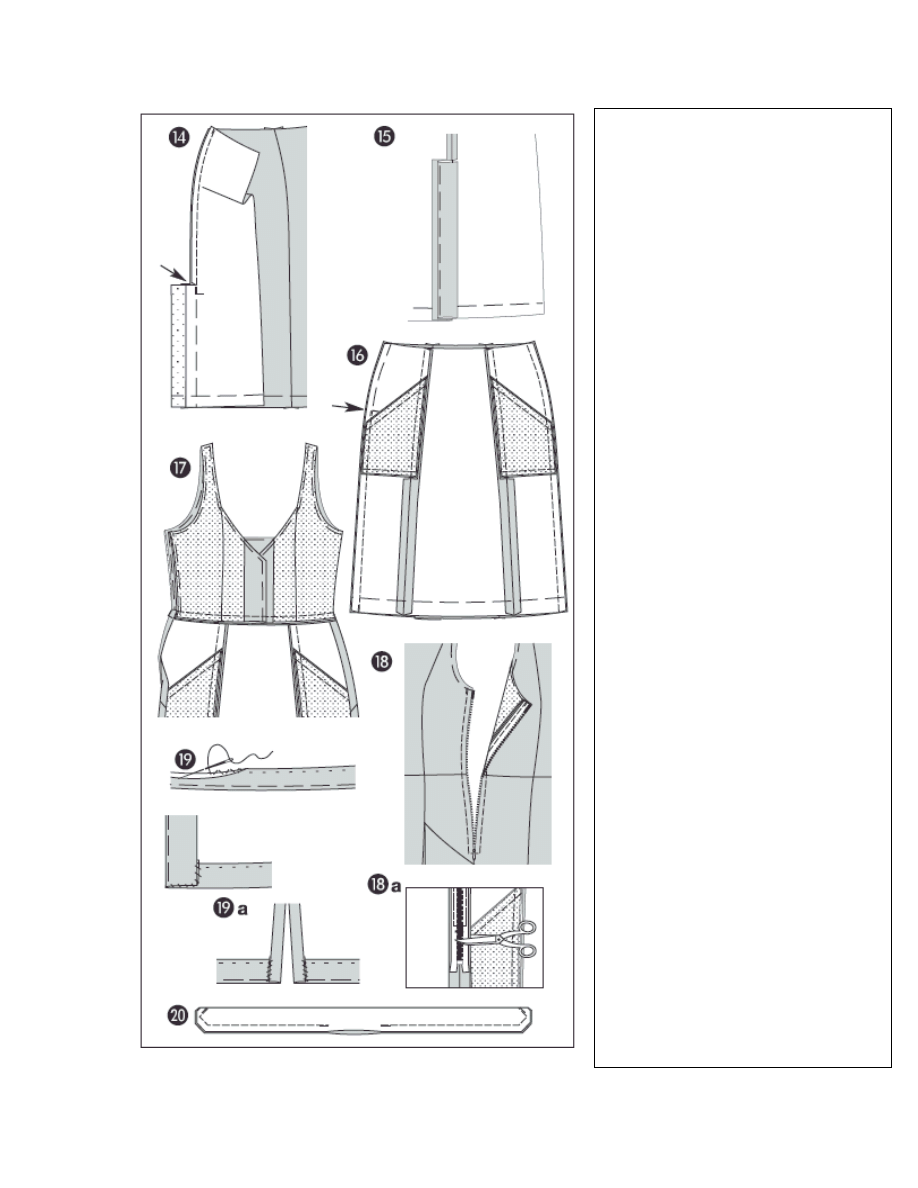
14.) Place the backside skirt piece right sides
facing onto the back middle skirt piece, pin the
dividing seam (seam number 9) from the top until
you reach the arrow mark. Secure seam ends. Cut
in the side skirt piece at the end of the underlap,
ending at the stitching line (arrow)
15.) Trim seam allowances, facing and underlap
.
Fold apart and iron the seam allowances until you
reach the cut. After the cut, iron the facing and
underlap into the middle skirt piece.
Fold over and pin, then iron the facing at the
underlap near the selvage line.
Side seams/ left slit
16.) Place front skirt piece right sides facing onto
the back skirt piece, pin side seams (seam number
9) and stitch. ATTENTION: Pin at the left side
seam from the arrow mark (arrow) downward.
Leave slit pinned. Trim seam allowances, fold
apart and iron. Tear basting stitches at the slit.
Stitching Bodice
Add in BUTTON holes into the right front edge.
Pin the right front piece middle on middle onto the
left one, pin the lower edges onto each other.
17.) Pin the bodice right sides facing onto the skirt
edge, so that seams are meeting. Pin the waist
seam (seam number 10) and stitch together. Trim
seam allowances, serge them held together and
iron them into the skirt.
Zipper
Fold the seam allowances over to the inside at the
slit.
18.) Pin the zipper underneath the slit edges so
that the teeth are covered up. Fold over the ends of
the zipper band at the top. Stitch the zipper to the
garment with the zipper foot. Should the zipper be
too long, tie it off at the slit end and cut it (18a) as
depicted in the drawing.
Seam/Slit
Tear the basting stitches at the slits. Apply facing
and addition to slit.
19.) Trim seam allowance, fold over and iron.
Attach the seam loosely by hand. Turn the slit’s
seam allowances and facing back over to the
inside, sew them onto the seam (19a).
Add the BUTTON HOLES into the back middle
skirt piece. Attach the BUTTONS at the underlap.
Sew buttons in the front middle onto the left front
piece. Also sew buttons onto the front side skirt
piece to match the flaps.

Belts
20.) Fold belt lengthwise, right side inside. Pin
edges one to the other according to the drawing
and stitch, leaving an opening to turn it later.
Secure seam ends.
Turn belt. Pin edges, iron. Stitch edges neatly,
closing the opening.
Add in BUTTON HOLES.
Sew the BUTTONS onto the waistband. Button
belt.
Wyszukiwarka
Podobne podstrony:
jonny dress instructions
7939 Dress Instructi
brown leaf dress instructions
Marisa dress instructions
Laura dress pattern
African Dress Instructions
6035 dress Instructions
Shari dress Instructions
bra dress instructions
Mushroom Dress Instructions
Hope Dress Instructions
6007 Dress Minna Instructions
122 Dress cutting and sewing instructions original
117 Dress cutting and sewing instructions original
The AMC Dress by AnaJan Instructions
więcej podobnych podstron