
14975EZ:
Landscape Cutting Boards
Cutting boards are always popular gift items, and over the years we’ve seen them made
in what seems to be an endless variety of shapes and styles.
Of the many that we’ve seen though, these landscape designs remain one of our favor-
ites.
They require a minimum of time and effort, yet the result is a design that’s both unusual
and attractive.
We used cherry and walnut for ours, but just about any combination of wood species can
be used as long as there is good color contrast.
The maple veneer strip serve to fill the space made by the band saw cut while at the
same time creating a nice detail.
Steps 1 through 9 explain the construction techniques.
This procedure keeps waste to a minimum and results in two cutting boards.
Landscape Cutting Boards Complete
Schematic


Landscape Cutting Boards Step-by-Step In-
structions
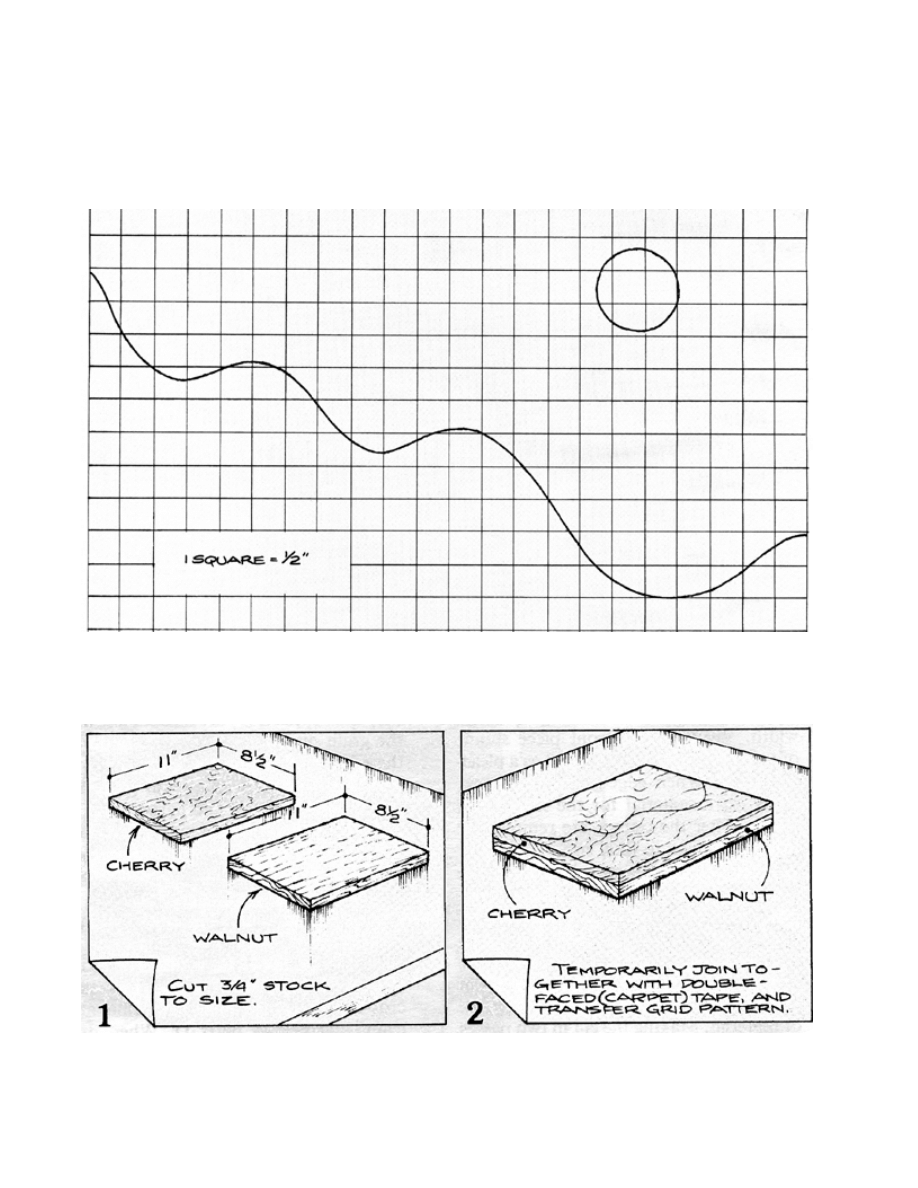
1. Select 3/4" thick straightgrained stock that’s free from knots or other defects for
best appearance.
2. Cut two boards, one from cherry and one from walnut, each measuring 8-1/2"
wide by 11" long.
3. Use double-faced carpet tape to temporarily join the two boards together, making
sure the edges are flush.
4. Transfer the grid pattern to the top board.
5. Use a fine-toothed blade (12 or more teeth per inch) that’s 1/8 – 1/4" wide to band
saw the joined boards.
6. Cut 1" wide maple veneer to a length of about 18".
7. Match each cherry section to a mating walnut half.
8. Apply glue to both sides of the veneer and to the mating surfaces of the walnut
and cherry, making sure the veneer extends above the surface on both sides so that
it can be sanded flush after the glue dries.
9. Clamp the two sections firmly.
10. Keep the end edges aligned with an end clamp.
11. Allow the glue to dry.
12. Sand the veneer flush with the surface on both sides and the ends.
13. Lay out and mark the location of the “moon” on each side.
14. Use a forstner bit to bore a 1-1/4" diameter by 3/8" deep hole for the moon.
15. Cut a 1/2" thick by 2" square blank for the moon.
16. Use a compass to scribe a 1-1/4" diameter circle.
17. Bore a 1/4" diameter by 1/4" deep pivot hole on one side only.

18. Use the band saw to cut just outside the scribed circle.
19. Make a jig for the disc sander to sand the moon to a perfect circle by using a piece
of 3/4" scrap stock cut to about 3" wide and 5" long.
20. Drill a 7/16" deep hole at a point 1/2" from one end to accommodate a 1/4" diam-
eter x 5/8" long pin.
21. Glue the pin in the hole, making sure that it protrudes 3/16".
22. Start the disc sander.
23. Assemble the moon to the jig pin.
24. Slide the jig toward the disk sander until it sands to the 1-1/4" diameter circle.
25. Stop the sander and clamp the jig to the disk sander table.
26. Rotate the moon 360 degrees to create a perfect circle.
27. Glue and clamp each moon in place.
28. Allow the glue to dry.
29. Smooth and final sand.
30. Finish with non-toxic finish.
These plans were originally published in Volume 9, Issue 6 of The Woodworker’s Jour-
nal (Nov./Dec.
1985, pages 50-51).
Wyszukiwarka
Podobne podstrony:
Cutting Board 1
cutting board knife
Cutting Board 2
Cutting Board
Cutting Board 1
cutting board knife
Cutting Board French Bread Cutter
HOW TO CLEAN A CUTTING BOARD
Cutting Edge Placement Tests
Cutting Threaded Rod
The cutting sticks problem
cutting lines
Panel Cutting Sled
9 Wire?M V20 No Core Cutting
12 Wire?M V20 Cutting a 4 axis part
Ch22 cutting tool materials
więcej podobnych podstron