
Replacing parts in an assembly
Publication Number
spse01665


Replacing parts in an assembly
Publication Number
spse01665

Proprietary and restricted rights notice
This software and related documentation are proprietary to Siemens Product
Lifecycle Management Software Inc.
© 2011 Siemens Product Lifecycle Management Software Inc. All Rights Reserved.
Siemens and the Siemens logo are registered trademarks of Siemens AG. Solid Edge
is a trademark or registered trademark of Siemens Product Lifecycle Management
Software Inc. or its subsidiaries in the United States and in other countries. All
other trademarks, registered trademarks or service marks belong to their respective
holders.
2
Replacing parts in an assembly
spse01665

Contents
Replacing parts in an assembly
. . . . . . . . . . . . . . . . . . . . . . . . . . . . . . . 2-1
Replacing parts in assemblies . . . . . . . . . . . . . . . . . . . . . . . . . . . . . . . . . . . 2-2
Activity: Replacing parts in an assembly
. . . . . . . . . . . . . . . . . . . . . . . . . . . 2-5
Lesson review . . . . . . . . . . . . . . . . . . . . . . . . . . . . . . . . . . . . . . . . . . . . . . . 2-6
Answers . . . . . . . . . . . . . . . . . . . . . . . . . . . . . . . . . . . . . . . . . . . . . . . . . . . 2-7
Lesson summary
. . . . . . . . . . . . . . . . . . . . . . . . . . . . . . . . . . . . . . . . . . . . 2-8
Activity: Replacing parts in an assembly . . . . . . . . . . . . . . . . . . . . . . . . A-1
Open an existing assembly with all the parts active . . . . . . . . . . . . . . . . . . . . A-2
Replacing the subassembly . . . . . . . . . . . . . . . . . . . . . . . . . . . . . . . . . . . . . A-3
Summary . . . . . . . . . . . . . . . . . . . . . . . . . . . . . . . . . . . . . . . . . . . . . . . . . . A-4
spse01665
Replacing parts in an assembly
3


Lesson
1
Introduction
Welcome to self paced training for Solid Edge. This course is designed to educate you
in the use of Solid Edge. The course is self-paced and contains instruction followed
by activities.
Solid Edge self-paced courses
•
spse01510—Sketching
•
spse01515—Constructing base features
•
spse01520—Moving and rotating faces
•
spse01525—Working with face relationships
•
spse01530—Constructing treatment features
•
spse01535—Constructing procedural features
•
spse01536—Modeling synchronous and ordered features
•
spse01540—Modeling assemblies
•
spse01545—Creating detailed drawings
•
spse01546—Sheet metal design
•
spse01550—Practicing your skills with projects
•
spse01560—Modeling a Part Using Surfaces
•
spse01610—Solid Edge frame design
•
spse01640—Assembly patterning
•
spse01645—Assembly systems libraries
•
spse01650—Working with large assemblies
•
spse01655—Revising assemblies
•
spse01660—Assembly reports
•
spse01665—Replacing parts in an assembly
•
spse01670—Designing in the context of an assembly
spse01665
Replacing parts in an assembly
1-1

Lesson 1
Introduction
•
spse01675—Assembly features
•
spse01680—Inspecting assemblies
•
spse01685—Alternate assemblies
•
spse01686—Adjustable parts and assemblies
•
spse01690—Virtual components in assemblies
•
spse01691—Exploding assemblies
•
spse01692—Rendering assemblies
•
spse01693—Animating assemblies
•
spse01695—XpresRoute (tubing)
•
spse01696—Creating a Wire Harness with Harness Design
•
spse01424—Working with Solid Edge Embedded Client
Start with the tutorials
Self-paced training begins where tutorials end. Tutorials are the quickest way for
you to become familiar with the basics of using Solid Edge. If you do not have any
experience with Solid Edge, please start by working through the tutorials for basic
part modeling and editing before starting this self-paced training.
1-2
Replacing parts in an assembly
spse01665

Lesson
2
Replacing parts in an assembly
It is possible to quickly replace a part in an assembly with another part or
subassembly that has similar geometry.
spse01665
Replacing parts in an assembly
2-1

Lesson 2
Replacing parts in an assembly
Replacing parts in assemblies
At times you may need to replace a part or subassembly in an assembly with a new
part or subassembly. For example, a part may be placed in multiple assemblies,
and at a later time, the part needs to be redesigned for one assembly only. After
creating a new version of the part, you can replace the existing part using the
Replace command.
Tip
In the Teamcenter-managed environment, you should use the Revisions
command to replace an item with a different revision of the same item.
Replacing similar parts
When you replace a part with a new version of the same part, Solid Edge attempts
to use the existing assembly relationships to position the new version. However, if
any faces used to position the old part were consumed when the part was modified;
assembly relationships can fail. If this occurs, you can delete the affected assembly
relationships using PathFinder, and then apply new relationships to completely
position the new part.
You can also use a member of a family of parts as a replacement part. If the current
part is not a family of parts member, and you want to replace it with a family of parts
member, use the Replacement Part dialog box to select a family of parts member as
the replacement part.
If the current part is a member of a family of parts, the Family of Parts Member
dialog box is automatically displayed when you select the part you want to replace.
You can then specify another family member you want to use as the replacement
part. If you want to replace the family of parts member with any other part, click the
Browse button on the Family of Parts Member dialog box to display the Replacement
Part dialog box. This allows you to select any part as the replacement part.
2-2
Replacing parts in an assembly
spse01665

Replacing parts in an assembly
Replacing dissimilar parts
When you replace a part with a different part, one that was created independently of
the part being replaced, Solid Edge compares the geometry of the two parts. If the
geometry matches sufficiently, the replacement part is positioned properly.
When replacing dissimilar parts, the original part and the replacement part are
required to be in the same relative orientation in their respective part files.
Replacing one occurrence of a part
If the part you are replacing has been placed more than once in the active assembly,
you can specify whether to replace all occurrences of the part, or only the selected one.
Replacing parts in subassemblies
The Replace command can be used to replace parts in the active assembly only. If
the part you want to replace is in a subassembly, you will have to in-place activate
the subassembly before replacing the part.
Replacing subassemblies
When you replace a subassembly, you can replace it with another subassembly or
you can replace it with a part. If the current or replacement subassembly is also a
family of assemblies, you can use the Assembly Member dialog box to specify which
family member you want to use as the replacement.
Note
For more information on working with families of assemblies, see the Family
of Assemblies and Alternate Position Assemblies topic in online Help.
Failed relationships during part replacement
Assembly relationships can fail when you are replacing parts. Normally, this
happens because the assembly cannot locate the faces in the new part that it was
connected to in the old part. When this occurs, a symbol displays to the left of the
failed relationship in the lower pane of the PathFinder.
Replacing renamed occurrences
When you replace an assembly occurrence whose default name in PathFinder has
been overridden using the Rename or Occurrence Properties commands on the
spse01665
Replacing parts in an assembly
2-3

Lesson 2
Replacing parts in an assembly
PathFinder shortcut menu, you can control whether the replacement occurrence uses
the new document name or the overridden name in PathFinder.
When you set the Use Default Placement Name During Replace Part option on the
Assembly tab on the Options dialog box, the document name of the replacement
occurrence is used. When you clear this option, the overridden name is maintained.
When you override the name of an assembly occurrence, the actual document name
is not changed.
2-4
Replacing parts in an assembly
spse01665
Replacing parts in an assembly
Activity: Replacing parts in an assembly
Overview
The objective of this activity is to show how to replace a part or subassembly in
an assembly.
Activity
In this activity you will replace a subassembly with a similar subassembly inside
of the top level assembly.
Turn to Appendix A for the activity.
spse01665
Replacing parts in an assembly
2-5

Lesson 2
Replacing parts in an assembly
Lesson review
Answer the following questions:
1.
Can you replace subassemblies within an assembly?
2.
Can parts with dissimilar geometry be replaced?
3.
Can you replace parts in a subassembly, and if so, how?
4.
Can you replace members when creating a family of assemblies?
2-6
Replacing parts in an assembly
spse01665

Replacing parts in an assembly
Answers
1.
Can you replace subassemblies within an assembly?
Subassemblies as well as parts can be replaced in a top level assembly.
2.
Can parts with dissimilar geometry be replaced?
Parts with dissimilar geometry can be replaced, however failed relationships are
likely to occur. These would have to be repaired.
3.
Can you replace parts in a subassembly, and if so, how?
Parts can be replaced in a subassembly by in place activating the subassembly
and then replacing the part.
4.
Can you replace members when creating a family of assemblies?
When creating a member of a family of assemblies, replacing a part as an
occurrence override.
spse01665
Replacing parts in an assembly
2-7

Lesson 2
Replacing parts in an assembly
Lesson summary
In this lesson you learned how to replace a subassembly within a top level assembly.
2-8
Replacing parts in an assembly
spse01665
A
Activity: Replacing parts in
an assembly
Overview
This activity demonstrates how to replace a part in an assembly.
Objectives
You will replace a subassembly in an assembly.
spse01665
Replacing parts in an assembly
A-1
A
Activity: Replacing parts in an assembly
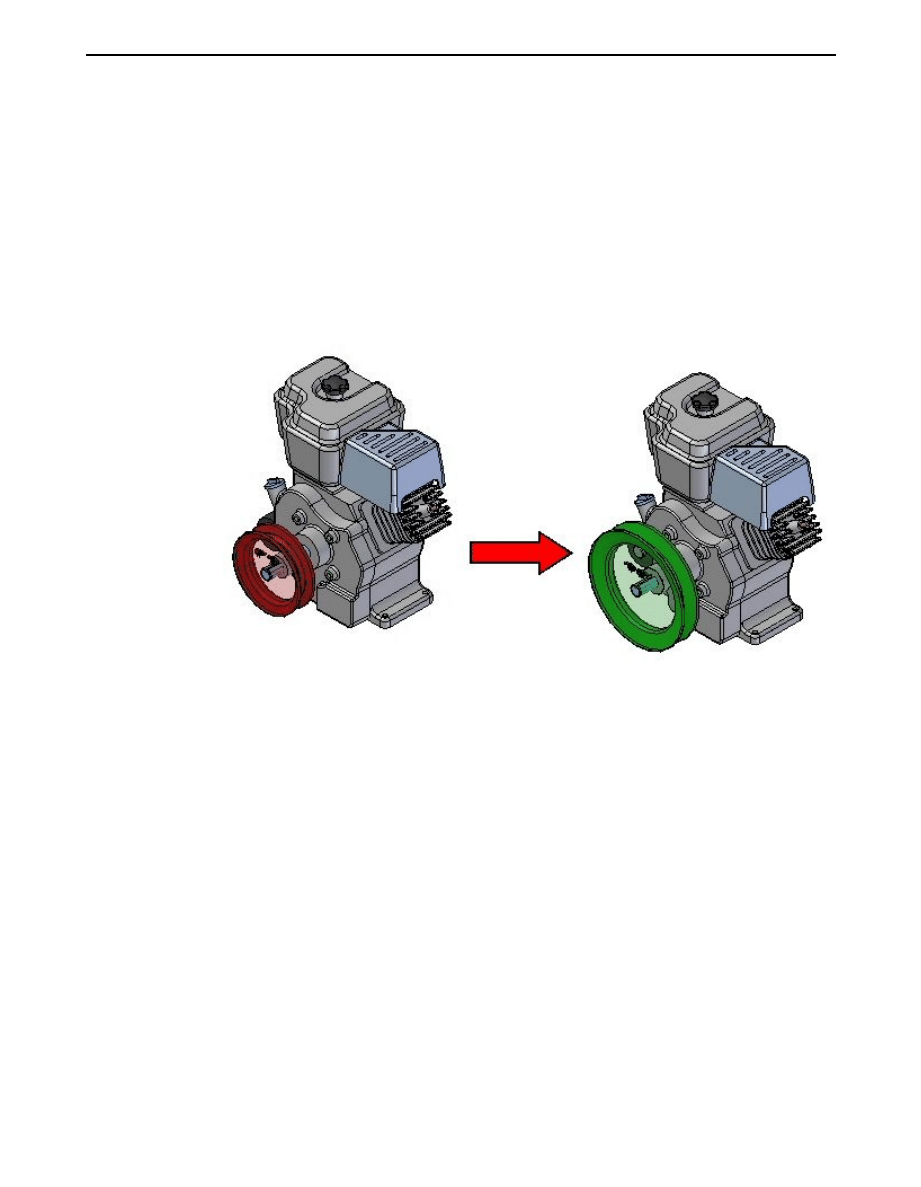
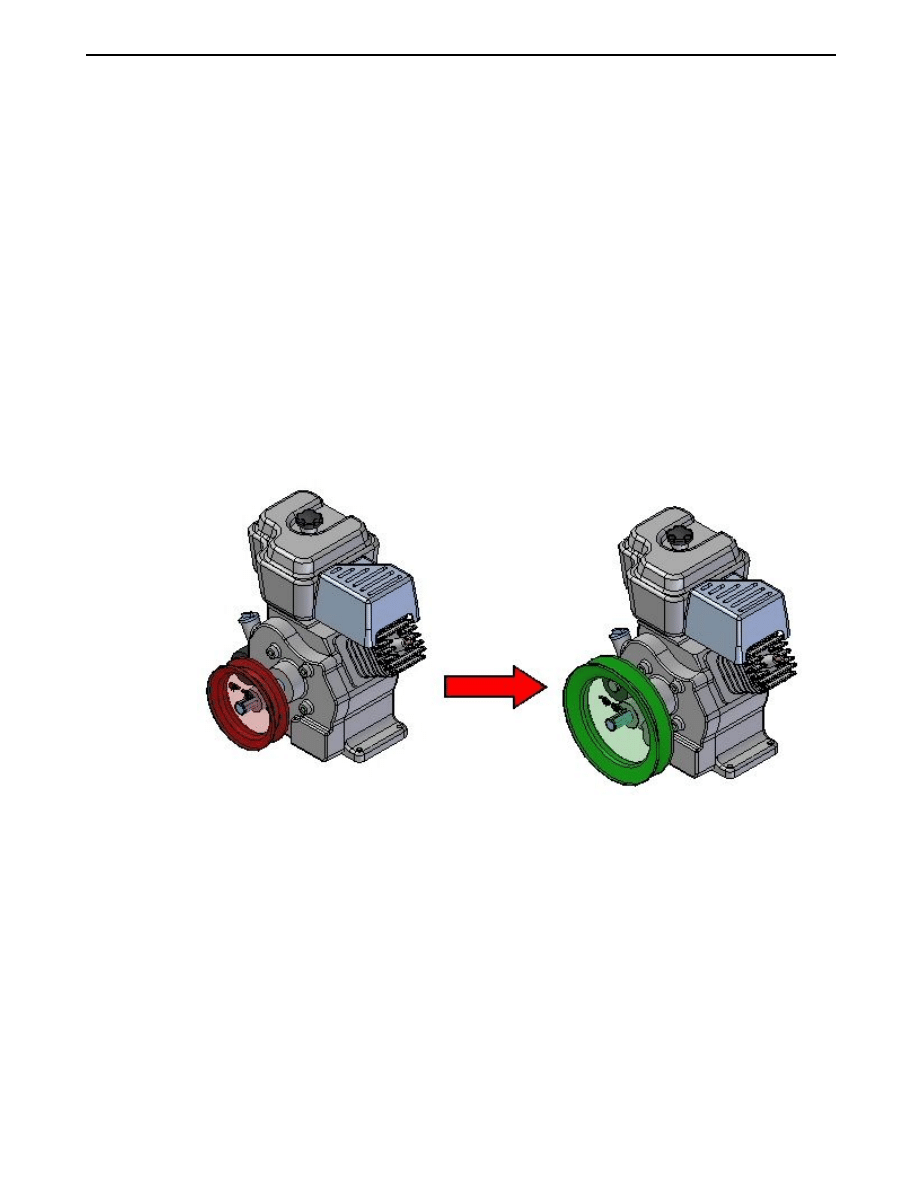
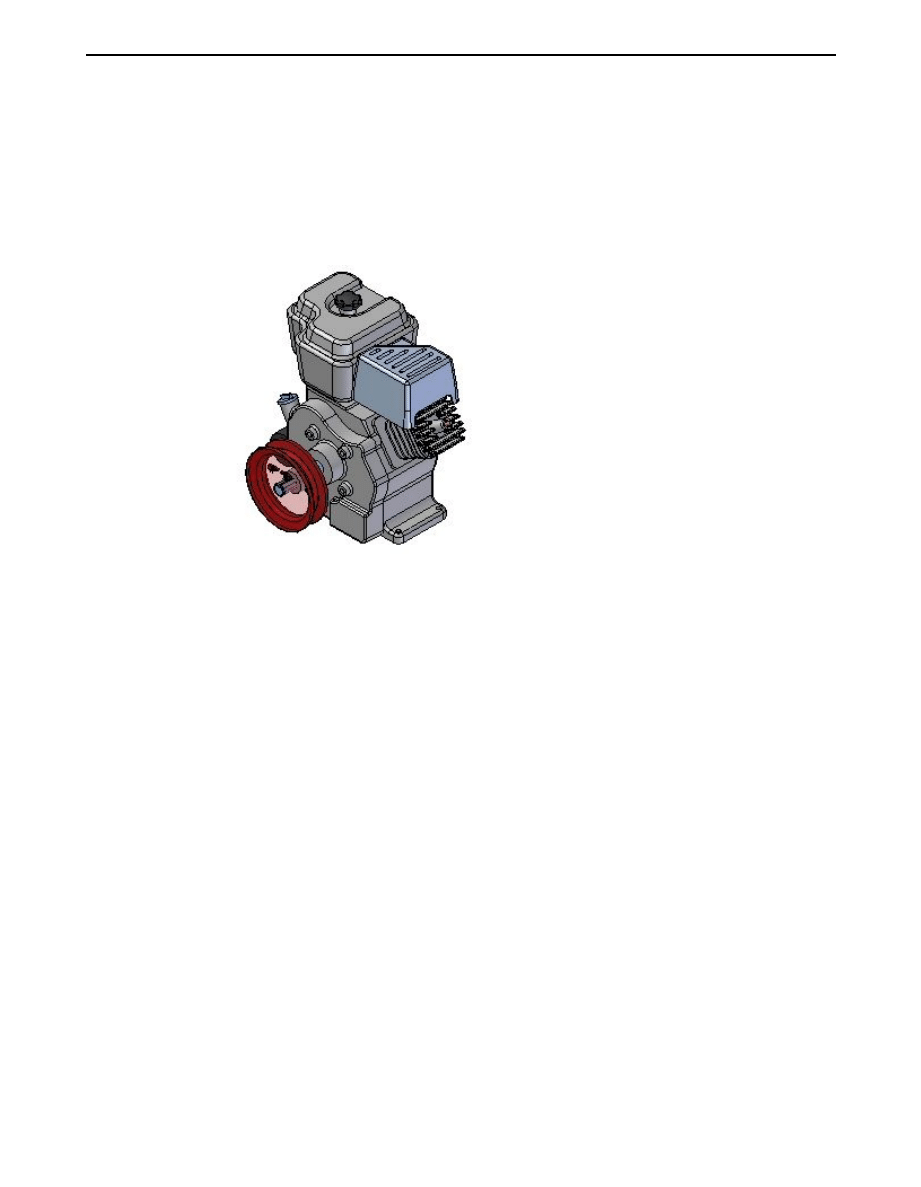
Open an existing assembly with all the parts active
The assembly you will open has a small pulley subassembly that you will replace
with a large pulley subassembly.
▸
From the Solid Edge start screen, click Open Existing Document. Browse for
Engine.asm in the folder where the activity files are located.
A-2
Replacing parts in an assembly
spse01665

Activity: Replacing parts in an assembly
Replacing the subassembly
The subassembly small.asm will be replaced with large.asm.
▸
In the Home tab, in the Modify group, choose the Replace Part command
.
▸
In Pathfinder, select small.asm as the subassembly to replace.
▸
In the replacement part dialog box, browse for the assembly large.asm in the
folder where the activity files are located, and then click open.
The subassembly has been replaced.
▸
Save and close the assembly. This completes the activity.
spse01665
Replacing parts in an assembly
A-3

A
Activity: Replacing parts in an assembly
Summary
In this activity you learned how to replace a subassembly within a top level assembly.
A-4
Replacing parts in an assembly
spse01665
Document Outline
- Contents
Wyszukiwarka
Podobne podstrony:
Iannace, Ianniello, Romano Room Acoustic Conditions Of Performers In An Old Opera House
Discuss some of the issues raised in An Inspector?ls
Emergency Survival Safety Preparations Food And Water In An Emergency
Evidence of an oscillating peripheral clock in an equine fib
20090702 01 One?ghan man?ad of wounds sustained in an escalation of force incident Friday
Angielski tematy Working in an international context
Estimating Temperatures in an Air
METAREPRESENTATIONS IN AN EVOLUTIONARY PERSPECTIVE
Performance Improvements in an arc welding power supply based on resonant inverters (1)
Variations in Risk and Treatment Factors Among Adolescents Engaging in Different Types of Deliberate
Sean Michael Love in an Elevator
The Effect of DNS Delays on Worm Propagation in an IPv6 Internet
#0733 – Voting in an Election
Rethinking SSL Development in an Appified World
Ingold, T Bindings against boundaries entanglements of life in an open world
Lisa Watanabe Securing Europe; European Security in an American Epoch (2010)
Civilian Victims in an Asymmetrical Conflict Operation Enduring Freedom, Afghanistan Aldo A Benini,
więcej podobnych podstron