Painter 7 · Screen Tones Tutorial
Back to Tutorials
A visual guide to making screen tones with Painter 7.
The purpose of this guide is to visually show how to acomplish very convincing
screen tone effects with Painter 7. The tutorial is very visual, this was done in
consideration for those of us (like me) who need visual cues to learn properly.
Setting up your Canvas
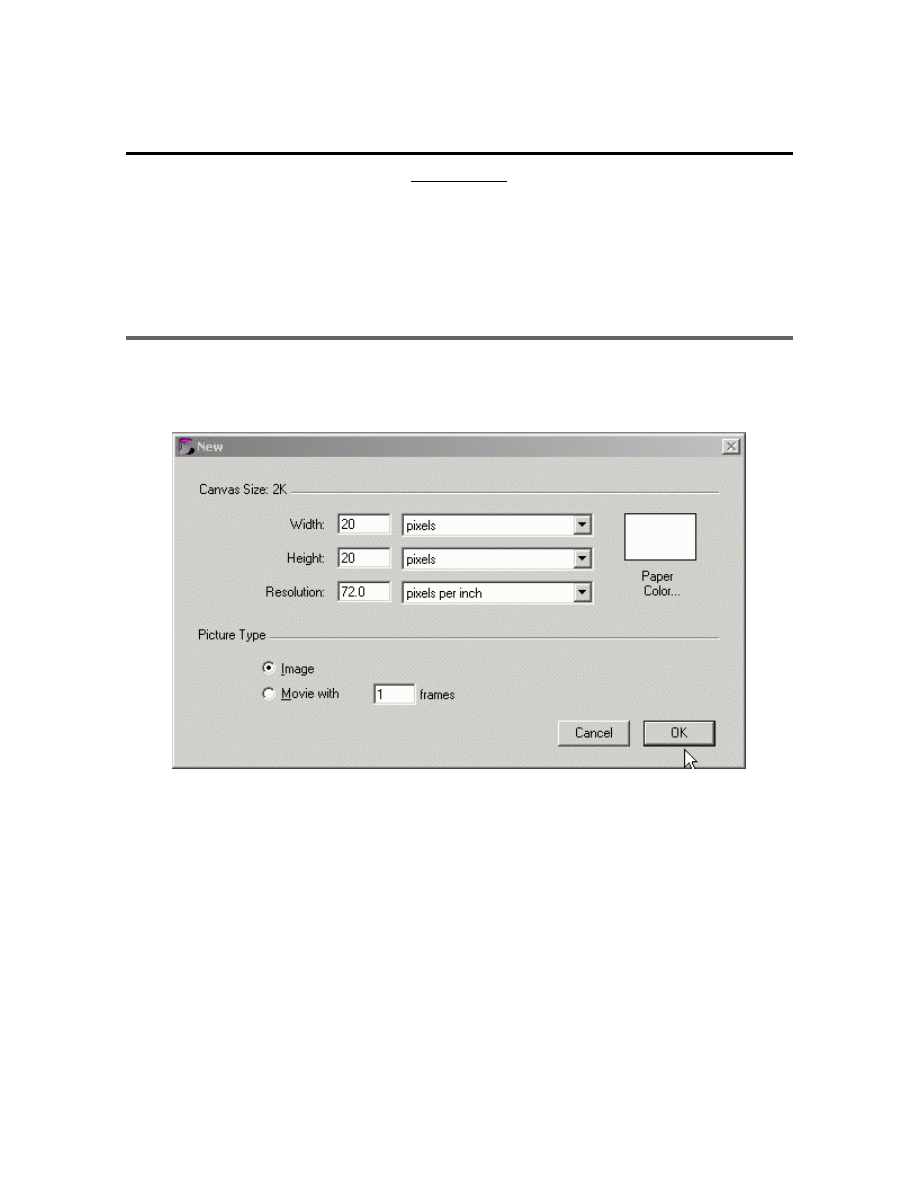
· Create a new file 20x20 in size.
· Zoom in to about 3200%
Page 1 of 17
The Paper Mill - Painter 7 · Screen Tones Tutorial
06/11/03
http://www.astralmatrix.net/bahn/tutorial/screentones/
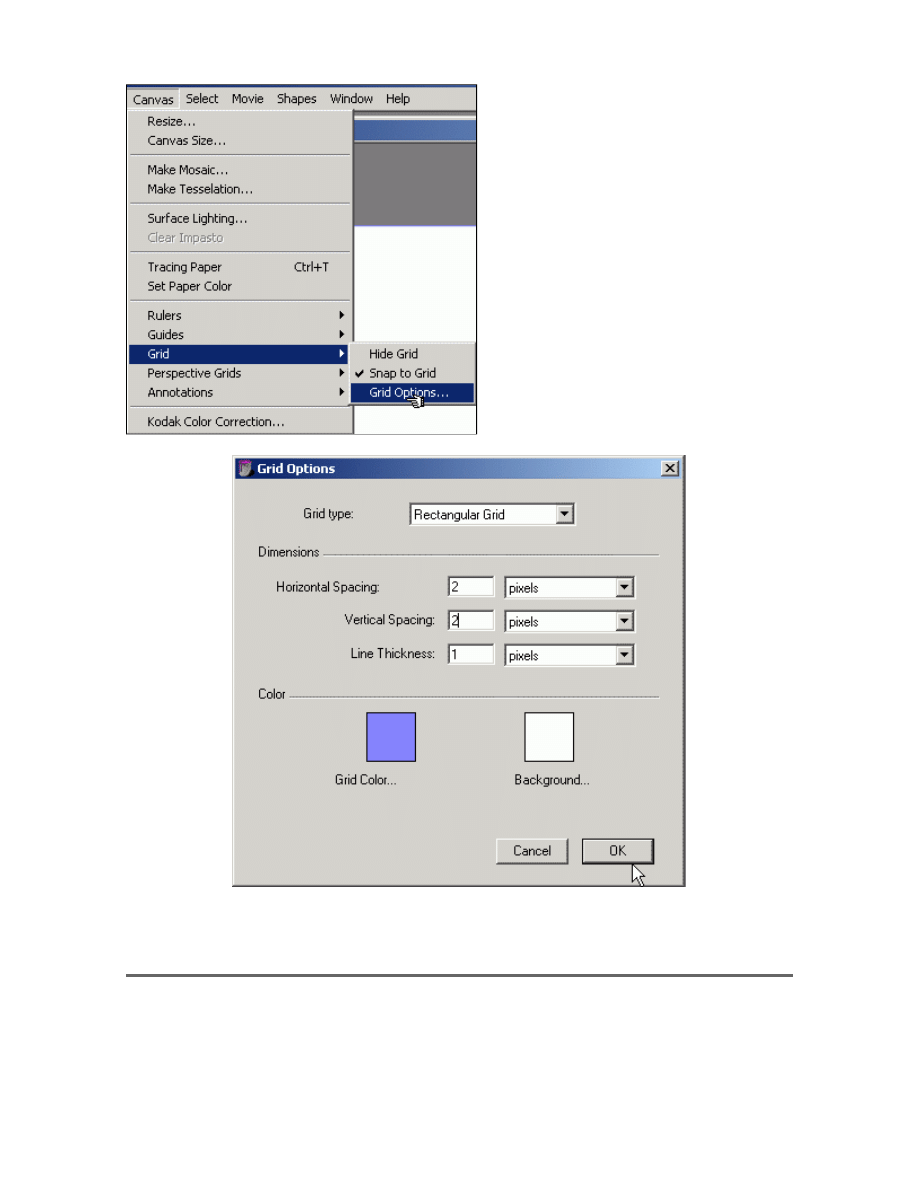
· Horizontal spacing and vertical spacing at 2. You can have it at 1 or 5 or whatever
you please. The guide helps us make a coherent tone.
Making the tones
· Click on Show Grid and then
follow into Grid Options.
Page 2 of 17
The Paper Mill - Painter 7 · Screen Tones Tutorial
06/11/03
http://www.astralmatrix.net/bahn/tutorial/screentones/
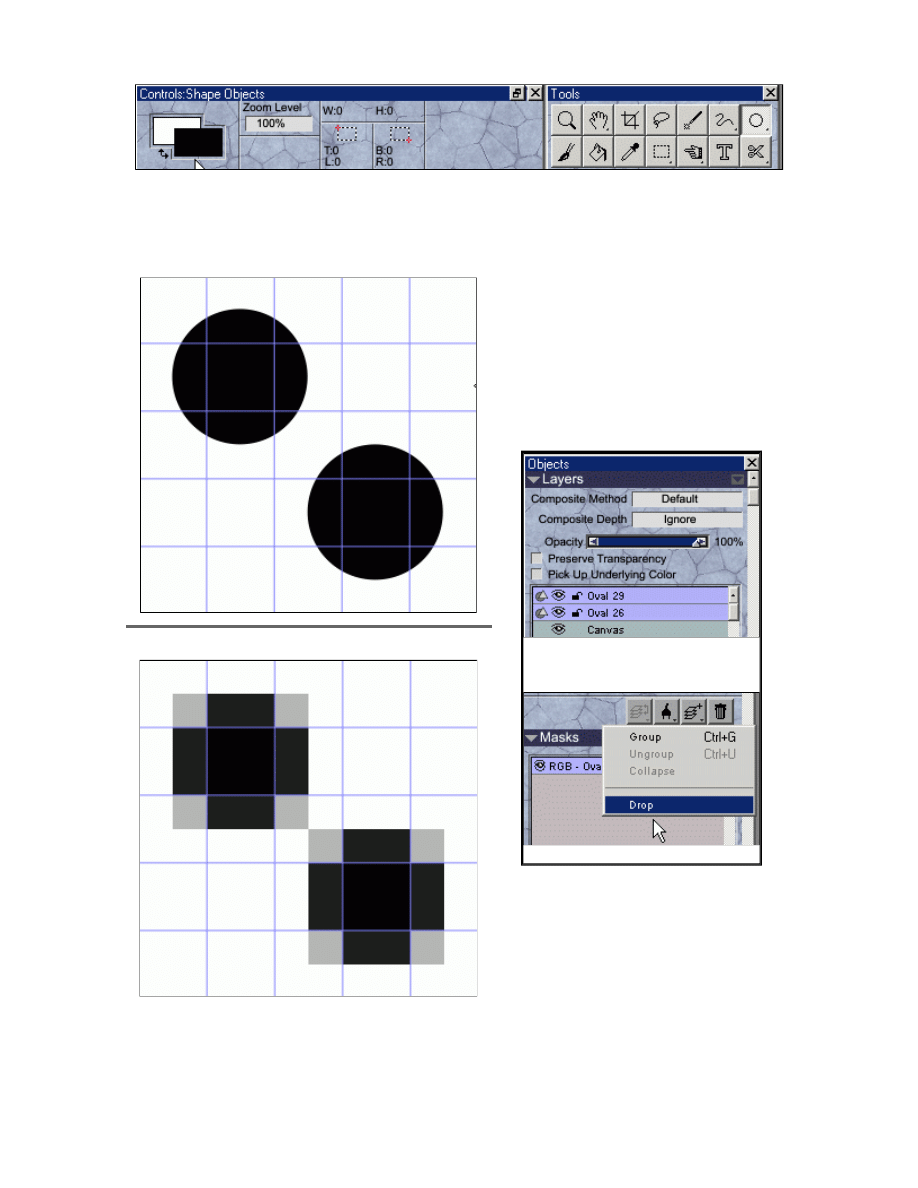
· Select black and the circle tool (If you do not see the circle tool, click and hold on
the square icon whre the circle is on my example and select the circle)
Before Drop
After Drop
· Draw something like this.Your setting
up the dots in a brick pattern.
· Remember, you are extremely
zoomed you are seeing vector drawings
and they don't represent actual pixels.
Dropping the vectors.
· Before we continue I want to make a
short note about vector circles.
Select both circles in Layers
by holding Ctrl + clicking each
Oval layer.
Then drop those layers.
Place cursor over the circle
Page 3 of 17
The Paper Mill - Painter 7 · Screen Tones Tutorial
06/11/03
http://www.astralmatrix.net/bahn/tutorial/screentones/
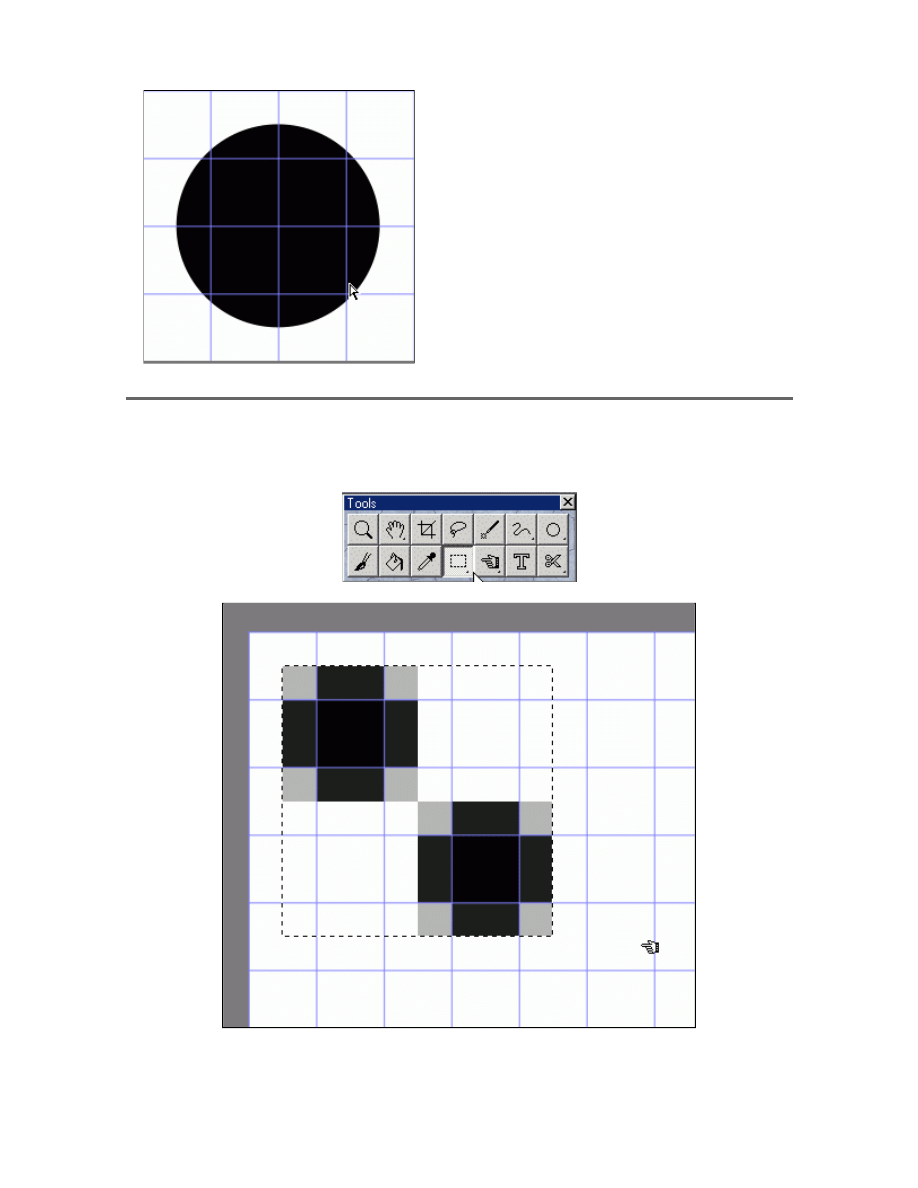
Creating The Pattern
Select the Rectangle Selection tool
· Select your dots thusly. This should be a perfect tile.
· Notice the circle is bigger. It's very smooth.
But when dropped into a rasterized mode
(mouse over the image) we get a rather
jaggy image. Considering we are 2300%
zoomed in, this isn't so bad.
· When using tones, the larger the dpi and
resolution, the better. I usually work on a
drawing double it's original size when i'm
publishing to the net. I proceed to resample
it to half it's original size.
Page 4 of 17
The Paper Mill - Painter 7 · Screen Tones Tutorial
06/11/03
http://www.astralmatrix.net/bahn/tutorial/screentones/
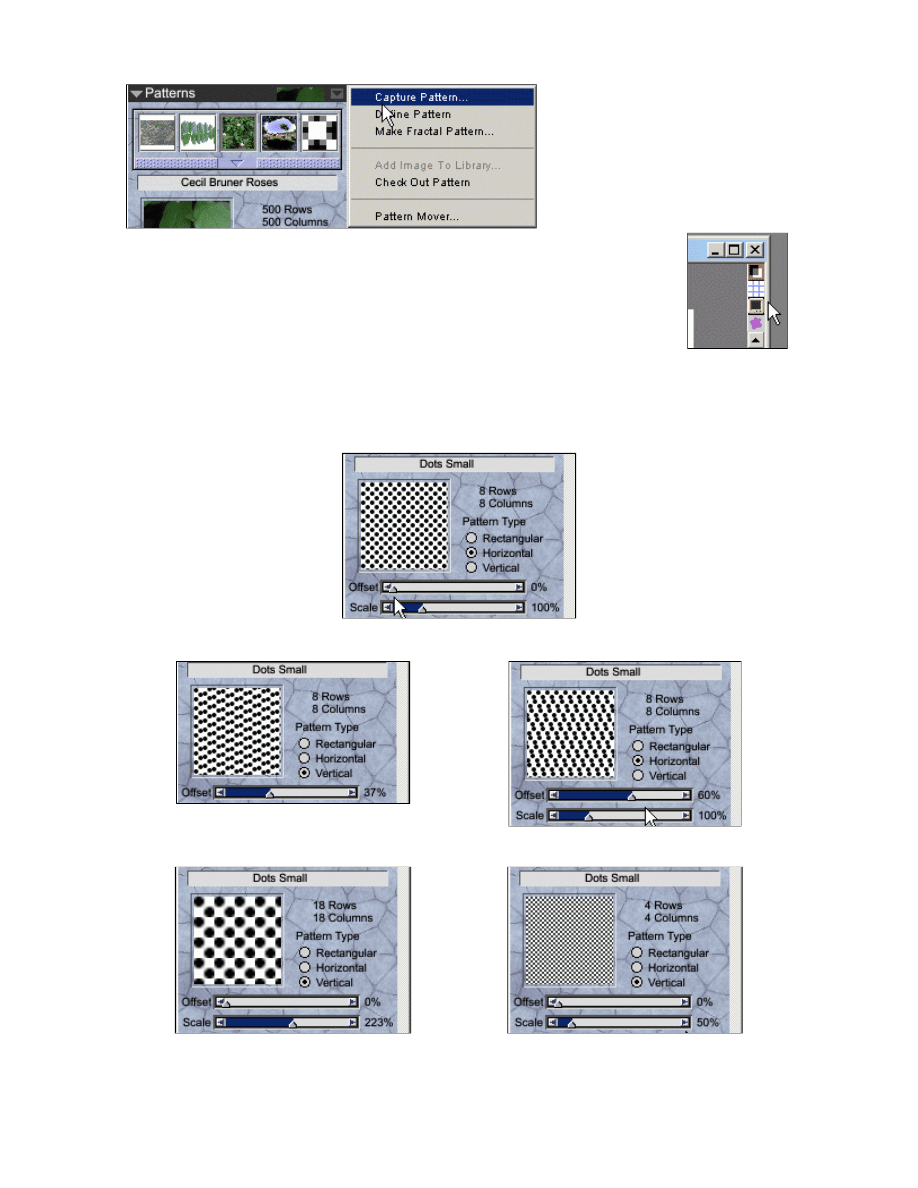
· We can now adjust the tiling of our pattern. We can do this to fix our pattern or alter
our pattern for interesting effects.
· When you Scale bigger, there is this ugly clipping effect. It can only be defeated by
· Click on the arrow pointing
downwards in your Patterns
window. Click on Capture
Pattern.
· Name the file and click OK and remove the grid lines (since we don't
need them anymore). There is shortcut in the upper hand corner of
your canvas window.
Original Settings
Vertical
Horizontal
Larger
Smaller
Page 5 of 17
The Paper Mill - Painter 7 · Screen Tones Tutorial
06/11/03
http://www.astralmatrix.net/bahn/tutorial/screentones/
making a larger redudant version of your original tiles. You can safely Scale you tiles
up to 130% before any noticeable clipping. The other way to fix this is too keep all dots
away from the edges when you initially select it.
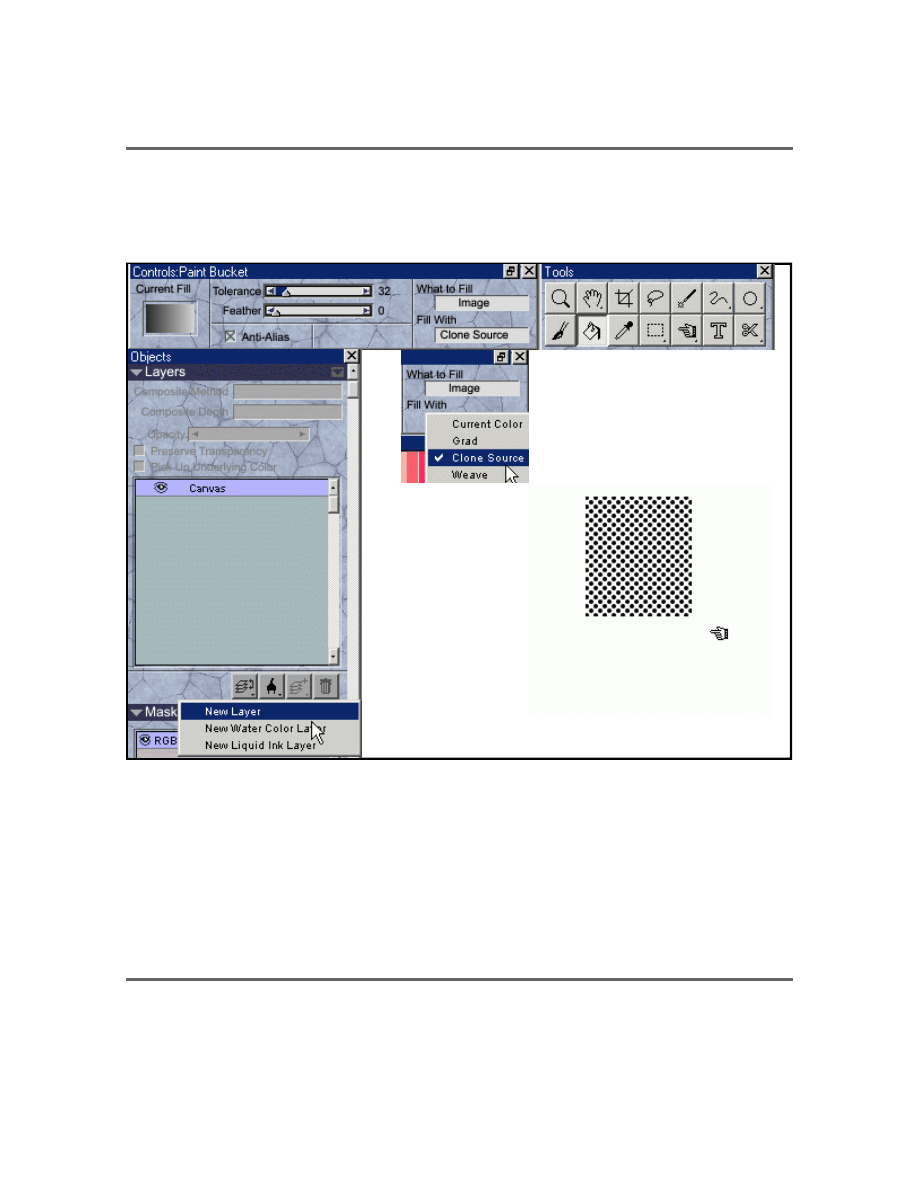
Displaying Your Tone
· Create a new canvas, sizeably larger then 20x20. I think 400x400 should suffice.
· Now you have a square sheet of tone.
· You can also use the Lasso selection tool. Draw a selection then click with the Fill
Tool to fill in the area. Remember: Always make a New Layer for each new tone. If it
has a different size or adjustment. Doing so will keep your tones manageable.
· Next, we want to access our Mask window. (Remember to have one of your tone
Layers selected). Click on the eyeball beside the name of the mask your working on (It
should be underneath a mask called RGB).
Scratching and Erasing
· There are two ways to do what the following.
^ Click on the Fill icon.
< Click on Fill With and set it
to "Clone Source"
< In your Layers
window and add a
New Layer.
^ Click and drag the Fill Tool on
your new Layer.
Page 6 of 17
The Paper Mill - Painter 7 · Screen Tones Tutorial
06/11/03
http://www.astralmatrix.net/bahn/tutorial/screentones/
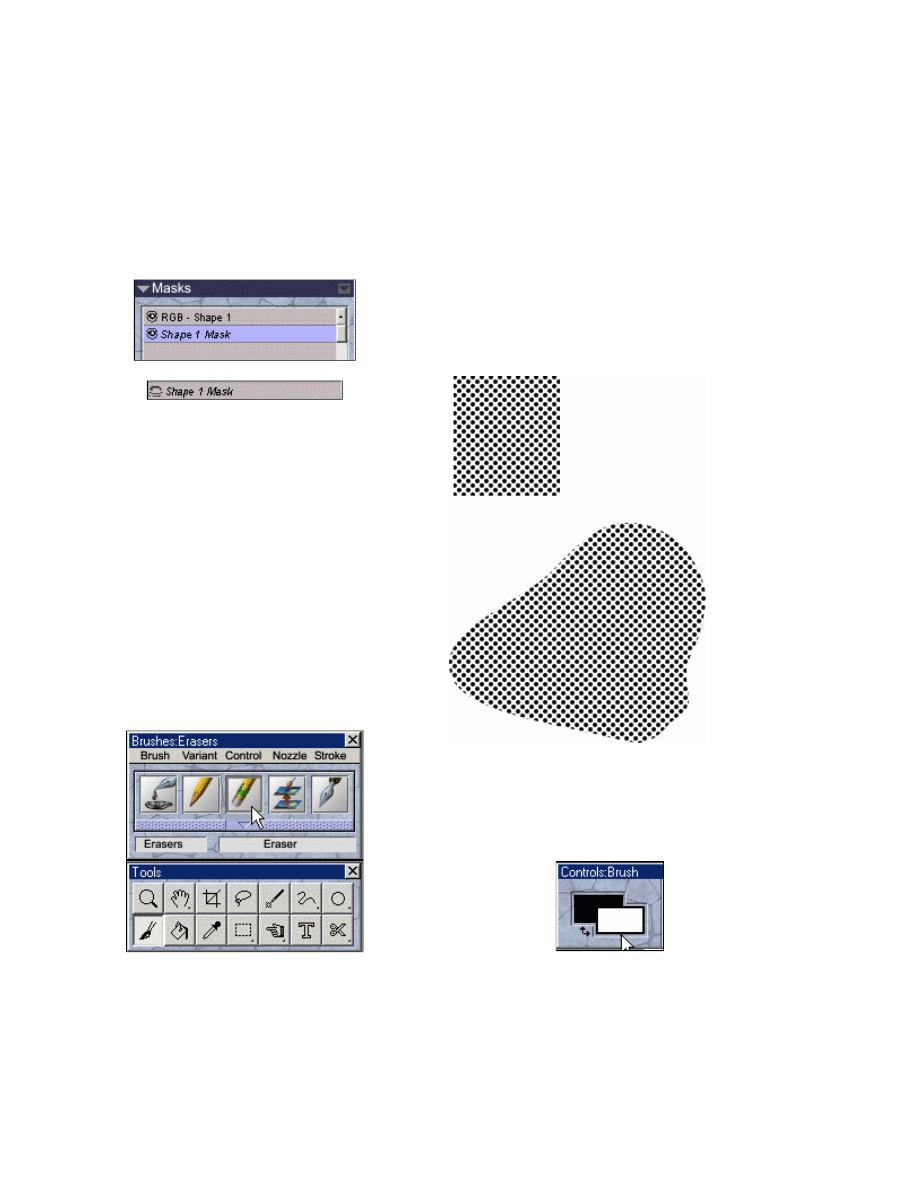
· Altering the actual image
or
· Altering the images Mask. We will alter the Mask because it keeps the scratchings
and minor touch-ups unafected by layer or canvas filters. The most interesting thing
about making tones with Painter 7 is how we can affect the look of the tones on 2
different levels.
Mask and Canvas
.
· Erase!
Mouse Over
^
· The black represents what
can be seen. White is what
cannot be seen. Greys
partially allow some of the
image to come through.
· Remember, you do not
have to have the mask visible
when we want to edit it. only
selected. Have the proper
Layer selected and the
proper Mask.
· Select the Eraser tool.
· Select the Paint tool
· Select white
Page 7 of 17
The Paper Mill - Painter 7 · Screen Tones Tutorial
06/11/03
http://www.astralmatrix.net/bahn/tutorial/screentones/
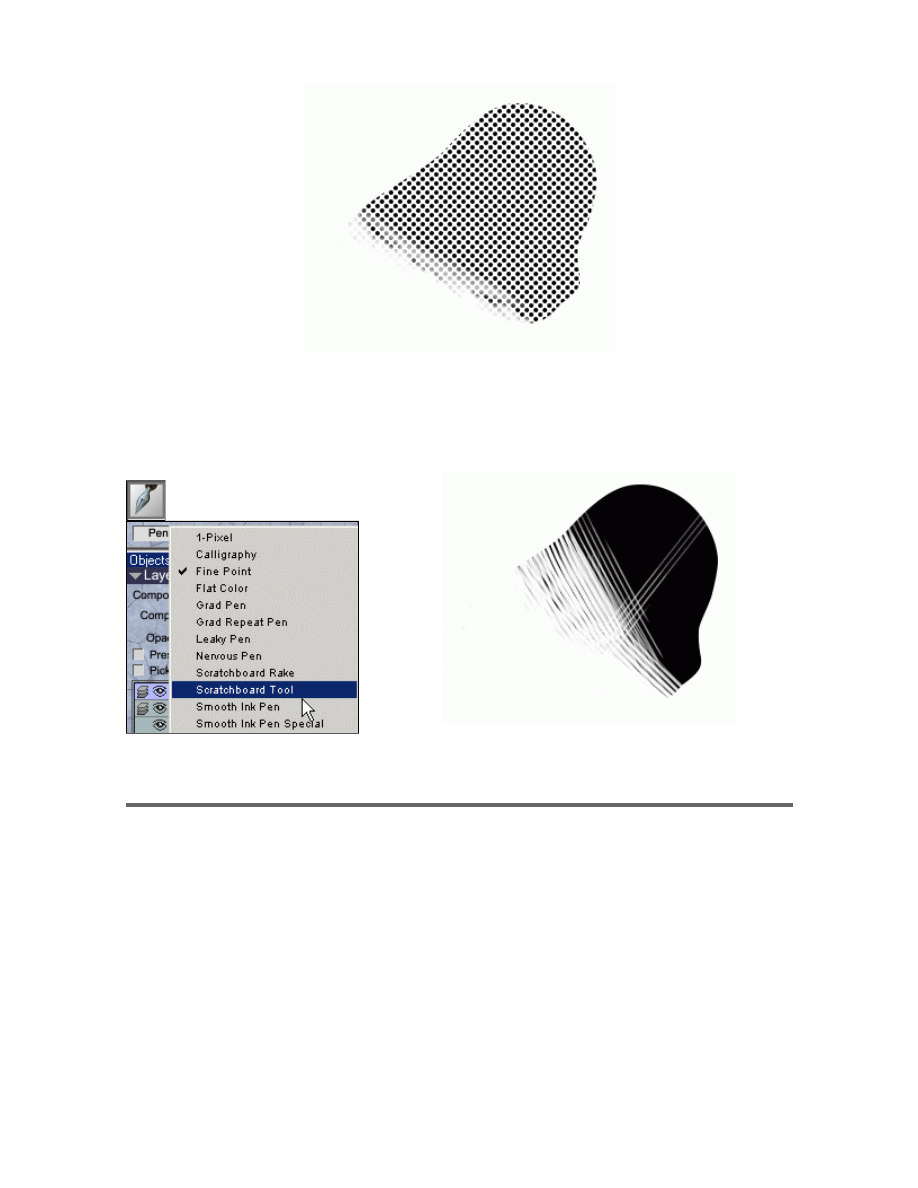
· We have an effect very similar to an eraser or electric eraser. A very convinvcing
effect. Now for scratching effects.
Gradients
· Select the Ink Pen tool
And there you have it.You don't need to use the
show maskoption but i've used it here for clarity. I
used Scratchboard Tool and Scratchboard Rake
for this effect.
· Select Scratchboard Tool ^
· Select the Two-Point Gradient from your Gradients
window.
Page 8 of 17
The Paper Mill - Painter 7 · Screen Tones Tutorial
06/11/03
http://www.astralmatrix.net/bahn/tutorial/screentones/
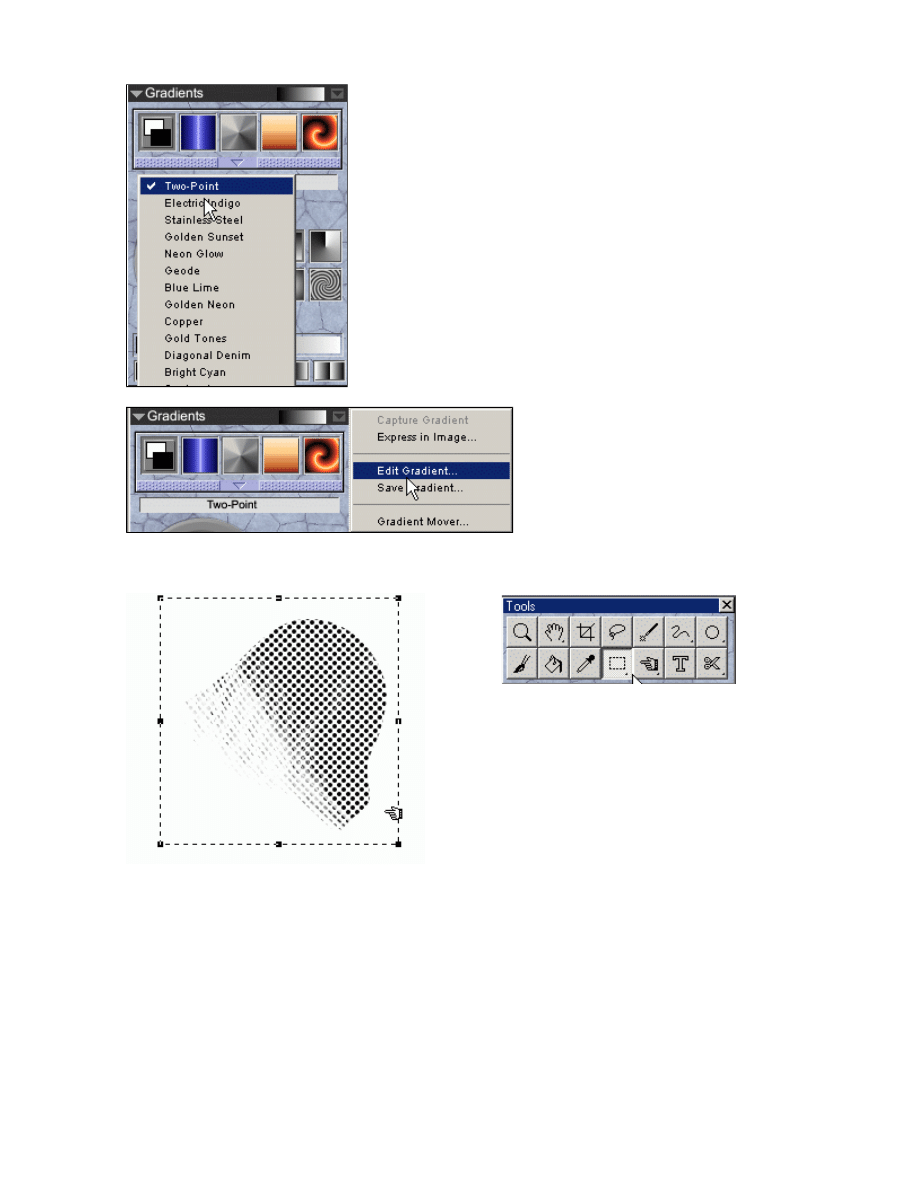
· Select the Rectangle Selection Tool
· Click on the downwards arrow
and select Edit Gradient to fine
tune your gradient.
· Make a box around your tone. (You can
also use the Oval selection or the Lasso).
· Make sure your bucket
fill is set on Clone
Source. Right click on the
selection box and
choose Fill...
Page 9 of 17
The Paper Mill - Painter 7 · Screen Tones Tutorial
06/11/03
http://www.astralmatrix.net/bahn/tutorial/screentones/
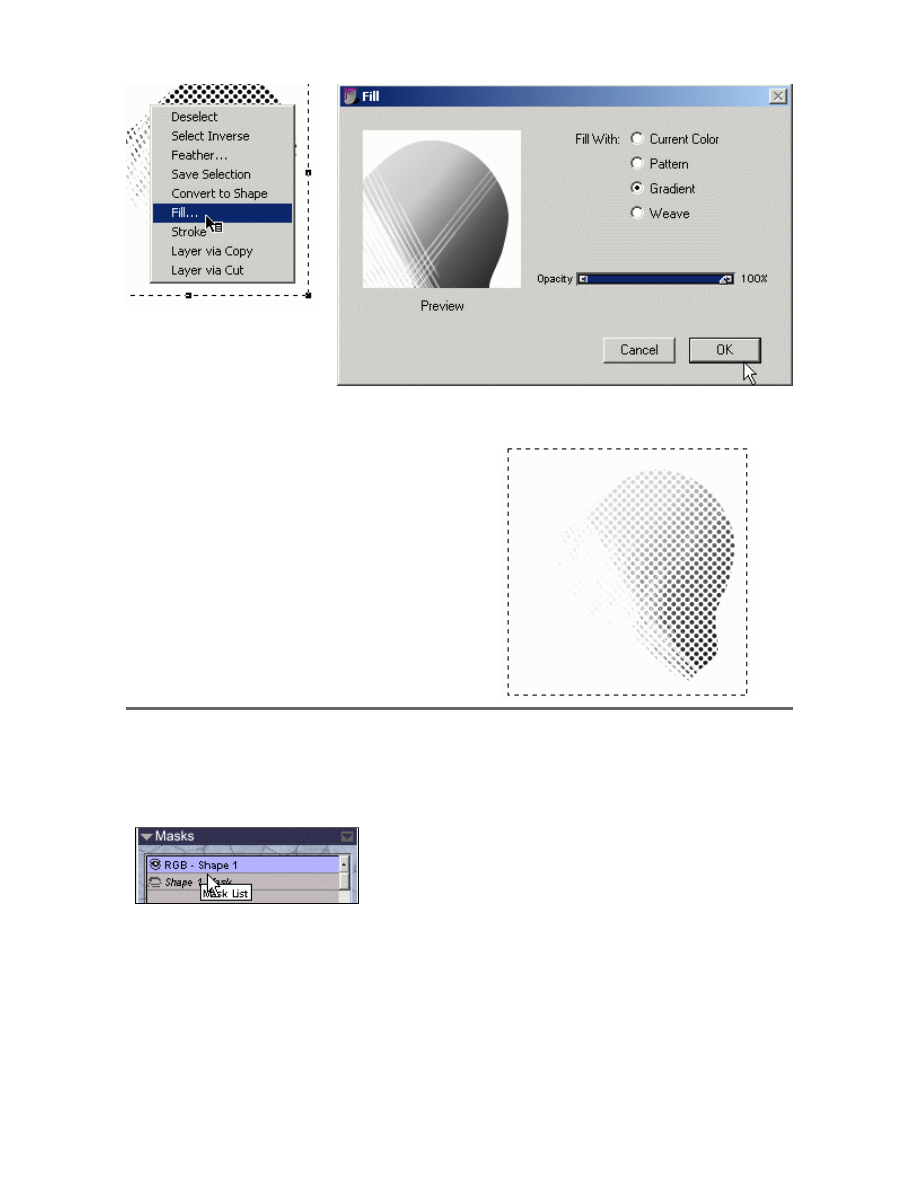
Click on Gradient and click OK.
Tweaking
· Lets go back to our Masks and select RGB (no mask effects)
· Dye Concentration will give your tone that "real screen tone gradient" feel. It will
shrink the ligher dots and increase the darker dots size.
· We have a gradient tone!
· But we still have a bite more work to do.
Page 10 of 17
The Paper Mill - Painter 7 · Screen Tones Tutorial
06/11/03
http://www.astralmatrix.net/bahn/tutorial/screentones/
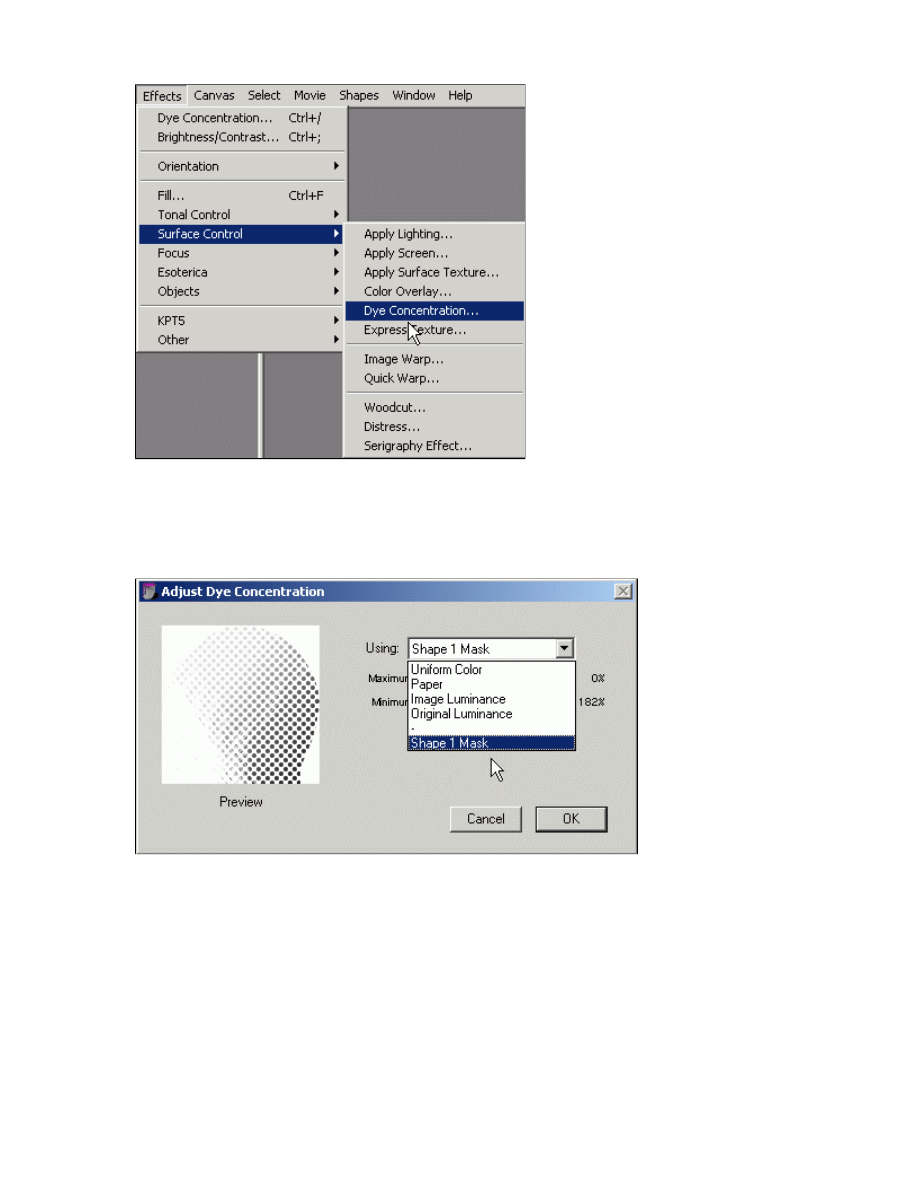
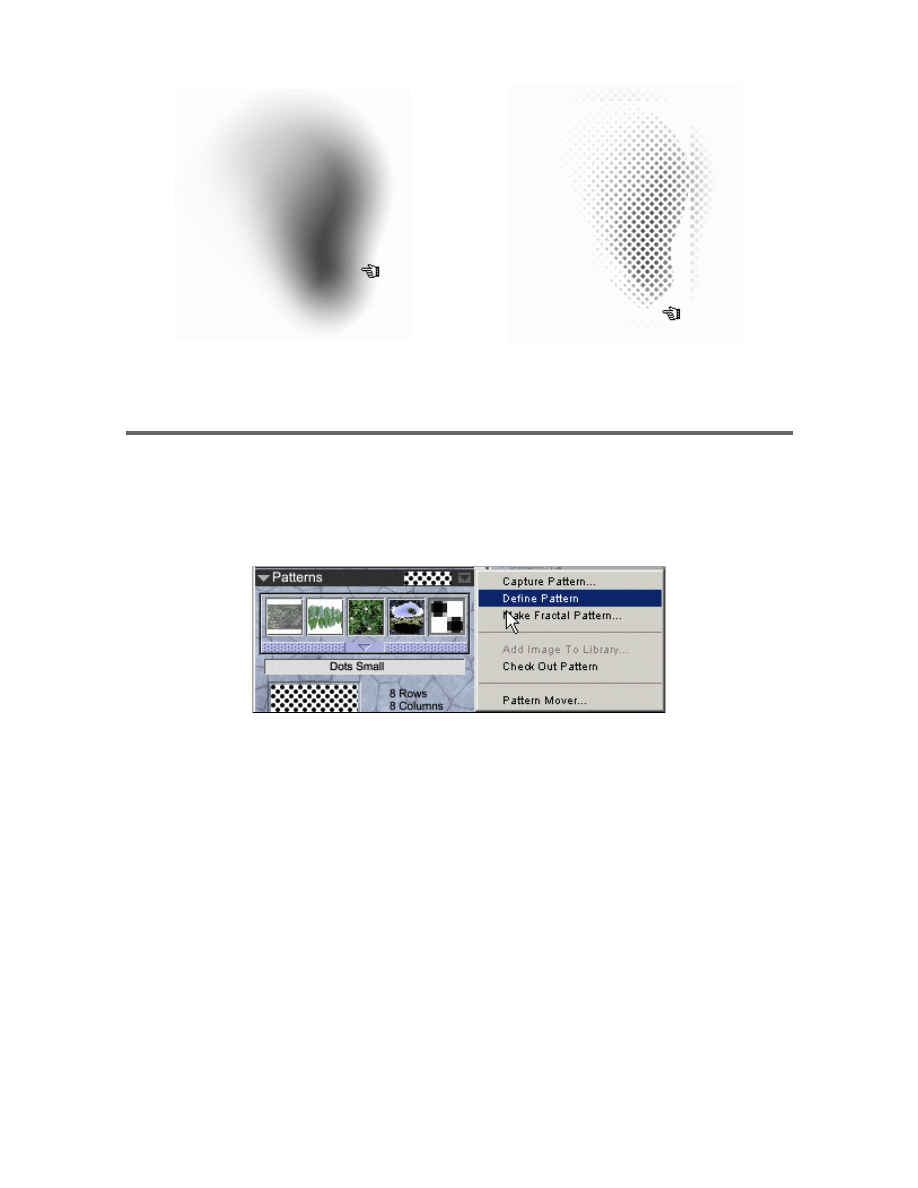
· Click on Using (default should Paper or Uniform color), and select Shape Mask.
· Hidden underneath the selection box are two slide bars, play with them to optomise
the effect.
· Once done click OK.
Before
After
Page 11 of 17
The Paper Mill - Painter 7 · Screen Tones Tutorial
06/11/03
http://www.astralmatrix.net/bahn/tutorial/screentones/
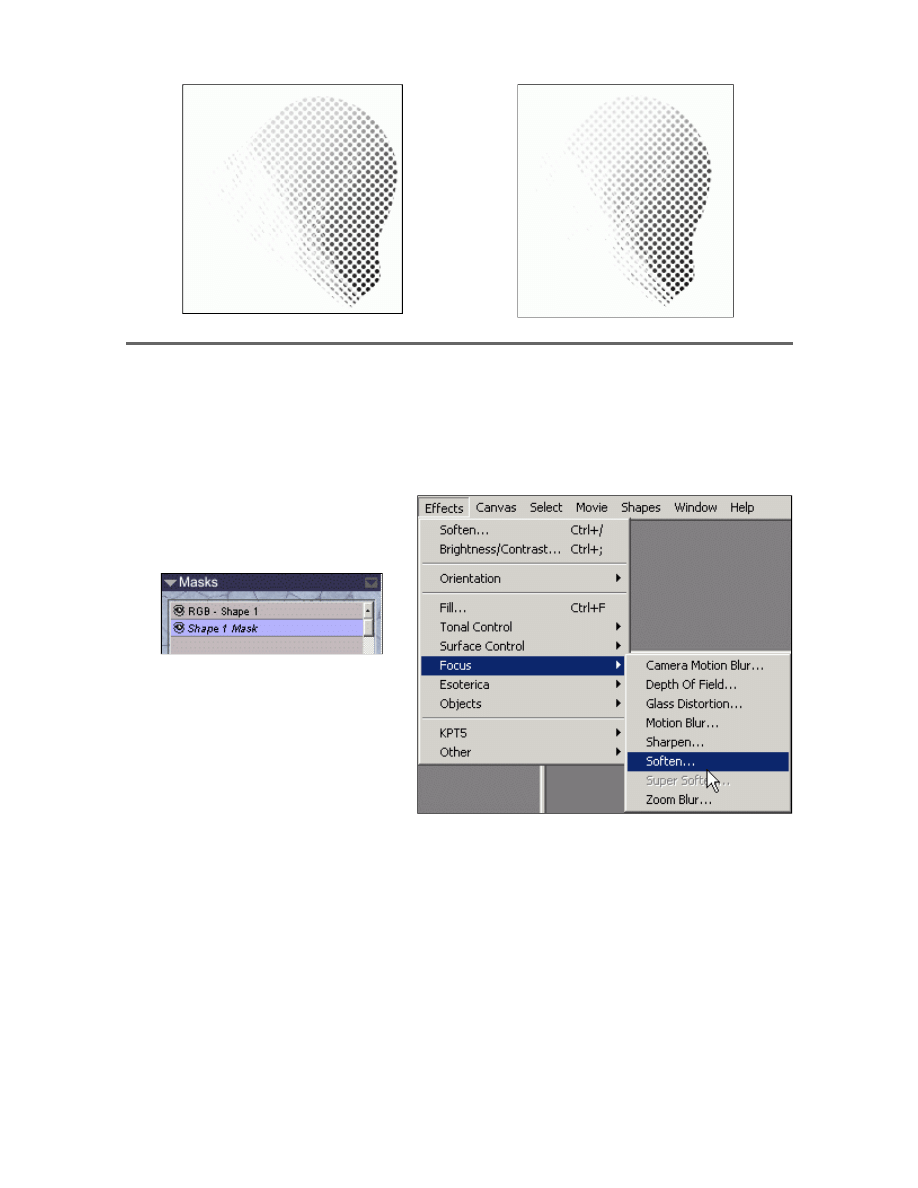
Mask effects
· This is where editing the Layer and the Mask makes things interesting. You can star
altering the look of the dots by adding contrast or brightness to the layer (mask off).
Or equalise it. Or add any other filter you believe would improve your tone effect.
· You can get a pretty interesting effect, but you may get some glitches. Make sure
you check before you save.
· Select the shape Shape Mask once
again.
· Access one of the many plugins.
I've chosen Focus. Once done click
OK.
Mask Visible
Mask Invisble
Page 12 of 17
The Paper Mill - Painter 7 · Screen Tones Tutorial
06/11/03
http://www.astralmatrix.net/bahn/tutorial/screentones/
· If ever you encounter this undesired effect, draw white or erase the excess portions
of the Mask.
Pattern Tip
· If ever you decide to venture outside of dots and lines for patterns, a very helpfull
function called Define Pattern may make things alot easier for you.
Page 13 of 17
The Paper Mill - Painter 7 · Screen Tones Tutorial
06/11/03
http://www.astralmatrix.net/bahn/tutorial/screentones/
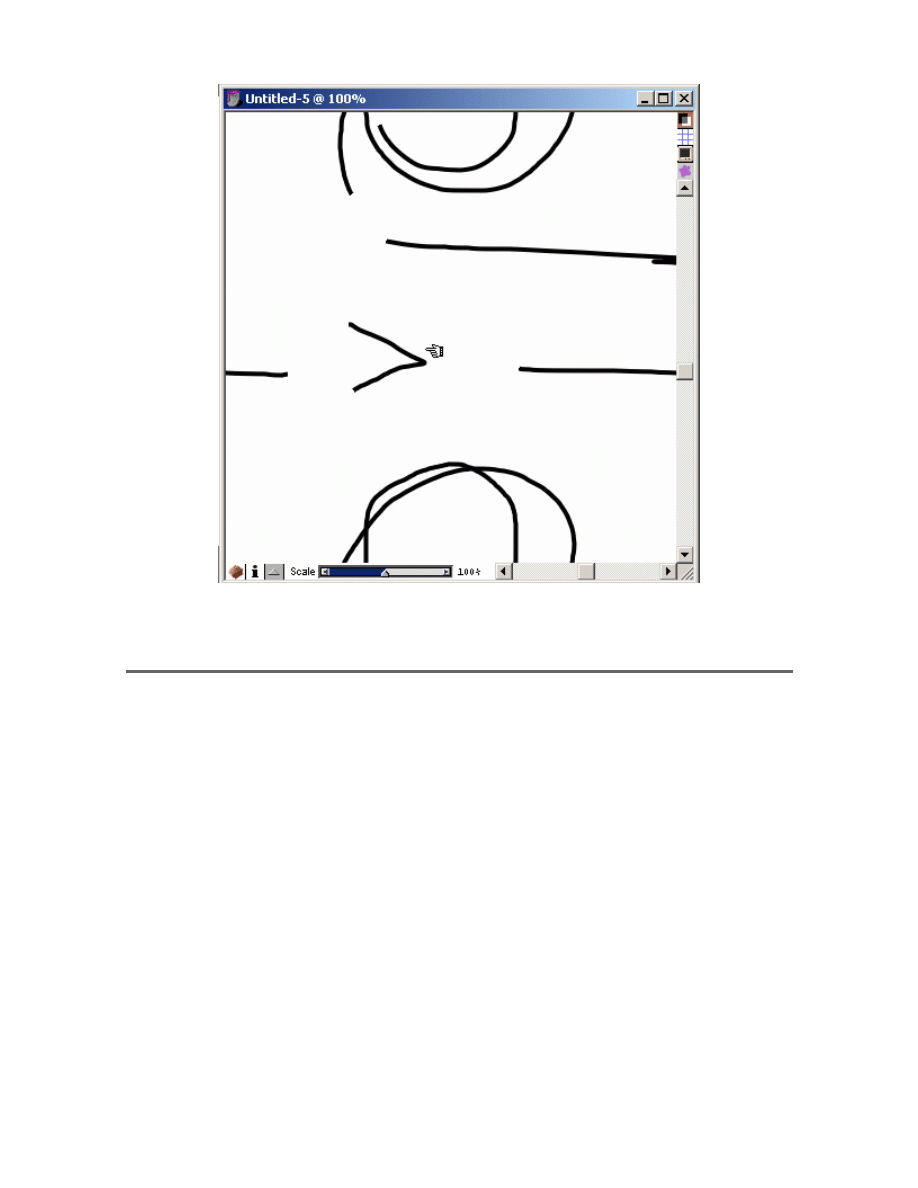
· The cursor "loops" around from the opposite side, when you draw off the canvas.
Painting from scratch with this function on will guarantee perfect tiling results.
Applying Tone To Art
· Create a new Layer and import or draw some lineart.
Page 14 of 17
The Paper Mill - Painter 7 · Screen Tones Tutorial
06/11/03
http://www.astralmatrix.net/bahn/tutorial/screentones/
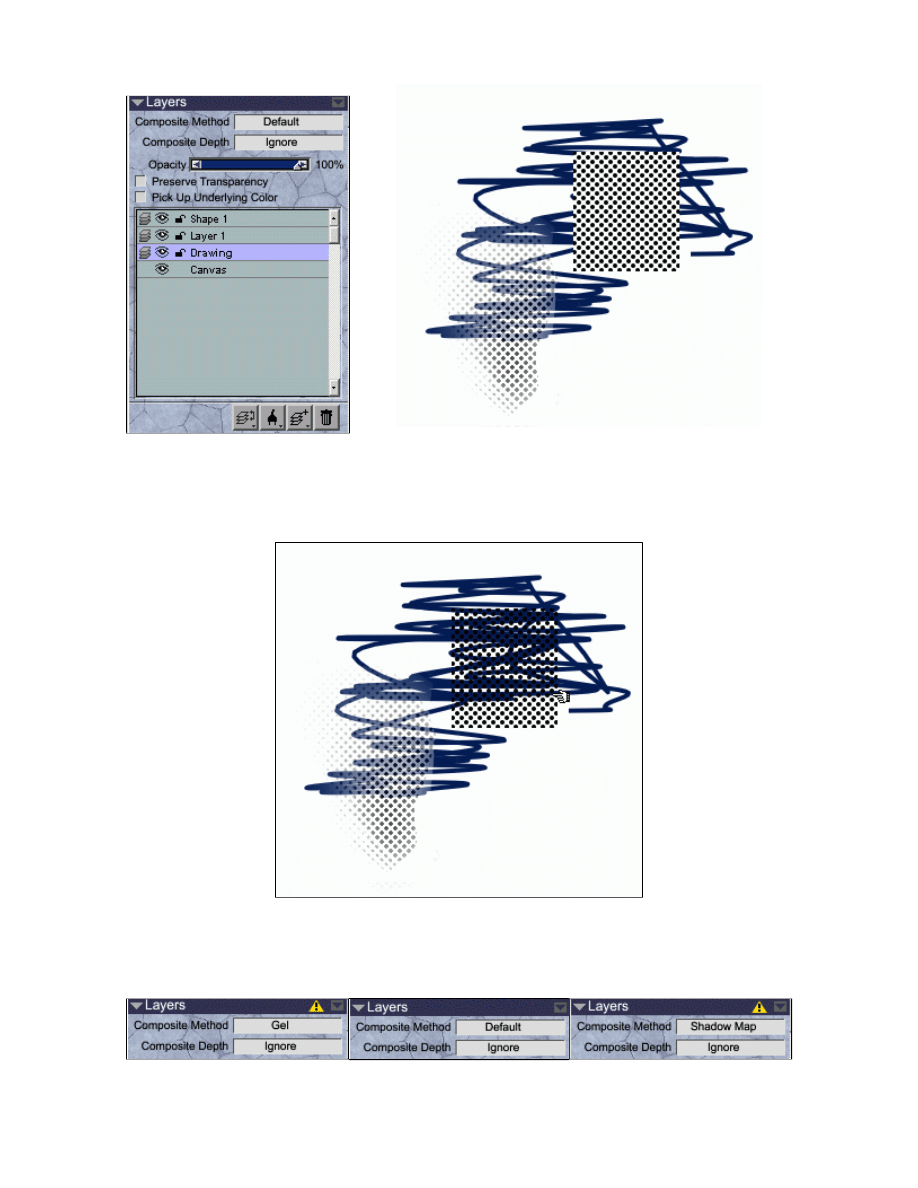
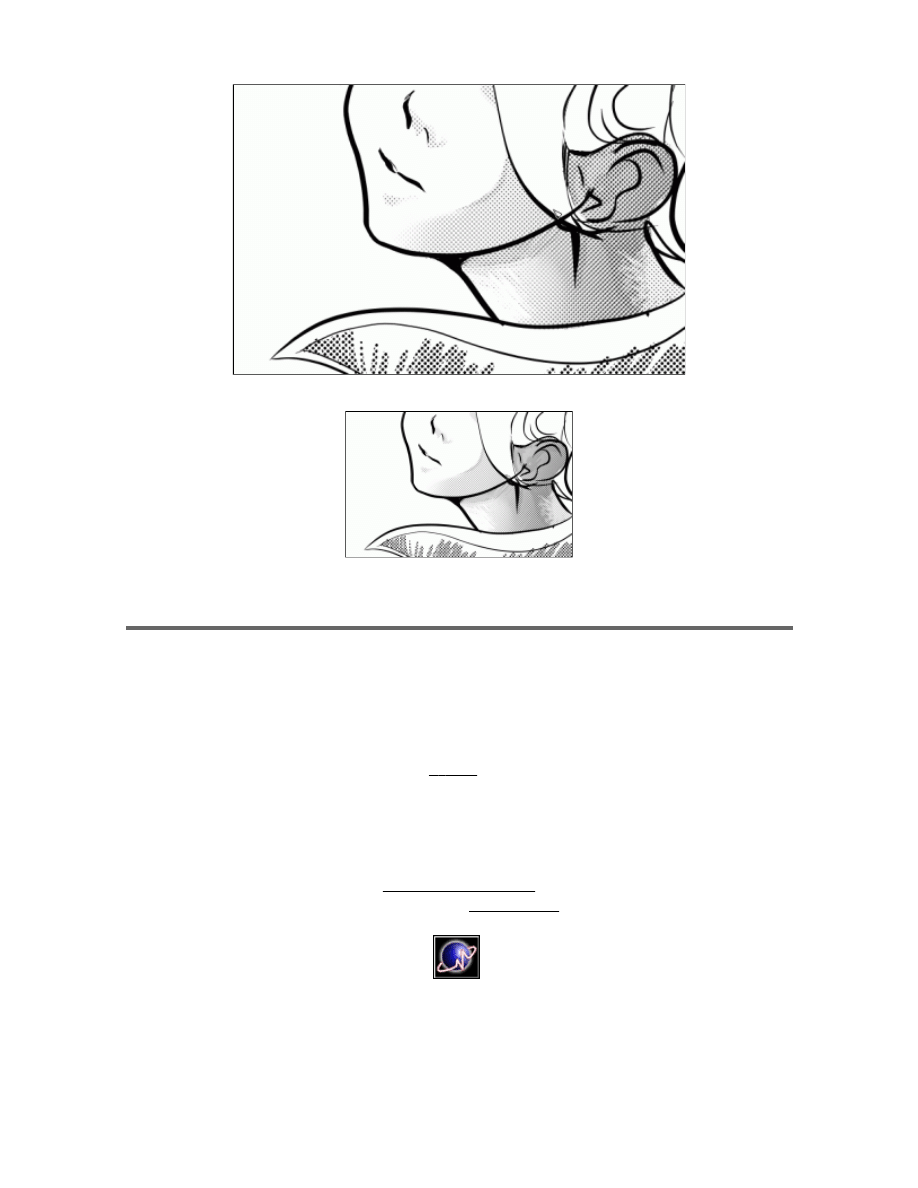
· The white isn't transparent! We don't want that. Select the Layer for your screen
tone. Set Composite Method to Gel or Shadow Map (it's in your Layers window.
Set to Default usually). They offer simmilar results.
Perfect!
· Differences between Gel, Default and Shadow Map
Whats going on!
Page 15 of 17
The Paper Mill - Painter 7 · Screen Tones Tutorial
06/11/03
http://www.astralmatrix.net/bahn/tutorial/screentones/
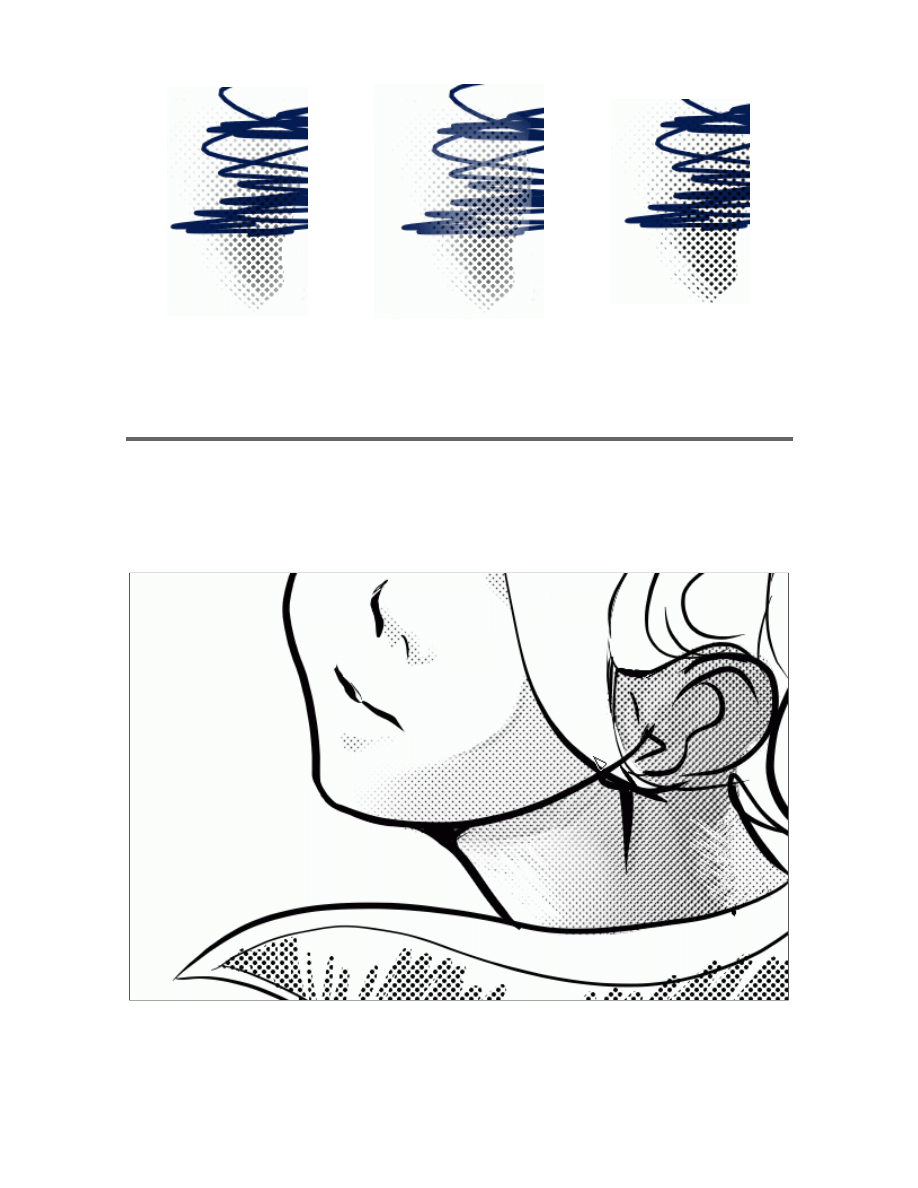
Sample Effect
· Two layers. One Flat, one gradient.
100%
60%
Gel
Default
Shadow Map
Remains slightly transparent.
But removes all instances of
white.
White effect artwork.
Stronger contrast between
light and dark. Best choice
for potential screen tone
imitation.
Page 16 of 17
The Paper Mill - Painter 7 · Screen Tones Tutorial
06/11/03
http://www.astralmatrix.net/bahn/tutorial/screentones/
20%
· Looks good at almost any resample size!
Closing Comments
I can't believe I got this finished in one day. I stumbled onto the posibilities of
great looking tones on Painter 7 last night around 2 am and I felt it had so much
potential that I had to make a tutorial. I've never made a visual tutorial before. I hope
everything is simple, concise and clear. E-mail me for comments. Don't be shy to drop
me a line if you apreciate this tutorial.
This tutorial is NOT link free. My homepage is, but not the tutorial. If you want to host
my tutorial please e-mail me.
Back to Tutorials
All works copyright of Richard Campbell
Page 17 of 17
The Paper Mill - Painter 7 · Screen Tones Tutorial
06/11/03
http://www.astralmatrix.net/bahn/tutorial/screentones/
Wyszukiwarka
Podobne podstrony:
3100873 how to draw manga anime female figure drawing tutorial
[Tutorial] How to draw Manga Rei Ayanami (Neon Genesis Evangelion)
How to Draw Manga Dressing Your Character in Casual Wear
How to draw manga Body
How To Draw Manga Vegeta (Dragon Ball Z)
How To Draw Manga Getting Started
How to Draw Manga Anime Clothing And Folds Drawing
How To Draw Manga Shampoo (Ranma 1 2)
How To Draw Manga Creating A Dragon (2)
How to Draw Manga Dressing Your Character in Casual Wear
How to Draw Manga Dressing Your Character in Casual Wear
How To Draw Manga Basics of Hair, Eyes, Super Deform, Photoshop Tips Characters Mangazeichnen
How To Draw Manga Eyes
How to Draw Manga Vampire Hunter D
How To Draw Manga Goku (Dragon Ball Z)
How to draw Manga Rei Ayanami (Neon Genesis Evangelion)
więcej podobnych podstron