
EQUIPMENT
Needle, scalp vein or angiocath
Antiseptic solution (povidone-iodine and/or alcohol)
Tourniquet
Gloves, nonsterile
GENERAL GUIDELINES
1. Check physician’s order. Ensures appropriate adminis-
tration of prescribed intravenous therapy.
2. Prepare child and family. Enhances cooperation and
participation and reduces anxiety and fear.
3. Check child for allergies, especially allergies to tape,
latex, and povidone-iodine.
4. Gather equipment. Promotes organization and effi-
ciency.
5. Wash hands. Reduces transmission of microorganisms.
6. Choose site and type of device.
a. Use most distal portion of vein found. Proximal site is
still usable if needed.
b. Avoid using dominant hand if possible. Interferes less
with the child’s usual activities.
c. Avoid bony prominences. Difficult to access and
maintain.
d. Avoid inserting IV through an infection or rash.
Reduces risk for IV-associated bacteremia.
7. Apply a warm compress over the area if needed. Helps
distend the vein.
8. Put on gloves. Protects from contact with body fluids.
9. Position child.
a. For scalp vein insertion, use a mummy restraint.
b. For infants and children who are unable to fully
cooperate, have a second nurse restrain as necessary.
10. Cleanse the insertion site by using povidone-iodine or
alcohol; use a circular motion moving outward from the
puncture site. Reduces the transmission of microorgan-
isms and carries microorganisms away from site of
entry.
a. If using povidone-iodine allow to dry for 1–2 min-
utes. Povidone-iodine must dry to be effective.
b. If povidone-iodine makes it difficult to visualize the
vein, it can be wiped off with alcohol.
c. If using alcohol alone, scrub site until last applicator
is visually clean.
INSERTION OF SCALP VEIN
NEEDLE
PROCEDURE
1. Steps 1–10 of General Guidelines.
2. Apply a rubber band tourniquet if using a scalp vein, or
a tourniquet if using an extremity. Distends vein and
makes it easier to enter.
3. Prepare needle by attaching a syringe with normal saline
to the needle and forcing out a few drops of saline.
Determines patency of needle and removes air from nee-
dle.
4. Select a fairly straight segment of vein; place the needle
in the direction of the blood flow.
5. Grasp the needle by the winged tabs bevel up and at a
23°–30° angle. Produces less trauma to the skin and
vein.
6. Anchor the vein with a finger of the free hand by
stretching the skin. Applying traction to the skin helps to
stabilize the vein.
7. Hold the needle parallel to the long axis of the vein.
Decreases the risk of thrusting the needle through the
wall of the vein as the skin is entered.
8. Gently advance the needle into the vein until blood
appears in the tubing. Do not advance the needle once
blood is seen. Reduces risk of piercing the distal wall of
the vein. Increased venous pressure from the tourniquet
increases backflow of blood.
9. Release the tourniquet. Permits venous flow of blood.
Reduces backflow of blood.
10. Infuse 2–3 ml of saline from the syringe into the vein.
Checks patency of the system.
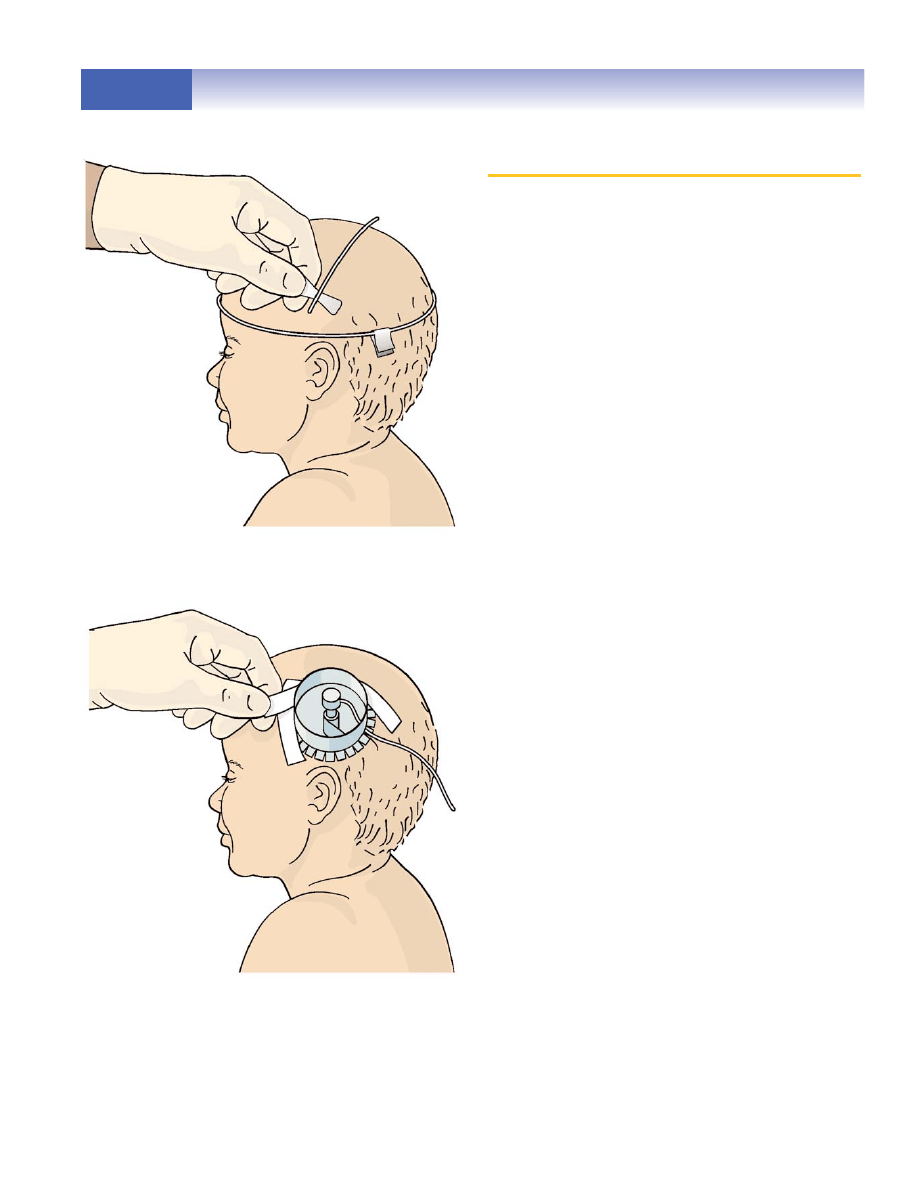
11. Secure IV by taping. Reduces risk of needle becoming
dislodged from the vein. (Figure 17A)
12. Attach hub of needle to adapter of the infusion tubing.
13. Set appropriate rate on infusion pump and begin infu-
sion.
14. Place medicine cup or drinking cup cut in half and
padded over IV site. Commercial devices are also avail-
able. Protects site from child’s touch. (Figure 17B)
15. Dispose of used equipment in appropriate container.
Consistent with body fluid precautions.
16. Remove gloves. Wash hands. Reduces transmission of
microorganisms.
50
Copyright © 2007 by Thomson Delmar Learning, a division of Thomson Learning, Inc. All rights reserved.
SKILL 18
SKILL 18
Insertion of a Peripheral IV Line
continued
INSERTION OF ANGIOCATH
PROCEDURE
1. Steps 1–10 of General Guidelines.
2. Apply tourniquet above insertion site. Tourniquet
should be tight enough to impede venous flow, but not
arterial flow. Check pressure of distal pulse. Distends
vein and makes it easier to enter. Decreased arterial flow
prevents venous filling.
3. With free hand pull skin taut about 2 inches from inser-
tion site. Stabilizes vein and extremity.
4. Select straightest portion of vein. Align needle in same
direction as blood flow.
5. Hold needle bevel up at a 10°–30° angle. Enter the skin.
Do not enter the vein at this time. Decreases risk of pen-
etrating other side of vein. Causes less trauma to skin
and vein.
6. Decrease the angle of the needle depending on the
depth of the vein and enter the vessel. Blood will enter
the flash chamber. You may feel catheter “release” as it
enters the vein. Increased venous pressure from tourni-
quet decreases backflow of blood.
7. Decrease the angle of the needle and slightly advance
further into vein,
1
/
16
to
1
/
8
inch. Ensures plastic
catheter has entered the vein.
8. Hold needle hub/stabilize flash chamber and advance
catheter off needle into the vein. Reinsertion of needle
can cause catheter breakage in vein.
NOTE: Never reinsert the needle into the catheter.
9. Release the tourniquet. Apply pressure on vein just
beyond the catheter tip and slowly remove the needle
while holding the catheter in place. Permits venous
blood flow. Reduces backflow of blood.
10. Connect the primed extension tubing with the injection
cap. Flush catheter slowly. Checks for proper place-
ment/infiltration.
11. Place transparent dressing over insertion site and secure
catheter and tubing. Protects IV site and reduces risk of
catheter becoming dislodged from the vein.
12. Attach extension tubing to the infusion set tubing.
13. Set appropriate rate on infusion pump and begin infu-
sion or heplock as ordered.
14. Place a label on the dressing with date, time, gauge, and
name of person who started IV.
51
Copyright © 2007 by Thomson Delmar Learning, a division of Thomson Learning, Inc. All rights reserved.
SKILL 18
SKILL 18
Insertion of a Peripheral IV Line
continued
FIGURE 17B Securing a scalp vein IV site.
FIGURE 17A Placement of a scalp IV.
continued
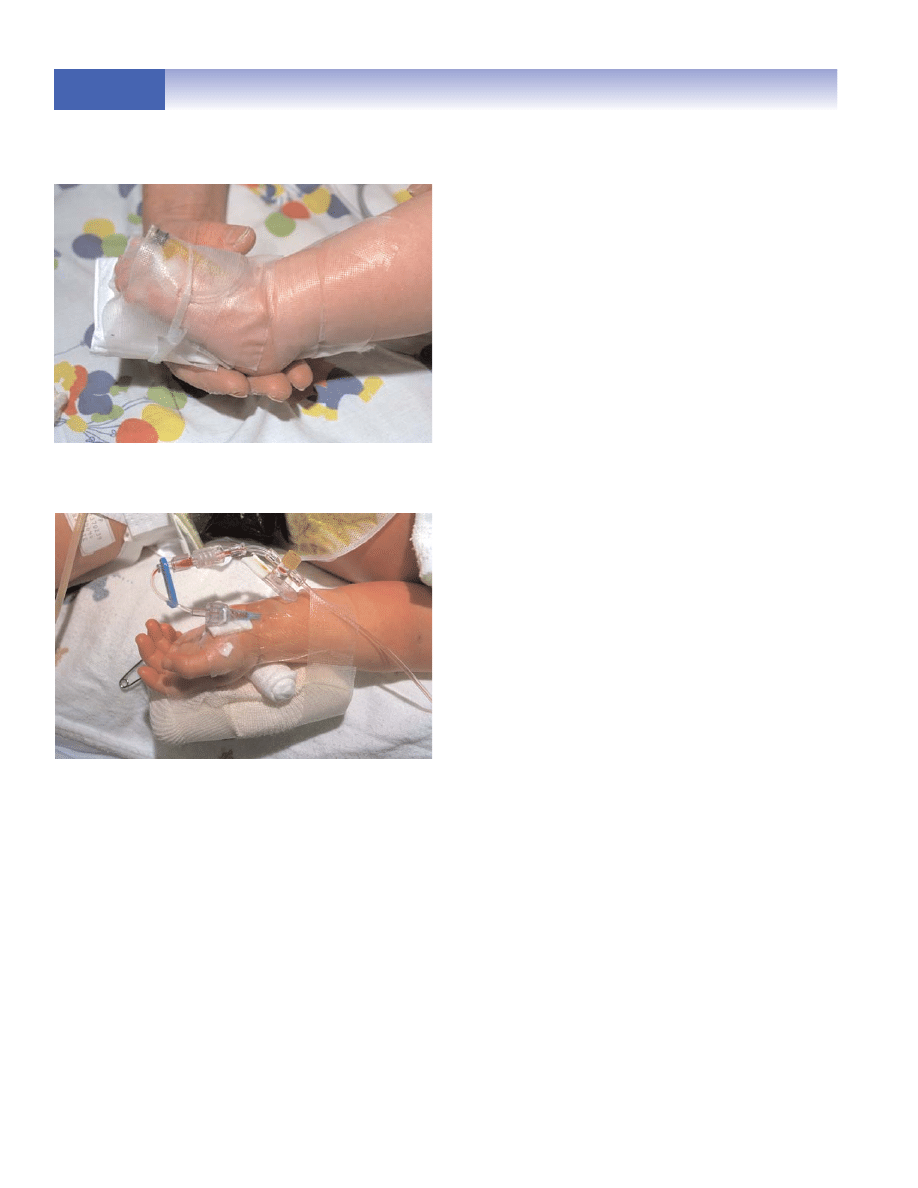
15. Immobilize area if needed. (Figures 18 and 19)
16. Place medicine cup or drinking cup cut in half and
padded over IV site. Commercial devices are also avail-
able. Protects site from child’s touch.
17. Dispose of used equipment in appropriate container.
Reduces transmission of microorganisms and maintains
body fluid precautions.
18. Remove gloves. Wash hands. Reduces transmission of
microorganisms.
DOCUMENTATION
1. Insertion site.
2. Type and gauge of needle or catheter used.
3. Date and time.
4. Person who placed the IV.
5. IV solution started and rate of infusion.
6. Type of dressing over site.
52
Copyright © 2007 by Thomson Delmar Learning, a division of Thomson Learning, Inc. All rights reserved.
SKILL 18
SKILL 18
Insertion of a Peripheral IV Line
continued
FIGURE 18 Footboard used to secure IV
placement.
FIGURE 19 IV secured on handboard.
Wyszukiwarka
Podobne podstrony:
Skill 20[1] Insertion of a Nasogastric Tube
18 WHEELS OF STEL CONVOY KODY
18 Comparison of Processes (C)
Skill 11[1] Collection of Stool Specimen
Skill 21[1] Management of Gastrointestinal Suction
Skill 41[1] Care of the Child with a Chest Tube
Peters, Ellis Brother Cadfael 18 Summer of the Danes, The
Hearts of Iron IV poradnik do gry
18 Numeri Księgi Liczb IV Księgi Mojżeszowe XVIII rtf
Skill 24[1] Administration of a Bolus Feeding
A comparative study of inverter and line side filtering schemes in the dynamic voltage restorer
Pike, Christopher Spooksville 18 Attack of the Giant Crabs (Attack of the Killer Crabs)
Skill 25[1] Administration of NG, NJ, Gastrostomy and
Christian Witnessing Tips To Jehovah s Witnesses John 1 18 Diety Of Jesus Christ
Skill 28[1] Administration of Enemas
kody do Hard Truck 18 whells of steel
więcej podobnych podstron