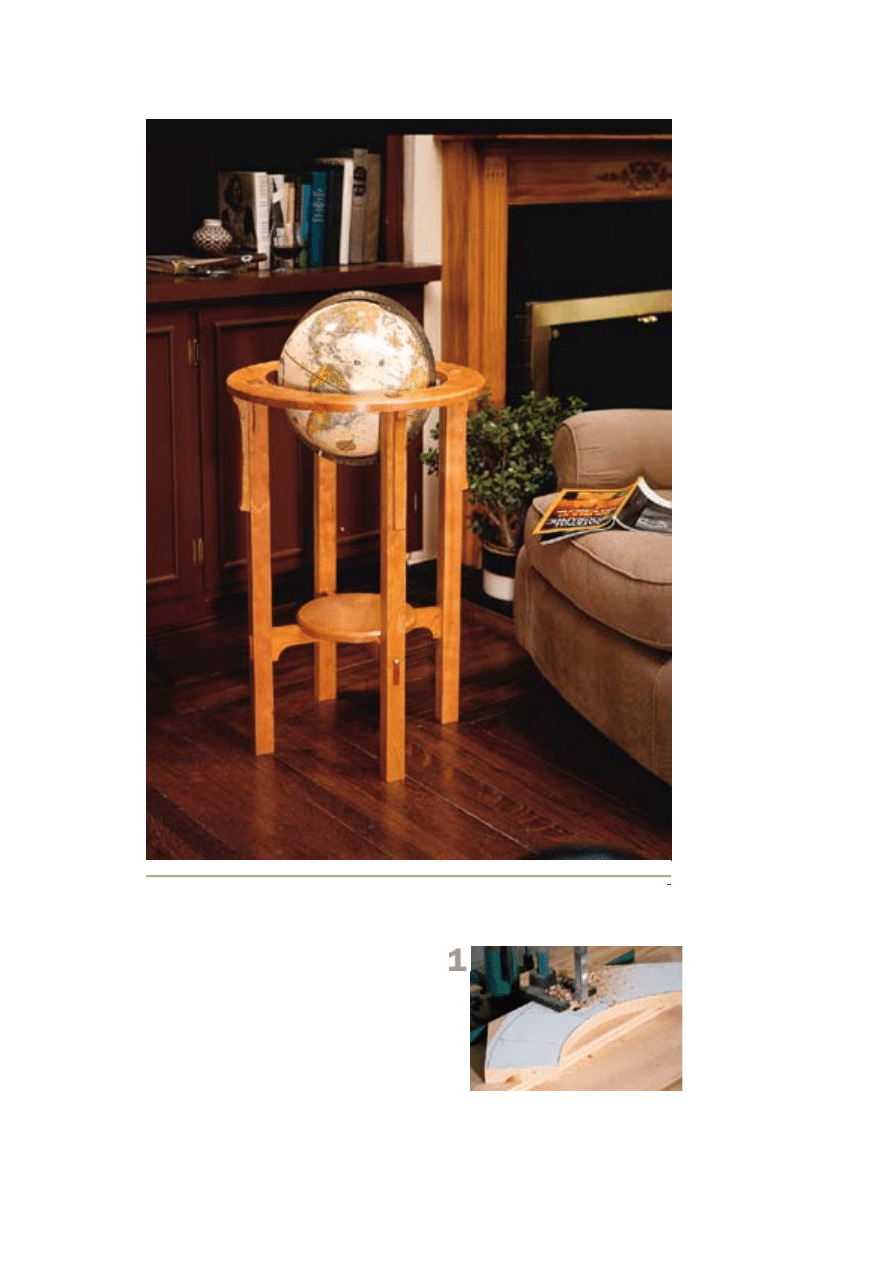
Arts & Crafts Globe Stand
Nothing decks out your library like a
proper globe stand.
As was the case with most Americans, my
world became a larger place last fall. I
began to realize that I had only a vague
notion of the location, size and
geographical relationship of many of the
countries whose names dominated the
nightly news. Since I always had a problem
Use the plans from the diagrams to lay out
your mortises on your top pieces. Draw the

with the Mercator projection maps that
colored the walls of my high-school
classrooms (is Greenland really as large as
the United States?) I knew that a globe was
the only thing that would give me a clear
understanding of what’s what and where.
When I visited my local map store, the
globe-stand selection ran the gamut from
traditional nautical themes to modern metal
sculpture. What I was really looking for, a
simple Arts & Crafts-inspired piece, was
lacking from the lineup. I decided that the
only way that I would be happy with the
new addition to my living room was to buy a
globe separately and come up with my own
base.
Paging through a few of my Arts & Crafts
books, the taboret (essentially a small
table) appeared to be a staple of the
founding fathers of the movement. From
Limbert to Mackintosh, Stickley to Wright,
there always seemed to be room for yet
another small table. With all its variations, it
was the perfect starting point for a globe
stand. With a little stretching here and a
little cutting there, I soon had enough
designs to house a galaxy, or at least a
small solar system, of globes.
The Stickley variation that I finally built
incorporates a lot of the “tricks” – through-
mortises, half laps, chamfered and pegged
through-tenons, pyramids, and corbels. As
it turned out, it was a great project for
developing my Arts & Crafts joinery skills.
Because all the parts are small, and a
limited amount of material is involved, I
didn’t become suicidal when a mistake
condemned a piece to the kindling bin.
I strayed from the quarter-sawn white-oak
norm and chose to use cherry to build the
stand. Aside from cherry’s tendency to
scorch when being cut, it’s a pleasure to
work, easy to finish and, in central Ohio, the
price is right.
Around the World in Four Easy
Pieces
Start by laying out the four top quadrants.
With the exception of the legs, all the parts
for this project are sized to be cut from 1 x 6
stock. Before turning to your band saw to
test your eye/hand coordination on the
outside curves, cut the 1" x 1" mortises.
They’re easier to form when there are still
mortise locations on paper, photocopy
the plans and use rubber cement or a
spray adhesive to attach them to your
wood. Then it’s simple matter of cutting
where the lines tell you to.
After you’ve cut your top to size, you need
to clean up the band-sawn edges using a
router table, a straight bit and the shop-
made jig shown here. First cut a piece of
¼"-thick plywood to the same size as your
top and attach it to the top using a spray
adhesive. Nail the center of the ¼" plywood
to a sub-base of ¾" plywood. My router
table is part of my table saw setup, so I
attached a miter bar to the ¾" plywood,
which allowed me to slide the jig into
position. If you don’t have a miter slot, you
might need to first clamp the jig in place
and raise the router bit while it’s running to
get your cut started.
Once you get the outside shaped
perfectly, you can use that edge to
guide your router. I used a commercial
edge guide (the Micro Fence). Essentially,
two rounded guides ride along the outside
edge of the top, ensuring the straight bit
cuts a perfectly circular path. You also
could make this cut using a commercial or
shop-made circle-cutting jig for a router.

flat sides to press against a fence.
While splined joints might have been
another “trick” that I could have thrown into
the mix, I opted for the ease and familiarity
of biscuits when assembling the ring. After
gluing up the ring, cut the arcs slightly wide
of the line on the band saw. I used a shop-
made circle-cutting jig on my router table to
refine the outside edge. Then I used a
router edge guide to trim the inside edge to
a perfect circle.
I also used biscuits to join the two halves of
the lower table. I added another level of
detail with a ¼" x ¼" chamfer on the top
edge of both the ring and table. Finally, I
plowed two ¼"-deep x ¾"-wide grooves that
crossed in the middle of the bottom of the
table to position it squarely on the
stretchers.
The legs are formed from 2 x 2 stock.
Although the ½" x 2" through-mortises were
made on the legs with a straightforward
series of cuts with a ½" mortising chisel, the
through-tenons required some attention to
detail. After cutting the tenons on the ends
of the legs to fit the mortises, I determined
that a 14° bevel would give me an 1/8"-high
pyramidal top. The tenon is sized to allow
for an 1/8" vertical rise above the top before
transitioning into the slopes. I like the look,
and it’s more forgiving than trying to align
four pyramid bases exactly with the
tabletop.
The stretchers are joined with a simple half
lap. The ends of the through-tenons are
chamfered at a 45° angle. I then pegged
each tenon using 3/8" cherry dowels
through 23/64" holes after slightly tapering
the ends of the dowels. With the holding
power of contemporary glues, they’re only
for show anyway.
Speaking of show, the corbels that
“support” the top are structurally
unnecessary to this project. Visually,
however, they’re the icing on the cake. Glue
them in place and clamp them up.
To mount the globe on the stand, you need
to cut two ¼"-long x ¼"-deep notches in the
inner edge of the ring. Rather than setting
up my router and a jig for the operation, I
chucked a ¼" Forstner bit into my drill
press, made a ¼"-deep hole that was
Though there are many complicated
ways to attach corbels to legs, I prefer
to simply glue and clamp them in place.
Here’s a close look at the notches in the
top that hold the pins on the globe.

tangent to the inner edge, and squared up
the bore with a sharp utility knife. See the
photo at left for details.
Because cherry darkens quickly enough
through oxidation and exposure to
ultraviolet rays, I used a clear wipe-on oil
finish to emphasize the contrast between
the end grain of the through-tenons and
pegs and the face grain of the legs and top.
If you’ve got ’em, you might as well flaunt
’em. PW
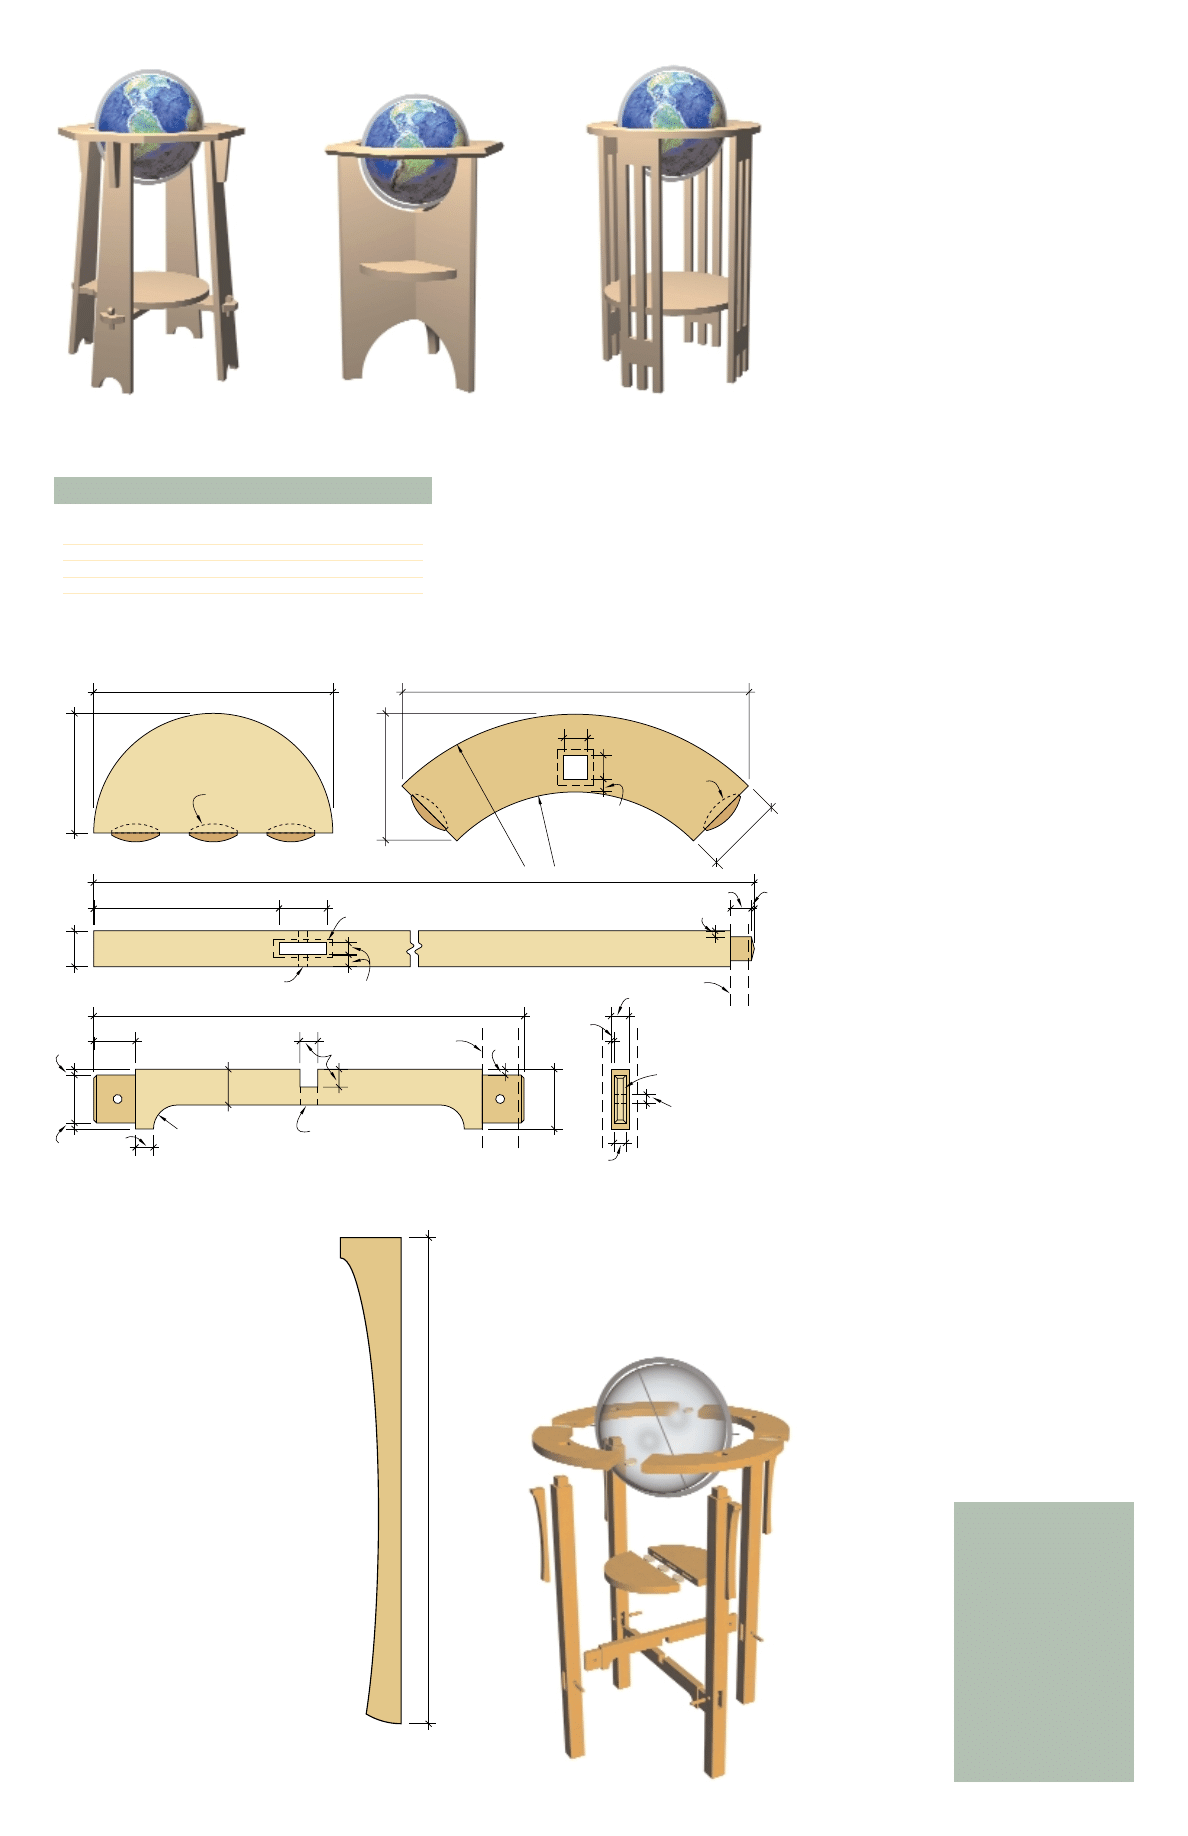
10"
5"
29
3
/
4"
7
3
/
4"
2"
Reverse orientation of
cutout on second stretcher
1
1
/
2
"
1
/
2
"
1
/
4
"
1
/
4
"
1
/
4
"
#10 biscuits
2"
3
/
4"
1
3
/
4"
3
/
4"
2
1
/
2
"
R 1"
1
1
/
2
"
1
/
4
"
Outline of stretcher
7
/
8"
18"
5
5
/
16
"
3
1
/
4
"
1"
1"
R 10
1
/
4
"
R 7"
1
/
2
"
#10 biscuits
1
/
8"
chamfer
1
/
2"
3
/
8"
dowel
14
1
/
2"
3
/
8"
dowel
1
/
8"
1
/
8"
3
/
4"
Outline of top
Half scale - enlarge 200%
9"
Outline of leg
You might prefer a tapered-leg taboret
with wedged tenons…
…or a globe stand in the style of Frank
Lloyd Wright…
…or even in the style of a Gustav Stickley
end table.
SUPPLIES
Popular Woodworking readers
can order this 12" antique globe
for $70 (a 10 percent discount)
plus shipping (and sales tax if
you live in Ohio).
Contact:
The Map Store
5821 Karric Square Drive
Dublin, OH 43017
614-792-6277
N O .
I T E M
D I M E N S I O N S ( I N C H E S )
M AT E R I A L
T W
L
❏
4
Top pieces
3
⁄
4
5
5
⁄
16
14
1
⁄
2
Cherry
❏
2
Table pieces
3
⁄
4
5
10
Cherry
❏
4
Legs
1
1
⁄
2
1
1
⁄
2
29
3
⁄
4
Cherry
❏
2
Stretchers
3
⁄
4
2
1
⁄
2
18
Cherry
❏
4
Corbels
3
⁄
4
7
⁄
8
9
Cherry
ARTS & CRAFTS GLOBE STAND
Wyszukiwarka
Podobne podstrony:
Globe Stand
Popular Woodworking Magazine Arts & Crafts Globe Stand
Audyt wewnetrzny (SGHowy) Stand Nieznany (2)
arkusz ang stand pr cz2 A
lumber cut off stand
Stand.V.8 kom, Wycena gruntów
bassinet and stand
Jacques Derrida Taking A Stand For Algeria
stand
Make Your Resume Stand out From the Pack
ang PR stand cz1 rozw
rozp zm stand
MicroOven Stand
ang stand transkrypcja pr
2 page Stand
Batteries & Charge Control in Stand Alone PV Systems
ang PR stand cz2 A rozw
bell hooks Where We Stand Class Matters Routledge (2000)
więcej podobnych podstron