Popular Woodworking Magazine
A Jig for Precision Trimming
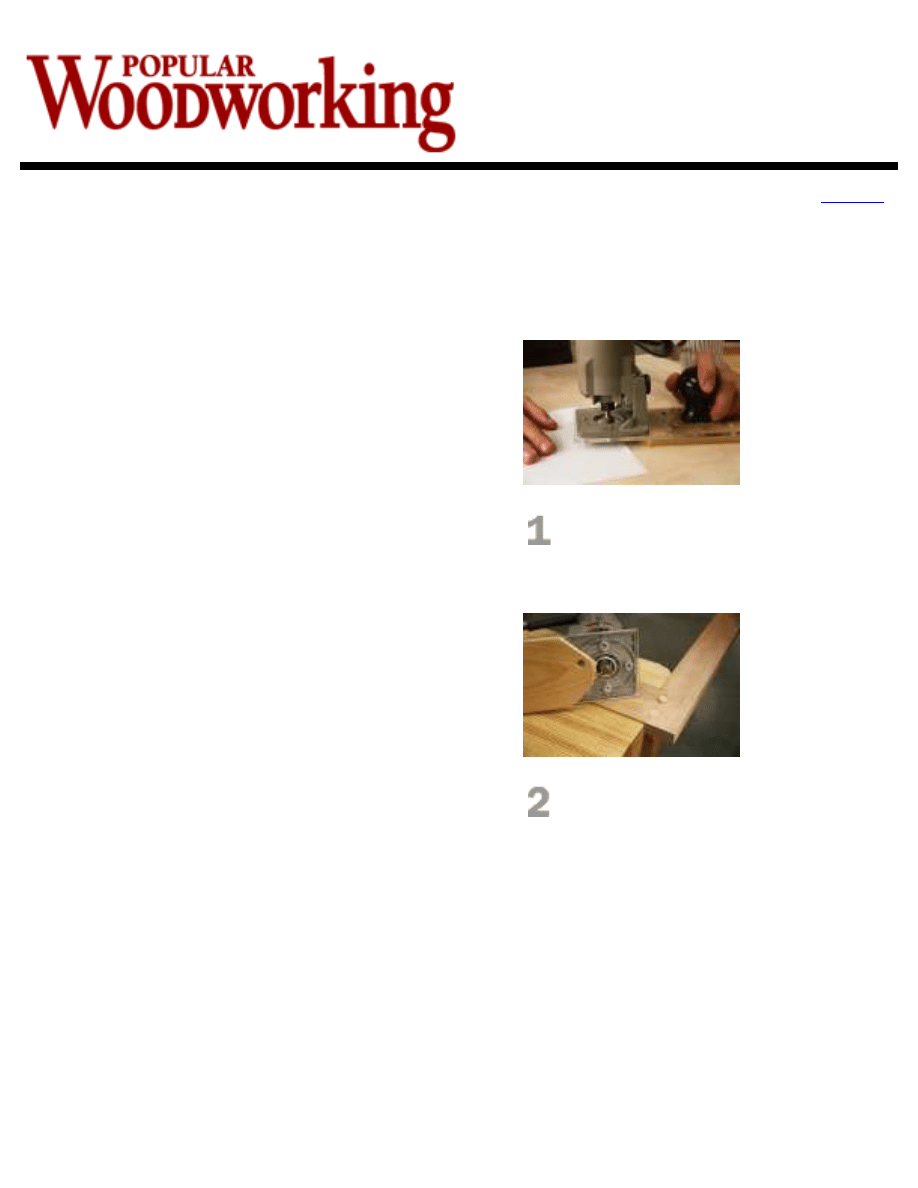
You can use a piece of paper to position the
bit about .003" above the surface. This will
look flush but still ensure you don't hurt the
surrounding laminate.
This jig also will trim wooden plugs flush with
the surrounding surface without cutting or
marring that surface.
Turn a laminate trimmer into a tool that flushes
surfaces smoothly.
Once upon a time I had the brilliant idea to use a strip of
hardwood to trim out the edge of a laminate countertop.
And not just any laminate, either. This stuff was so
expensive that if you asked how much it cost, the
salesperson presumed you could not afford it. So
scratching it during installation was not an option.
The challenge, I realized the moment the glue set upon the
wood trim, was that I had to plane the top surface of the
trim flush with the laminate without touching the laminate
itself. If the blade touched the laminate, I would remove
the thin layer that held the color, revealing the dull
substrate (which the manufacturer thoughtfully made a flat
white to provide maximum contrast and advertise my slip-
up to the world).
I searched the 40 billion tool catalogs I receive each month
(give or take), looking for something that would shave the
wood without touching the laminate. I found nothing that
would do the trick.
Now, we all know what happens when you have a perfectly good excuse to buy an expensive new tool
and you can't find anything suitable – you buy something that's unsuitable and make it work. As a result, I
bought a small laminate trimmer and built the jig shown here to turn it into a tool that I hoped would not
mar the laminate.
Making a Router Cut Like a Hand Plane
What I made is sometimes called a "router plane," although it does something quite different from the hand
tool of the same name.
http://www.popularwoodworking.com/features/printable.asp?id=1344 (1 of 3) [12/8/2005 10:21:10 PM]

Popular Woodworking Magazine
An old-time router plane rides on the surface and reaches down into a recess to trim the bottom. This jig
lets you adjust the depth of the router bit to cut adjacent surfaces flush to or higher than the surface on
which the router is riding.
In my case, I wanted the tool to ride on the laminate and shave the top surface of the wood trim ever-so-
slightly higher than the laminate it was attached to.
The first thing to do is to make a mounting plate from clear acrylic. (This lets you see what you are
planing.) The plate should be rectangular and about twice as long as the laminate trimmer's base is wide.
Mount the router at one end of this plate, centered over a 1"-diameter opening for a bit. On the end of the
plate, mount a 3/8"-thick wooden base and a handle, as shown in the drawing at right. The base rests on
one surface and lets you cantilever the router over another surface that you want to shave parallel to the
first.
The handle not only helps you control the router, it lets you counterbalance the router's weight and keep
the base flat on the reference surface as you work.
The fasteners you use to assemble the plate, base and handle must not protrude below the bottom
surface of the base – after all, you don't want metal hardware dragging over the surface you're trying not to
cut.
Using the Jig
Mount a straight bit in the router. I commonly use a 3/4"-diameter bit, but any bit smaller than the plate
opening will do.
Adjust the depth of cut to the level you want to rout. If you want to trim one surface flush to another, raise
or lower the bit until the tip barely touches the surface on which the base rests. If you want to cut slightly
above a surface, as I did, simply raise the bit to the proper height.
I used a piece of paper as a feeler gauge to position the tip of the bit about .003" above the surface – close
enough to look flush, but far enough away to make sure it wouldn't cut the laminate on which the jig rested.
Then make a test cut to check your setup.
As you cut, pay close attention to the direction of rotation and the direction you move the trimmer. I cut
with the router so the bit rotation pulled the router through the wood trim and away from the laminate
surface I was trying to protect.
If you have to "back-feed" (where you move the router so the bit pulls in a direction you don't want to go),
move the router very slowly and keep the base pressed firmly against the guiding surface. For delicate
work, cut the wood in several passes, lowering the router a tiny fraction of an inch between each pass. PW
Nick Engler has built a replica of the 1903 Wright Flyer.
http://www.popularwoodworking.com/features/printable.asp?id=1344 (2 of 3) [12/8/2005 10:21:10 PM]

Popular Woodworking Magazine
http://www.popularwoodworking.com/features/printable.asp?id=1344 (3 of 3) [12/8/2005 10:21:10 PM]
Document Outline
- popularwoodworking.com
Wyszukiwarka
Podobne podstrony:
więcej podobnych podstron