The Techie Guide to
Google Website Optimizer
v 1.0

2
The Techie Guide to Google Website Optimizer
Contents
Forward 3
Prerequisites 3
Future Compatibility
Updates and Revisions 3
How Experiments Work 4
A/B Experiments 6
Detailed Explanation of MVT Experiments
Background 9
Standard Experiments
Non-Standard Experiments (Testing Static Content) 12
Background 12
But what if this isn’t the case? 12
Setting up Multivariate Tests
Experiments with Dynamic Content
Background 18
Option 1 - Use a MVT experiment and custom JavaScript 19
Option 2 - Use an A/B experiment.
Using Server Side Session Variables 23
Advanced A/B Testing
Segmenting traffic 25
Detailed Reporting: GWO Users Pitch In 26

3
The Techie Guide to Google Website Optimizer
Forward
Forward
Welcome to The Techie Guide for Google Website Optimizer™ (GWO) This guide will help you integrate GWO
into any website and test almost anything.
You’ll find detailed technical information on what GWO does and how it works. We’ll cover integration issues
(“Where exactly do I put the GWO code?”) and setup issues (“How do I create an experiment using a non-
standard setup?”). We’ll show you how to launch simple experiments and full-on hairy scenarios.
We’ll also look behind the scenes at an experiment in operation. You’ll see how the elements you install
actually work when the experiment is launched.
By the end of this guide you should have enough information so that the only thing limiting your testing is
your imagination.
Prerequisites
This is a technical guide. We assume that you, dear reader:
• Know how to edit HTML files
• Have a basic understanding of JavaScript
• Understand how cookies work
The more advanced stuff also requires experience with server side programming like PHP or ASP.
When giving examples, we’ll refer to the site you’re testing as www.mysite.com.
We may, at whim, abbreviate Google Website Optimizer as GWO and Google Analytics as GA. We will also, at
times, abbreviate multivariate testing as MVT and A/B testing as simply A/B.
Future Compatibility
Though this guide provides “inside” information on how GWO works, Website Optimizer is an evolving
product. Information in this document may become stale in the future, and experiment designs using this
information may not work as intended after some future date. This does not mean that certain types of
experiments will become impossible in the future, only that some assumptions will no longer hold true, and
that there will be different ways to achieve the same ends.
We should emphasize here that deviating from the “out of the box” methods for creating experiments should
always involve testing a technique and previewing pages to ensure a good user experience.
Updates and Revisions
The Techie Guide is a living document. We intend to update both it and GWO with the latest tricks from our
engineers and the Website Optimizer community. You can always find the latest version of the Techie Guide

4
How Experiments Work
How Experiments Work
This chapter will show you how experiments work, with notes on page loads, JavaScript, cookies, and more.
We’ll describe what happens when a website visitor hits:
• The test page for A/B
• The test page for MVT
• The conversion page
Let’s start with a simplified overview of what Google Website Optimizer does.
Suppose you have a website at http://www.mysite.com/landing_page.html, and you want to answer the
question, “What changes could I make to this page to make it perform better?” You might consider changing
the headline, the copy, or the call-to-action buttons. You might want to try a different image (Which picture
drives more conversions, puppies or kittens?). Or perhaps, you want to try a completely different layout
and page structure. Website Optimizer lets you try these different variations and see which performs most
effectively.
Note that while, GWO allows you to test several pages or extended portions of your website, not just single
pages, for the purposes of this explanation we’ll assume that you’re testing just a single page of your site.
Website Optimizer offers two types of experiments for your testing pleasure:
A/B experiments test involve testing one page against one or more alternate pages. Each version of the page
has its own URL. For example:
• http://ww w.mysite.com/landing_page.html
(Version A, also known as the original or
control)
• http://ww w.mysite.com/test_page_b.html
(Version B)
• http://ww w.mysite.com/test_page_c.html
(Version C)
And so on, with as many test versions as you like
With an A/B experiment you are testing two
completely separate pages. So you could design a
page with an entirely different layout, navigation.
You can also test smaller changes like new copy,
headlines, and images.
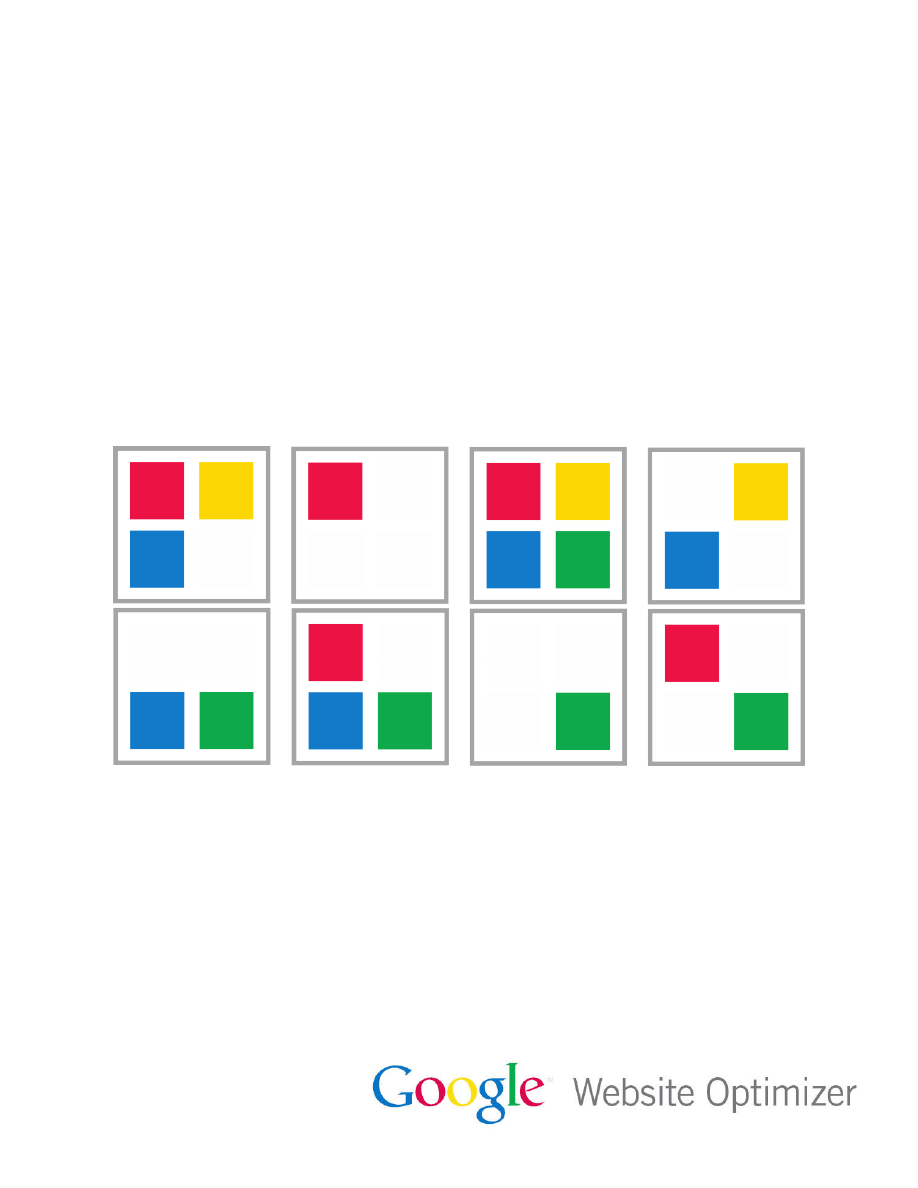
Multivariate (MVT) experiments test different versions
of content within a page.
With an MVT experiment, all your visitors would go
to http://www.mysite.com/landing_page.html, but
they would see various combinations of the three
elements you’re testing. The sections of the page are
altered dynamically as the browser displays the page
to the user.
Side Discussion
At first glance it may seem like A/B is always the
simpler choice, but this isn’t necessarily the case.
Here are three reasons why:
1. Just running an experiment introduces
a small amount of latency by requiring
JavaScript (siteopt.js -- more about this
later) to be fetched. A/B redirection
introduces more latency in that a new
page needs to be fetched. MVT does not
have this problem.
2. A/B involves more than one URL, thanks
to the redirects to versions B and C. That
adds more chances for error. For example,
the alternative URLs may not be in the
same domain as the original URL, or
pages may have multiple URLs aliased to
them
3. Query parameters are merged when
redirection occurs. Making assumptions
about which parameters are found where
can lead to mistakes.
Don’t be scared off of doing A/B experiments by
any means. Just don’t assume they’re always the
easiest choice, either.

5
The Techie Guide to Google Website Optimizer
How Experiments Work
Depending on how you set up your experiment, each visitor could see one of a dozen or more combinations
of the headline, image, and call-to-action button on that page.
In other words, one would see the puppy image with headline A and call-to-action button B. Another would
see the kitten image with headline C and call-to-action button A. And so on.
Let’s take a closer look at an MVT experiment in action, continuing the three-section experiment we
described above. Here’s the sequence of events:
1. A visitor lands on your test page: http://www.mysite.com/landing_page.html.
2. The GWO Control Script (which is JavaScript code) executes, which generates a request to the GWO
servers to request an additional JavaScript
known as siteopt.js.
3. If this is the first time the user has seen
this experiment, siteopt.js sets cookies to
note what variation of the page the user has
seen, and it sets up variables and defines
the utmx_section function so that later in
the page, as the document is parsing and
executing, the code there will make use of
the variables to replace the section content.
If this is not first time the user as seen the
experiment, then siteopt.js will read the previously created cookies. It will then define the utmx_
section function such that later in the page the user will see the same variation they saw when they
last saw the experiment. Additionally, the cookie expiration date will be reset to two years.
4. A third piece of code, which we call the Section Script, determines which section variations will
appear to users. As the browser parses the page, it will encounter Section Scripts, which can modify
the original content. It calls utmx_section function that was defined by siteopt.js earlier in the page.
5. The Section Script works with siteopt.js to replace the original version of the content with an
alternate version that includes alternate headline B, a kitten image, and call-to-action button C.
Some users, chosen at random, will see the original version of the page as a control. In this case, the
Section Script will leave the original content in the page unchanged.
6. The Tracking Script on the test page uses the cookies set by siteopt.js to note which combination
of content was displayed to the user. The Tracking Scripts submits this information to GWO for the
purpose of reporting.
7. If the user (we hope) then visits your
conversion page, such as http://www.mysite.
com/thank_you.html. The GWO Conversion
Script, which is nearly identical to the
Tracking Script, records the visit to the
conversion page, thank_you.html, and adds
one more conversion to the total for the
B-kitten-C combination this visitor saw.
Note that the Conversion Script will record
the conversion only if the user first came
through the test page, executing the Control
Script and the Tracking Script. Visitors
who happen to reach the conversion page
through some other route won’t be counted
as conversions.
Points to remember
• siteopt.js is not a static file. It is generated
dynamically based on the values passed to
it and on the specifics of your experiment.
• The Control Script also checks to see if
the page is using HTTP or HTTPS. If the
page is using HTTPS, it will make a secure
request for the siteopt.js file.
Points to remember:
• Any individual visitor will be counted only
once for visits and conversions on a given
test, no matter how many times he or she
visits the test or conversion page. This
makes each test an “apples to apples”
comparison of first-time visitors.
• GWO cookies have a lifetime of two
years. A conversion must happen within
two years of the visit to the test page to
be counted. (And if you finally get your
conversion 23 months after first contact
with the customer, congratulations!)

6
The Techie Guide to Google Website Optimizer
How Experiments Work
A/B Experiments
For A/B tests, the sequence is almost the same. But instead of GWO replacing pieces of the page content
dynamically, it redirects the visitor to one of the prepared test pages.
The Control Script for an A/B experiment is nearly identical to that of a multivariate experiment. It contains
an extra script that when executed calls the utmx function. The utmx function will either not do anything (if
the user is to see the original) or redirect the user to the B or C pages.
Detailed Explanation of MVT Experiments
Now let’s take a more technical look at what happens for MVT experiments:
1. The visitor’s browser makes a request for http://www.mysite.com/landing_page.html
2. The contents of landing_page.html are loaded into the browser. (Technically the page is streamed to
the browser and the parser won’t see the whole page until after all the data has been streamed in and
the inline scripts executed).
3. The GWO Control Script (at the top of the page) executes.
4. The Control Script looks for a GWO cookie. This is to see if the user has visited the page before.
5. The Control Script makes a request from Google’s servers for an additional script, siteopt.js,
appending the experiment key and GWO cookie values, like this:
http://ww w.google-analytics.com/siteopt.js?v=1&utmxkey=<experiment
key>&utmx=<__utmx cookie value>&utmxx=<__utmxx cookie
value>&utmxtime=<request timestamp>
If this is the visitor’s first visit to the page:
• The utmx and utmxx values passed to siteopt.js will be empty.
• A combination will be randomly chosen for the visitor
• siteopt.js will set the __utmx and __utmxx cookies.
If this is not the visitor’s first visit to the page:
• The utmx and utmxx values passed to siteopt.js will have the values that were previously set.
• The combination chosen for the visitor will be based on the utmx value.
• The GWO cookie’s two-year expiration date is reset.
siteopt.js includes the code that defines the utmx_section function. This is the function that actually replaces
the content on the page.
The utmx_section functions are executed, which replace the content for each section. The content to be
replaced comes from whatever was entered when the experiment was set up.
If the section content to be shown is the original version of the content, GWO will do nothing to that section.
The user will simply be shown the original section content. If you modify the content on your original page
after the test begins, users will then see whatever changes are made.
The visit tracking code runs, which tracks a visit and the combination seen. This is basically a standard
Google Analytics (GA) tracking call, using a custom “virtual URL” representing a visit to the test page.

7
The Techie Guide to Google Website Optimizer
How Experiments Work
The virtual URL looks like this:
“/<experiment key>/test” where the experiment key is the same as
the k variable in the Control Script like
var k=’2045836535’.
Detailed Explanation for A/B Experiments
Now let’s take the same technical look at what happens for A/B experiments:
1. The visitor’s browser makes a request for http://www.mysite.com/landing_page.html
2. The contents of landing_page.html are loaded into the browser.
3. The GWO Control Script (at the top of the page) executes.
4. The Control Script looks for a GWO cookie. This is to see if the user has visited the page before.
5. The Control Script makes a request from Google’s servers for an additional script, siteopt.js, and
appends the experiment key and GWO cookie values as such:
http://ww w.google-analytics.com/siteopt.js?v=1&utmxkey=<experiment
key>&utmx=<__utmx cookie value>&utmxx=<__utmxx cookie
value>&utmxtime=<request timestamp>
Know your cookies
Here’s a detailed explanation of the parameters in the GWO cookie:
v The version of the control code making the signup request to siteopt.js. The v value is hard coded in
the Control Script on the test page.
utmxkey The unique identifier for the experiment. This 0-padded 10-digit decimal value is read from the
k variable in the Control Script (var k=’1234567890’).
utmx The value of the ___utmx cookie that GWO uses. It tracks what combinations a visitor has seen for
zero or more experiments. For example:
123456.01234567890123456789:1:1-3-2.98765432109876543210:3:3-1
This example illustrates information for two experiments. The first part (123456 in this example) is
the domain hash, identical to that found in the Analytics cookies (__utma, for example). Then comes
information for experiments, each one separated by at dot. For each experiment, there is a three-part,
colon separated string. The first part is the Experiment ID and Experiment Key represented by a 20
digit number. The Experiment Key represents a family of experiments. Experiment ID uniquely identifies
an experiment, regardless of the family. The second part is for GWO internal purposes. The third is the
combination that the visitor is to see for the given experiment. It is of the form of components separated
by dashes where each component represents the variation chosen for the visitor to see for a given
section. The number of components is equals to the number of sections defined by the experiment. In
the above example, there are two experiments represented. In the first, the visitor is to see combination
1-3-2 and in the second experiment, the visitor is to see combination 3-1.
It’s important to note that information about multiple experiments can be encoded in the utmx cookie.
utmxx This is the value of the __utmxx cookie that GWO uses. This variable is reserved for future use.
utmxtime A simple Unix-based time stamp for the request. This is added so the request will not be
cached.

8
The Techie Guide to Google Website Optimizer
How Experiments Work
6. The visit tracking code runs, which tracks a visit and the page version. This is basically a standard
Google Analytics (GA) tracking call, using a custom “virtual URL” representing a visit to the test page.
7. The virtual URL looks like this:
/<experiment key>/test
where the experiment key is the same
as the k variable in the Control Script like
var k=’1234567890’
.
The Conversion Page
When your visitor reaches the conversion page:
1. The Conversion Script runs, which tracks a conversion and the combo version (for MVT) or page
version (for A/B).
2. Like the Tracking Script, this is basically a standard Google Analytics (GA) tracking call, using a
custom “virtual URL” representing a visit to the test page.
The virtual URL looks like this:
/<experiment key>/goal
where the experiment key is the same
as the k variable in the Control Script such as
var k=’2045836535’
.
3. When the GA call is made, the value for the __utmx cookie is passed to Google’s servers. If the user
has an __utmx cookie (which matches the experiment ID), GWO uses the value from the cookie to
know which combination or page to attribute the conversion to.
For more details on our Tracking Scripts, please see the GA technical documentation at:
http://code.google.com/apis/analytics/docs/gaConceptsOverview.html#trackingCodeExecution
.
Points to remember
• The parameters for A/B experiments are the same as for multivariate experiments, with this
exception: The value of “utmx” applies to each single experiment page, rather than to several
sections of each page.
• If the visitor was chosen to get the original version of the test page, GWO will do nothing (not
redirect).
Know your cookies
GWO uses cookies (and only cookies) to identify unique visitors. Each unique visitor will be counted only
as a single visitor -- and if they convert, only as a single conversion -- regardless of how many times they
visit the test page or conversion page. The cookie lifetime is two years.

9
Setting Up Experiments - Standard Experiments
Setting Up Experiments
Background
Now that we see how GWO actually works down in the boiler room, let’s set up an experiment.
Section one,
Standard Experiments, covers the simple scenario of a single test page and a single conversion
page on a single server.
In this scenario the content you want to test is static (though the page itself might be generated dynamically
with PHP or ASP.NET).
Section two,
Non-Standard Experiments, covers more advanced scenarios for testing static content, such as:
• Dealing with development and production servers
• Dealing with pages that are not directly accessible (like those requiring a user to log in)
We won’t cover every single possible scenario, but the explanations you’ll find here should give you enough
information to integrate GWO into your own specific environment.
In section two, we’re still assuming the content you want to test is static, but in section three,
Experiments
with Dynamic Content, we explain what to do when the content you want to test has dynamic elements. This
might include, for example, testing a product detail page with variations on the product-specific information.
Standard Experiments
Here’s a jolly step-by-step example for setting up a simple experiment.
This example is kept simple on purpose. In later sections we’ll dig deeper into what GWO does in each step
of the setup process, and talk about how to rig up more advanced scenarios.
Setting up an MVT experiment
Let’s say you’re testing a lead sign-up form (found at http://www.mysite.com/sign-up.html) and
your conversion page is http://ww w.mysite.com/thank-you.html.
Let’s also say you want to test two parts of the page:
• The headline
• The call-to-action text in the submit button
Step 1: Set up test and goal pages
• Name your experiment. For example: Sign-up Form Test
• Set your test page URL: http://www.mysite.com/sign-up.html
• Set your conversion page: http://www.mysite.com/thank-you.html
At this point GWO will try to retrieve the pages from your website to make sure the URLs are valid.

10
The Techie Guide to Google Website Optimizer
Setting Up Experiments - Standard Experiments
Step 2: Install and validate JavaScript tags
On your test page:
• Add the Control Script at the top of the page
• Add Section Script tags for the sections you want to test (in this example, the headline and the
submit button text)
• Add the Tracking Script at the bottom of the page
On your conversion page:
• Add the Conversion Script
At this point GWO will try to retrieve the pages from your website in order to:
• Validate the Control Script on the test page
• Validate the Tracking Script on the test page
• Search for Section Scripts to understand
what sections are on the page
• Validate the Conversion Script on the
conversion page
Step 3: Create variations
• Create the alternate versions of the content
you want to test. (In this example, one or
more alternate headlines and one or more
versions of the submit button text.)
Step 4: Review and launch
Review the data, test the page using the ‘preview’ function, and then launch your test!
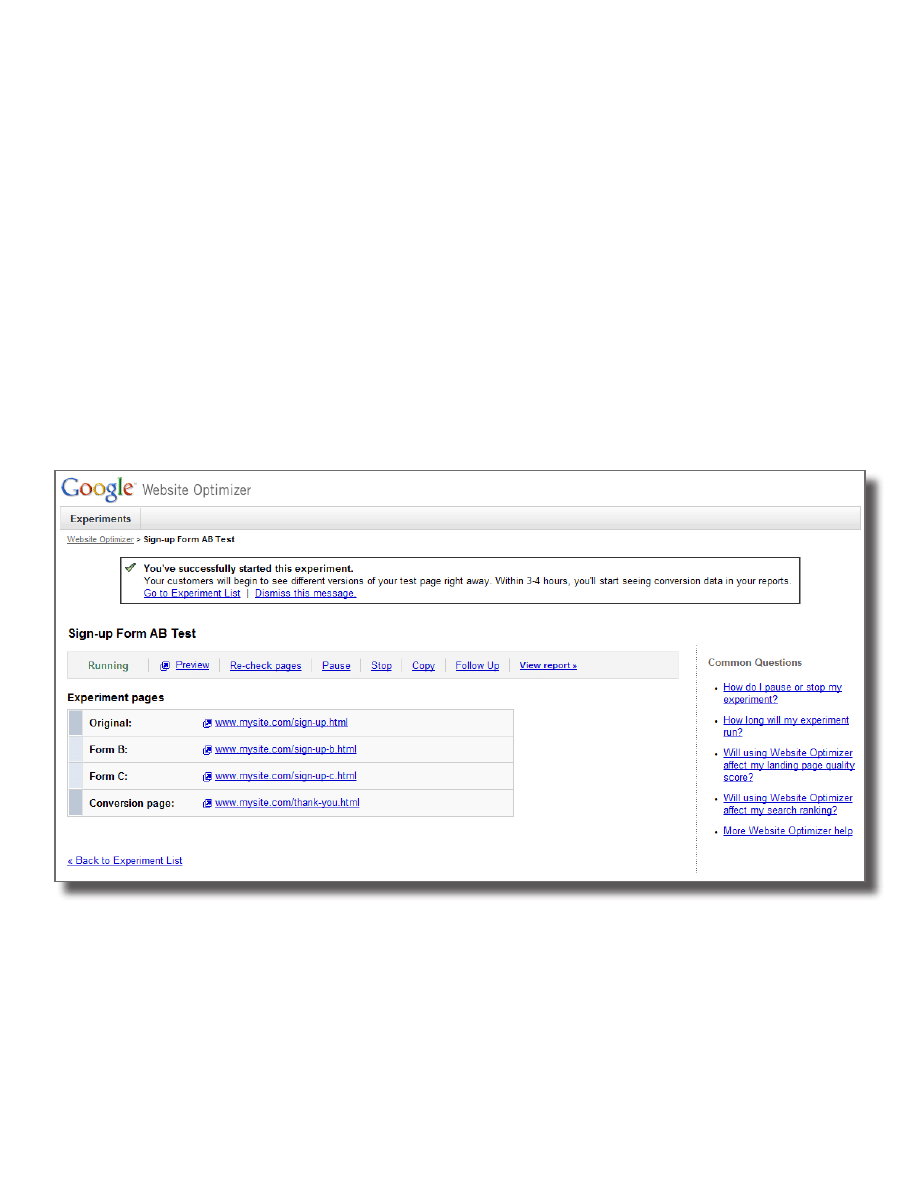
Setting up an A/B Experiment
Let’s say you want to test two variations for the layout of the sign-up page.
Step 1: Name your experiment and identify pages
• Name your experiment. For example: Sign-up Form AB Test
• Set your original test page URL: http://www.mysite.com/sign-up.html
• Set your first variation test page URL: http://www.mysite.com/sign-up-b.html
• Set your (optional) second variation test page URL: http://www.mysite.com/sign-up-c.html
• Set your conversion page URL: http://www.mysite.com/thank-you.html
At this point GWO will try to retrieve these pages from your website to make sure the URLs are valid.
Step 2: Install and validate JavaScript tags
Original test page:
• Add the Control Script at the top of the page.
• Add the Tracking Script at the bottom of the page
Experimenting with only a percentage of traffic
You can show the experiment to only a percentage
of the traffic to your site if you like. For instance,
you might decide that you only want 10% of your
traffic to see the test.
Note that even though you may include only a
certain percentage (such as 10%) of visitors in
the test, all visitors will trigger the script. The
only way the system knows how to include 10%
of visitors is to be measure the arrival of everyone
who visits the page.
11
The Techie Guide to Google Website Optimizer
Setting Up Experiments - Standard Experiments
First variation test page:
• Add the Tracking Script at the bottom of the page
Second variation test page:
• Add the Tracking Script at the bottom of the page
Conversion page:
• Add the Conversion Script
At this point GWO will try to retrieve these pages in order to:
• Validate the Control Script on the original test page
• Validate the Tracking Script on the original and variation test pages
• Validate the Conversion Script on the conversion page
Step 3: A/B experiment set-up: Preview and start experiment
• Review the data, test the pages using the ‘preview’ function, and then launch your test!
A/B Experiment Launched!

12
Non-Standard Experiments
Non-Standard Experiments (Testing Static Content)
Background
Before we go into the specifics of setting up experiments for non-standard setups, let’s elaborate on some
GWO concepts.
Earlier in this guide, we used the terms test page and conversion page (in singular form) to keep things
simple. As you set up an experiment, GWO asks for the URL for your test page (or pages, for A/B
experiments) and the URL for your conversion page. GWO then continues to explain how to install the
JavaScript code on the test page and the conversion page.
These terms imply that your test elements are all part of a single test page with a specific URL, and that
conversions happen on a specific URL.
But what if this isn’t the case?
Let’s look at how to set up more complicated scenarios. As we saw earlier, GWO has four pieces of JavaScript
(three for A/B):
1. The Control Script at the top of the page (this loads the JavaScript functions used to replace content
for MVT or redirect the user for A/B)
2. The Section Script (utmx_section) right before a section with a </noscript> at the end (for MVT only)
3. The Tracking Script JavaScript
4. The Conversion Script JavaScript
This time, instead of thinking in terms of a test page and conversion page with specific URLs, think in terms
of executing some JavaScript for each one of the functions.
• To load the utmx section function, call the Control Script, which then invokes siteopt.js, which will
provide an implementation of the utmx section function.
• To replace the content for a section, call the Section Script. This applies to MVT experiments only.
The utmx_section alone is not capable of completing this work. You need an ending </noscript> tab
to delineate where the section ends.
• To register a visit, call the Tracking Script.
• To register a conversion, call the Conversion Script.
Here are a few other details you should know:
Purpose of utmx_section
The utmx_section function call just before a section, and the </noscript> at the end of a section, are actually
serving two different purposes.
1. When the function is executed, it marks where the section begins and ends (denoted by </noscript>),
and it may replace the content. When a user is viewing the original content, it leaves anything
between those tags untouched.
2. When the experiment is being set up, GWO looks for the utmx_section call to identify the names and
order of the sections.

13
The Techie Guide to Google Website Optimizer
Non-Standard Experiments
Original versions of content
When the original version of the content is displayed, GWO does NOT make any modification to the content
in the section. The only place that the original content exists (for the purposes of displaying to end users) is
in the page itself. If you make any changes to the original content on the page that’s what visitors will see
when they are chosen to see the original. Keep in mind that changing content in the middle of an experiment
will screw up the stats for the original and effectively invalidate the experiment as a whole. So, you probably
don’t want to do that.
In other words, if you set up an experiment with this code:
<script>utmx_function(“headline”)</script>
<h2>Buy Acme Widgets at 50% Off!</h2>
</noscript>
...and then after setting up the experiment, changed the code on your page to this:
<script>utmx_function(“headline”)</script>
<h2>Acme Widgets - Buy One Get One Free.</h2>
</noscript>
The content that would now be displayed for the original version is:
Acme Widgets - Buy One Get One Free.
Now that we better understand what the setup process does, let’s look at some common scenarios that don’t
fit the simpler setup scenario:
•
Development & production servers that have different URLs (usually just the domain name: http://
dev.mysite.com and http://www.mysite.com)
•
Pages that aren’t directly accessible by GWO (pages behind a firewall, pages that require a username
and password, or pages that use the same URL but display differently)
•
Multiple “pages” that share the same page name but use parameters to display different content
(such as product_page.php?pid=5 and product_page.php?pid=6)
Setting up Multivariate Tests
Step 1: Set up test and goal pages
Experiment name is used only within your GWO account. You’ll see it on the list of experiments in your
account, but visitors to your website won’t see it.
Test page URL is used only during the setup process and for the preview function. After you’re done setting up
your experiment, Website Optimizer won’t use this URL in any way other than to show a preview within GWO
-- for example, when you preview how a combination or variation looks by clicking the combination on the
report page. If you plan to upload pages manually, then this field won’t matter.
14
The Techie Guide to Google Website Optimizer
Non-Standard Experiments
How Website Optimizer uses the Test page URL:
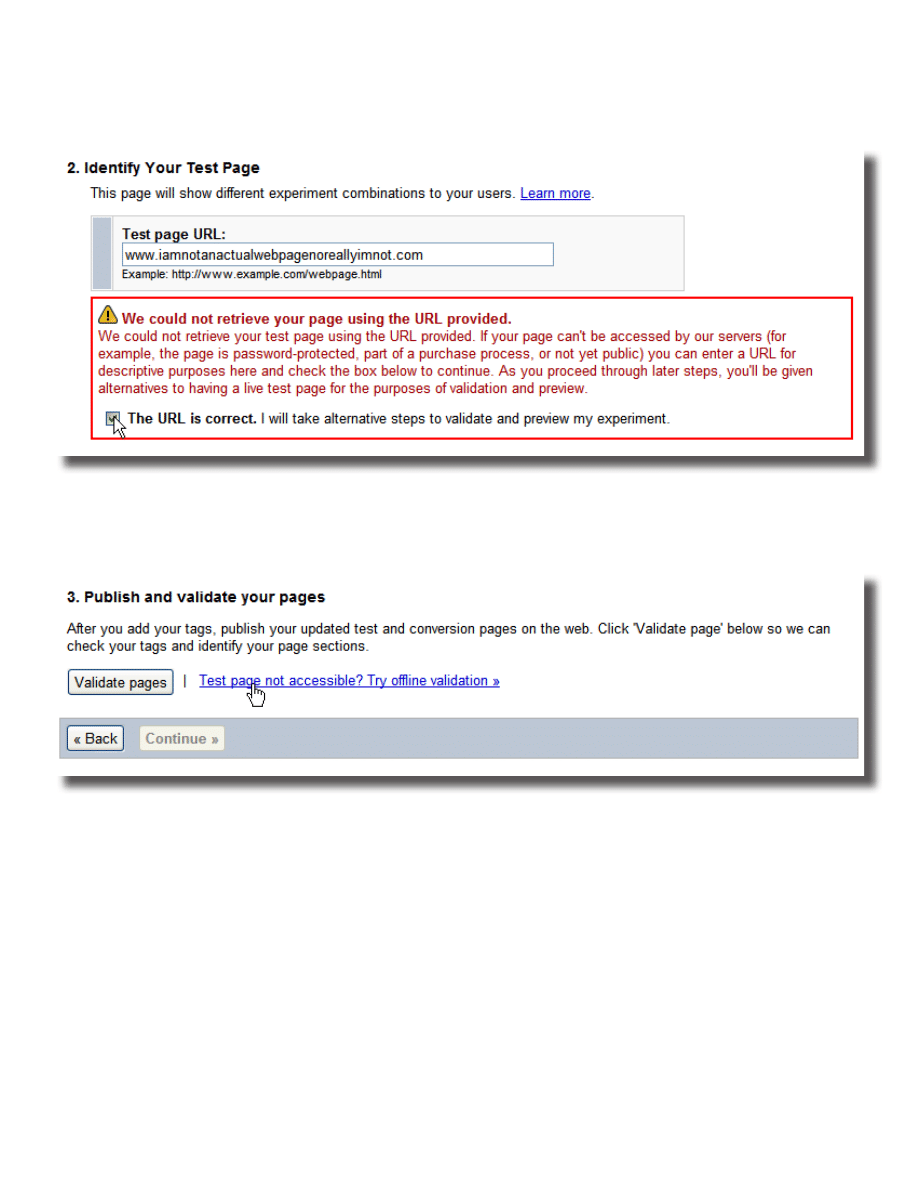
• In Step 1, GWO will make a request to this URL to confirm that the page exists. If this URL isn’t live
yet, check the box reading ‘The URL is correct’ to continue on to the next step.
• In Step 2, GWO will try to load the page found at this URL, looking for the page sections to be tested.
If there is nothing at this URL, or if there is the page exists but doesn’t include the valid Section
Scripts, try using offline validation.
• Also in Step 2, GWO will look for the Tracking Script at this URL. If there is nothing at this URL, or if
there is something but it doesn’t include the valid GWO code, you can just use the offline validation
as above.
• For previews, GWO uses this URL to load the page in the preview frame. Pages can also be previewed
using a URL different than the one you entered here. We’ll show you how to do that later.
Conversion page URL is used only during the setup process. After you’re done setting up the experiment, GWO
doesn’t use this URL in any way. If you’ll be uploading the pages manually, you can enter whatever you like
here. The field can’t be left blank, however, so feel free to enter whatever URL you’d like here.
How Website Optimizer uses the Conversion page URL:
• In Step 1: GWO will make a request to this URL, just to see if something is there. If not, click the
checkbox provided to continue to Step 2.
• In Step 2: GWO will look for the Conversion Script at this URL. If it alerts you that it can’t find valid
GWO code, use the offline validation instead.
15
The Techie Guide to Google Website Optimizer
Non-Standard Experiments
Step 2: Install and validate JavaScript tags
In Step 2, GWO asks you to add the JavaScript code to the appropriate pages or sections of your site. The
system will then:
• Try to validate that you correctly copied the Control Script, Tracking Script and Conversion Scripts.
• Look for parts of the page tagged with Section Script.
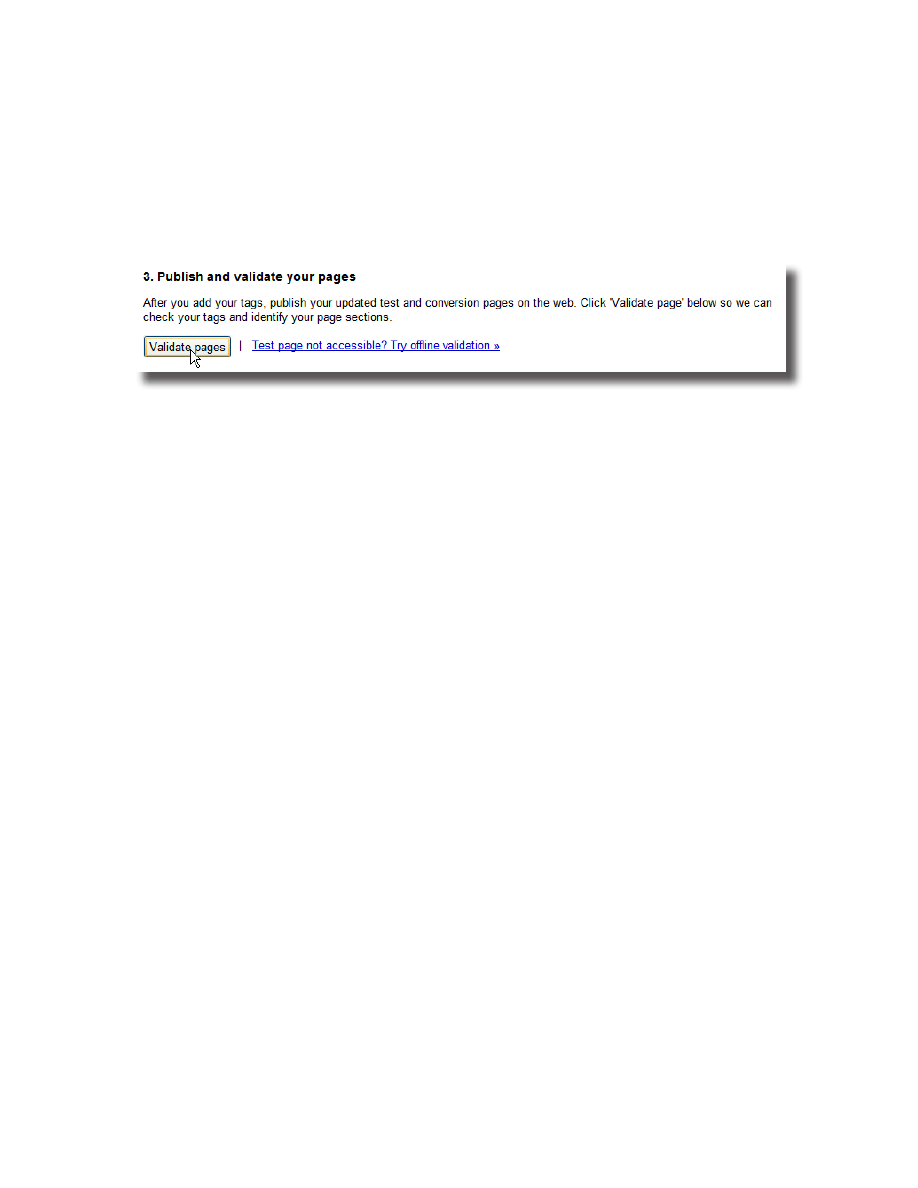
Click
Validate pages and GWO will try to download the files from the URLs provided.
To use your own files for validation, use this option:
Test page not accessible? Try offline validation »
The question you may ask now is: “What files do I upload and where do I put the tags if I’m uploading my
own files for validation?”
For the
test page, we recommend:
1. Add the tags in the right places so you can see them using the browser’s “view source” on your local
machine.
2. Use a web browser to view the page you want to test locally on your computer (such as http://dev.
mysite.com/product.php?id=50)
3. Save the HTML source of the page to a local static file (product_php.html)
4. Edit that saved file (product_php.html) by adding the right tags in the right places
Notes from a GWO tester:
“For the test page, you can technically create a page that contains nothing but the Control Script, the
test page Tracking Script, and the appropriate sections with nothing in them. Something like this:
{Control Script}
<script>utmx_section(“headline”)</script>
</noscript>
<script>utmx_section(“product image”)</script>
</noscript>
<script>utmx_section(“call to action button”)</script>
</noscript>
{test page Tracking Script}
While this will work fine from a technical perspective, I find that by using the actual HTML output
from the test page, it forces me identify the start and end of each section in the page, which I’ll have
to do in any case and should have done before setting up the experiment. It’s also helpful to see the
correct version of the original content within the GWO interface.”

16
The Techie Guide to Google Website Optimizer
Non-Standard Experiments
For the
conversion page, locally create a dummy file (such as conversion_dummy_file.html) containing
nothing but the Conversion Script. This is especially helpful if the conversion page requires a purchase and
is hard to view without making an actual purchase. In any case, you’ll need to add the Conversion Script to
the real conversion page before you launch the experiment.
Step 3: Create variations
Once you’ve reached Step 3, creating variations is the same as in the simple scenario. If your variations
contain dynamic content, you can see how to set that up in the next section.
Step 4: Review and launch
This step should really be called “Review,
preview and launch”.
While GWO used your own local files to help during the experiment setup stage, by this point you should
have all the GWO code in place so it appears in the HTML source on an actual web server. If you have access
to the test page from your own PC (for instance, on a development server that is not publicly accessible), the
preview function will work fine. The preview function calls the page based on the URL you provided in Step
1, and adds a string that looks like a local anchor (starting with #).
For example, to preview: http://dev.mysite.com/product_page.php?pid=123
GWO will use a URL that looks like this:
http://de v.mysite.com/product_page.php?pid=123#utmxid=EAAAACmLHKpzyPXnHnp
og9gHi14;utmxpreview=0-0-0;utmxreload=1
Experiment ID is an alpha numeric sequence (
AgAAAIuElaplZk1wAusMbP0ZUYo, for example). To find
this ID, open the Website Optimizer preview page for your experiment; the value of the query parameter
experiment is the experiment ID.
Combination is the combination you want to preview. It is a sequence of numbers, separated by dashes. Each
number represents a page section in your experiment, and the value of each number identifies the variation.
For example, if your experiment has three sections, the combination
2-0-1 specifies the second variation of
the first section, the original of the second section, and the first variation of the third section. Variation order
is determined by the order of the Section Scripts on the test page. To see the original combination for an
experiment with four sections, you would specify
0-0-0-0.
For example:
http://ww w.mysite.com/product_page#utmxid=EAAAAOYh8q79WlRUYLWrG7ax48I;utm
xpreview=0-2-0
Once you’ve appended the preview string to your test page URL, you’ll need to force a refresh to get the
browser to fetch the requested variation. This can usually be achieved by hitting CTRL+F5 in the browser.
(The forced refresh is necessary because the specified combination appears after a ‘#’ symbol and is not
considered part of the cacheable URL.)
If the test page is not directly accessible within the GWO preview, you can copy and paste the “preview
string” and append it to the live page. Let’s say you set up the experiment on a dev server and provided
URLs for the dev server during the experiment setup, then copied the GWO code to the live server. In that
case, before launching the experiment you can copy the files to the production server and then replace the
preview URLs with ones for production.

17
The Techie Guide to Google Website Optimizer
Non-Standard Experiments
For example, if the page is:
http://dev.mysite.com/product_page.php?pid=123
...and the preview URL looks like this:
http://de v.mysite.com/product_page.php?pid=123#utmxid=EAAAACmLHKpzyPXnHnp
og9gHi14;utmxpreview=0-0-0;utmxreload=1
You can just switch the domain name to test it in production:
http://ww w.mysite.com/product_page.php?pid=123#utmxid=EAAAACmLHKpzyPXnHnp
og9gHi14;utmxpreview=0-0-0;utmxreload=1
Once you’re happy with the preview in production, you can just launch the experiment, and then test the
pages in production (without the preview string, of course).
http://ww w.mysite.com/product_page.
php?pid=123
Previewing Inaccessible Pages
In some circumstances, you won’t be able to use the preview feature to view your test page combinations.
For example, if your test page is password protected, part of a checkout process, or session-specific, Website
Optimizer may not be able to access your test page for previewing.
However, you can still preview your page manually. Launch your browser and navigate to your test page,
taking whatever steps are required to get to your actual test page URL (such as entering a password or going
through a checkout process).
Once you’re viewing the test page, you can modify the URL in the browser’s address field to view a
specific combination. Append the following string to the test page URL:
#utmxid=Experiment_
ID;utmxpreview=Combination.
Most browsers won’t reload a page if the only difference in the URL is the anchor string. Here’s an example:
If you visit a page with this URL: http://www.mysite.com/page.html#string_a
...and then go to a URL where the only difference is the anchor string, like this: http://ww w.mysite.com/page.
html#string_b
...the browser won’t try to load the page from the server, but will use the local cached version. This means
you might not see the correct version in the preview.
The solution is to simply force a reload of the page after you’ve updated the URL. To do so, hit CTRL+F5.
This works on all major browsers on the PC. On a Mac, hit Command + Shift + R.

18
Experiments with Dynamic Content
Experiments with Dynamic Content
Background
It’s a common question: “How do I deal with experiments where the section I want to test includes dynamic
content?”
Suppose you want to test three sections on a product detail page:
• Product name (testing a short name vs. long name)
• Product image (testing large vs. small)
• Call-to-action button (testing “Add to Cart” vs. “Buy Now”)
At first glance, this seems to be a prime candidate for a MVT experiment. But when setting up the
experiment you realize to your horror that there’s no way to enter dynamic data into any of the sections.
What’s the solution?
There are actually two ways to tackle this:
Option 1 - Use a MVT experiment and custom JavaScript
Pros:
• This is a true MVT experiment.
• Does not require a redirect
• Works well if you’re comfortable with advanced JavaScript.
Cons:
• Requires an additional layer of JavaScript to display the content, which could potentially get very
complex and difficult to debug.
• Requires additional code to support users who have JavaScript disabled.
Option 2: Use an A/B experiment
Set up the experiment as an A/B experiment, regardless of what you’re testing. Since the GWO server does
not return dynamic content any dynamic content has to come from the your own web server.
There are two ways to implement this using an A/B experiment, which we’ll cover in a moment, but the
underlying idea is the same.
Pros:
• Simple to implement
• Works for everyone (even if they have JavaScript off).
• Works well if you’re not a JavaScript guru.
Cons:
• You’ll need to manually create a separate version of the page for each combination.
• Requires a redirect.

19
The Techie Guide to Google Website Optimizer
Experiments with Dynamic Content
Let’s dig into the details.
Option 1 - Use a MVT experiment and custom JavaScript
Here is a proof of concept example that uses an
MVT style of experiment to test sections with
dynamic content. Suppose you have a section in
which there are three pieces of dynamic content.
Then, consider an alternative section variation for
this section:
Buy a %%product_name%% for the price
of %%product_price%% by <a href=’buy.php?prod-id=%%product_id%%’>clicking
here</a>
Tokens (such as
%%product_id%%
) are to be replaced with dynamically generated content. When creating
your alternate versions, you might want to try:
For the price of only %%product_price%%, you can buy a %%product_name%%
by <a href=’buy.php?prod-id=%%product_id%%’>clicking here</a>
Note that the second variation mentions the price before the product name. Now, the JavaScript that takes
advantage of these kinds of section variations would look like this:
<script>
var v = utmx(‘variation-content’, ‘Section1’);
if (v) {
document.write(
v.replace(“%%product_name%%”, “<? print $product_name ?>”).
replace(“%%product_price%%”, “<? print $product_price ?>”).
replace(“%%product_id%%”, “<? print $product_id ?>”));
document.write(“</nosc” + “ript>”);
}
</script>
<ul>
<li>Product name: <? print $product_name ?>
<li>Product price: <? print $product_price ?>
<li><a href=’buy.php?prod-id=<? print $product_id ?>’>
Buy Now</a>
</ul>
</noscript>
The call to the utmx function, taking the arguments ‘variation-content’ and ‘Section1’ will return the section
template for the section named “Section1” that includes the %%’ed tokens, which are replaced with the
dynamic content. Note that the <?...?> tokens in the script are server-side PHP code. This example uses
PHP, but any server-side system will work.
Please take note that visitors who have turned off JavaScript will see the default, unordered list of the
dynamically generated content.
Gotcha alert: Always escape any JavaScript special characters when setting up the variables, such as quotes.
Otherwise the JavaScript code will have errors.
Point to remember
There is no “best” solution for implementing
experiments with dynamic content. Each has its
pros and cons. Some developers will prefer option
1 and others will stick with option 2

20
The Techie Guide to Google Website Optimizer
Experiments with Dynamic Content
Option 2 - Use an A/B experiment.
As noted earlier, an A/B experiment can be implemented two ways:
Option A: Create multiple physical copies of the dynamic page.
Option B: Have a single physical page with multiple virtual versions.
Let’s look at the implementation details of each option.
Option A: Create multiple physical copies of the dynamic page.
For example:
• Original: product.php
• Test Variation B: product_b.php
• Test Variation C: product_c.php
From a technical integration perspective, this is the simplest option. It needs no special backend code to
support GWO.
If version A is chosen for a visitor, any time they get to product.php the page will load and then immediately
redirect them to product_a.php.
GWO will append the query string when doing a redirect, so if a visitor clicks:
http://ww w.mysite.com/product.php?pid=72&group=boys&sid=1234
...they will be redirected to:
http://ww w.mysite.com/product_b.php?pid=72&group=boys&sid=1234
For some sites, creating multiple copies of a dynamic page, such as the product page, creates additional
problems unto itself. For instance, you now have to maintain and update all of the copies. Web analytics data
is complicated as well, since we have several versions of the product page.
Sometimes having unique URLs for each version of the product page is a good thing, however. For one, you
now have web analytics data for each version separately and can gain additional insights such as time on
page, etc.
When setting up the experiment, here are the URLs you’d use:
• Original:
http://ww w.mysite.com/product.php
• Test Variation A:
http://ww w.mysite.com/product_b.php
• Test Variation B:
http://ww w.mysite.com/product_c.php
Note: If your product.php page returns an error when no product ID is passed in, simply use the offline
validation.
Option B: Have a single physical page with multiple virtual versions.
Each of the multiple virtual versions will dynamically include the content you want to test. You’ll need to
differentiate between the virtual versions using a query parameter in the URL, and add a few lines to the
server side code of your page.

21
The Techie Guide to Google Website Optimizer
Experiments with Dynamic Content
This method has an additional advantage: Since the file name is the same for all variations, only the
parameters change, when the experiment is over and you’ve removed any GWO specific server side code,
your users will never get a 404 (looking for a page that no longer exists). Just make sure the page won’t crash
on unrecognized parameters.
Let’s say the page we want to test is product.php
You’ll create a dynamically-included section for each version of the page you want to test. For example:
• Original: dynamic_include_a.php
• Test Variation B: dynamic_include_b.php
• Test Variation C: dynamic_include_c.php
The original version uses a URL something like this: http://ww w.mysite.com/product.php?pid=87
...and the virtual version will use a URL something like this:
http://ww w.mysite.com/product.php?pid=87&variation=b
Here is an outline and some pseudo-code for the original and modified versions of product.php:
Original version of product.php:
_stuff before the section we want to test_
<include file=dynamic_include_a.php>
_stuff after the section we want to test_
Modified version of product.php:
<if (variation is not defined in URL)
<include gwo_display_control_code.js>
</if>
_stuff before the section we want to test_
<if (variation is not defined in URL)>
<include file=dynamic_include.php>
<else>
<include file=dynamic_include_($variation).php>
</if>
_stuff after the section we want to test_
Here’s what will happen:
Scenario one: GWO chooses the original version of the page.
1. The user reaches
product.php?pid=123
2. The GWO display code will be included and then executed (but not do anything)
3. dynamic_include_a.php will be included.
Scenario two: GWO chooses variation B of the page.
1. The user reaches
product.php?pid=123
2. The GWO display code will be included and then executed, causing a redirect

22
The Techie Guide to Google Website Optimizer
Experiments with Dynamic Content
3. The visitor will immediately be redirected to
product.php?pid=123&variation=b
4. The page
product.php?pid=123&variation=b loads
5. The GWO display code will NOT be included
6. dynamic_include_b.php will be included
When setting up this experiment, you’d use these URLs:
• Original:
http://ww w.mysite.com/product.php
• Test Variation B:
http://ww w.mysite.com/product.php?variation=b
• Test Variation C:
http://ww w.mysite.com/product.php?variation=c
If your product.php page returns an error when no product id is passed in, simply use the offline validation.
Let’s say you set up an A/B experiment with these values:
• Original page:
http://ww w.mysite.com/page.php
• Test Variation B:
http://ww w.mysite.com/page.php?track=456&variation=b
• Test Variation C:
http://ww w.mysite.com/page.php?track=789&variation=c
A visitor reaches the page for the first time using this URL:
http://ww w.mysite.com/page.php?track=123&productID=72
GWO rolls the dice and chooses to redirect the visitor to the URL for variation B.
Since both the current URL and the test page URL have the track parameter, the visitor will be redirected to
this URL:
http://ww w.mysite.com/page.php?track=456&productID=72&variation=b
Point to remember
Technically, GWO does not append the parameters from the original page to the test page. It merges the
parameters from the two URLs. GWO will favor the parameter values from the URLs for the alternative
test pages entered during the experiment setup.

23
The Techie Guide to Google Website Optimizer
Other Advanced Stuff
Other Advanced Stuff
Using Server Side Session Variables
If you’re using a single physical page, and multiple virtual versions, you may also add back-end code that
uses a server-side session variable to remember what variation to display for the user. Naturally, this requires
some experience using session variables.
The advantage to this is that visitors will be redirected only once per session -- the first time they visit the
test page. Later visits to the test page will use the session variable to show the correct version, so there’s no
need to redirect the user.
You’ll need to add some server-side code to check the URL, and set a server-side session variable to store the
variation value.
Here’s some pseudo-code that adds the support of a session variable. (Changes from previous example are
in
blue.
)
<if (variation is defined in URL)>
<$session_variation = variation value from URL>
</if>
<if (
$session_variation is not defined
)
<include gwo_display_control_code.js>
</if>
_stuff before the section we want to test_
<if (
$session_variation is not defined
)>
<include file=dynamic_include.php>
<else>
<include file=dynamic_include_(
$session_variation
).php>
</if>
_stuff after the section we want to test_
Advanced A/B Testing
There are situations in which the A/B testing interface won’t allow you to make the customizations you may
want -- experiments that span multiple domains or copied experiments, for example.
In these situations, Website Optimizer supports a more manual implementation of A/B testing. You’ll use the
multivariate experiment creation flow in Website Optimizer to accomplish this:
1. Sign in to Website Optimizer.
2. Click
Create another experiment.
3. From the Multivariate Experiment box, click
Create.
Identify experiment pages
1. Enter an experiment name.
2. Enter your
Test page URL and Conversion page URL. You’ll identify your variation pages in a later step.
3. Click
Continue. Website Optimizer will check for the existence of these pages on your server -- if
they’re not present or not accessible, select
The URL is correct from the warning message and click
Continue again.

24
The Techie Guide to Google Website Optimizer
Other Advanced Stuff
Add JavaScript tags to experiment pages
This is Step 2 of the Website Optimizer tool provides the specific code to install on your pages.
For your original page:
1. Add both the Control Script and the Tracking script as described in the tagging instructions.
2. Ignore the instructions under Page sections, and instead add the following script, exactly as it
appears below, immediately after the Control Script:
<!-- utmx section name=”Test URL” -->
<script>
var b = utmx(‘variation_content’, ‘Test URL’);
function filter(v) {
var u = v[0].contents;
if (b && u.substr(0,7) == ‘http://’ && b.substr(0, 7) != ‘http://’) {
u = u.substr(7);
}
return u;
}
utmx(‘url’, ‘Test URL’, 0, filter);
</script>
3. The filter function exists to strip off the ‘http://’ which the utmx function might prepend to the URL.
This allows one to redirect to relative URL’s.
For alternative pages (B, C, and other pages):
Add the Tracking Script as described in the tagging instructions.
For your conversion page:
Add the Conversion Script to your conversion page, at the very end of your source code (after the closing
</body> tag) as described in the tagging instructions.
Once the process of tagging your pages is finished, click
Validate pages. If your pages aren’t accessible, click
Try offline validation to upload your pages directly into Website Optimizer.
Click
Continue to move on to Step 3.
Create Variations
In Step 3 of the Website Optimizer tool:
1. Click
Add new variation.
2. Enter a name for this variation and click
Add.
3. In the text box, enter the URL for alternative page for this variation. This should be on a single line
with no additional whitespace before or after the URL..
4. Click
Save.
5. Click
Preview - Website Optimizer will display your variation page.
6. Repeat the steps above for any additional variation pages (your C, D, and other pages).
7. Click
Save and continue to move to Step 4.

25
The Techie Guide to Google Website Optimizer
Other Advanced Stuff
Review and launch
1. Double-check your experiment setup, and designate how much traffic to include in the experiment.
2. Click
Launch now to launch the experiment.
3. View your reports
Although the reports will not offer any definitive conclusions for a while, you should check your reports after
a few hours to make sure impressions and conversions are being recorded, and that the traffic recorded in
the experiment is consistent with the traffic measured by your web analytics tools. Zero impressions and
conversions, or serious discrepancies, may indicate that the experiment tags were not installed correctly.
Note that each alternative page is considered a ‘combination’ in your reports. Page section reports can be
ignored during A/B testing, as you’re concerned with entire pages (combinations) instead of page sections.
Stopping the experiment
You can stop the experiment at any time, regardless of whether or not Website Optimizer has identified a
clear winner. The experiment will continue for as long as you want it to.
(Note: You can get these same details in this AdWords Help Center entry:
http://adwords.google.com/support/
bin/answer.py?answer=62999
.)
Segmenting traffic
Here’s another popular question: “How can I segment traffic so only some of my users are part of my
experiment?”
Why do that? So you can remove any internal traffic from the experiment, test only new visitors, only
users coming from AdWords, or manage other variables. Google Website Optimizer doesn’t do this out of the
box though we hope to add it in the future.
But! Let us pass on this workaround suggested by a user:
“If your pages aren’t static HTML pages, you can simply add some backend code that conditionally
outputs the GWO code. Here is some pseudo code:
< if (show visitor GWO code)>
include gwo_code.include
</if>
Make sure to use conditional logic for all sections of the test page!
Also, from a testing perspective, if a visitor isn’t shown the experiment at first, that visitor should
continue to not see the experiment.
If you’re running an MVT experiment this includes the Control Script, the Section Script and the
Tracking Script. If you’re running an A/B this includes the Control Script (on the original page) and
the Tracking Script (on the original and all test pages)
You don’t have to worry about conditionally including the Conversion Script on the conversion page.
If a visitor reaches the conversion page without having executed the Control Script, they won’t be
counted as part of the experiment.“

26
The Techie Guide to Google Website Optimizer
Wrapping it up
Detailed Reporting: GWO Users Pitch In
Google Website Optimizer focuses on visitors and conversions. But suppose you’d like to get even more
detailed analytical information for each combination? Stats like time spent on each page, bounce rates,
keyword segmentation, date breakdown, etc.
Well, you can -- again, thanks to a clever trick by some of our GWO users. The bright minds at ROI
Revolution (one of our Website Optimizer Authorized Consultants) came up with some JavaScript code that
can be added to pages to make each combination look like its own page. They describe the process here:
http://www.roirevolution.com/blog/2008/11/google_website_optimizer_renews.html
Thanks, guys!
Going one better, here’s a script that has the heart of their idea in it, but with a much more simplified version
of the code:
<script type=”text/javascript”>
if (utmx(‘combination’) != undefined) {
var l = document.location, s = l.search;
s += s.length ? ‘&’ : ‘?’;
s += ‘combo=’ + utmx(‘combination’);
var pt = _gat._getTracker(“UA-123456-1”);
pt._trackPageview(l.pathname + s);
}
</script>
To use this code, you replace the Google Analytics tracking script on your test page with the above code.
Remember to replace UA-123456-1 with your own Analytics profile ID. You’ll then see the different
combinations listed in your Google Analytics reports.
Wrapping it up
That’s the end of the Techie Guide, for now. We’re constantly at work building new features and finding
new ways to use Website Optimizer, as are our users. We’ll be updating this guide regularly with the latest
advanced testing techniques. Until then, don’t stop testing until your conversion rate is 100%.
--the Website Optimizer team
Document Outline
- Forward
- Prerequisites
- Future Compatibility
- Updates and Revisions
- How Experiments Work
- Setting Up Experiments
- Non-Standard Experiments (Testing Static Content)
- Experiments with Dynamic Content
- Other Advanced Stuff
- Wrapping it up
Wyszukiwarka
Podobne podstrony:
Mind Control Technique Guide
Data and memory optimization techniques for embedded systems
Google Search Operator Guide
search engine optimization starter guide
NIST Technical Guide to Information Security Testing and Assessment SP800 115
Mazda5 Technical Guide 08 Restraints
Zend Optimizer User Guide
Technicians Guide to the Left Hand Path
Google Website Optimizer Przewodnik goweop
Warn The Basic Guide to Winching Techniques
Forex, Foreign Exchange, Currency, Technical Analysis, Elliot Wave Theory, Trading Guide
więcej podobnych podstron