
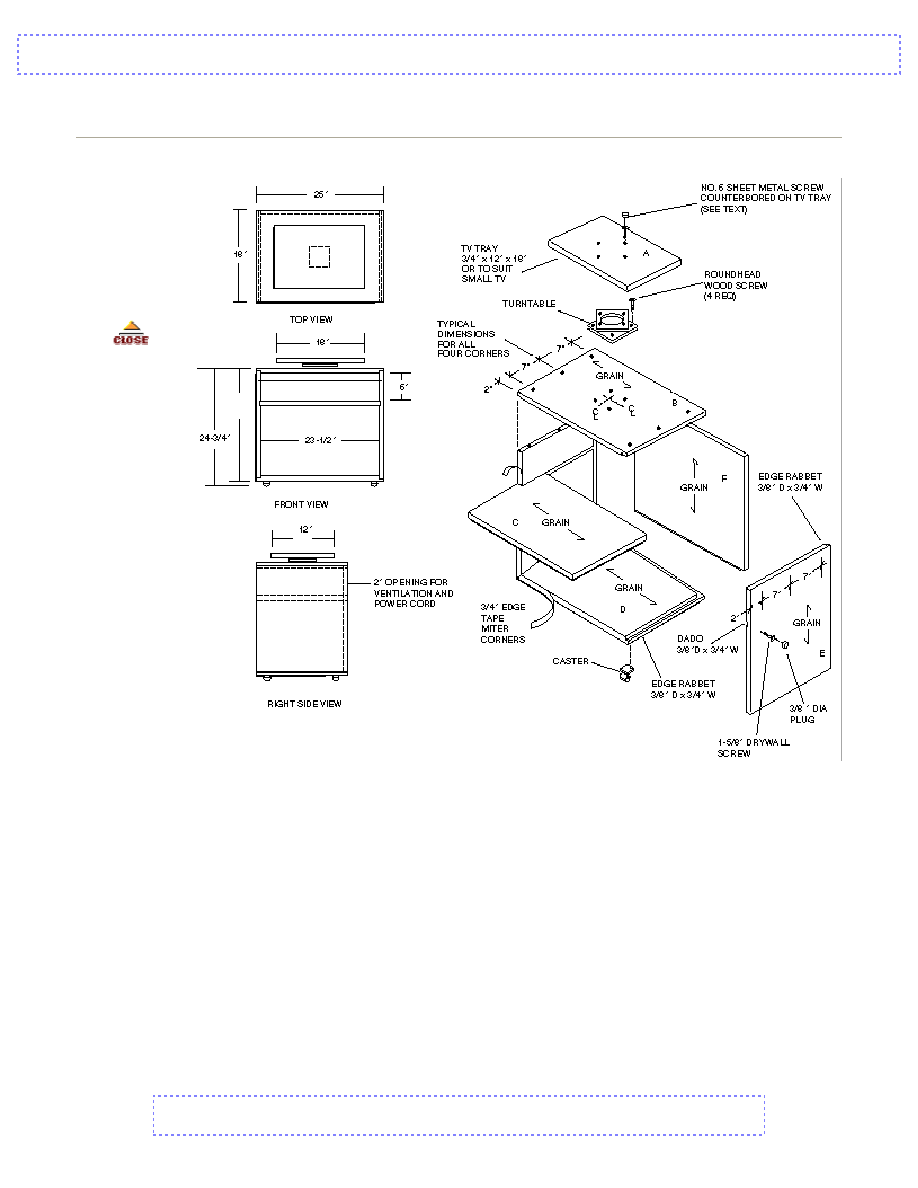
TV/VCR Cabinet with Swivel Tray
.
Tools & Materials
Tools Required
?
Pencil
?
Safety glasses
?
Mallet
?
Hammer
?
11/32" nail set
?
Jointer
?
Block plane
?
Drill press
?
Assorted files
?
Philips screw driver
?
Sandpaper (80-grit through 220-grit)
?
Radial arm saw
?
Assorted bits
?
Ruler (zigzag or tape)
?
Countersinking drill bits
?
Square (framing, try and 4 ft. T)
?
Assorted clamps (C, bar, spring-type)
?
Cordless drill-driver with Philips bit
?
Table saw with dado head set
?
Router (3/4" diameter straight bit)
?
Sanders (stationary belt and portable belt, random orbit, pad)
Materials
Shopping List, nominal dimensions
A
TV tray
3/4 x 12 x 18"
pine (1 pc.)
B,C,D
Top, Shelf
3/4 x 4 x 8'
E,F
Bottom, Sides, Back
cabinet-grade plywood,
walnut veneer(1 pc.)

Cutting List, actual dimensions
A
TV tray
3/4 x 12 x 18"
1 required
B,D
Top, Bottom
3/4 x 18 x 25"
1 each required
C
Shelf
3/4 x 17-1/4 x 24-1/4"
1 required
E
Sides
3/4 x 18 x 23-1/4"
2 required
F
Back
3/4 x 21-1/4" x 24-1/4"
1 required
Miscellaneous: Professional Strength Wood Glue, 1-5/8" drywall screws, 1-1/4" brads, assorted
nails, length of 3/8" dowel, flexible wood tape, contact cement, machine oil for Lazy Susan.
Hardware: Four 1" no 6 pan head sheet metal screws, four 1" no. 8 round head wood screws, Lazy
Susan swivel (No. 9548, Shepherd Hardware), 30mm plate casters (No. 27144, Woodcraft).
Procedure
I. Cabinet - Layout and Cutting
Builder's Tip: When building quality furniture, remember all wood grains should "run" in a certain
direction. For this project: sides and back - vertical; top and bottom - left to right.
1. After checking direction of wood grain, rough cut all members (slightly oversized). Note:
The easiest way to work a large sheet of plywood initially is by placing it on top of three
lengths of 2x3s laid across a pair of sawhorses. This improvised "table" puts the material at
a convenient height.
2. Using a securely-clamped 4-ft. T-square as the straightedge, carefully trim the top, shelf,
bottom and side pieces to size. Note: Back and tray piece will be trimmed later.
Builder's Tip: Whether you use a table, radial arm, or portable circular saw, a fine tooth,
plywood veneer blade should be installed to ensure perfectly clean cuts. Always cut wood
with the veneer side down when using a portable circular saw, and with the veneer side up
when cutting with table and radial arm saws.
3. Mark locations for ploughing all dadoes and rabbets on sides, top and bottom pieces.
Builder's Tip: No edge rabbet is required at back edge of the top piece to accommodate
the back piece because the back is installed with a 2" space between its top edge and the
cabinet top. This space ensures ventilation for the VCR, plus easy ingress/egress for the
cords.
4. Plough grooves and rabbets using a 3/4" straight bit in the router guided by a securely-
clamped straightedge. If necessary, set up dado heads in the table saw to make these cuts.
Builder's Tip: Cut edge rabbets for bottom piece in veneer side of plywood, so "good" side
will face up into the cabinet. All other rabbets should be cut into the non-veneer or "lesser"
side of the plywood panels.
II. Cabinet Assembly

1. Temporarily assemble cabinet by tack-nailing parts together with partially driven 1-1/4"
finishing nails; if necessary, use several bar clamps as well. Note: Try to position nails
where 1-5/8" drywall screws will eventually be driven, so nail holes will not be visible in
veneer.
2. With piece assembled, bore screw holes using a counterbore bit, which makes the pilot,
shank, and countersink and counterbore holes in one step. Note: Drive home several
strategically-placed screws to secure the piece until all the holes are bored.
3. With piece assembled measure and trim back piece to size; temporarily install with veneer
side out.
4. Lightly sand cabinet using 150-grit paper in the pad sander; always use with-the-grain
strokes. Thoroughly dust all surfaces and disassemble.
5. Reassemble cabinet using carpenter's glue and 1-5/8" drywall screws. Immediately install
back piece to ensure that cabinet remains square during glue drying period. Note: Since
you may want access to cabinet from the back in the future, install back using screws only -
no glue.
6. Use flexible veneer tape to cover exposed plywood edges:
a. Cut tape slightly over length for each edge.
b. Work one edge at a time; apply contact cement to back of tape and mating
surface, allowing adhesive to dry until it can be touched with a piece of clean brown
paper without sticking.
c. Carefully position first end of tape and guide along edge. Trim off any overlap.
d. Allow entire assembly to rest for at least four hours.
Procedure - Page 2
III. TV Tray
1. Trim TV tray to size.
2. Install turntable (swivel) hardware. Note: Select and install turntable hardware that will
accommodate the size and weight of the television it will support.
a. Center "blind" side of turntable on tray's underside and mark screw holes.
b. Remove turntable and bore holes for four No. 6 (1" long) self-tapping screws. On
top side of tray, bore countersink holes (about 1/4" deep) using drill and
countersink bit, so screw heads will be slightly below the wood surface when turned
home.
c. To make certain that self-tapping screws are correct length and won't interfere with
turntable operation, temporarily attach the tray to the turntable by driving at least
two of the screws into the turntable's small holes.
d. Remove turntable from tray.
e. Center turntable on top of cabinet; "blind" side up, mark and bore pilot screw holes
for bottom plate.
f. Lubricate turntable's ball bearings with a light to heavy oil, depending on the
degree of rotating action wanted.

g. Mount turntable on cabinet using four 1" No. 8 roundhead wood screws.
h. Place the tray on the turntable using 6d finishing nails as guide pins to position the
pre-drilled holes over the small turntable holes. Remove nails one at a time and
drive home four self-tapping screws.
3. Cut the required number of 1/4" long dowel plugs from a length of 3/8" dowel to conceal
screws holding cabinet together. To keep sanding on veneer surface to a minimum, do not
cut plugs too long. Squirt glue into each hole and press plugs into place. Immediately
remove excess glue from surface with clean, damp rag. Allow glue to dry overnight if
possible.
4. Position plate casters on underside of bottom piece; mark for screws and bore pilot holes.
5. Fasten casters to cabinet bottom using screws that come with the hardware.
6. Inspect cabinet inside and out for smoothness. Sand lightly where necessary and wipe
clean.
IV. Staining and Finishing
1. Wipe all surfaces with a tack cloth to remove dust.
2. Apply
Minwax
®
Pre-Stain Wood Conditioner
according to label instructions. Wait 15 minutes,
and wipe away excess using a clean rag. Apply stain within two hours.
3. Sand again lightly with 220-grit sandpaper and remove dust with the tack cloth.
4. Stir the stain well; apply the
Minwax
®
Wood Finish™
of your choice with a clean brush and
with-the-grain strokes. Allow to set for 5 to 15 minutes, depending on desired tone. Wipe
off excess with clean, lint-free rag. Apply second coat if desired. Note: For stain and
polyurethane protection in one easy step, use any
Minwax
®
PolyShades
®
or
Minwax
®
Woodsheen
®
color according to label instructions.
5. Allow piece to dry for at least 8 hours or, preferably, overnight.
6. To achieve a tough finish with a soft luster, apply a coat of
Minwax
®
Fast-Drying
Polyurethane
following the label instructions. Allow to dry overnight.
7. Allow piece to cure for at least two weeks.
V. Cleanup
?
If you have product left over, wipe the can rim so that product in the rim won't dry out and
prevent the lid from forming a tight seal.
?
Clean brushes used for oil-based finishes with mineral spirits; soap and water are all that is
needed for brushes used for water cleanup products.
VI. Safe Disposal of Rags & Waste
Please be mindful of the safe way to dispose of used rags and other waste. Remember that rags,
steel wool and other waste soaked with oil finishes may spontaneously catch fire if improperly
discarded. Place these items in a water-filled metal container immediately after use. Tightly seal the
container and then dispose of it in accordance with local regulations. Be sure to keep the container
out of reach of children.
TV/VCR Cabinet With Swivel Tray
Tips Summary
1. Stain and finish all exposed surfaces including the cabinet's interior and bottom surfaces to
help prevent warping.
2. If additional surface protection is desired, apply a coat of
Minwax
®
Paste Finishing Wax
over
all exposed surfaces. Let stand for 10 minutes, then buff with a clean fiber brush (scrub
brush). Finish buffing with a clean, lint-free rag.
3. If you spot any minor imperfections in the wood (e.g. pinholes, surface scratches) resist the
urge to use a wood filler before applying any stain. Conventional wood fillers may not
absorb stain in exactly the same manner as adjacent wood, so the spot will become even
more evident. Instead, wait until finish has dried completely and then use
Minwax
®
Blend-
Fil
®
Pencils
or
Minwax
®
Wood Finish™ Stain Markers™
for touch-ups.
4. It's critical that all stains and finishes be allowed to dry thoroughly between coats.
Remember, drying times may vary due to humidity and other climatic conditions.

Wyszukiwarka
Podobne podstrony:
Cabinet TV DVD Cabinet (on wheels)
Cabinet TV & Video cabinet
Cabinet Compact TV Cabinet
Cabinet TV Stand (Part 1)
Cabinet TV Stand (Part 2)
Cabinet TV Stand #2 (Part 1)
Cabinet TV Stand #2 (Part 2)
Apex Tv At20022002Spn
Kody TV do pilota DM 800HD
Grundig TV Lcd
Wpływ TV na dzieci! (art z sieci)
Hitachi Vt M161 Vcr Partial Manual
Backup of Tv Tuner Cards Waikato Li
Apex Tv Gb43 65Hd09Pn
checklist radio tv theatre events
2 misja publiczna tv
Corner Buffet Cabinet(1)
24 DZIECI A TV
więcej podobnych podstron