
2009 Chevrolet Aveo
|
Aveo, Wave, G3, Barina (VIN S/T) Service Manual
|
Engine
|
Engine Electrical
|
Specifications
|
Document ID: 1303854
Fastener Tightening Specifications
Application
Specification
Metric
English
Battery Cable Nuts
4.5 N·m
40 lb in
Battery Carrier Tray Lower Bolts
20 N·m
15 lb ft
Battery Carrier Tray Upper Bolts
20 N·m
15 lb in
Battery Retainer Clamp-to-Battery Rod Nuts
4 N·m
35 lb in
Engine Mount Lower Bracket Bolts (1.2L)
41 N·m
30 lb ft
Front Bearing Plate Screws
8 N·m
71 lb in
Fuel Rail Retaining Bolts
20 N·m
15 lb in
Generator Adjusting Bolt (1.2L)
7 N·m
62 lb ft
Generator Battery Lead Nut
15 N·m
11 lb ft
Generator Brush Holder Screws
12 N·m
106 lb in
Generator Drive and End Bearing Nut
81 N·m
60 lb ft
Generator Drive End Bearing Nut
81 N·m
60 lb ft
Generator Lower Bracket Mounting Bolt (1.2L)
28 N·m
21 lb ft
Generator Lower Bracket-to-Generator Nuts
25 N·m
18 lb ft
Generator Pulley Nut (1.2L)
110 N·m
81 lb ft
Generator Shackle Bracket Bolt
25 N·m
18 lb ft
Generator Through-Bolts
10 N·m
89 lb in
Harness Ground Bolt
41 N·m
30 lb ft
Reaction Rod Bolt and Nut (1.2L)
83 N·m
61 lb ft
Starter Field Coil Connector Nut
8 N·m
71 lb in
Starter Mounting Bolts (1.2L)
23 N·m
17 lb ft
Starter Mounting Bolts (1.4L/1.5L SOHC and 1.4L/1.6L DOHC)
43 N·m
32 lb ft
Starter Solenoid Assembly Screws
8 N·m
71 lb in
Starter Solenoid Nuts
15 N·m
11 lb ft
Starter Through-Bolts
6 N·m
53 lb in
© 2010 General Motors Corporation. All rights reserved.
Page 1 of 1
Document ID: 1303854
7/5/2010
http://localhost:9001/si/showDoc.do?docSyskey=1303854&pubCellSyskey=37499&pubObj...

2009 Chevrolet Aveo
|
Aveo, Wave, G3, Barina (VIN S/T) Service Manual
|
Engine
|
Engine Electrical
|
Specifications
|
Document ID: 1542460
General Specifications
Application
Specification
Metric
English
Battery
l
Manual
• 1.2L SOHC
• 1.5L SOHC
410 Cold Cranking Amps
l
Automatic
• 1.4L SOHC/DOHC
• 1.5L SOHC
550 Cold Cranking Amps
Alternator
• 1.4L SOHC/DOHC
• 1.5L SOHC, A/T
85 A
Alternator
• 1.2L SOHC
• 1.5L SOHC, M/T
75 A
Starter-Manual (No-Load Test Current
Draw)
• 1.2L SOHC
• 1.5L SOHC
0.8 kW
Maximum 53 A (Drive Pinion Speed at Minimum
5,000 RPM, 11.5 V
Starter-Automatic (No-Load Test
Current Draw)
• 1.4L SOHC/DOHC
• 1.5L SOHC
1.2 kW
Maximum 90 A (Drive Pinion Speed at Minimum
2,600 RPM, 11.5 V
© 2010 General Motors Corporation. All rights reserved.
Page 1 of 1
Document ID: 1542460
7/5/2010
http://localhost:9001/si/showDoc.do?docSyskey=1542460&pubCellSyskey=37501&pubObj...
2009 Chevrolet Aveo
|
Aveo, Wave, G3, Barina (VIN S/T) Service Manual
|
Engine
|
Engine Electrical
|
Specifications
|
Document ID: 1303852
Battery Usage
Table 1:
Battery Voltage Specifications
Application
Description
L4 Engine
Cold Cranking Amps
550 amps
Load Test
270 amps
RC - Minimum
90 minutes
Replacement
85B-60
Battery Voltage Specifications
Application
Specification
Metric
English
Minimum Voltage:
l
9.6 V
21°C
70°F
l
9.4 V
20°C
68°F
l
9.1 V
0°C
32°F
l
8.8 V
-10°C
14°F
l
8.5 V
-18°C
0°F
l
8.0 V
Below -18°C
Below 0°F
© 2010 General Motors Corporation. All rights reserved.
Page 1 of 1
Document ID: 1303852
7/5/2010
http://localhost:9001/si/showDoc.do?docSyskey=1303852&pubCellSyskey=37556&pubObj...
2009 Chevrolet Aveo
|
Aveo, Wave, G3, Barina (VIN S/T) Service Manual
|
Engine
|
Engine Electrical
|
Specifications
|
Document ID: 1303634
Starter Usage
Application
Description
Starter
l
No Load Test @ 12 volts (1.4L/1.5L SOHC and 1.4L/1.6L DOHC) Maximum 90 amps
l
Drive Pinion Speed (1.4L/1.5L SOHC and 1.4L/1.6L DOHC)
Minimum 2,600 RPM
l
No Load Test 9 volts (1.2L)
Maximum 150 amps
l
Drive Pinion Speed (1.2L)
Minimum 2,000 RPM
Solenoid
l
Hold-in Windings @ 12 volts
12-20 amps
l
Pull-in Windings @ 12 volts
60-90 amps
© 2010 General Motors Corporation. All rights reserved.
Page 1 of 1
Document ID: 1303634
7/5/2010
http://localhost:9001/si/showDoc.do?docSyskey=1303634&pubCellSyskey=37553&pubObj...

2009 Chevrolet Aveo
|
Aveo, Wave, G3, Barina (VIN S/T) Service Manual
|
Engine
|
Engine Electrical
|
Specifications
|
Document ID: 1303791
Generator Usage
Application
Description
Generator Types (1.4L/1.5L SOHC and 1.4L/1.6L DOHC)
CS-121D
Generator Types (1.2L)
SG7K
© 2010 General Motors Corporation. All rights reserved.
Page 1 of 1
Document ID: 1303791
7/5/2010
http://localhost:9001/si/showDoc.do?docSyskey=1303791&pubCellSyskey=37509&pubObj...

2009 Chevrolet Aveo
|
Aveo, Wave, G3, Barina (VIN S/T) Service Manual
|
Engine
|
Engine Electrical
|
Repair Instructions
| Document ID: 2089626
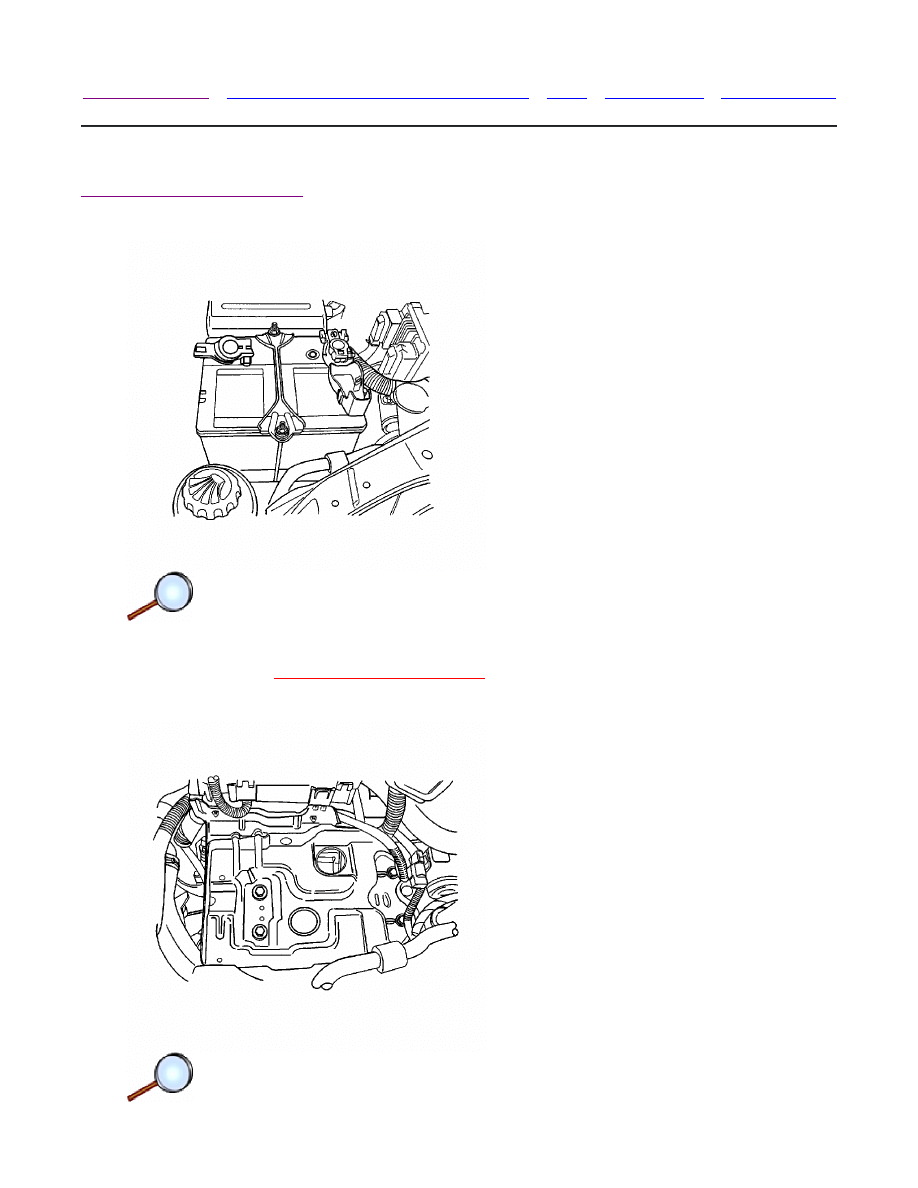
Battery Negative Cable Disconnection and Connection
Removal Procedure
Warning: Unless directed otherwise, the ignition and start switch must be in the OFF or
LOCK position, and all electrical loads must be OFF before servicing any electrical component.
Disconnect the negative battery cable to prevent an electrical spark should a tool or
equipment come in contact with an exposed electrical terminal. Failure to follow these
precautions may result in personal injury and/or damage to the vehicle or its components.
1. Record all preset and theft codes, (if equipped), from the radio.
2. Turn the ignition switch to the OFF position.
3. Verify that all the electrical components are OFF such as interior lights, all doors are closed,
the underhood lamp , etc.
4. Loosen the clamping bolt from the battery negative cable.
5. Remove the battery negative cable from the battery.
6. Position the battery negative cable away from any body ground.
Installation Procedure
1. Verify that all the electrical components are OFF such as interior lights, all doors are closed,
the underhood lamp , etc.
2. Clean corrosion from the negative battery cable using a metal brush.
3. Install the battery negative cable to the battery.
Caution:
Refer to
Fastener Caution
in the Preface section.
4. Install the clamping bolt to the negative cable and tighten to 4.5 N·m (40 lb in).
5. Reset the radio stations and the clock.
© 2010 General Motors Corporation. All rights reserved.
Page 1 of 1
Document ID: 2089626
7/5/2010
http://localhost:9001/si/showDoc.do?docSyskey=2089626&pubCellSyskey=37733&pubObj...
2009 Chevrolet Aveo
|
Aveo, Wave, G3, Barina (VIN S/T) Service Manual
|
Engine
|
Engine Electrical
|
Repair Instructions
| Document ID: 2094901
Battery Tray Replacement
Removal Procedure
1. Disconnect the negative battery cable and then disconnect the positive battery cable.
Warning:
Refer to
Battery Disconnect Warning
in the Preface section.
2. Remove the nuts from the battery rods that fasten the battery hold-down bar clamp.
© 2010 General Motors Corporation. All rights reserved.
Page 1 of 3
Document ID: 2094901
7/5/2010
http://localhost:9001/si/showDoc.do?docSyskey=2094901&pubCellSyskey=37692&pubObj...
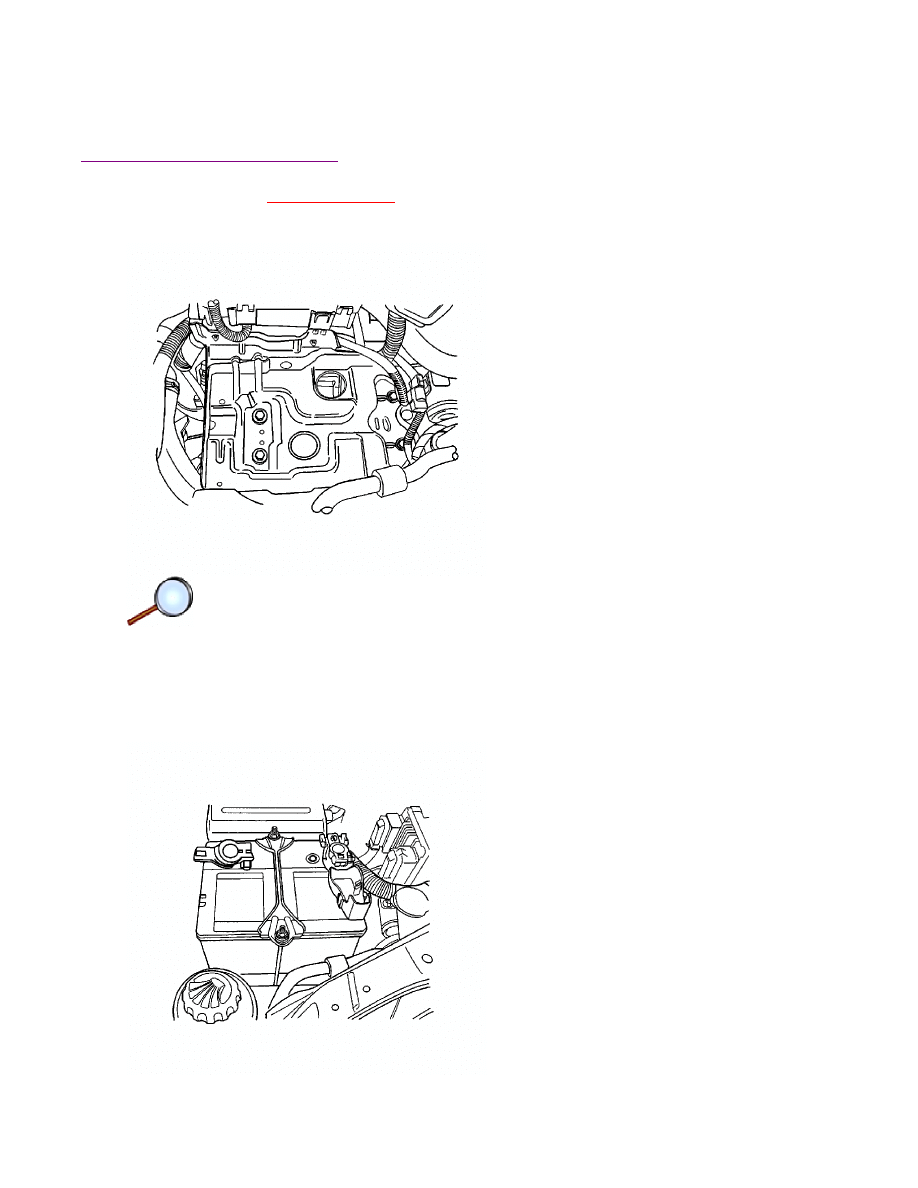
3. Check the battery carrier tray for obvious cracks or damage. Detach the carrier tray if
necessary by removing the upper and the lower bolts.
Installation Procedure
Caution:
Refer to
Fastener Caution
in the Preface section.
1. Install the battery carrier by fastening the carrier tray upper and lower bolts.
Tighten
Tighten the battery carrier tray upper and the lower bolts to 20 N·m (15 lb ft).
Page 2 of 3
Document ID: 2094901
7/5/2010
http://localhost:9001/si/showDoc.do?docSyskey=2094901&pubCellSyskey=37692&pubObj...

2. Install the battery into the tray.
3. Fasten the bar clamp to the battery by loosely attaching the battery rods from the batter tray
cutouts through the bar clamp holes, and loosely tightening the nuts.
Tighten
Tighten the battery retainer clamp-to-battery rod nuts to 4 N·m (35 lb in).
4. Connect the negative battery cables.
Tighten
Tighten the battery cable nuts to 4.5 N·m (40 lb in).
Page 3 of 3
Document ID: 2094901
7/5/2010
http://localhost:9001/si/showDoc.do?docSyskey=2094901&pubCellSyskey=37692&pubObj...

2009 Chevrolet Aveo
|
Aveo, Wave, G3, Barina (VIN S/T) Service Manual
|
Engine
|
Engine Electrical
|
Repair Instructions
| Document ID: 2038058
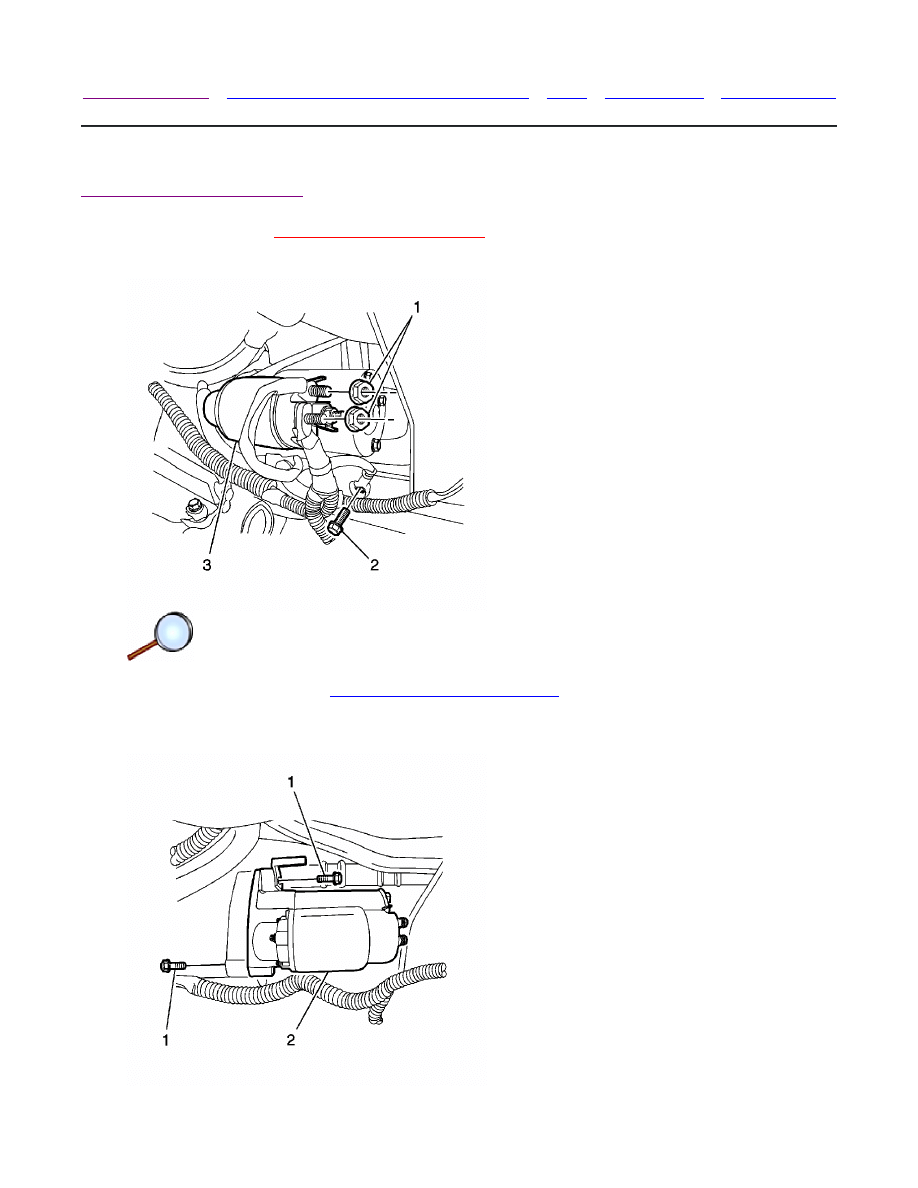
Starter Replacement (1.4L)
Removal Procedure
Warning:
Refer to
Battery Disconnect Warning
in the Preface section.
1. Disconnect the battery negative cable.
2. Remove the upper and the lower starter mounting bolts.
3. Remove the starter solenoid nuts to disconnect the electrical cable.
© 2010 General Motors Corporation. All rights reserved.
Page 1 of 3
Document ID: 2038058
7/5/2010
http://localhost:9001/si/showDoc.do?docSyskey=2038058&pubCellSyskey=37552&pubObj...

4. Remove the starter assembly.
Installation Procedure
1. Place the starter assembly in position.
Caution:
Refer to
Fastener Caution
in the Preface section.
2. Install the upper and the lower starter mounting bolts and tighten to 43 N·m (32 lb ft).
3. Position the starter electrical wire on the solenoid terminal.
4. Install the starter solenoid nuts and tighten to 15 N·m (11 lb ft).
5. Connect the battery negative cable. Refer to
Battery Negative Cable Disconnection and
Page 2 of 3
Document ID: 2038058
7/5/2010
http://localhost:9001/si/showDoc.do?docSyskey=2038058&pubCellSyskey=37552&pubObj...

Connection
.
Page 3 of 3
Document ID: 2038058
7/5/2010
http://localhost:9001/si/showDoc.do?docSyskey=2038058&pubCellSyskey=37552&pubObj...
2009 Chevrolet Aveo
|
Aveo, Wave, G3, Barina (VIN S/T) Service Manual
|
Engine
|
Engine Electrical
|
Repair Instructions
| Document ID: 2044944
Starter Replacement (1.2L DOHC)
Removal Procedure
Warning:
Refer to
Battery Disconnect Warning
in the Preface section.
1. Disconnect the battery negative cable.
2. Raise the vehicle. Refer to
Lifting and Jacking the Vehicle
.
3. Remove the starter solenoid nut (1) to disconnect the starter harness.
4. Remove the starter solenoid nut (1) to disconnect the battery positive connector.
5. Remove the ground bolt (21) from the engine block.
© 2010 General Motors Corporation. All rights reserved.
Page 1 of 3
Document ID: 2044944
7/5/2010
http://localhost:9001/si/showDoc.do?docSyskey=2044944&pubCellSyskey=37552&pubObj...

6. Remove the starter retaining bolts (1).
7. Remove the starter (2).
Installation Procedure
1. Install the starter (2).
Caution:
Refer to
Fastener Caution
in the Preface section.
2. Install the starter retaining bolts (1) and tighten to 23 N·m (16.9 lb ft).
Page 2 of 3
Document ID: 2044944
7/5/2010
http://localhost:9001/si/showDoc.do?docSyskey=2044944&pubCellSyskey=37552&pubObj...

3. Install the ground bolt (2) from the engine block.
4. Install the starter solenoid nut (1) to connect the battery positive connector.
5. Install the starter solenoid nut (1) to connect the starter harness and tighten.
6. Lower the vehicle. Refer to
Lifting and Jacking the Vehicle
.
7. Connect the battery negative cable.
• The engine ground bolt to 38 N·m (28.0 lb ft).
• The starter solenoid harness connector nut to 10.5 N·m (7.7 lb ft).
• The starter solenoid battery positive connector nut to 10.5 N·m (7.7 lb ft).
Page 3 of 3
Document ID: 2044944
7/5/2010
http://localhost:9001/si/showDoc.do?docSyskey=2044944&pubCellSyskey=37552&pubObj...
2009 Chevrolet Aveo
|
Aveo, Wave, G3, Barina (VIN S/T) Service Manual
|
Engine
|
Engine Electrical
|
Repair Instructions
| Document ID: 2049066
Starter Replacement (1.4L LDT, 1.6 LXV)
Removal Procedure
Warning:
Refer to
Battery Disconnect Warning
in the Preface section.
1. Disconnect the negative battery cable.
2. Raise the vehicle. Refer to
Lifting and Jacking the Vehicle
.
3. Remove the starter solenoid nut (1) to disconnect the starter harness.
4. Remove the starter solenoid nut (1) to disconnect the battery positive connector.
5. Remove the ground bolt from the engine block.
© 2010 General Motors Corporation. All rights reserved.
Page 1 of 3
Document ID: 2049066
7/5/2010
http://localhost:9001/si/showDoc.do?docSyskey=2049066&pubCellSyskey=37552&pubObj...

6. Remove the starter mounting bolts (1).
7. Remove the starter (2).
Installation Procedure
1. Install the starter (2).
Caution:
Refer to
Fastener Caution
in the Preface section.
2. Install the starter mounting bolts (1) and tighten to 25 N·m (18.4 lb ft).
Page 2 of 3
Document ID: 2049066
7/5/2010
http://localhost:9001/si/showDoc.do?docSyskey=2049066&pubCellSyskey=37552&pubObj...

3. Install the ground bolt to the engine block.
4. Install the starter solenoid nut (1) to connect the battery positive connector.
5. Install the starter solenoid nut (1) to connect the starter harness and tighten.
6. Lower the vehicle.
7. Connect the battery negative cable. Refer to
Battery Negative Cable Disconnection and
Connection
• The engine ground bolt to 38 N·m (28.0 lb ft).
• The starter solenoid harness connector nut to 10.5 N·m (7.7 lb ft).
• The starter solenoid battery positive connector nut to 10.5 N·m (7.7 lb ft).
Page 3 of 3
Document ID: 2049066
7/5/2010
http://localhost:9001/si/showDoc.do?docSyskey=2049066&pubCellSyskey=37552&pubObj...
2009 Chevrolet Aveo
|
Aveo, Wave, G3, Barina (VIN S/T) Service Manual
|
Engine
|
Engine Electrical
|
Repair Instructions
| Document ID: 2038059
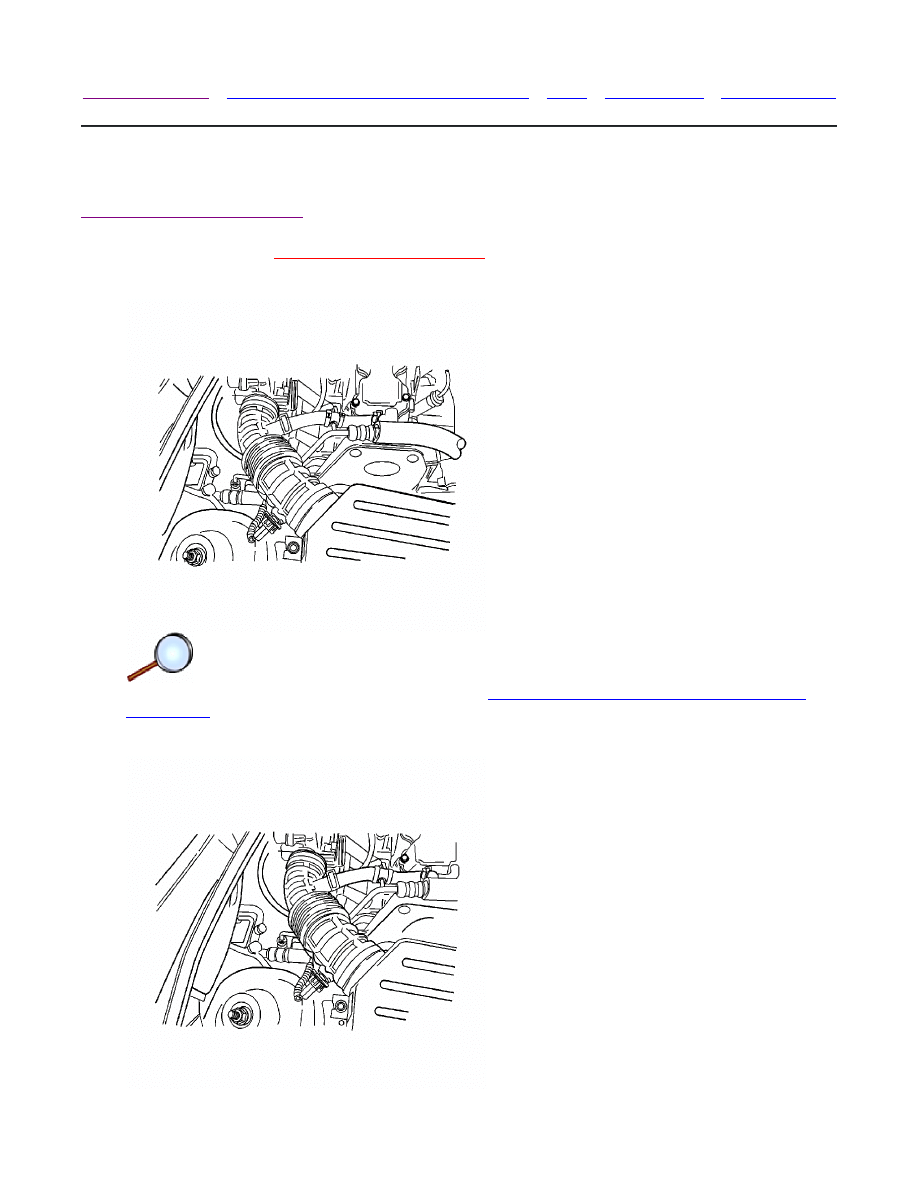
Generator Replacement (1.4L)
Removal Procedure
Warning:
Refer to
Battery Disconnect Warning
in the Preface section.
1. Disconnect the battery negative cable. Refer to
Battery Negative Cable Disconnection and
Connection
.
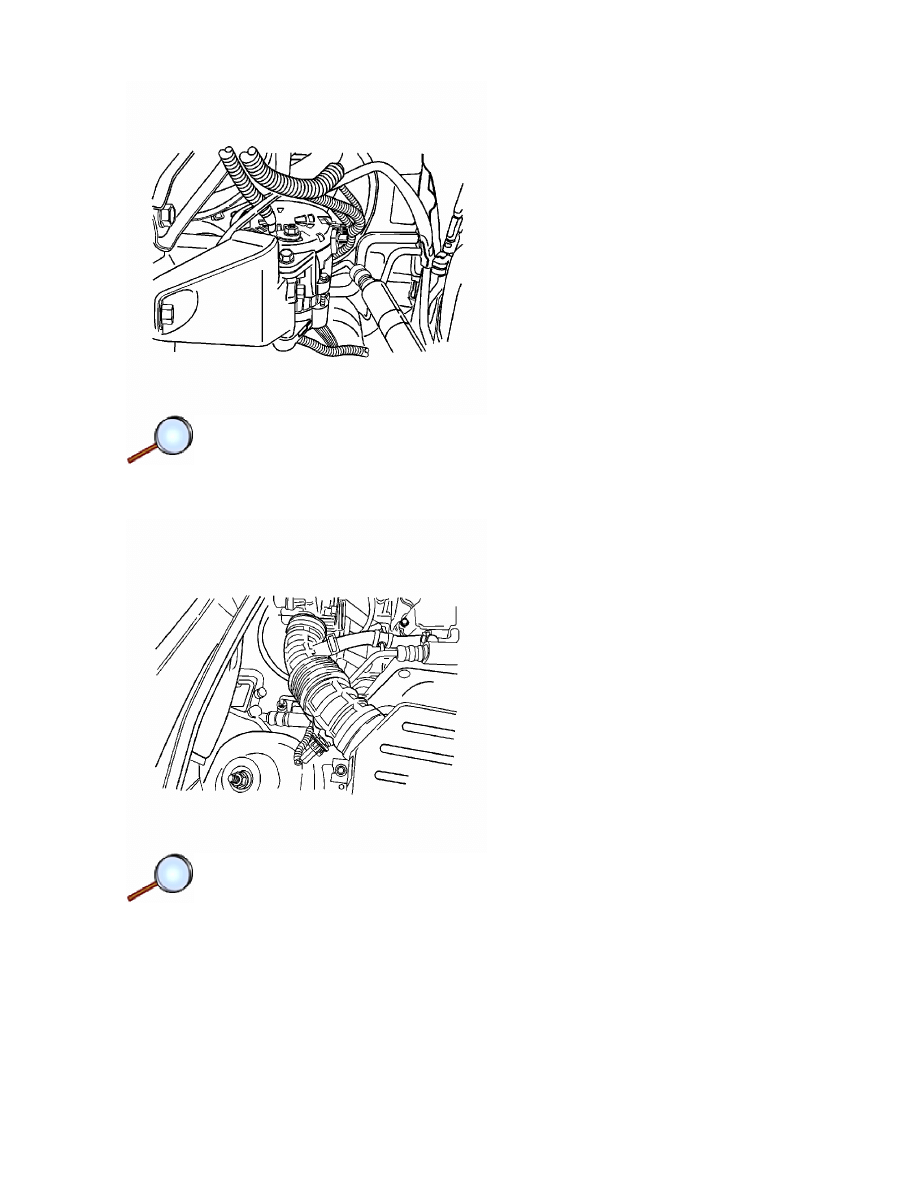
2. Disconnect the intake air temperature (IAT) sensor electrical connector from the air intake
tube.
© 2010 General Motors Corporation. All rights reserved.
Page 1 of 6
Document ID: 2038059
7/5/2010
http://localhost:9001/si/showDoc.do?docSyskey=2038059&pubCellSyskey=37565&pubObj...
3. Remove the breather tube clamp and all other clamps to remove the air intake tube.
4. Remove the battery harness connector nut from the generator.
5. Remove the generator shackle bracket bolt.
Page 2 of 6
Document ID: 2038059
7/5/2010
http://localhost:9001/si/showDoc.do?docSyskey=2038059&pubCellSyskey=37565&pubObj...

6. Remove the serpentine accessory drive belt. For vehicles equipped with power steering and
air conditioning.
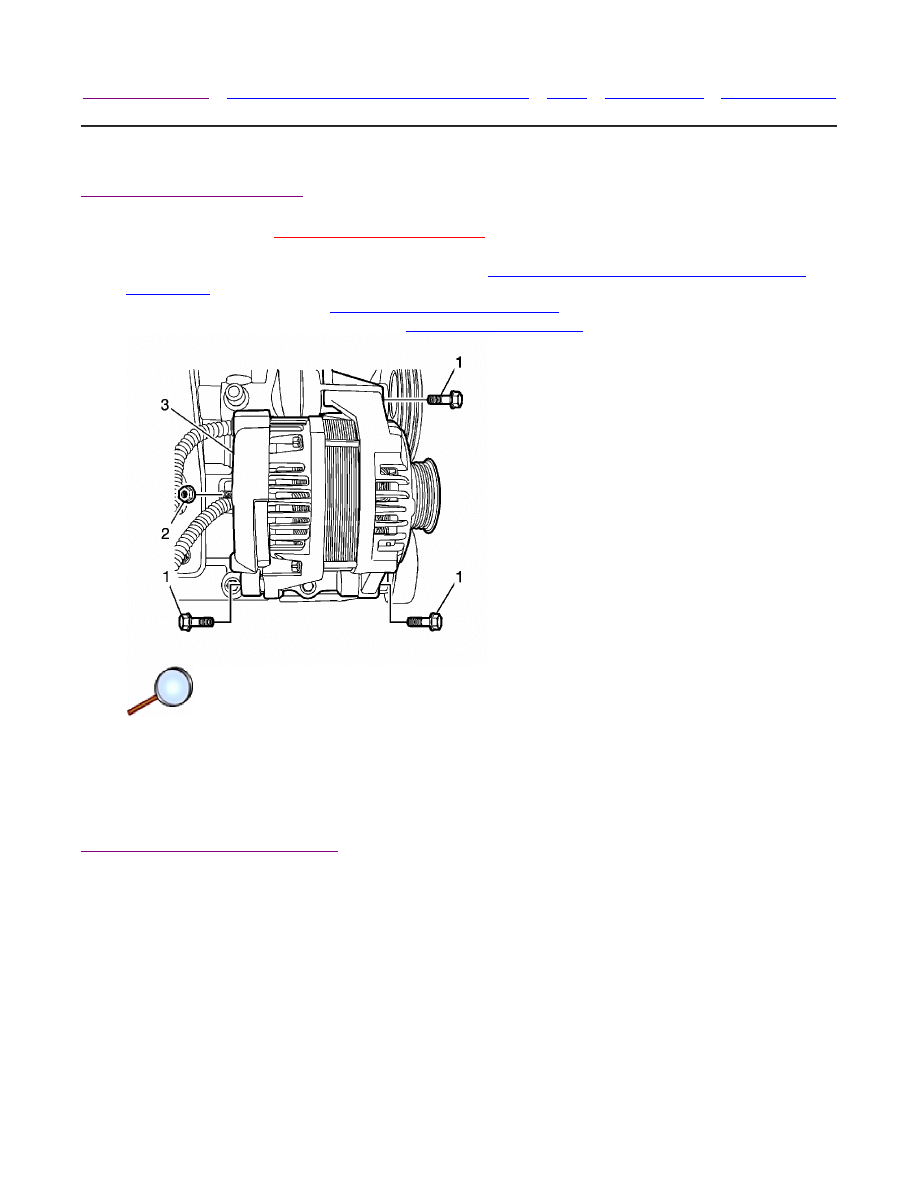
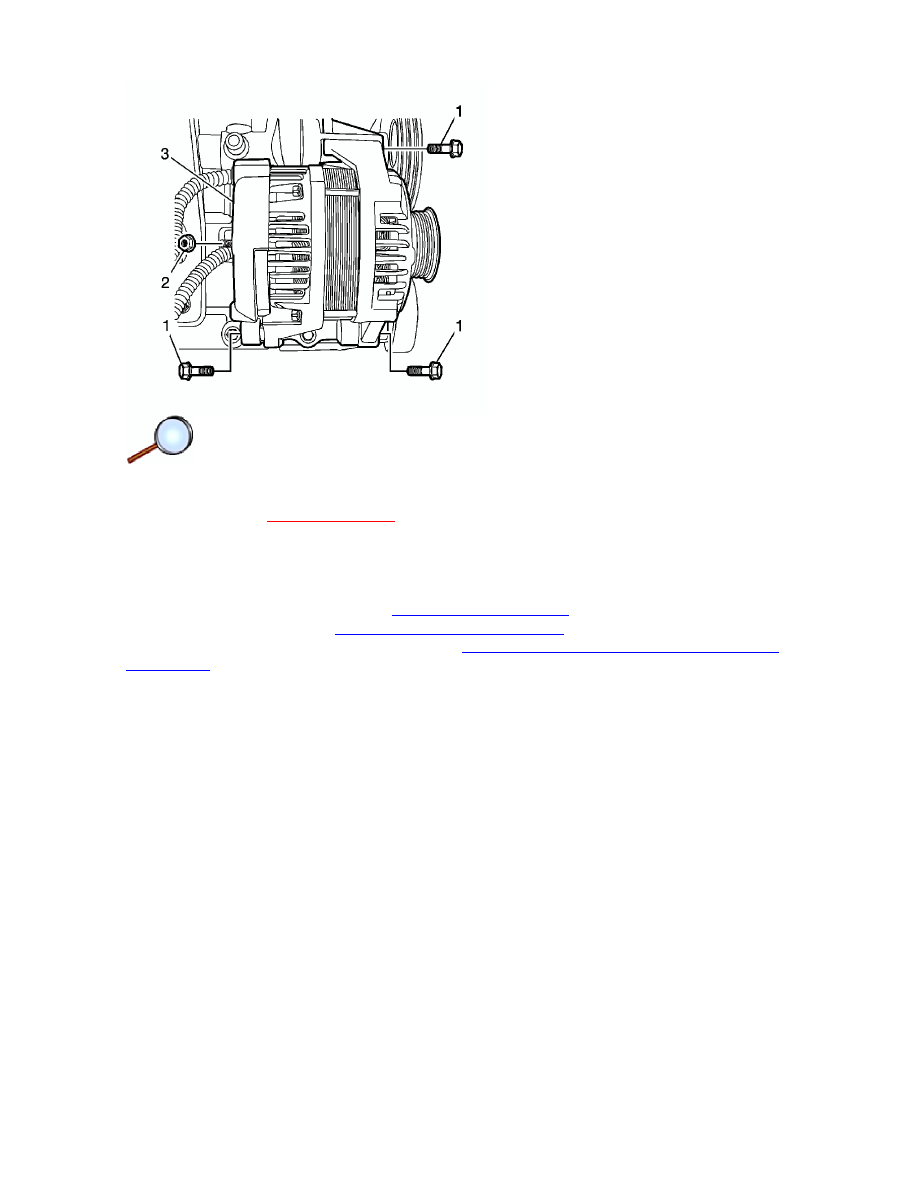
7. Remove the nuts which hold the generator lower bracket-to-generator bolts.
8. Carefully remove the generator.
Installation Procedure
Page 3 of 6
Document ID: 2038059
7/5/2010
http://localhost:9001/si/showDoc.do?docSyskey=2038059&pubCellSyskey=37565&pubObj...

1. Install the generator at the generator lower bracket and insert the generator bolts.
Caution:
Refer to
Fastener Caution
in the Preface section.
2. Install the nut and the washers on the generator lower bracket-to-generator bolts and
tighten to 25 N·m (18 lb ft).
3. Install the generator and the lower support bracket assembly to the engine block with the
bolts.
4. Secure the generator to the shackle bracket with the bolt and tighten to 25 N·m (18 lb ft).
Page 4 of 6
Document ID: 2038059
7/5/2010
http://localhost:9001/si/showDoc.do?docSyskey=2038059&pubCellSyskey=37565&pubObj...
5. Connect the harness connector to the back of the generator.
6. Install the generator lead to the battery and fasten the lead with the nut and tighten to
15 N·m (11 lb ft).
7. Install the air intake tube and the connector.
Page 5 of 6
Document ID: 2038059
7/5/2010
http://localhost:9001/si/showDoc.do?docSyskey=2038059&pubCellSyskey=37565&pubObj...

8. Install the IAT electrical connector to the air intake tube.
9. Connect the battery negative cable. Refer to
Battery Negative Cable Disconnection and
Connection
.
Page 6 of 6
Document ID: 2038059
7/5/2010
http://localhost:9001/si/showDoc.do?docSyskey=2038059&pubCellSyskey=37565&pubObj...
2009 Chevrolet Aveo
|
Aveo, Wave, G3, Barina (VIN S/T) Service Manual
|
Engine
|
Engine Electrical
|
Repair Instructions
| Document ID: 2044943
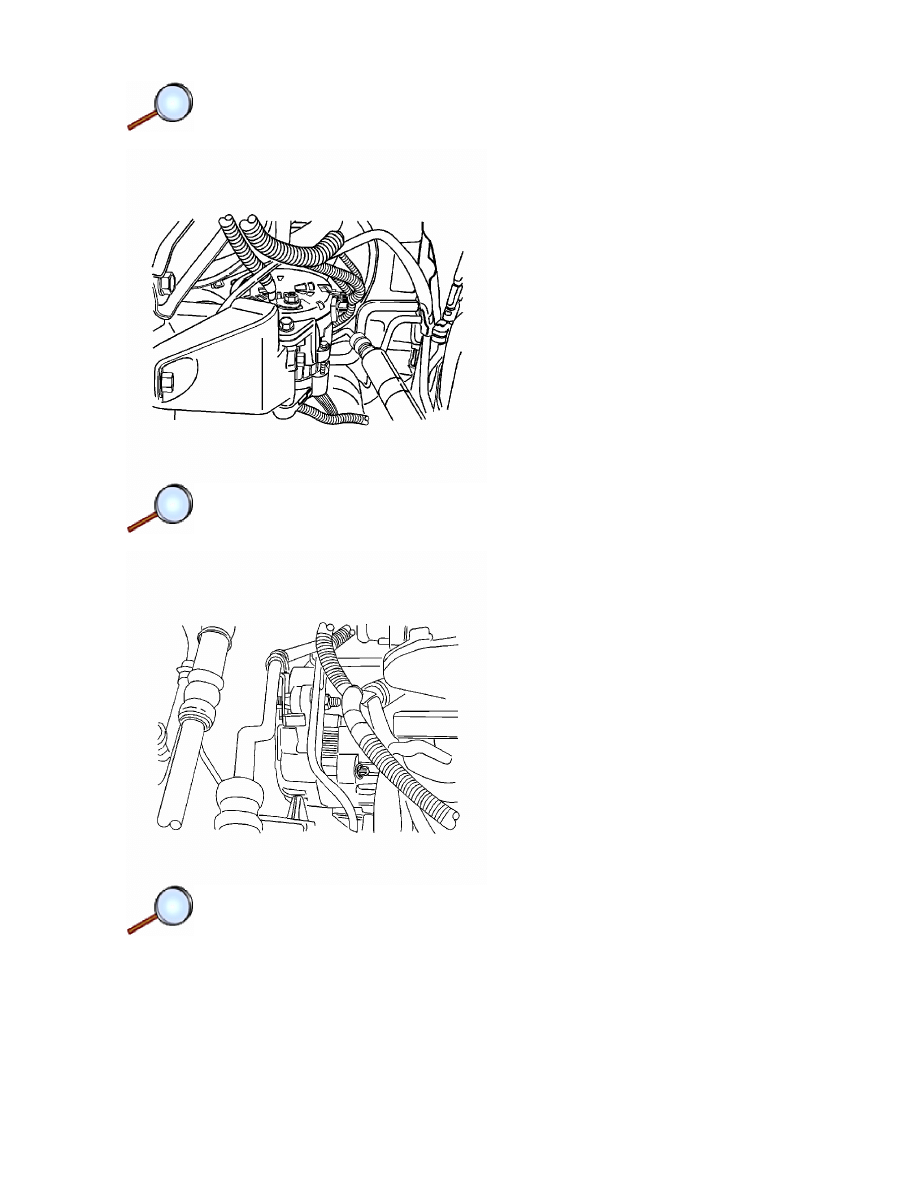
Generator Replacement (1.2L)
Removal Procedure
Warning:
Refer to
Battery Disconnect Warning
in the Preface section.
1. Disconnect the battery negative cable. Refer to
Battery Negative Cable Disconnection and
Connection
.
2. Raise the vehicle. Refer to
Lifting and Jacking the Vehicle
.
3. Remove the accessory belt. Refer to
Drive Belt Replacement
.
4. Disconnect the harness connector.
5. Remove the battery harness connector nut (2) to disconnect the battery positive connector.
6. Disconnect the generator harness connector.
7. Remove the generator retaining bolts (1) and nuts.
8. Remove the generator (3).
Installation Procedure
© 2010 General Motors Corporation. All rights reserved.
Page 1 of 2
Document ID: 2044943
7/5/2010
http://localhost:9001/si/showDoc.do?docSyskey=2044943&pubCellSyskey=37565&pubObj...
1. Install the generator (3).
Caution:
Refer to
Fastener Caution
in the Preface section.
2. Install the generator retaining bolt (1) and nut. Tighten to 4.75 N·m (3.5 lb ft).
3. Install the battery harness connector nut (2) to connect the battery positive connector.
4. Connect the harness connector.
5. Install the accessory belt. Refer to
Drive Belt Replacement
.
6. Lower the vehicle. Refer to
Lifting and Jacking the Vehicle
.
7. Connect the battery negative cable Refer to
Battery Negative Cable Disconnection and
Connection
.
Page 2 of 2
Document ID: 2044943
7/5/2010
http://localhost:9001/si/showDoc.do?docSyskey=2044943&pubCellSyskey=37565&pubObj...

2009 Chevrolet Aveo
|
Aveo, Wave, G3, Barina (VIN S/T) Service Manual
|
Engine
|
Engine Electrical
|
Repair Instructions
| Document ID: 2049065
Generator Replacement (1.4L LDT, 1.6L LXV)
Removal Procedure
Warning:
Refer to
Battery Disconnect Warning
in the Preface section.
1. Disconnect the battery negative cable. Refer to
Battery Negative Cable Disconnection and
Connection
.
2. Raise the vehicle. Refer to
Lifting and Jacking the Vehicle
.
3. Remove the accessory belt. Refer to
Drive Belt Replacement
and
Drive Belt Replacement
.
4. Disconnect the harness connector.
5. Remove the generator retaining bolts/nuts (1).
6. Remove the generator (2).
Installation Procedure
• Remove the battery harness connector nut to disconnect the battery positive connector.
• Disconnect the generator harness connector.
© 2010 General Motors Corporation. All rights reserved.
Page 1 of 2
Document ID: 2049065
7/5/2010
http://localhost:9001/si/showDoc.do?docSyskey=2049065&pubCellSyskey=37565&pubObj...

1. Install the generator (2).
Caution:
Refer to
Fastener Caution
in the Preface section.
2. Install the generator retaining bolt/nut (1) and tighten to 25 N·m (18.4 lb ft).
3. Install the battery harness connector nut to connect the battery positive connector.
4. Connect the harness connector.
5. Install the accessory belt. Refer to
Drive Belt Replacement
and
Drive Belt Replacement
.
6. Lower the vehicle.
7. Connect the battery negative cable. Refer to
Battery Negative Cable Disconnection and
Connection
.
Page 2 of 2
Document ID: 2049065
7/5/2010
http://localhost:9001/si/showDoc.do?docSyskey=2049065&pubCellSyskey=37565&pubObj...
Document Outline
Wyszukiwarka
Podobne podstrony:
więcej podobnych podstron