
INTERIOR PAINTING
No special skills are needed in order to paint and decorate
successfully - attention to detail is the key to it all.
Even when working just a couple of feet off the floor, always
use a strong stepladder - never stand on a chair or other
'hop-up'. Use protective clothing when necessary.
Painting is a cheap and easy way to give your home a new
look.
To get the best results when painting, choose good materials
and equipment; keep brushes and other tools clean and in
good condition.
Never skimp on preparation work or you'll be disappointed
with the finished results. Take time to rub down surfaces
properly and fill cracks and holes neatly. Only start painting
when surfaces are smooth, clean and dry.
2
- Preparing a room
Clear as much furniture from the room as possible.
Whatever has to remain should be gathered in the middle of
the floor. Vacuum the room thoroughly. Use dustsheets to
cover furniture and floor coverings.
Remove all fixtures and fittings from walls and doors. In the
long run, it is far quicker to do this rather than to try and
paint around them, which leads to paint runs and smudging
on the fitting itself. With electrical fittings, turn off the power
before loosening switches, ceiling roses, etc.
Mask off window-panes and woodwork using masking tape,
newspaper and polythene dustsheets.
3
- Preparing walls and ceilings
If there are any damp patches on walls and ceilings, find out
the cause and remedy it first. There's no point in trying to
paint over dampness, because it will probably cause the
paint to flake off quickly and the damp patch will seep
through again anyway. When the damp patch has dried, it
should be primed with a damp seal. Watermarks will seep
through even several coats of emulsion.
Use sugar soap or mild detergent and a large decorator's
sponge to wash down all surfaces, starting with the ceiling.
Rinse thoroughly, but do not saturate the surfaces. Allow to
dry before painting. Make sure that electrical fittings are
protected from water. Plaster surfaces tarnished by nicotine
stains need to be coated with a stain block or nicotine block
before painting.
In older houses, you can still find walls and ceilings coated
with distemper, and paint will not adhere to this. You can tell
if this is the case, because the powdery coating will come off
when you wash down the surface. Distemper is best
removed. Wet the distemper thoroughly with water and
remove with a nylon-scouring pad, or for thicker layers,
scrape off as much of it as possible. Use a stabilising
solution over the area to bind any last traces of distemper.
Ceiling paper that is sound and well adhered can remain and
be painted. Any loose edges can be stuck back with
wallpaper adhesive or overlap adhesive and allowed to dry
before painting. Loose or bubbled paper has to be stripped
off. Remember that paper may have been applied to a wall
or ceiling to hide minor cracks that are superficial but
unsightly. If necessary, you may need to re-paper.
4
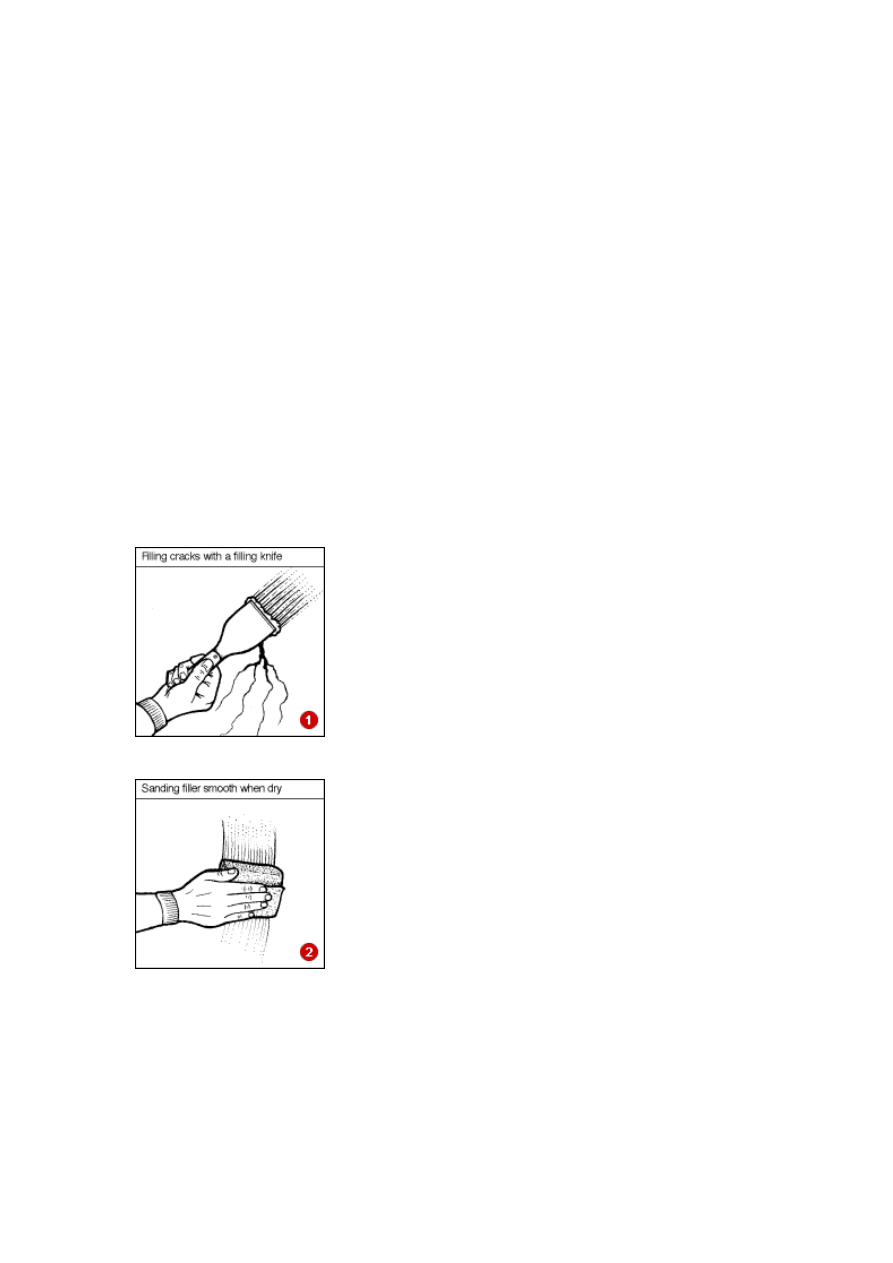
- Cracks and holes
Use interior filler to fill any
small cracks and holes in
plaster. Use a flexible filling
knife to force the filler into
the hole (1).
Leave the filler slightly proud
of the surface, allow it to dry,
then rub it smooth with dry
sandpaper wrapped aroun
wooden block (2). You may
need to repeat the process in
some areas for a really
smooth finish.
d a
Larger holes and cracks are more economically filled with
deep-repair filler, or a plaster filler. Check manufacturer's
instructions for use - a larger crack may have to be filled in
a couple of stages. Any loose plaster should be chipped off
first. Where a surface is sound but covered with a network of
crazed superficial cracks, you can use a textured flexible
paint, or first hang lining paper. Alternatively, use a textured
wallcovering that is specifically made to be overpainted and
ideal for uneven walls.
5
- Preparing woodwork
If existing paintwork is in a sound condition, there is no
need to strip it off - it will make a good base for the new
paint. The only exception is where a thick coat of paint is
causing windows or doors to jam.
If the paint is to remain, then it should be washed down with
sugar soap and water to remove all traces of dust, grease
and stains. Rinse thoroughly.
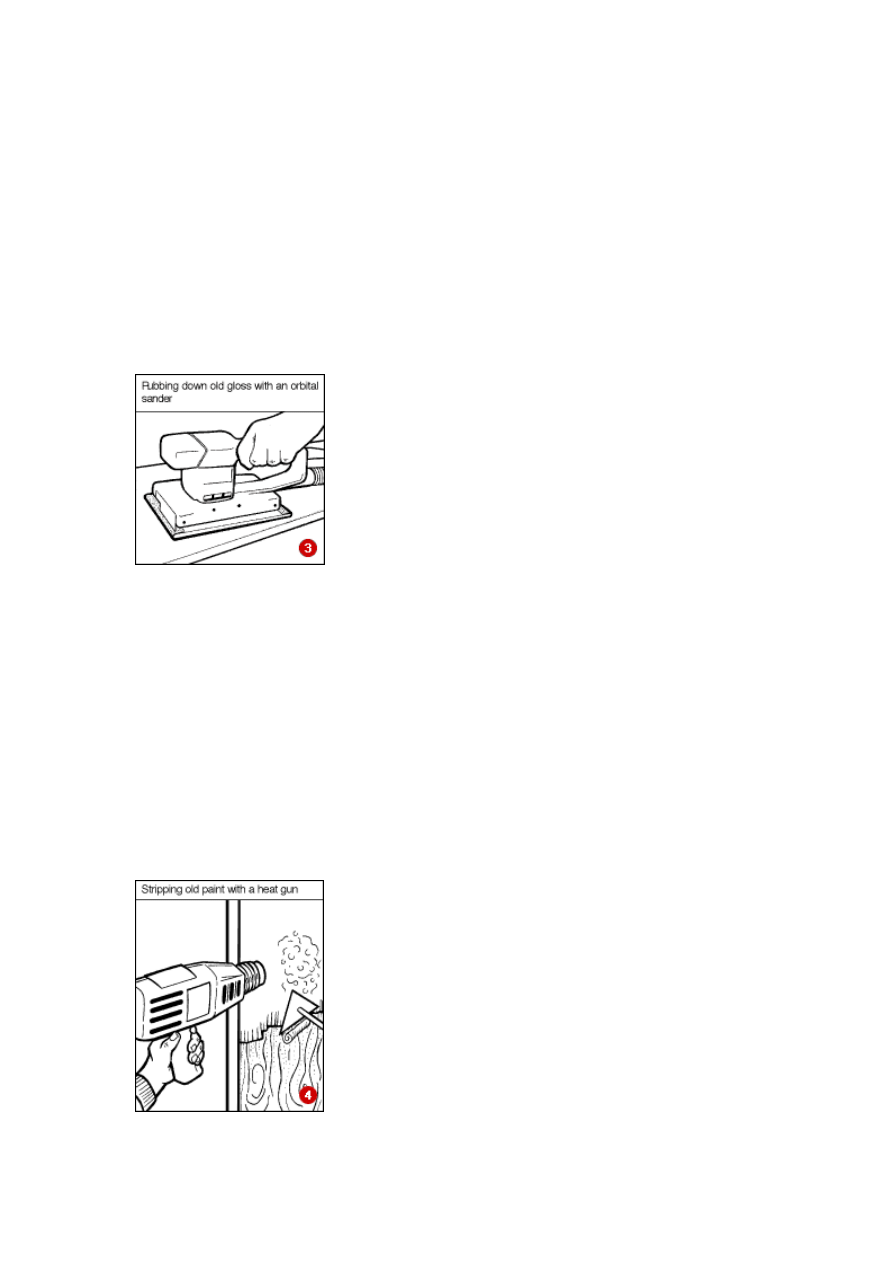
Rub down the surface with
medium-grade sandpaper, or
an orbital sander fitted with a
medium-grade sanding she
(3). This roughens the
surface, giving a good key fo
the new paint to adhere to.
Always wear a facemask
when sanding (please refer to
the section 'Lead in Pain
et
r
t').
Finally, wipe over the surface with a lint-free rag moistened
with white spirit. Use a pointed stick to get the rag into
corners where dust can be trapped - it may be picked up on
the brush and spread across the surface to leave a pimply
effect on the dried paintwork. Don't forget to clean out
keyholes and the top edges of doors where dirt and dust can
be picked up on the brush.
Paintwork that has the odd chip or crack need not be
stripped off. Fill any chips and holes with interior filler or a
wood filler and sand it flush with the surface when the filler
has dried.
If the paintwork is in bad
condition and has lots of
cracks and flaking areas, th
it is best to strip it off back to
en
bare wood. You can strip
paint by dry sanding, with a
chemical paint stripper
with a heat gun (4). Dry
sanding with sandpaper
recommended for
other than the smallest area,
and even then it is advisable
to wear a facemask. Chemical
stripper, in the form o
pastes, gels and liquids, is best where you suspect that the
old paint may have contained lead. See the section 'L
or
is not
anything
f
ead in

paint' for details. However, it is a much lengthier process
than using heat, and more costly. A hot-air gun melts the
thickest paint coat so that it can be scraped off with a shave
hook. It is best to use a chemical stripper near to windows
where heat can crack the glass. Bare wood should be rubbe
down with medium sandpaper or an electric sander.
d
are wood will need treating before painting. Knots must be
- Preparing varnish
trip sound varnish. If it
l any
- Preparing metal
st, and if this is happening all
ust can reform overnight, so fill any holes with a filler
soon
B
treated with knotting. This prevents the resin seeping out
and staining the paintwork. To seal the surface, use a wood
primer before undercoating and then painting your surface.
6
ike paint, there is no need to s
L
needs to come off then remove it just like paintwork. Fil
holes and cracks with woodfiller, sand down surfaces lightly,
wipe over with white spirit and then start varnishing.
7
ron or steel windows can ru
I
traces need to be removed. Small patches can be treated
with emery cloth or wire wool, but larger areas need wire
brushing, either with a hand-held brush or a wire cup brush
fitted to an electric drill. Always wear a facemask and safety
goggles.
R
suitable for metal, then apply a coat of metal primer as
as possible. Aluminium just needs to be washed with sugar
soap and rubbed down with medium-grade sandpaper. There
are various primers available, for both ferrous and non-
ferrous metals.
8 - Painting ceilings and walls
lying emulsion
the
are plaster needs to be sealed before app
B
paint. This can be done with a plaster sealer, dilute PVA
sealer, or a diluted coat of emulsion. You do not need to
prime a surface that has been painted previously, except
areas you have had to fill and repair.
lways plan to decorate a ceiling or a complete wall in one
t
A
work session. If you take a break and the paint dries, a pain
line will show where you stopped and restarted.
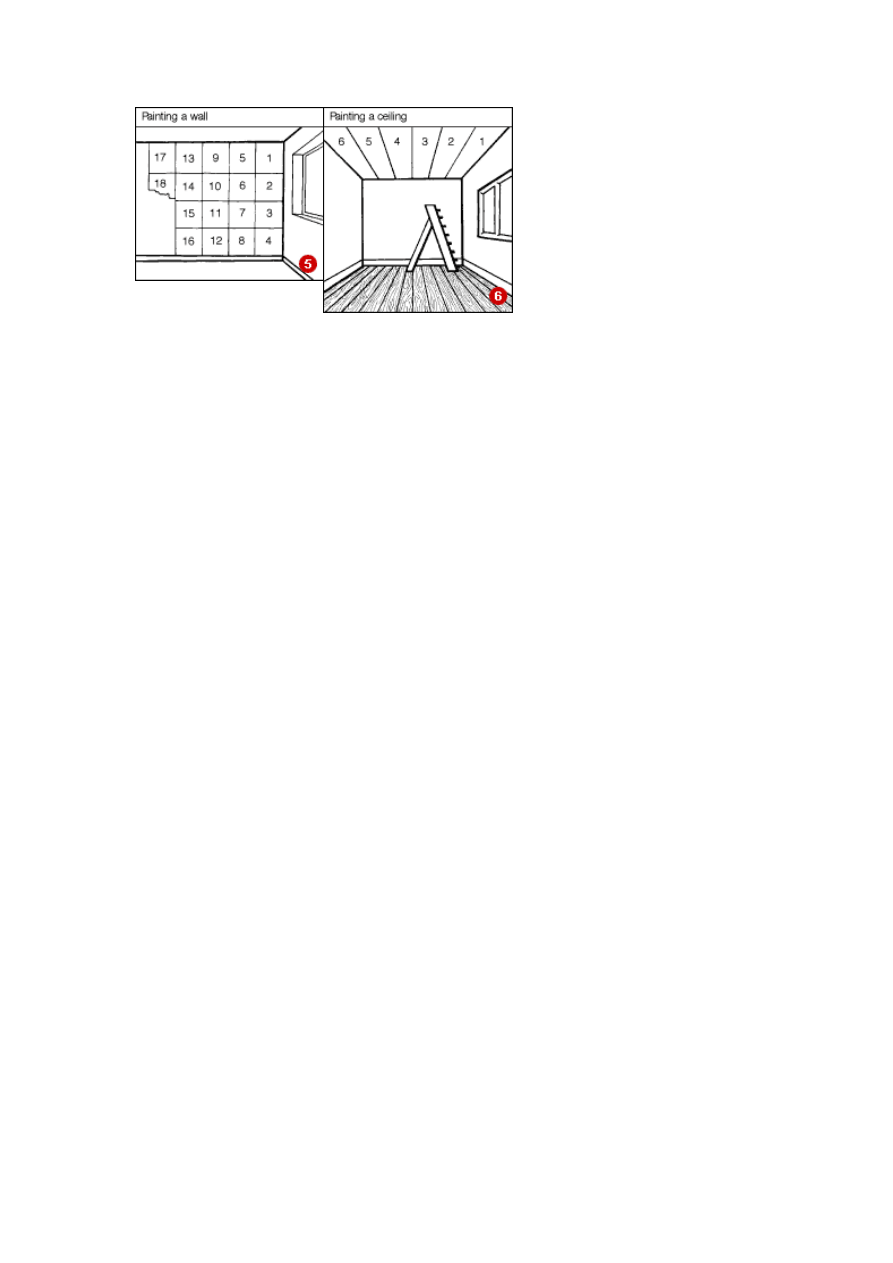
Start pain
window and w
ting at the main
ork back into
the room (5 &
makes it easier to
what you are doing.
If using a roller, first paint a n
along all edges and into corne
reach; this is called cutting in
pen and paint applied with ev
Do not dip your brush too far into the paint, a third of the
brushes bristles is enough. Make sure you feather the edges
paint so you do not leave a hard edge that is difficult
blend and cover.
nt and running it
d forwards on the slope of the tray, completely
d evenly covering the roller sleeve.
over
e room. Paint
ceiling in 600mm (2ft) bands, and on walls work
wnwards from the top to the skirting.
aint pads are also used in zigzag directions, working quickly
he
,
edium-grade sandpaper and wipe
ith a lint-free cloth moistened with white spirit, before
pplying the next coat.
and around
6). This
see
arrow band, using a brush,
rs where the roller won't
. Brushes are best held like a
en strokes.
of the
o
t
Tip some paint into the well of the roller tray and load the
roller by dipping and rolling it in the pai
backwards an
n
a
Now apply the paint with the roller in a zigzag motion
the surface and work systematically across th
the
o
d
P
to join up wet edges.
9 - Painting woodwork
Always use a primer on bare wood first to help seal the
surface. Where a surface has already been painted, use t
undercoat colour recommended by the manufacturers of
your chosen gloss or satin paint. In some cases it might
require a second undercoat to completely obliterate the old
paint. It is important that you do this or the colour will show
through the new coat of paint. When each coat has dried
sand down lightly with m
w
a

When painting woodwork, apply the paint with the grain and
then, without reloading the brush, work it across the grain,
and finish with the grain. Then reload and move on to th
next section, joining up wet edges quickly. Do
e
n t over
rush areas that have already started to dry.
he
7).
(2in)
respectively.
ace
eld, will ensure a neat finish
round window frames.
e
o
b
Start painting window frames
from the edge closest to t
glass and work outwards (
If an open window is a
security risk, complete it
early in the day so that it is
dry for closing by night. Use a
25mm (1in) and 50mm
brush for covering narrow
and wider sections,
It is recommended to take a margin of about 3mm of paint
onto the glass - this prevents condensation running down
into the frame causing it to rot. Masking tape stuck in pl
on the glass, or a paint shi
a
Paint a flush door using a
75mm (3in) wide brush or a
small foam roller. Start at th
top corner of the hinge side
and work in square sections
across and down the door,
finishing at the bottom corner
on the hand
le side (8).
ls.
ng the outside verticals followed by the
he door.
these
With a panelled door, it is best to work with a couple of
brushes - a 25mm (1in) one for mouldings and a 50mm
(2in) or foam roller for the wider areas. First paint the
moulded areas around the panel then paint in the panels.
Then paint in the centre verticals, followed by the cross rai
Finish off by painti
edge of t
10 - Painting radiators
The best paints to use are special radiator enamels, as
will give you a tough and durable surface that will not
discolour with the heat. However, solvent-based gloss or
satin can also be used to good effect. Only paint a radiato
when it is cold and don't turn it back on until the paint is
thoroughly dried. There may be a paint smell initially when
r

the radiator is warmed, but this will soon dissipate. Don't
e radiator connections and valves.
er-
le
as
ow the instructions on the tin for
dividual products.
pet. This could
y release lead dust into the house.
re
in
-testing kits available that are
easy to use.
You can paint over this
face sealing the old paint in.
mical paint stripper, as this
release harmful dust.
to
ease fumes. Set your
heat gun to below 450 °C.
e facemask
•
rea from the rest of the house and
•
•
are
paint th
It is not recommended to use emulsion paint or some wat
based paints on radiators as they are not tough enough.
There are now, however, some water-based paints availab
that can be used to paint walls and woodwork, as well
radiators. Always foll
in
11 - Lead in paint
Up until the mid-sixties, lead was used in some kinds of
paint, especially those use on wood and metal work. This is
a hazardous substance, especially for young children and
pregnant women, and should always be handled with care.
Lead can be absorbed into the body through the skin or by
inhalation of dust particles. The danger occurs if the
paintwork is loose and flaking, or if it is likely to get
knocked, chewed or scratched by a child or a
potentiall
If your house was built after the sixties, it is unlikely that
paint containing lead was used. But any house built befo
the sixties, even if it has been painted since then, most
likely has some lead-based painted woodwork. If you are
any doubt, there are lead
quick and
If your old painted surface is in good condition - not flaking
or chipped - it is best left alone.
sur
If it is necessary to remove the old paint, then the best way
to do this is to use a liquid che
will not
You can also use a hot-air gun, but use only enough heat
soften the paint - burning it will rel
•
Do not use an electric sander
•
Wear protective clothing and a suitabl
•
Clear the room as much as possible
Seal the work a
cover carpets
•
Open windows for plenty of ventilation
Keep other people away from the working area -
especially children and pregnant women
When taking a break, store the clothes you have
been wearing in a sealed bag and wash any b
skin carefully as soon as you finish working
•
Do not eat or drink while you are working

•
smooth it with wet-and-dry paper -
•
int
•
re an
re
all traces of dust are removed from the house
int
ly, call in a reputable, professional
ecorating firm.
When most of the paint has been removed, moisten
the surface and
not sandpaper
When the paint has been removed, collect all pa
peelings as you work and put them in a sealed
plastic bag for collection by your refuse collector
Clean the room with water and detergent. Hi
industrial-standard vacuum cleaner (British
Standard 5415) to clean carpets and to make su
If you are not confident about dealing with lead in pa
correctly and safe
d
Wyszukiwarka
Podobne podstrony:
Interior Painting
Interior Painting 2
Painting interior walls
Painting interior panel doors
face painting lesson 3 id 16748 Nieznany
EXTERIOR AND INTERIOR TRIM
M39g Interior Trim
Applying Water Based Interior Finish
Fly Model 030 B17G interiors some custom parts
M000411 B Eng Propulsor painting instructions
20 body interio and exterior
36 interimRPTfinal
19 Ursachenerklärung von Fehlern ( Kontrastivhypothese, Identitäts Hypothese, Interimsprachen Hypoth
Paintings and One Qaradawi
http, poczta interia pl poczta attachment fid=1&mid=5&mpid=3&f=Curie1
Empire of the Petal Throne Legions of the Petal Throne Painting Guide
Exterior Painting
Fly Model 030 B17G interiors med res
Cats Paintings
więcej podobnych podstron