Framing Twoja Obrazy
W tym samouczku, będę uczyć w jaki sposób zaprojektować obraz w ramie Cinema 4D posiadania i wyświetlać swoje arcydzieła w każdym sceny 3D, które ma swój fantazyjny. This tutorial is written for beginners, but it covers a variety of techniques, so more experienced users may benefit from its content too. So, without further ado, here we go... Ten przewodnik jest przeznaczony dla początkujących, ale obejmuje szereg technik, a więc bardziej doświadczeni użytkownicy mogą skorzystać z jego treścią zbyt. Zatem, bez dalszych ADO, zaczynamy ...
|
Step 1: Create a cube object by clicking the add object button or selecting Objects -> Primitive -> Cube from the menu. Krok 1: Tworzenie kostki obiektu klikając przycisk Dodaj obiekt lub wybierając Obiekty -> Primitive -> Kostka z menu. Go to the attributes menu and copy the settings shown on the left. Przejdź do menu i atrybuty kopiować ustawienia widoczne po lewej stronie. Make the cube editable by pressing C on your keyboard or Right-Click on the Cube icon and choose (Objects) -> Make editable . Marka kostki edycji naciskając C na klawiaturze lub kliknij prawym przyciskiem myszy na ikonę i wybrać Cube (obiekty) -> Marka edycji. |
|
Step 2: Now go to YX view by pressing F4 , then go to Tools -> Polygons . Krok 2: Teraz przejdź do YX widok naciskając klawisz F4, a następnie przejdź do Narzędzia -> wielokąty. If you have done this correctly, the cube wire frame will now be light-blue colour. Jeśli zrobiłeś to poprawnie, kostki drutu ramka będzie światłem niebieskim kolorze. Select the Knife tool by pressing K or selecting Structure -> Knife . Wybierz narzędzie Knife naciskając K lub wybierając Struktura -> Knife. Cut up the cube as illustrated on the left click-dragging and holding shift all the way across the cube. Pokrojone w kostkę, co ilustruje na lewym kliknięcie i przeciągnięcie gospodarstwa przejście na drodze w całej kostki. This will now become your frame. To obecnie ramki. |
|
|
|
Step 4a: As you can see, the frame is quite rough, so we will bevel it. Krok 4a: Jak widać, ramy jest dość szorstki, więc będziemy go węgielnica. Go to Bevel with Structure -> Bevel , and enter the settings shown in the image to the left in the Active Tool tab. Idź do węgielnica z Struktura -> węgielnica i wprowadź ustawienia pokazano na zdjęciu z lewej strony w zakładce Active Tool. These settings can be varied to give your frame many different funky shapes. Ustawienia te mogą być zróżnicowane w celu nadania ramki funky różnych kształtach. Make sure that you still have the selection shown earlier, or things will start to look weird. Upewnij się, że wciąż masz wybór wykazano wcześniej, lub rzeczy zaczną wyglądać dziwnie. |
|
Step 4b: If you render your model now, your result will look like the image opposite. As you can see, though, its rather boring, grey, and plain. Krok 4b: Jeśli wykonywali swój model teraz, Twój wynik będzie wyglądać obraz naprzeciwko. Jak widać, jednak jego dość nudne, szare i proste. |
|
|
|
Step 6: In this step, we will almost do the same as in step 5, so I will only cover the differing points. Select the area where the picture will be with the Live Selection tool (shown in image, selected is shown in red), and go to Selection -> Set Selection . Now choose Attributes -> Basic and name it " front ". Do the same with the back part of it, but name it " back ". Krok 6: W tym kroku, będziemy prawie to samo jak w kroku 5, więc obejmuje jedynie różne punkty. Wybierz obszar, w którym obraz będzie z Live Selection Tool (pokazane w zdjęcie, wybrana jest w kolorze czerwonym ), i przejść do wyboru -> Ustaw wybór. teraz wybrać atrybuty -> Podstawowe i nadaj mu nazwę "przodu". Czy samo z tylnej części, ale nazwa to "powrót". |
|
Step 7: Now to put textures onto our model. Krok 7: Teraz do położenia tekstury na nasz model. You will need to make four new materials (textures) in order to do this - 2 wooden materials, 1 sky material and 1 painting material. Potrzebny będzie do czterech nowych materiałów (tekstury), aby to zrobić - 2 drewnianych materiałów, 1 nieba materiałów i 1 obraz materiału. You can get good textures here if you need them. Możesz uzyskać dobre tekstury tutaj, jeśli są potrzebne. Download two wooden textures, preferably one lighter an one darker. Pobierz dwie drewniane tekstury, najlepiej zapalniczka jeden jeden ciemniejszy. Make a new material by pressing Ctrl + N or going to Materials editor at the bottom and choose File -> New Material . Tworzy nowy materiał, naciskając Ctrl + N lub jadących do Materiały edytora u dołu i wybierz Plik -> Nowy materiał. Do this four times. Zrób to cztery razy. As you can see on the image, I've already added my materials and textures. Jak widać na obrazku, już dodaje moje materiały i tekstury.
Mat is the frame wood. Mat jest rama z drewna. |
|
Step 8: Now comes the tricky part of assigning a texture to the materials. Krok 8: Teraz przychodzi skomplikowanych części przypisanie tekstur do materiałów. Double-click the material called Mat , go to the colour subsection, click the bar to the right of the texture text and duplicate the settings shown in the image opposite. Kliknij dwukrotnie materiału o nazwie Mat, przejdź do koloru podsekcji, kliknij pasek z prawej strony tekstu i tekstury dwóch egzemplarzach ustawienia widoczne na obrazku odwrotnie. A file window should pop up. Plik okna pop-up powinny. Just go to your lighter wooden texture and assign it as the texture. Wystarczy udać się do lżejszych drewniane tekstury i przypisać je jako teksturę. Now go to the Specular subsection and change the Width to 22% - this can be varied to give you different results. Teraz przejdź do wziernikowy podsekcję i zmienić szerokość do 22% - może to być różnicowane w celu uzyskania różnych wyników. These settings may also need to be changed depending on the texture that you use. Ustawienia te mogą być także zmieniony w zależności od tekstury korzystanie. |
Step 9: We will now assign a material to the back. Krok 9: Będziemy teraz przypisać materiał do tyłu. Double-click the material called Mat.1 , deselect the specular and duplicate the colour subsection settings in the image opposite. Kliknij dwukrotnie materiału o nazwie Mat.1, wyczyść to wziernikowy i powielać koloru podsekcja ustawienia obrazu odwrotnie.
Step 10: The next step, making the material for the painting, is simplicity itself. Double-click your material named " Mat.2 ", deselect the Specular, go to Colour and assign the image you want on the painting as the texture. Krok 10: W następnym kroku, co sprawia, że materiał do malowania, jest sama prostota. Kliknij dwukrotnie materiał o nazwie "Mat.2", wyczyść to wziernikowy, przejdź do kolorów i przypisać obraz chcesz na obraz jako tekstur.
Note: Just a general pointer, make sure that you use an image that is as large as possible... Uwaga: Wystarczy ogólny wskaźnik, upewnij się, że korzystanie z tego obrazu jest tak duża, jak to możliwe ... otherwise the final result won't look very nice. inny wynik końcowy nie będzie bardzo miło. The one I used was 800x800px in size. Jeden kiedyś był w rozmiarze 800x800px.
Step 11: Double-click on the material named " Mat.3 ". Krok 11: Kliknij dwukrotnie materiał o nazwie "Mat.3". Uncheck all boxes with the exception of Luminance , and assign your sky image as the texture. Odznacz wszystkie pola wyboru z wyjątkiem luminancji i przypisać swój obraz nieba jako tekstur. The sky image can be anything you like, and will be shown as the surroundings of the model. Niebo obraz może być cokolwiek chcesz, i będzie wyświetlany jako okolicach modelu. Duplicate the settings as shown on the left. Zduplikuj ustawienia jak pokazano po lewej stronie.
Step 12: Add a Sky Object. Krok 12: Dodawanie obiektu Sky. If you don't know where to find it, look at the image opposite. When this has been done, click-drag the material called " Mat.3 " to the object called " Sky " in the Objects manager . Jeśli nie wiesz, gdzie znaleźć to, spójrz na zdjęcia naprzeciwko. Gdy to zostało zrobione, kliknij-przeciągnij materiału o nazwie "Mat.3" do obiektu o nazwie "Sky" w Obiekty menedżera. You now have a Sky Object complete with a texture! Teraz masz Sky Obiekt wraz z tekstury!
Note: As in step 10, avoid using small images here too. In the right circumstances (and with a few tweaks) it is possible to use smaller images, but its hard to do correctly, and larger images nearly always give better results. Uwaga: Podobnie jak w kroku 10, uniknięcia stosowania zbyt małe zdjęcia tutaj. W prawym okolicznościach (i kilka poprawek) możliwe jest stosowanie mniejszych obrazów, ale trudno nie poprawnie, i większe zdjęcia prawie zawsze dają lepsze wyniki.
Now to the texturing part of this tutorial. Teraz do teksturowania części tego podręcznika. This can be a bit tricky. To może być trochę skomplikowane.
Step 13: Click-Drag all the materials except " Mat.3 " to the cube icon in the Objects manager . Krok 13: Kliknij, Przeciągnij wszystkie materiały z wyjątkiem "Mat.3" do kostki w ikonę Menedżer obiektów. As you can see, there are now three small icons with small circles in them, each representing materials you will assign to the model. Jak widać, istnieją obecnie trzy małe ikony z małych kręgach w nich, z których każda reprezentuje materiały można przypisać do modelu. We will now assign each of the materials to just one area of the frame, one for the front , one for the back and one for the frame . Będziemy teraz przypisać każdej z materiałów tylko jeden obszar ramki, jeden do przodu, jeden do tyłu i jeden do ramki.
We will use the lighter wood in the frame, the darker wood on the back, and the painting on the front. Będziemy używać lżejszych drewna w konstrukcji, ciemniejsze drewno na odwrocie, a obraz z przodu.
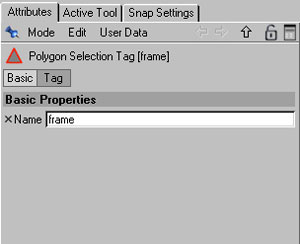
Step 14: Click the light wood texture in the Object Manager once, go to the Attributes section, and click on the " Tag " tab. Now look for an empty field called Selection and give it a value of "frame" (without quotes). Krok 14: Kliknij świetle drewna tekstury w Object Manager raz, przejdź do sekcji Atrybuty, a następnie kliknij przycisk "Tag" tab. Teraz patrzeć na puste pole o nazwie Wybór i nadać jej wartość "ramki" (bez cudzysłowów) . Press Enter. Naciśnij klawisz Enter. This is also shown on the image. Jest to również widoczne na obrazku. You will now see that only this texture is assigned to the frame. Teraz tylko to, że faktura jest przypisany do ramy.
Step 15: Do the same with the other textures, writing back in the selection field for the Dark Wood and front in the selection field for the Painting material. Krok 15: Czy to samo z drugiej tekstury, w piśmie z powrotem w pole wyboru dla ciemnego drewna i przodu w zakresie doboru materiałów na malarstwo.
Click on the icon for the cube object to view all textures. Kliknij na ikonę kostki obiekt, aby przejrzeć wszystkie tekstury. The painting material might need to be adjusted slightly to put it into the centre of the frame. This can be done with the Offset X and Y controls, but bear in mind that the height and width may also need adjustment too. Obraz może materiału muszą być nieznacznie dostosowane do wprowadzenia go w środku ramy. Można to zrobić z Przesunięcie X i Y kontroli, ale pamiętać, że wysokość i szerokość może również potrzebę dostosowania zbyt.
Finishing Up: Now that you have finished the tutorial, all that's left to do is hit the render button! If you want the render to look better go to the render settings, turn Radiosity on and turn off the Auto-Light on the Options tab. Finishing Up: Teraz, gdy już się z samouczkiem, wszystko to w lewo, aby zrobić to wciskamy przycisk czynią! Jeśli chcesz wyglądać lepiej oddać go do uczynienia ustawień kolei Radiosity i wyłączyć automatyczne światła na karcie Opcje . I'll let you figure out these options yourself though! Just so you know what to expect, here's what I made earlier: I'll let you figure out tych opcji siebie choć! Wystarczy więc wiesz czego się spodziewać, oto co zrobiłem wcześniej:
I hope that you have learned something from this tutorial, and now have a nice render on the screen in front of you. Mam nadzieję, że nauczyli się czegoś z tego podręcznika, a teraz mają ładny render na ekranie przed sobą. If you want to contact me about this tutorial, just click on my name below which will refer you to the Creative Forums, where you can Private Message or E-mail me. Jeśli chcesz się ze mną na temat tego podręcznika, po prostu kliknij na moje nazwisko, poniżej którego będzie się odnosić do Creative Forum, gdzie można Prywatne wiadomości lub e-mail do mnie. You may be required to sign up. Być może być wymagane, aby się zarejestrować.
Wyszukiwarka