
Building An Outdoor Playhouse
Project Level: Advanced
If you want to give the children in your family
their own retreat and improve your do-it-yourself
skills at the same time, this playhouse is the
perfect project for you. Not only will you create a
special hideaway, you will also practice framing,
sheathing and roofing skills that could save you a
bundle on large do-it-yourself projects down the
road. And when your children outgrow their
playhouse, it will make a great storage shed.
Tools, Materials and Hardware.
Tools
• Shovel ·Rake Mitre saw ·Circular saw ·Drill/driver ·Tape measure ·Framing
square ·4' Level ·Torpedo level ·Hammer 2" Chisel Utility knife ·Metal snips
·Staple gun ·Chalk line ·Caulk gun ·
• Hand saw ·Paintbrushes
Hardware List
Quantity
Item
2
1-lb. boxes of 8d 2 1/2" galvanized common nails
2
1-lb. boxes of 12d 3 1/4" galvanized common nails
1
1-lb. box of 16d 3 1/2" galvanized common nails
1
1-lb. box of 1 1/2" galvanized joist hanger nails
2
1-lb. boxes of 1 3/4" galvanized ring shank nails
2
1-lb. boxes of 6d 1 7/8" coated cooler nails/sinker
nails
2
1-lb. boxes of 7/8" galvanized roofing nails
1
1-lb. box of 6d 2" galvanized finishing nails
1
100-count box of 1 1/4" #6 coated deck screws
1
100-count box of 1 5/8" #6 coated deck screws
1
100-count box of 2" #7 deck screws
10
Hurricane ties
10
Adjustable rafter ties
2
2" x 6" fence brackets
2
2" 4" f
b
k

2
2" x 4" fence brackets
1
Standard box of 9/16" staples
2
4" tee-hinges
Materials List
Quantity
Item
11
2" x 6" x 8' lumber rated for outdoor use
1
10' x 10' sheet of 1 mil. Plastic film
2
4' x 8' sheets of 3/4" CDX plywood
18
2" x 4" x 12' spruce
14
2" x 4" x 8' spruce
3
4" x 4" x 8' lumber rated for outdoor use
7
4' x 8' sheets of 5/8" T-111 sheathing
3
5/4" x 6" x 12' lumber rated for outdoor use
4
4' x 8' sheets of 1/2" sheathing
1
36"-long roll of 15-lb. roofing felt
3
Bundles of roofing shingles
Small quantity of roofing cement
3
Windows
3
Tubes of caulking compound
5
1" x 4" x 8' Ponderosa Pine
1
1" x 4" x 6' Ponderosa Pine
2
1" x 3" x 12' Ponderosa Pine
1
1" x 6" x 8' Ponderosa Pine
3
1" x 2" x 12' Ponderosa Pine
2
Gallons latex primer
1
Gallon latex top coat paint
2
Quarts of accent colours, depending on colour
scheme
2
8' pieces of drip edge
4
Decorative fan brackets (optional)
Cut List

Quantity
Item
Day 1
2
2" x 6" x 8' lumber rated for outdoor use for front
and rear rim joists
2
2" x 6" x 7' 6" lumber rated for outdoor use for side
rim joists
5
2" x 6" x 7' 9" lumber rated for outdoor use for floor
joists
6
2" x 6" blocks to fit between floor joists
1
1/2 4' x 8' sheets of 3/4" CDX plywood for floor
Day 2
19
2" x 4" x 5' 6" for wall studs
5
2" x 4" x 8' for top and bottom of front and rear walls
2
2" x 4" x 7' 9" for lateral top plates
4
2" x 4" x 65" for top and bottom of side walls
6
Nailers the width of windows
4
2" x 4" x 21 1/2" nailers in rear wall
1
2" x 4" x 2' for front door header
3
2" x 4" x 7' 5" for front, middle and rear plates
3
4" x 4" x 6' 2-1/2" lumber rated for outdoor use for
porch posts
Day 3
1
2" x 6" x 8' lumber rated for outdoor use for ridge
beam
1/2
4' x 8' sheet of 5/8" T-111 sheathing for porch ceiling
1
2" x 4" x 17 7/8" for front ridge beam support
1
2" x 4" x 18 1/2" for rear ridge beam support
10
2" x 4" x 55 1/2" with ends cut at 67 1/2° angles for
rafters
Day 4
17
5/4" x 6" x 21" lumber rated for outdoor use for
porch decking
7
4' x 8' sheets of 5/8" T-111 sheathing cut to size
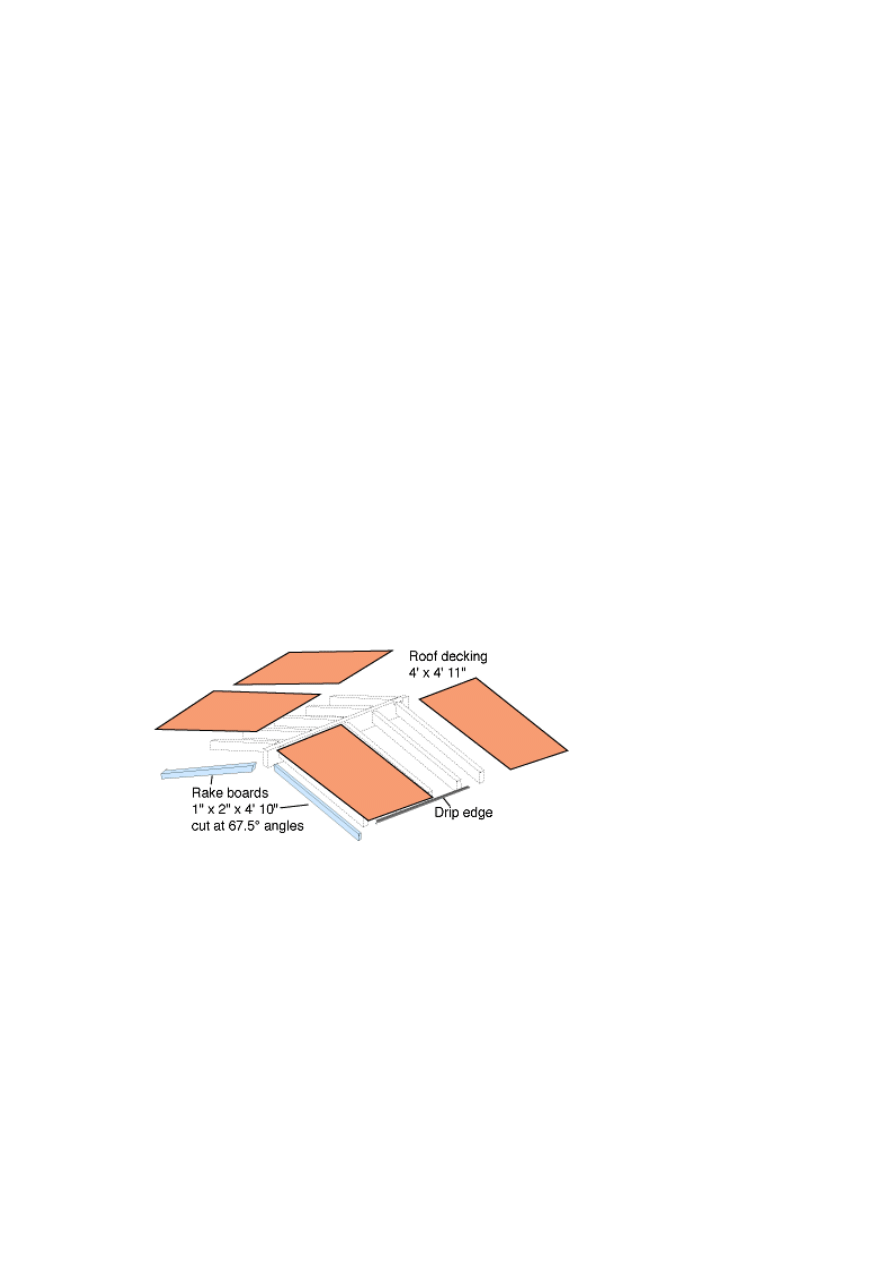
Day 5
4
4' x 4' 11" sheets for roof decking

2
1" x 2" x 4' 10" Ponderosa Pine for rake boards
Day 7
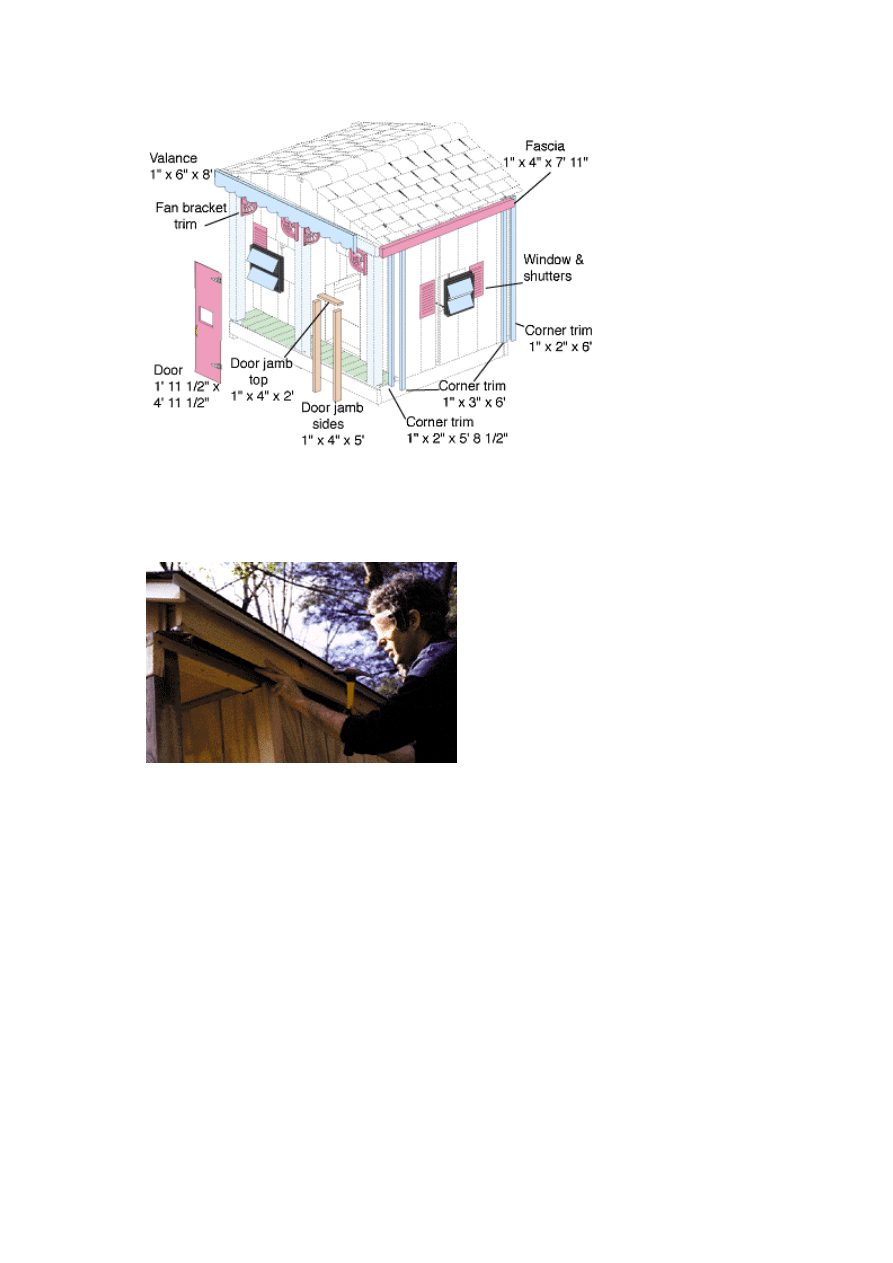
1
1" x 4" x 2' Ponderosa Pine for top of door jamb
2
1" x 4" x 5' Ponderosa Pine for sides of door jamb
2
1" x 6" x 8' Ponderosa Pine for valance
2
1" x 4" x 7' 11" Ponderosa Pine for fascia
4
1" x 3" x 6' Ponderosa Pine
2
1" x 2" x 6' Ponderosa Pine
2
1" x 2" x 5' 8 1/2" Ponderosa Pine
1
1' 11 1/2" x 4' 11 1/2" piece of 3/4" CDX plywood for
door
Construction
Day 1: The Floor
Day 2: Framing
Day 3: Roof Framing
Day 4: Decking and Sheathing
Day 5: Roof Deck
Day 6: Roofing
Day 7: Windows, Doors & Trim
Introduction
This is a fairly extensive project. We recommend that you print the drawings, as well
as the text in this frame. Study both the text and drawings until you are comfortable
with them before you begin.
The project will typically take a two-person crew at least seven days to complete. Build
it in stages and have a good tarp on hand to protect your work from harsh weather
until the playhouse is fully under roof. The finished playhouse measures 7' 9" (L) x 8'
(W) x 8.5' (H). Many towns do not require building permits for outbuildings smaller
than a 10' cube. However, you should still check with your city or county building
department for local code requirements.
Although you can cut your framing materials with a circular saw, a mitre saw will save
time and create more accurate cuts. We used a 12" Heavy Duty Compound Mitre Saw
because it is large enough to cut through 2" x 6" and 4" x 4" lumber. For cutting
plywood, we used a cordless circular saw and a cutting guide to help us make perfectly
straight cuts. Make sure that any lumber that comes in contact with the ground is rated
as such. All fasteners used in the project must be galvanized to resist rust.
Construction
At the end of each day, make sure that your work site is clear of lumber and fallen
nails. Untidy building sites, especially in play areas, can cause accidents.

Day 1: The Floor
Step 1: Site Preparation
Select a site that is fairly level and has good drainage. Using a tape measure and a
framing square, measure an 8' x 8' square. Check that your site is perfectly square by
measuring the diagonals. If they each measure 11' 6", your site is a perfect 8' square.
Step 2: Outer Frame
Use two 8' lengths of 2" x 6" lumber rated for outdoor use for the front and rear
. From two more 8' lengths of 2" x 6"lumber rated for outdoor use, cut two pieces
of 2" x 6" x 7' 6" for the side rim joists. Assemble the outer frame by nailing through
the front and rear rim joists into the side rim joists, using two 12d 3 1/4" common nails
for each corner. See Figure 1.
Step 3: Levelling the Site
Level the ground under your floor frame using a shovel and a rake. Check your level by
placing a 4'-long carpenter's level on top of the rim joists (you may have to prop up a
corner of the floor with a brick or a patio block). After the site is level, move the frame
away and spread a sheet of polyethylene film over the site to prevent vegetation from
growing. Move the frame back into place.
Step 4: Inner Frame Joists
From 8' lengths, cut five pieces of 2" x 6" x 7' 9" lumber rated for outdoor use for the
floor joists. Measure from the outer rear corners of the frame, and locate the centres of
the inner floor joists at 16", 32", 48", 64" and 72". Use two 12d 3 1/4" galvanized
common nails to secure each end of the inner floor joists to the side rim joists. Measure
the gaps between the inner floor joists and cut lengths of 2" x 6" lumber rated for
outdoor use to fit between each pair of joists. Nail the blocks into place near the middle
of the floor joists. Every second block should be offset slightly to facilitate nailing.
Step 5: Plywood Floor
Set one 4' x 8' sheet of 3/4" CDX plywood (exterior rated) on the frame, with one edge
of the sheet flush with the rear rim joist. Use the plywood as a guide to square up your
frame. The front edge of the plywood sheet should fall exactly at the centre of the floor
joist that was secured at 48" on centre. Fasten the plywood to the joists with 1 5/8" #6
coated deck screws at 8" intervals around the perimeter and at 12" intervals in the
centre of the plywood. Mark and cut the second sheet of 3/4" CDX plywood in half
lengthwise. Put one half aside for later use as the door. Set the other half on the floor
joists next to the full plywood sheet, leaving a 1/16" gap between the two sheets.
Secure the half-sheet to the floor joists with 1 5/8" #6 coated deck screws.
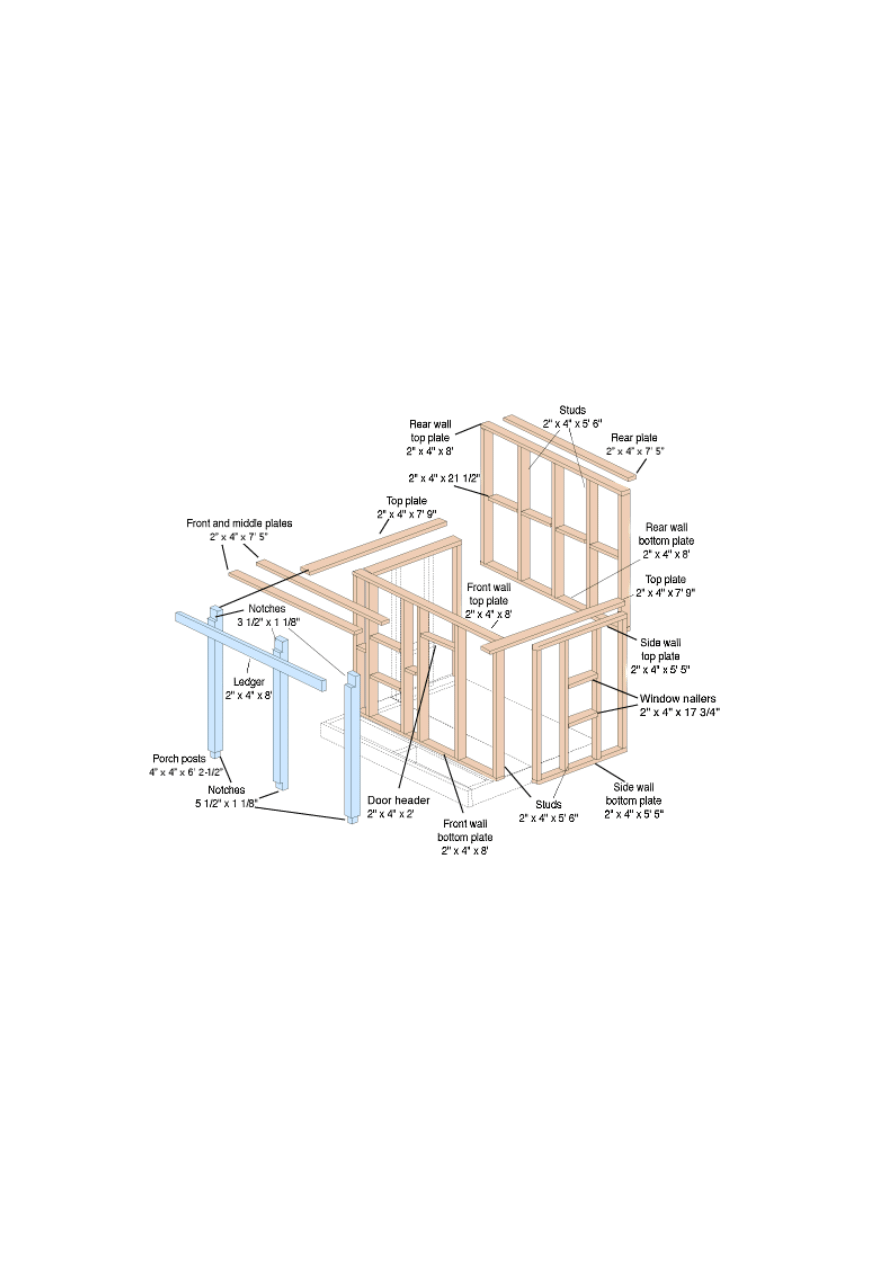
Day 2: Framing
Build the walls on the ground, stand them up and then nail them into place.
Step 1: Wall Studs
Cut nineteen 5' 6" lengths of 2" x 4" from 12' lengths for the wall studs.
Step 2: Rear Wall
Use two 8' lengths of 2" x 4" for the top and bottom plates. Space the studs 2' on
centre between the top and bottom plates and secure the studs by nailing through the
plates with 8d 2 1/2" galvanized common nails. Cut four 2" x 4" x 21 1/2" pieces and
nail them, horizontally, between the studs about halfway up the wall.

Set the rear wall in place directly over the rear
rim joist and floor. Nail the rear wall into place
with 16d 3 1/2" galvanized common nails, driven
through the wall's bottom plate and the floor and
into the rim joist. Temporarily prop up the rear
wall with an 8'-long 2" x 4". Rest one end on the
ground and nail the other at an angle into the
right-side stud of the back wall, at a height of
about 4'.
Step 3: Side Walls
The two sidewalls are identical. Our windows
required a 17 3/4"-wide x 15 1/4"-high opening.
If you use different windows, adjust the distance between the two centre studs. In
doing so, make sure you have a stud centred at 4' from the back of the playhouse to
use as a nailer for the edges of the sheathing boards. Since the side walls will be
mounted 3 1/2" from the back of the playhouse, the middle nailers should be centred at
44 1/2" from the back of the side walls.
Cut four 2" x 4" x 65" pieces from 12' lengths for the top and bottom plates. Nail the
plates to the end studs with two 8d 2 1/2" common nails at each joint. Nail one stud on
centre at 44 1/2" from the back of each side wall. Nail another stud at the appropriate
distance for the window framing.
Set one sidewall in place, butted up against the end of the rear wall and flush with the
edge of the side rim joist. Nail the wall into place with 16d 3 1/2" nails. Use a level to
make sure that the wall is plumb and then secure it to the end of the back wall with 8d
2 1/2" common nails. Repeat for the other sidewall.
Step 4: Front Wall
Use two 2" x 4" x 8' pieces for the top and bottom plates. Fasten a stud to each end of
the top plate by nailing through the plate into the stud, using two 8d 2 1/2" common
nails at each joint. Fasten the bottom plate to the two end studs with 8d 2 1/2"
common nails. Fasten another stud 22" from the right end of the front wall for the edge
of the doorway. Fasten a fourth stud so that it is centred 48" from each side of the wall.
This will serve as the second stud for the doorway and as a nailer for the left front
sheathing. The other two studs serve as framing for the front window. We spaced them
17 3/4" apart so that their centres were 61" and 79 1/4" from the right side of the wall
(adjust for different window sizes).
Set the front wall in place, butted up against the sidewalls and flush with the edge of
the plywood floor. Nail the front wall to the floor with 16d 3 1/2" common nails. Make
sure the front and sidewalls are plumb and nail their end studs together with 8d 2 1/2"
common nails.
Cut 5 1/2"-long, 1 1/8"-deep notches on the bottom front faces of the posts, at the
bottom left side of one post and at the bottom right side of another post.
Stand the left post inside the rim joists at the front left of the playhouse. The notches
will allow the base of the post to be flush with the left and front rim joists Have a
will allow the base of the post to be flush with the left and front rim joists. Have a
helper hold the post plumb. Secure the post to the floor frame by nailing through the
rim joists with four 12d 3 1/4" common nails. Repeat for right post.
Stand the centre post inside the front rim joist with its centre at 50" from the right side
of the frame. The notch allows the base of the post to be flush with the front of the rim
joist. Secure it to the rim joist with two 12d 3 1/4" common nails.
Step 6: Top Plates
Insert one 2" x 4" x 8' into the top notches of the front posts as a ledger board. Check
that the posts are plumb and secure the ledger to each post with two 2 1/2" #7 deck
screws.
Cut two 2" x 4" x 7' 9" pieces from 8' lengths for the lateral top plates. Set one on top
of each sidewall, overlapping the splice between the back and sidewalls and stretching
to the front edge of the post. Using ten 12d 3 1/4" common nails, secure each side
plate by nailing into the post, the back wall splice and the top of the sidewall.
Cut three 2" x 4" x 7' 5" pieces from 8' lengths for the front, middle and rear plates.
Set them in place between the side plates and over the front wall, the rear wall and the
ledger. Using ten 12d 3 1/4" common nails, secure the plates.
Step 7: Window and Door Framing
Cut six lengths of 2" x 4" to serve as window nailers. Our nailers are 17 3/4" wide, to
bridge the distance between the two studs that serve as side framing for the windows.
Using two 8d 2 1/2" galvanized common nails at each joint, fasten the lower nailer
between the two studs, 24" from the floor. Check that the nailer is level before securing
it.
Fit a window into the opening, resting on the lower nailer. Set the top nailer in place
over the window. Remove the window and fasten the top nailer with 8d 2 1/2"
galvanized common nails, driven through the studs into the nailer. Repeat for the other
two windows.
Cut one 2" x 4" x 2' for the header above the front door. Insert the header between the
two front door studs at a height of 5' from the floor. Make sure that it is level and then
fasten the header in place, with two 8d 2 1/2"galvanized common nails, driven through
the studs into each end of the header.
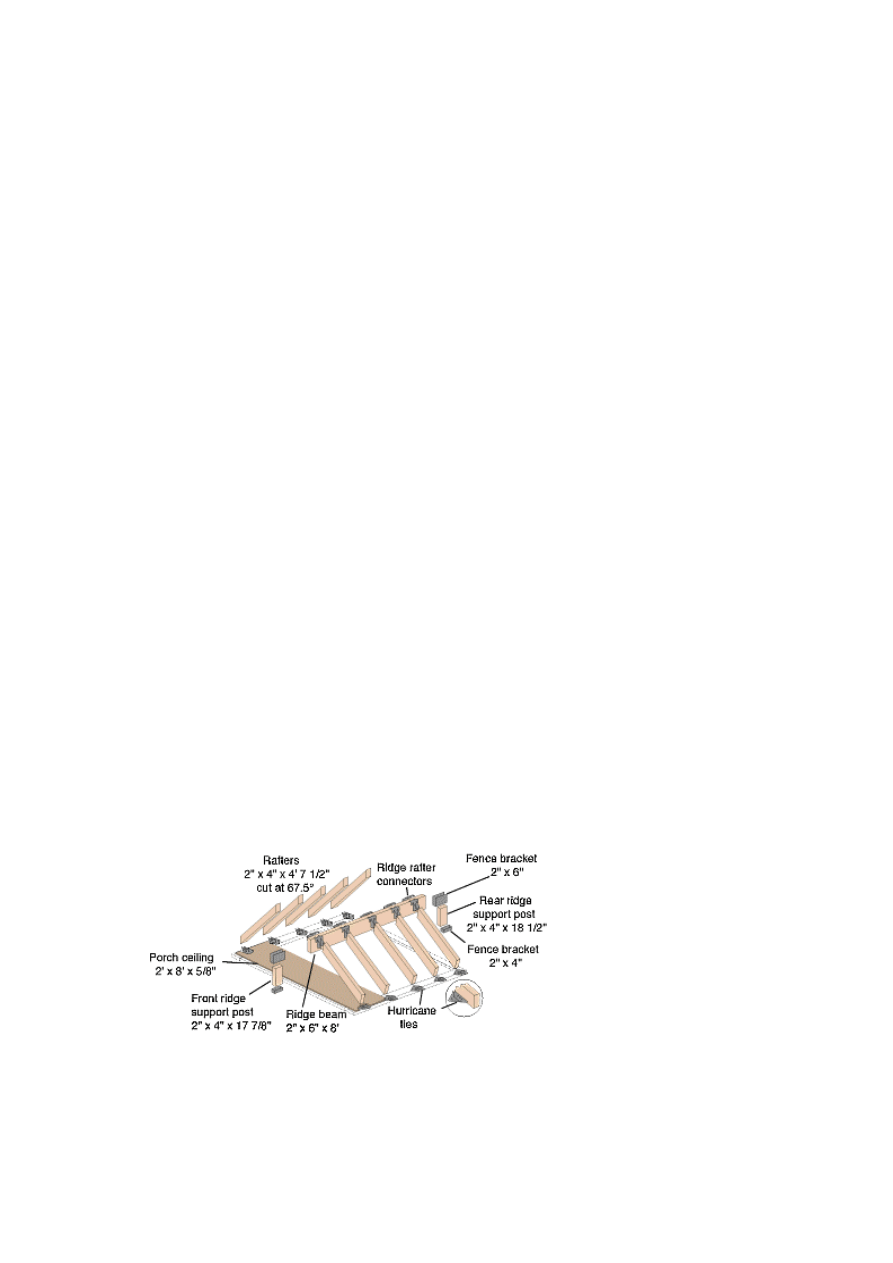
Day 3: Roof Framing
)
Step 1: The Ridge Beam
Use one 2" x 6" x 8' board for the roof ridge beam. Use 1 1/2" galvanized joist hanger
nails to secure five ridge rafter connectors to each side of the ridge beam. Starting
from the front end of the beam, locate the centres of the connectors at 2", 24", 48",
72" and 93"
72" and 93".
Step 2: Hurricane Ties
To ensure that the rafters are secured to the proper locations on top of the two side
walls, set the ridge beam on top of each side wall in succession, allowing the beam to
overhang 1 1/2" in the front and 1 1/2" in the back. Mark the top of each sidewall at
the centre of each ridge rafter connector. Secure hurricane ties to the top of each
sidewall at the ridge rafter marks, using 1 1/2" galvanized joist hanger nails. Make sure
the prongs of the ties are facing outward and protrude over the edges of the plates.
Step 3: Porch Ceiling
Cut one 4' x 8' sheet of 5/8" T-111 tongue and groove sheathing in half, lengthwise, for
the porch ceiling. Set half the sheet, groove-side down, over the front wall and flush
with the front edge of the posts. Mark the location of the front hurricane ties on the
sheathing and cut 1 3/4"-wide, 1 3/4"-deep notches in the sheathing at each hurricane
tie location. Set the sheathing back in place and secure it to the wall plates with 1 5/8"
#6 coated deck screws every 6" around the perimeter.
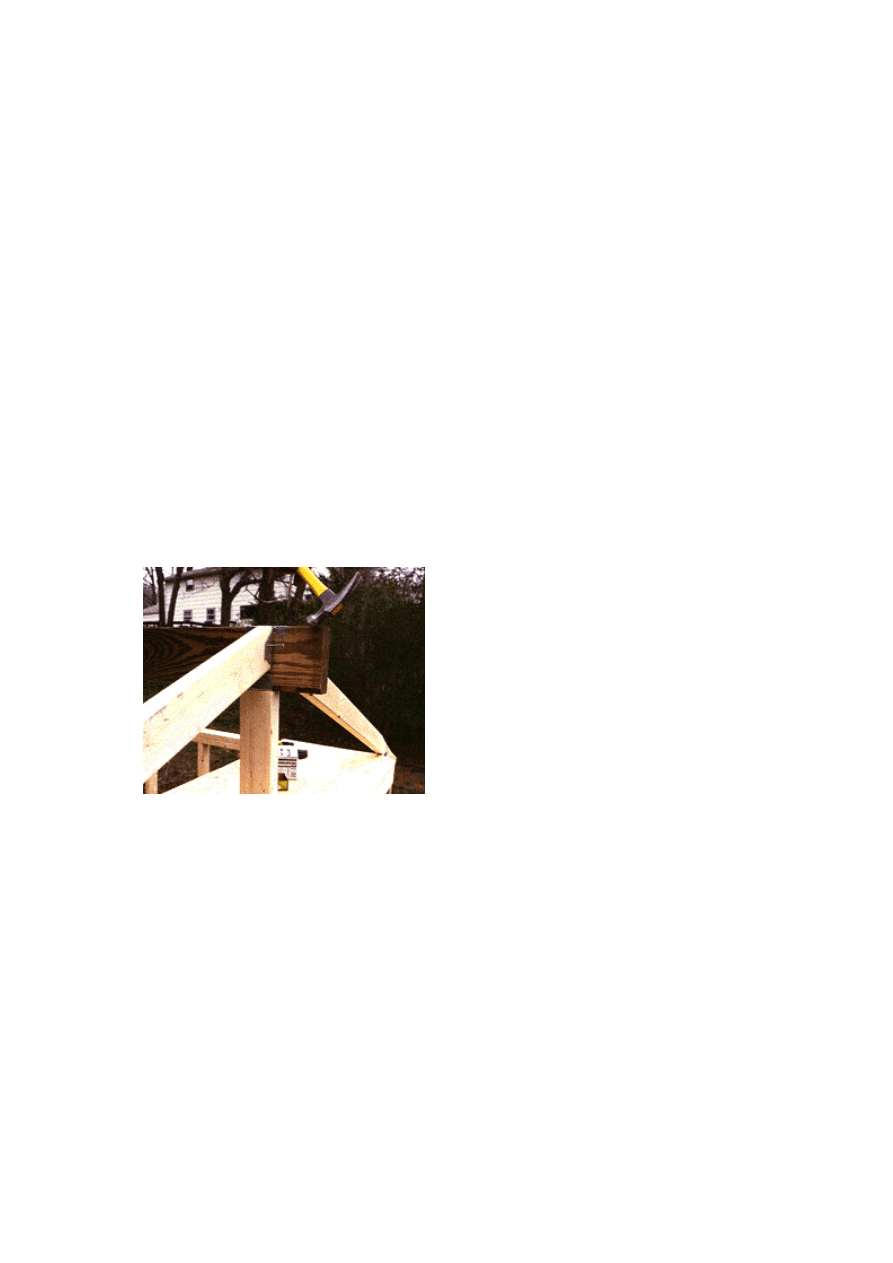
Step 4: Front Ridge Support Post
Cut one 2" x 4" x 17 7/8" piece for the front ridge support post. Using 1 1/2" joist
hanger nails, secure one 2" x 6" fence bracket to the top edge of the ridge beam
support post, flush with the front of the post, as shown in Figure 3. Secure the support
post to the centre of the porch ceiling, flush with the front edge, using a 2" x 4" fence
bracket and 1 1/2" joist hanger nails.
Step 5: Rear Ridge Beam Support Post
Cut one 2" x 4" x 18 1/2" piece for the rear ridge
beam support post. Prepare the top of the post a
outlined in Step 4. Centre a 2" x 4" fence brac
over the rear wall plate, flush with the rear edge
of the plate. Secure the bracket and post as
outlined in Step 4.
s
ket
Step 6: Fastening the Ridge Beam
Set the ridge beam, rafter connector-side up, into
the 2" x 6" fence brackets. The beam should
overhang the posts by 2" in the front and 1" in
the back. Using 1 1/4" #6 deck screws, secure the beam to the brackets.
Step 7: The End Rafters
A mitre saw is particularly useful for cutting the rafters. They are 55 1/2"-long
parallelograms, cut from 2" x 4" lumber. Cut ten rafters at 67 1/2° angles, as shown in
Figure 3. Using one 1 1/4" #6 deck screw, secure one rafter to each of the front ridge
rafter connectors and set the other end of each rafter into the appropriate hurricane tie.
Use a torpedo level to bring the front ridge beam support post to a plumb position.
Secure each front rafter to its hurricane tie with one 1 1/4" #6 deck screw. Repeat for
rear rafters.
Step 8: Securing the Rafters
Insert the remaining rafters into the ridge rafter connectors and hurricane ties. Using 1
1/2" galvanized joist hanger nails, fasten all rafters to the hurricane ties and rafter
connectors. It is vital to use all of the fastening holes in the connectors, as this will
increase the strength and snow-bearing capacity of the roof
increase the strength and snow-bearing capacity of the roof.
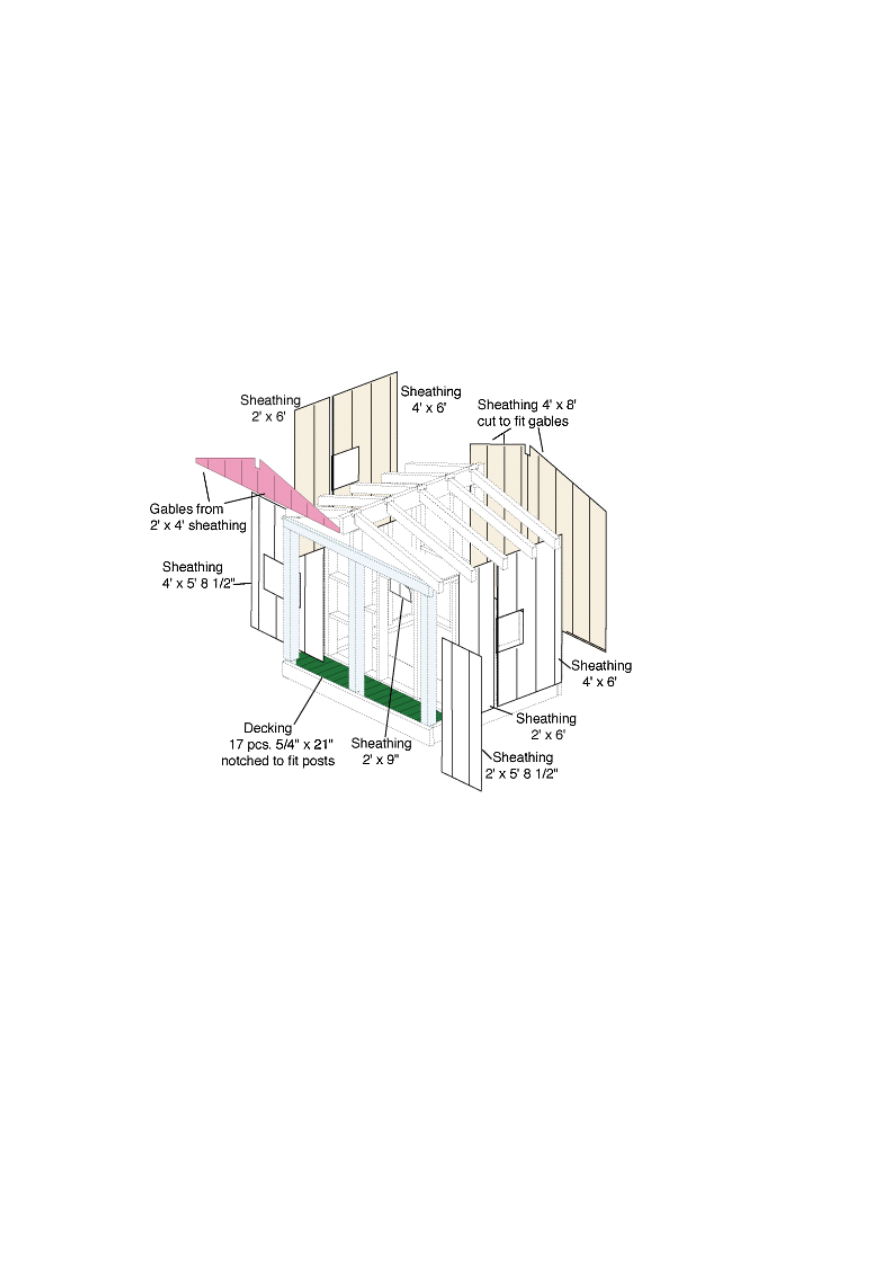
Day 4: Decking & Sheathing
)
Step 1: Decking
Cut 17 pieces of 5/4" x 6" x 21" for the front deck boards. Notch one deck board to fit
around the left post and secure it to the front and left rim joists and the floor joist with
2" #7 deck screws. Use two 16d 3 1/2" common nails as spacers between deck boards
and secure all deck boards in place. You will need to notch two boards to fit around the
centre and right posts. You will also have to trim the right decking board to make it
flush with the right rim joist.
Step 2: Rear Wall Sheathing
Position two 4' x 8' sheets of T-111 tongue-and-groove sheathing vertically, so that
they fit together at the centre stud of the rear wall and reach the top of the ridge.
Using two 6d 2" finishing nails, hammered through the sheathing and about 1" into two
studs, tack each rear sheathing board into position. The boards will be bent slightly at
the top because the ridge beam hangs over the rafters. Mark each sheet of sheathing
for the ridge beam notch. Remove the sheathing and cut the notches. Tack the
sheathing back into place and mark the sheets for the gable cuts.
Cut the sheathing for the rear gable and use the two sheets as templates for marking
the front gable angles on two other sheets of sheathing, making sure that the front
gable sheathing boards meet with a tongue on one side and a groove on the other.
Mark the sheathing for the location of wall studs and then secure the sheathing to the
rear wall with 1 3/4" galvanized ring shank nails, spaced 6" apart around the perimeter
and 12" apart on the rest of the board.
Step 3: Side Wall Sheathing
Cut two 2' x 6' pieces of T-111 sheathing from one 4' x 8' sheet. Butt the straight edge
of one board against the front edge of the playhouse and push the sheathing up until it
is 1/16" from the bottom of the rafters. Fasten it to the front wall stud and the top and
bottom wall plates with 13/4" galvanized ring shank nails at 6" intervals. Do not secure
the sheathing to the stud that is 48" from the rear wall at this point.
Cut the front gables from the tops of the two previously marked sheets of sheathing.
You will have two 4' x 6' sheets left that should be used as the side wall sheathing.
Attach, using 1 3/4" ring shank nails.
Step 4: Front Wall Sheathing
Fasten the two gable sheathing pieces to the front gables, using 1 3/4" ring shank
nails. Cut one sheet of T-111 sheathing to a height of 68 1/2" and secure it to the left
side of the front wall, using 1 3/4" ring shank nails. Cut a 68 1/2"-high piece of
sheathing from the 2' x 8' piece that was left from the front shelf cut. Nail it to the left
front side of the playhouse with 1 3/4" ring shank nails. Cut a 2' x 9" piece of sheathing
and nail it to the door header, top plate and door studs with 1 3/4" ring shank nails.
Day 5: Roof Deck
Step 1: Laying Out the Deck
Cut four 4' x 4' 11" pieces of 1/2" plywood sheathing from the four 4' x 8' sheets. Snap
chalk lines down the centres of the middle rafters on each side of the roof. Those lines
should be exactly 4' from each end of the ridge beam. Stand on the front shelf and
carefully position the left front piece of sheathing so that one side meets the centre of
the left middle rafter. The top end of the sheet should be positioned directly over the
centre of the ridge board. Tack the sheet in place, using two 6d 2" finishing nails,
driven to a depth of about 1" through the deck board and into the rafters.
Step 2: Fitting the Deck Sheets
Set the second deck sheet in place next to the first sheet, leaving a 1/16" gap between
the two sheets. Tack the sheet in place with two 6d 2" finishing nails. Set the right rear
roof deck sheet in place and make sure that the sheets meet at the ridge. If they do
not, adjust the sheets until they do. Do not tack the right rear deck sheet at this time.

Step 3: Nailing the Roof Deck
Remove the right rear roof deck sheet. This will allow
you to stand on a ladder inside the playhouse to
secure the left deck boards. Snap chalk lines on the
two left roof deck boards to mark the positions of the
rafters. Using 6d 1 7/8" coated cooler nails, fasten
the roof deck boards to the rafters. The nails should
be positioned at 6" intervals around the perimeter
and at 12" intervals in the centres of the sheets.
Secure the right roof decking boards in the same
way. To secure the front right board, you will need to
sit on the peak of the roof.
Step 4: Drip Edge
Cut two 8' 2" pieces of drip edge. Secure them to the left and right edges of the roof
deck with 7/8" roofing nails.
Step 5: Rake Boards
Cut two pieces of 1" x 2" x 4' 10" boards at 67 1/2° angles from a 12' length for the
rake boards. They are parallelograms that match the angles of the rafters. Using five 1
5/8" #6 deck screws, driven through the roofing deck, fasten the rake boards flush with
the front edges of the roofing deck.
Day 6: Roofing
Wear sneakers when roofing on a warm day. Since the materials are designed to bond
together by melting slightly in warm weather, heavy, hard shoes can mar the shingles.
Do as much work as you can from a ladder and then sit on the roof for the remainder of
the work.
Step 1: Roofing Felt
Snap chalk lines across each side of the roof deck, 34" and 50" up from the drip edges.
Place a 36'-long roll of roofing felt at one corner of the deck. Roll it out along the first
chalk line, extending over the front and rear of the deck by 2". Cut the felt with a sharp
utility knife. Staple the roofing felt down with 9/16" staples, spaced about 18" apart.
Roll out and staple down the next course of felt, along the second chalk line,
overlapping the first courses by about 8". Repeat for the other side of the roof. Roll out
and staple down the ridge course, overlapping the second courses on both sides by
about 10".
Step 2: Shingles
Since asphalt roof shingles vary from manufacturer to manufacturer, carefully read the
instructions provided with your shingles. In general, three bundles of asphalt shingles is
enough material to cover a 100-square-foot area, or slightly more than is needed to
cover this playhouse roof.
To ensure that nails do not protrude into the playhouse, secure the shingles with 7/8"-
long roofing nails. Cut shingles on the smooth side, using a sharp utility knife. If you
follow the manufacturer's instructions carefully, you should have only two exposed
roofing nails on the ridge. They must be covered with roofing cement.
Day 7: Windows, Doors & Trim
Step 1: Window Openings
From inside the playhouse, drill 1/2" holes through the sheathing in the four corners of
the rectangular window frames. Use a framing square to draw lines for each window on
the outer sheathing, linking the four holes for each window. Cut out the window
rectangles. We used a cordless circular saw to make the cut. It can also be done with a
sabre saw.
Step 2: Inserting Windows
Caulk liberally along the inside flanges of
each window and then secure it in place
according to the manufacturer's instructions.
Step 3: Door Opening
Using a handsaw, cut away the bottom plate
of the doorway framing in the front wall. Cut
one 2' piece and two 5' pieces of 1" x 4"
Ponderosa Pine from a 12' length for the top and sides of the door jamb. Using 6d 2"
finishing nails, join the top piece to each of the 5' jamb sides. Set the jamb in the door
opening and nail it in place with 6d 2" finishing nails. Although it is preferable to make
the door jamb level and plumb for the sake of appearance, it is not really necessary
because the door will mount over the jamb, rather than inside it.
Step 4: Door
Cut a 1' 11 1/2" x 4' 11 1/2" door from the remaining half-sheet of 3/4" CDX plywood.
Secure the door with 4" galvanized tee-hinges, mounted on the right side of the jamb
on the outside of the playhouse. The hinges should be positioned 10" from the top and
bottom of the door. When mounting the door, set it on a piece of scrap shingle to
create a 1/8" clearance from the deck boards. If your playhouse is square, your door
should fit inside the right and left pieces of T-111 sheathing.
Step 5: Fascia
Cut two 7' 11" pieces of 1" x 4" Ponderosa Pine for the fascia boards to cover the
exposed edges of the rafters. Secure them to the rafters with 6d 2" finishing nails.
Step 6: Exterior Corner Trim
Cut four 6' pieces of 1" x 3" Ponderosa Pine and two 6' pieces of 1" x 2" Ponderosa Pine
from 12' lengths Caulk the back of a 1" x 2" piece and secure it lengthwise to the rear

from 12' lengths. Caulk the back of a 1" x 2" piece and secure it lengthwise to the rear
corner of the side wall, flush with the edge of the back wall and the bottom of the
sheathing, using 6d 2" finishing nails. Caulk the back of a 1" x 3" and secure it to the
corner of the back wall, flush with the outer edge of the 1" x 2" trim. Repeat for the
other rear corner.
Cut two 5' 8 1/2" pieces of 1" x 2" Ponderosa Pine for the front wall corner trim. Caulk
the back of a 1" x 2" and secure it lengthwise to the right corner of the front wall, flush
with the edge of the side wall, using 6d 2" finishing nails. Caulk the back of a 1" x 3"
and secure it to the corner of the front wall, flush with the outer edge of the 1" x 2" and
the base of the sheathing. Repeat for the remaining corner.
Step 7: Paint the Playhouse
Use a top-quality outdoor latex primer and top coat. We chose Enterprise® Severe
Weather because it has a warrantee of 15 years. For a playhouse that blends with the
exterior of your house, choose colours that are compatible with your home's colour
scheme. Or have fun and let your children select a colour palette.
window and trimmed the rough opening with corner moulding.
Wyszukiwarka
Podobne podstrony:
4 2 2 7 Lab Building an Ethernet Crossover?ble
Building an MVP Framework for NET Part 1
Building An Olympic Body Through Bodyweight Conditioning Gymnastics Strength Training Article
Building an MVP Framework for NET Part 2
Building An Online Shopping Cart Using C Sharp Part 2
Building An Online Shopping Cart Using C Sharp And Asp Net Part 1
Building an MVP Framework for NET Part 3
An Optically Isolated Hv Igbt Based Mega Watt Cascade Inverter Building Block For Der Applications
(psychology, self help) Building Your Self Esteem as an Adult
Munster Application of an acoustic enhancement system for outdoor venues
Using Team Building Methods With an Ice Hockey Team
A Guide to Building Outdoor Stairs budujemy schody na zewnatrz
Wykład 5 An wsk cz II
Building a Greenhouse
An%20Analysis%20of%20the%20Data%20Obtained%20from%20Ventilat
NLP for Beginners An Idiot Proof Guide to Neuro Linguistic Programming
więcej podobnych podstron