Burda sizes 34, 36, 38, 40, 42
Outside leg length 88 cm (34
3
/
4
ins)
Edge of waistband 1 cm (
3
/
8
inch)
below waist
Hem about 36 cm (15 ins)
Materials:
140 – 145 cm (57 ins) linen print:
140 m (1
1
/
8
yards) for all sizes. Vile-
ne/Pellon H 410. One invisible zip
22 cm (9 ins) and a special presser
foot. 2 buttons and one flat inside
button.
Recommended fabrics:
linen, blends, cotton fabrics.
Preparation:
Print out the pattern pieces onto
20 sheets of paper with the nar-
row frame around. Wait until all
the sheets have been printed. Posi-
tion the sheets so that they match
together (see diagram = reduced
layout drawing). Beginning at the
lower left sheet, cut out the indivi-
dual sheets on the upper and
right-hand side and cutting along
the thin frame line. Glue the pie-
ces together exactly on the thin
frame lines, then cut out all the
pattern pieces.
Important: note that the pattern
pieces do not include the seam
and hem allowances. Please also
note different lines for the right
and left front edge of waistband
piece.
Cutting out:
Seam and hem allowances:
Remember to add seam, edge and
hem allowances of 4 cm (= 1
5
/
8
ins).
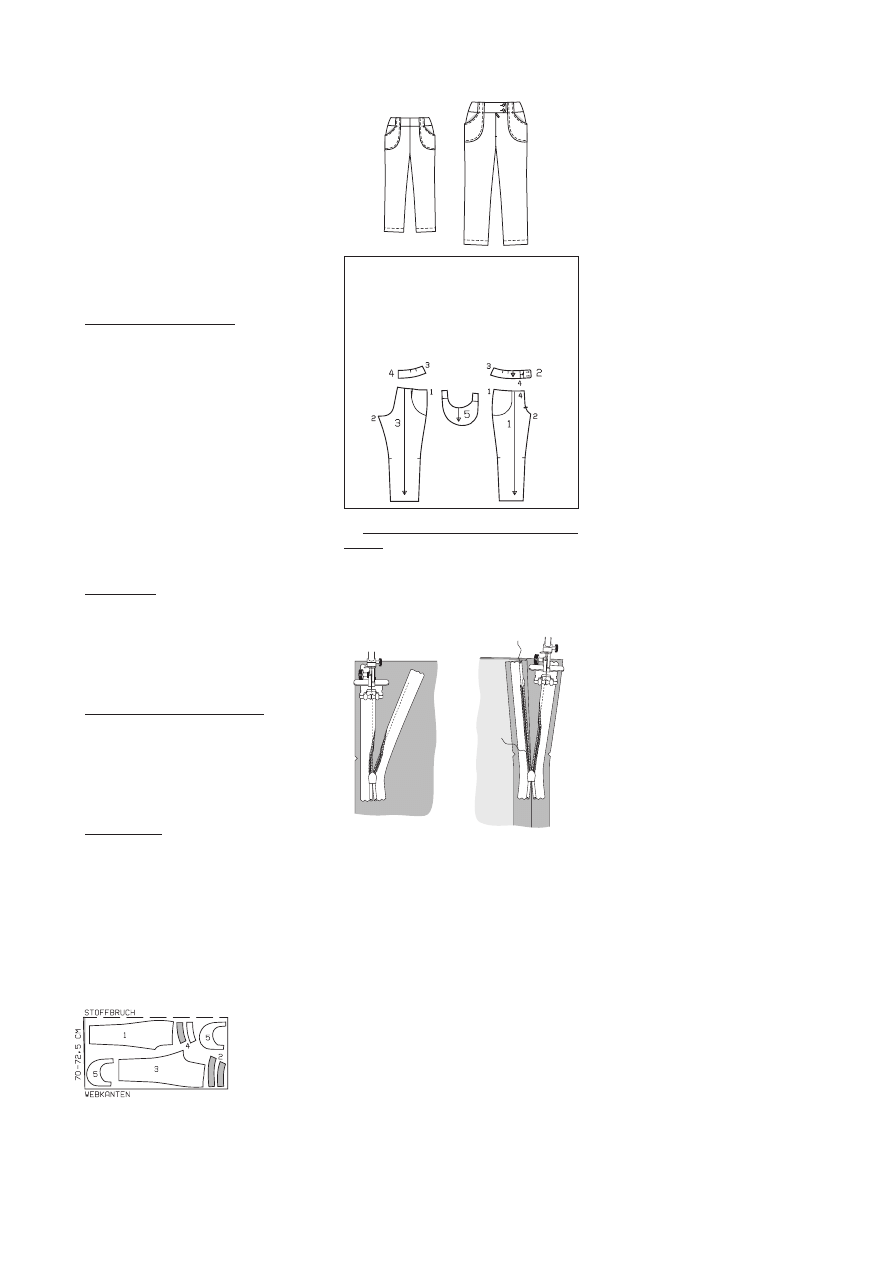
1 trouser front
x2
2 front waistband
x4
3 trouser back
x2
4 back waistband
x4
5 pocket
x4
interfacing:
see cutting layout.
Interface only the outer waistband
pieces.
Construction:
■ Stitch back darts and press to
centre.
■ Stitch side seams and inside leg
seams.
■ Insert invisible zip at front slit
edges, as described hereafter.
Open the zip and push the coil
back with your thumbnail to reve-
al the seam between the tape/
band and the coil. Place the open
zip face down on the right side of
Place the other zip band face
down on the other opening edge
and pin in place at the top. Open
zip again. Place the presser foot on
the top end of the zip so that the
coil is in the notch to left of the
needle (figure 2). Stitch the zip in
place from the top to the end of
the opening. Close zip.
Now stitch centre front seam from
bottom to top (up to zip). Turn
back the loose lower end of the
zip onto the seam allowances.
Stitch as close as possible to the
last stitch of the zip seams. Trim
off the surplus zip and bind the
end with a scrap of fabric.
■ Stitch the side seams on waist-
band pieces. Stitch outer waist-
band pieces onto upper edge of
trousers, leaving ends of waist-
band overhanging from centre
front. Press seam allowances of joi-
ning seams onto waistband pieces.
Place inside waistband pieces right
sides together with the stitched
outer waistband pieces and pin
edges together. Place seam allo-
wances at lower edges of waist-
band down again in front. Stitch
across front ends of waistband and
upper edges of waistband. Trim
seam allowances. Turn waistband
pieces.
■ Stitch two pocket pieces, with
right sides together, leaving nar-
row edges open at the top. Trim
seam allowances. Turn pockets and
press. Topstitch integrated belt-
carriers and pocket opening edge
at 5 mm (
3
/
16
inch). Pin pockets on
trouser pieces at placement line
and stitch 5 mm (
3
/
16
inch) wide.
Now pull belt carriers down again
and pin in place.
■ Place inside back waistband pie-
ces up again and press seam allo-
wances at upper edge of waist-
band open about 5 cm (2 ins) long,
then smooth flat over the joining
seam. Topstitch along waistband
close to edges. Work buttonholes
in the front ends of waistband as
marked and on the left for inside
button.
■ Place belt carriers on pockets up
again, stitch crosswise as marked.
Turn ends in and stitch at upper
edge of waistband.
■ Press hem allowances to inside,
turn in to a width of 2.5 cm (1
inch) and stitch in place.
Pattern piece cutting layout
Linen, 140 – 145 cm wide
Fold fabric in
half longwise,
with right
side inwards
1
2
b u r d a D o w n l o a d 1 0 6 B t r o u s e r s / p a n t s – I n s t r u c t i o n
Copyright 2006 by Verlag Aenne Burda GmbH & Co. KG, Am Kestendamm 1, D-77652 Offenburg.
All rights reserved. All designs and contributions are copyrighted. Reproduction for commercial purposes is prohibited.
The publishers do not accept responsibility for damages occuring from improper use of materials,
improper carrying out of tips or instructions or improper use of completed models.
Pattern from Burda World of Fashion 4/2006
one opening edge. So that the zip
can be stitched in place exactly
along the marked seam-line, calcu-
late the distance between the
band and the fabric as follows:
seam allowance width minus 1 cm
(
3
/
8
inch) = distance from the edge
of the fabric. The bottom end of
the zip will overhand the marked
end of the opening. Place the spe-
cial presser foot on the zip so that
the coil is in the notch to the right
of the needle (figure 1). Stitch zip
in place from the top to the mar-
ked end of the opening. Close the
zip.
Pattern pieces 1 – 5
Size 34 3333
Size 36 4444
Size 38 55
Size 40 6666
Size 42 7777
Wyszukiwarka
Podobne podstrony:
Instrukcja 9000 vnr En
OVERMAX CamRoad 6 1 Instrukcja Obsługi PL EN CZ SK RO HU EE
Budzik Versa wielkość karty kredytowej instrukcja EN
instrukcja bad makro wg pn en iso
Instrukcja obslugi EN
Bestway Zamek Dmuchany PL EN Instrukcja
Honda CB 750 Seven Fifty Instrukcja EN
Blaupunkt CR5WH Alarm Clock Radio instrukcja EN i PL
Instrukcja Obslugi Audi A4 S4 Cabriolet en
instrukcja obslugi do Nokia CR 115 EN
LTSpice instrukcja EN
Instrukcja PSR S970S770 Firmware Installation EN
Budzik Versa wielkość karty kredytowej instrukcja EN
instrukcja bad makro wg pn en iso
Instrukcja obslugi EN
Instrukcja obslugi do Nokia BH 108 EN
Instrukcja instalacji AutoData 3 38 EN Windows 10
więcej podobnych podstron