188
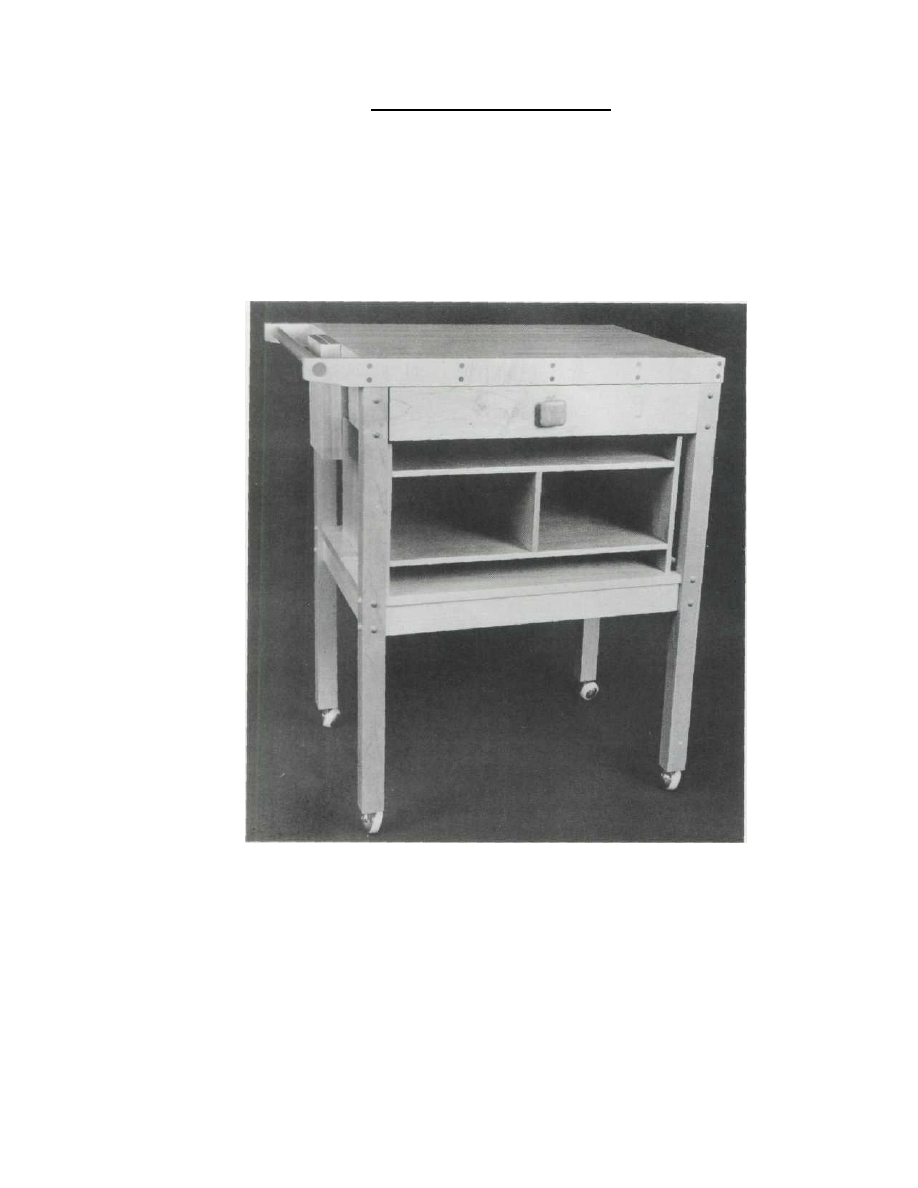
BUTCHER BLOCK
MICROWAVE OVEN STAND
Copyright 2004 Martian Auctions
828
The butcher block has fallen out of favor in recent years, replaced by the countertop cutting
board in an attempt to save space. This design, however, makes the butcher block a useful
part of the kitchen once again. It has a drawer and shelves for storage, it can be moved to
provide a cutting surface or extra counter space wherever needed, and it even has space for a
microwave oven. In addition to the stand, plans are included for building a storage unit on the
lower shelf in place of the oven.
MAKING THE STAND
1. Cut all pieces to size according
to the dimensions given.
2. If you want to make the stand
mobile and add casters to the legs
(A), cut 2" off the length of the legs
and drill a center hole in the bot
tom of each one to accept the cast
er shaft.
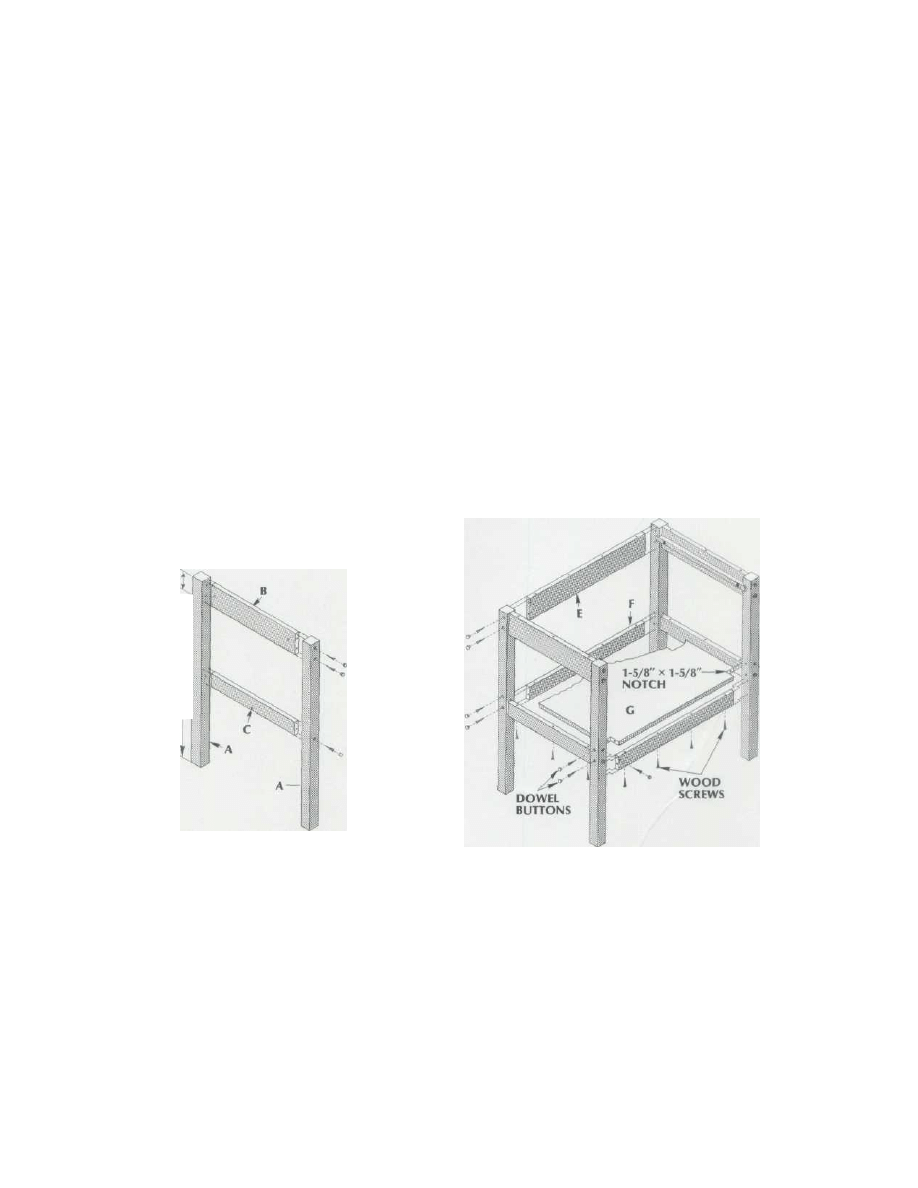
3. Lay out the positions of the rail
joints on the legs as indicated in
the drawings. Note that all rails are
centered on the width of the legs
and that the tops of the upper rails
(B, E) and legs are flush. The lower
rails (C, F) should be set 14-3/4"
DOWEL
BUTTON
LEG AND RAIL ASSEMBLY
BASE ASSEMBLY
1-9/16"
14-3/4
Copyright 2004 Martian Auctions
829
1-5/8" x 1-5/8" notches on each
corner of the shelf for fitting it be-
tween the legs.
7. Fasten the legs and rails togeth
er using wood glue and #8 x 1-3/4"
wood screws. Then fasten the shelf
in place, running #8 x 1-3/4" screws
through the rails into its underside.
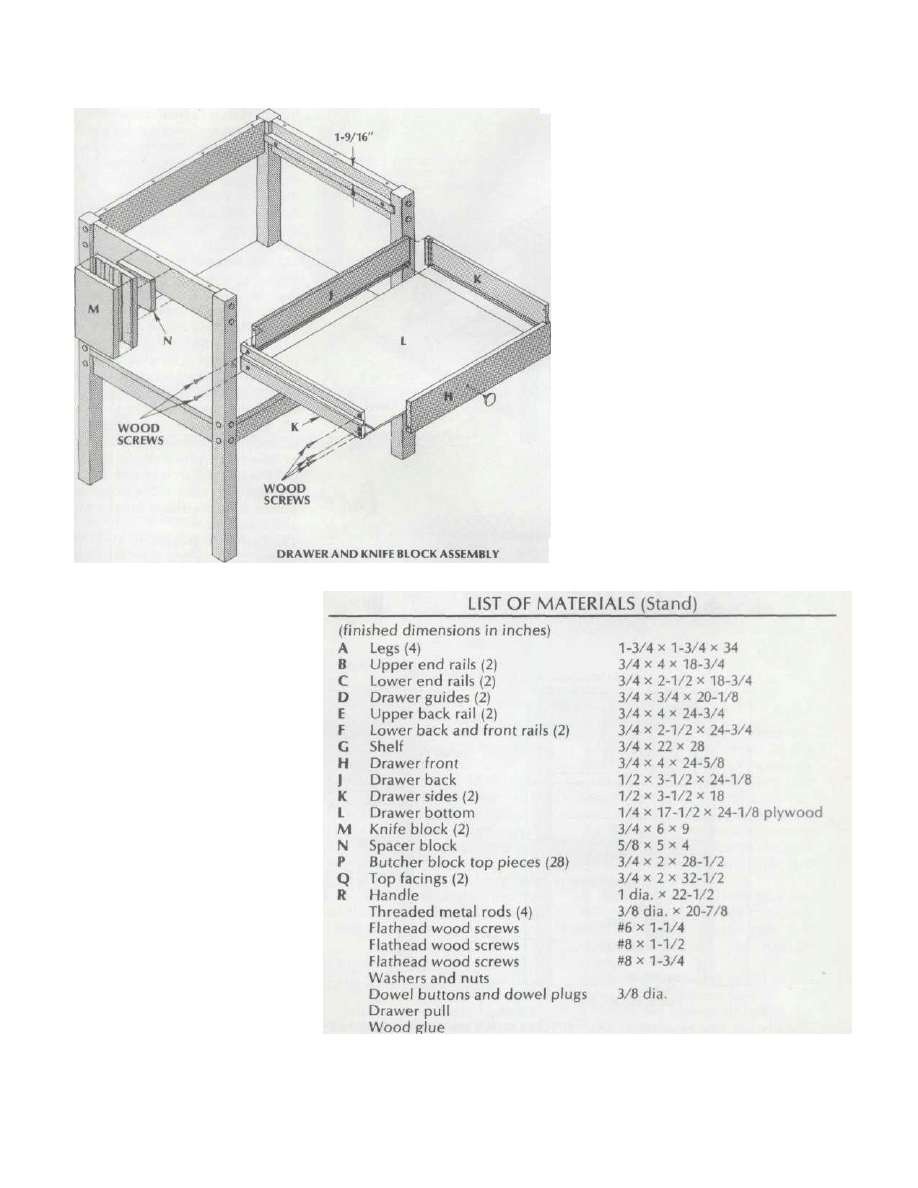
8. Position the drawer guides
against the inside faces and 1-9/16"
below the upper edges of the up
per end rails. Fasten the guides to
the rails using wood glue and #6 x
1-1/4" wood screws. Countersink
the screws so their heads will not
interfere with the operation of the
drawers.
9. Cut a 3/4"-wide x 1/4"-deep
groove 1" below the upper edge
along the outside face of each
drawer side (K). Check the fit be
tween these grooves and the draw
er guides. If necessary, widen the
grooves to allow the drawer sides
to slide smoothly back and forth on
the guides.
10. Cut 1/2"-wide x 1/2"-deep rab
bets across the ends of the drawer
above the bottoms of the legs, un-
less the shelf (G) will house a micro-
wave oven. In that case, drop the
lower rails 4".
4. Drill, countersink, and counter-
bore pilot holes for a pair of #8
wood screws at each joint between
rails and legs. Drill through the legs
into the ends of the rails and make
the counterbores 3/8" in diameter
and 3/4" deep.
5. Drill another set of counter-
bored pilot holes for #8 screws
through each of the lower rails—
three holes in each end rail and
four in each front and back rail.
Run the holes through the width of
the rails, from the lower to the
upper edges, and make the coun
terbores 1-3/8" deep. It might help
to drill the counterbores first, then
use a long, thin bit to complete the
pilot holes.
6. Cut 3/8"-wide x 1/2"-deep rab
bets across the rear ends and 1" x
1/2" rabbets across the front ends
of the drawer guides (D). Also, cut
Copyright 2004 Martian Auctions
830
front (H) to receive the ends of the
sides. Cut 1/4"-deep x 1/2"-wide
dadoes across the drawer sides,
1/2" in from the rear, to receive the
ends of the back (J). Cut 1/4"-
deep x 1/4"-wide grooves in the
drawer front, back, and sides, 1/4"
above their lower edges, to receive
the bottom (L).
11. Center and drill a screw hole
through the drawer front for attach
ing the pull. Countersink screw
holes through the drawer sides
where they will attach to the ends
of the front and back. Then assem
ble the drawer. Use glue and #6 x
1-1/4" flathead wood screws to join
the sides, front, and back, but leave
the bottom unglued in the grooves.
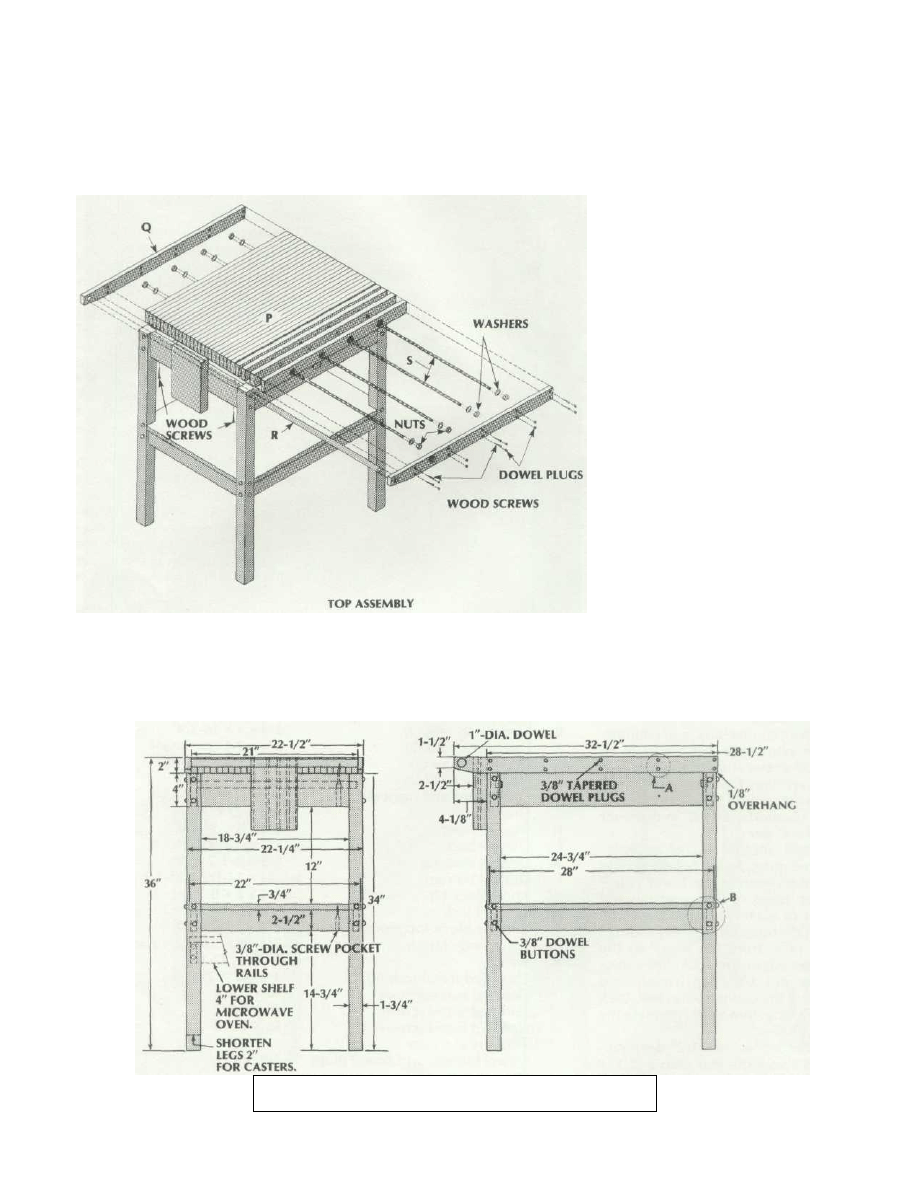
12. Drill four evenly spaced 3/8"-
diameter holes through each butch
er block top piece (P) to receive
the metal reinforcing rods. Coun-
terbore the holes in the outer two
pieces to make room for the nuts
and washers.
13. Spread waterproof glue be
tween all adjacent butcher block
top pieces. Thread the rods through
BUTCHER BLOCK MICROWAVE STAND LAYOUT
Copyright 2004 Martian Auctions
831
the pieces and install the nuts and
washers. Tighten the nuts to align
and clamp the pieces while the
glue dries.
14. Trim one end of each facing
(Q) to the profile shown in the
stand layout drawing and drill holes
for the ends of the handle (R). Be
gin the tapers 3" from the ends and
center the holes 1-1/4" from the
ends of the facing pieces.
15. Fasten the facings to the top
using waterproof glue and #8 x
1-1/2" flathead wood screws, mak
ing their right ends and upper
edges flush. Glue the handle in
place at the same time. Position the
screw holes where you will not hit
the metal rods. Counterbore the
holes and fill them with 3/8"-diam-
eter plugs.
16. Sand the top and facings flush,
then finish them with mineral oil or
a similar non toxic finish. Sand
the
rest of the stand, fill the counter-
bored holes with wood buttons,
then apply polyurethane or anoth
er finish of choice.
17. Center the top on the frame
and mark the position of the screw
holes in the upper edges of the
rails. Drill pilot holes into the un-
derside of the block top, then fas-
ten it to the rails using #8 x 1-3/4"
flathead wood screws. 18. Cut
matching 1/16"-deep grooves
in the two halves of the knife
block (M). Then glue the
pieces together, aligning the
grooves. Nail or screw the 5/8"-
thick spacer block (N) to the left
end rail, then glue the knife block
to the spacer, making its top flush
with the upper surface of the butch-
er block.
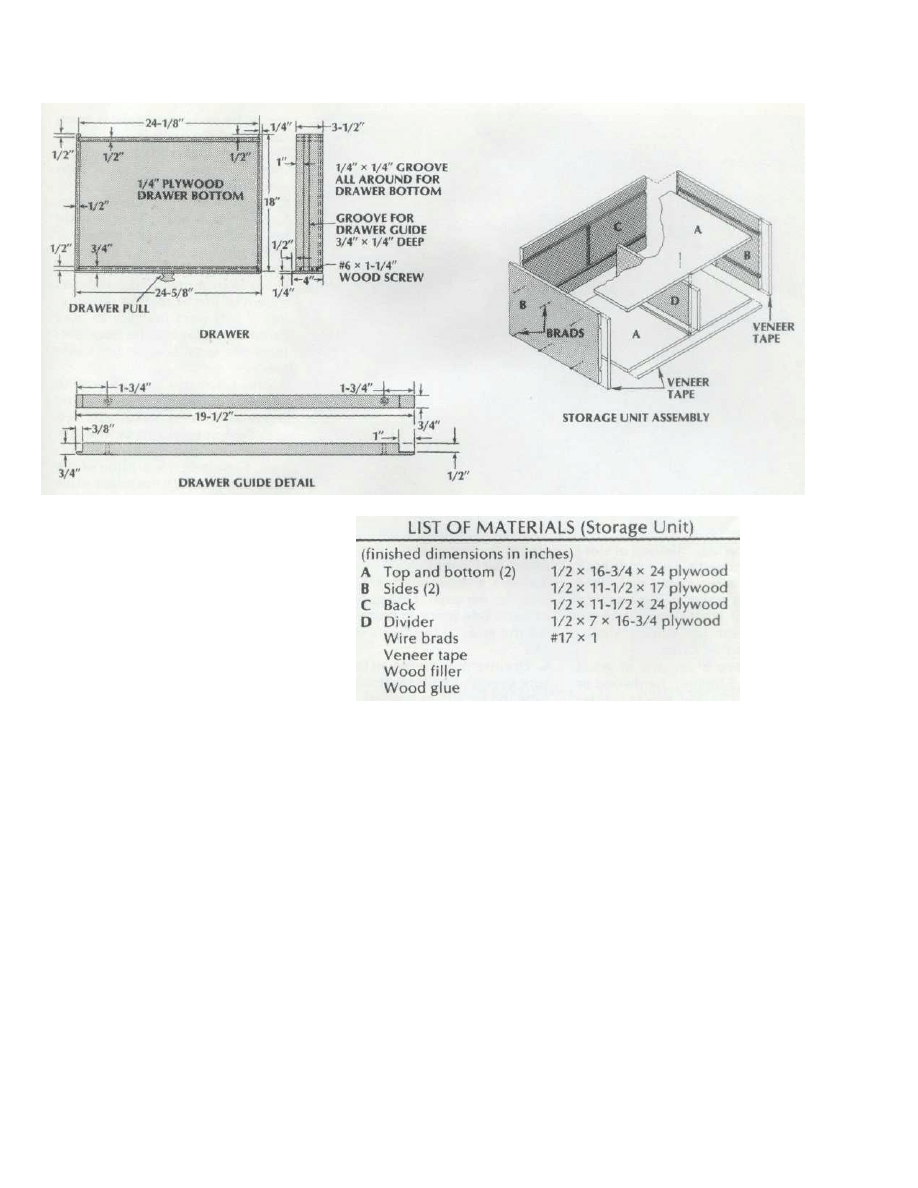
MAKING THE
STORAGE UNIT
1. Cut all pieces to size from 1/2"-
thick veneer plywood.
2. Cut 1/2"-wide x 1/4"-deep rab
bets across the rear ends of the
sides (B) and 1/2" x 1/4" grooves,
spaced 6-1/2" apart, along the
length of the sides and back (C).
Also, cut 1/2" x 1/4" dadoes across
the center of the top and bottom
(A) and back. The dado on the back
should only connect the two
grooves.
3. Assemble the unit with glue and
#17 x 1" wire brads. Set the brads
and fill with a wood filler that
matches the finish you will be
using.
4. Cover all exposed edges of the
plywood with veneer tape.
5. Finish the drawer to match the
stand and storage unit, then install.
Copyright 2004 Martian Auctions
832
Wyszukiwarka
Podobne podstrony:
Audyt wewnetrzny (SGHowy) Stand Nieznany (2)
arkusz ang stand pr cz2 A
lumber cut off stand
Stand.V.8 kom, Wycena gruntów
bassinet and stand
Jacques Derrida Taking A Stand For Algeria
MicroOrganisms
stand
Make Your Resume Stand out From the Pack
ang PR stand cz1 rozw
rozp zm stand
ang stand transkrypcja pr
2 page Stand
Batteries & Charge Control in Stand Alone PV Systems
ang PR stand cz2 A rozw
bell hooks Where We Stand Class Matters Routledge (2000)
Stand.V.4, Wycena gruntów
Stand.V.4 kom, Wycena gruntów
więcej podobnych podstron