
8.7.14a
8.7.14a Adding
Transitions (Premiere)
1-2
Fundamentals of Web Design 1.2—-Lab 8.7.14a
Copyright
2002, Adobe Systems, Inc.
8.7.14a Adding Transitions (Premiere)
Getting started
To begin, you’ll create a new project and then import the video clips. Make sure
you know the location of the files used in this lab. Insert the CD-ROM disc if
necessary.
1. Start
Premiere.
When you start Premiere for the first time, the Select Initial Workspace dialog
box appears so you can select an initial workspace. Four editing workspaces are
available: A/B Editing Single-Track Editing, Effects, and Audio.
2. Select the Single-Track Editing workspace. This is used for more
advanced editing techniques and for work with the Video 1 track as a
single track. You start this lab in that mode in order to learn how basic
transitions work in it.
For the balance of the lab, you will switch to A/B Editing Mode. At times,
switching between Single-Track and A/B Editing after you have begun editing in
the Timeline window can cause unexpected or unpredictable behavior. When you
do make the switch in this lab, however, there should be nothing to adversely
affect the flow of your learning process.
•
The Monitor window displays both the Source View and the Program View
(called Dual View). Clips open in the Source View window for trimming and
positioning by setting In and Out Points.
•
The Timeline window has a single Video 1 track in which the video and
transition tracks are combined. All tools act on the three subtracks as a single
track for inserting and overlaying the trimmed clips. You can expand the Video 1
track to show its transition track and the upper and lower tracks.
3. In the Load Project Settings dialog box, choose
a preset from the list of
Available Presets and click O
K. Use the preset included with your
capture card software or the appropriate preset included with Premiere.

Copyright
2002, Adobe Systems, Inc.
Fundamentals of Web Design 1.2—Lab 8.7.14a
1-3
Note If you don’t see a preset that matches your video, select the preset that most
closely matches your editing environment, and then click Custom, specify your
project settings, and click Save. In the Save Project Settings dialog box, type a
name and description (if desired) and click OK. The settings are saved as a preset
file that appears in the list of available presets in the Load Project Settings dialog
box.
The three main windows appear: the Project window, the Monitor window, and
the Timeline window.
4. If necessary, rearrange windows and palettes so they don’t overlap.
Before importing files, you’ll simplify the interface by closing several palettes
that you don’t need right now.
5. Click the close box on the Navigator/Info/History palette. Leave the
Transitions/Video/Audio palette open, as we’ll be using it in this lab
once you start a project, you can check the project settings at any time.
6. Choose Project > Project Settings > General, Video, Audio, Keyframe
and Rendering, or Capture. The selected Project Settings window
appears.
7. Click Next or Prev to sequence through all of the Project Settings
windows, if desired.
8. Click
OK.
Importing clips
Now you’ll import the source files that you’ll need for your project to the Project
window.
1. Import files in one of the following ways, depending on your system:
•
In Windows, Choose File > Import > File and then open the 8_7_14/a folder
you copied or installed from the Premiere Application CD-ROM disc. Select all
the files (but not the Final folder) by selecting the first file, holding down the
Shift key, and then selecting the Solar2.mov file, then click Open.
•
In Mac OS, choose File > Import > Multiple, open the 8_7_14/a folder you
copied or installed from the Premiere Application CD-ROM disc, and then open
the Clops folder. Then hold down the Shift key as you select all the files (but not
the Final folder): Earth.mov, Eye.mov, Solar1.mov and Sola2.mov. Then click
Open.
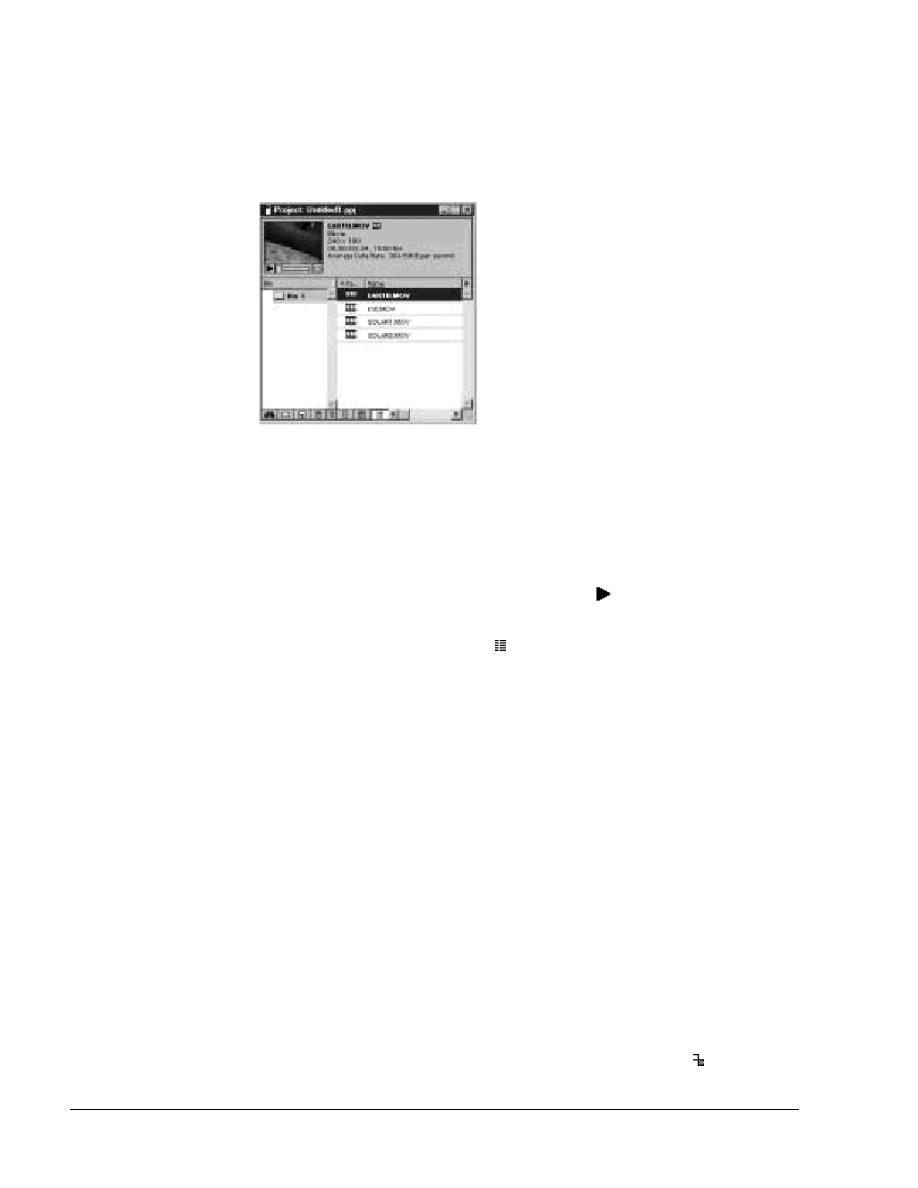
The video files are added to the Project window.
A
Project window includes a
bin view, which shows the bins that have been added to the project. The bin view
appears on the left side of the Project window and can be resized or hidden. You
can scroll or enlarge the Project window if necessary.
1-4
Fundamentals of Web Design 1.2—-Lab 8.7.14a
Copyright
2002, Adobe Systems, Inc.
At the top of Project window/bin view is the thumbnail viewer, which you can
use to preview individual clips. When you select a clip in the Project window, the
thumbnail viewer displays the poster frame. The poster frame is the first frame of
a clip and the frame that is used for icon view and as a sample frame for titles.
You can change the poster frame to any frame in the clip. The thumbnail view
also displays the clip name, media type, video information, duration, and data
rate.
Now, let’s view a clip and its information in the Project window:
2. Click the Thumbnail View button
()
at the bottom of the Bin window.
3. Select the Earth.mov clip in the Project window. The clip's information
appears beside the thumbnail viewer in the upper left corner of the
Project window.
4. View the clip by pressing the Play button (
) on the thumbnail viewer.
Press Play again to stop playback.
5. Click the List View button
(
), if necessary, and expand or scroll along
the right side of the window to see all of the columns of information.
6. Choose Clip > Properties.
Now you’ll name and save the project.
7. Choose File > Save, type Dream.ppj for the name, and 8_7_14/a folder
for the location. Click Save.
In Windows, the default file extension for Premiere projects, ppj, is added to
your filename automatically. In Mac OS, type the extension as part of the
filename.
Overlapping clips
To create a transition between two clips, you need to overlap them in the Video 1
and in the Timeline window. Only the overlapping area—the end of one clip and
the beginning of the next—is involved in the transition. Typically, you overlap
portions of the clips that are not essential to the video program, since they will
likely be obscured by the effect of the transition.
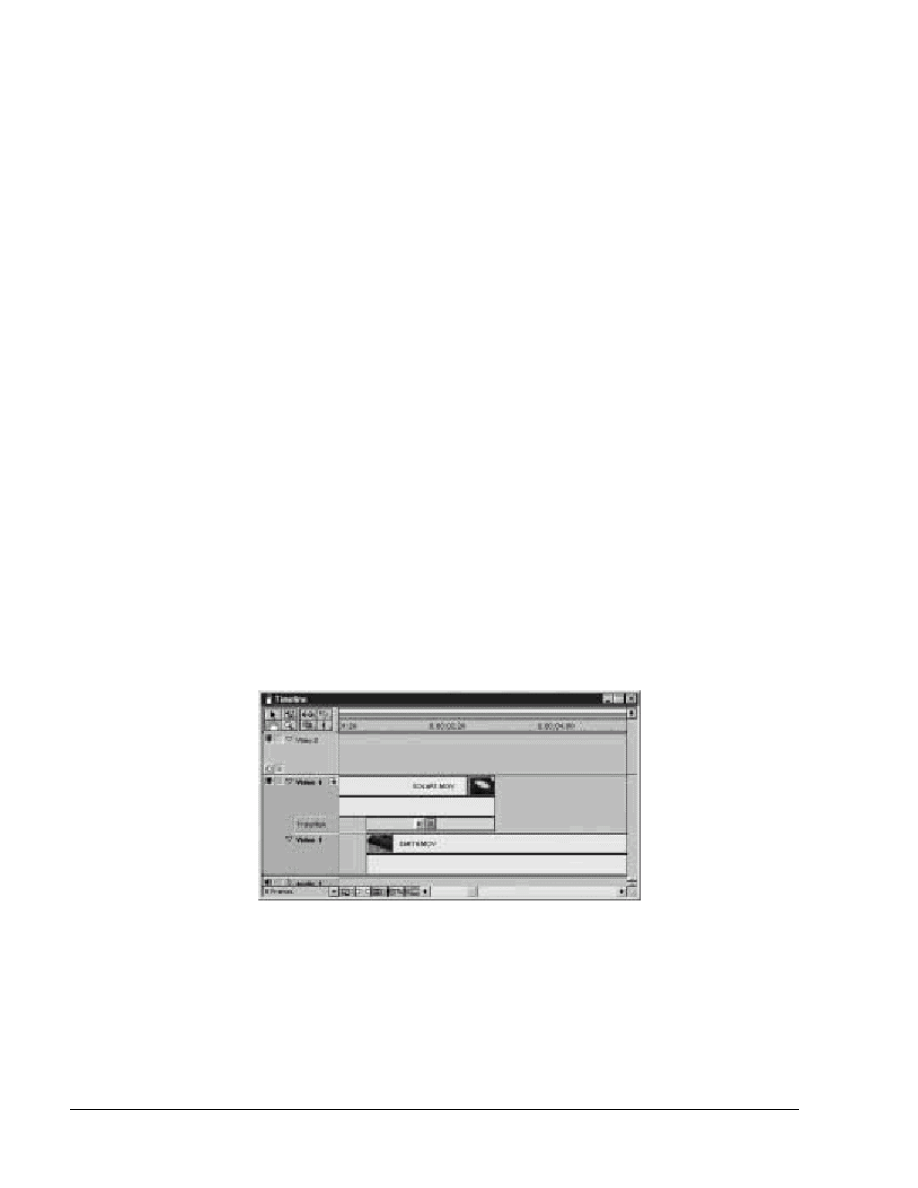
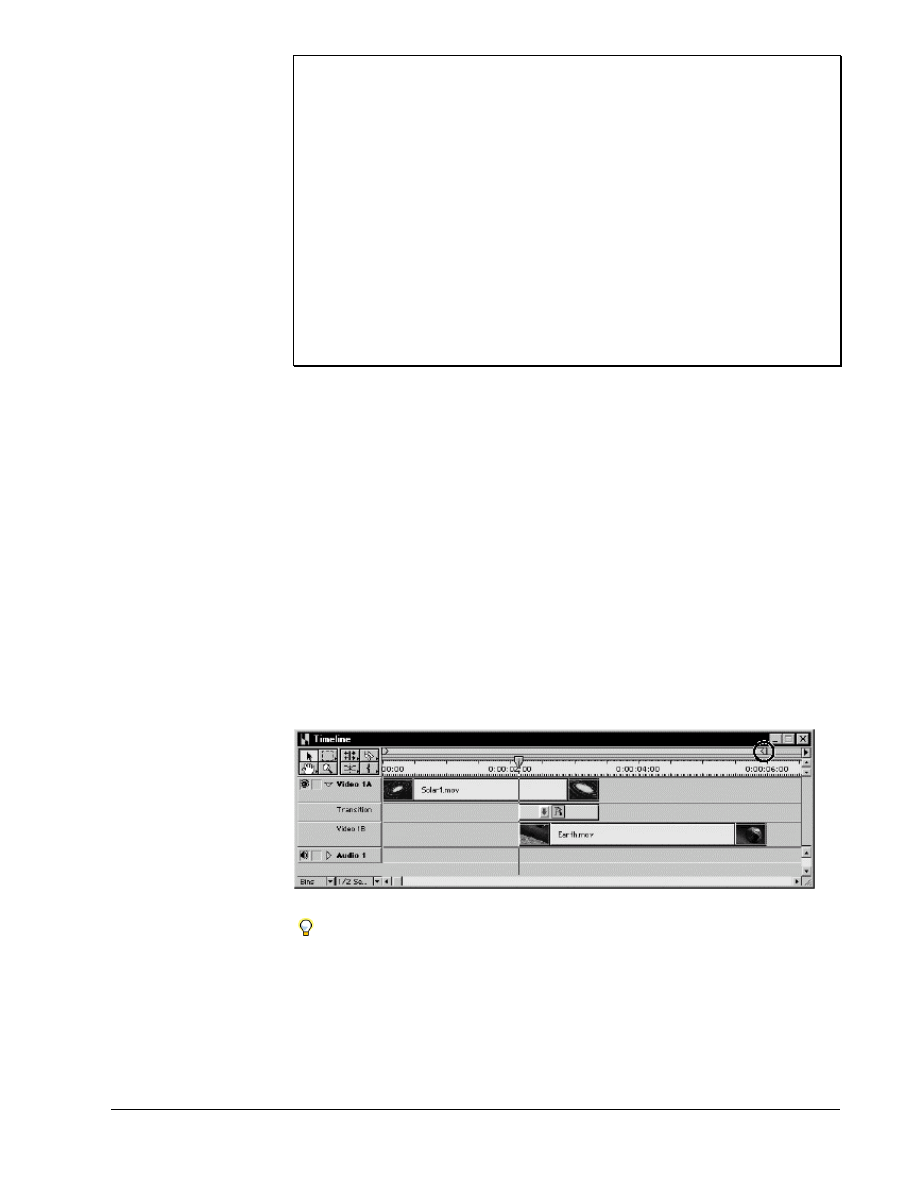
1. In the Timeline window, make sure the Video 1 track is expanded so that
it displays the Video 1 upper, the Transition, and the Video 1 lower
tracks. If it’s not expanded, click the Track Mode button ( ) to the right
of the Video 1 label.

Copyright
2002, Adobe Systems, Inc.
Fundamentals of Web Design 1.2—Lab 8.7.14a
1-5
To make your clips a little easier to see in the Timeline, you’ll change the view.
2. Click the title bar of the Timeline window to make it active. Choose
Window > Window Options > Timeline Window Options. Select the
medium sized icon size. Click OK.
3. In the lower left corner of the Timeline window, choose 1/2 Second from
the Time Zoom level pop-up menu.
4. Drag Solar1.mov from the Project window to the Video1 track in the
Timeline window, placing its In Point at the very beginning of the time
line.
Now you’ll overlap the beginning of the Earth.mov clip with the end of the
Solar1.mov clip.
5. Drag Earth.mov into the Video 1 lower track, snapping its In Point to the
Out Point of Solar1.mov.
6. Make sure the Timeline window is selected. Choose > Timeline > Apply
Default Transition.
1-6
Fundamentals of Web Design 1.2—-Lab 8.7.14a
Copyright
2002, Adobe Systems, Inc.
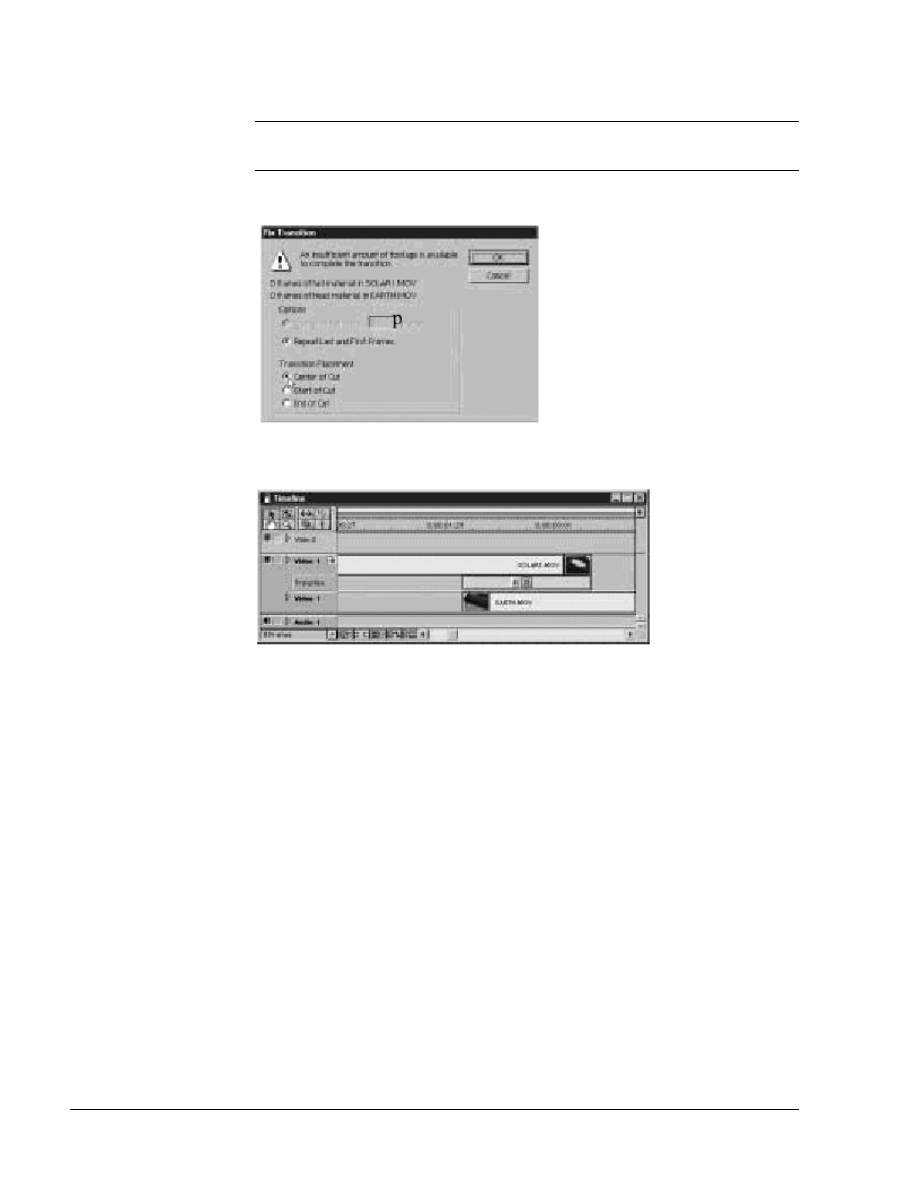
Premiere places the transition between the two clips, automatically sizing it to the
duration of the overlapping area.
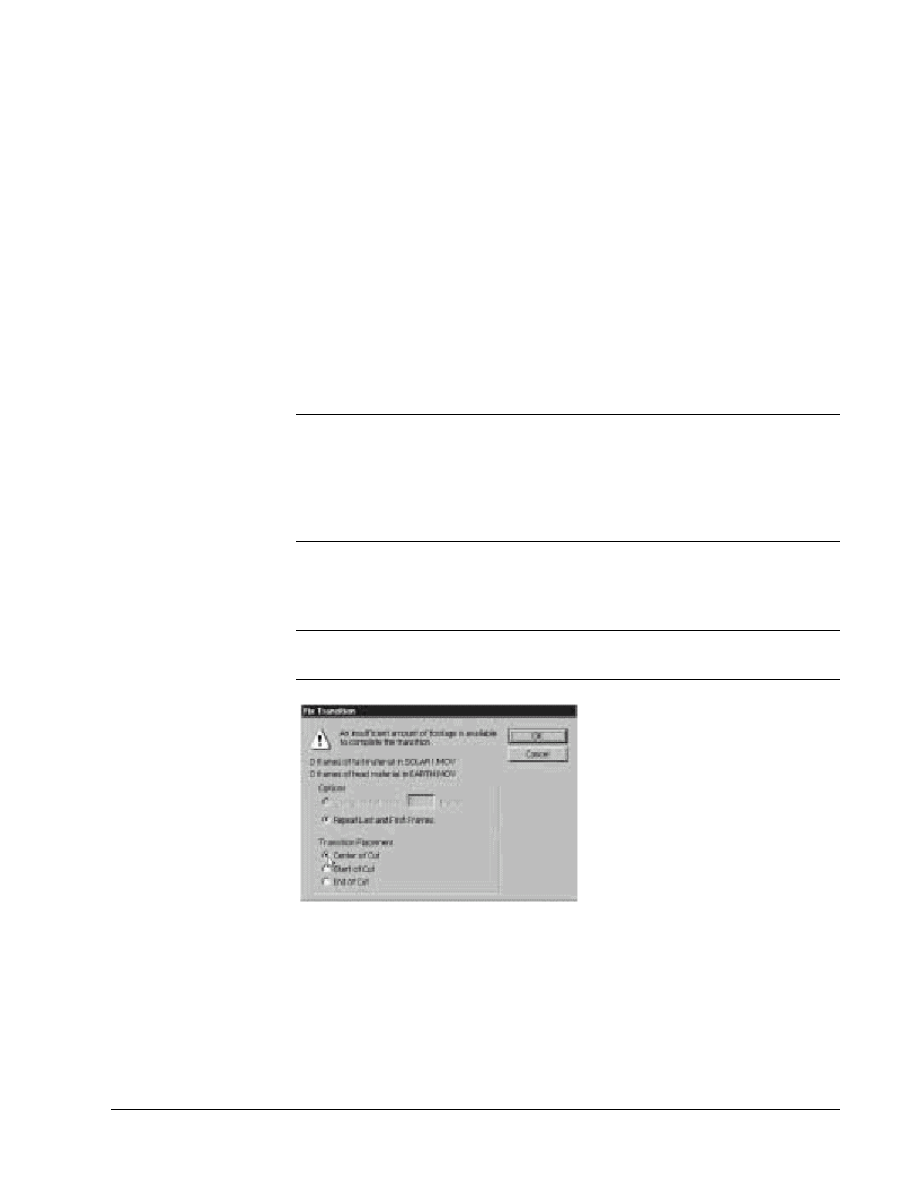
Note If insufficient frames are available, the Fix Transition dialog box appears. Click
OK.
You’ll view the transition in place and see that the clips overlap.
7. Choose File > Save.
Adding the Cross Dissolve transition
In this lab, you’ll see how this is done manually.
1. Here is where you will complete the balance of the Lab in A/B Editing.
In the upper right corner of the Timeline window, click the small black
arrow and select (check) A/B Editing.
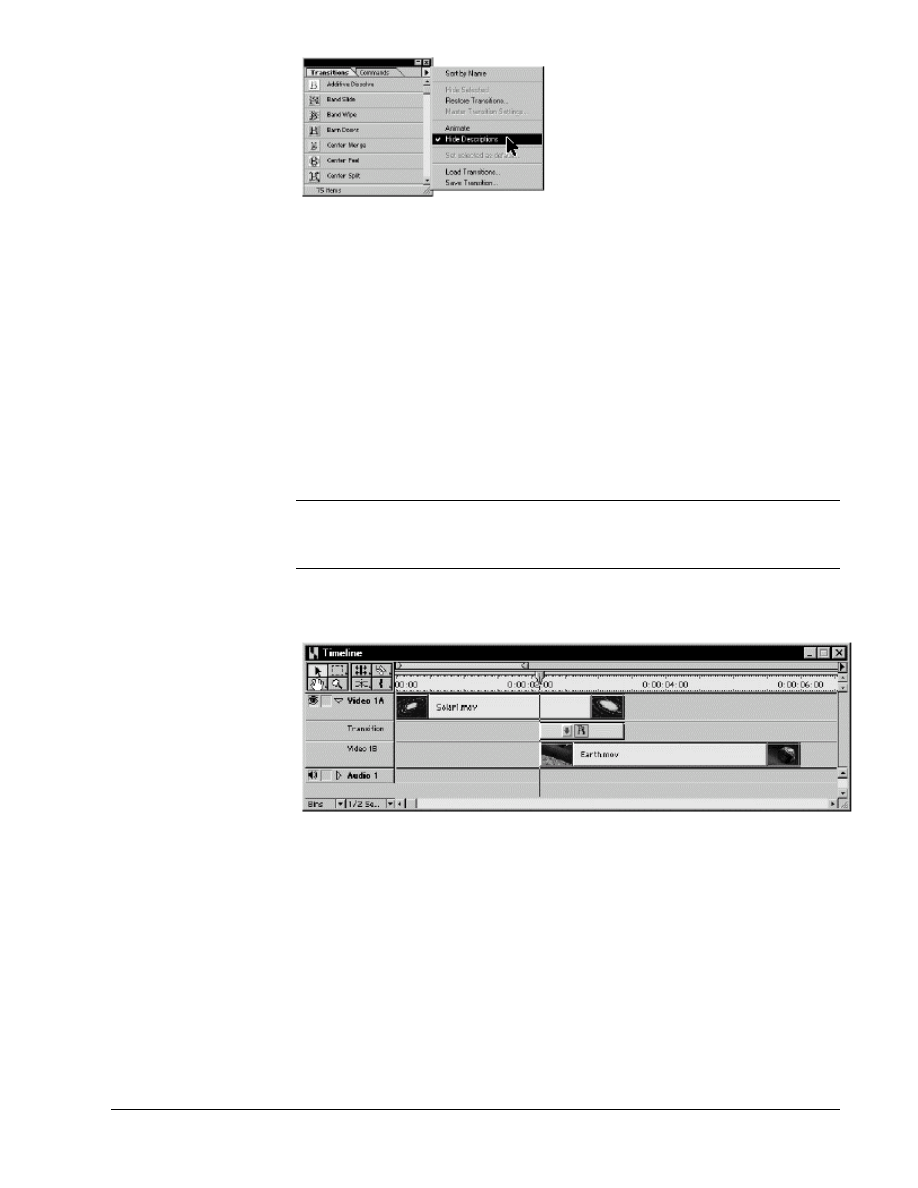
2. If the Transitions palette is not open, choose Windows > Show
Transitions.
Each transition is represented by an icon next to the transition name.
3. In the upper right corner of the Transitions palette, click the small black
arrow and select (check) Show Hidden in the menu to show all hidden
transitions.
Copyright
2002, Adobe Systems, Inc.
Fundamentals of Web Design 1.2—Lab 8.7.14a
1-7
The icons in the palette are shown at a larger size.
3. Click the black arrow again and this time choose Animate from the
menu.
The icons for each transition are now animated, showing you more precisely how
the transitions work.
4. Click the triangle next to the Dissolve folder to expand the folder. The
available Dissolve transitions appear.
5. Scroll down to the Cross Dissolve transition in the Dissolve folder of the
Transitions palette. Drag it into the Transition track of the Timeline
window in the area where the two clips overlap.
Note If you want to view a description of a transition, display the Info palette. Choose
Window > Show Info. Select the transition in the Transitions palette. The
description appears in the Info palette.
7. Premiere places the transition between the two clips, automatically sizing
it to the duration of the overlapping area, which is 1 second.
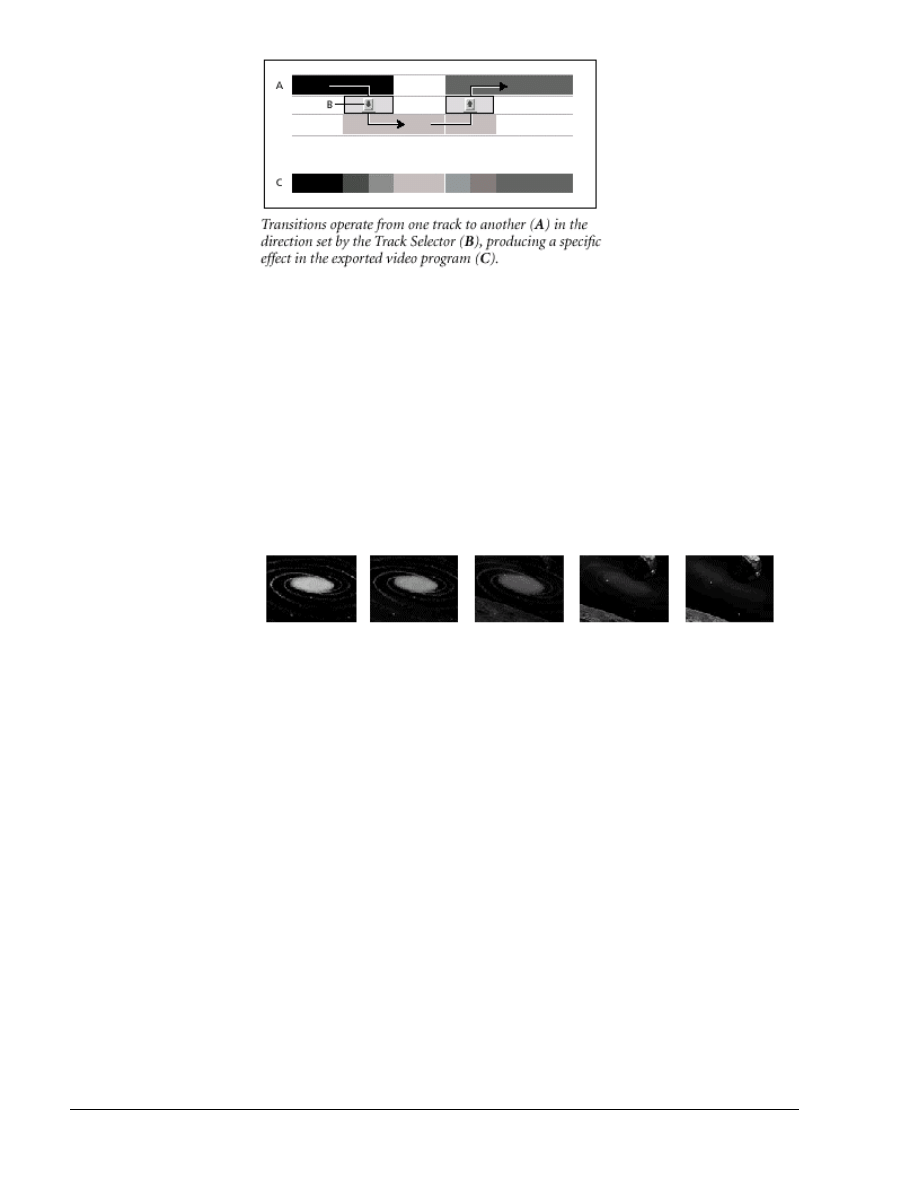
The arrow button (called the Track Selector) in the transition icon is used to set
the direction of the transition (from Video 1A to Video 1B, or from Video 1B to
Video 1A).
1-8
Fundamentals of Web Design 1.2—-Lab 8.7.14a
Copyright
2002, Adobe Systems, Inc.
In most cases, Premiere sets the direction of the transition automatically, and you
won’t have to worry about it. Later in this lab, you’ll use the Track Selector and
other controls to modify transitions.
To preview transitions (and other effects) by scrubbing (dragging) in the
Timeline ruler, you need to hold down a modifier key. Otherwise, Premiere
previews only the video clips, without any transitions or effects.
6. Hold down the Alt key (Windows) or the Option key (Mac OS) and then
scrub in the Timeline ruler to move the edit line across the transition.
Note that the pointer has changed into a smaller arrow, indicating that
you are previewing effects. The preview plays in the Program view of
the Monitor window.
7. Save the project.
Copyright
2002, Adobe Systems, Inc.
Fundamentals of Web Design 1.2—Lab 8.7.14a
1-9
Using the Transitions palette
Premiere includes over 75 transitions, which you choose from the Transitions
palette. Within the palette, transitions are organized by type, in folders. Each
transition is represented by an icon depicting how it works, where A is the first
clip and B is the second. To help you choose, you can animate these icons and
view brief descriptions. In addition, you can preview the transition effect with
actual frames from the two clips involved in the transition. You can also
customize the Transitions palette to group transitions together in folders or hide
transitions that you don't use often. The changes you make to a palette affect all
projects.
For more information about using the transitions palette, see Chapter 4,
“Adding Transitions,” in the Adobe Premiere 6.0 User Guide.
–From the Adobe Premiere User Guide, Chapter 4
Previewing the transition at the intended frame rate
So far, you have used two preview methods: clicking the Play button in the
Program view and scrubbing in the Timeline ruler. The Play button, however, is
intended for previews of only the video clips; transitions (and other effects) are
not shown, as this would take too long to process.
Holding down the modifier key and scrubbing in the Timeline ruler does display
the transition but cannot give you a precise speed. To preview transitions (and
other effects) at the intended frame rate, you need to use a third method that
generates a preview file on your hard disk. Premiere then plays this file in the
Program view of the Monitor window.
Before you generate a preview in this way, however, you need to set the work
area bar. This bar specifies the portion of your project that you want to preview
or export as a movie file.
1. Drag the arrow on the right end of the work area bar to cover the
Solar1.mov and Earth.mov clips.
To make the work area bar cover all contiguous clips, press Alt (Windows) or
Option (Mac OS) as you click the work area bar.
2. Choose Project > Preview, or press Enter (Windows) or Return (Mac
OS) on the keyboard.
Premiere generates the preview, displaying a status bar. When it has finished, the
two clips and the transition between them are played in the Program view.

1-10
Fundamentals of Web Design 1.2—-Lab 8.7.14a
Copyright
2002, Adobe Systems, Inc.
About Preview Options
When you want to preview edits, transitions, and effects at the final playback
speed choose to preview To Disk. When To Disk is selected, Premiere renders the
preview to the hard disk.
•
To enable Preview To Screen, choose Project > Project Settings > Keyframe
and Rendering. Then for Preview (under Rendering Options), choose To Disk
and click OK.
When you render a preview with the Preview From RAM selected, Premiere
stores and processes the selected frames in RAM, instead of writing them to the
disk and reading them back. When From RAM is selected, Premiere creates a
preview by displaying frames as they are rendered. Because frames are rendered
in RAM, this process depends on the amount of RAM available. If sufficient RAM
is not available or if the frame rate, frame size, or effects used require more RAM
than is available, frames may be dropped during playback, or Premiere may
render the preview to disk instead.
•
To enable Preview from RAM, choose Project > Project Settings > Keyframe
and Rendering. Then for Preview (under Rendering Options), choose From RAM
and click OK.
When you want to preview edits, transitions, and effects but don't care if the
preview is at final playback speed, choose to preview To Screen. When To Screen
is selected, Premiere renders directly to the screen as quickly as possible. The
playback speed depends on image size and resolution, the number and
complexity of effects and transitions, and the processing speed of your system.
This option is not recommended for previewing areas that include many effects.
•
To enable Preview To Screen, choose Project > Project Settings > Keyframe
and Rendering. Then for Preview (under Rendering Options), choose To Screen
and click OK.
–From the Adobe Premiere User Guide, Chapter 3
Replacing a transition
You can replace a transition by simply dropping a new transition on top of the
old one. When you replace a transition, the alignment and duration are preserved.
The settings for the old transition are discarded and replaced by the default
settings for the new transition, or by the master transition settings if you have set
them in the Transitions palette.
To create a transition in Single-Track Editing mode, Premiere either uses the
extra frames available for the clips (extra frames are created by trimming a clip),
or repeats frames at the beginning or ending of the clips. Frames that you have
trimmed out of the program (by setting new In or Out points, or using the trim,
ripple edit, or rolling edit tools) are used to create a transition.
The frames trimmed from the beginning of a clip are called head material. The
frames trimmed from the end of a clip are called tail material. If insufficient head
or tail material is present when applying a transition, Premiere displays a Fix
Transition dialog box in which you can choose to change the duration of the
Copyright
2002, Adobe Systems, Inc.
Fundamentals of Web Design 1.2—Lab 8.7.14a
1-11
transition, change the transition's alignment, or repeat the first and last frames of
the clip and use those frames for the transition.
1. If the Transitions palette is not open, choose Window > Show
Transitions. Each transition is represented by an icon next to the
transition name.
2. In the upper right corner of the Transitions palette, click the small black
arrow and select (check) Show Hidden in the menu to show all hidden
transitions
3. Click the triangle next to the 3D Motion folder to expand the folder. The
available 3D Motion transitions appear.
4. Scroll down to the Cube Spin transition in the 3D Motion folder of the
Transitions palette, and then drag it into the Transition track of the
Timeline window, in the area where the Solar1.mov and Earth.mov clips
overlap. The overlapping area is highlighted as the pointer moves over
the meeting point.
Note If the two adjacent clips in the Timeline window do not already have extra frames
that you can use for the transition, trim the Out point of the first by half the number
of frames that will be used in the transition and the In point of the second by half
the number of frames that will be used in the transition. (For example, for a 10
frame transition, trim the In and Out points by 5 frames each.) Remove the
resulting gap by selecting it and choosing Timeline > Ripple Delete.
5. Premiere places the transition between the two clips, automatically sizing
it to the duration of the overlapping area.
Note If insufficient frames are available, the Fix Transition dialog box appears. Click
OK.
6. Click the triangle next to the Dissolve folder to expand the folder. The
available Dissolve transitions appear.
7. Scroll down to the Random Invert transition in the Dissolve folder of the
Transitions palette, and then drag it into the Transition track of the
Timeline window, in the area where the Solar1.mov and Earth.mov clips
overlap.
1-12
Fundamentals of Web Design 1.2—-Lab 8.7.14a
Copyright
2002, Adobe Systems, Inc.
8. Drag the Random Invert transition from the Transitions palette onto the
existing Cube Spin transition in the Timeline window.
9. Generate a preview with the two clips and the replaced transition
between them.
For more information about replacing a transition, see Chapter 4, “Adding
Transitions,” in the Adobe Premiere 6.0 User Guide.
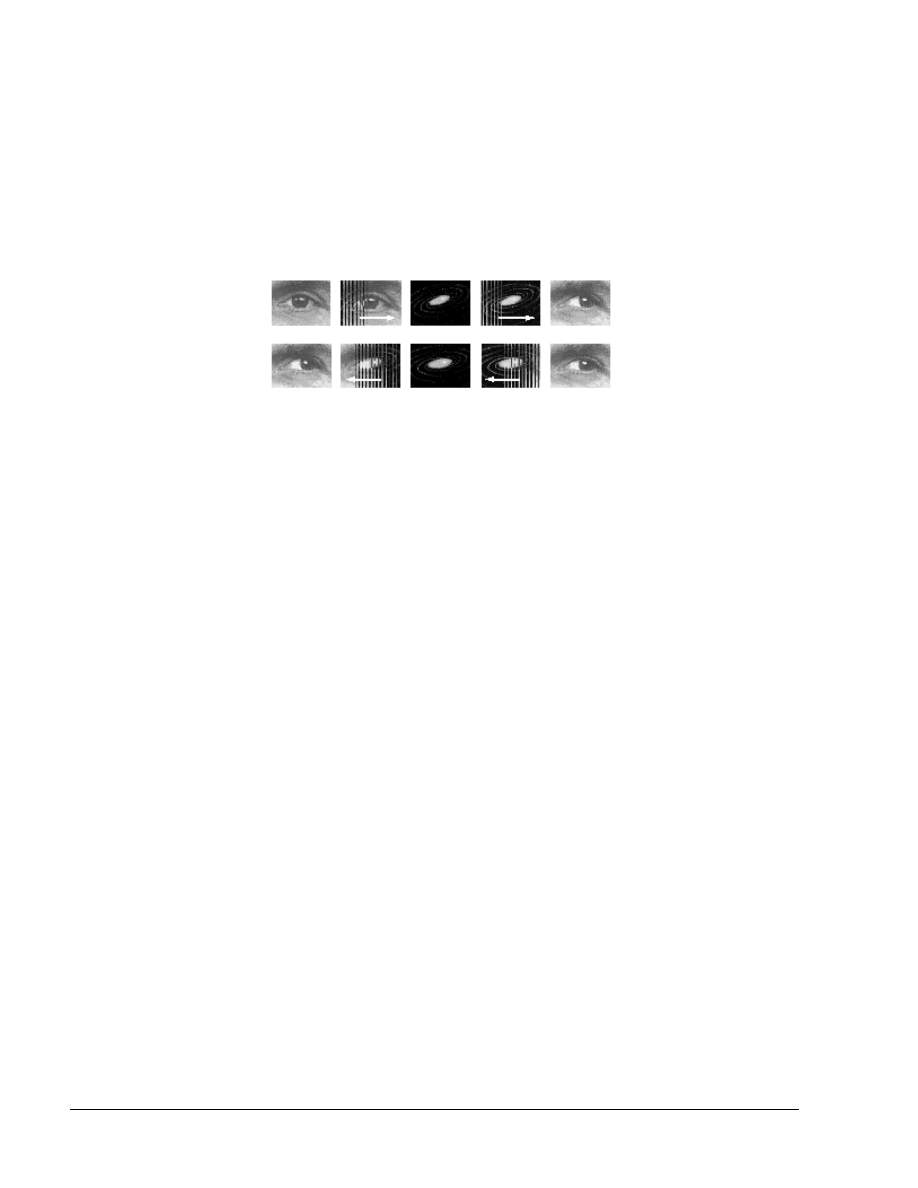
Adding the Cross Zoom transition
Now you’ll add a third clip (Eye.mov) and use the Cross Zoom transition, which
zooms into one clip and zooms out of the other. Here, the Cross Zoom transition
zooms into the end of the Earth.mov clip and then zooms out at the start of the
Eye.mov clip.
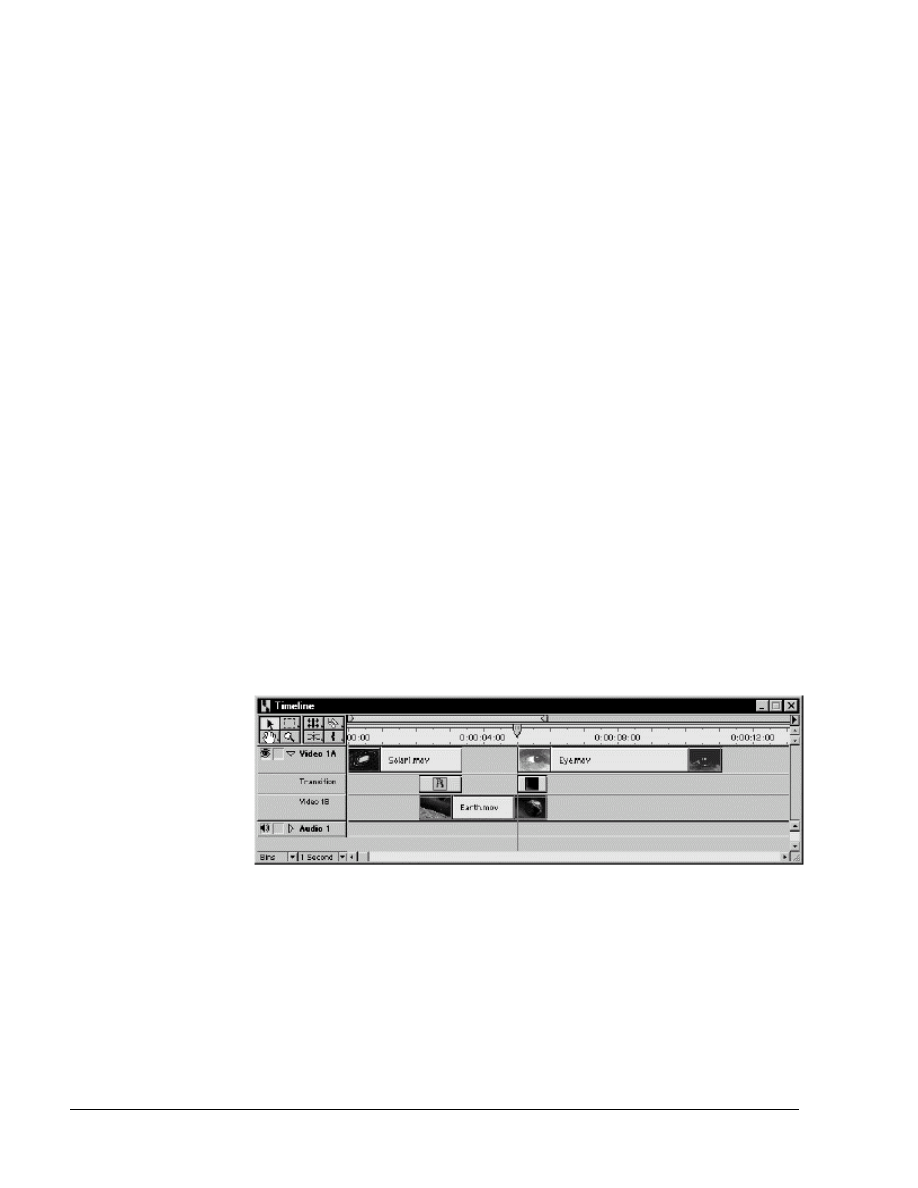
1. From the Time Units pop-up menu in the Timeline window, choose 1
Second.
2. Underneath the Program view of the Monitor window, drag the shuttle
slider until the location timecode reads 05:04.
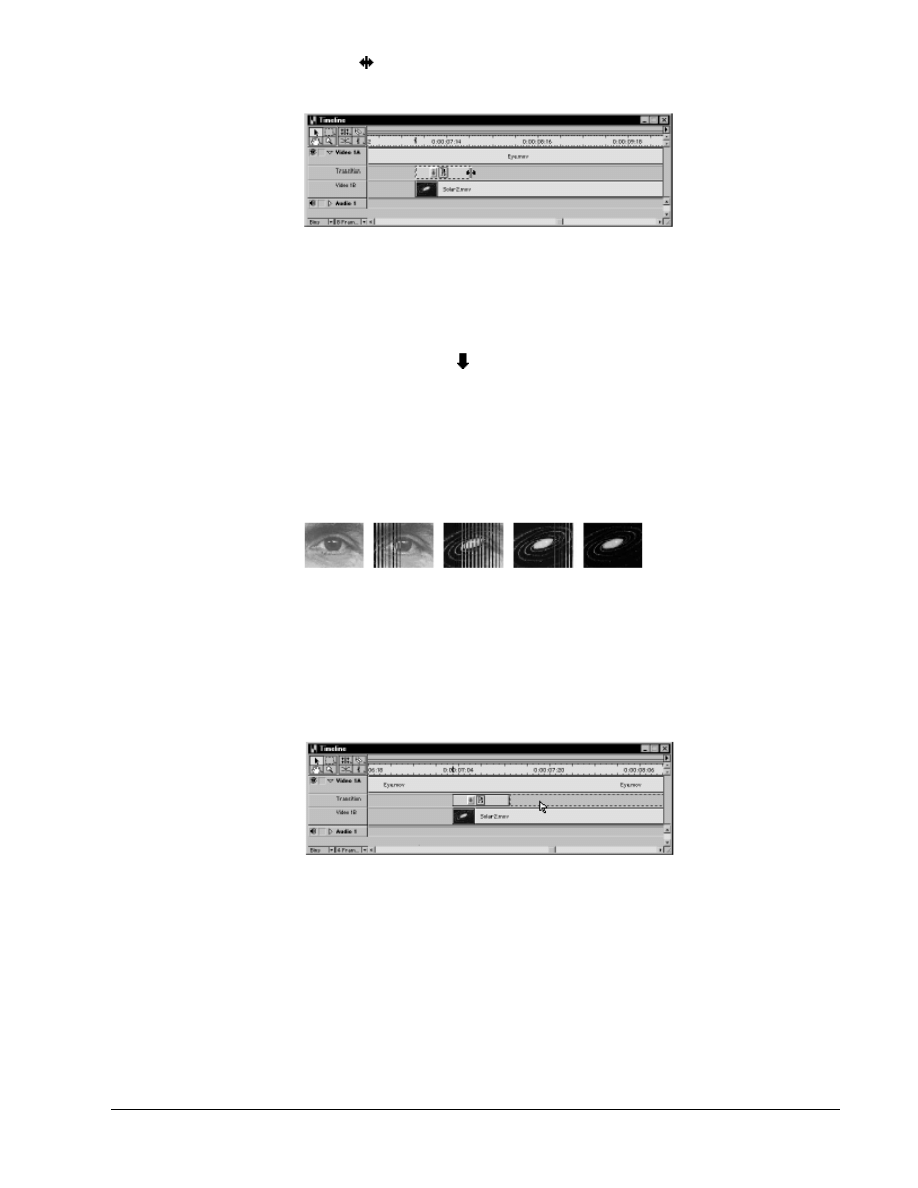
3. From the Project window, drag the Eye.mov clip into the Video 1A
track, snapping its In point to the edit line.
The Earth.mov and Eye.mov clips now overlap for a duration of about 1 second.
4. In the Transitions palette, scroll down to the Zoom folder and click the
triangle next to the Zoom folder to expand the folder. The available
Zoom transitions appear.
5. Drag the Cross Zoom transition into the Transition track, in the area
where the Earth.mov and Eye.mov clips overlap.
6. Note: If you want to view a description of a transition, display the Info
palette choose Window>Show Info. Then select the transition in the
Transitions palette. The description appears in the Info palette.
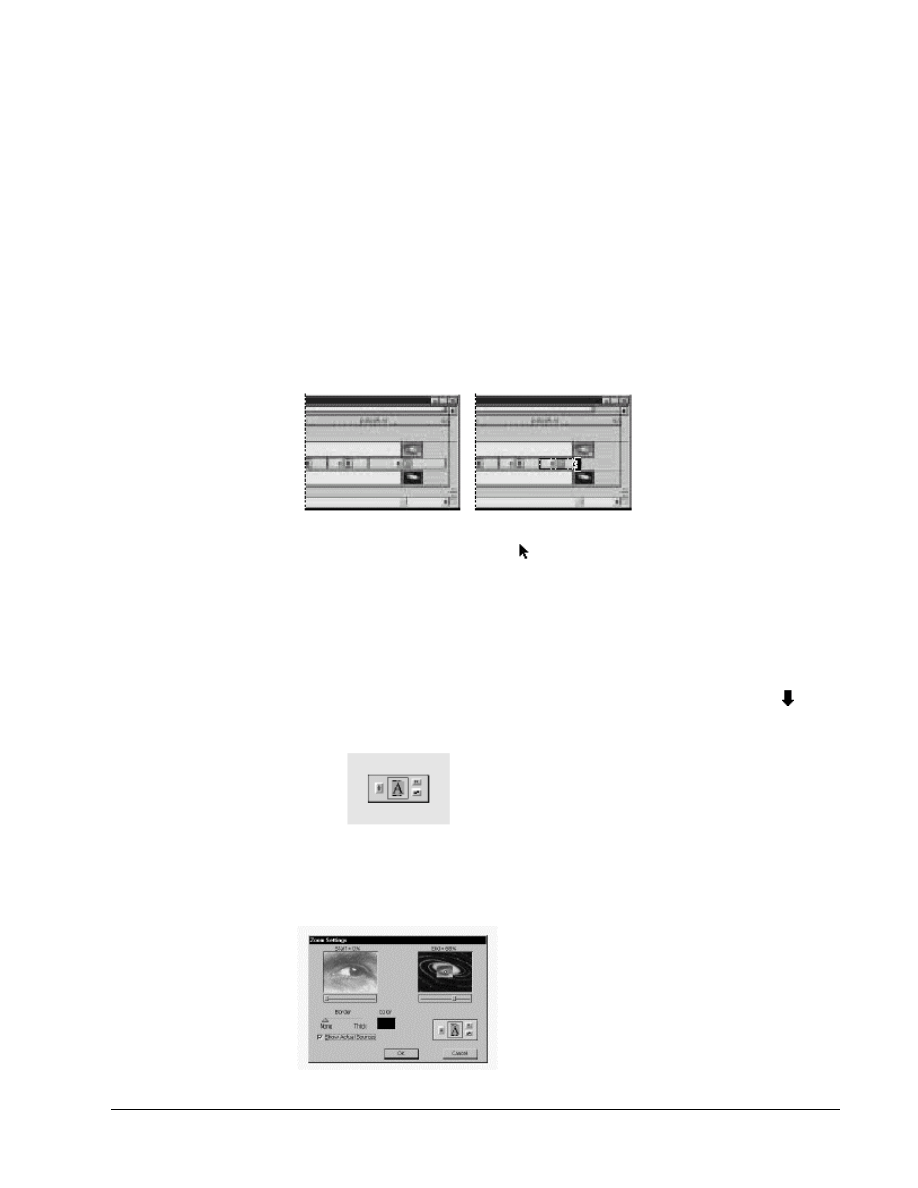
This time, you’ll modify the transition somewhat.
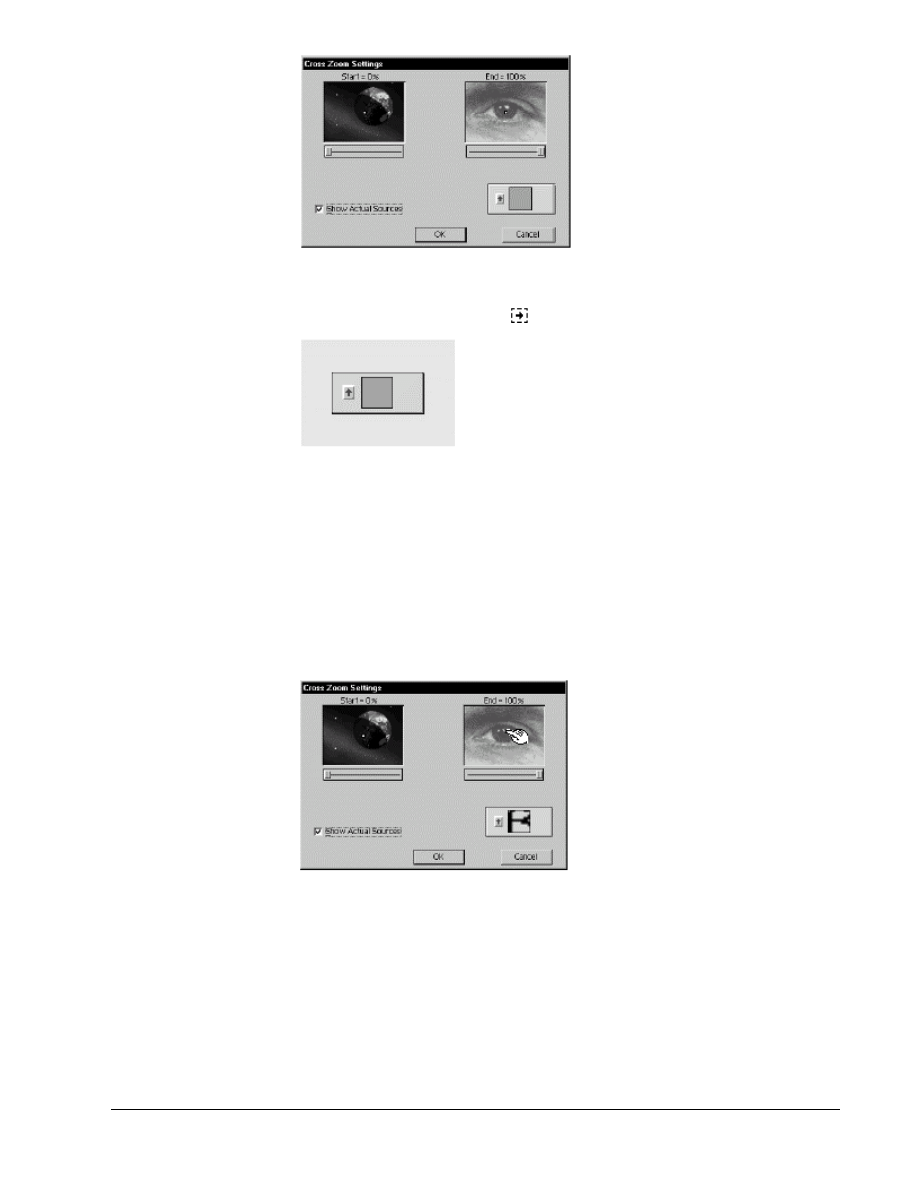
7. In the Timeline window, double-click the transition you just placed to
open the Cross Zoom Settings dialog box.
8. Select the Show Actual Sources option.
Copyright
2002, Adobe Systems, Inc.
Fundamentals of Web Design 1.2—Lab 8.7.14a
1-13
9. Leave the Start and End settings as they are, and make sure the Track
Selector is pointing up ( ).
When the arrow points up, the transition will start zooming into the clip in the
Video 1B track (Earth.mov), and then zoom out of the clip in the Video 1A track
(Eye.mov), ending with the eye.
This transition also lets you specify the location in each clip where the zoom
begins. You’ll specify that now.
10. In the End view, drag the small white square from the center of the
image into the reflection in the upper right of the pupil of the eye.
This square determines where the zoom ends.
11. In the Start view, drag the white square to approximately the same
position as in the End view.
12. Click OK.
13. Preview the Cross Zoom transition by scrubbing in the Timeline ruler
while holding down the Alt key (Windows) or the Option key (Mac OS).
If you like, you can also generate a preview at the precise frame rate by setting
the work area to cover the new transition and pressing Enter (Windows) or
Return (Mac OS).

1-14
Fundamentals of Web Design 1.2—-Lab 8.7.14a
Copyright
2002, Adobe Systems, Inc.
Adding multiple transitions
To create other effects, you can place two or more transitions together. You’ll do
this now to give the last clip in the sequence a dream-like quality.
1. Drag the edit line to the end of the Eye.mov clip.
2. From the Project window, drag the Solar2.mov clip into the Video 1B
track, snapping its Out point to the edit line marked by the edit line.
Before you place the transition, take a look at both clips to see what they look
like individually.
3. Double-click the Eye.mov clip in the Timeline window so that it appears
in the Source view. Then click the Source view Play button.
4. Do the same for the Solar2.mov clip.
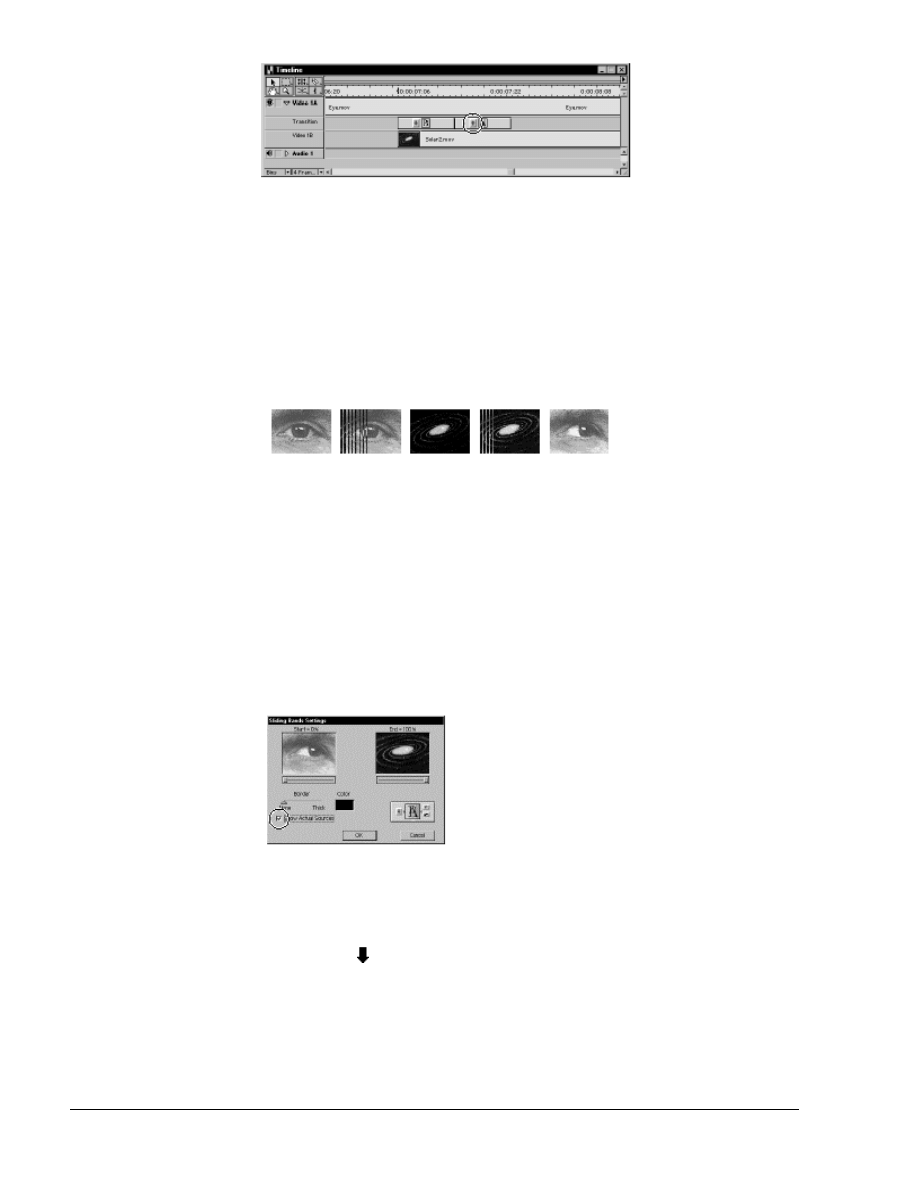
5. From the Transitions palette, drag the Sliding Bands transition into the
Transition track, between the Eye.mov and Solar2.mov clips, so that it
snaps to the beginning of the Solar2.mov clip.
You’ll now shorten this transition so you can add others to the same overlapping
area. First, let’s change our view of the transition area.
6. From the Time Units pop-up menu in the Timeline window, choose 8
Frames. This will make it easier to precisely resize the transition you just
placed. Scroll the Timeline until you can see the transition you just
added.
7. If the Info palette is not visible, choose Window > Show Info.
8. Select the selection tool ( ) (if necessary) and position it on the right
edge of the Sliding Bands transition so that it turns into a trim pointer
Copyright
2002, Adobe Systems, Inc.
Fundamentals of Web Design 1.2—Lab 8.7.14a
1-15
( ). Now drag the edge until the Cursor At display in the Info palette
reads 7:20.
9. From the Time Units pop-up menu in the Timeline window, choose 4
Frames. Drag the scroll bar in the Timeline window so that the Sliding
Bands transition is visible again.
10. Make sure the Track Selector in the Sliding Bands transition icon is
pointing down ( ). If it isn’t, click it.
The transition begins with the Eye.mov clip and ends with Solar2.mov clip. Let’s
preview this.
11. Hold down the Alt key (Windows) or the Option key (Mac OS) and
scrub in the ruler across the Sliding Bands transition.
Copying transitions
Now you’ll duplicate three more versions of the Sliding Bands transition to
create a longer and more varied effect.
1. In the Timeline window, select the Sliding Bands transition and choose
Edit > Copy.
2. Click in the Transition track just after the Sliding Bands transition,
selecting the empty area.
3. Choose Edit > Paste.
A copy of the same transition appears just after the first.
4. In the copy, click the Track Selector to make the arrow point upward.
This creates a transition that moves from the Video 1B track to the Video
1A track.
1-16
Fundamentals of Web Design 1.2—-Lab 8.7.14a
Copyright
2002, Adobe Systems, Inc.
Now let’s preview what you’ve done.
5. In the Timeline window, hold down the Alt key (Windows) or the
Option key (Mac OS) and scrub in the Timeline ruler across the two
copies of the Sliding Bands transition.
In the first one, the transition starts with the Eye.mov clip and ends with the
Solar2.mov clip. In the second, it begins with the Solar2.mov clip and ends with
Eye.mov. As viewed in the Timeline window, therefore, the transitions follow
the direction specified by the Track Selector arrows.
Reversing the bands
Now you’ll create two more copies of the same transition, but this time, you’ll
reverse the movement of the sliding bands, making them slide from right to left.
1. Click in the area of the Transition track just after the second Sliding
Bands transition. The empty area is now selected.
2. Choose Edit > Paste.
The Sliding Bands transition that you previously copied is pasted into the track.
3. Double-click this copy to open the Sliding Bands Settings dialog box.
4. Select the Show Actual Sources option.
Since the previous Sliding Bands transition finished with the Eye.mov clip, you
want this one to finish with the Solar2.mov clip.
5. Make sure the Track Selector to the left of the animating icon is pointing
down ( ).
6. To reverse the movement of the sliding bands, click the Forward/Reverse
Selector to the right of the animating icon.
The F (forward) changes into an R (reverse), and the animating icon shows the
bands moving in the opposite direction.
Copyright
2002, Adobe Systems, Inc.
Fundamentals of Web Design 1.2—Lab 8.7.14a
1-17
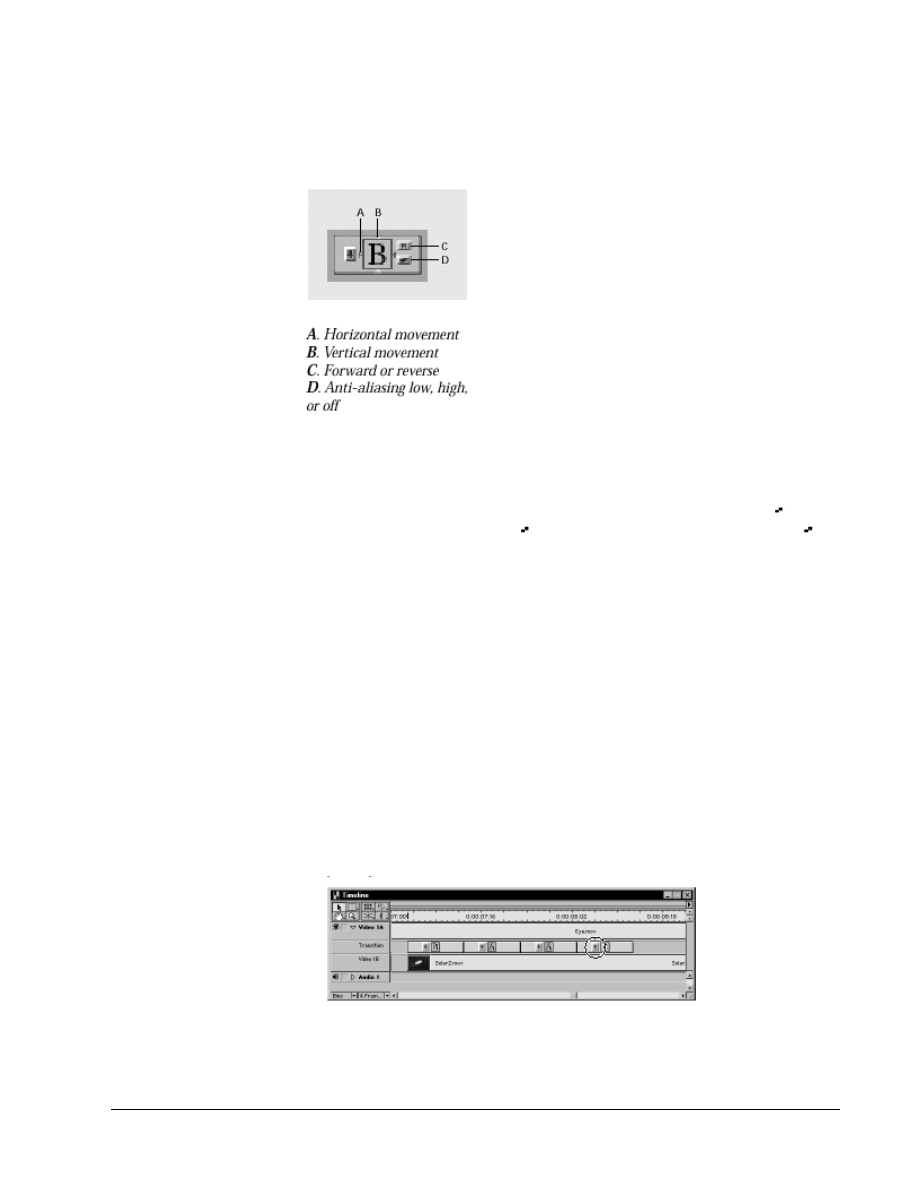
You’ll notice a couple of Os near the animating icon. Surrounding the icon itself
are four triangles, called Edge Selectors; two are red and two are white. Clicking
the Edge Selectors sets the orientation of the sliding bands. The Edge Selectors
on the left and right sides of the icon, which are red, specify that the sliding
bands move horizontally. Those on the top and bottom specify vertical
movement. The red ones are selected.
Below the Forward/Reverse Selector is another button. This controls whether the
transition uses anti-aliasing or not. Anti-aliasing blends the edges of the bands,
smoothing the hard edges. Anti-aliasing is turned off when you see the ( ) icon;
it’s set to Low when you see the ( ) icon. It’s set to High when you see the ( )
icon. You’ll leave it off.
These controls are available for only certain transitions.
7. In the Setting dialog box, click OK.
Finally, to repeat the Sliding Bands to mirror the first two, you’ll copy and paste
it one more time.
8. The third version of the Sliding Bands transition (the one you just
modified) should still be selected. If it isn’t, select it. Then choose Edit >
Copy.
9. Select the empty area in the Transition track after the third transition,
then choose Edit > Paste.
Another copy of the transition appears in the Transition track.
10. In the Timeline window, click the Track Selector in the transition icon so
that it points up.
1-18
Fundamentals of Web Design 1.2—-Lab 8.7.14a
Copyright
2002, Adobe Systems, Inc.
Let’s briefly look at what you’ve done. You’ve created four copies of the same
transition, alternating its direction—down, up, down, up—and changing the
motion of the bands for the second two. Let’s preview it at the precise frame rate.
11. From the Time Zoom Level pop-up menu in the Timeline window,
choose 1 Second. This will make it easier to find the work area bar.
12. Drag either end of the work area bar to cover the entire length of the
Solar2.mov and Eye.mov clips, then press Enter (Windows) or Return
(Mac OS).
13. Premiere generates the preview and then plays it in the Program view.
14. To watch it again, press Enter (Windows) or Return (Mac OS).
Since Premiere does not need to generate it again, the preview plays in the
Program view immediately.
15. Save the project.

Copyright
2002, Adobe Systems, Inc.
Fundamentals of Web Design 1.2—Lab 8.7.14a
1-19
Specifying and adding a default transition
The default transition can be applied quickly, without stopping to open the
Transitions palette and drag the transition to the Timeline. Premiere
automatically uses Cross Dissolve as the default transition, as it is one of the
most commonly used transitions. If you frequently use another transition, you
can set it as the default.
To specify a default transition:
1.
Choose Window > Show Transitions.
2.
Select the transition that you want to make the default.
3.
From the Transitions palette menu, choose Set Selected as Default.
4.
Type the default duration for the transition. (You can later change the
duration, once the transition is added to the Timeline.)
5.
Choose the default alignment for the transitions added when using the Single-
Track Editing mode.
6.
Click OK. These settings remain in effect for all projects until you change them.
To add a default transition
1.
In Single-Track mode, make sure that the Video 1 track in the Timeline window
is collapsed, and then position two clips on the Video 1 track so that they meet.
2.
Position the edit line where the two clips meet or overlap.
3.
Click the Apply Default Transition
()
button in the Monitor window, or press
Ctrl+D (Windows) or Command+D (Mac OS). If extra frames are not available
at the In and Out points of the adjacent clips, the Fix Transitions dialog box
appears. If necessary, select options from this dialog box.
–From the Adobe Premiere User Guide, Chapter 4
Changing transition settings
You can change a number of settings for each transition, including the transition
direction, the start and end values, the border, and anti-aliasing. You can display
the Transition Settings dialog box and change settings common to many
transitions. In addition, settings specific to transitions are available by clicking
Custom in the Transition Settings dialog box.
1. Double-click any transition in the Timeline window or select the
transition and choose
Timeline > Transition Settings (for example, the Swing In transition is displayed
below).

1-20
Fundamentals of Web Design 1.2—-Lab 8.7.14a
Copyright
2002, Adobe Systems, Inc.
2 Adjust any of the following settings, and then click OK:
Note Some settings are not available on all transitions.
•
To see the starting and ending frames of the clips, select Show Actual Sources.
•
To change the initial and final appearance of the transition, use the Start and
End sliders. Hold down the Shift key to move the start and end sliders together.
•
To adjust the width of the optional border on the transition, drag the Border
slider.
•
To select a border color, click the color swatch, select a color from the color
selection window, and then click OK.
•
To specify which clip begins the transition, click the Track selector on the left
side of the transition's thumbnail to toggle back and forth starting with clip A (the
left clip) or clip B (the right clip). You can also click this selector from the
transition's thumbnail in the Timeline window if the thumbnail is large enough.
•
To change the orientation of the transition, click an Edge selector on the
transition's thumbnail. The Edge selectors are small triangles bordering the
transition icon.
•
To make the transition play forward or backward, click the Forward/Reverse
selector in the upper right corner of the transition's thumbnail.
•
To adjust the smoothness of the transition's edges, click the Anti-aliasing
selector in the lower right corner of the transition's thumbnail, clicking cycles
through the values Low, High, and Off.
•
To adjust the center point of the transition, drag the small box that appears in
the Start and End images. For example, the Iris Round transition can be centered
toward the side or corner of the image.
•
To change settings specific to the transition, click Custom. (Transitions without
additional controls do not include a Custom button.)
For more information, see Chapter 4, “Adding Transitions” in the Adobe
Premiere 6.0 User Guide.
Copyright
2002, Adobe Systems, Inc.
Fundamentals of Web Design 1.2—Lab 8.7.14a
1-21
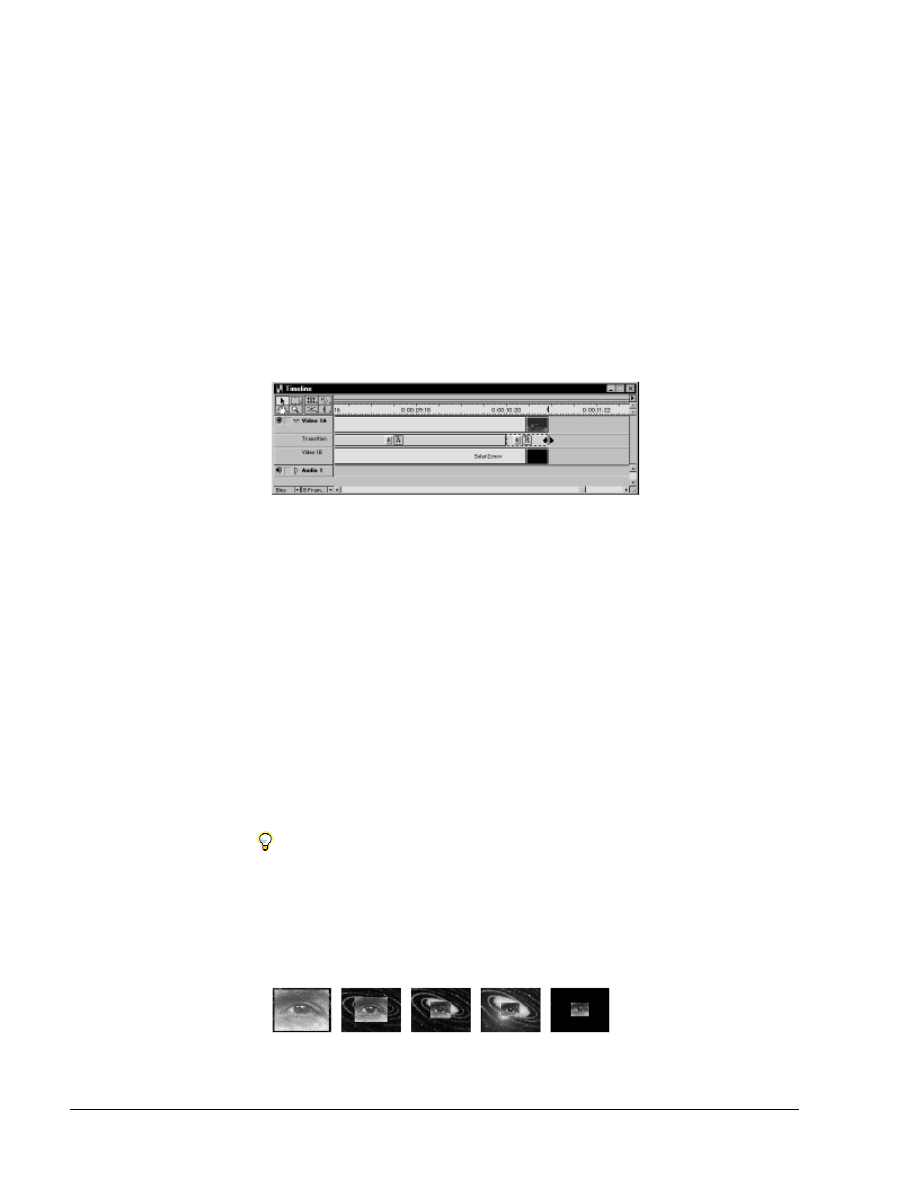
Adding the Zoom transition
To complete the project, you’ll add the Zoom transition, which works a little
differently from the Cross Zoom. While the Cross Zoom zooms on an element
within the clip, the Zoom transition zooms one entire clip into or out of the
second clip, playing both at the same time.You’ll use the Zoom transition to
create a centered inset of the eye (Eye.mov in Video 1A) inside the stars
(Solar2.mov in Video 1B).
1. From the Time Zoom level pop-up menu in the Timeline window,
choose 8 Frames. This will make it easier to work with the transition you
are about to add.
2. In the Transitions palette, drag down the Zoom folder and click the
triangle next to the Zoom folder to expand the folder. The available
Zoom transitions appear.
3. Drag the Zoom transition into the remaining overlapping area between
the Eye.mov and Solar2.mov clips.
4. Using the selection tool ( ), drag the right edge of the Zoom transition
so that it fills about 2/3 of the remaining overlap between the Eye.mov
and Solar2.mov clips.
5. In the Timeline window, double-click the Zoom transition.
6. In the Zoom Settings dialog box, select the Show Actual Sources option.
7. To make the Eye.mov clip shrink in size and play on top of the
Solar2.mov clip, make sure the Track Selector is pointing down ( ), and
click the Forward/Reverse Selector so that it is set to Reverse.
8. To shrink the Eye.mov clip, drag the slider below the End view to 68%.
The Eye.mov clip shrinks to 68% of its size, centered within the Solar2.clip.
1-22
Fundamentals of Web Design 1.2—-Lab 8.7.14a
Copyright
2002, Adobe Systems, Inc.
9. Click
OK.
Let’s preview it.
10. Hold down the Alt key or the Option key and drag in the ruler across the
Zoom transition.
The project currently ends as soon as the eye reaches 68%. To finish our project,
we’ll hold the eye at the end of the zoom as an inset within the stars. To do this,
you need to create another version of the Zoom transition, keeping the Start and
End percentages the same.
11. From the Transitions palette, drag the Zoom transition into the remaining
overlapping area between the Eye.mov and Solar2.mov clips.
12. If the right edge of the second Zoom transition does not quite match the
Out point of both the Eye.mov and Solar2.mov clips, drag it to the left or
right until it does.
13. Double-click the second Zoom transition to open the Zoom Settings
dialog box.
14. If you like, select the Show Actual Sources option.
15. Make sure the Track Selector is pointing down, and click the
Forward/Reverse Selector so that it is set to Reverse.
16. Drag the slider underneath the Start view to 68%.
17. Setting the Start value to 68% continues the inset from the previous
instance of the Zoom transition.
18. Drag the slider underneath the End view to 68%.
Setting the End to 68% keeps the Eye.mov clip at its current size as an inset,
while both it and the Solar2.mov clip continue to play for about another second.
Keep the other settings the same.
To set the Start value and the End value to the same setting in the Zoom
Settings dialog box, press and hold the Shift key and then drag either slider.
19. Click OK.
20. To preview the end of the project, hold down the Alt key or the Option
key and scrub in the Timeline ruler across the final portion.
Copyright
2002, Adobe Systems, Inc.
Fundamentals of Web Design 1.2—Lab 8.7.14a
1-23
Alt/Option-scrubbing in the Timeline ruler gives a quick preview of your work
but is not time accurate. For a more accurate look at your work, let’s generate a
preview of the entire project.
21. Extend the work area bar to cover the entire duration of the project and
press Enter (Windows) or Return (Mac OS).
Exporting the movie
1. Click anywhere in the Timeline window to make it active. This ensures
that Premiere exports the entire project. If the Monitor window and the
Source view are selected instead of the Timeline window, Premiere will
export only the clip displayed in the Source view.
2. Choose File > Export > Movie.
Note For more information about exporting to a Web plug-in (File > Export Timeline >
Save for Web, Advanced Windows Media, or Advanced RealMedia Export), see
Lab 8.7.14b, “Creating a Title”.
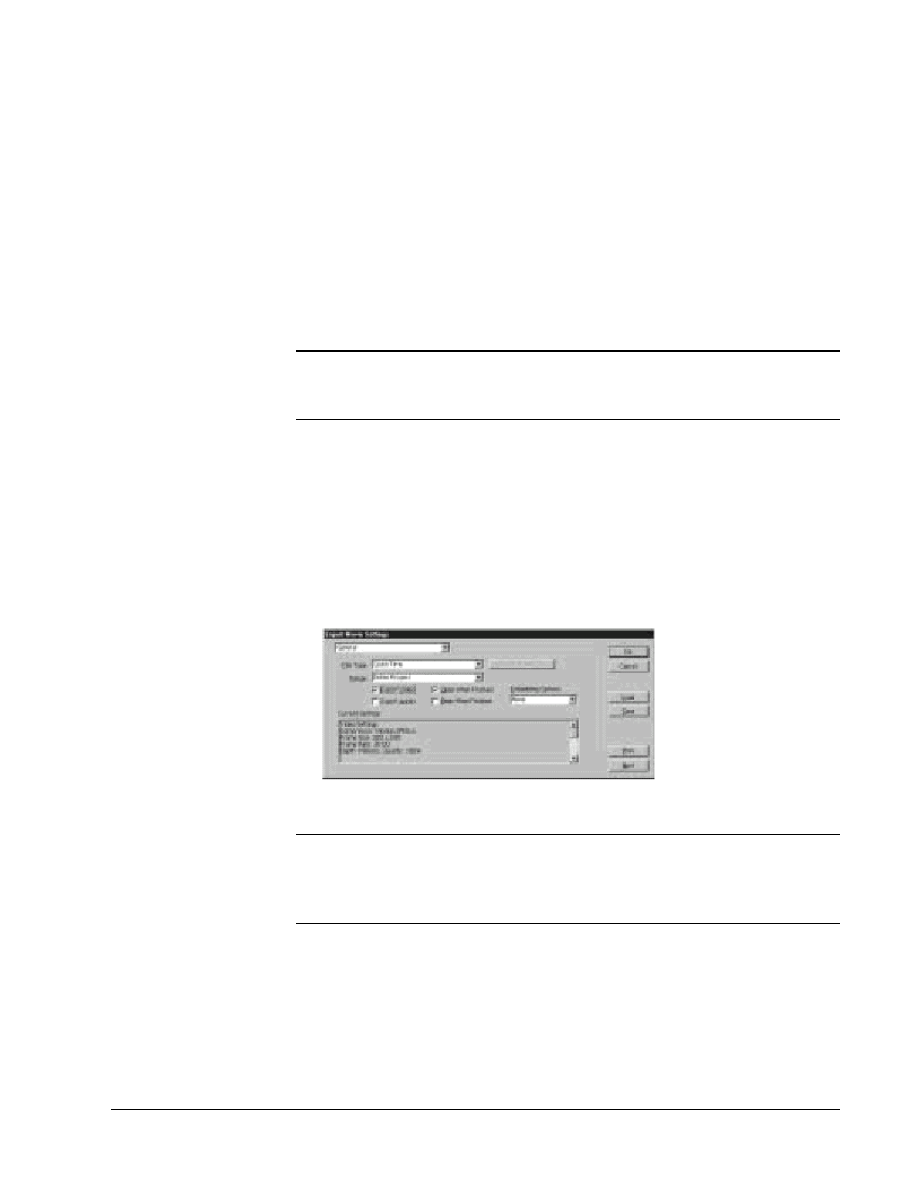
3. In the Export Movie dialog box, click the Settings button and choose
your settings as necessary.
4. Make sure QuickTime is selected for the File Type and Entire Project is
selected for the Range.
5. Make sure that the Export Video is selected and Export Audio is not
selected. The default values for other settings, including those for
compression, are fine for this project.
Note Use the Save and Load buttons in the Export Movie Settings dialog box to save
and later quickly load export settings that you use frequently. Loading saved
settings is particularly useful when you create several types of video files (for
example, NTSC and Web video) from the same project.
6. Click OK to close the Export Movie Settings dialog box.
7. In the Export Movie dialog box, type Dream.mov for the name of the
video program. Click Save (Windows) or OK (Mac OS).
Premiere starts making the movie, displaying a status bar that provides an
estimate for the amount of time it will take. When the movie is ready, it opens in
the Source view (Clip view).

1-24
Fundamentals of Web Design 1.2—-Lab 8.7.14a
Copyright
2002, Adobe Systems, Inc.
8. Click the Play button to watch what you’ve just created. You may notice
that some frames are dropped during playback. This depends on the
system you are using and also the frame rate at which the movie was
exported.
Congratulations on completing the transitions lab!
Wyszukiwarka
Podobne podstrony:
14a
materialy 14a
4 14a
Programowanie robota SCORA-ER 14a, DEFP PK1
Programowanie robota SCORA-ER 14a, DEFP PK1
14a- zmiany w organizacji [tryb zgodnoci]
14a potas 2012 13 net wersja r Nieznany (2)
F2 14A Wejscia Schmitta
14a Korozja metali i stopów (PPTminimizer)
14a socjologia organizacji, psychologia zarządzaniaid 15867 ppt
14a
14a automatyzacja procesów w zarządzaniu info, Procesy informacyjne w zarządzaniu, materiały student
14a Niedziela zwykła Rok A, Lectio Divina, Okres Zwykły, Rok A
Wyklad 14a PRCz
Alergologia 14a
14a, ZMIANA 1
więcej podobnych podstron