
User Guide for Artlantis Studio and Artlantis Render Export Add-ons
User Guide for Artlantis
Studio and Artlantis Render
Export Add-ons

User Guide for Artlantis Studio and Artlantis Render Export Add-ons

Contents
User Guide for Artlantis Studio and Artlantis Render Export Add-ons
3
Export from ArchiCAD 14 to Artlantis Render 2 and Artlantis Studio 2 ___ 5
Export from ArchiCAD 14 to Artlantis Render 3 and Artlantis Studio 3 ___ 7

Contents
4
User Guide for Artlantis Studio and Artlantis Render Export Add-ons

Export from ArchiCAD 14 to Artlantis Render 2 and Artlantis Studio 2
User Guide for Artlantis Studio and Artlantis Render Export Add-ons
5
Export from ArchiCAD 14 to Artlantis
Render 2 and Artlantis Studio 2
Foreword
Use this add-on to export the ArchiCAD 14 model into Artlantis Render and Studio 2.
Although this add-on is installed by default with ArchiCAD, the add-on remains the property of
Abvent R&D, which ensures its development and maintenance. In case of problems, please
contact technical support:
Configuration
Minimum requirements: Artlantis Render 2 or Artlantis Studio 2 installed. The add-on creates
files in .atl file format. Note that file version 2 is incompatible with the old Artlantis 1.2 versions,
as well with the old Art*lantis 4.5 version.
How to use
The export dialog
1) Display the perspective 3D view in ArchiCAD and select the File > Save as... command
2) In the file format list, choose the « Artlantis Render Studio 2 » option.
3) Click on the Save button, and the Export dialog box will be displayed:

Export from ArchiCAD 14 to Artlantis Render 2 and Artlantis Studio 2
6
User Guide for Artlantis Studio and Artlantis Render Export Add-ons
The export dialog allows you to:
•
Create a new .atl file.
•
Update an .atl file already sent into Artlantis.
Creating a new file
Perspective Cameras, Lights, Sun: Check the items to export.
•
Perspectives Cameras: All cameras created in ArchiCAD will appear on Artlantis’s
Perspectives Inspector List.
•
Lights*: All lamps inserted into the ArchiCAD project will appear on Artlantis’s Lights
Inspector List.
•
Sun*: The heliodon (geographical position, date and time) will appear on Artlantis’s
Heliodons Inspector List.
*Note: If the Lights or Sun controls are disabled on the export dialog, open the ArchiCAD
PhotoRendering Settings dialog box (Document > Creative Imaging), activate the
Internal Rendering Engine and switch ON the appropriate light source.
Texture Options:
•
Wall, Roof, Slab, Others*: Textures associated with the ArchiCAD materials will be exported.
*Note: The Others option includes all ArchiCAD tools such as Column, Beam, Stair, Door,
Window, as well as Mesh and Object.
Update an .atl file already sent into Artlantis
All controls described in the “Creating new file section” are also valid here!
Select the “Use Reference File” option, and click on the “Choose a File” button. Then select the
.atl reference file.
Available options:
•
Replace ArchiCAD Materials with Artlantis Reference File Materials Using the Same Identifier
•
Add Artlantis Perspective Views, Lights, Heliodons, Objects from the Reference File
Note: If the “Replace ArchiCAD Materials with Artlantis Reference File Materials Using the
same Identifier” and the “Add Artlantis Views, Lights, Heliodons, Objects from the Reference
File” options are selected, only those newly created ArchiCAD elements (new geometry, new
viewpoints, new lamps, new heliodon) will be exported from ArchiCAD that are not part of
the reference file. All outgoing items will be used from the reference file.
Remarks
By default, curved ArchiCAD elements exported into Artlantis are never smoothed. To smooth
the curves in Artlantis, go to the Shaders inspector tab "Advanced Parameters" area, select the
needed material, and use the "Smoothness" slider.
More information
For more information, please visit:
Export from ArchiCAD 14 to Artlantis Render 3 and Artlantis Studio 3
User Guide for Artlantis Studio and Artlantis Render Export Add-ons
7
Export from ArchiCAD 14 to Artlantis
Render 3 and Artlantis Studio 3
Foreword
Use this add-on to export the ArchiCAD 14 model into Artlantis Render and Studio 3.
Although this add-on is installed by default with ArchiCAD, the add-on remains the property of
Abvent R&D, which ensures its development and maintenance. In case of problems, please
contact technical support:
Configuration
Minimum requirements: Artlantis Render 3 or Artlantis Studio 3 installed. The add-on creates
files in .atl file format. Note that file version 3 is incompatible with the old Artlantis 2/1.2
versions, as well with the old Art*lantis 4.5 version.
How to use
The export dialog
1) Display the perspective 3D view in ArchiCAD and select the File > Save as... command
2) In the file format list, choose the « Artlantis Render Studio 3 » option.
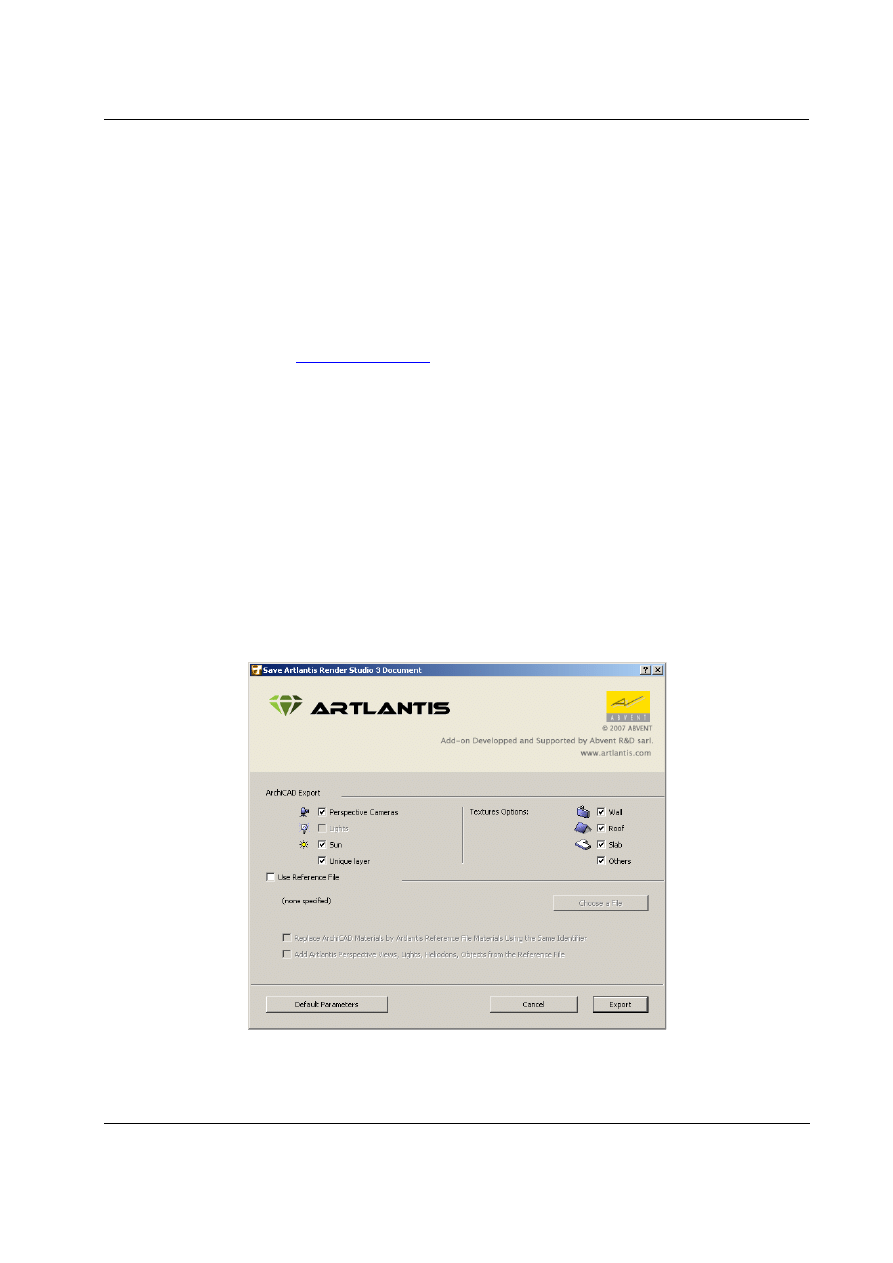
3) Click on the Save button, and the Export dialog box will be displayed:
The export dialog allows you to:
•
Create a new .atl file.
•
Update an .atl file already sent into Artlantis.

Export from ArchiCAD 14 to Artlantis Render 3 and Artlantis Studio 3
8
User Guide for Artlantis Studio and Artlantis Render Export Add-ons
Creating a new file
Perspective Cameras, Lights, Sun: Check the items to export.
•
Perspectives Cameras: All cameras created in ArchiCAD will appear on Artlantis’s
Perspectives Inspector List.
•
Lights*: All lamps inserted into the ArchiCAD project will appear on Artlantis’s Lights
Inspector List.
•
Sun*: The heliodon (geographical position, date and time) will appear on Artlantis’s
Heliodons Inspector List.
•
Unique Layer: If checked, all the ArchiCAD layers are exported into a single layer to
Artlantis. If unchecked, all the ArchiCAD layers will be recovered into the Layers list of the
Artlantis Objects Inspector.
*Note: If the Lights or Sun controls are disabled on the export dialog, open the ArchiCAD
PhotoRendering Settings dialog box (Document > Creative Imaging), activate the
Internal Rendering Engine and switch ON the appropriate light source.
Texture Options:
•
Wall, Roof, Slab, Others*: Textures associated with the ArchiCAD materials will be exported.
*Note: The Others option includes all ArchiCAD tools such as Column, Beam, Stair, Door,
Window, as well as Mesh and Object.
Update an .atl file already sent into Artlantis
All controls described in the “Creating new file section” are also valid here!
Select the “Use Reference File” option, and click on the “Choose a File” button. Then select the
.atl reference file.
Available options:
•
Replace ArchiCAD Materials with Artlantis Reference File Materials Using the Same Identifier
•
Add Artlantis Perspective Views, Lights, Heliodons, Objects from the Reference File
Note: If the “Replace ArchiCAD Materials with Artlantis Reference File Materials Using the
same Identifier” and the “Add Artlantis Views, Lights, Heliodons, Objects from the Reference
File” options are selected, only those newly created ArchiCAD elements (new geometry, new
viewpoints, new lamps, new heliodon) will be exported from ArchiCAD that are not part of
the reference file. All outgoing items will be used from the reference file.
Remarks
By default, curved ArchiCAD elements exported into Artlantis are never smoothed. To smooth
the curves in Artlantis, go to the Shaders inspector tab "Advanced Parameters" area, select the
needed material, and use the "Smoothness" slider.
More information
For more information, please visit:
Abvent
June 2010
Document Outline
- User Guide for Artlantis Studio and Artlantis Render Export Add-ons
Wyszukiwarka
Podobne podstrony:
An IC Amplifier User’s Guide to Decoupling, Grounding and Making Things Go Right for a Change
A Guide for Counsellors Psychotherapists and Counselling
A Guide for Counsellors Psychotherapists and Counselling
Ferguson S300 User Guide for sharing functions
user guide for HD USB TV dongle
06 Artlantis Render and Studio Export
Atmel Gcc Tools For Avr Studio User s Guide
ArchiCAD 13, Export to Artlantis Render and Artlantis Studio 3
A User Guide To The Gfcf Diet For Autism, Asperger Syndrome And Adhd Autyzm
Ada 95 A guide for C and C programmers S Johnston
Guide for solubilization of membrane proteins and selecting tools for detergent removal
Notice that you must leave a brief guide for landlords and tenants
Volkswagen Bora 1999, Bora Variant 1999, CC 2010, Eos 2006, Scirocco 200, Golf 1998 and more Guide
Setup Guide Server side synchronization for CRM Online and Exchange Server
Breast Fine Needle Aspiration Cytology And Core Biopsy A Guide For Practice
GUIDE Wine Cabinet Designs and What You Should Look For
Overview and Guide for Wiccans in the Military
więcej podobnych podstron