

00 DX9_GP FM 3/15/04 1:05 PM Page i

00 DX9_GP FM 3/15/04 1:05 PM Page ii
© 2004 by Premier Press, a division of Course Technology. All rights reserved.
No part of this book may be reproduced or transmitted in any form or by any
means, electronic or mechanical, including photocopying, recording, or by any
information storage or retrieval system without written permission from
Course PTR, except for the inclusion of brief quotations in a review.
The Premier Press logo and related trade dress are trademarks of Premier Press
and may not be used without written permission.
DirectX is a registered trademark of Microsoft Corporation in the U.S. and/or
other countries.
© Microsoft Corporation, 2002. All rights reserved.
All other trademarks are the property of their respective owners.
Important: Course PTR cannot provide software support. Please contact the
appropriate software manufacturer’s technical support line or Web site for
assistance.
Course PTR and the author have attempted throughout this book to distin-
guish proprietary trademarks from descriptive terms by following the capital-
ization style used by the manufacturer.
Information contained in this book has been obtained by Course PTR from
sources believed to be reliable. However, because of the possibility of human or
mechanical error by our sources, Course PTR, or others, the Publisher does not
guarantee the accuracy, adequacy, or completeness of any information and is
not responsible for any errors or omissions or the results obtained from use of
such information. Readers should be particularly aware of the fact that the
Internet is an ever-changing entity. Some facts may have changed since this
book went to press.
Educational facilities, companies, and organizations interested in multiple
copies or licensing of this book should contact the publisher for quantity dis-
count information. Training manuals, CD-ROMs, and portions of this book are
also available individually or can be tailored for specific needs.
ISBN: 1-59200-349-4
Library of Congress Catalog Card Number: 2004090736
Printed in the United States of America
04 05 06 07 08 BH 10 9 8 7 6 5 4 3 2 1
Course PTR, a division of Course Technology
25 Thomson Place
Boston, MA 02210
http://www.courseptr.com
Senior Vice President,
Course PTR Group:
Andy Shafran
Publisher:
Stacy L. Hiquet
Senior Marketing Manager:
Sarah O’Donnell
Marketing Manager:
Heather Hurley
Manager of Editorial Services:
Heather Talbot
Senior Acquisitions Editor:
Emi Smith
Associate Marketing Manager:
Kristin Eisenzopf
Project/Copy Editor:
Karen A. Gill
Technical Reviewer:
Joseph Hall
Retail Market Coordinator:
Sarah Dubois
Interior Layout:
Marian Hartsough
Cover Designer:
Steve Deschene
CD-ROM Producer:
Brandon Penticuff
Indexer:
Sharon Shock
Proofreader:
Sean Medlock

00 DX9_GP FM 3/15/04 1:05 PM Page iii
To my children,
Virginia, Elizabeth, and Ian
and my forever, Ilene.

00 DX9_GP FM 3/15/04 1:05 PM Page iv
Acknowledgments
I
’d definitely like to thank Emi Smith and Karen Gill for working so patiently with me
in the writing of this book. I’m very grateful to Joseph Hall for agreeing to do the
technical editing. His comments regarding the code samples kept me sane.
I’d also like to thank Course PTR for giving me the opportunity to present such a won-
derful topic as DirectX.
Finally, I’d like to send a heartfelt thank you to Albert James, my friend and mentor, who
helped me embrace my love for programming and allow it to grow.
iv

00 DX9_GP FM 3/15/04 1:05 PM Page v
A bout the Author
W
ENDY
J
ONES
devoted herself to computers the first time her eyes befell an Apple IIe in
elementary school. From that point on, she spent every free moment learning BASIC and
graphics programming, sketching out her ideas on graph paper to type in later. Other
computer languages followed, including Pascal, C, Java, and C++.
As Wendy’s career in computers took off, she branched out from DOS, teaching herself
Windows programming and then jumping into the dot-com world for a bit. Although
Internet companies provided cash, they didn’t provide fulfillment, so Wendy started
expanding her programming skills to games, devoting any extra energy to its pursuit.
Wendy’s true passion became apparent when she got the opportunity to work for Atari’s
Humongous Entertainment as a game programmer. During her time at Atari, she worked
on both PC and console titles, thrilled with the challenge they provided.
Wendy is currently working with PocketPC software and handheld gaming devices.
If you have any comments or questions about this book, you can reach Wendy at
gadget2032@yahoo.com.
v

00 DX9_GP FM 3/15/04 1:05 PM Page vi
Contents at a Gl ance
Introduction . . . . . . . . . . . . . . . . . . . . . . . . . . . . . . . . . . . . .xv
Part I
Getting Down the Basics . . . . . . . . . . . . .1
Chapter 1
The What, Why, and How of DirectX . . . . . . . . . . . . . . . . . .3
Chapter 2
Your First DirectX Program . . . . . . . . . . . . . . . . . . . . . . . . . .9
Chapter 3
Surfaces, Sprites, and Salmon . . . . . . . . . . . . . . . . . . . . . . .35
Part II
It’s a 3D World After All . . . . . . . . . . .63
Chapter 4
3D Primer . . . . . . . . . . . . . . . . . . . . . . . . . . . . . . . . . . . . . . .65
Chapter 5
Matrices, Transforms, and Rotations . . . . . . . . . . . . . . . . . .87
Chapter 6
Vertex Colors, Texture Mapping, and 3D Lighting . . . . . .117
Chapter 7
Meshes . . . . . . . . . . . . . . . . . . . . . . . . . . . . . . . . . . . . . . . .147
Chapter 8
Point Sprites, Particles, and Pyrotechnics . . . . . . . . . . . . . .177
vi

00 DX9_GP FM 3/15/04 1:05 PM Page vii
vii
Contents at a Glance
Part III
Additional Needs . . . . . . . . . . . . . . . . .199
Chapter 9
Using DirectInput . . . . . . . . . . . . . . . . . . . . . . . . . . . . . . . .201
Chapter 10
DirectSound . . . . . . . . . . . . . . . . . . . . . . . . . . . . . . . . . . . .237
Chapter 11
The Final Project . . . . . . . . . . . . . . . . . . . . . . . . . . . . . . . .257
Part IV
Appendixes . . . . . . . . . . . . . . . . . . . . . .293
Appendix A Answers to End-of-Chapter Exercises . . . . . . . . . . . . . . . .295
Appendix B Using the CD-ROM . . . . . . . . . . . . . . . . . . . . . . . . . . . . . . .311
Glossary . . . . . . . . . . . . . . . . . . . . . . . . . . . . . . . . . . . . . . .315
Index . . . . . . . . . . . . . . . . . . . . . . . . . . . . . . . . . . . . . . . . .318

00 DX9_GP FM 3/15/04 1:05 PM Page viii
Contents
Introduction . . . . . . . . . . . . . . . . . . . . . . . . . . . . . . . . . . . . .xv
Part I
Getting Down the Basics . . . . . . . . . . . . .1
Chapter 1
The What, Why, and How of DirectX . . . . . . . . . . . . . . . . . .3
Chapter 2
Your First DirectX Program . . . . . . . . . . . . . . . . . . . . . . . . . .9
What Is DirectX? . . . . . . . . . . . . . . . . . . . . . . . . . . . . . . . . . . . . . . . . . .3
The Components . . . . . . . . . . . . . . . . . . . . . . . . . . . . . . . . . . . . . . .4
Why Is DirectX Needed? . . . . . . . . . . . . . . . . . . . . . . . . . . . . . . . . . . . .4
How Is DirectX Put Together? . . . . . . . . . . . . . . . . . . . . . . . . . . . . . . .5
The Component Object Model . . . . . . . . . . . . . . . . . . . . . . . . . . . .6
The Architecture . . . . . . . . . . . . . . . . . . . . . . . . . . . . . . . . . . . . . . .6
Chapter Summary . . . . . . . . . . . . . . . . . . . . . . . . . . . . . . . . . . . . . . . . .7
Creating the Project . . . . . . . . . . . . . . . . . . . . . . . . . . . . . . . . . . . . . . .9
Adding the Windows Code . . . . . . . . . . . . . . . . . . . . . . . . . . . . . . . . .11
WinMain . . . . . . . . . . . . . . . . . . . . . . . . . . . . . . . . . . . . . . . . . . . .12
InitWindow . . . . . . . . . . . . . . . . . . . . . . . . . . . . . . . . . . . . . . . . . .13
WndProc . . . . . . . . . . . . . . . . . . . . . . . . . . . . . . . . . . . . . . . . . . . .14
Time for DirectX . . . . . . . . . . . . . . . . . . . . . . . . . . . . . . . . . . . . . . . . .16
The Direct3D Object . . . . . . . . . . . . . . . . . . . . . . . . . . . . . . . . . . .16
Creating the Rendering Device . . . . . . . . . . . . . . . . . . . . . . . . . . .17
Clearing the Screen . . . . . . . . . . . . . . . . . . . . . . . . . . . . . . . . . . . .19
Displaying the Scene . . . . . . . . . . . . . . . . . . . . . . . . . . . . . . . . . . .20
Cleaning Up . . . . . . . . . . . . . . . . . . . . . . . . . . . . . . . . . . . . . . . . .21
viii

00 DX9_GP FM 3/15/04 1:05 PM Page ix
ix
Contents
Updating the Code . . . . . . . . . . . . . . . . . . . . . . . . . . . . . . . . . . . . . . .22
Changing the Message Loop . . . . . . . . . . . . . . . . . . . . . . . . . . . .22
The Init Function . . . . . . . . . . . . . . . . . . . . . . . . . . . . . . . . . . . . . .23
The Render Function . . . . . . . . . . . . . . . . . . . . . . . . . . . . . . . . . . .24
The cleanUp Function . . . . . . . . . . . . . . . . . . . . . . . . . . . . . . . . . .25
Adding the DirectX Libraries . . . . . . . . . . . . . . . . . . . . . . . . . . . . . . . .25
Taking the Game Full Screen . . . . . . . . . . . . . . . . . . . . . . . . . . . . . . . .27
Video Modes and Formats . . . . . . . . . . . . . . . . . . . . . . . . . . . . . .29
Gathering Video Adapter and Driver Information . . . . . . . . . . . .29
Getting the Display Modes for an Adapter . . . . . . . . . . . . . . . . .30
A Code Example for Querying the Video Adapter . . . . . . . . . . . .32
Chapter Summary . . . . . . . . . . . . . . . . . . . . . . . . . . . . . . . . . . . . . . . .34
Chapter 3
Surfaces, Sprites, and Salmon . . . . . . . . . . . . . . . . . . . . . . .35
You’ve Just Touched the Surface . . . . . . . . . . . . . . . . . . . . . . . . . . . . .35
The Display Buffers . . . . . . . . . . . . . . . . . . . . . . . . . . . . . . . . . . . .36
Offscreen Surfaces . . . . . . . . . . . . . . . . . . . . . . . . . . . . . . . . . . . .36
Loading a Bitmap to a Surface . . . . . . . . . . . . . . . . . . . . . . . . . . .37
Using DirectX to Render a Bitmap . . . . . . . . . . . . . . . . . . . . . . . .39
StretchRect Revisited . . . . . . . . . . . . . . . . . . . . . . . . . . . . . . . . . .42
Sprites . . . . . . . . . . . . . . . . . . . . . . . . . . . . . . . . . . . . . . . . . . . . . . . . .46
What Do Sprites Need? . . . . . . . . . . . . . . . . . . . . . . . . . . . . . . . . .46
Representing a Sprite in Code . . . . . . . . . . . . . . . . . . . . . . . . . . .46
Creating Your First Sprite . . . . . . . . . . . . . . . . . . . . . . . . . . . . . . .47
Moving Your Sprite . . . . . . . . . . . . . . . . . . . . . . . . . . . . . . . . . . . .51
Animating Your Sprite . . . . . . . . . . . . . . . . . . . . . . . . . . . . . . . . .53
Displaying the Animated Sprites . . . . . . . . . . . . . . . . . . . . . . . . .55
Why Is It So Fast? . . . . . . . . . . . . . . . . . . . . . . . . . . . . . . . . . . . . .57
Timers: How to Animate on Time . . . . . . . . . . . . . . . . . . . . . . . . . . . .57
Timing Under Windows . . . . . . . . . . . . . . . . . . . . . . . . . . . . . . . .57
Using QueryPerformanceCounter . . . . . . . . . . . . . . . . . . . . . . . .58
Getting the Time for Each Frame . . . . . . . . . . . . . . . . . . . . . . . . .58
Changing the Animation to Be Time Based . . . . . . . . . . . . . . . . .59
Chapter Summary . . . . . . . . . . . . . . . . . . . . . . . . . . . . . . . . . . . . . . . .61
Part II
It’s a 3D World After All . . . . . . . . . . .63
Chapter 4
3D Primer . . . . . . . . . . . . . . . . . . . . . . . . . . . . . . . . . . . . . . .65
3D Space . . . . . . . . . . . . . . . . . . . . . . . . . . . . . . . . . . . . . . . . . . . . . . .65
Coordinate Systems . . . . . . . . . . . . . . . . . . . . . . . . . . . . . . . . . . . . . . .66
Defining a Point in 2D Space . . . . . . . . . . . . . . . . . . . . . . . . . . . .66

00 DX9_GP FM 3/15/04 1:05 PM Page x
x
Contents
Chapter 5
Defining a Point in 3D Space . . . . . . . . . . . . . . . . . . . . . . . . . . . .67
Left-Handed Systems . . . . . . . . . . . . . . . . . . . . . . . . . . . . . . . . . .68
Right-Handed Systems . . . . . . . . . . . . . . . . . . . . . . . . . . . . . . . . .68
Vertices Explained . . . . . . . . . . . . . . . . . . . . . . . . . . . . . . . . . . . . . . . .68
Creating a Shape . . . . . . . . . . . . . . . . . . . . . . . . . . . . . . . . . . . . .69
Adding Color . . . . . . . . . . . . . . . . . . . . . . . . . . . . . . . . . . . . . . . .70
Vertex Buffers . . . . . . . . . . . . . . . . . . . . . . . . . . . . . . . . . . . . . . . . . . .71
Creating a Vertex Buffer . . . . . . . . . . . . . . . . . . . . . . . . . . . . . . . .71
Flexible Vertex Format . . . . . . . . . . . . . . . . . . . . . . . . . . . . . . . . .72
Loading Data into a Buffer . . . . . . . . . . . . . . . . . . . . . . . . . . . . . .74
Drawing the Contents of the Buffer . . . . . . . . . . . . . . . . . . . . . . .78
Primitive Types . . . . . . . . . . . . . . . . . . . . . . . . . . . . . . . . . . . . . . . . . . .82
Point List . . . . . . . . . . . . . . . . . . . . . . . . . . . . . . . . . . . . . . . . . . . .83
Line List . . . . . . . . . . . . . . . . . . . . . . . . . . . . . . . . . . . . . . . . . . . . .83
Line Strip . . . . . . . . . . . . . . . . . . . . . . . . . . . . . . . . . . . . . . . . . . . .83
Triangle List . . . . . . . . . . . . . . . . . . . . . . . . . . . . . . . . . . . . . . . . . .83
Triangle Strip . . . . . . . . . . . . . . . . . . . . . . . . . . . . . . . . . . . . . . . .84
Triangle Fan . . . . . . . . . . . . . . . . . . . . . . . . . . . . . . . . . . . . . . . . .85
Chapter Summary . . . . . . . . . . . . . . . . . . . . . . . . . . . . . . . . . . . . . . . .85
Matrices, Transforms, and Rotations . . . . . . . . . . . . . . . . . .87
Creating a 3D Model . . . . . . . . . . . . . . . . . . . . . . . . . . . . . . . . . . . . . .87
Defining the Vertex Buffer . . . . . . . . . . . . . . . . . . . . . . . . . . . . . .88
Rendering the Cube . . . . . . . . . . . . . . . . . . . . . . . . . . . . . . . . . . .91
Index Buffers . . . . . . . . . . . . . . . . . . . . . . . . . . . . . . . . . . . . . . . . . . . .92
Generating a Cube by Using Index Buffers . . . . . . . . . . . . . . . . . .93
Creating and Filling the Index Buffer . . . . . . . . . . . . . . . . . . . . . .94
The Geometry Pipeline . . . . . . . . . . . . . . . . . . . . . . . . . . . . . . . . . . . .97
World Transformation . . . . . . . . . . . . . . . . . . . . . . . . . . . . . . . . . .98
View Transformation . . . . . . . . . . . . . . . . . . . . . . . . . . . . . . . . . .98
Projection Transformation . . . . . . . . . . . . . . . . . . . . . . . . . . . . . .98
What Is a Matrix? . . . . . . . . . . . . . . . . . . . . . . . . . . . . . . . . . . . . . . . .99
The Identity Matrix . . . . . . . . . . . . . . . . . . . . . . . . . . . . . . . . . . .100
Initializing a Matrix . . . . . . . . . . . . . . . . . . . . . . . . . . . . . . . . . . .100
Multiply Matrices . . . . . . . . . . . . . . . . . . . . . . . . . . . . . . . . . . . .101
How Direct3D Defines a Matrix . . . . . . . . . . . . . . . . . . . . . . . . .102
D3DX Makes Matrices Easier . . . . . . . . . . . . . . . . . . . . . . . . . . . .102
Manipulating 3D Objects by Using Matrices . . . . . . . . . . . . . . . . . . .104
Moving an Object Around . . . . . . . . . . . . . . . . . . . . . . . . . . . . .104
Rotating an Object . . . . . . . . . . . . . . . . . . . . . . . . . . . . . . . . . . .105
Center of Rotation . . . . . . . . . . . . . . . . . . . . . . . . . . . . . . . . . . .108

00 DX9_GP FM 3/15/04 1:05 PM Page xi
xi
Contents
Chapter 6
Scaling . . . . . . . . . . . . . . . . . . . . . . . . . . . . . . . . . . . . . . . . . . . . .110
Order of Matrix Operations . . . . . . . . . . . . . . . . . . . . . . . . . . . .111
Creating a Camera by Using Projections . . . . . . . . . . . . . . . . . . . . . .112
Positioning and Pointing the Camera . . . . . . . . . . . . . . . . . . . . .113
Chapter Summary . . . . . . . . . . . . . . . . . . . . . . . . . . . . . . . . . . . . . . .115
Vertex Colors, Texture Mapping, and 3D Lighting . . . . . .117
Changing the Color of an Object . . . . . . . . . . . . . . . . . . . . . . . . . . .117
Vertex Colors Revisited . . . . . . . . . . . . . . . . . . . . . . . . . . . . . . . .118
Color Macros . . . . . . . . . . . . . . . . . . . . . . . . . . . . . . . . . . . . . . . .119
Shading . . . . . . . . . . . . . . . . . . . . . . . . . . . . . . . . . . . . . . . . . . . . . . .119
Flat Shading . . . . . . . . . . . . . . . . . . . . . . . . . . . . . . . . . . . . . . . .120
Gouraud Shading . . . . . . . . . . . . . . . . . . . . . . . . . . . . . . . . . . . .121
Choosing the Shading Mode . . . . . . . . . . . . . . . . . . . . . . . . . . .121
Fill Mode . . . . . . . . . . . . . . . . . . . . . . . . . . . . . . . . . . . . . . . . . . . . . .122
Lighting Explained . . . . . . . . . . . . . . . . . . . . . . . . . . . . . . . . . . . . . .124
Lighting Types . . . . . . . . . . . . . . . . . . . . . . . . . . . . . . . . . . . . . . . . . .124
Ambient Light . . . . . . . . . . . . . . . . . . . . . . . . . . . . . . . . . . . . . . .124
Directional Lights . . . . . . . . . . . . . . . . . . . . . . . . . . . . . . . . . . . .125
Point Lights . . . . . . . . . . . . . . . . . . . . . . . . . . . . . . . . . . . . . . . . .125
Spotlights . . . . . . . . . . . . . . . . . . . . . . . . . . . . . . . . . . . . . . . . . .126
Light Properties . . . . . . . . . . . . . . . . . . . . . . . . . . . . . . . . . . . . . . . . .127
Creating Lights in a Scene . . . . . . . . . . . . . . . . . . . . . . . . . . . . . . . . .128
Creating an Ambient Light . . . . . . . . . . . . . . . . . . . . . . . . . . . . .129
Creating a Directional Light . . . . . . . . . . . . . . . . . . . . . . . . . . . .130
Creating a Point Light . . . . . . . . . . . . . . . . . . . . . . . . . . . . . . . . .131
Creating a Spotlight . . . . . . . . . . . . . . . . . . . . . . . . . . . . . . . . . .132
Materials Explained . . . . . . . . . . . . . . . . . . . . . . . . . . . . . . . . . . . . . .134
Diffuse Reflection . . . . . . . . . . . . . . . . . . . . . . . . . . . . . . . . . . . .134
Ambient Reflection . . . . . . . . . . . . . . . . . . . . . . . . . . . . . . . . . . .134
Specular Reflection . . . . . . . . . . . . . . . . . . . . . . . . . . . . . . . . . . .134
Emission . . . . . . . . . . . . . . . . . . . . . . . . . . . . . . . . . . . . . . . . . . .135
How Materials Are Used . . . . . . . . . . . . . . . . . . . . . . . . . . . . . . .135
Specular Highlights . . . . . . . . . . . . . . . . . . . . . . . . . . . . . . . . . . .136
Texture Mapping . . . . . . . . . . . . . . . . . . . . . . . . . . . . . . . . . . . . . . . .136
How Direct3D Uses Textures . . . . . . . . . . . . . . . . . . . . . . . . . . . .137
How Textures Are Applied . . . . . . . . . . . . . . . . . . . . . . . . . . . . .137
Texture Coordinates . . . . . . . . . . . . . . . . . . . . . . . . . . . . . . . . . .138
Texture Stages . . . . . . . . . . . . . . . . . . . . . . . . . . . . . . . . . . . . . . .139
Texture Stage States . . . . . . . . . . . . . . . . . . . . . . . . . . . . . . . . . .139

00 DX9_GP FM 3/15/04 1:05 PM Page xii
xii
Contents
Chapter 7
Chapter 8
Part III
Loading a Texture . . . . . . . . . . . . . . . . . . . . . . . . . . . . . . . . . . . .139
Applying a Texture . . . . . . . . . . . . . . . . . . . . . . . . . . . . . . . . . . .142
Chapter Summary . . . . . . . . . . . . . . . . . . . . . . . . . . . . . . . . . . . . . . .145
Meshes . . . . . . . . . . . . . . . . . . . . . . . . . . . . . . . . . . . . . . . .147
Creating a 3D World . . . . . . . . . . . . . . . . . . . . . . . . . . . . . . . . . . . . .147
What Is a Mesh? . . . . . . . . . . . . . . . . . . . . . . . . . . . . . . . . . . . . . . . .148
How Direct3D Defines a Mesh . . . . . . . . . . . . . . . . . . . . . . . . . . . . .148
Creating a Mesh . . . . . . . . . . . . . . . . . . . . . . . . . . . . . . . . . . . . . . . .148
Filling the Mesh . . . . . . . . . . . . . . . . . . . . . . . . . . . . . . . . . . . . .151
Displaying a Mesh . . . . . . . . . . . . . . . . . . . . . . . . . . . . . . . . . . . .154
Optimizing a Mesh . . . . . . . . . . . . . . . . . . . . . . . . . . . . . . . . . . .155
Predefined Meshes . . . . . . . . . . . . . . . . . . . . . . . . . . . . . . . . . . . . . .162
D3DX Object Creation . . . . . . . . . . . . . . . . . . . . . . . . . . . . . . . . .163
The Direct3D Mesh Format: The X File . . . . . . . . . . . . . . . . . . . .168
Saving a Mesh to an X File . . . . . . . . . . . . . . . . . . . . . . . . . . . . . . . .169
D3DXSaveMeshToX . . . . . . . . . . . . . . . . . . . . . . . . . . . . . . . . . . .169
Loading a Mesh from an X File . . . . . . . . . . . . . . . . . . . . . . . . . . . . .172
Using the D3DXLoadMeshFromX Function . . . . . . . . . . . . . . . . .172
Chapter Summary . . . . . . . . . . . . . . . . . . . . . . . . . . . . . . . . . . . . . . .175
Point Sprites, Particles, and Pyrotechnics . . . . . . . . . . . . .177
Particles . . . . . . . . . . . . . . . . . . . . . . . . . . . . . . . . . . . . . . . . . . . . . . .177
Particle Properties . . . . . . . . . . . . . . . . . . . . . . . . . . . . . . . . . . . .178
The Particle Structure . . . . . . . . . . . . . . . . . . . . . . . . . . . . . . . . .178
How Are the Particles Created? . . . . . . . . . . . . . . . . . . . . . . . . .179
How Do the Particles Move? . . . . . . . . . . . . . . . . . . . . . . . . . . . .180
Particle Systems . . . . . . . . . . . . . . . . . . . . . . . . . . . . . . . . . . . . . . . . .182
Designing a Particle System . . . . . . . . . . . . . . . . . . . . . . . . . . . .182
Coding a Particle System Manager . . . . . . . . . . . . . . . . . . . . . . .184
Point Sprites: Making Particles Easy . . . . . . . . . . . . . . . . . . . . . . . . .193
Using Point Sprites in Direct3D . . . . . . . . . . . . . . . . . . . . . . . . . .193
How to Use Point Sprites . . . . . . . . . . . . . . . . . . . . . . . . . . . . . .194
Chapter Summary . . . . . . . . . . . . . . . . . . . . . . . . . . . . . . . . . . . . . . .197
Additional Needs . . . . . . . . . . . . . . . . .199
Chapter 9
Using DirectInput . . . . . . . . . . . . . . . . . . . . . . . . . . . . . . . .201
I Need Input . . . . . . . . . . . . . . . . . . . . . . . . . . . . . . . . . . . . . . . . . . .201
Using DirectInput . . . . . . . . . . . . . . . . . . . . . . . . . . . . . . . . . . . . . . .203
Creating the DirectInput Object . . . . . . . . . . . . . . . . . . . . . . . . .204

00 DX9_GP FM 3/15/04 1:05 PM Page xiii
Contents
xiii
Chapter 10
Chapter 11
Creating the DirectInput Device . . . . . . . . . . . . . . . . . . . . . . . . .205
Setting the Data Format . . . . . . . . . . . . . . . . . . . . . . . . . . . . . . .206
Setting the Cooperative Level . . . . . . . . . . . . . . . . . . . . . . . . . .207
Acquiring Access . . . . . . . . . . . . . . . . . . . . . . . . . . . . . . . . . . . . .209
Getting Input . . . . . . . . . . . . . . . . . . . . . . . . . . . . . . . . . . . . . . .209
Enumerating Input Devices . . . . . . . . . . . . . . . . . . . . . . . . . . . . .210
Getting the Device Capabilities . . . . . . . . . . . . . . . . . . . . . . . . .214
Getting Input from a Keyboard . . . . . . . . . . . . . . . . . . . . . . . . .216
Getting Input from a Mouse . . . . . . . . . . . . . . . . . . . . . . . . . . . .217
Using a Gamepad or Joystick . . . . . . . . . . . . . . . . . . . . . . . . . . .221
Supporting Multiple Input Devices . . . . . . . . . . . . . . . . . . . . . . .226
Reacquiring an Input Device . . . . . . . . . . . . . . . . . . . . . . . . . . . .228
Cleaning Up DirectInput . . . . . . . . . . . . . . . . . . . . . . . . . . . . . . .229
Force Feedback . . . . . . . . . . . . . . . . . . . . . . . . . . . . . . . . . . . . . . . . .230
Force Feedback Effects . . . . . . . . . . . . . . . . . . . . . . . . . . . . . . . .230
Enumerating the Input Devices for Force Feedback . . . . . . . . . .231
Creating a Force Feedback Effect . . . . . . . . . . . . . . . . . . . . . . . .232
Starting an Effect . . . . . . . . . . . . . . . . . . . . . . . . . . . . . . . . . . . .235
Stopping an Effect . . . . . . . . . . . . . . . . . . . . . . . . . . . . . . . . . . .235
Chapter Summary . . . . . . . . . . . . . . . . . . . . . . . . . . . . . . . . . . . . . . .236
DirectSound . . . . . . . . . . . . . . . . . . . . . . . . . . . . . . . . . . . .237
Sound . . . . . . . . . . . . . . . . . . . . . . . . . . . . . . . . . . . . . . . . . . . . . . . .237
DirectSound . . . . . . . . . . . . . . . . . . . . . . . . . . . . . . . . . . . . . . . . . . . .238
How Does DirectSound Work? . . . . . . . . . . . . . . . . . . . . . . . . . .238
Using DirectSound . . . . . . . . . . . . . . . . . . . . . . . . . . . . . . . . . . .239
Sound Files . . . . . . . . . . . . . . . . . . . . . . . . . . . . . . . . . . . . . . . . . . . .244
The Secondary Buffer . . . . . . . . . . . . . . . . . . . . . . . . . . . . . . . . .244
Creating a Secondary Buffer . . . . . . . . . . . . . . . . . . . . . . . . . . . .247
Loading a Sound File into a Buffer . . . . . . . . . . . . . . . . . . . . . . .248
Chapter Summary . . . . . . . . . . . . . . . . . . . . . . . . . . . . . . . . . . . . . . .255
The Final Project . . . . . . . . . . . . . . . . . . . . . . . . . . . . . . . .257
Welcome to the Final Project . . . . . . . . . . . . . . . . . . . . . . . . . . . . . .257
Creating the Application Window . . . . . . . . . . . . . . . . . . . . . . . . . .258
WinMain . . . . . . . . . . . . . . . . . . . . . . . . . . . . . . . . . . . . . . . . . . .258
initWindow . . . . . . . . . . . . . . . . . . . . . . . . . . . . . . . . . . . . . . . . .259
WndProc . . . . . . . . . . . . . . . . . . . . . . . . . . . . . . . . . . . . . . . . . . .261
Initializing DirectX . . . . . . . . . . . . . . . . . . . . . . . . . . . . . . . . . . . . . . .262
The DirectX Manager . . . . . . . . . . . . . . . . . . . . . . . . . . . . . . . . .262
Hooking in the DirectX Manager . . . . . . . . . . . . . . . . . . . . . . . .264

00 DX9_GP FM 3/15/04 1:05 PM Page xiv
xiv
Contents
Coding the Demo . . . . . . . . . . . . . . . . . . . . . . . . . . . . . . . . . . . . . . .266
The Game Application Class . . . . . . . . . . . . . . . . . . . . . . . . . . . .266
Creating the Game Timer . . . . . . . . . . . . . . . . . . . . . . . . . . . . . .267
Hooking the Game Application into WinMain . . . . . . . . . . . . . .268
Adding Objects to the World . . . . . . . . . . . . . . . . . . . . . . . . . . . . . .270
The CGameObject Class . . . . . . . . . . . . . . . . . . . . . . . . . . . . . . .271
The CModel Class . . . . . . . . . . . . . . . . . . . . . . . . . . . . . . . . . . . .272
The Game Object List . . . . . . . . . . . . . . . . . . . . . . . . . . . . . . . . .276
Creating the Planet . . . . . . . . . . . . . . . . . . . . . . . . . . . . . . . . . . . . . .277
The CPlanet Class . . . . . . . . . . . . . . . . . . . . . . . . . . . . . . . . . . . .277
Adding the Planet to the Scene . . . . . . . . . . . . . . . . . . . . . . . . .280
Adding a Spaceship . . . . . . . . . . . . . . . . . . . . . . . . . . . . . . . . . . . . . .281
Moving in the Universe . . . . . . . . . . . . . . . . . . . . . . . . . . . . . . . . . . .283
The Spaceship Move Function . . . . . . . . . . . . . . . . . . . . . . . . . .283
Bringing in DirectInput . . . . . . . . . . . . . . . . . . . . . . . . . . . . . . . .285
Releasing Your Creation to the World . . . . . . . . . . . . . . . . . . . . . . .288
Packaging Your Game for Release . . . . . . . . . . . . . . . . . . . . . . .288
What Tools Are Available to Bundle My Game? . . . . . . . . . . . . .289
The DirectX Runtime . . . . . . . . . . . . . . . . . . . . . . . . . . . . . . . . . . . . .289
Shipping the DirectX Runtime with Your Game . . . . . . . . . . . . .289
Installing the DirectX Runtime . . . . . . . . . . . . . . . . . . . . . . . . . .290
Chapter Summary . . . . . . . . . . . . . . . . . . . . . . . . . . . . . . . . . . . . . . .292
Part IV
Appendixes . . . . . . . . . . . . . . . . . . . . . .293
Appendix A Answers to End-of-Chapter Exercises . . . . . . . . . . . . . . . .295
. . . . . . . . . . . . . . . . . . . . . . . . . . . . . . .311
Appendix B Using the CD-ROM
What’s on the CD-ROM . . . . . . . . . . . . . . . . . . . . . . . . . . . . . . . . . . .311
Installing the DirectX SDK . . . . . . . . . . . . . . . . . . . . . . . . . . . . . . . . .311
Glossary . . . . . . . . . . . . . . . . . . . . . . . . . . . . . . . . . . . . . . .315
Index . . . . . . . . . . . . . . . . . . . . . . . . . . . . . . . . . . . . . . . . .318

00 DX9_GP FM 3/15/04 1:05 PM Page xv
Introduction
G
ame programming is an exciting job in the computing world. Where else do you
get the chance to create virtual worlds that encompass creatures or places nor-
mally found only in dreams? You give people the ability to become anyone they
want, and provide them with environments that bring their fantasies to life.
The game industry is growing by leaps and bounds, and the technology is expanding right
along with it. Just a few years ago, video cards with 3D hardware on the consumer level
were unheard of. Only expensive SGI workstations were capable of real-time 3D, and
OpenGL were in its infancy. As PCs became more popular, OpenGL was ported to this
expanding platform, bringing 3D rendering to the masses for the first time.
Windows was still an unpopular platform for games, but that began to change when
Microsoft introduced DirectX. DirectX slowly gained popularity until it surpassed
OpenGL as the standard way to create 3D graphics under Windows. Today, most PC
games on the market are built on DirectX, enabling gamers to experience the latest graph-
ics technologies and the most realistic worlds.
How Much Should You Know?
A relatively decent understanding of C++ and object-oriented concepts can help you
understand all the lessons presented in this book. Basic math skills are a plus, although
most math concepts are explained in detail. Working knowledge of Visual Studio .NET
2003 or any product in the Visual Studio family is helpful. The opening chapters explain
what you need to get started.
xv

00 DX9_GP FM 3/15/04 1:05 PM Page xvi
xvi
Introduction
How to Use This Book
This book is divided into three parts. The first part describes DirectX and how to get your
first DirectX program up and running. The second part gives you the basics you need for
designing and building 3D worlds, with an introduction to 3D concepts and Direct3D.
The third and final part rounds out your DirectX knowledge with an introduction to
sound processing with DirectSound and getting input from the user with DirectInput.
The book wraps up everything with a final project that shows you how to apply the con-
cepts you’ve learned.
If you’re already familiar with DirectX and have already written a few applications, you can
easily skip Part I. Anyone who’s just getting into game programming and DirectX should
read this book straight through to gain a full understanding of what DirectX can do.

01 DX9_GP CH01 3/12/04 4:12 PM Page 1
Get ting Down
the Basics
Chapter 1
The What, Why, and How of DirectX . . . . . . . . . . . . . . . . . . . . . . . . . . .3
Chapter 2
Your First DirectX Program . . . . . . . . . . . . . . . . . . . . . . . . . . . . . . . . . . .9
Chapter 3
Surfaces, Sprites, and Salmon . . . . . . . . . . . . . . . . . . . . . . . . . . . . . . . .35
PART I

This page intentionally left blank

01 DX9_GP CH01 3/12/04 4:12 PM Page 3
chapter 1
The What, Why,
and How of DirectX
D
irectX is the premier game Application Programming Interface (API) for the
Windows platform. Just a few years ago, game makers were struggling with
problems stemming from hardware incompatibilities, making it impossible for
everyone to enjoy their games. Then Microsoft came along with DirectX. It provided
game makers with a single, clean API to write to that would almost guarantee compati-
bility across different sets of PC hardware. Over the years since DirectX’s release, the num-
ber of games that are running under Windows has increased dramatically.
Here’s what you’ll learn in this chapter:
■
What DirectX is
■
Why DirectX is useful
■
Which components make up the DirectX API
What Is DirectX?
DirectX is the Microsoft collection of APIs that are designed to give game developers a
low-level interface to the PC hardware that is running Windows. Currently on version 9.0,
each DirectX API component provides access to different aspects of the hardware, includ-
ing graphics, sound, and networking, all through a standard interface. This interface
allows developers to write their games using one set of functions, regardless of the hard-
ware they’re being run on.
3

01 DX9_GP CH01 3/12/04 4:12 PM Page 4
4
Chapter 1
■
The What, Why, and How of DirectX
The Components
The DirectX API is split into multiple components, each one representing a different
aspect of the system. Each API can be used independently, thereby adding only the func-
tionality that your game requires. Here are the components:
■
DirectX Graphics. This is the component that handles all graphics output. This
API provides functions for handling 2D and 3D graphics drawing, as well as
initializing and setting the resolution for your game.
■
DirectInput. All user input is handled through this API. This component includes
support for devices such as the keyboard, mouse, gamepad, and joysticks.
DirectInput also now adds support for force-feedback.
■
DirectPlay. Network support for your games is added through DirectPlay. The
networking functions provide communication with other machines, allowing
more than one person to play. DirectPlay gives you a high-level interface for
networking, keeping you from having to implement every aspect of network
communication.
■
DirectSound. When you need to add sound effects or background music, this is
the API to use. DirectSound’s functionality allows for the loading and playing of
one or more WAV files, while providing complete control over how they’re played.
■
DirectMusic. This component allows you to create a dynamic soundtrack. Sounds
can be played back on a timed schedule or adapted to the gameplay using pitch,
tempo, or volume changes.
■
DirectShow. You access cut scenes and streaming audio through this component.
AVI, MP3, MPEG, and ASF files are just a few of the formats that DirectShow
allows to be played. With DirectShow, the entire file doesn’t have to be loaded
into memory; you can stream the file from the hard drive or CD-ROM.
■
DirectSetup. After your game is complete, you’ll want to show it to others.
DirectSetup gives you the functionality to install the latest version of DirectX
on the user’s computer.
n o t e
The DirectX Graphics component includes all the functionality of both DirectDraw and Direct3D.
Version 7 of DirectX was the last version to separate DirectDraw into its own interface.
Why Is DirectX Needed?
Before the release of the Windows operating system, developers wrote games for DOS.
This single-threaded, non-GUI operating system provided developers with a direct path

01 DX9_GP CH01 3/12/04 4:12 PM Page 5
5
How Is DirectX Put Together?
between their application code and the hardware it was running on. This had both advan-
tages and problems. For example, because there was a direct path between the game code
and the hardware, developers could pull every ounce of power out of the machine, giving
them complete control over how their games performed. The downside to this included
the need to write device drivers themselves for any hardware they wanted their game titles
to support. This even included common hardware, such as video and sound cards.
At the time, not all video cards followed the same standard. This made drawing to the
screen difficult if you wanted to support a resolution above 320
× 240. Just writing a game
using 640
× 480 resolution caused developers to write directly to video memory and han-
dle the manipulation of video registers themselves. Developers were definitely looking for
a better and easier way.
When Windows 3.1 was released, it carried with it the same limitations that DOS had.
Because Windows ran on top of DOS, it severely limited the resources available to games
and took away the direct access that developers had enjoyed for so long. Most games that
were written to support Windows at the time consisted mainly of card games and board
games, whereas action games continued to support only DOS.
Previously, Microsoft had attempted to give developers a faster way to access the video
adapter through a library called WinG. It predated DirectX and offered only a few func-
tions. WinG was a nice attempt, but it still didn’t give developers the much-needed access
to the system they enjoyed under DOS.
Microsoft did address a lot of these issues with the release of DirectX 1, called the Game
Software Development Kit (SDK). DirectX 1 gave developers a single library to write to,
placing a common layer between their games and the PC hardware. Drawing graphics to
the screen became easier. The first version of DirectX still didn’t give support for all the
hardware out there, but it was a great starting point in giving game developers what they
had been waiting for. Over the years, there have been nine releases of DirectX, each one
improving and adding support for new technologies such as network play, streaming
audio and video, and new kinds of input devices.
How Is DirectX Put Together?
DirectX made life a bit easier for developers who wanted to write games under Windows.
Developers had a clear set of libraries and support from Microsoft, who had finally real-
ized the importance and market potential of games.
Through the years, DirectX has evolved and improved, building on previous versions to
offer updated and faster support for new hardware. Microsoft wanted to make sure that
each subsequent release of DirectX allowed games written for previous versions to run
without problems. To accomplish this goal, Microsoft based DirectX on COM.
01 DX9_GP CH01 3/12/04 4:12 PM Page 6
6
Chapter 1
■
The What, Why, and How of DirectX
The Component Object Model
The DirectX API is based on the Component Object Model (COM). COM objects consist
of a collection of interfaces that expose methods that developers use to access DirectX.
COM objects are normally DLL files that have been registered with the system. For
DirectX COM objects, this happens during the installation of DirectX. Although they’re
similar to C++ objects, COM objects require the use of an interface to access the methods
within them. This is actually an advantage over standard objects because multiple versions
of an interface can be present within a COM object, allowing for backward compatibility.
For instance, each version of DirectX includes a new DirectDraw interface that is accessi-
ble through the API, while still containing the previous version so it doesn’t break exist-
ing code. Games that were created using DirectX 7 can work with DirectX 9 with no
problems.
An additional advantage to COM objects is their ability to work with multiple languages
beyond just C++. Developers can use Visual Basic, C++, or C# and still use the same
DirectX libraries.
The Architecture
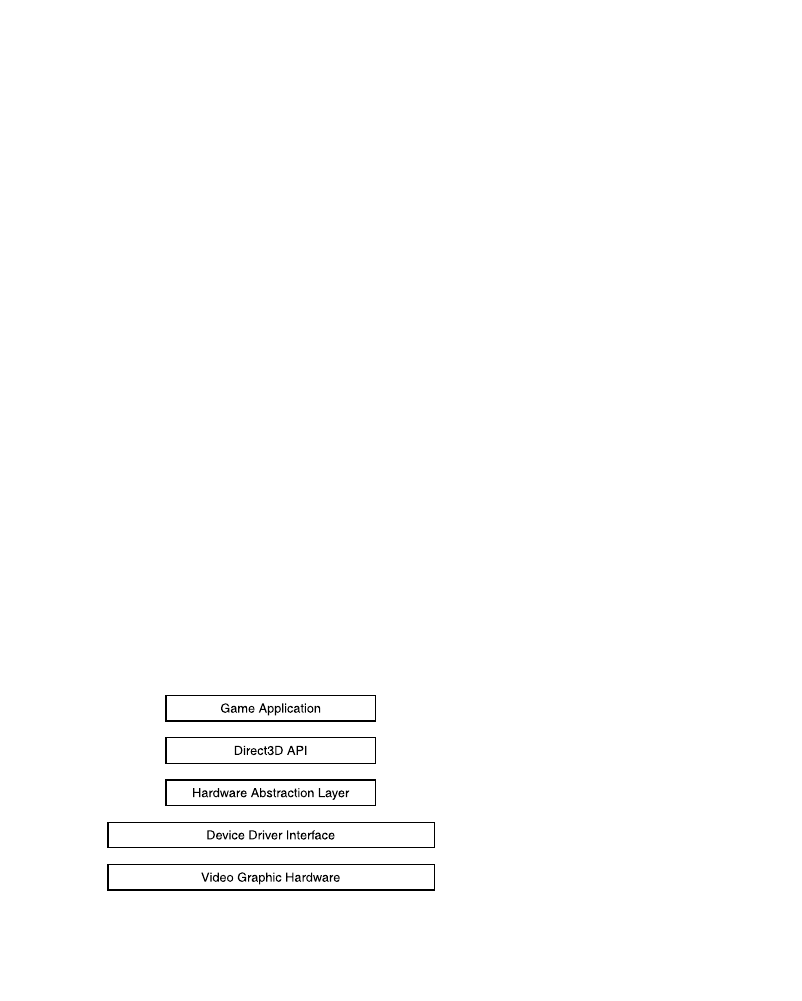
DirectX is based on two layers: the API layer and the Hardware Abstraction Layer (HAL).
The API layer communicates with the hardware in the machine by talking to the HAL. The
HAL provides a standardized interface to DirectX, while also being able to talk directly to
the hardware through its specific device driver. Because the HAL needs to know how the
hardware and device driver actually work, the hardware manufacturer writes it. You never
interact with the HAL directly while writing your game, but you do access it indirectly
through functions that DirectX provides. Figure 1.1 displays how the HAL is layered
between Direct3D and the hardware device driver.
Figure 1.1 DirectX integration.

01 DX9_GP CH01 3/12/04 4:12 PM Page 7
7
Chapter Summary
In previous versions, DirectX was split into both the HAL and another layer called the
Hardware Emulation Layer (HEL) or RGB device. The HEL emulated some missing func-
tionality of the hardware. This allowed both low-end and high-end video cards to seam-
lessly provide the same functionality to the DirectX API. Although the functionality of the
HEL was the same, the performance was not. Because the HEL did all its rendering in soft-
ware, normally the frame rate was significantly lower than with hardware acceleration.
The HEL has since been replaced with the pluggable software device. This device performs
software rendering and must be written by the application developer. Most games on the
market do not use software rendering anymore and require a video card with 3D hard-
ware because most machines now support this.
n o t e
The Direct3D Device Driver Kit (DDK) provides information you need to write your own pluggable
software device.
Chapter Summary
You’ve now learned the behind-the-scenes details of what DirectX is and why you need it.
The next chapter dives into how to create your first application using DirectX.

This page intentionally left blank

02 DX9_GP CH02 3/12/04 4:13 PM Page 9
chapter 2
Your First
DirectX Program
I
t’s time to get into writing some actual code now. I’m going to take you step-by-step
through the process of creating your very first DirectX application. Most examples
that come with the DirectX Software Development Kit (SDK) rely on the sample
framework, a collection of source files that take care of a lot of the tedious programming
for you. In my explanations and examples that follow, however, I will not be using this
framework so that you get an idea of everything that’s needed for an actual game.
Here’s what you’ll learn in this chapter:
■
How to create a project
■
How to set up a Windows application
■
How to initialize DirectX
■
How to clear the screen
■
How to present your scene
■
How to take your game full screen
■
How to determine the video modes the system supports
Creating the Project
The first step to any application is the creation of the Visual Studio project. Start by run-
ning Visual Studio .NET with no project loaded.
1. Select New, Project from the File menu to bring up the New Project dialog box,
shown in Figure 2.1.
9

02 DX9_GP CH02 3/12/04 4:13 PM Page 10
10
Chapter 2
■
Your First DirectX Program
Figure 2.1 Creating a new project.
2. Change the project name to
example1
and select Win32 Project from the list of pro-
ject templates. Click on the OK button when this is complete. The Application
Wizard dialog box appears with two option tabs available: Overview and Applica-
tion Settings. This dialog box is shown in Figure 2.2.
3. Select the Application Settings tab and make sure the Empty Project option is
checked, as shown in Figure 2.3.
4. Click the Finish button.
Figure 2.2 The Application Wizard dialog box.

02 DX9_GP CH02 3/12/04 4:13 PM Page 11
11
Adding the Windows Code
Figure 2.3 The Application Settings dialog box.
Adding the Windows Code
At this point, Visual Studio will have created an empty project. The next step is to create
the source code to initialize the main application window. You start off by adding a blank
source file to the project.
1. Select Add New Item from the Project menu. This brings up the Add New Item
dialog box, as shown in Figure 2.4.
2. Select the C++ File (.cpp) from the Templates list.
3. Change the name of the file to winmain.cpp.
Figure 2.4 The Add New Item dialog box.

02 DX9_GP CH02 3/12/04 4:13 PM Page 12
12
Chapter 2
■
Your First DirectX Program
4. Click the Open button.
WinMain
The first part of any Windows application is always the entry point. In console applica-
tions, for example, the entry point function is called
main
, whereas the entry point func-
tion for Windows applications is called
WinMain
. The
WinMain
function is used to initialize
your application, create the application window, and start the message loop. At this point,
you can either type the code that follows or just load the winmain.cpp file from the chap-
ter2\example1 directory.
// Include the Windows header file that’s needed for all Windows applications
#include <windows.h>
HINSTANCE hInst;
// global handle to hold the application instance
HWND wndHandle;
// global variable to hold the window handle
// forward declarations
bool initWindow( HINSTANCE hInstance );
LRESULT CALLBACK WndProc( HWND, UINT, WPARAM, LPARAM );
// This is winmain, the main entry point for Windows applications
int WINAPI WinMain( HINSTANCE hInstance, HINSTANCE hPrevInstance,
LPTSTR lpCmdLine, int nCmdShow )
{
// Initialize the window
if ( !initWindow( hInstance ) )
return false;
// main message loop:
MSG msg;
ZeroMemory( &msg, sizeof( msg ) );
while( msg.message!=WM_QUIT )
{
// Check the message queue
while (GetMessage(&msg, wndHandle, 0, 0) )
{
TranslateMessage( &msg );
DispatchMessage( &msg );
}
}
return (int) msg.wParam;
}

02 DX9_GP CH02 3/12/04 4:13 PM Page 13
13
Adding the Windows Code
The most important part of this function is the main message loop. This is the part of the
application that receives messages from the rest of the system, allowing the program to
run in the Windows environment. The
GetMessage
function checks the application’s
message queue and determines whether user input or system messages are waiting. If mes-
sages are available, the
TranslateMessage
and
DispatchMessage
functions are called.
After the
WinMain
function is complete, it’s time to create the application window.
InitWindow
Before Windows allows an application to create a window on the desktop, the application
must register a window class. After the class is registered, the application can create the
needed window. The following code example registers a generic window with the system
and then uses this class to create a default window.
/******************************************************************************
* bool initWindow( HINSTANCE hInstance )
* initWindow registers the window class for the application, creates the window
******************************************************************************/
bool initWindow( HINSTANCE hInstance )
{
WNDCLASSEX wcex;
// Fill in the WNDCLASSEX structure. This describes how the window
// will look to the system
wcex.cbSize
= sizeof(WNDCLASSEX); // the size of the structure
wcex.style
= CS_HREDRAW | CS_VREDRAW; // the class style
wcex.lpfnWndProc
= (WNDPROC)WndProc;
// the window procedure callback
wcex.cbClsExtra
= 0;
// extra bytes to allocate for this class
wcex.cbWndExtra
= 0;
// extra bytes to allocate for this instance
wcex.hInstance
= hInstance;
// handle to the application instance
wcex.hIcon
= 0; // icon to associate with the application
wcex.hCursor
= LoadCursor(NULL, IDC_ARROW);// the default cursor
wcex.hbrBackground
= (HBRUSH)(COLOR_WINDOW+1);
// the background color
wcex.lpszMenuName .
= NULL;
// the resource name for the menu
wcex.lpszClassName
= “DirectXExample”; // the class name being created
wcex.hIconSm
= 0;
// the handle to the small icon
RegisterClassEx(&wcex);
// Create the window
wndHandle = CreateWindow(
“DirectXExample”,
“DirectXExample”,
WS_OVERLAPPEDWINDOW,
// the window class to use
// the title bar text
// the window style

02 DX9_GP CH02 3/12/04 4:13 PM Page 14
14
Chapter 2
■
Your First DirectX Program
CW_USEDEFAULT,
// the starting x coordinate
CW_USEDEFAULT,
// the starting y coordinate
640,
// the pixel width of the window
480,
// the pixel height of the window
NULL,
// the parent window; NULL for desktop
NULL,
// the menu for the application; NULL for
// none
hInstance,
// the handle to the application instance
NULL);
// no values passed to the window
// Make sure that the window handle that is created is valid
if (!wndHandle)
return false;
// Display the window on the screen
ShowWindow(wndHandle, SW_SHOW);
UpdateWindow(wndHandle);
return true;
}
The preceding function is documented in every Windows programming book. I’ll just
give a short rundown of what this code does.
Every application that will display a window must first register a window class with the
system. The window class describes certain characteristics of the window, such as the
background color, the mouse cursor to use, and the icon to associate with the application.
The window class is represented by the
WNDCLASSEX
structure. After the
WNDCLASSEX
structure
is properly filled in, it is passed as a parameter to the function
RegisterClassEx
.
The
RegisterClassEx
function takes the information provided within the
WNDCLASSEX
struc-
ture and registers a window class with the system. Now that you have a valid window class
registered, you are ready to create the window that your application will use.
Next, the window needs to be created, which is handled through a call to
CreateWindow
.
The
CreateWindow
function requires 11 parameters, each one assisting in telling the system
what the window will look like when it’s created. Each parameter is documented in the
previous code sample.
WndProc
The window procedure is the final part required for a working windows application. The
window procedure, shown as
WndProc
in the code sample that follows, handles events from
the system that relate to your application. For instance, when a mouse click occurs within
your application window, the system sends a mouse click event to your windows procedure.
Your windows procedure can then decide whether it needs to handle the event or ignore it.

02 DX9_GP CH02 3/12/04 4:13 PM Page 15
15
Adding the Windows Code
The window procedure in the following example contains only the bare minimum of code
needed to end the application.
/******************************************************************************
* LRESULT CALLBACK WndProc(HWND hWnd, UINT message, WPARAM wParam,
*
LPARAM lParam)
* The window procedure
******************************************************************************/
LRESULT CALLBACK WndProc(HWND hWnd, UINT message, WPARAM wParam, LPARAM lParam)
{
// Check any available messages from the queue
switch (message)
{
case WM_DESTROY:
PostQuitMessage(0);
break;
}
// Always return the message to the default window
// procedure for further processing
return DefWindowProc(hWnd, message, wParam, lParam);
}
You should be able to compile this application and get a blank window with a white back-
ground, as shown in Figure 2.5. You will find this simple application in the chapter2\
example1 directory on the CD-ROM.
Figure 2.5 The blank window application.

02 DX9_GP CH02 3/12/04 4:13 PM Page 16
16
Chapter 2
■
Your First DirectX Program
Time for DirectX
Before DirectX 8, drawing was split into two separate interfaces: DirectDraw and
Direct3D. DirectDraw, which was used for all 2D rendering, is no longer being updated.
All 2D rendering must now be handled through the Direct3D API.
You’re going to take the new path and do all drawing through Direct3D. The following
steps are needed to get Direct3D up and running:
1. Create the Direct3D object.
2. Create the Direct3D device.
3. Draw to the device.
The Direct3D Object
The Direct3D object provides an interface for functions used to enumerate and determine
the capabilities of a Direct3D device. For example, the Direct3D object gives you the abil-
ity to query the number of video devices installed in a system and to check the capabili-
ties of each one.
The Direct3D object is created using the following call:
IDirect3D9 *Direct3DCreate9( D3D_SDK_VERSION );
n o t e
D3D_SDK_VERSION
is the only valid parameter that can be sent to the
Direct3DCreate9
function.
This function returns a pointer to an
IDirect3D9
interface. If the returned value is
NULL
, the
call has failed.
Remember when I mentioned that it’s possible to query the number of video devices or
adapters in the machine? As an example of the functionality provided by the Direct3D
object, you’re going to do just that.
The
GetAdapterCount
function, defined next, allows you to count the number of video
adapters.
UINT IDirect3D9::GetAdapterCount(VOID);
This function requires no parameters to be passed to it and returns the number of video
adapters in the system. The
GetAdapterCount
function returns a value of 1 on most end user
systems.

02 DX9_GP CH02 3/12/04 4:13 PM Page 17
17
Time for DirectX
n o t e
If a system has only one video adapter installed, this device is referred to as the primary adapter. If
more than one adapter is available, the first card is the primary adapter.
Creating the Rendering Device
The Direct3D device, through the
IDirect3DDevice9
interface, provides the methods that
applications use to render to the screen. It’s through this interface that all drawing for your
game must be done.
The Direct3D device is created with a call to
CreateDevice
.
HRESULT CreateDevice(
UINT Adapter,
D3DDEVTYPE DeviceType,
HWND hFocusWindow,
DWORD BehaviorFlags,
D3DPRESENT_PARAMETERS *pPresentationParameters,
IDirect3DDevice9** ppReturnedDeviceInterface
);
The resulting device object will be used throughout your game to access the video adapter
for drawing. The
CreateDevice
function requires a total of six parameters and has a return
value of type
HRESULT
. If the function call succeeds, it returns a value of
D3D_OK
; otherwise,
there are three possible return values:
■
D3DERR_INVALIDCALL
. One of the given parameters may be invalid.
■
D3DERR_NOTAVAILABLE
. The device doesn’t support this call.
■
D3DERR_OUTOFVIDEOMEMORY
. The video adapter doesn’t have enough video memory to
complete this call.
t i p
It’s always a good idea to check the return values of Direct3D functions to confirm that the objects
were created correctly. Most Direct3D functions return a value of D3D_OK if the creation was
successful.

02 DX9_GP CH02 3/12/04 4:13 PM Page 18
18
Chapter 2
■
Your First DirectX Program
Following are the parameters required by
CreateDevice
:
■
Adapter
. Type
UINT
. This is the number of the video adapter that the device will be
created for. Most game applications send the value
D3DADAPTER_DEFAULT
, which corre-
sponds to the primary video adapter in the machine.
■
DeviceType
. Type
D3DDEVTYPE
. There are three possible device types to choose from:
•
D3DDEVTYPE_HAL
. The device uses hardware acceleration and rasterization.
•
D3DDEVTYPE_REF
. The Microsoft reference rasterizer is used.
•
D3DDEVTYPE_SW
. A pluggable software device is used.
■
hFocusWindow
. Type
HWND
. This is the window to which this device will belong.
■
BehaviorFlags
. Type
DWORD
. This parameter allows multiple flags to be passed that
specify how the device should be created. The examples presented here will only be
using the
D3DCREATE_SOFTWARE_VERTEXPROCESSING
flag, which specifies that vertex pro-
cessing will be handled in software.
■
PresentationParamters
. Type
D3DPRESENT_PARAMETERS
. This structure controls how the
device will be presented, such as whether this is a windowed application or
whether this device will include a backbuffer. The
D3DPRESENT_PARAMETERS
structure is
defined like this:
typedef struct _D3DPRESENT_PARAMETERS_ {
UINT BackBufferWidth, BackBufferHeight;
D3DFORMAT BackBufferFormat;
UINT BackBufferCount;
D3DMULTISAMPLE_TYPE MultiSampleType;
DWORD MultiSampleQuality;
D3DSWAPEFFECT SwapEffect;
HWND hDeviceWindow;
BOOL Windowed;
BOOL EnableAutoDepthStencil;
D3DFORMAT AutoDepthStencilFormat;
DWORD Flags;
UINT FullScreen_RefreshRateInHz;
UINT PresentationInterval;
} D3DPRESENT_PARAMETERS;
Table 2.1 describes the preceding parameters in more detail.
■
ppReturnedDeviceInterface
. Type
IDirect3Ddevice9
**. This is the variable that will
contain the valid Direct3D device.
After the device has been created, it’s possible to call other Direct3D methods and get
something drawn to the screen.

02 DX9_GP CH02 3/12/04 4:13 PM Page 19
19
Time for DirectX
Member
Description
BackBufferWidth
BackBufferHeight
BackBufferFormat
D3DFORMAT
D3DFMT_UNKNOWN
uses the current display-mode format.
BackBufferCount
MultiSampleType
D3DMULTISAMPLE_NONE
.
MultiSampleQuality
enabled.
SwapEffect
hDeviceWindow
Windowed
TRUE
for a windowed application or
FALSE
for full screen.
EnableAutoDepthStencil
TRUE
enables Direct3D to manage these buffers for you.
AutoDepthStencilFormat
D3DFORMAT
.
Flags
Unless you’re specifically setting one of the
D3DPRESENTFLAG
to 0.
FullScreen_RefreshRateInHz
this parameter must be set to 0.
PresentationInterval
Table 2.1 D3DPRESENT_PARAMETERS
The width of the backbuffer.
The height of the backbuffer.
The format for the backbuffer. This is of type
. In windowed
mode, passing
The number of backbuffers to create.
The levels of full-scene multisampling. Unless multisampling is being
supported specifically, pass
The quality level. Pass 0 to this parameter unless multisampling is
The type of swapping used when switching backbuffers. Examples
presented here use D3DSWAPEFFECT_DISCARD.
The window that owns this device.
This is
This value controls the depth buffers for the application. Setting this to
The format of the depth buffers. This is of type
, set this
The rate at which the adapter refreshes the screen. In windowed mode,
This controls the rate at which the buffers are swapped.
Clearing the Screen
Now that the Direct3D device has been created, you can render to the screen, be it with
an image or a bunch of polygons. The first thing you’ll have to do in your main game loop
is clear the screen. Clearing the screen gives you a clean slate to render to for each frame.
An updated winmain.cpp file can be found in the chapter2\example2 directory on the
CD-ROM.
You can clear the frame with the function call
Clear
.
HRESULT Clear(
DWORD Count,
const D3DRECT *pRects,
DWORD Flags,
D3DCOLOR Color,
float Z,
DWORD Stencil
);

02 DX9_GP CH02 3/12/04 4:13 PM Page 20
20
Chapter 2
■
Your First DirectX Program
Six parameters are required for this function.
The first parameter,
Count
, is the number of rectangles that you will be clearing. If this
value is 0, the second parameter
pRects
must be
NULL
. In this instance, the entire viewing
area of the screen will be cleared, which is the most common behavior. If
count
is a num-
ber greater than 0,
pRects
must point to an array of
D3DRECT
structures designating the rec-
tangular areas of the screen to be cleared.
The
Flags
parameter specifies the buffer to be cleared. There are three possible values for
Flags
:
■
D3DCLEAR_STENCIL
■
D3DCLEAR_TARGET
■
D3DCLEAR_ZBUFFER
The value you’re going to use at the moment is
D3DCLEAR_TARGET
, which specifies the render
target.
Color is a
D3DCOLOR
value containing the color to clear the render target to. Multiple macros
are available that can be used to specify this value, such as
D3DCOLOR_XRGB
.
The
Z
parameter is the value to store in the depth buffer. This value ranges from 0.0f to
1.0f. I’ll go into more detail on the
Z
buffer later.
The
Stencil
parameter holds the value to store in the stencil buffer. When the
Stencil
buffer is not in use, the value should be 0.
Displaying the Scene
Now that you’ve cleared the frame, it’s time to display it to the screen. Direct3D uses the
Present
function to do this. The
Present
function performs the page flipping of the back
buffer.
All the drawing that you’ve been doing up to this point has been to the back buffer. The
back buffer is the area of memory where drawing can be completed before being displayed
to the screen. Page flipping is the process of taking the information contained in the back
buffer and displaying it to the screen. Attempting to update the graphics currently being
displayed results in screen flicker. To keep your graphics updates smooth, all drawing is
done to an offscreen buffer and then copied to the display.
n o t e
Page flipping refers to the swapping of the front and back buffers. For instance, drawing to the back
buffer requires a page flip to occur before its contents can be seen on the screen.

02 DX9_GP CH02 3/12/04 4:13 PM Page 21
21
Time for DirectX
HRESULT Present(
CONST RECT *pSourceRect,
CONST RECT *pDestRect,
HWND hDestWindowOverride,
CONST RGNDATA *pDirtyRegion
);
Present
requires only four parameters:
■
pSourceRect
is a pointer to a
RECT
structure containing the source rectangle to dis-
play from the backbuffer. This value should be
NULL
to use the entire backbuffer,
which is the most common behavior.
■
pDestRect
is another
RECT
that contains the destination rectangle.
■
hDestWindowOverride
is the destination window to use as the target area. This value
should be
NULL
to use the window specified earlier in the presentation parameters
structure.
■
pDirtyRegion
details the region within the buffer that needs to be updated. Again,
this value should be
NULL
to update the whole buffer.
Cleaning Up
The final thing to do in any DirectX application is to clean up and release the objects that
you’ve used. For instance, at the beginning of your program, you created both a Direct3D
object and a Direct3D device. When the application closes, you need to release these
objects so that the resources they’ve used are returned to the system for reuse.
COM objects, which DirectX is based on, keep a reference count that tells the system when
it’s safe to remove these objects from memory. By using the
Release
function, you decre-
ment the reference count for an object. When the reference count reaches 0, the system
reclaims these resources.
For example, to release the Direct3D device, you would use the following:
If ( pd3dDevice != NULL )
pd3dDevice->Release( );
The
if
statement first checks to make sure that the variable
pd3dDevice
, which was assigned
to the device earlier, is not
NULL
and then calls the device’s
Release
function.
t i p
Always check to make sure that DirectX objects are not
NULL
before calling
Release
on them.
Attempting to release an invalid pointer causes your game to crash.

02 DX9_GP CH02 3/12/04 4:13 PM Page 22
22
Chapter 2
■
Your First DirectX Program
Updating the Code
Now that you’ve seen how to get DirectX up and running, it’s time to add the code to do
it yourself. These code additions will be made to the winmain.cpp file that was created
earlier.
The first step when writing any DirectX-enabled application is adding the Direct3D
header.
#include <d3d9.h>
The following two variables need to be added to the globals section at the top of the code.
LPDIRECT3D9
pD3D;
// the Direct3D object
LPDIRECT3DDEVICE9
pd3dDevice;
// the Direct3D device
The
LPDIRECT3D9
type says that you’re creating a long pointer to the
IDirect3D9
interface.
The
LPDIRECT3DDEVICE9
type is creating a pointer to the
IDirect3DDevice9
interface.
Next, you add a call to the
initDirect3D
function, which you’ll be defining a bit further
down in the code. This call should be placed right after the
initWindow
call within the
WinMain
function.
// called after creating the window
If ( !initDirect3D( ) )
return false;
Changing the Message Loop
Here you need to replace the default Windows message loop with one that is useful for
games. The original message loop uses a function call to
GetMessage
that checks whether
messages are waiting for the application; if there are messages,
GetMessage
waits to return
until the message has been posted.
PeekMessage
checks for messages and returns immedi-
ately, allowing your game to call its own functions in the loop.
In this instance, you will add an
else
clause after the call to
PeekMessage
to call the game’s
render
function. The
render
function takes care of drawing everything to the screen. This
function will be defined in a bit.
if( PeekMessage( &msg, NULL, 0U, 0U, PM_REMOVE ) )
{
TranslateMessage ( &msg );
DispatchMessage ( &msg );
}
else
{
render( );
}

02 DX9_GP CH02 3/12/04 4:13 PM Page 23
23
Updating the Code
The Init Function
The
initDirect3D
function creates the Direct3D object and the device.
/*********************************************************************
* initDirect3D
*********************************************************************/
bool initDirect3D(void)
{
pD3D = NULL;
pd3dDevice = NULL;
// Create the DirectX object
if( NULL == ( pD3D = Direct3DCreate9( D3D_SDK_VERSION ) ) )
{
return false;
}
// Fill the presentation parameters structure
D3DPRESENT_PARAMETERS d3dpp;
ZeroMemory( &d3dpp, sizeof( d3dpp ) );
d3dpp.Windowed = TRUE;
d3dpp.SwapEffect = D3DSWAPEFFECT_DISCARD;
d3dpp.BackBufferFormat = D3DFMT_UNKNOWN;
d3dpp.BackBufferCount = 1;
d3dpp.BackBufferHeight = 480;
d3dpp.BackBufferWidth = 640;
d3dpp.hDeviceWindow
= wndHandle;
// Create a default DirectX device
if( FAILED( pD3D->CreateDevice( D3DADAPTER_DEFAULT,
D3DDEVTYPE_REF,
wndHandle,
D3DCREATE_SOFTWARE_VERTEXPROCESSING,
&d3dpp,
&pd3dDevice ) ) )
{
return false;
}
return true;
}

02 DX9_GP CH02 3/12/04 4:13 PM Page 24
24
Chapter 2
■
Your First DirectX Program
At the beginning of this function, you’re making a call to
Direct3DCreate9
. This creates the
Direct3D object, which in turn allows you to create the device. Next, you fill out the pre-
sentation parameters structure. I’m setting this to handle a 640
× 480 window.
Then the
CreateDevice
function is called, and the structure you just filled in is passed as
the second-to-last parameter. Here you’re telling
CreateDevice
that you want to use the
primary video adapter by passing
D3DADAPTER_DEFAULT
. The
D3DDEVTYPE_REF
says that you
want to create a device that uses the default Direct3D implementation. You’re also using
D3DCREATE_SOFTWARE_VERTEXPROCESSING
to ensure that your sample runs on most hardware.
Hardware vertex processing is available on some of the newer video cards. The final para-
meter is
&pd3dDevice
. This is where
CreateDevice
stores the Direct3D device that you’ve
created.
The Render Function
The
render
function is where the actual drawing takes place. As you’ll recall from earlier,
this function is called from within the main loop and is called once per frame.
/*********************************************************************
* render
*********************************************************************/
void render(void)
{
// Check to make sure you have a valid Direct3D device
if( NULL == pd3dDevice )
return;// Clear the back buffer to a blue color
pd3dDevice->Clear( 0, NULL, D3DCLEAR_TARGET,
D3DCOLOR_XRGB( 0,0,255 ), 1.0f, 0 );
// Present the back buffer contents to the display
pd3dDevice->Present( NULL, NULL, NULL, NULL );
}
This is a simple example of a
render
function. First, you check to make sure that you have
a valid Direct3D device by checking it against
NULL
. If this object has been released before
calling the
render
function, you don’t want further code in here to execute.
Next, you need to make use of the
Clear
function presented earlier. Because you want to
clear the entire buffer, you need to pass 0 and
NULL
as the first two parameters. The
D3DCLEAR_TARGET
parameter tells DirectX that you want the render buffer to be cleared.
The next parameter calls for a type of
D3DCOLOR
. I’m using the macro
D3DCOLOR_XRGB
to
clear the screen to a blue color specified by the values
R=0
,
G=0
, and
B=255
.

02 DX9_GP CH02 3/12/04 4:13 PM Page 25
25
Updating the Code
You’ll also need to pass a float value of 1.0 into the depth buffer. The depth buffer, which
helps Direct3D determine how far away an object is from the viewer, can hold a value any-
where from 0.0 to 1.0. The higher the value is, the farther the distance from the viewer.
The stencil buffer allows for the masking of certain areas of an image so they aren’t dis-
played. Because the stencil buffer is not currently being used, a value of 0 is passed to this
parameter.
The last thing that needs to be done during the render function is to display the contents
to the screen. This happens with a call to
Present
. Again, because you want the whole back
buffer flipped to the screen,
NULL
values are passed for all parameters to the
Present
func-
tion. It’s rare that you would want to flip only a portion of the back buffer.
The cleanUp Function
Of course, after the application ends, you need to release the objects that were created.
This is handled with the following code.
void cleanUp (void)
{
// Release the device and the Direct3D object
if( pd3dDevice != NULL )
pd3dDevice->Release( );
if( pD3D != NULL )
pD3D->Release( );
}
First, you need to make sure that the objects have not been released before by checking
whether they are equal to
NULL
. If they’re not, you call their
Release
method. The preced-
ing code should be added right before the return call at the end of the
WinMain
function.
Adding the DirectX Libraries
At last, you have all the code you need to create your first DirectX application. Before you
can compile and run this, you have to do one more thing: link in the DirectX libraries. For
this simple example, you only need to link with
d3d9.lib
.
1. Select the Properties option from the Project menu. The Property Pages dialog box
appears. This dialog box is shown in Figure 2.6.
2. Click the Linker option in the left pane. This expands to show the included
options.
3. Next, select the Input option. The dialog box changes and should reflect what’s
shown in Figure 2.7.
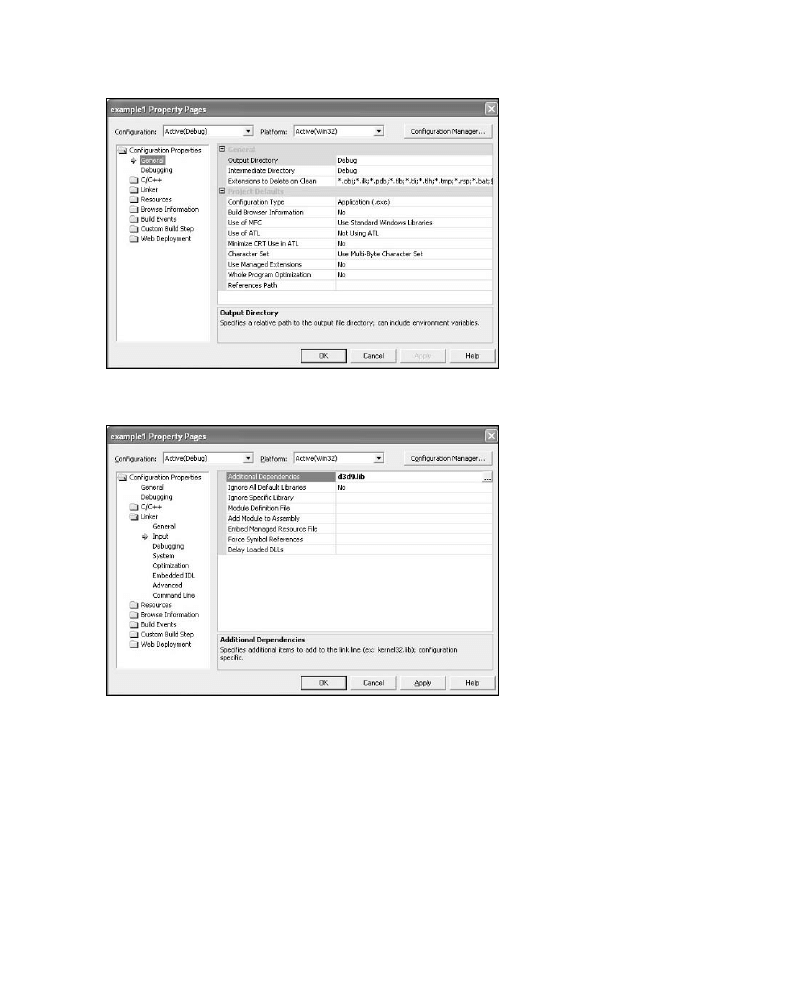
02 DX9_GP CH02 3/12/04 4:13 PM Page 26
26
Chapter 2
■
Your First DirectX Program
Figure 2.6 The Property Pages dialog box.
Figure 2.7 Changing the Linker option in the Property Pages
dialog box.
4. Type
d3d9.lib
into the Additional Dependencies field and click OK.
Compile and run the application. Unlike the white window from before, this window
should now display a blue background color. Although this application doesn’t show the
depth of what DirectX can do, it does give you the basics to start with.

02 DX9_GP CH02 3/12/04 4:13 PM Page 27
27
Taking the Game Full Screen
n o t e
Multiple libraries are needed for different DirectX functionality. You only need to link to those spe-
cific libraries that you are accessing functions within.
Taking the Game Full Screen
So far, the examples that you’ve gone through all take place in a 640
× 480 window on the
desktop. Although this is fine for applications, when you’re trying to immerse yourself in
a virtual world, nothing but full screen will do.
You need to make just a few changes to your code to transform your game from being
a window on the desktop to being full screen. One of the biggest changes is within the
CreateWindow
function.
If you’ll recall, this is the
CreateWindow
function you’ve been using.
wndHandle = CreateWindow(“DirectXExample”,
“DirectXExample”,
WS_OVERLAPPEDWINDOW,
CW_USEDEFAULT,
CW_USEDEFAULT,
640,
480,
NULL,
NULL,
hInstance,
NULL);
The third parameter, the window style, has been set to
WS_OVERLAPPEDWINDOW
up to this point.
This is the standard style for a desktop application, which includes a title bar, a border, and
the Minimize and Close buttons. Before you can create a full-screen window, the window
style needs to be changed to this:
WS_EX_TOPMOST | WS_POPUP | WS_VISIBLE
The first part of this new style,
WS_EX_TOPMOST
, tells this window that it will be created above
all other windows.
WS_POPUP
creates a window with no border, title bar, or system menus.
The final part,
WS_VISIBLE
, tells the window to display itself.
The new function call for
CreateWindow
looks like this:
wndHandle = CreateWindow(“DirectXExample”,
“DirectXExample”,
WS_EX_TOPMOST | WS_POPUP | WS_VISIBLE,

02 DX9_GP CH02 3/12/04 4:13 PM Page 28
28
Chapter 2
■
Your First DirectX Program
CW_USEDEFAULT,
CW_USEDEFAULT,
640,
480,
NULL,
NULL,
hInstance,
NULL);
The next step is to make a few minor changes to your
initDirect3D
function. Within the
D3DPRESENT_PARAMETERS
structure that is being passed to
CreateDevice
, you need to modify
two items: the
Windowed
and
BackBufferFormat
variables. Currently, you’re setting these vari-
ables like this:
d3dpp.BackBufferFormat = D3DFMT_UNKNOWN;
d3dpp.Windowed = TRUE;
n o t e
Using
D3DFMT_UNKNOWN
for the
BackBufferFormat
variable causes Direct3D to use the current dis-
play format for the desktop.
To enable full-screen mode within DirectX, the
Windowed
and
BackBufferFormat
variables
need to be changed to this:
d3dpp.BackBufferFormat = D3DFMT_X8R8G8B8;
d3dpp.Windowed = FALSE;
The obvious change is the
d3dpp.Windowed
change. Basically, setting this to
FALSE
lets
CreateDevice
know that you want full screen.
The
d3dpp.BackBufferFormat
change is not so obvious. When you were creating a windowed
application, you didn’t necessarily need to know what format the desktop was using. Pass-
ing
D3DFMT_UNKNOWN
automatically takes the current setting and uses it. When you want full
screen, you need to specifically tell Direct3D what
D3DFORMAT
you want to use. The
D3DFORMAT
is a value that represents the bit depth of the screen. For example, I chose
D3DFMT_X8R8G8B8
as a default format that most video cards should support.
D3DFMT_X8R8G8B8
represents a 32-
bit format that includes 8 bits for the red component, 8 bits for the green component, and
8 bits for the blue component. This format also includes 8 bits that are unused.
These changes and the full code listing can be found in the chapter2\example3 directory
on the CD-ROM.

02 DX9_GP CH02 3/12/04 4:13 PM Page 29
29
Taking the Game Full Screen
The next section explains how to query the available formats and how to determine which
video modes your system supports.
Video Modes and Formats
If a game you write runs only in windowed mode on the desktop, then knowing which
video modes the computer supports isn’t that important; however, when you want your
game running full screen, it’s vital to know which modes the computer supports. Most
computers support a 640
× 480 screen resolution, but what about 800 × 600 or 1024 ×
768? Not all video adapters support these higher resolutions. And if they do, will they give
you the bit depth you want? That’s why, when you write a game that supports full screen,
it’s best to query the hardware to make sure that it supports what your game needs. To do
this, you use the functions provided to you by Direct3D through the
IDirect3D9
interface.
The first function you need was actually covered earlier:
UINT IDirect3D9::GetAdapterCount(VOID);
To recap a bit, this function returns an unsigned integer that holds the number of video
adapters in the system. DirectX can support multiple video adapters, which allows games
to run across multiple screens. To keep things simple, though, you’re going to assume only
one video adapter in the following explanations.
Gathering Video Adapter and Driver Information
Most times, it’s useful to have certain information about the video adapter in a machine.
For instance, you might want to know the resolutions that the video adapter supports, or
the manufacturer of the device. Using the function
GetAdapterIdentifier
, you can gather
this information and much more.
GetAdapterIdentifier
is defined like this:
HRESULT GetAdapterIdentifier(
UINT Adapter
DWORD Flags,
D3DADAPTER_IDENTIFIER9 *pIdentifier
);
■
The first parameter is an unsigned integer that specifies which video adapter you
want information for. Because I’m assuming only one adapter right now, the value
of
D3DADAPTER_DEFAULT
, which means the primary video adapter, should be passed.
■
The second parameter,
Flags
, represents the
WHQLLevel
of the driver.
■
The third and final parameter is a pointer to a
D3DADAPTER_IDENTIFIER9
structure.
This structure gets filled with the information that is returned from the display
adapter.

02 DX9_GP CH02 3/12/04 4:13 PM Page 30
30
Chapter 2
■
Your First DirectX Program
The
D3DADAPTER_IDENTIFIER9
structure provides the following information:
typedef struct _D3DADAPTER_IDENTIFIER9 {
// the name of the driver
char Driver[MAX_DEVICE_IDENTIFIER_STRING];
// a textual description of the device
char Description[MAX_DEVICE_IDENTIFIER_STRING];
// a short text version of the device name
char DeviceName[32];
// the version of the driver installed
LARGE_INTEGER DriverVersion;
// This value holds the bottom 32 bits of the driver version
DWORD DriverVersionLowPart;
// This value holds the upper 32 bits of the driver version
DWORD DriverVersionHighPart;
// the ID of the manufacturer
DWORD VendorId;
// the ID of the particular device
DWORD DeviceId;
// the second part of the device ID
DWORD SubSysId;
// the revision level of the device chipset
DWORD Revision;
// a unique identifier for the device
GUID DeviceIdentifier;
// the level of testing that this driver has gone through
DWORD WHQLLevel;
} D3DADAPTER_IDENTIFIER9;
This structure holds all the specific data concerning the adapter and the device driver that’s
installed. The full structure is explained in more detail in the DirectX documentation.
Getting the Display Modes for an Adapter
The next step is getting the details on the display modes that the video adapter supports.
To do this, you first have to check how many display modes are available. This is done
using a function called
GetAdapterModeCount
, which is defined as follows:
UINT GetAdapterModeCount(
UINT Adapter,
D3DFORMAT Format
);

02 DX9_GP CH02 3/12/04 4:13 PM Page 31
31
Taking the Game Full Screen
The first parameter is the number of the adapter you want to query. Again, you use the
value of
D3DADAPTER_DEFAULT
.
The second parameter is asking for the
D3DFORMAT
that you want to check for. Earlier I
used
D3DFMT_X8R8G8B8
, which was 8 bits for red, 8 bits for green, 8 bits for blue, and 8 bits
that were unused. You can pass in any of the formats that Direct3D defines, and
GetAdapterModeCount
will return the number of video modes that fit this format. Table 2.2
lists some of the
D3DFORMAT
s that DirectX has available.
Format Description
D3DFMT_R8G8B8
24-bit RGB pixel format with 8 bits per channel.
D3DFMT_A8R8G8B8
D3DFMT_X8R8G8B8
D3DFMT_R5G6B5
D3DFMT_X1R5G5B5
D3DFMT_A1R5G5B5
for alpha.
D3DFMT_A4R4G4B4
D3DFMT_R3G3B2
Table 2.2 D3DFORMATs
32-bit ARGB pixel format with alpha, using 8 bits per channel.
32-bit RGB pixel format, where 8 bits are reserved for each color.
16-bit RGB pixel format with 5 bits for red, 6 bits for green, and 5 bits for blue.
16-bit pixel format, where 5 bits are reserved for each color.
16-bit pixel format, where 5 bits are reserved for each color and 1 bit is reserved
16-bit ARGB pixel format with 4 bits for each channel.
8-bit RGB texture format using 3 bits for red, 3 bits for green, and 2 bits for blue.
The final function that you need to make use of is
EnumAdapterModes
. This function fills in
a
D3DDISPLAYMODE
structure for each of the modes available. Here’s the definition of the
function
EnumAdapterModes
:
HRESULT EnumAdapterModes(
UINT Adapter,
D3DFORMAT Format,
UINT Mode,
D3DDISPLAYMODE* pMode
);
Again, the first parameter,
Adapter
, can be passed
D3DADAPTER_DEFAULT
. The second parame-
ter format is the
D3DFORMAT
you are querying modes for. The third parameter,
Mode
, is the
number of the mode you are looking at. Remember that
GetAdapterModeCount
returned the
number of modes this adapter has? Mode is any value from 0 up to this value. The final
parameter is a pointer to a
D3DDISPLAYMODE
structure. This structure holds information
about this video mode, such as its width, height, refresh rate, and format.

02 DX9_GP CH02 3/12/04 4:13 PM Page 32
32
Chapter 2
■
Your First DirectX Program
A Code Example for Querying the Video Adapter
The following bit of code is from example4, located in the chapter2\example4 directory
on the CD-ROM. This code sample shows the exact steps and calls needed to display a dia-
log box listing the display modes available for a particular
D3DFORMAT
.
I took the
initDirect3D
function from previous examples and changed it to gather the
needed information from the video adapter.
bool initDirect3D()
{
pD3D = NULL;
// Create the DirectX object
if( NULL == ( pD3D = Direct3DCreate9( D3D_SDK_VERSION ) ) )
{
return false;
}
First you create the Direct3D object. You’ll use this to access the needed functions.
// This section gets the adapter details
D3DADAPTER_IDENTIFIER9 ident;
pD3D->GetAdapterIdentifier(D3DADAPTER_DEFAULT, 0, &ident);
Here I defined a
D3DADAPTER_IDENTIFIER9
structure and passed it into the
GetAdapterIdentifier
function. Using this, I was able to obtain the following details.
addItemToList(“Adapter Details”);
addItemToList(ident.Description);
addItemToList(ident.DeviceName);
addItemToList(ident.Driver);
I’m calling the
addItemToList
helper function to add the details to be shown in a dialog box
later.
// collects the modes this adapter has
UINT numModes = pD3D->GetAdapterModeCount(
D3DADAPTER_DEFAULT,
D3DFMT_X8R8G8B8);
Next, I’m using
GetAdapterModeCount
to get the number of modes. I then use this number
in the
for
loop that follows. Here you start looping through the modes and gathering the
details for each one.
for (UINT i=0; I < numModes; i++)
{
D3DDISPLAYMODE mode;
// Define the D3DDISPLAYMODE structure
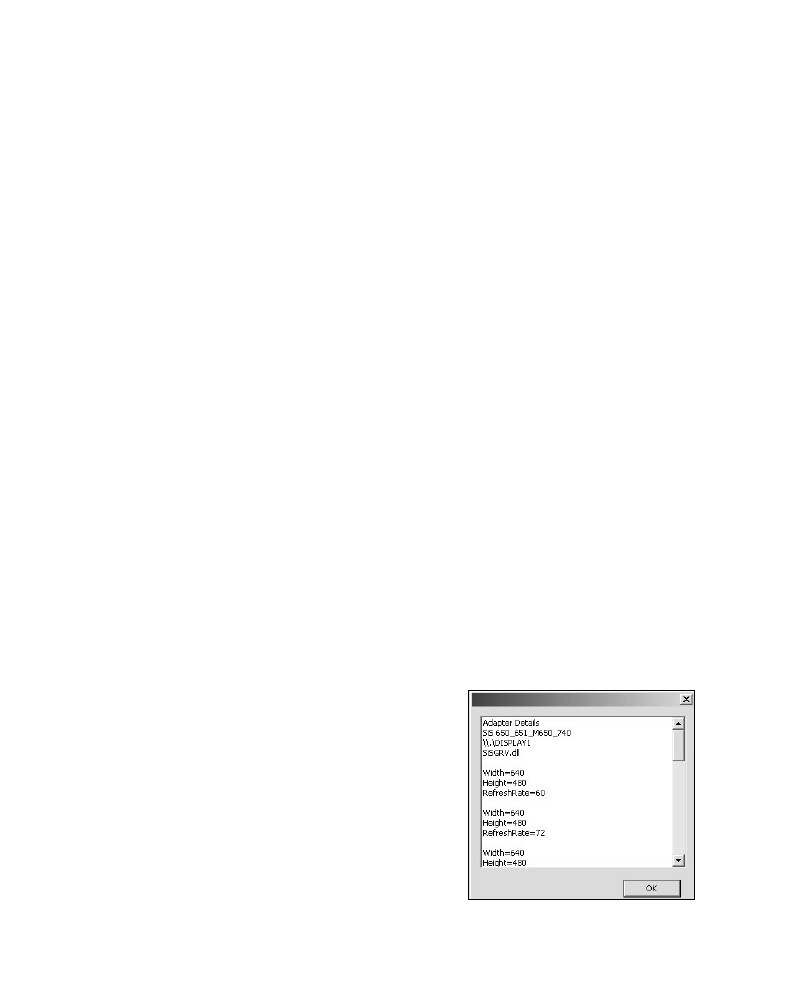
02 DX9_GP CH02 3/12/04 4:13 PM Page 33
33
Taking the Game Full Screen
char modeString[255];
// This is a temporary char array
// Get the displaymode structure for this adapter mode
pD3D->EnumAdapterModes(D3DADAPTER_DEFAULT,
D3DFMT_X8R8G8B8,
i,
&mode);
// Draw a blank line in the list box
addItemToList(“”);
// Output the width
sprintf(modeString, “Width=%d”,mode.Width);
addItemToList(modeString);
// Output the height
sprintf(modeString, “Height=%d”,mode.Height);
addItemToList(modeString);
// Output the refresh rate
sprintf(modeString, “Refresh Rate=%d”,mode.RefreshRate);
addItemToList(modeString);
}
return true;
}
This is a simple helper function that takes one parameter of
STL string
and adds it to the
end of a vector. By the end of the
initDirect3D
function, the vector will include all the
details concerning the video adapter.
// The adapterDetails variable is a vector that contains strings; each string will
// hold the information for the different video modes
std::vector<std::string> adapterDetails;
void addItemToList(std::string item)
{
adapterDetails.push_back(item);
}
Figure 2.8 shows the dialog box and the details that
you should get when you run this example. Because
everyone has different video cards, expect the details
to vary based on the machine that this is run on.
Figure 2.8 Video modes details.

02 DX9_GP CH02 3/12/04 4:13 PM Page 34
34
Chapter 2
■
Your First DirectX Program
t i p
The Standard Template Library (STL) provides many useful items, such as the string and vector types
that you’ve already used, as well as others. Using STL types also eases your work when porting to
additional platforms, such as UNIX or gaming consoles.
Chapter Summary
This chapter covered a lot of information, ranging from the beginnings of a project to a
workable DirectX application. These examples might not show much, but they are the
building blocks for everything you will do going forward.
What You Have Learned
In this chapter, you learned the following:
■
How the Direct3D object and Direct3D device are created
■
The proper method for clearing the screen each frame
■
The changes to a standard message loop that need to be made for games
■
How to add the DirectX libraries to your game projects
■
How to determine the video adapter in a system and what its capabilities are
The next chapter introduces surfaces and the creation of animated sprites.
Review Questions
You can find the answers to Review Questions and On Your Own exercises in Appendix
A, “Answers to End-of-Chapter Exercises.”
1. What’s the first DirectX object that needs to be created in any application?
2. What does the
GetAdapterCount
function do?
3. The
D3DFORMAT
of
D3DFMT_A8R8G8B8
defines how many bits for each color?
4. What DirectX function is required to blank the screen to a specific color?
5. What function do you use to find the number of modes that are available on a
video adapter?
On Your Own
1. Change example 2 on the CD-ROM to clear the screen to green instead of blue.
2. Update example 4 on the CD-ROM to search your system for the display modes
available for another
D3DFORMAT
other than
D3DFMT_X8R8G8B8
.

03 DX9_GP CH03 3/12/04 4:13 PM Page 35
chapter 3
Surfaces, Sprites,
and Salmon
S
prite-based and 2D games still have a big part to play in the game market. Not all
games require the latest in 3D video hardware; fun and timeless games like Tetris
are completely 2D and still immensely popular. This chapter introduces you to
some simple ways to use DirectX for the creation of sprite-based games.
Here’s what you’ll learn in this chapter:
■
What surfaces are and how they can be used
■
How to gain access to the back buffer
■
How to create offscreen surfaces
■
How to load a bitmap easily
■
How to create and use sprites
■
How to animate sprites
■
How to use timers for smooth animation
You’ve Just Touched the Surface
Surfaces are an integral part of DirectX. Surfaces are areas within memory that are used
for the storage of image information. They store images and textures and are used to rep-
resent the display buffers. Surfaces are stored internally as a contiguous block of memory,
usually residing on the video card, but occasionally in main system memory.
This chapter covers two specific types of surfaces: display buffers and offscreen surfaces.
35

03 DX9_GP CH03 3/12/04 4:13 PM Page 36
36
Chapter 3
■
Surfaces, Sprites, and Salmon
The Display Buffers
There are two display buffers that you have to worry about: the front buffer and the back
buffer. These are the areas of video memory where your game is drawn.
The front buffer is the surface that represents the viewable area of your game window.
Everything that you can see within your application window is considered the front buffer
or drawing area. In full-screen mode, the front buffer is expanded to fill the whole screen.
The second buffer is the back buffer. As you’ll recall from earlier, the back buffer is where
you perform all the drawing. After the drawing to the back buffer is complete, you use the
Present function to display its contents.
The back buffer is created during the call to
CreateDevice
by specifying the
BackBufferCount
parameter in the
D3DPRESENT_PARAMETERS
structure.
n o t e
Attempting to draw directly to the front buffer results in your graphics flashing and tearing. Graph-
ics should always be drawn to the back buffer first, and then displayed using the Present method.
Offscreen Surfaces
Offscreen surfaces are areas of video or system memory
that hold the graphics that your game needs. For instance,
if you’re creating an overhead role-playing game, you
need an area to store the tiles that represent the different
terrain, as well as the graphics for your characters. An off-
screen surface would be a perfect choice for this task.
Graphics for use within DirectX are usually bitmaps. Fig-
ure 3.1 shows an example bitmap that would be loaded
Figure 3.1 Example tiles for a
for use in your game.
2D role playing game.
n o t e
Some older video cards allow only for the creation of offscreen surfaces that are the same resolu-
tion as the primary buffer. Newer video cards allow for creation of larger surfaces.
Offscreen surfaces, represented by the
IDirect3DSurface9
interface, are created using the
function
CreateOffscreenPlainSurface
. You must call this function for each surface you
want to create. The
CreateOffscreenPlainSurface
function is defined as follows:
HRESULT CreateOffscreenPlainSurface(
UINT Width,
// width of the surface
UINT Height,
// height of the surface

03 DX9_GP CH03 3/12/04 4:13 PM Page 37
37
You’ve Just Touched the Surface
D3DFORMAT Format,
// D3DFORMAT type
DWORD Pool,
// memory pool
IDirect3DSurface9** ppSurface,
// resulting surface pointer
HANDLE* pHandle
// always NULL
);
CreateOffscreenPlainSurface
has six parameters:
■
Width
. This parameter is the width in pixels that the created surface should be.
■
Height
. This is the height in pixels of the created surface.
■
Format
. This is the
D3DFORMAT
that the surface should use.
■
Pool
. This is the memory location in which the surface will be placed. You can
choose from four types of memory pools:
•
D3DPOOL_DEFAULT
. The system places the resource in the most appropriate type of
memory. This can be either in video or system memory.
•
D3DPOOL_MANAGED
. The resource is copied to the appropriate memory when
needed.
•
D3DPOOL_SYSTEMMEM
. The surface is created in system memory.
•
D3DPOOL_SCRATCH
. Again, this is created in system memory but is not directly
accessible by DirectX.
■
PpSurface
. This is a pointer to an
IDirect3DSurface9
interface. This variable holds the
reference to the surface after it is created.
■
pHandle
. This is a reserved parameter and should always be
NULL
.
Next is a sample call to
CreateOffscreenPlainSurface
. This sample creates a surface that is
640
× 480 resolution and has the display format of
D3DFMT_X8R8G8B8
.
hResult = CreateOffscreenPlainSurface(
640, // the width of the surface to create
480, // the height of the surface to create
D3DFMT_X8R8G8B8, // the surface format
D3DPOOL_DEFAULT, // the memory pool to use
&surface,
// holds the resulting surface
NULL);
// reserved; should be NULL
// Check the return value to make sure that this function call was successful
if (FAILED(hResult))
return NULL;
Loading a Bitmap to a Surface
Because bitmaps are commonly used for graphics within Windows, I’ll be using this for-
mat exclusively in the examples. DirectX provides functions within the D3DX library that
enable the easy and quick loading of bitmaps and their drawing.

03 DX9_GP CH03 3/12/04 4:13 PM Page 38
38
Chapter 3
■
Surfaces, Sprites, and Salmon
D3DX Explained
The D3DX library is a collection of commonly used functions that Microsoft has provided with the
DirectX SDK. Included in this collection are functions to do any of the following:
■
Handle loading images
■
Load and manipulate 3D meshes
■
Perform shader effects
■
Make transforms and rotations simpler
You can use functions within the D3DX library by including the
d3dx9.h
file and linking to
d3dx9.lib
.
n o t e
Many image formats are used in game development today. Some companies use common formats
such as bitmap or Targa, whereas others create their own proprietary formats to protect their art
assets. Rarely are games released with images that are editable by the end user.
The function
D3DXLoadSurfaceFromFile
performs the loading of a source bitmap into an off-
screen surface. The
D3DXLoadSurfaceFromFile
function is defined as follows:
HRESULT D3DXLoadSurfaceFromFile(
LPDIRECT3DSURFACE9 pDestSurface,
CONST PALETTEENTRY* pDestPalette,
CONST RECT* pDestRect,
LPCTSTR pSrcFile,
CONST RECT* pSrcRect,
DWORD Filter,
D3DCOLOR ColorKey,
D3DXIMAGE_INFO* pSrcInfo
);
D3DXLoadSurfaceFromFile
takes eight parameters:
■
pDestSurface
. A pointer to the surface that should hold the incoming bitmap image.
■
pDestPalette
. A pointer to a
PALEETTEENTRY
structure. This parameter is used only for
256-color bitmaps. For 16-, 24-, and 32-bit images, this parameter should be set to
the value of
NULL
.
■
pDestRect
. A pointer to a
RECT
structure that represents the rectangular area of the
surface that the bitmap should be loaded to.

03 DX9_GP CH03 3/12/04 4:13 PM Page 39
39
You’ve Just Touched the Surface
■
pSrcFile
. A string representing the file name of the bitmap to load.
■
pSrcRect
. A pointer to a
RECT
structure that represents the area of the source bitmap
that should be loaded into the surface.
■
Filter
. A
D3DX_FILTER
type that specifies the type of filtering that should be applied.
■
ColorKey
. The
D3DCOLOR
format of the color that should be used for transparency.
The default color value is 0.
■
pSrcInfo
. A pointer to a
D3DXIMAGE_INFO
structure. This structure holds information
about the source bitmap file, such as width, height, and bit depth.
Here’s an example of a simple call to
D3DXLoadSurfaceFromFile
, which loads a bitmap called
test.bmp
into an offscreen surface. Remember: This surface must first be created with a call
to
CreateOffscreenPlainSurface
.
IDirect3DSurface9* surface;
hResult = D3DXLoadSurfaceFromFile( surface,
NULL,
NULL,
“test.bmp”,
NULL,
D3DX_DEFAULT,
0,
NULL );
if ( FAILED( hResult ) )
return NULL;
Following this call, the bitmap will reside in memory and be ready for use in your game.
Using DirectX to Render a Bitmap
Now that you’ve seen how to create a surface and how to load a bitmap into it, it’s time to
display it. To do this, you have to make some changes to the
Render
function that was cre-
ated earlier.
The previous
Render
function looked like this.
/*********************************************************************
* Render(void)
*********************************************************************/
void Render(void)
{
// Check to make sure you have a valid Direct3D device
if( NULL == pd3dDevice )
return;

03 DX9_GP CH03 3/12/04 4:13 PM Page 40
40
Chapter 3
■
Surfaces, Sprites, and Salmon
// Clear the back buffer to a blue color
pd3dDevice->Clear( 0, NULL, D3DCLEAR_TARGET,
D3DCOLOR_XRGB(0,0,255), 1.0f, 0 );
// Present the back buffer contents to the display
pd3dDevice->Present( NULL, NULL, NULL, NULL );
}
To get the bitmap shown on the screen, you’ll need to use the StretchRect function.
StretchRect
performs rectangular copies between two surfaces.
The
StretchRect
function is defined as follows:
HRESULT StretchRect(
IDirect3DSurface9 *pSourceSurface,
CONST RECT *pSourceRect,
IDirect3DSurface9 *pDestSurface,
CONST RECT *pDestRect,
D3DTEXTUREFILTERTYPE Filter
);
StretchRect
has the following parameters:
■
pSourceSurface
. A pointer to the offscreen surface that has already been created.
■
pSourceRect
. A pointer to a
RECT
structure that holds the area to be copied. If this
parameter is
NULL
, the full source surface is copied.
■
pDestSurface
. A pointer to the destination surface. In most cases, this will be a
pointer to the back buffer surface.
■
pDestRect
. A pointer to the
RECT
structure that represents the area on the destination
surface where the copy will be placed. This parameter can be
NULL
if no destination
RECT
is needed.
■
Filter
. The filter type to apply to this copy. Sending the value of
D3DTEXF_NONE
indi-
cates that no filtering should be applied.
You might be wondering how you get a pointer to the back buffer surface. The aptly
named function
GetBackBuffer
does the trick. A standard call to this function would look
like this:
GetBackBuffer( 0,
// a value that represents the swap chain
0,
// index of the buffer chain;
// 0 if only one back buffer is available
D3DBACKBUFFER_TYPE_MONO, // the only valid type
&backbuffer); // IDirect3DSurface9 object for the back buffer

03 DX9_GP CH03 3/12/04 4:13 PM Page 41
41
You’ve Just Touched the Surface
Including the new calls to
StretchRect
and
GetBackBuffer
, your new
Render
function now
looks like this:
/*********************************************************************
* Render
*********************************************************************/
void Render(void)
{
// This will hold the back buffer
IDirect3DSurface9* backbuffer = NULL;
// Check to make sure you have a valid Direct3D device
if( NULL == pd3dDevice )
return;
// Clear the back buffer to a blue color
pd3dDevice->Clear( 0, NULL, D3DCLEAR_TARGET,
D3DCOLOR_XRGB(0,0,255), 1.0f, 0 );
// Get the back buffer
pd3dDevice->GetBackBuffer( 0,
0,
D3DBACKBUFFER_TYPE_MONO,
&backbuffer );
// Copy the offscreen surface to the back buffer
// Note the use of NULL values for the source and destination RECTs
// This ensures a copy of the entire surface to the back buffer
pd3dDevice->StretchRect( srcSurface,
NULL,
backbuffer,
NULL,
D3DTEXF_NONE );
// Present the back buffer contents to the display
pd3dDevice->Present ( NULL, NULL, NULL, NULL );
}
You can find the full source listing for this example in the chapter3\example1 directory
on the CD-ROM. Compiling and running this example produces the window shown in
Figure 3.2.

03 DX9_GP CH03 3/12/04 4:13 PM Page 42
42
Chapter 3
■
Surfaces, Sprites, and Salmon
Figure 3.2 Background bitmap displayed using the function
StretchRect
.
StretchRect Revisited
Previously, you used
StretchRect
to copy the whole offscreen surface to the back buffer, but
that only touches on the usefulness of this function.
StretchRect
lets you copy one or more
portions of an offscreen surface, allowing the surface to contain many smaller graphics.
For instance, an offscreen surface can hold multiple frames of an animation or include
different pieces needed for a puzzle game.
StretchRect
has two parameters —
pSourceRect
and
pDestRect
— that are used to define the areas to copy. Figure 3.3 shows an example of
using a source and destination rectangle area in a copy.
Figure 3.3 The left image represents the source bitmap with a
rectangular area selected to be copied. The right image shows the
resulting back buffer after the
StretchRect
function call.

03 DX9_GP CH03 3/12/04 4:13 PM Page 43
43
You’ve Just Touched the Surface
The next example uses this functionality to display a
message to the screen using the bitmapped font. Figure
3.4 shows the source bitmap that holds the font. As you
can see, all the letters of the alphabet are included in one
bitmap and are placed in blocks of equal size. By keeping
each letter the same size, the code can predict the loca-
tion of each letter in the source bitmap and make copy-
Figure 3.4 The bitmap that
ing the needed letters much easier.
will hold the font you’ll be using.
Because you’ll need to copy more than one item per
frame, you must make multiple calls to the
StretchRect
function. To keep things simple,
I’ve placed all the needed calls into a
for
loop in the updated
Render
function.
/*********************************************************************
* Render
*********************************************************************/
void Render(void)
{
int letterWidth=48;
// the uniform width of each letter block
int letterHeight=48;
// the uniform height of each letter block
int destx = 48;
// the top-left X coordinate for the first letter
int desty = 96;
// the top-left Y coordinate for the first letter
// This variable will hold the pointer to the back buffer
IDirect3DSurface9* backbuffer = NULL;
// Check to make sure you have a valid Direct3D device
if( NULL == pd3dDevice )
return;
// Clear the back buffer to a blue color
pd3dDevice->Clear( 0, NULL, D3DCLEAR_TARGET,
D3DCOLOR_XRGB(0,0,255), 1.0f, 0 );
// Retrieve a pointer to the back buffer
pd3dDevice->GetBackBuffer(0,0,D3DBACKBUFFER_TYPE_MONO, &backbuffer);
// Set up a counter variable to hold the letter’s position on the screen
int count=0;
// Loop through the message one character at a time
for ( char *c = message; c != “ “; c++ )
{

03 DX9_GP CH03 3/12/04 4:13 PM Page 44
44
Chapter 3
■
Surfaces, Sprites, and Salmon
// source and destination rectangles
RECT src;
RECT dest;
// Set the source rectangle
int srcY = ( ( ( *c - ‘A’ ) / 6 ) ) * letterHeight;
int srcX = ( ( ( *c - ‘A’ ) %7 ) * letterWidth );
src.top = srcY ;
src.left = srcX;
src.right = src.left + letterWidth;
src.bottom = src.top + letterHeight;
// Set the dest rectangle
dest.top = desty;
dest.left = destx + ( letterWidth * count );
dest.right = dest.left + letterWidth;
dest.bottom = dest.top + letterHeight;
// Increase the letter count by one
count++;
// Copy this letter to the back buffer
pd3dDevice->StretchRect( srcSurface,
// the source surface
src,
// the source rectangle
backbuffer,
// the destination surface
dest,
// destination rectangle
D3DTEXF_NONE);
// the filter to apply
}
// Present the back buffer contents to the display
pd3dDevice->Present( NULL, NULL, NULL, NULL );
}
The resulting output from this example displays the text
“HELLO WORLD”
and gives you the
feeling that you are looking at a ransom letter. The output is shown in Figure 3.5. You can
find the full code listing in the chapter3\example2 directory on the CD-ROM.
The previous code loops through each letter in the message variable, which was defined
outside the
Render
function as follows:
char *message = “HELLO WORLD”;

03 DX9_GP CH03 3/12/04 4:13 PM Page 45
45
You’ve Just Touched the Surface
Each time through the loop, you are working with only one letter. For example, the first
time through the code, you’re handling only the H from the word
“HELLO”
. The code then
computes the source rectangle by getting the top-left X and Y coordinates for this letter.
int srcY = ( ( ( *c - ‘A’ ) / 6 ) ) * letterHeight;
int srcX = ( ( ( *c - ‘A’ ) %7 ) * letterWidth);
After you have the top-left coordinates, you can get the bottom-right ones by adding the
width and height of the letter.
src.top = srcY ;
src.left = srcX;
src.right = src.left + letterWidth;
src.bottom = src.top + letterHeight;
Next you’ll want to figure out where on the back buffer this letter should be copied.
dest.top = desty;
dest.left = destx + ( letterWidth * count );
dest.right = dest.left + letterWidth;
dest.bottom = dest.top + letterHeight;
I set up a variable called
count
to keep track of how many letters have already drawn to the
screen. Using
count
, you can figure out what the top-left X coordinate should be. The top-
left Y coordinate remains the same throughout. Again, you determine the bottom-right
coordinates by adding the width and height of the letters.
Figure 3.5 Using your bitmapped font, Hello World!

03 DX9_GP CH03 3/12/04 4:13 PM Page 46
46
Chapter 3
■
Surfaces, Sprites, and Salmon
n o t e
You can also use the
StretchRect
function to stretch or shrink an image during a copy. If the des-
tination rectangle is larger or smaller than the source rectangle, the image will be adjusted appro-
priately.
Sprites
As was covered in the previous section, you can copy small rectangles between surfaces.
You did this in example two to display a bitmapped font. Using the same method, you can
create a system to display sprites.
Sprites are 2D graphical objects that are commonly used in games to represent the player
characters or any range of objects within your game. For example, in a platform game, a
sprite displays the character you move around the screen. Sprites normally have multiple
frames of animation, can be moved about by the player, and can interact with the game
world. I’m going to cover what it takes to create a sprite and how to use one in a game.
n o t e
A
frame is a single still image of an animation. Quickly displaying multiple frames in succession cre-
ates the illusion of movement.
What Do Sprites Need?
The first thing all sprites need is an image to display. This image will be the sprite’s one or
more frames of animation.
A sprite also needs a location. The location is where the sprite is currently on the screen.
Two numbers normally represent this value: the X and the Y coordinates.
To be usable in a game, the sprites need to be able to hold a bit more information, but
these two items are the core requirements for any sprite and serve as a good starting point.
Representing a Sprite in Code
This will be your first attempt at creating a sprite structure. This structure will hold all the
information for each sprite that you want to create. Here’s the sprite structure:
struct {
RECT sourceRect;
// position
int X;
// the X coordinate
int Y;
// the Y coordinate
} spriteStruct ;

03 DX9_GP CH03 3/12/04 4:13 PM Page 47
Sprites
47
In the
spriteStruct
structure, the image needed is being represented by a
RECT
variable. The
sourceRect
holds the location of the sprite within the source bitmap.
The
X
and
Y
coordinates are represented by integers. Because this example only needs to
be able to support a resolution of 640
× 480, a standard integer has plenty of space to hold
your data.
As I stated before, this is just a simple starting point for a sprite. For now, let’s get some-
thing on the screen.
Creating Your First Sprite
To create your first sprite, you’re going to need to use some of the functions that were cov-
ered earlier.
■
D3DXLoadSurfaceFromFile
■
CreateOffscreenPlainSurface
■
StretchRect
Each of these functions has its own benefits when using sprites.
D3DXLoadSurfaceFromFile
assists you in the loading of your source art,
CreateOffscreenPlainSurface
gives you an area
of memory to store your artwork, and
StretchRect
displays your sprites on the screen.
Loading the Sprite Images
You load the sprite image using the
D3DXLoadSurfaceFromFile
function and place it into an
IDirect3DSurface9
object created, as before, with the
CreateOffscreenPlainSurface
function.
To encompass the needed functionality into a single function, I have created
getSurfaceFromBitmap
.
This function has only a single parameter: a
string
to hold the file name of the bitmap to
load.
/**********************************************************
* getSurfaceFromBitmap
**********************************************************/
IDirect3DSurface9* getSurfaceFromBitmap(std::string filename)
{
HRESULT hResult;
IDirect3DSurface9* surface = NULL;
D3DXIMAGE_INFO imageInfo;
// holds details concerning this bitmap
// Get the width and height info from this bitmap
hResult = D3DXGetImageInfoFromFile(filename.c_str(), &imageInfo);
// Make sure that the call to D3DXGetImageInfoFromFile succeeded

03 DX9_GP CH03 3/12/04 4:13 PM Page 48
48
Chapter 3
■
Surfaces, Sprites, and Salmon
if FAILED (hResult)
return NULL;
// Create the offscreen surface that will hold the bitmap
hResult = pd3dDevice->CreateOffscreenPlainSurface( width,
height,
D3DFMT_X8R8G8B8,
D3DPOOL_DEFAULT,
&surface,
NULL )
// Make sure that this function call did not fail; if it did,
// exit this function
if ( FAILED( hResult ) )
return NULL;
// Load the bitmap into the surface that was created earlier
hResult = D3DXLoadSurfaceFromFile( surface,
NULL,
NULL,
filename.c_str( ),
NULL,
D3DX_DEFAULT,
0,
NULL );
if ( FAILED( hResult ) )
return NULL;
return surface;
}
The
getSurfaceFromBitmap
function is used in the following manner:
IDirect3DSurface9* spriteSurface;
spriteSurface = getSurfaceFromBitmap( “sprites.bmp”);
If (spriteSurface == NULL)
return false;
First you create a variable to hold the new surface, and then you call
getSurfaceFromBitmap
with the name of the bitmap to load.
Always check the return value of the
getSur-
faceFromBitmap
call to make sure that the
bitmap was loaded correctly and that you
Figure 3.6 Bitmap containing multiple sprite
have a valid surface. Figure 3.6 shows a sam-
graphics.
ple bitmap that contains multiple sprites.

03 DX9_GP CH03 3/12/04 4:13 PM Page 49
Sprites
49
The
getSurfaceFromBitmap
function will be used throughout the rest of this book as needed.
Initializing the Sprites
After you have your sprite graphic loaded, it’s time to fill the sprite structures with the cor-
rect information. Because you’re going to be using a single surface that contains all the
graphics for the sprites, it’s a good idea to place the code to initialize each sprite into a
for
loop. The
initSprites
function that follows demonstrates this technique.
#define SPRITE_WIDTH 48
#define SPRITE_HEIGHT 48
#define SCRN_WIDTH 640
#define SCRN_HEIGHT 480
/*************************************************************************************
* bool initSprites(void)
*************************************************************************************/
bool initSprites(void)
{
// Loop through 10 sprite structures and initialize them
for (int i = 0; i < 10; i++ )
{
spriteStruct[i].srcRect.top = 0;
spriteStruct[i].srcRect.left = i * SPRITE_WIDTH;
spriteStruct[i].srcRect.right = spriteStruct[i].srcRect.left +
SPRITE_WIDTH;
spriteStruct[i].srcRect.bottom = SPRITE_HEIGHT;
spriteStruct[i].posX = rand()% SCRN_WIDTH – SPRITE_WIDTH;
spriteStruct[i].posY = rand()% SCRN_HEIGHT – SPRITE_HEIGHT;
}
return true;
}
First, the
for
loop is set up. It iterates through the loop 10 times, resulting in 10 different
sprites.
Within the loop, the
srcRect
must be set. This tells the sprite where within the source
bitmap it should find its graphic. The final two lines set the X and Y coordinate position
of the sprite. In this case, they are being set to a random position that guarantees they will
be visible on the screen.
Displaying the Sprites
You’re almost there! Only one more step to go, and your sprites will be on the screen.
Again, you need to change the
Render
function. This time, a
for
loop is created that will call
StretchRect
multiple times, once for each sprite being rendered.

03 DX9_GP CH03 3/12/04 4:13 PM Page 50
50
Chapter 3
■
Surfaces, Sprites, and Salmon
/*****************************************************************************
* Render(void)
*****************************************************************************/
void Render(void)
{
// This will hold the back buffer
IDirect3DSurface9* backbuffer = NULL;
if( NULL == pd3dDevice )
return;
// Clear the back buffer to a black color
pd3dDevice->Clear( 0,
NULL,
D3DCLEAR_TARGET,
D3DCOLOR_XRGB(0,0,0),
1.0f,
0 );
// Retrieve a pointer to the back buffer
pd3dDevice->GetBackBuffer(0,0,D3DBACKBUFFER_TYPE_MONO, &backbuffer);
// Loop through all the sprites
for ( int i = 0; i < 10; i++ )
{
RECT destRect;
// Create a temporary destination RECT
// Fill the temporary RECT with data from
// the current sprite structure
destRect.left = spriteStruct[i].posX;
destRect.top = spriteStruct[i].posY;
destRect.bottom = destRect.top + SPRITE_HEIGHT;
destRect.right = destRect.left + SPRITE_WIDTH;
// Draw the sprite to the back buffer
pd3dDevice->StretchRect( spriteSurface,
srcRect,
backbuffer,
destRect,
D3DTEXF_NONE);
}
// Present the back buffer contents to the display
pd3dDevice->Present( NULL, NULL, NULL, NULL );
}
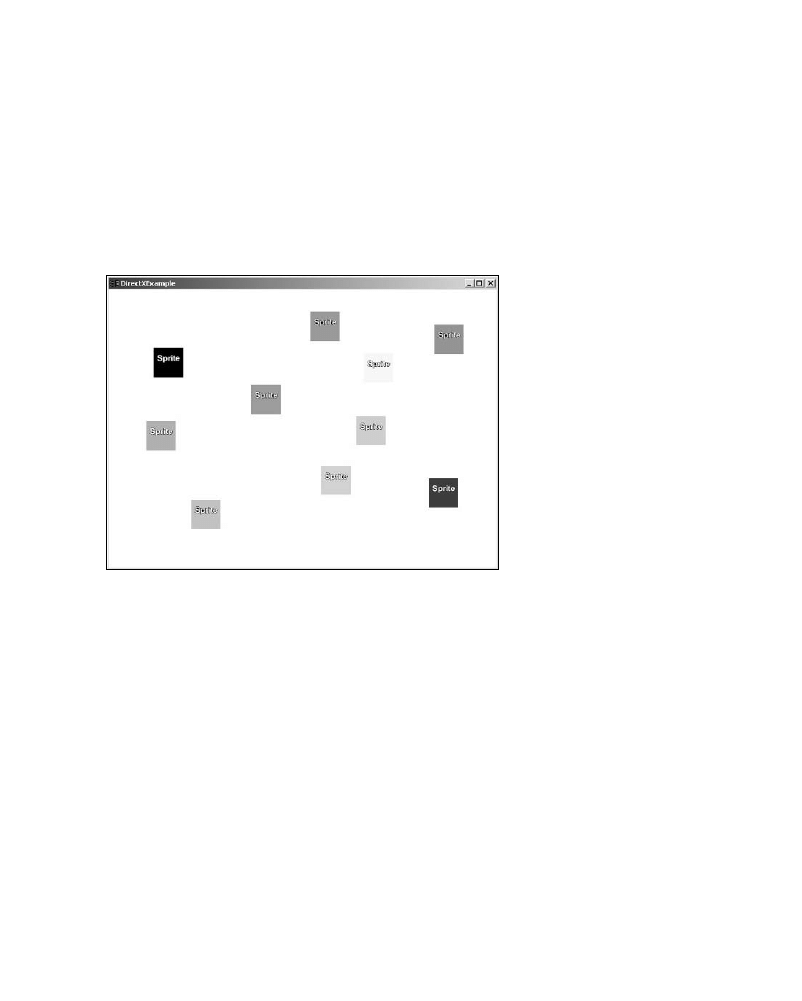
03 DX9_GP CH03 3/12/04 4:13 PM Page 51
Sprites
51
The previous code segment again loops through all 10 sprites. Within the loop, it creates
and sets a temporary destination
RECT
variable.
StretchRect
uses the
RECT
structure you cre-
ated to tell DirectX where the sprite should be drawn. Finally, the
StretchRect
function is
called. One by one, the sprites should be drawn to the back buffer. Figure 3.7 shows how
all 10 sprites might look when rendered on the screen.
You can find the full code for this example in the chapter3\example3 directory on the
CD-ROM.
Figure 3.7 Ten sprites being drawn in random places.
Moving Your Sprite
Your sprites are on the screen and everyone’s happy, right? Probably not. One of the
advantages of a sprite is that it can move around. I’m sure Sonic the Hedgehog wouldn’t
have been very much fun if Sonic couldn’t move. Sprites need a way of tracking how far
and in what direction they need to move in each frame.
To fix this problem, you need to add a few more variables to the sprite structure that was
defined earlier.
struct {
RECT srcRect;
// holds the location of this sprite
// in the source bitmap
// position
int posX;
// the sprite’s X position
int posY;
// the sprite’s Y position

03 DX9_GP CH03 3/12/04 4:13 PM Page 52
52
Chapter 3
■
Surfaces, Sprites, and Salmon
// movement
int moveX;
// how many pixels to move in the X direction
// per frame
int moveY;
// how many pixels to move in the Y direction
// per frame
} spriteStruct;
As you can see, two variables —
moveX
and
moveY
— have been added. These two variables
will be used to hold a value that corresponds to the number of pixels per frame that you
want to move your sprite. The
moveX
and
moveY
variables will then be added to the
posX
and
posY
values in the
spriteStruct
for each sprite. For example, for each frame, the following
would take place:
for (int i = 0; i < 10; i++)
{
spriteStruct[ i ].posX += spriteStruct[ i ].moveX;
spriteStruct[ i ].posY += spriteStruct[ i ].moveY;
}
The sprites would then be sent to the
Render
function to be drawn. For each frame, their
position variables (
posX
,
posY
) would be updated, resulting in the sprite’s movement across
the screen.
Of course, you’ll have to check the
posX
and
posY
variables against the screen resolution if
you want them to stay on the screen. For example, the previous code sample could be
changed to keep the sprites within the 640
× 480 boundary of your window.
for (int i = 0; i < 10; i++)
{
// Add the moveX to posX
spriteStruct[ i ].posX += spriteStruct[ i ].moveX;
// Check to make sure that posX is not greater than 640
if (spriteStruct[ i ].posX > SCRN_WIDTH)
{
// If posX has become greater than 640, change the moveX value
// to a negative value by multiplying it by -1
// This causes the sprite, on the next frame, to start
// moving backward away from the side of the screen
spriteStruct[ i ].moveX *= -1;
}
// Add the moveY to posY
spriteStruct[ i ].posY += spriteStruct[ i ].moveY;
// Check again to make sure that posY doesn’t go bigger than 480
if (spriteStruct[ i ].posY > SCRN_HEIGHT)

03 DX9_GP CH03 3/12/04 4:13 PM Page 53
Sprites
53
{
// If posY is bigger than 480, multiply the moveY value by -1
// This causes the sprite, on the next frame, to start moving
// away from the bottom of the screen
spriteStruct[ i ].moveY *= -1;
}
// Because the sprites will also be traveling backward now, it’s a
// good idea to check 0 again as well; this allows the sprites to
// bounce off the left and top sides of the screen
if (spriteStruct[ i ].posX < 0)
{
// Reverse the direction of the sprite if it has reached the left
// side of the screen
spriteStruct[ i ].moveX *= -1;
}
// Check to make sure the sprite has hit the top of the screen
if (spriteStruct[ i ].posY < 0)
{
// If the sprite has reached the top of the screen, reverse
// its direction
spriteStruct[ i ].moveY *= -1;
}
}
The previous code causes the sprites to bounce around the screen, staying within the
640
× 480 area.
n o t e
If you change the resolution of the window, you must make sure to change the values that the
posX
and
posY
variables check against to ensure that the sprites stay contained.
Animating Your Sprite
The previous version of the sprite structure allowed for the movement of the sprites
around the screen, but the sprites still aren’t that exciting. The sprites are constantly dis-
playing the same static image the whole time. In this section, you’re going to add multiple
frames of animation and bring your sprites to life.
To accomplish your goal of lifelike sprites, you’re going
to use the updated sprite structure, shown next, and the
Figure 3.8 Bitmap showing the needed
new bitmap, shown in Figure 3.8.
frames for a sprite animation.

03 DX9_GP CH03 3/12/04 4:13 PM Page 54
54
Chapter 3
■
Surfaces, Sprites, and Salmon
struct {
RECT srcRect;
// holds the location of this sprite
// in the source bitmap
// position data
int posX;
// the sprite’s X position
int posY;
// the sprite’s Y position
// movement data
int moveX;
// how many pixels to move in the X direction
// per frame
int moveY;
// how many pixels to move in the Y direction
// per frame
// animation data
int numFrames;
// number of frames this animation has
int curFrame;
// the current frame of animation
} spriteStruct;
To include support for animation to the sprite structure, you must add two new variables:
■
numFrames
. The number of frames within the sprite’s animation.
■
curFrame
. The current frame the animation is displaying.
The two new variables help you to keep track of which frame of the animation is currently
being shown and allow you to loop your animation.
Because you now have new information added to the sprite structure, you must change
the
initSprites
function to support this.
The new
initSprites
function is shown next.
/*****************************************************************************
* bool initSprites(void)
*****************************************************************************/
bool initSprites(void)
{
// Loop through all the sprite structures and initialize them
for (int i=0; i < 10; i++)
{
// Set the sprite position data
spriteStruct[i].srcRect.top = 0;
spriteStruct[i].srcRect.left = i * 64;
spriteStruct[i].srcRect.right = spriteStruct[i].srcRect.left + 64;
spriteStruct[i].srcRect.bottom = 23;
spriteStruct[i].posX = rand()%600;
// places the sprite in a
// random position
spriteStruct[i].posY = rand()%430;

03 DX9_GP CH03 3/12/04 4:13 PM Page 55
Sprites
55
// Set the animation data
spriteStruct[i].curFrame = 0; // Start at frame 0
spriteStruct[i].numFrames = 4; // The animation has four frames
// Set the move data
spriteStruct[i].moveX = 1;
// Move the sprite 1 pixel per frame
// in a left-right direction
spriteStruct[i].moveY = 0;
// The sprite will not move up and down
}
return true;
}
Now that the sprites have been initialized with their position and animation data, they’re
ready to be displayed.
Displaying the Animated Sprites
The
Render
function again needs to be updated to support the new data. Each time
through this function, the
curFrame
variable is incremented. This variable controls which
frame of the sprite animation is being shown. When this number becomes greater than
the number of frames in the animation, represented by the
numFrames
variable, the
curFrame
variable is reset to zero and the process starts over again. This causes the animation to loop
indefinitely. A new version of the
Render
function follows.
/*****************************************************************************
* Render(void)
*****************************************************************************/
void Render(void)
{
// This holds the back buffer
IDirect3DSurface9* backbuffer = NULL;
// Check to make sure you have a valid D3DDevice pointer
if( NULL = = pd3dDevice )
return;
// Clear the back buffer to a black color
pd3dDevice->Clear( 0,
NULL,
D3DCLEAR_TARGET,
D3DCOLOR_XRGB(0,0,0),
1.0f,
0 );

03 DX9_GP CH03 3/12/04 4:13 PM Page 56
56
Chapter 3
■
Surfaces, Sprites, and Salmon
// Retrieve a pointer to the back buffer
pd3dDevice->GetBackBuffer(0,0,D3DBACKBUFFER_TYPE_MONO, &backbuffer);
// Loop through all the sprite structures
for ( int i = 0; i < 10; i++ )
{
// Increment the sprite animation frame
if (spriteStruct[ i ].curFrame < spriteStruct[ i ].numFrames)
spriteStruct[ i ].curFrame++;
else
// You have reached the last frame; reset to first frame
spriteStruct[ I ].curFrame = 0;
// Set the source rectangle to the correct frame position
spriteStruct[ i ].srcRect.left = spriteStruct[ i ].curFrame * 64;
spriteStruct[ i ].srcRect.right = spriteStruct[ i ].srcRect.left + 64;
// Create a temporary destination RECT
RECT destRect;
// Fill the temporary RECT with data
destRect.left = spriteStruct[i].posX;
// from the current sprite structure
destRect.top = spriteStruct[i].posY;
// The fish sprite is 23 pixels tall
destRect.bottom = destRect.top + SPRITE_HEIGHT;
// The fish sprite is 64 pixels wide
destRect.right = destRect.left + SPRITE_WIDTH;
// Draw the sprite to the back buffer
pd3dDevice->StretchRect (spriteSurface,
srcRect,
backbuffer,
destRect,
D3DTEXF_NONE);
}
// Present the back buffer contents to the display
pd3dDevice->Present( NULL, NULL, NULL, NULL );
}
If you compile and run the previous changes, you should see a couple of fish swimming
back and forth on the screen. Figure 3.9 shows the fish you should see. You can find
the full source code listing for the sprite animation example in the chapter3\example4
directory on the CD-ROM.
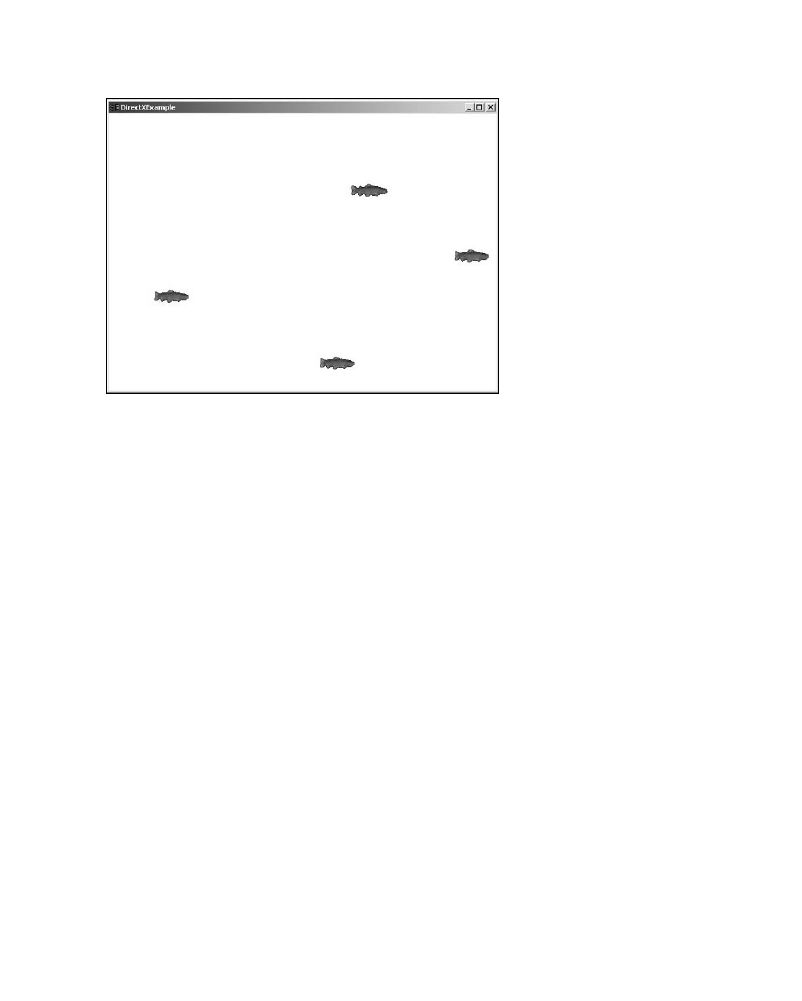
03 DX9_GP CH03 3/12/04 4:13 PM Page 57
57
Timers: How to Animate on Time
Figure 3.9 Swimming fish with nowhere to go.
Why Is It So Fast?
You’ve probably noticed that the fish tend to go through their four frames of animation
and move rather quickly about the screen. This is because of the frame-based animation
technique that was used. Because there is no way to speed up or slow down the anima-
tions, they are completely system dependent. On faster computers, the fish move about
rapidly, whereas on slower machines, the fish movement might be sluggish.
In the next section, you’re going to learn how to slow down your animations and keep
them at a constant rate by using a timer.
Timers: How to Animate on Time
Creating smooth animations within your game should be a top priority. Using a timer,
animation movement can be set up to occur at fixed intervals. For example, if you want
to run an animation at 30 frames per second (fps) but your game’s current frame rate is
60 fps, you need to slow down the updating of animation to keep it from playing through
twice in one second. In this instance, you would use a timer to update the animation only
half as often, maintaining your 30 fps rate.
Timing Under Windows
You can track time under Windows using
GetTickCount
and
QueryPerformanceCounter
.
GetTickCount
, based on the system timer, is limited in its usefulness when it comes to
game programming.
GetTickCount
retrieves the number of milliseconds that has elapsed

03 DX9_GP CH03 3/12/04 4:13 PM Page 58
58
Chapter 3
■
Surfaces, Sprites, and Salmon
since the system was started. It has a limited granularity and is updated every 10 milli-
seconds. Because of
GetTickCount
’s limitations, a higher performance timer is needed. The
QueryPerformanceCounter
function fills that need.
QueryPerformanceCounter
has a higher resolution than its
GetTickCount
counterpart. The
QueryPerformanceCounter
function, being based on a hardware counter instead of a software
solution, allows for timing in microseconds. This is useful in games where functions for
animation normally require a more detailed timer to keep the animation smooth.
Using QueryPerformanceCounter
The
QueryPerformanceCounter
function is defined as follows:
BOOL QueryPerformanceCounter(
LARGE_INTEGER *lpPerformanceCount
);
The previous function takes only one parameter: a pointer to a
LARGE_INTEGER
type. After
this function is completed, the
lpPerformanceCount
variable contains the current value from
the hardware performance counter.
Following is a small code example using the
QueryPerformanceCounter
function.
LARGE_INTEGER timeStart;
QueryPerformanceCounter(&timeStart);
Here, the
timeStart
variable is holding the value returned from the
QueryPerformanceCounter
function.
Getting the Time for Each Frame
To accurately time your animations, you need to call the
QueryPerformanceCounter
function
twice within the game loop: once before you start a drawing, and once after all drawing
has been completed. Both values returned contain the number of counts from the system
at the time the function was called. Because the performance counter has such a high res-
olution, both of these values should be unique. You can use the difference between these
two values to determine the number of counts that has passed between the calls.
For example, you could write the following code:
LARGE_INTEGER timeStart;
LARGE_INTEGER timeEnd;
QueryPerformanceCounter(&timeStart);
Render( );
QueryPerformanceCounter(&timeEnd);
LARGE_INTEGER numCounts = ( timeEnd.QuadPart – timeStart.QuadPart )

03 DX9_GP CH03 3/12/04 4:13 PM Page 59
59
Timers: How to Animate on Time
After this code is executed, the
numCounts
variable contains the number of timer counts that
have elapsed between the two calls to
QueryPerformanceCounter
. The
QuadPart
portion of the
LARGE_INTEGER
type tells the system that you want the full 64-bit value to be returned from
the counter.
When you have the number of counts stored in a variable, you need to perform one more
step before you have a useful number to help time your animations with. You must divide
the value in
numCounts
by the frequency of the performance counter.
n o t e
The
performance counter frequency is a value that represents the number of times per second the
counter is incremented.
The function
QueryPerformanceFrequency
obtains the frequency of the counter from the
system.
The
QueryPerformanceFrequency
function takes only one parameter: a pointer to a
LARGE_
INTEGER
that holds the returned frequency. A sample call to this function is shown next:
LARGE_INTEGER timerFrequency;
QueryPerformanceFrequency(&timerFrequency);
After you have the frequency of the timer, you can use it along with the value in the
numCounts
variable to calculate a rate of movement for your animation. You can find
the animation rate by dividing the number of counts that has passed by the frequency
of the timer. The code sample that follows performs this task:
float anim_rate = numCounts / timerFrequency.QuadPart;
Now that you have the animation rate, you can change the timing code to give a smoother
animation rate.
Changing the Animation to Be Time Based
I’m going to show you how to take the information you learned in the previous section
and apply it by changing example 4 to use time-based animation.
The first step is making a few changes to the sprite structure. Originally, the movement
variables —
moveX
and
moveY
— were integer values. They must change to float values so that
you can update the sprite’s movement more accurately. Here’s an updated version of the
sprite structure.
struct {
RECT srcRect;
// holds the location of this sprite
// in the source bitmap

03 DX9_GP CH03 3/12/04 4:13 PM Page 60
60
Chapter 3
■
Surfaces, Sprites, and Salmon
float posX;
// the sprite’s X position
float posY;
// the sprite’s Y position
// movement
float moveX;
float moveY;
// animation
int numFrames;
// the number of frames this animation has
int curFrame;
// the current frame of animation
} spriteStruct[MAX_SPRITES];
As you can see, the position variables —
posX
and
posY
— were changed to floats to help
more accurately depict their location in the game world.
Next, you need to update the value used in the
initSprites
function for the
moveX
variable.
The
moveX
variable was previously set to 1, but you must change it to a new value to reflect
the time-based animation. The new value needs to be the number of pixels you want the
sprite to travel in a one-second time frame. In this case, let’s set it to 30.0. This should
allow the fish to swim across the screen at a decent rate.
The final piece of the sprite code you must change is within the
drawSprite
function. Inside
this function, you’ll see the following bit of code:
spriteStruct[whichOne].posX += spriteStruct[whichOne].moveX;
This line of code controls the movement of each sprite across the screen. You’ll see that
the X position variable —
posX
— is being incremented by the value within the
moveX
vari-
able. To allow this to be based on the animation rate determined earlier, you need to
change this line of code as follows:
spriteStruct[whichOne].posX += spriteStruct[whichOne].moveX * anim_rate;
Here, the
moveX
variable is being multiplied by the value stored in the
anim_rate
variable.
Because the
anim_rate
variable is updated each frame based on the counter, this should
produce a smooth-moving sprite that won’t speed up on fast machines.
Now that you’ve updated the sprite code, you have to add in the timer code. The timer
code requires three new global variables:
LARGE_INTEGER timeStart;
// holds the starting count
LARGE_INTEGER timeEnd;
// holds the ending count
LARGE_INTEGER timerFreq;
// holds the frequency of the counter

03 DX9_GP CH03 3/12/04 4:13 PM Page 61
61
Chapter Summary
Next, you need to make a call to
QueryPerformanceFrequency
to get the frequency of the
counter. You should call this function right before the main message loop:
QueryPerformanceFrequency(&timerFreq);
Finally, you need to add the calls around the
Render
function to
QueryPerformanceCounter
.
The first one should go right before the call to
Render
.
QueryPerformanceCounter(&timeStart);
The second call should go after the call to
Render
.
QueryPerformanceCounter(&timeEnd);
Immediately following the last
QueryPerformanceCounter
function, you must determine the
new animation rate.
anim_rate = ( (float)timeEnd.QuadPart - (float)timeStart.QuadPart ) /
timerFreq.QuadPart;
You can now compile the updated example to see how the changes you made have affected
the smoothness of the animation. View the full source listing in the chapter3\example5
directory on the CD-ROM.
Chapter Summary
At this point, you should have a basic understanding of how DirectX works and how it
creates and uses surfaces.
You should now understand how timers work within the Windows environment and how
to use them to smooth out your animations. You’ll continue to use timers throughout this
book, so you’re not done with them quite yet.
In the next chapter, you’ll dive into the world of 3D.
What You Have Learned
In this chapter, you learned the following:
■
How to load a bitmap using the D3DX Utility Library
■
How to draw an image to the screen using DirectX
■
What sprites are and how to use them
■
How to animate a sprite using frame- and time-based animation techniques

03 DX9_GP CH03 3/12/04 4:13 PM Page 62
62
Chapter 3
■
Surfaces, Sprites, and Salmon
Review Questions
You can find the answers to Review Questions and On Your Own exercises in Appendix
A, “Answers to End-of-Chapter Exercises.”
1. Offscreen surfaces are created using which function?
2. What is the
StretchRect
function used for?
3. What sort of data can be stored in an offscreen surface?
4. Why is it a good idea to clear the back buffer each frame?
5. What is the difference between the
QueryPerformanceCounter
and
GetTickCount
functions?
On Your Own
1. Write a small example of how you can use the
StretchRect
function to shrink a sec-
tion of an image.
2. Write a program using what you’ve learned in this chapter to scroll a text message
across the screen using sprites.
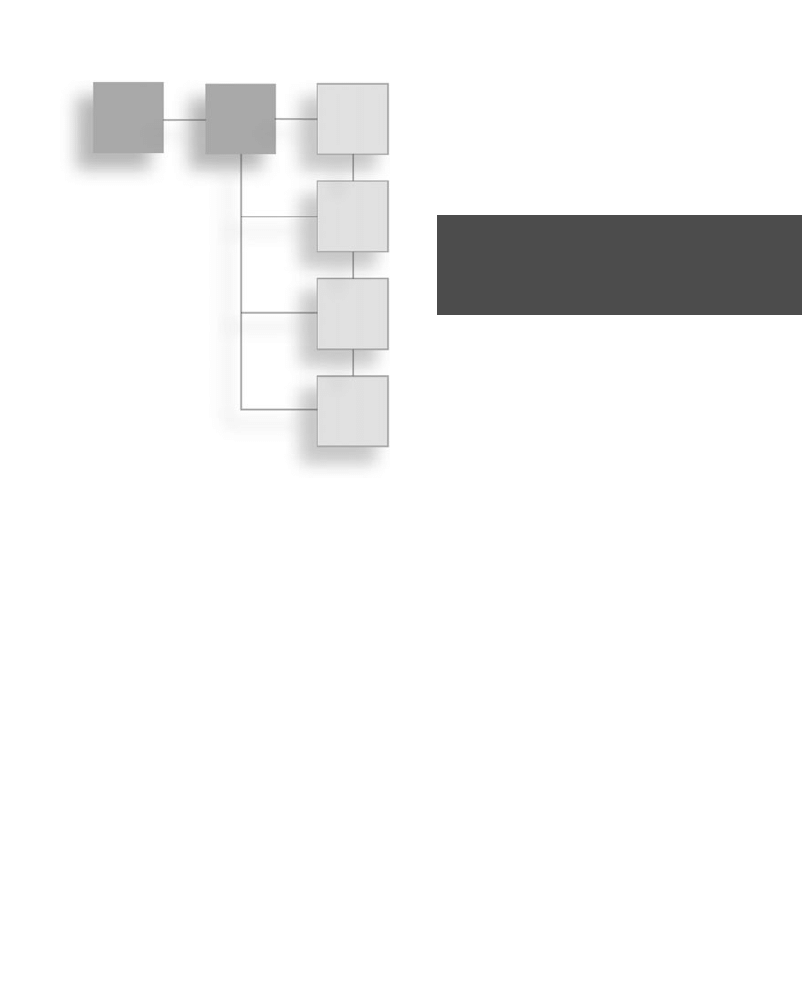
04 DX9_GP CH04 3/12/04 4:14 PM Page 63
It’s a 3D World
A fter A ll
Chapter 4
3D Primer . . . . . . . . . . . . . . . . . . . . . . . . . . . . . . . . . . . . . . . . . . . . . . . .65
Chapter 5
Matrices, Transforms, and Rotations . . . . . . . . . . . . . . . . . . . . . . . . . . .87
Chapter 6
Vertex Colors, Texture Mapping, and 3D Lighting . . . . . . . . . . . . . . .117
Chapter 7
Meshes . . . . . . . . . . . . . . . . . . . . . . . . . . . . . . . . . . . . . . . . . . . . . . . . .147
Chapter 8
Point Sprites, Particles, and Pyrotechnics . . . . . . . . . . . . . . . . . . . . . . .177
PART II

This page intentionally left blank

04 DX9_GP CH04 3/12/04 4:14 PM Page 65
chapter 4
3D Primer
Y
ou’ve probably noticed that 2D games have been on the decline for the past few
years. Recently, games have been all about pushing the power of the latest 3D
video cards, trying to bring more reality to the games being played. Direct3D is a
key component in the 3D wave. It allows millions of Microsoft Windows users to experi-
ence the latest technologies in games.
Here’s what you’ll learn in this chapter:
■
How 3D space is used
■
What coordinate systems are
■
How to plot the points of a polygon
■
How Direct3D defines vertices
■
What a vertex buffer is
■
How to define a 3D scene
■
The different primitive types available to you
3D Space
Previously, I talked about games that only allowed movement in two directions, which
created a rather flat world. The sprites you created before resided in a world with width
and height but no depth; the sprites existed in a two-dimensional world.
Direct3D gives you the power to take your game world one dimension further with the
addition of depth. Depth is the ability for objects to move farther away or closer to the
viewer. Characters within a three-dimensional world are more realistic than their 2D
counterparts.
65
04 DX9_GP CH04 3/12/04 4:14 PM Page 66
66
Chapter 4
■
3D Primer
3D space is the area in which your three-dimensional world exists. 3D space enables your
characters to move around in a way that is similar to the real world. Before you can take
advantage of 3D space, you need to know how that space is constructed and how objects
are placed into it.
Coordinate Systems
Coordinate systems are a way of defining points within a space. They consist of a set of
imaginary grid-like lines—called axes—that run perpendicular to one another. A 2D
coordinate system contains only two axes, whereas a 3D system adds one more. The center
of a coordinate system, where the axes intersect, is called the origin. Figure 4.1 shows what
a standard 2D coordinate system looks like. The two axes in a 2D coordinate system are
referred to by the letters X and Y. The X axis is horizontal, whereas the Y axis is vertical.
You’ll notice in Figure 4.1 that the center X and Y lines are darker than the rest. These lines
define the center for each axis and have a value of 0.
Defining a Point in 2D Space
A point is defined as a single position along an axis. A point in 1D space, which consists
of a single line, would be referred to by a single value. Figure 4.2 shows a single point plot-
ted on a line. The origin of the line is represented by the value of 0. Points to the right of
the origin have a positive value, whereas those to the left of the origin have a negative
value. In Figure 4.2, the point has a value of positive 4.
Figure 4.1 How a 2D coordinate system is laid out.
Figure 4.2 A 1D coordinate system.
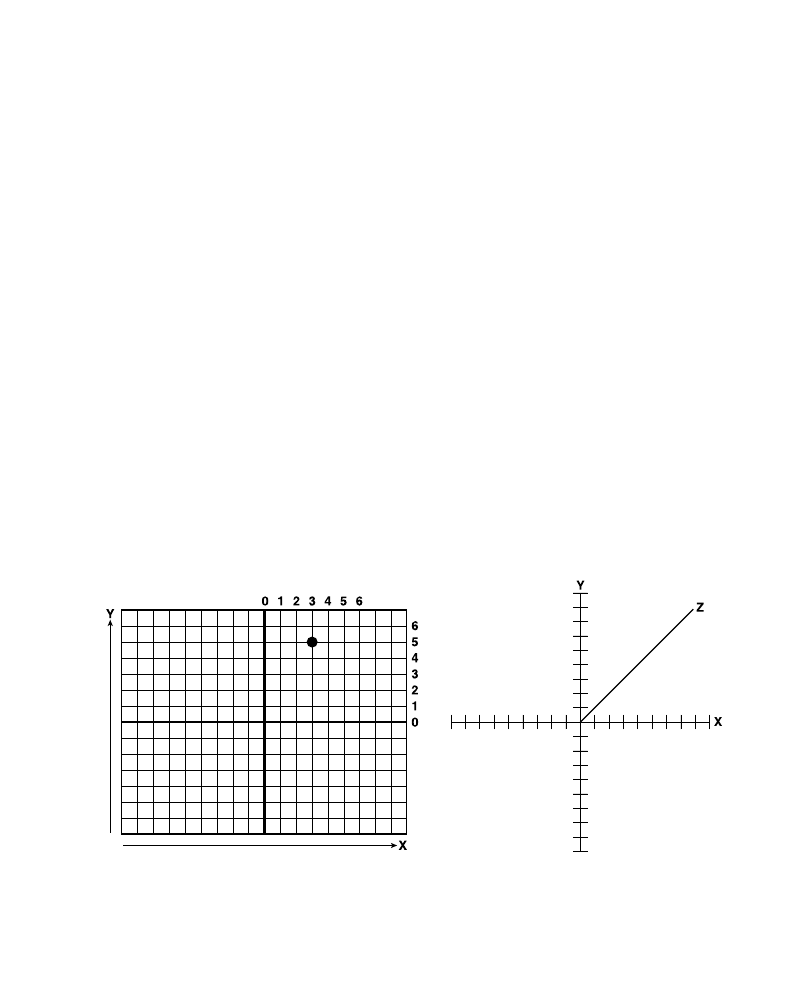
04 DX9_GP CH04 3/12/04 4:14 PM Page 67
67
Coordinate Systems
2D coordinate systems, because they have two axes, require a second value to plot a point.
To plot a point within 2D space, you need to define a position along both the X and Y axes.
For instance, a single point in a 2D coordinate system would be referred to by two
numbers—an X value and a Y value—each number referring to the point’s position on that
axis.
Like the 1D example shown in Figure 4.2, the values on the X axis continue to increase to
the right of the origin, but the values on the Y axis increase as you go up from the origin.
Figure 4.3 shows a 2D coordinate system with a point plotted at an X value of 3 and a
Y value of 5. You’ll commonly see points shown as (X, Y). In this instance, the point would
be shown as (3, 5).
Defining a Point in 3D Space
As I mentioned earlier, a 3D coordinate system adds an extra axis, called the Z axis. The Z
axis is perpendicular to the plane created by the X and Y axes. Figure 4.4 shows how a 3D
coordinate system would look.
Notice that the coordinate system has the Z axis pointing off into the distance. Com-
monly, the X and Y axes describe width and height, and the Z axis describes depth.
The Z axis can have either a positive or negative value as it moves away from the origin
based on the layout of the coordinate system. Coordinate systems are commonly laid out
in either a left-handed or right-handed manner.
Figure 4.3 A point plotted on a 2D coordinate
Figure 4.4 A 3D coordinate system layout.
system.
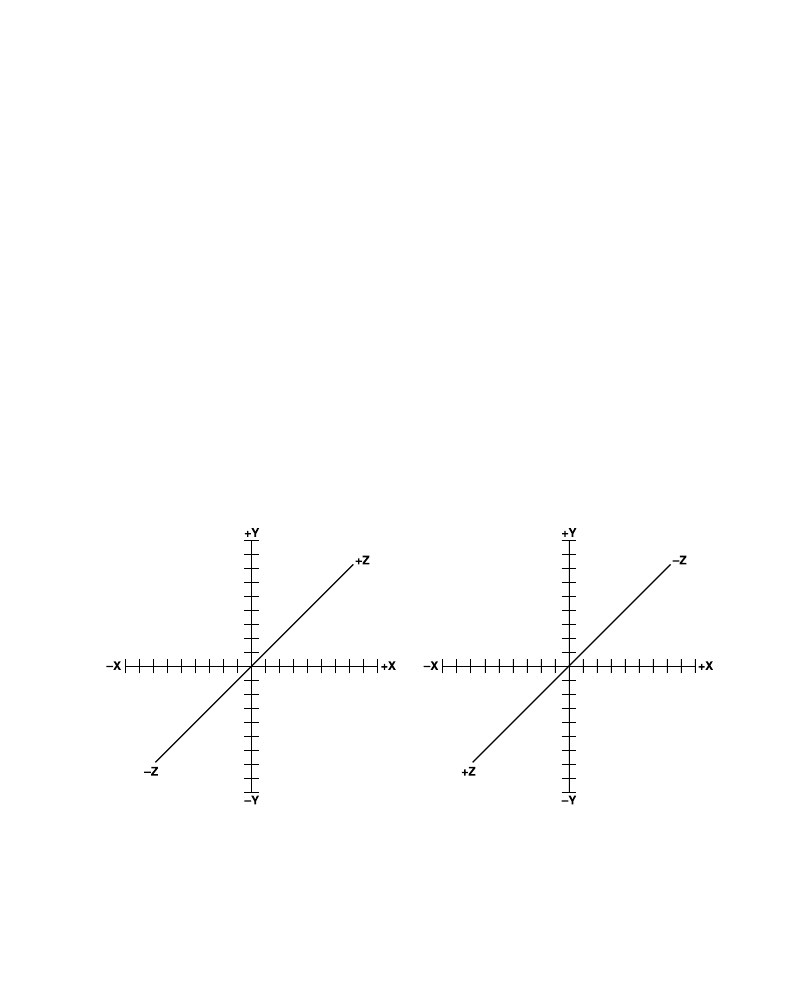
04 DX9_GP CH04 3/12/04 4:14 PM Page 68
68
Chapter 4
■
3D Primer
Left-Handed Systems
A left-handed coordinate system extends the positive X axis to the right and the positive
Y axis upward. The major difference is the Z axis. The Z axis in a left-handed system is
positive in the direction away from the viewer, with the negative portion extending toward
him. Figure 4.5 shows how a left-handed coordinate system is set up. This is the coordi-
nate system used in Direct3D.
Right-Handed Systems
The right-handed coordinate system, which is the system used by OpenGL, extends the X
and Y axes in the same direction as the left-handed system, but it reverses the Z axis. The
positive Z values extend toward the viewer, whereas the negative values continue away.
Figure 4.6 shows a right-handed system.
Vertices Explained
A vertex is similar to the idea of the point that I described earlier. A vertex includes infor-
mation such as location along the X, Y, and Z axes, but it can include other information
as well, such as color or texture.
Figure 4.5 A left-handed coordinate system.
Figure 4.6 A right-handed coordinate system.

04 DX9_GP CH04 3/12/04 4:14 PM Page 69
69
Vertices Explained
When describing a vertex in code, you can use a structure similar to this:
struct {
float x;
float y;
float z;
} vertex;
This vertex structure contains three variables —
each one of type
float
— that describe the vertex’s
location along each axis.
Creating a Shape
You can create shapes by using two or more ver-
tices. For instance, in the creation of a triangle,
three vertices would be needed to define the three
points of the triangle. Plotting a shape with ver-
tices is similar to playing connect the dots. Figure
4.7 shows how to create a triangle by using three
Figure 4.7 Three vertices create a triangle.
vertices.
Defining this triangle in code requires three vertex structures.
struct {
float x;
// the X coordinate
float y;
// the Y coordinate
float z;
// the Z coordinate
} vertex [ 3 ];
Here, I’ve changed the vertex structure to define an array of three vertices. The next step
is setting each of the vertices to the positions found in Figure 4.7.
// Set the first vertex
vertex[0].x = 2.0;
vertex[0].y = 4.0;
vertex[0].z = 0.0;
// Set the X coordinate
// Set the Y coordinate
// Set the Z coordinate
// Set the second vertex
vertex[1].x = 5.0;
vertex[1].y = 1.0;
vertex[1].z = 0.0;
// Set the X coordinate
// Set the Y coordinate
// Set the Z coordinate

04 DX9_GP CH04 3/12/04 4:14 PM Page 70
70
Chapter 4
■
3D Primer
// Set the final vertex
vertex[0].x = 2.0;
vertex[0].y = 1.0;
vertex[0].z = 0.0;
// Set the X coordinate
// Set the Y coordinate
// Set the Z coordinate
Notice that the Z coordinate of all three vertices was set to
0.0
. This triangle has no depth,
so the Z coordinate remains at 0.
n o t e
Triangles are the simplest closed shapes that you can plot with vertices. You can create more com-
plex shapes, such as squares or spheres, but they are broken down into triangles before rendering.
Adding Color
Previously, the vertex structure only included information that related to the position of
each vertex. However, vertices can also contain color information. This color information
can be held in four additional variables called
R
,
G
,
B
and
A
.
■
R
. The red component of the color
■
B
. The green color component
■
B
. The blue color component
■
A
. The alpha color component
Each of these values helps to define the final color of the vertex. You can see the updated
vertex structure next.
struct {
// position information
float x;
float y;
float z;
// color information
float R;
float G;
float B;
float A;
} vertex;
Using the
R
,
G
,
B
, and
A
variables, you can set the color of the vertex. For instance, if you
want your vertex to be white in color, the
R
,
G
, and
B
variables should be set to
1.0
.
Setting the vertex to a pure blue color requires
R
and
G
to be set to
0.0
, whereas the
B
variable is set to
1.0
.

04 DX9_GP CH04 3/12/04 4:14 PM Page 71
71
Vertex Buffers
n o t e
The alpha component of a color determines its transparency level. If the value of an alpha compo-
nent is 0, the color specified in the
R
,
G
, and
B
values is completely opaque. If the alpha value is
greater than 0, the color specified has a level of transparency. The alpha component can be any
value between
0.0f
and
1.0f
.
Vertex Buffers
Vertex buffers are areas of memory that hold the vertex information needed to create 3D
objects. The vertices contained within the buffer can contain different kinds of informa-
tion, such as position information, texture coordinates, and vertex colors. Vertex buffers
are useful for storing static geometry that needs to be rendered repeatedly. Vertex buffers
can exist in either system memory or the memory on the graphics adapter.
A vertex buffer is created by first declaring a variable of type
IDirect3DVertexBuffer9
. The
resulting pointer refers to the vertex buffer that DirectX will create for you.
Next, your game must create the vertex buffer and store it in the variable you created.
After you have a valid vertex buffer available, you need to fill it with vertices. You can do
this by locking the vertex buffer and copying the vertices.
Creating a Vertex Buffer
You can create vertex buffers by using a call to
CreateVertexBuffer
. The
CreateVertexBuffer
function, defined next, requires six parameters.
HRESULT CreateVertexBuffer(
UINT Length,
DWORD Usage,
DWORD FVF,
D3DPOOL Pool,
IDirect3DVertexBuffer9** ppVertexBuffer,
HANDLE* pHandle
);
■
Length
. Variable containing the length of the vertex buffer in bytes.
■
Usage
. Flags that determine the behavior of the vertex buffer. This value should
commonly be 0.
■
FVF
. The flexible vertex format that the vertex buffer uses.
■
Pool
. The memory pool where the vertex buffer resides. This value is an enumer-
ated value of type
D3DPOOL
.

04 DX9_GP CH04 3/12/04 4:14 PM Page 72
72
Chapter 4
■
3D Primer
■
ppVertexBuffer
. An address to a pointer of a variable of type
IDirect3DVertexBuffer9
.
This variable holds the newly created buffer.
■
pHandle
. A reserved value, this should always be
NULL
.
The vertices within a vertex buffer can contain flexible vertex information. Basically, this
means that the vertices in the buffer can include just position information, or they can
include colors or texture coordinates. The type of data contained within the vertices of the
buffer is controlled by the Flexible Vertex Format (
FVF
) flags.
Flexible Vertex Format
The Flexible Vertex Format allows for customization of the information stored in the ver-
tex buffer. By using a set of
FVF
flags, the buffer can be made to contain any number of ver-
tex properties. Table 4.1 describes the
FVF
flags in move detail.
Flag
Description
D3DFVF_XYZ
D3DFVF_XYZRHW
transformed.
D3DFVF_XYZW
D3DFVF_NORMAL
D3DFVF_PSIZE
D3DFVF_DIFFUSE
D3DFVF_SPECULAR
D3DFVF_TEX0
D3DFVF_TEX1
D3DFVF_TEX2
D3DFVF_TEX3
D3DFVF_TEX4
D3DFVF_TEX5
D3DFVF_TEX6
D3DFVF_TEX7
D3DFVF_TEX8
Table 4.1 Flexible Vertex Format Flags
Vertex format includes the X, Y, and Z coordinate of an untransformed vertex.
Vertex format includes the X, Y, and Z coordinates, but this time they are already
Vertex format contains transformed and clipped vertex data.
Vertex format contains normal information.
Format includes the point size of the vertex.
Diffuse color is part of the vertex buffer.
Specular information is part of the vertex buffer.
Texture coordinate 0.
Texture coordinate 1.
Texture coordinate 2.
Texture coordinate 3.
Texture coordinate 4.
Texture coordinate 5.
Texture coordinate 6.
Texture coordinate 7.
Texture coordinate 8.

04 DX9_GP CH04 3/12/04 4:14 PM Page 73
73
Vertex Buffers
Direct3D can handle up to eight sets of texture coordinates per vertex.
The format of the vertices you use is created by defining a custom vertex structure. The
following structure defines a vertex that contains untransformed position information, as
well as a color component.
struct CUSTOMVERTEX
{
FLOAT x, y, z, rhw;
// the untransformed, 3D position for the vertex
DWORD color;
// the vertex color
};
The
CUSTOMVERTEX
structure consists of the standard vertex position variables X, Y, and Z,
but also includes the variable
RHW
. The
RHW
value, which stands for Reciprocal of Homoge-
neous W, tells Direct3D that the vertices that are being used are already in screen coordi-
nates. This value is normally used in fog and clipping calculations and should be set to 1.0.
n o t e
The vertex color is a
DWORD
value. Direct3D provides a few macros to assist you in creating these
colors. One such macro is the
D3DCOLOR_ARGB(a, r, g, b)
macro. This macro accepts four compo-
nents: an alpha, a red, a green, and a blue. Each of these components is a value between 0 and
255. This macro returns a
DWORD
color value that Direct3D can use.
D3DCOLOR_ARGB(0, 255, 0, 0)
creates a color value representing all red.
Additional macros are
D3DCOLOR_RGBA
and
D3DCOLOR_XRGB
, which are described fully in the DirectX
documentation.
Now that the vertex structure is created, the next step is determining the flags that will be
sent to the
CreateVertexBuffer
function as the
FVF
parameter.
Because the
CUSTOMVERTEX
structure requires non-transformed position information and a
color component, the needed flags would be
D3DFVF_XYZRHW
and
D3DFVF_DIFFUSE
.
The sample code that follows shows a call to
CreateVertexBuffer
using this vertex structure.
// a structure for your custom vertex type
struct CUSTOMVERTEX
{
FLOAT x, y, z, rhw;
// the untransformed, 3D position for the vertex
DWORD color;
// the vertex color
};
// Create the variable to hold the vertex buffer
LPDIRECT3DVERTEXBUFFER9 buffer
= NULL;

04 DX9_GP CH04 3/12/04 4:14 PM Page 74
74
Chapter 4
■
3D Primer
// variable used to hold the return code
HRESULT hr;
// Create the vertex buffer
hr = pd3dDevice->CreateVertexBuffer(
3*sizeof( CUSTOMVERTEX ),
0,
D3DFVF_XYZRHW | D3DFVF_DIFFUSE,
D3DPOOL_DEFAULT,
&buffer,
NULL );
// Check the return code
if FAILED ( hr)
return false;
As you can see, the
CUSTOMVERTEX
structure is created first, telling Direct3D the type of ver-
tices to use. Next, the call to
CreateVertexBuffer
creates the actual buffer and stores it in the
buffer
variable.
The first parameter to
CreateVertexBuffer
, the size of the buffer in bytes, is created with
enough space to hold three vertices of type
CUSTOMVERTEX
.
The third parameter, the
FVF
, is shown as having the flags
D3DFVF_XYZRHW
and
D3DFVF_DIFFUSE
being used.
The fourth parameter sets the memory pool for this vertex buffer. The value
D3DPOOL_DEFAULT
is used, which allows the buffer to be created in the most appropriate
memory for this type.
The final parameter that you have to worry about is the fifth one. This is where you pass
in the variable that holds the newly created buffer.
After the call to
CreateVertexBuffer
is complete, make sure to check the return code to con-
firm that the buffer was created successfully.
Loading Data into a Buffer
Now that you have a valid vertex buffer, you need to add vertices to it. Before you can place
vertices in the buffer, you must lock the memory the buffer is using. After this memory is
locked, it is freely available to be written to by your game.
Locking the Vertex Buffer
Locking the memory used by the vertex buffer allows your application to write to it. At
this point, you’ve already defined the vertex buffer and the type of vertices it will hold. The

04 DX9_GP CH04 3/12/04 4:14 PM Page 75
75
Vertex Buffers
next step is locking the buffer and copying the vertices. Locking of the buffer is accom-
plished with the
Lock
function, defined next.
HRESULT Lock(
UINT OffsetToLock,
UINT SizeToLock,
VOID **ppbData,
DWORD Flags
);
The
Lock
function takes four parameters:
■
OffsetToLock
. The offset into the buffer to lock. If you want to lock the entire buffer,
this value should be 0.
■
SizeToLock
. The size in bytes to lock. Again, if you are locking the whole buffer, this
value should be 0.
■
ppbData
. A void pointer to the buffer that holds the vertices.
■
Flags
. Flags that describe the type of lock. Following are the available flags:
•
D3DLOCK_DISCARD
. The entire buffer is overwritten.
•
D3DLOCK_NO_DIRTY_UPDATE
. Dirty regions of the buffer are not written to.
•
D3DLOCK_NO_SYSLOCK
. The system keeps normal display mode changes from
happening during a lock. This flag enables the system to continue processing
other events.
•
D3DLOCK_READONLY
. The buffer cannot be written to.
•
D3DLOCK_NOOVERWRITE
. Any information currently in the buffer is not to be
overwritten.
The following code sample shows a normal call to the
Lock
function.
HRESULT hr;
VOID* pVertices;
// Lock the vertex buffer
hr = g_pVB->Lock( 0, 0, ( void** ) &pVertices, 0 );
// Check the return code to make sure the lock was successful
if FAILED (hr)
return false;
The
Lock
function assumes that you’ve already created a valid vertex buffer. The variable
g_pVB
refers to this buffer.

04 DX9_GP CH04 3/12/04 4:14 PM Page 76
76
Chapter 4
■
3D Primer
Copying Vertices to a Vertex Buffer
After the vertex buffer is locked, you can freely copy data into the buffer. You can either
copy enough vertices to fill the whole buffer, or you can selectively change vertices within
the buffer. The next example shows how to use
memcpy
to copy an array of vertices into a
vertex buffer.
// the customvertex structure
struct CUSTOMVERTEX
{
FLOAT x, y, z, rhw;
// the transformed, 3D position for the vertex
DWORD color;
// the vertex color
};
// Define the vertices to be used in the buffer
CUSTOMVERTEX g_Vertices [ ] =
{
{320.0f, 50.0f, 0.5f, 1.0f, D3DCOLOR_ARGB (0, 255, 0, 0),},
{250.0f, 400.0f, 0.5f, 1.0f, D3DCOLOR_ARGB (0, 0, 255, 0),},
{50.0f, 400.0f, 0.5f, 1.0f, D3DCOLOR_ARGB (0, 0, 0, 255),},
};
// Copy the vertices into the vertex buffer
memcpy( pVertices, g_Vertices, sizeof( g_Vertices ) );
The sample first declares the
CUSTOMVERTEX
structure. As mentioned before, this structure
takes a position vertex as well as a color component. Next, an array of vertices is created.
The array, referred to by the
g_Vertices
variable, holds the vertices to be copied into the
buffer. Finally, a call to
memcpy
is made to copy the vertices into the buffer. The first para-
meter to
memcpy
,
pVertices
, refers to the void pointer that was created during the call to
Lock
.
Unlocking the Vertex Buffer
After the vertices have been copied into the buffer, you must unlock the buffer. Unlocking
the buffer allows Direct3D to continue processing normally. You can unlock the buffer
through the
Unlock
function, defined here:
HRESULT Unlock (VOID);
The
Unlock
function requires no parameters and returns the value of
D3D_OK
on success.
After the vertex buffer is filled with vertices, it’s ready to be drawn to the screen.
The
SetupVB
function that follows takes all the steps from earlier and places them in an
easy-to-use function.

04 DX9_GP CH04 3/12/04 4:14 PM Page 77
77
Vertex Buffers
// variable to hold the newly created vertex buffer
LPDIRECT3DVERTEXBUFFER9 g_pVB
= NULL;
/******************************************************************************
* SetupVB
* Creates and fills the vertex buffer
******************************************************************************/
HRESULT SetupVB()
{
HRESULT hr;
// Initialize three vertices for rendering a triangle
CUSTOMVERTEX g_Vertices[] =
{
{320.0f, 50.0f, 0.5f, 1.0f, D3DCOLOR_ARGB (0, 255, 0, 0), },
{250.0f, 400.0f, 0.5f, 1.0f, D3DCOLOR_ARGB (0, 0, 255, 0), },
{50.0f, 400.0f, 0.5f, 1.0f, D3DCOLOR_ARGB (0, 0, 0, 255), },
};
// Create the vertex buffer
hr = pd3dDevice->CreateVertexBuffer(
3*sizeof(CUSTOMVERTEX),
0,
D3DFVF_XYZRHW|D3DFVF_DIFFUSE,
D3DPOOL_DEFAULT,
&g_pVB,
NULL );
// Check to make sure that the vertex buffer was
// created successfully
if FAILED ( hr )
return NULL;
VOID* pVertices;
// Lock the vertex buffer
hr = g_pVB->Lock( 0, sizeof(g_Vertices), (void**)&pVertices, 0 );
// Check to make sure the lock was successful
if FAILED (hr)
return E_FAIL;

04 DX9_GP CH04 3/12/04 4:14 PM Page 78
78
Chapter 4
■
3D Primer
// Copy the vertices into the buffer
memcpy( pVertices, g_Vertices, sizeof(g_Vertices) );
// Unlock the vertex buffer
g_pVB->Unlock();
return S_OK;
}
The
SetupVB
function requires that a variable to hold the vertex buffer is defined outside
the scope of this function. The variable
g_pVB
refers to this variable. If the vertex buffer is
created and filled successfully, the
SetupVB
function returns the
HRESULT
value of
S_OK
.
Drawing the Contents of the Buffer
Now that you’ve spent all this time creating the vertex buffer and filling it with vertices,
you’re probably wondering when you get to see something on the screen. Well, rendering
the vertices within the vertex buffer requires three steps. The first step is setting the stream
source, followed by configuring the vertex shader, and then finally drawing the vertices to
the screen. These steps are explained in detail in the following sections.
Setting the Stream Source
Direct3D streams are arrays of component data that consist of multiple elements. The ver-
tex buffer you created earlier is an example of such a stream. Before Direct3D can render
a vertex buffer, you must associate the buffer with a data stream. This is accomplished
with the function
SetStreamSource
, defined here:
HRESULT SetStreamSource(
UINT StreamNumber,
IDirect3DVertexBuffer9 *pStreamData,
UINT OffsetInBytes,
UINT Stride
);
SetStreamSource
requires four parameters.
■
StreamNumber
. The number of the data stream. If you have created only one vertex
buffer, this parameter is 0.
■
pStreamData
. The pointer to the variable that contains the vertex buffer.
■
OffsetInBytes
. The number of bytes from the start of the buffer where the vertex
data is stored. This value is usually 0.
■
Stride
. The size of each vertex structure within the buffer.

04 DX9_GP CH04 3/12/04 4:14 PM Page 79
79
Vertex Buffers
An example call to
SetStreamSource
is shown next:
pd3dDevice->SetStreamSource ( 0, buffer, 0, sizeof(CUSTOMVERTEX) );
In this function call to
SetStreamSource
, the first parameter representing the stream num-
ber is set to 0. The second parameter must be a valid pointer to a properly created vertex
buffer. The third parameter is set to 0, telling Direct3D to start at the beginning of the
stream. The final parameter is the stride of the stream. This is set to the size in bytes of the
CUSTOMVERTEX
structure. The
sizeof
function calculates the number of bytes.
Setting the Vertex Shader
After you set the source for the stream, you must set the vertex shader. The vertex shader
tells Direct3D which types of shading to apply. The
SetFVF
function, defined next, sets up
Direct3D to use a fixed vertex function format.
HRESULT SetFVF(
DWORD FVF
);
The
SetFVF
function requires only one parameter specified by the variable
FVF
. The
FVF
parameter accepts a value of type
D3DFVF
.
The following code sample shows how
SetFVF
is used.
HRESULT hr;
hr = pd3dDevice->SetFVF (D3DFVF_XYZRHW | D3DFVF_DIFFUSE);
// Check the return code to verify that SetFVF completed successfully
if FAILED (hr)
return false;
This code sample passes the values
D3DFVF_XYZRHW
and
D3DFVF_DIFFUSE
as the parameter to
SetFVF
. As you’ll recall, when the
CUSTOMVERTEX
structure was set up, it used these two values
when creating the vertex buffer.
You must have already created a valid Direct3D device. It is referred to by the
pd3dDevice
variable.
Rendering the Vertex Buffer
Now that you have created the stream and associated it with the vertex buffer, you can ren-
der the vertices to the screen. The function needed to do this is
DrawPrimitive
, defined next.
The
DrawPrimitive
function continues through the vertex buffer and renders its data to the
screen.
HRESULT DrawPrimitive(
D3DPRIMITIVETYPE PrimitiveType,

04 DX9_GP CH04 3/12/04 4:14 PM Page 80
80
Chapter 4
■
3D Primer
UINT StartVertex,
UINT PrimitiveCount
);
The
DrawPrimitive
function requires three parameters:
■
PrimitiveType
. The type of primitive to draw using the vertices within the stream
■
StartVertex
. The number of the first vertex in the stream
■
PrimitiveCount
. The number of primitives to render
The
PrimitiveType
parameter can be any of these enumerated values:
■
D3DPT_POINTLIST
. A series of individual, unconnected points
■
D3DPT_LINELIST
. Isolated lines
■
D3DPT_LINESTRIP
. A series of lines connected by a single vertex
■
D3DPT_TRIANGLELIST
. Isolated triangles consisting of three vertices
■
D3DPT_TRIANGLESTRIP
. A series of connected triangles where only one vertex is
required for the definition of each additional triangle
■
D3DPT_TRIANGLEFAN
. A series of connected triangles that share a common vertex
The following code segment shows a call to
DrawPrimitive
using a triangle strip as the
primitive type.
HRESULT hr;
// Call DrawPrimitive
hr = pd3dDevice->DrawPrimitive( D3DPT_TRIANGLESTRIP, 0, 1 );
// Check the return code to verify that the function was successful
if FAILED (hr)
return false;
The previous code sample tells Direct3D to render the vertices in the vertex buffer using
a triangle strip described using the
D3DPT_TRIANGLESTRIP
type as the first parameter. The sec-
ond parameter is set to
0
, meaning that
DrawPrimitive
should start with the first vertex in
the buffer. The last parameter is set to
1
because there were only enough vertices defined
to create a single triangle.
A valid Direct3D device must exist. It is referred to by the
pd3dDevice
variable.
The full source for creating and rendering a vertex buffer is available in the
chapter4\example1 directory on the CD-ROM.
Figure 4.8 shows the drawing of a single colored triangle.

04 DX9_GP CH04 3/12/04 4:14 PM Page 81
81
Vertex Buffers
Figure 4.8 The output of Example 1.
Rendering a Scene
Before you can render 3D primitives, you must prepare Direct3D to render. The
BeginScene
function tells Direct3D that rendering is about to take place. Using the
BeginScene
func-
tion, Direct3D makes sure that the rendering surfaces are valid and ready. If the
BeginScene
function fails, your code should skip making rendering calls.
After rendering is done, you need to call the
EndScene
function. The
EndScene
function tells
Direct3D that you are finished making rendering calls and the scene is ready to be pre-
sented to the back buffer.
The code that follows confirms the return codes from
BeginScene
and
EndScene
.
HRESULT hr;
if ( SUCCEEDED( pDevice->BeginScene( ) ) )
{
// Render primitives only if the scene
// starts successfully
// Close the scene
hr = pDevice->EndScene( );
if ( FAILED ( hr ) )
return hr;
}

04 DX9_GP CH04 3/12/04 4:14 PM Page 82
82
Chapter 4
■
3D Primer
The previous code confirms that the call to
BeginScene
is successful before allowing ren-
dering to take place using the
SUCCEEDED
macro around the call. When rendering is com-
plete, you call the
EndScene
function.
The next code sample shows what an example
render
function might look like.
/******************************************************************************
* render
******************************************************************************/
void render()
{
// Clear the back buffer to black
pd3dDevice->Clear( 0, NULL, D3DCLEAR_TARGET,
D3DCOLOR_XRGB(0,0,0), 1.0f, 0 );
// Tell Direct3D to begin the scene
pd3dDevice->BeginScene();
// Draw the contents of the vertex buffer
// Set the data stream first
pd3dDevice->SetStreamSource( 0, buffer, 0, sizeof(CUSTOMVERTEX) );
// Set the Vertex format for the stream next
pd3dDevice->SetFVF( D3DFVF_CUSTOMVERTEX );
// Draw the vertices within the buffer using triangle strips
pd3dDevice->DrawPrimitive( D3DPT_TRIANGLESTRIP, 0, 1 );
// Tell Direct3D that drawing is complete
pd3dDevice->EndScene();
// copies the back buffer to the screen
pd3dDevice->Present( NULL, NULL, NULL, NULL );
}
The
render
function takes all these steps and combines then into a single function. The
pd3dDevice
variable represents a valid Direct3D device created outside this function.
Primitive Types
Earlier, you had the option of setting the primitive type that
DrawPrimitive
would use to
render the vertices within the vertex buffer. For the purpose of the previous example, I
chose a triangle strip for its speed and ability to add additional triangles easily. This sec-
tion explains in a little more detail the differences among the available primitive types.
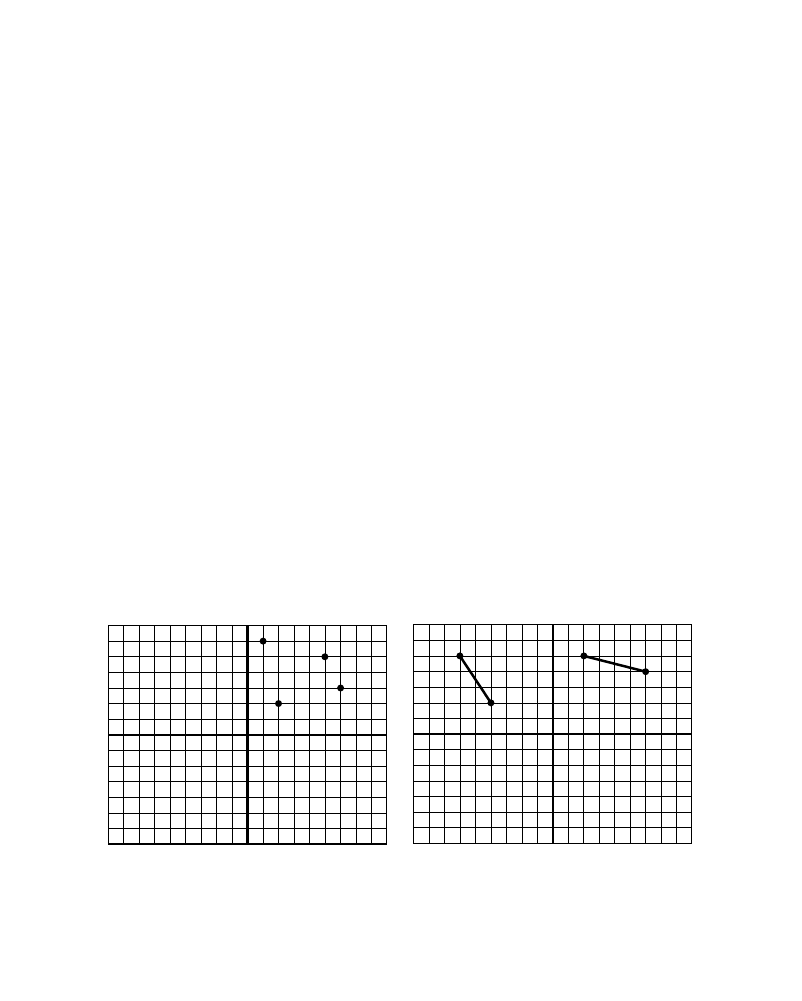
04 DX9_GP CH04 3/12/04 4:14 PM Page 83
83
Primitive Types
Point List
A point list consists of a series of points that are not connected in any way. Figure 4.9
shows a grid containing four distinct points. Each point is defined using X, Y, and Z coor-
dinates. For example, the top-left point would be defined as (1, 6, 0).
Line List
A line list consists of lines constructed by two points, one at each end. The lines within a
line list are not connected. Figure 4.10 shows two lines rendered using a line list. This par-
ticular line list is constructed from four vertices. The line on the left is formed using (-6,
5, 0) for the upper coordinate and (-4, 2, 0) for the bottom coordinate.
Line Strip
A line strip is a series of connected lines in which each additional line is defined by a
single vertex. Each vertex in the line strip is connected to the previous vertex for a line.
Figure 4.11 shows how a line list is constructed and rendered. The line list in this figure is
constructed using a series of six vertices, creating five lines.
Triangle List
A triangle list contains triangles that are not connected in any way and can appear any-
where within your world. Figure 4.12 shows two individual triangles constructed from six
vertices. Each triangle requires three vertices to construct a complete triangle.
Figure 4.9 An example of rendered points
Figure 4.10 Lines rendered using a line list.
using a point list.

04 DX9_GP CH04 3/12/04 4:14 PM Page 84
84
Chapter 4
■
3D Primer
Figure 4.11 Lines rendered using a line strip.
Figure 4.12 Triangles rendered using a
triangle list.
Triangle Strip
A triangle strip is a series of triangles connected to one another in which only one vertex
is required to define each additional triangle. Figure 4.13 shows four triangles created
using only six vertices.
Triangle strips are constructed first by creating three vertices to define the first triangle. If
an additional vertex is defined, lines are drawn between the two previously created ver-
tices, forming another triangle. In Figure 4.13, the order of the vertices’ creation is shown.
Figure 4.13 Triangles rendered using a
triangle strip.
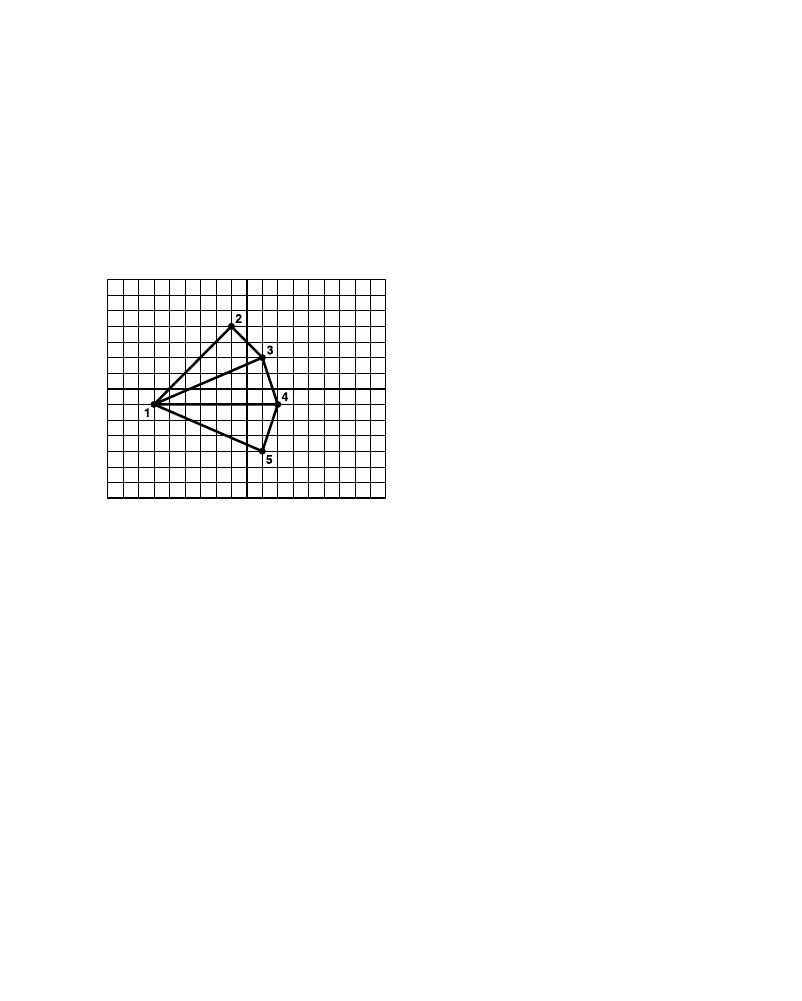
04 DX9_GP CH04 3/12/04 4:14 PM Page 85
85
Chapter Summary
Triangle Fan
A triangle fan is a series of triangles that share a common vertex. After the first triangle is
created, each additional vertex creates another triangle with one of its points being the
first vertex defined.
Figure 4.14 shows how a triangle fan consisting of three triangles is created using only five
vertices. The order of the vertices controls what the triangle fan looks like. Figure 4.14
shows the order of the vertices’ creation needed to construct the displayed fan.
Figure 4.14 Triangles rendered using a
triangle fan.
Chapter Summary
So far, you’ve only seen the basics of how 3D works. As the book progresses, you’ll learn
more advanced topics, but right now you should have a clear understanding of the virtues
of vertex buffers.
Now that you have a basic understanding of how 3D space works and how to define
objects within it, it’s time to learn how to navigate within this world. In the next chapter,
you’ll learn how to rotate and move your objects.
What You Have Learned
In this chapter, you learned the following:
■
The differences between 2D and 3D space
■
What vertices are and how to define them
■
How to create and use a vertex buffer

04 DX9_GP CH04 3/12/04 4:14 PM Page 86
86
Chapter 4
■
3D Primer
■
How to render any number of vertices easily
■
The different primitive types that Direct3D offers
Review Questions
You can find the answers to Review Questions and On Your Own exercises in Appendix
A, “Answers to End-of-Chapter Exercises.”
1. How is a point defined in a 3D coordinate system?
2. Which axis is commonly used to describe depth?
3. What does the
SetFVF
function do?
4. Which primitive type consists of a series of connected lines?
5. How many vertices are needed to create a triangle strip of five triangles?
On Your Own
1. Write a function to render a line list consisting of four lines.
2. Write a function to render multiple triangles using a triangle list.

05 DX9_GP CH05 3/12/04 4:15 PM Page 87
chapter 5
Matrices, Transforms,
and Rotations
M
ost beginners believe that matrices and 3D math are the most difficult part of
learning graphics programming. This might have been true a couple of years
ago, but it’s not true anymore. Direct3D has advanced during that time and
taken away a lot of the complexity, leaving programmers to focus more on how they want
their games to work.
This chapter introduces you to matrices and shows you how easily they can be made to
work for you instead of against you.
Here’s what you’ll learn in this chapter:
■
What a 3D model is and how it’s created
■
How to optimize rendering by using index buffers
■
What the geometry pipeline is and what its stages are
■
What matrices are and how they affect your 3D world
■
How D3DX can make your job easier
■
What it takes to manipulate your objects within a scene
■
How to create a virtual camera
Creating a 3D Model
Now that you’ve been introduced to drawing triangles, it’s time to expand on that knowl-
edge and create full 3D models. Almost everything in games is represented with 3D
objects, from the character you play to the environment the character interacts with. A 3D
87

05 DX9_GP CH05 3/12/04 4:15 PM Page 88
88
Chapter 5
■
Matrices, Transforms, and Rotations
object’s complexity can range from a single polygon to thousands of polygons, depending
on what the model represents. Full cities complete with cars, buildings, and people can be
represented this way.
Although 3D objects might seem intimidating, it helps to think of them as just a series of
connected triangles. By breaking down a model into its most primitive type, it becomes a
little easier to grasp.
I’m going to take you through the steps you need to follow to create and render a cube. A
cube isn’t the most complicated object, but it does give you the basics you need to handle
any 3D model.
Defining the Vertex Buffer
In Chapter 4, “3D Primer,” you were introduced to vertex buffers as a clean and handy
place for storing vertex information. As the complexity of the objects you’re using grows,
the convenience of vertex buffers will become more apparent. The vertex buffer is a great
place to store object vertices, allowing you easy access and simple methods for rendering
those vertices.
Your previous use of a vertex buffer needed only three vertices to create a triangle. Now
that you’ll be creating a more complicated object, you’ll need to store more vertices.
When you’re defining the vertices for a static object, consider storing them in an array.
The array has a type of
CUSTOMVERTEX
, which, as you’ll recall from Chapter 4, allows you to
define the layout of your vertex data. Each element in the array holds all the information
that Direct3D needs to describe a single vertex. Following is the code you need to define
the vertices for a cube.
// a structure for your custom vertex type
struct CUSTOMVERTEX
{
FLOAT x, y, z;
// the untransformed, 3D position for the vertex
DWORD color;
// the color of the vertex
};
CUSTOMVERTEX g_Vertices[] =
{
// 1
{ -64.0f, 64.0f, -64.0f, D3DCOLOR_ARGB(0,0,0,255)},
{ 64.0f, 64.0f, -64.0f, D3DCOLOR_ARGB(0,0,0,255)},
{ -64.0f, -64.0f, -64.0f, D3DCOLOR_ARGB(0,0,0,255)},
{ 64.0f, -64.0f, -64.0f, D3DCOLOR_ARGB(0,0,0,255)},
// 2

05 DX9_GP CH05 3/12/04 4:15 PM Page 89
89
Creating a 3D Model
{ -64.0f, 64.0f, 64.0f, D3DCOLOR_ARGB(0,0,0,255)},
{ -64.0f, -64.0f, 64.0f, D3DCOLOR_ARGB(0,0,0,255)},
{ 64.0f, 64.0f, 64.0f, D3DCOLOR_ARGB(0,0,0,255)},
{ 64.0f, -64.0f, 64.0f, D3DCOLOR_ARGB(0,0,0,255)},
// 3
{ -64.0f, 64.0f, 64.0f, D3DCOLOR_ARGB(0,0,0,255)},
{ 64.0f, 64.0f, 64.0f, D3DCOLOR_ARGB(0,0,0,255)},
{ -64.0f, 64.0f, -64.0f, D3DCOLOR_ARGB(0,0,0,255)},
{ 64.0f, 64.0f, -64.0f, D3DCOLOR_ARGB(0,0,0,255)},
// 4
{ -64.0f, -64.0f, 64.0f, D3DCOLOR_ARGB(0,0,0,255)},
{ -64.0f, -64.0f, -64.0f, D3DCOLOR_ARGB(0,0,0,255)},
{ 64.0f, -64.0f, 64.0f, D3DCOLOR_ARGB(0,0,0,255)},
{ 64.0f, -64.0f, -64.0f, D3DCOLOR_ARGB(0,0,0,255)},
// 5
{ 64.0f, 64.0f, -64.0f, D3DCOLOR_ARGB(0,0,0,255)},
{ 64.0f, 64.0f, 64.0f, D3DCOLOR_ARGB(0,0,0,255)},
{ 64.0f, -64.0f, -64.0f, D3DCOLOR_ARGB(0,0,0,255)},
{ 64.0f, -64.0f, 64.0f, D3DCOLOR_ARGB(0,0,0,255)},
// 6
{-64.0f, 64.0f, -64.0f, D3DCOLOR_ARGB(0,0,0,255)},
{-64.0f, -64.0f, -64.0f, D3DCOLOR_ARGB(0,0,0,255)},
{-64.0f, 64.0f, 64.0f, D3DCOLOR_ARGB(0,0,0,255)},
{-64.0f, -64.0f, 64.0f, D3DCOLOR_ARGB(0,0,0,255)},
};
The first thing the code does is to declare the layout of the
CUSTOMVERTEX
structure. This
structure includes two sections: the position using the
X
,
Y
, and
Z
variables, and the color.
After the structure is defined, the
g_Vertices
array is created and filled with the vertex data
necessary to create a cube. The vertex data is split up into six sections, each one repre-
senting a side of the cube. Previously, you always used a value of
1.0f
for the
Z
value in ver-
tex declarations, which made your objects appear flat. Because the cube you are creating
is a fully 3D model, the
Z
value is being used to define the distances of the vertices within
the world.
The next step in the process is creating and filling the vertex buffer with the vertex data
for the cube. The code that follows shows what is needed to do this.
// Create the vertex buffer
HRESULT hr;

05 DX9_GP CH05 3/12/04 4:15 PM Page 90
90
Chapter 5
■
Matrices, Transforms, and Rotations
LPDIRECT3DVERTEXBUFFER9 vertexBuffer;
// Create the vertex buffer that will store the cube’s vertices
hr = pd3dDevice->CreateVertexBuffer(sizeof(g_Vertices) * sizeof(CUSTOMVERTEX),
0,
D3DFVF_CUSTOMVERTEX,
D3DPOOL_DEFAULT,
&vertexBuffer,
NULL );
// Check the return code of CreateVertexBuffer call to make sure it succeeded
if FAILED (hr)
return false;
// Prepare to copy the vertices into the vertex buffer
VOID* pVertices;
// Lock the vertex buffer
hr = vertexBuffer->Lock(0,
sizeof(g_Vertices),
(void**) &pVertices,
0);
// Check to make sure the vertex buffer can be locked
if FAILED (hr)
return false;
// Copy the vertices into the buffer
memcpy ( pVertices, g_Vertices, sizeof(g_Vertices) );
// Unlock the vertex buffer
vertexBuffer->Unlock();
Using the call to
CreateVertexBuffer
creates the vertex buffer; its size and type are defined
as well. Instead of specifically stating the size of the vertex buffer to create, I’ve used the
sizeof
function to calculate this at compile time. Multiply the size of the
g_Vertices
array
by the size of the
CUSTOMVERTEX
structure to get the exact size that the vertex buffer needs to
be to hold all the vertices.
The resulting buffer is then locked, and the vertices from the
g_Vertices
array are copied
into it using the
memcpy
function.
Now that you have a filled vertex buffer, you are ready to draw your 3D object.

05 DX9_GP CH05 3/12/04 4:15 PM Page 91
91
Creating a 3D Model
Rendering the Cube
Rendering the cube is just like drawing any other object from a vertex buffer, regardless of
its complexity. The major difference separating a cube, a triangle, and a car is the number
of vertices involved. After the object is stored in the vertex buffer, it’s easy to render it.
The
Render
function shown here details the code needed to render the cube you defined in
the
g_Vertices
array.
/*****************************************************************************
* Render
*****************************************************************************/
void Render(void)
{
// Clear the back buffer to a white color
pd3dDevice->Clear( 0,
NULL,
D3DCLEAR_TARGET,
D3DCOLOR_XRGB(255,255,255),
1.0f,
0 );
pd3dDevice->BeginScene();
// Set the vertex stream for the model
pd3dDevice->SetStreamSource( 0, vertexBuffer, 0, sizeof(CUSTOMVERTEX) );
// Set the vertex format
pd3dDevice->SetFVF( D3DFVF_CUSTOMVERTEX );
// Call DrawPrimitive to draw the cube
pd3dDevice->DrawPrimitive( D3DPT_TRIANGLESTRIP, 0, 2 );
pd3dDevice->DrawPrimitive( D3DPT_TRIANGLESTRIP, 4, 2 );
pd3dDevice->DrawPrimitive( D3DPT_TRIANGLESTRIP, 8, 2 );
pd3dDevice->DrawPrimitive( D3DPT_TRIANGLESTRIP, 12, 2 );
pd3dDevice->DrawPrimitive( D3DPT_TRIANGLESTRIP, 16, 2 );
pd3dDevice->DrawPrimitive( D3DPT_TRIANGLESTRIP, 20, 2 );
pd3dDevice->EndScene();
// Present the back buffer contents to the display
pd3dDevice->Present( NULL, NULL, NULL, NULL );
}
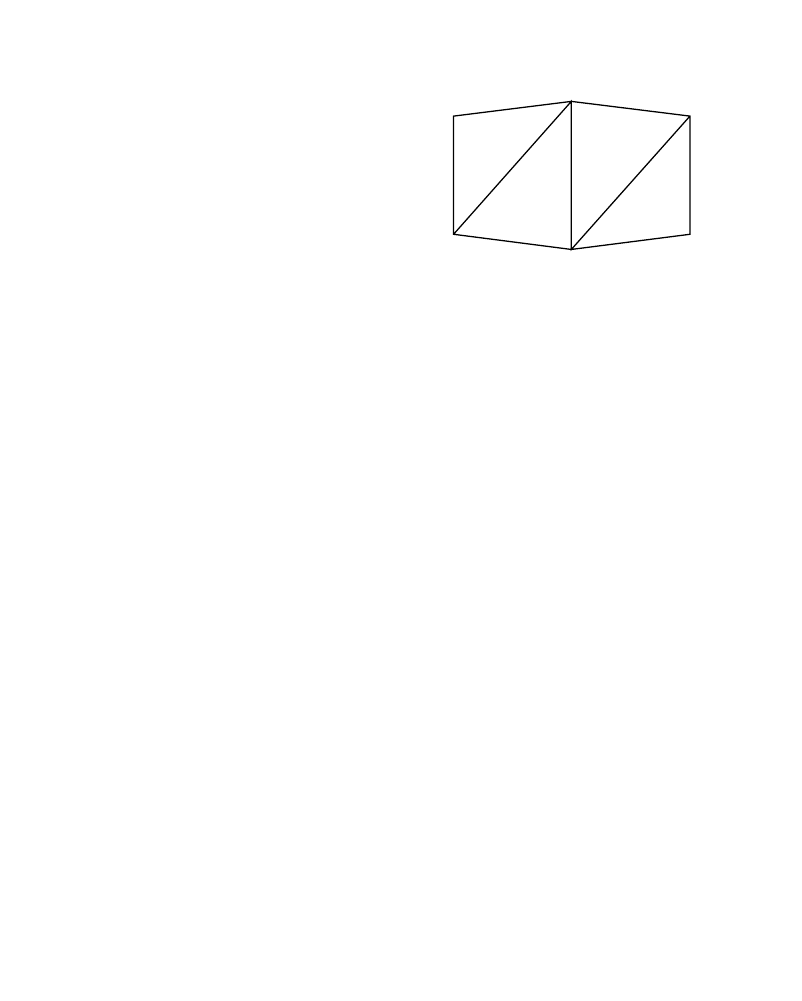
05 DX9_GP CH05 3/12/04 4:15 PM Page 92
92
Chapter 5
■
Matrices, Transforms, and Rotations
The cube is rendered first by setting the vertex
stream source and the vertex format. The biggest
difference between drawing one triangle and
drawing the multiple triangles required to render
a 3D cube is the additional calls to
DrawPrimitive
.
Each of the six
DrawPrimitive
calls renders a single
side of the cube using the triangle strip primitive.
Figure 5.1 shows what the resulting cube looks
like. The cube is rendered using wireframe so that
Figure 5.1 The full 3D cube.
you can see the triangles that go into its creation.
Index Buffers
Index buffers are areas of memory that store index data. Each index in the buffer refers to
a particular vertex with a vertex buffer. The indices reduce the amount of data that must
be sent to the graphic card by sending only a single value for each vertex instead of the full
X
,
Y
, and
Z
data. The vertex data lives in the vertex buffer, and the values within the index
buffer reference the vertex buffer.
You create index buffers, which are based on the
IDirect3DIndexBuffer9
interface, by using
the
CreateIndexBuffer
function, which is defined next.
HRESULT CreateIndexBuffer(
UINT Length,
DWORD Usage,
D3DFORMAT Format,
D3DPOOL Pool,
IDirect3DIndexBuffer9** ppIndexBuffer,
HANDLE* pHandle
);
The
CreateIndexBuffer
function requires six parameters:
■
Length
. The size of the index data in bytes.
■
Usage
. A value of type
D3DUSAGE
that details how the buffer is to be used.
■
Format
. The format of the buffer indices. You have two choices here:
D3DFMT_INDEX16
or
D3DFMT_INDEX32
.
D3DFMT_INDEX16
means the indices are 16 bits each, and
D3DFMT_INDEX32
means the indices are 32 bits each.
■
Pool
. The type of memory to be used in the index buffer creation.
■
ppIndexBuffer
. An address to a pointer where the newly created index buffer will
reside.
■
pHandle
. A reserved value that should be
NULL
.

05 DX9_GP CH05 3/12/04 4:15 PM Page 93
93
Index Buffers
A sample call to
CreateIndexBuffer
is shown here.
// Create the index buffer
hr = pd3dDevice->CreateIndexBuffer(sizeof(IndexData)*sizeof(WORD),
D3DUSAGE_WRITEONLY,
D3DFMT_INDEX16,
D3DPOOL_DEFAULT,
&iBuffer,
NULL);
The
CreateIndexBuffer
call is similar to the
CreateVertexBuffer
function you’ve used before.
The major difference between the two functions is the third parameter, which specifies the
format of the indices that will be in the buffer. You have the option of 16- or 32-bit indices,
which allows you to define your indices as either
WORD
or
DWORD
types.
Previously, I showed you how to create a cube using vertex buffers. The cube required 24
overlapping vertices to create 12 triangles. Using index buffers, you can create the same
cube using only eight vertices. The next section shows you how to do this.
Generating a Cube by Using Index Buffers
The first step to creating a cube using index buffers is to define the vertices and the indices
that will go into making up the model you’re trying to create. As before when you were
creating an object using vertex buffers, it’s easiest to define the values in an array.
You define the vertices first, again using the
CUSTOMVERTEX
type you created previously. Each
vertex has an
X
,
Y
, and
Z
value as well as a color component.
/ vertices for the vertex buffer
CUSTOMVERTEX g_Vertices[ ] = {
// X
Y
Z
U
V
{-1.0f,-1.0f,-1.0f, D3DCOLOR_ARGB(0,0,0,255)},
// 0
{-1.0f, 1.0f,-1.0f, D3DCOLOR_ARGB(0,0,0,255)},
// 1
{1.0f, 1.0f,-1.0f, D3DCOLOR_ARGB(0,0,0,255)},
// 2
{ 1.0f,-1.0f,-1.0f, D3DCOLOR_ARGB(0,0,0,255)},
// 3
{-1.0f,-1.0f, 1.0f, D3DCOLOR_ARGB(0,0,0,255)},
// 4
{1.0f,-1.0f, 1.0f, D3DCOLOR_ARGB(0,0,0,255)},
// 5
{ 1.0f, 1.0f, 1.0f, D3DCOLOR_ARGB(0,0,0,255)},
// 6
{-1.0f, 1.0f, 1.0f, D3DCOLOR_ARGB(0,0,0,255)}
// 7
};
After you have the vertices defined, the next step is to generate the indices. The indices,
like the vertices, are defined and stored in an array. Remember when I mentioned that the
format of the indices could be 16 or 32 bits? This is where that choice comes into play.

05 DX9_GP CH05 3/12/04 4:15 PM Page 94
94
Chapter 5
■
Matrices, Transforms, and Rotations
The following code shows the array of indices that will go into creating the cube.
// index buffer data
WORD IndexData[ ] = {
0,1,2,
// triangle 1
2,3,0,
// triangle 2
4,5,6,
// triangle 3
6,7,4,
// triangle 4
0,3,5,
// triangle 5
5,4,0,
// triangle 6
3,2,6,
// triangle 7
6,5,3,
// triangle 8
2,1,7,
// triangle 9
7,6,2,
// triangle 10
1,0,4,
// triangle 11
4,7,1
// triangle 12
};
The previous
IndexData
array has split 36 indices into 12 groups, each consisting of 3 val-
ues that make up a triangle. Twelve triangles are needed to make a cube, using two trian-
gles per face.
n o t e
Remember: If you are tight on memory and your model doesn’t require a
DWORD
type for your
indices, use a
WORD
type instead.
Creating and Filling the Index Buffer
Now that the values you need for the index buffer have been defined, you need to copy
them into the index buffer. This process is similar to copying vertices into a vertex buffer.
First, you lock the index buffer by using the
Lock
function. From there, you copy the
indices into the buffer by using the
memcpy
function and then unlock the buffer. The result
is an index buffer that contains the indices you need to render the cube.
The following code shows the process of creating and filling an index buffer with data.
// the index buffer
LPDIRECT3DINDEXBUFFER9 iBuffer;
HRESULT hr;
// Create the index buffer

05 DX9_GP CH05 3/12/04 4:15 PM Page 95
95
Index Buffers
hr = pd3dDevice->CreateIndexBuffer(sizeof(IndexData)*sizeof(WORD),
D3DUSAGE_WRITEONLY,
D3DFMT_INDEX16,
D3DPOOL_DEFAULT,
&iBuffer,
NULL);
// Check to make sure the index buffer was created successfully
if FAILED(hr)
return false;
// Prepare to copy the indexes into the index buffer
VOID* IndexPtr;
// Lock the index buffer
hr = iBuffer ->Lock(0, 0, (void**)& IndexPtr, D3DLOCK_DISCARD);
// Check to make sure the index buffer can be locked
if FAILED (hr)
return hr;
// Copy the indices into the buffer
memcpy( pVertices, IndexData, sizeof(IndexData) );
// Unlock the index buffer
iBuffer->Unlock();
After the index buffer is filled with data, you can use the vertex and index data together to
render your object.
Rendering the Cube with Index Buffers
Before, when you were drawing using vertex buffers, you used the
DrawPrimitive
function.
The
DrawPrimitive
function used the data in the vertex buffer to create primitives, such as
triangle strips and triangle lists. You can draw in a similar way using index buffers and the
DrawIndexedPrimitive
function.
The
DrawIndexedPrimitive
function uses an index buffer as its data source and renders
graphic primitives to draw your 3D objects. The
DrawIndexedPrimitive
function is defined
here.
HRESULT DrawIndexedPrimitive(
D3DPRIMITIVETYPE Type,
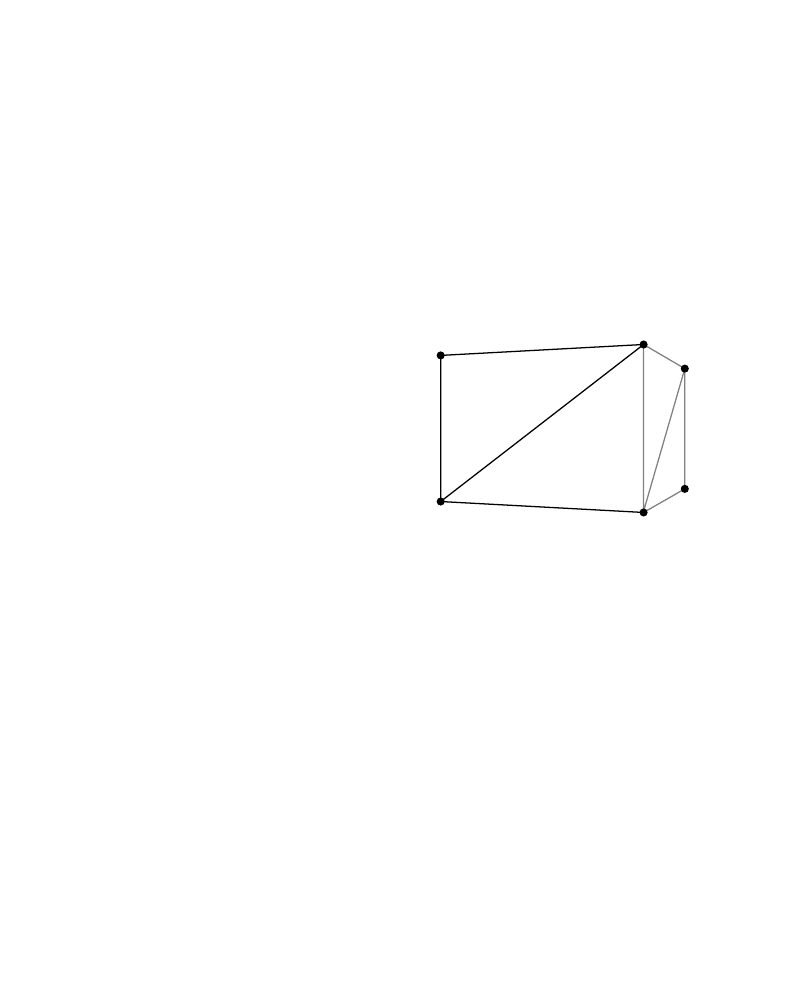
05 DX9_GP CH05 3/12/04 4:15 PM Page 96
96
Chapter 5
■
Matrices, Transforms, and Rotations
INT BaseVertexIndex,
UINT MinIndex,
UINT NumVertices,
UINT StartIndex,
UINT PrimitiveCount
);
The
DrawIndexedPrimitive
function takes six parameters:
■
Type
. The primitive type to use when rendering the index data
■
BaseVertexIndex
. The starting index within the vertex buffer
■
MinIndex
. The minimum vertex index for this call
■
NumVertices
. The number of vertices that
are used in this call
■
StartIndex
. The location in the vertex
array to start reading vertices
■
PrimitiveCount
. The number of primitives
to draw
Figure 5.2 shows a cube rendered in wireframe
mode with the edge vertices highlighted. The
edge vertices demonstrate the vertices referred
to in the index buffers.
Figure 5.2 A cube with edge vertices
highlighted.
// Set the indices to use
m_pd3dDevice->SetIndices( m_pDolphinIB );
// Call DrawIndexedPrimitive to draw the object using the indices
m_pd3dDevice->DrawIndexedPrimitive( D3DPT_TRIANGLELIST,
0,
// BaseVertexIndex
0,
// MinIndex
m_dwNumDolphinVertices,
// NumVertices
0,
// StartIndex
m_dwNumDolphinFaces );
// primitive count
Right before the call to
DrawIndexedPrimitive
is the
SetIndices
function. The
SetIndices
function, defined next, tells Direct3D which index buffer is going to be used as the data
source when drawing. The
SetIndices
function works in much the same way as the
SetStreamSource
function does when you’re drawing with vertex buffers.
HRESULT SetIndices(
IDirect3DIndexBuffer9 *pIndexData
);
The
SetIndices
function requires only a single parameter: a pointer to an index buffer con-
taining valid index data.
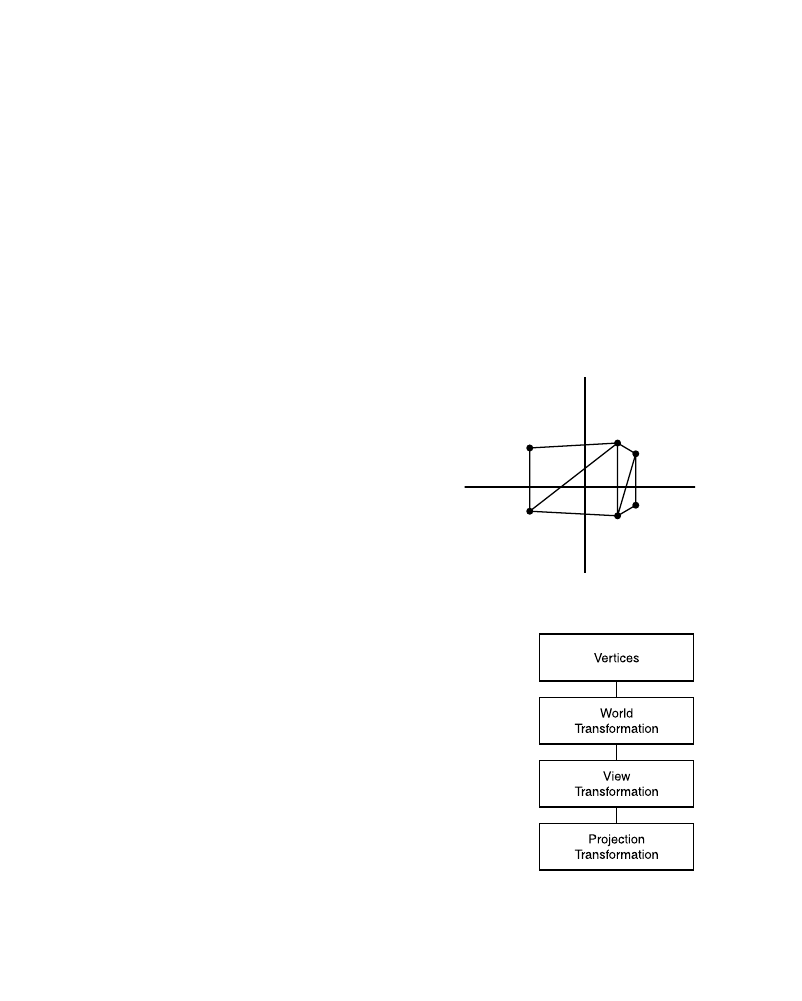
05 DX9_GP CH05 3/12/04 4:15 PM Page 97
97
The Geometry Pipeline
The Geometry Pipeline
So far you’ve been using pretransformed coordinates to draw your objects to the screen.
That means that the object’s position is basically predefined in screen coordinates. This
really restricts the size of the world and the movement of the objects within it.
3D models are for the most part created outside of your game code. For instance, if you’re
creating a racing game, you’ll probably create the car models in a 3D art package. During
the creation process, these models will be working off of the coordinate system provided
to them in the modeler. This causes the objects to be created with a set of vertices that
aren’t necessarily going to place the car model exactly where and how you want it in your
game environment. Because of this, you will need to move and rotate the model yourself.
You can do this by using the geometry pipeline. The geometry pipeline is a process that
allows you to transform an object from one coordinate system into another.
When a model first starts out, it is normally cen-
tered on the origin. This causes the model to be cen-
tered in the environment with a default orientation.
Not every model you load needs to be at the origin,
so how do you get models where they need to be?
The answer to that is through transformations. Fig-
ure 5.3 shows a cube centered on the origin.
Transformations refer to the actions of translating
(moving), rotating, and scaling 3D objects. By
applying these actions to a model, you can make the
model appear to move around. These actions are
Figure 5.3 A cube centered on the
handled through the geometry pipeline.
origin.
Figure 5.4 shows the different stages of the geometry pipeline.
When you load a model, its vertices are in a local coordinate
system called model space. Model space refers to the coordinate
system on which the model is based that is independent of the
rest of the world. For instance, upon creation, a model’s vertices
are in reference to the origin point around which they were cre-
ated. A cube that is 2 units in size centered on the origin would
have its vertices 1 unit on either side of the origin. If you then
wanted to place this cube somewhere within your game, you
would need to transform its vertices from the cube’s local coor-
dinate system into the system used by all the objects in your
world. This world coordinate system is called world space, and
the process of transforming vertices into this system is called
Figure 5.4 The stages
world transformation.
of the geometry pipeline.
05 DX9_GP CH05 3/12/04 4:15 PM Page 98
98
Chapter 5
■
Matrices, Transforms, and Rotations
World Transformation
The world transformation stage of the geometry pipeline takes an existing object with its
own local coordinate system and transforms that object into the world coordinate system.
The world coordinate system is the system
that places all objects within the 3D world
in their proper locations. The world system
has a single origin point that all models that
are transformed into this system then
become relative to. Figure 5.5 shows multi-
ple objects within a 3D scene relative to the
world origin point.
The next stage of the geometry pipeline is
the view transformation. Because all objects
at this point are relative to a single origin,
you can only view them from this point. To
allow you to view the scene from any arbi-
trary point, the objects must go through a
Figure 5.5 Multiple objects relative to a
view transformation.
single world system origin point.
View Transformation
The view transformation transforms the coordinates from world space into camera space.
Camera space refers to the coordinate system that is relative to the position of a virtual
camera. When you choose a point of view for your virtual camera, the coordinates in
world space get reoriented in respect to the camera.
n o t e
I’ve been saying “virtual camera” instead of “camera” because the concept of a camera in 3D
doesn’t really exist. By either moving the virtual camera up along the Y axis or by moving the entire
world down along that same axis, you obtain the same visual results.
At this point, you have the camera angle and view for your scene, and you’re ready to dis-
play it to the screen.
Projection Transformation
The next stage in the geometry pipeline is the projection transformation. The projection
transformation is the stage of the pipeline where depth is applied. When you cause objects
that are closer to the camera to appear larger than those farther away, you create an illu-
sion of depth.

05 DX9_GP CH05 3/12/04 4:15 PM Page 99
99
The Geometry Pipeline
Finally, the vertices are scaled to the viewport and projected into 2D space. The resulting
2D image appears on your monitor with the illusion of being a 3D scene. Table 5.1 shows
the types of transformations within the geometry pipeline and the types of spaces each
one affects.
Model space
Projection transformation
Projection space
Table 5.1 Coordinate System Transformations
Transformation Type
From Space
To Space
World transformation
World space
View transformation world space
View space
View space
What Is a Matrix?
A matrix, in simplest terms, is an array of numbers that are arranged in columns and
rows. Shown here is a simple 4
× 4 matrix containing the values 1 through 16.
1
2
3
4
5
6
7
8
9
10
11
12
13
14
15
16
Matrices are used within 3D to represent the transformations needed to move objects
between coordinate spaces. The values that are contained in matrices are used to translate,
rotate, and scale objects. Each row in the matrix represents the world coordinate of each
axis. The first row contains the coordinate position of the X axis, the second row contains
the Y axis position, and the third row contains the Z axis position.
Each position in the matrix represents a portion of a transformation.
For instance, positions 13, 14, and 15 hold the current X, Y, and Z position of a vertex.
Positions 1, 6, and 11 contain the scaling values.
A matrix can be defined in code like this:
float matrix [4][4] = {
1.0f, 0.0f, 0.0f, 0.0f,
0.0f, 1.0f, 0.0f, 0.0f,
0.0f, 0.0f, 1.0f, 0.0f,
2.0f, 3.0f, 2.0f, 1.0f
};

05 DX9_GP CH05 3/12/04 4:15 PM Page 100
100
Chapter 5
■
Matrices, Transforms, and Rotations
The final row of the previous matrix places the object with an X value of
2.0f
, a Y value
of
3.0f
, and a Z value of
2.0f
.
The Identity Matrix
The identity matrix is the default matrix that centers an object about the world origin and
sets the object’s scaling to 1. When you place a value of
1.0f
in the 1, 6, and 11 positions,
an object scaling of
1.0f
is generated. Positions 13, 14, and 15 hold a value of
0.0f
.
Following is an identity matrix.
float IdentityMatrix [4][4] = {
1.0f, 0.0f, 0.0f, 0.0f,
0.0f, 1.0f, 0.0f, 0.0f,
0.0f, 0.0f, 1.0f, 0.0f,
0.0f, 0.0f, 0.0f, 1.0f
};
If you ever need to get an object back to the world origin, you can translate the object’s
vertices by the identity matrix. The object is returned to the origin with no rotation or
scaling applied. You are then free to move the object anywhere within your world.
Initializing a Matrix
Initializing or updating a matrix is as simple as changing individual values within the
array. For instance, if you were given the identity matrix shown earlier and wanted to
apply a translation to move an object 5 units along the X axis and 3 units along the Y axis,
you would update the matrix like this:
Matrix[0][4] = 5.0f;
Matrix[1][4] = 3.0f;
Matrix[2][4] = 0.0f;
The resulting updated matrix would look like this.
float Matrix [4][4] = {
1.0f, 0.0f, 0.0f, 0.0f,
0.0f, 1.0f, 0.0f, 0.0f,
0.0f, 0.0f, 1.0f, 0.0f,
5.0f, 3.0f, 0.0f, 1.0f
};
The resulting matrix then contains the needed values to transform an object by the
required units.

05 DX9_GP CH05 3/12/04 4:15 PM Page 101
The Geometry Pipeline
101
Multiply Matrices
You’re probably wondering how the matrices affect the vertices within an object. Well,
each vertex in the object is multiplied individually by the matrix, resulting in a trans-
formed vertex.
The math involved in this is fairly simple. To get the transformed X vertex, each value in
the first row of the matrix is multiplied by each portion of the original vertex. The results
from each of these multiplications are totaled to get the final transformed vertex. The
complete method for this process is shown here.
X
A
B
C
D
AX + BY + CZ + DW
X (transformed)
Y
E
F
G
H
EX + FY + GZ + HW
Y (transformed)
Z
× I J K L
=
IX + JY + KZ + LW
=
Z (transformed)
W
M N
O
P
MX + NY + OZ + PW
W (transformed)
The far-left column shows the matrix that the vertex will be transformed by. The next col-
umn represents the vertex being transformed. The third column demonstrates the matrix
being multiplied by the vertex. The final column on the right shows the resulting trans-
formed vertex.
As you can see, multiplying a matrix by a vector is pretty straightforward, although mul-
tiplying two matrices can get a little complicated. You can accomplish matrix multiplica-
tion by multiplying the values in each row of the first matrix by the values in each column
in the second. The key to multiplying matrices is to do it one step at a time to simplify the
process.
Here’s a simple example to demonstrate matrix multiplication. First you define the two
matrices side by side. Letters represent the values in the first matrix, whereas numbers rep-
resents the values in the second matrix. This makes it easier to describe the math involved.
A
B
C
D
1
2
3
4
E
F
G
H
5
6
7
8
I
J
K
L
×
9
10
11
12
M
N
O
P
13
14
15
16
You start by multiplying each value from the rows in the first matrix by the values in the
columns of the second matrix. Through the multiplication process, you are going to end
up creating a third output matrix that will contain the results of the multiplication.
The first value in the output matrix is calculated like this:
A
×
1 + B
×
5 + C
×
9 + D
×
13
You need to perform four multiplies just to gain a single value for the output matrix. You
calculate the successive values for the output matrix by continuing to follow this pattern.

05 DX9_GP CH05 3/12/04 4:15 PM Page 102
102
Chapter 5
■
Matrices, Transforms, and Rotations
At this point, you’re probably thinking that the math and data involved will get daunting
pretty quickly. Direct3D tries to help by defining its own matrix data type.
n o t e
Matrix multiplication is not cumulative. Multiplying Matrix A by Matrix B does not result in the
same output matrix as multiplying Matrix B by Matrix A. The order in which matrices are multiplied
is important.
How Direct3D Defines a Matrix
Until now, you’ve been defining a matrix by using a 4
× 4 array of float values. Direct3D
simplifies this for you by providing the
D3DMATRIX
data type, defined here.
typedef struct _D3DMATRIX {
union {
struct {
float
_11, _12, _13, _14;
float
_21, _22, _23, _24;
float
_31, _32, _33, _34;
float
_41, _42, _43, _44;
};
float m[4][4];
};
} D3DMATRIX;
By using the
D3DMATRIX
data type that Direct3D provides, you are given a host of common
functions for performing tasks such as initializing new matrices.
D3DX Makes Matrices Easier
Previously, you were introduced to the
D3DMATRIX
data type that Direct3D provides. It helps
to simplify the definition and maintenance of matrices but still leaves you to perform all
the calculations yourself; this is where the D3DX utility library can help.
The D3DX library declares the
D3DXMATRIX
data type. The values within the
D3DXMATRIX
structure are identical to those found in a
D3DMATRIX
structure, but the
D3DXMATRIX
type gives
you an added bonus. It provides some built-in functions for handling matrix calculations
and comparisons.
The
D3DXMATRIX
type is defined here.
typedef struct D3DXMATRIX : public D3DMATRIX {
public:
D3DXMATRIX() {};

05 DX9_GP CH05 3/12/04 4:15 PM Page 103
The Geometry Pipeline
103
D3DXMATRIX( CONST FLOAT * );
D3DXMATRIX( CONST D3DMATRIX& );
D3DXMATRIX( FLOAT _11, FLOAT _12, FLOAT _13, FLOAT _14,
FLOAT _21, FLOAT _22, FLOAT _23, FLOAT _24,
FLOAT _31, FLOAT _32, FLOAT _33, FLOAT _34,
FLOAT _41, FLOAT _42, FLOAT _43, FLOAT _44 );
// access grants
FLOAT& operator () ( UINT Row, UINT Col );
FLOAT operator () ( UINT Row, UINT Col ) const;
// casting operators
operator FLOAT* ();
operator CONST FLOAT* () const;
// assignment operators
D3DXMATRIX& operator *= ( CONST D3DXMATRIX& );
D3DXMATRIX& operator += ( CONST D3DXMATRIX& );
D3DXMATRIX& operator -= ( CONST D3DXMATRIX& );
D3DXMATRIX& operator *= ( FLOAT );
D3DXMATRIX& operator /= ( FLOAT );
// unary operators
D3DXMATRIX operator + () const;
D3DXMATRIX operator - () const;
// binary operators
D3DXMATRIX operator * ( CONST D3DXMATRIX& ) const;
D3DXMATRIX operator + ( CONST D3DXMATRIX& ) const;
D3DXMATRIX operator - ( CONST D3DXMATRIX& ) const;
D3DXMATRIX operator * ( FLOAT ) const;
D3DXMATRIX operator / ( FLOAT ) const;
friend D3DXMATRIX operator * ( FLOAT, CONST D3DXMATRIX& );
BOOL operator == ( CONST D3DXMATRIX& ) const;
BOOL operator != ( CONST D3DXMATRIX& ) const;
} D3DXMATRIX, *LPD3DXMATRIX;
The first thing you’ll probably notice about the
D3DXMATRIX
type is that it’s a structure that
inherits from
D3DMATRIX
and includes functions that make it appear like a C++ class.

05 DX9_GP CH05 3/12/04 4:15 PM Page 104
104
Chapter 5
■
Matrices, Transforms, and Rotations
Because of the way this type is defined, you can only access it through C++, and it’s treated
as a full class with only public member functions.
If you look through the structure, you’ll see functions that overload a lot of the assign-
ment and comparison operators, as well as those used for calculating matrix operations.
Because the
D3DXMATRIX
data structure is so much more useful, I’ll continue to use it
throughout the examples.
Manipulating 3D Objects by Using Matrices
Now that you know what matrices are, I’m going to tell you how they can be useful. You
use matrices when you’re manipulating objects in a scene. Whether you want to move an
object around or just rotate it, you’ll need matrices to do the job.
D3DX provides multiple functions that make manipulating objects easier by using matri-
ces. I’ve listed a few of them here.
■
D3DXMatrixIdentity
. Resets a matrix to the origin
■
D3DXMatrixRotationX
. Rotates an object around the X axis
■
D3DXMatrixRotationY
. Rotates an object around the Y axis
■
D3DXMatrixScaling
. Scales an object by a specified amount
■
D3DXMatrixTranslation
. Moves an object along one or more axes
Moving an Object Around
To move an object around in your game world, you must translate it. Translation refers to
the movement of an object along one or more of the coordinate system axes. If you
wanted to move an object in your scene to the right, you would have to translate it along
the X axis in a positive direction.
Translation of objects is handled through the
D3DXMatrixTranslation
function, defined next.
D3DXMATRIX *D3DXMatrixTranslation(
D3DXMATRIX *pOut,
FLOAT x,
FLOAT y,
FLOAT z
);
The
D3DXMatrixTranslation
function requires just four parameters.
■
pOut
. The output matrix. This parameter is a pointer to a
D3DXMATRIX
object.
■
x
. The amount to translate the object along the X axis. This can be a positive or a
negative value.

05 DX9_GP CH05 3/12/04 4:15 PM Page 105
Manipulating 3D Objects by Using Matrices
105
■
y
. The amount to translate the object along the Y axis.
■
z
. The amount to translate the object along the Z axis.
The small sample of code that follows shows how to use the
D3DXMatrixTranslation
function.
D3DXMATRIX matTranslate;
D3DXMATRIX matFinal;
// Set the matFinal matrix to the identity
D3DXMatrixIdentity(&matFinal);
// Translate the object 64 units to the right of the origin along the X axis
// The resulting translated matrix is stored in the matTranslate variable
D3DXMatrixTranslation(&matTranslate, 64.0f, 0.0f, 0.0f);
// Multiply the translation and identity matrix together to get the final
// translated matrix stored in the finalMat variable
D3DXMatrixMultiply(&finalMat, &finalMat, & matTranslate);
// Transform the object in world space
pd3dDevice->SetTransform(D3DTS_WORLD, &finalMat);
The
D3DXMatrixTranslation
function is being used to translate an object 64 units to the right
along the X axis. To apply the translation to the object, multiply the translation matrix by
the identity matrix; then the object will be transformed into world space.
Rotating an Object
Being able to move an object along the axes is nice, but you’re really limiting what your
game can do. What fun would a racing game be if you couldn’t drive the car around the
track because the car was restricted to moving only in straight lines? That is why you need
rotation. Being able to rotate the car enables it to make turns and follow the curves of the
track.
Rotating 3D objects works alongside translation to give your characters freedom of move-
ment within their environment. Rotation allows wheels on cars to spin, an arm to swing
at the side of your character, or a baseball to curve right before it goes over the plate.
Rotating is the process of spinning an object around a coordinate system axis. Because
rotation takes place using matrices, the D3DX library provides some helper functions to
make rotating easier.
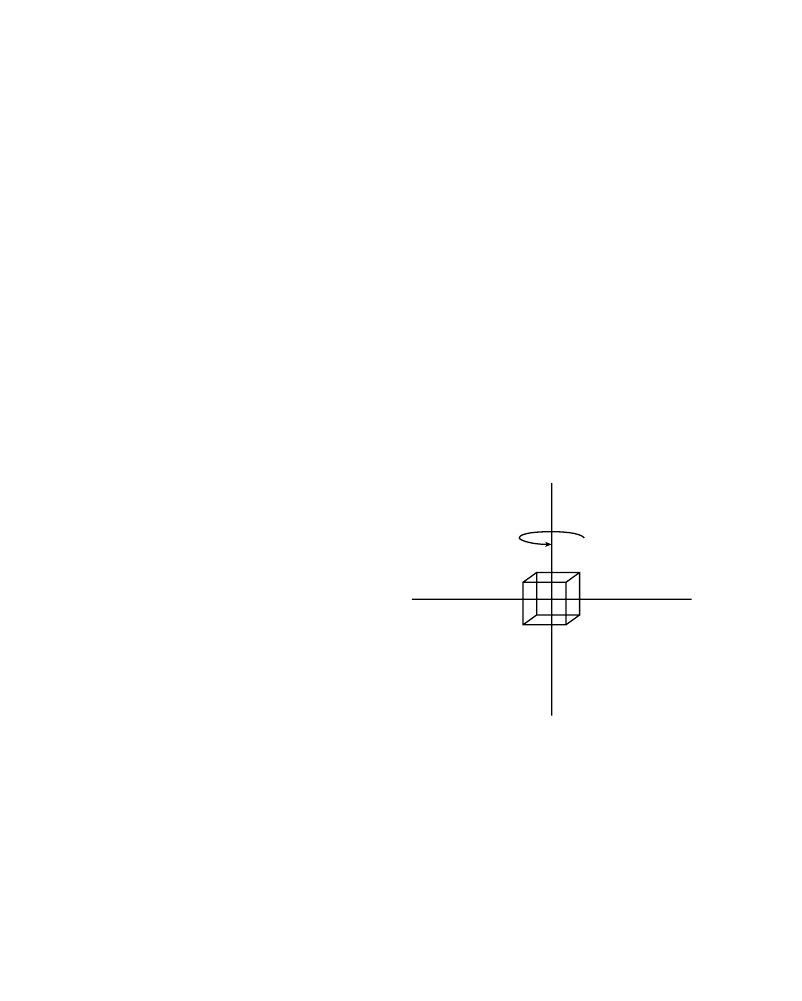
05 DX9_GP CH05 3/12/04 4:15 PM Page 106
106
Chapter 5
■
Matrices, Transforms, and Rotations
Rotation occurs along a single axis at any one time and can take place on any of the three
axes. D3DX provides a specific rotation function to handle rotating around each axis. For
instance, if you wanted to rotate an object around the X axis, you would use the function
D3DXMatrixRotationX
, defined here.
D3DXMATRIX *D3DXMatrixRotationX(
D3DXMATRIX *pOut,
FLOAT Angle
);
The
D3DXMatrixRotationX
function takes just two parameters:
■
pOut
. A pointer to a
D3DXMATRIX
object. This holds the resulting rotation matrix.
■
Angle
. The angle, in radians, to rotate the object.
Using the
D3DXMatrixRotationX
function or any of its derivatives is simple. First, define a
D3DXMATRIX
structure to hold the rotation matrix, and then input the angle to rotate the
object. The short code that follows shows how easy this function is to use.
D3DXMATRIX matRotate;
// This is the output matrix
D3DXMatrixRotationX(&matRotate, D3DXToRadian(45.0f));
You define the output matrix and then call
the
D3DXMatrixRotationX
function. You’ll
notice that the second parameter is using a
helper macro called
D3DXToRadian
. This
macro takes an angle from 0 to 360 and
converts it to radians. In the previous
example, the angle of rotation is 45 degrees.
The result of this rotation is the object
rotating around the X axis by 45 degrees.
Figure 5.6 shows how a cube that is rotating
around the Y axis behaves.
The following code shows what you need to
Figure 5.6 A cube rotating around the Y axis.
rotate a cube around the Y axis. The rota-
tion is based on a timer that allows the cube
to rotate continuously.
/************************************************************************
* render
************************************************************************/
void render(void)
{

05 DX9_GP CH05 3/12/04 4:15 PM Page 107
Manipulating 3D Objects by Using Matrices
107
D3DXMATRIX objMat, matRotate, finalMat;
// Clear the back buffer to a black color
pd3dDevice->Clear( 0,
NULL,
D3DCLEAR_TARGET,
D3DCOLOR_XRGB(255,255,255),
1.0f,
0 );
pd3dDevice->BeginScene();
// Set the vertex stream
pd3dDevice->SetStreamSource( 0, vertexBuffer, 0, sizeof(CUSTOMVERTEX) );
// Set up the vertex format for the object
pd3dDevice->SetFVF( D3DFVF_CUSTOMVERTEX );
// Set meshMat to identity
D3DXMatrixIdentity(&objMat);
// Set the rotation
D3DXMatrixRotationY(&matRotate, timeGetTime()/1000.0f);
// Multiply the scaling and rotation matrices to create the objMat matrix
D3DXMatrixMultiply(&finalMat, &objMat, &matRotate);
// Transform the object in world space
pd3dDevice->SetTransform(D3DTS_WORLD, &finalMat);
// Render the cube using triangle strips
pd3dDevice->DrawPrimitive( D3DPT_TRIANGLESTRIP, 0, 2 );
pd3dDevice->DrawPrimitive( D3DPT_TRIANGLESTRIP, 4, 2 );
pd3dDevice->DrawPrimitive( D3DPT_TRIANGLESTRIP, 8, 2 );
pd3dDevice->DrawPrimitive( D3DPT_TRIANGLESTRIP, 12, 2 );
pd3dDevice->DrawPrimitive( D3DPT_TRIANGLESTRIP, 16, 2 );
pd3dDevice->DrawPrimitive( D3DPT_TRIANGLESTRIP, 20, 2 );
pd3dDevice->EndScene();
// Present the back buffer contents to the display
pd3dDevice->Present( NULL, NULL, NULL, NULL );
}

05 DX9_GP CH05 3/12/04 4:15 PM Page 108
108
Chapter 5
■
Matrices, Transforms, and Rotations
Three variables are declared at the start of the render function:
objMat
,
matRotate
, and
finalMat
. These variables are the matrices that will store the cube’s transformations. Ear-
lier I showed you how to reset a matrix to represent the origin by setting it to the identity
matrix; the
objMat
matrix will need to be reset each time the render function is called. This
causes the rotations that you will apply to the cube to be centered on the origin. This is
accomplished by using the
D3DXMatrixIdentity
function. The
objMat
matrix represents the
actual position of the cube.
D3DXMatrixIdentity(&objMat);
The second matrix,
matRotate
, holds the rotation information for the cube. Because the
cube is going to be in continuous motion, you must update the
matRotate
matrix
each frame with the new position. The rotation takes place by using
D3DXMatrixRotationY
,
which is one of the D3DX helper functions. The D3DX rotation functions overwrite
the matrix each frame with the new rotation information, so you don’t need to call the
D3DXMatrixIdentity
function to reset this matrix.
D3DXMatrixRotationY(&matRotate, timeGetTime()/1000.0f);
The
timeGetTime
function uses the current time divided by
1000.0f
to allow the cube to
rotate in a smooth manner.
Now that you have two matrices — one representing the position of the object and the
other representing its movement — you need to multiply the two matrices to create the
final matrix represented by the
finalMat
variable.
The resulting matrix transforms the cube into world space by using the
SetTransform
func-
tion shown here.
pd3dDevice->SetTransform(D3DTS_WORLD, &finalMat);
The
SetTransform
function results in the cube being placed in its new position and orien-
tation in world space. The
render
function draws the cube by using multiple calls to the
DrawPrimitive
function.
You can find the full source code for rotating an object in the chapter5\example2 direc-
tory on the CD-ROM.
Center of Rotation
The center of an object’s rotation is based on the axis it is rotating around. If an object,
such as the cube in Figure 5.6, were rotated, its center of rotation would cause it to spin
around the origin. If an object were translated away from the origin and along one of the
axes, its center of rotation would remain along the same axes and the object would be
translated to a new position during the rotation.
05 DX9_GP CH05 3/12/04 4:15 PM Page 109
Manipulating 3D Objects by Using Matrices
109
Look at Figure 5.7, which shows a cube
translated along the X and Y axis before
being rotated. When the cube in this figure
is rotated along the X axis, the object is
translated while the rotation occurs.
To change an object’s center of rotation, you
must translate the object away from the ori-
gin before you apply rotation. The follow-
ing code shows how to translate an object so
that you can change the center of rotation.
Figure 5.7 A cube being rotated around the X
axis after being translated away from the origin.
/************************************************************************
* render
************************************************************************/
void render(void)
{
// Clear the back buffer to a black color
pd3dDevice->Clear( 0,
NULL,
D3DCLEAR_TARGET,
D3DCOLOR_XRGB(255,255,255),
1.0f,
0 );
pd3dDevice->BeginScene();
pd3dDevice->SetStreamSource( 0, vertexBuffer, 0, sizeof(CUSTOMVERTEX) );
pd3dDevice->SetFVF( D3DFVF_CUSTOMVERTEX );
// Translate the object away from the origin
D3DXMatrixTranslation(&matTranslate, 64.0f, 0.0f, 0.0f);
// Set the rotation
D3DXMatrixRotationY(&matRotate, timeGetTime()/1000.0f);
// Multiply the translation and rotation matrices to create the objMat matrix
D3DXMatrixMultiply(&objMat, &matTranslate, &matRotate);

05 DX9_GP CH05 3/12/04 4:15 PM Page 110
110
Chapter 5
■
Matrices, Transforms, and Rotations
// Transform the object in world space
pd3dDevice->SetTransform(D3DTS_WORLD, &objMat);
pd3dDevice->DrawPrimitive( D3DPT_TRIANGLESTRIP, 0, 2 );
pd3dDevice->DrawPrimitive( D3DPT_TRIANGLESTRIP, 4, 2 );
pd3dDevice->DrawPrimitive( D3DPT_TRIANGLESTRIP, 8, 2 );
pd3dDevice->DrawPrimitive( D3DPT_TRIANGLESTRIP, 12, 2 );
pd3dDevice->DrawPrimitive( D3DPT_TRIANGLESTRIP, 16, 2 );
pd3dDevice->DrawPrimitive( D3DPT_TRIANGLESTRIP, 20, 2 );
pd3dDevice->EndScene();
// Present the back buffer contents to the display
pd3dDevice->Present( NULL, NULL, NULL, NULL );
}
The biggest change to the
render
function is the addition of the
D3DXMatrixTranslation
function. The
D3DXMatrixTranslation
function moves the cube 64 units away from the ori-
gin during the rotation.
In this case, the cube is being translated away from the origin along the X axis and then
rotated. Two matrices are being used to move the cube:
matTranslate
and
matRotate
. The
two matrices are then multiplied together to create the
objMat
matrix, which holds the final
position of the cube. The result is the cube rotating away from the origin.
Scaling
Scaling allows you to change the size of an object by multiplying each vertex within the
object by a specified amount. To perform scaling on an object, you need to create a matrix
that contains the values by which to scale the object. The scaled values detail just how
much to scale each vertex. Remember the matrix layout from earlier? The positions 1, 6,
and 11 hold the scaling amounts for the X, Y, and Z axes, respectively. By default, these val-
ues are
1.0f
and the object remains its original size. Changing any of these values affects
the size of the object. If the values that are placed in these spots are greater than
1.0f
, the
object will be enlarged; alternatively, if the values are less than
1.0f
, the object can be
shrunk.
X
2
3
4
5
Y
7
8
9
10
Z
12
13
14
15
16

05 DX9_GP CH05 3/12/04 4:15 PM Page 111
Manipulating 3D Objects by Using Matrices
111
As I mentioned previously, scaling takes place by manipulating values within a matrix.
To create a scaling matrix, simply define an identity matrix and change the values in
the positions I detailed earlier. You can either change these values manually or use the
D3DXMatrixScaling
function, defined here.
D3DXMATRIX *D3DXMatrixScaling(
D3DXMATRIX *pOut,
FLOAT sx,
FLOAT sy,
FLOAT sz
);
The
D3DXMatrixScaling
function takes four parameters:
■
pOut
. A pointer to a
D3DXMATRIX
object that will hold the scaling matrix
■
sx
. The amount to scale the X vertices
■
sy
. The amount to scale the Y vertices
■
sz
. The amount to scale the Z vertices
The code sample that follows shows how to use the
D3DXMatrixScaling
function to double
the size of an object.
D3DXMATRIX matScale;
// Set the scaling
D3DXMatrixScaling(&matScale, 2.0f, 2.0f, 2.0f);
// Multiply the object’s matrix against the scaling matrix
D3DXMatrixMultiply(&objMat, & objMat, &matScaling);
The
objMat
variable in the previous code represents the object’s original matrix. Multiplying
the object’s matrix by a scaling matrix enables you to scale the object when you draw it.
Order of Matrix Operations
The order in which matrix operations are applied is important. For instance, if you want
to rotate an object around its center and then move the object somewhere in your world,
you first must apply the rotation matrix operation followed by the translation matrix. If
these two matrix operations were reversed, the object would first be translated into its new
position in the world and then rotated around the world’s origin point. This could cause
your object to be in the wrong place and orientation within your world. The code that fol-
lows shows how an object should be rotated and translated correctly.
D3DXMATRIX objRotate;
D3DXMATRIX objTranslation;

05 DX9_GP CH05 3/12/04 4:15 PM Page 112
112
Chapter 5
■
Matrices, Transforms, and Rotations
D3DXMATRIX objFinal;
// Set the rotation
D3DXMatrixRotationY(&objRotate, D3DXToRadian(45));
// Apply the translation matrix
D3DXMatrixTranslation(&objTranslation, 1.0f, 0.0f, 0.0f);
// Multiply the rotation and translation matrices to create the final matrix
D3DXMatrixMultiply(&objFinal, &objRotate, &objTranslation);
// Transform the object in world space
pd3dDevice->SetTransform(D3DTS_WORLD, &objFinal);
The first step is to create the object’s rotation matrix,
objRatate
. Using the
D3DXMatrixRotationY
function, the object is made to rotate 45 degrees around the Y axis.
Next, you translate the rotated object 1 unit to the right using the
D3DXMatrixTranslation
function.
Finally, you create the object’s final transformed matrix by multiplying the rotation and
translation matrices together using the
D3DXMatrixMultiply
function. If the rotation and
translation matrices were to reverse positions in the
D3DXMatrixMultiply
call, the translation
would take place before the rotation, dislocating the object.
Creating a Camera by Using Projections
You create a camera in Direct3D by defining a matrix for the projection transformation.
This matrix defines the field of view (FOV) for the camera, the aspect ratio, and the near
and far clipping planes.
After you’ve created the projection matrix, you apply it to your scene through the
SetTransform
function. You’ve probably noticed the
SetTransform
function used in the sam-
ple code earlier in this chapter. The
SetTransform
function, defined next, sets a matrix to a
particular stage of the geometry pipeline. For instance, when you’re setting the matrix for
a camera, you are setting how the scene is going to be viewed during the projection stage.
This stage, as the final part of the geometry pipeline, controls how the 3D scene is ren-
dered to the 2D display.
HRESULT SetTransform(
D3DTRANSFORMSTATETYPE State,
CONST D3DMATRIX *pMatrix
);

05 DX9_GP CH05 3/12/04 4:15 PM Page 113
Creating a Camera by Using Projections
113
The
SetTransform
function requires two parameters:
■
State
. The stage of the pipeline that is being modified
■
pMatrix
. A pointer to a
D3DMATRIX
structure that is to be applied to the pipeline
The code sample that follows shows how to create and define a matrix to be used for the
projection stage.
D3DXMATRIX matProj;
// the projection matrix
/**********************************************************************
* createCamera
* creates a virtual camera
***********************************************************************/
void createCamera(float nearClip, float farClip)
{
// Here, you specify the field of view, aspect ratio,
// and near and far clipping planes
D3DXMatrixPerspectiveFovLH(&matProj, D3DX_PI/4, 640/480, nearClip, farClip);
// Apply the matProj matrix to the projection stage of the pipeline
pd3dDevice->SetTransform(D3DTS_PROJECTION, &matProj);
}
Instead of creating the projection matrix by hand, I used the D3DX helper function
D3DXMatrixPerspectiveFovLH
. This function creates an output matrix, held in the
matProj
variable earlier, by allowing you to specify the perspective, aspect ratio, and clipping
planes in a single function call.
After you have generated the projection matrix, you apply it to the geometry pipeline by
way of the
SetTransform
function. Because this matrix affects the projection piece of the
pipeline, the value
D3DTS_PROJECTION
is used.
Positioning and Pointing the Camera
At this point, you can use the camera as is. The camera affects everything in the scene as
the objects pass through the projection part of the geometry pipeline. There’s just one
problem; the camera is located at the origin, pointing off into the distance. Because a cam-
era in the real world is a movable object, you want your virtual camera to behave the same
way. The camera needs to be able to move around the scene and also be able to change the
direction it’s pointing. To satisfy these two criteria, you need to change the matrix that
controls the view stage of the pipeline.
By default, the view matrix is set to the identity matrix, keeping your virtual camera stead-
fast at the origin. To change the camera’s position and orientation, you need to create a

05 DX9_GP CH05 3/12/04 4:15 PM Page 114
114
Chapter 5
■
Matrices, Transforms, and Rotations
new view matrix. The easiest way to create this matrix is through the D3DX helper func-
tion
D3DXMatrixLookAtLH
.
The
D3DXMatrixLookAtLH
function allows you to specify the position of the camera (defined
as a
D3DXVECTOR3
), where the camera is looking (using a
D3DXVECTOR3
), and the direction that
the camera should consider as up (also represented by a
D3DXVECTOR3
).
Following is a small code sample that will give you an idea of how to create the view
matrix.
D3DXMATRIX matView;
// the view matrix
/*************************************************************************
* pointCamera
* points the camera at a location specified by the passed vector
*************************************************************************/
void pointCamera(D3DXVECTOR3 cameraPosition, D3DXVECTOR3 cameraLook)
{
D3DXMatrixLookAtLH (&matView,
&cameraPosition,
//camera position
&cameraLook,
//look at position
&D3DXVECTOR3 (0.0f, 1.0f, 0.0f));
//up direction
// Apply the matrix to the view stage of the pipeline
pd3dDevice->SetTransform (D3DTS_VIEW, &matView);
}
The
pointCamera
function allows two parameters to be passed into it: the
cameraLook
vari-
able and the
cameraPosition
variable.
The
cameraPosition
variable holds the camera’s current position. For instance, if the cam-
era were located 2 units away from the origin along the Z axis, the
cameraPosition
variable
would contain the vector
(0.0f, -2.0f, 0.0f)
.
The
cameraLook
variable tells the camera where it needs to point and is relative to the loca-
tion of the camera. For example, assume that the camera is located 10 units up along the
Y axis and 10 units back along the Z axis. Now imagine that you want the camera to point
at the origin. Because the camera is currently residing above the origin, it actually needs
to look down to see it. By setting the
cameraLook
vector to
(0.0f, -10.0f; 0.0f)
, you are
telling the camera to remain looking straight ahead but to look downward along the Y
axis. The camera will then see the objects at the origin from a slightly overhead view.
The final view matrix that the
D3DXMatrixLookAtLH
creates is stored in the
matView
variable
and then applied to the view stage of the pipeline. The
D3DTS_VIEW
value that is passed to
the first parameter of
SetTransform
informs Direct3D that the view projection matrix will
be updated.

05 DX9_GP CH05 3/12/04 4:15 PM Page 115
Chapter Summary
115
Chapter Summary
In this chapter, you were introduced to the concepts that you’ll use every time you write a
3D-based application. Whether you’re creating a simple model viewer or the next first-
person shooter, matrices and transforms are the foundation your games are built on.
What You Have Learned
In this chapter, you learned the following:
■
How 3D objects are taken through the geometry pipeline
■
What matrices are, and when and how to apply them
■
How to move and rotate objects in a scene
■
Why the order of matrix multiplication is important
■
How to create and use a camera in your scene to view 3D objects
Review Questions
You can find the answers to Review Questions and On Your Own exercises in Appendix
A, “Answers to End-of-Chapter Exercises.”
1. The indices of an object can be stored in what kind of buffer?
2. What is a matrix?
3. What are the steps in the geometry pipeline?
4. What does the identity matrix do?
5. Changing a camera’s aspect ratio affects which part of the pipeline?
On Your Own
1. Using the
D3DXMatrixMultiply
function, show the code needed to first rotate and
then translate an object 5 units along the X axis.
2. Write a
render
function that will constantly rotate an object around the Y axis.

This page intentionally left blank
06 DX9_GP CH06 3/12/04 4:15 PM Page 117
chapter 6
Vertex Colors, Texture
Mapping, and 3D Lighting
T
his book previously touched on vertex colors to help give some much-needed
color to your 3D scenes, but single-colored flat polygons are not all that Direct3D
has to offer. Direct3D can add depth to your scene through lighting, or realism via
texture mapping. Your game worlds are about to get a lot more interesting.
Here’s what you’ll learn in this chapter:
■
How vertex colors are used
■
How to change the shading that Direct3D uses
■
The types of lighting that Direct3D offers
■
How materials are used
■
What textures are and how they can add realism to your scenes
■
How to apply textures to an object
Changing the Color of an Object
In Chapter 4, “3D Primer,” you used vertex colors to display a triangle filled with a rain-
bow of colors. In that example, each vertex was created with a different color, causing the
triangle to be filled with the mixture of those colors and a gradient pattern to be created.
By manipulating the color of each vertex per frame, you can create a multitude of color
effects within your scene. Figure 6.1 shows the triangle that you created earlier.
Vertex coloring is also beneficial when you’re running on low-end 3D hardware that
doesn’t support texture mapping. Vertex coloring enables polygons within your model to
be colored based on the vertices that are used to create them. Also, by using colored
117

06 DX9_GP CH06 3/12/04 4:15 PM Page 118
118
Chapter 6
■
Vertex Colors, Texture Mapping, and 3D Lighting
Figure 6.1 The rainbow triangle.
vertices, you don’t need to enable lighting within a scene. If you were to create a nonlit
scene with a triangle with no vertex colors, you would be unable to see the triangle.
Vertex Colors Revisited
As I mentioned before, vertex coloring is enabled by adding a
DWORD
variable in your
vertex structure and adding the
D3DFVF_DIFFUSE
flag to your
SetFVF
function call. A sample
CUSTOMVERTEX
structure is shown here:
struct CUSTOMVERTEX
{
FLOAT x, y, z, rhw;
// the untransformed, 3D position for the vertex
DWORD color;
// the vertex color
};
As you’ll recall, the vertex color is set when you define the properties of each vertex. The
colors used for each vertex are being set next, using one of the available
D3DCOLOR
macros
that Direct3D provides:
CUSTOMVERTEX g_Vertices[] =
{
// x, y, z, rhw, color
{ 320.0f, 50.0f, 0.5f, 1.0f, D3DCOLOR_ARGB(0,255,0,0), },
{ 250.0f, 400.0f, 0.5f, 1.0f, D3DCOLOR_ARGB(0,0,255,0), },
{ 50.0f, 400.0f, 0.5f, 1.0f, D3DCOLOR_ARGB(0,0,0,255), },
};

06 DX9_GP CH06 3/12/04 4:15 PM Page 119
Shading
119
Color Macros
Direct3D provides a few macros that enable easy creation of a D3DCOLOR value without
resorting to describing the color in hexadecimal.
In the previous code example, the macro
D3DCOLOR_ARGB
is used. This macro accepts four
values: an alpha or transparency setting, a red component, a green component, and a blue
component. Each value passed to the
D3DCOLOR_ARGB
macro can be between 0 and 255,
where 0 means no color and 255 represents full color. For example, a value of 0 in the blue
component would have the effect of removing blue from the resulting color. A value of
255 would cause the blue component to be added fully to the overall color.
#define D3DCOLOR_ARGB(a,r,g,b) \
((D3DCOLOR)((((a)&0xff)<<24)|(((r)&0xff)<<16)|(((g)&0xff)<<8)|((b)&0xff)))
The next macro that Direct3D provides is the
D3DCOLOR_RGBA
macro. This is similar to the
D3DCOLOR_ARGB
macro described earlier, but it switches the order in which the values are
passed. Each value that is passed to this macro must be between 0 and 255.
#define D3DCOLOR_RGBA(r, g, b, a) D3DCOLOR_ARGB(a, r, g, b)
You can use the
D3DCOLOR_XRGB
macro when you don’t need to specifically set an alpha
value. The
D3DCOLOR_XRGB
macro internally calls the
D3DCOLOR_ARGB
macro, but it automati-
cally fills in the alpha value for you.
#define D3DCOLOR_XRGB(r, g, b) D3DCOLOR_ARGB (0xff, r, g, b)
The final macro I will describe is
D3DCOLOR_COLORVALUE
. This macro, shown next, accepts
four components: red, green, blue, and an alpha. In the previous macros, these values were
represented by a value between 0 and 255. The
D3DCOLOR_COLORVALUE
macro requires these
values to be between 0 and 1.0. Internally, this macro calls the
D3DCOLOR_RGBA
macro and
converts the values appropriately.
#define D3DCOLOR_COLORVALUE (r, g, b, a) \
D3DCOLOR_RGBA((DWORD)((r)*255.f),
(DWORD)((g)*255.f),
(DWORD)((b)*255.f),
(DWORD)((a)*255.f))
Shading
Shading determines the look and color of each polygon in an object. Using different shad-
ing methods, you can cause your 3D models to appear smooth as the polygons are seam-
lessly blended, or blocky as each polygon is made distinctly visible. Direct3D supports two
types of shading:
■
Flat
■
Gouraud

06 DX9_GP CH06 3/12/04 4:15 PM Page 120
120
Chapter 6
■
Vertex Colors, Texture Mapping, and 3D Lighting
Each method of shading has its own benefits. For instance, flat shading was used pre-
dominantly before hardware acceleration became common on video cards. Because flat
shading is not computationally expensive, it was relatively easy to implement in software
renderers. The first Virtua Fighter game from Sega made extensive use of flat shading for
its models.
Although Gouraud shading gives better visual results, it takes longer to calculate. As video
cards have become more advanced, the restrictions on more intensive techniques have
loosened, allowing for better-looking graphics.
Flat Shading
Flat shading involves treating each polygon within an object as a separate piece. The color
of the polygon is determined by the color of the first vertex within it. For instance, if the
color of the vertices making up a polygon is red, the whole polygon will be filled with that
same red color. Figure 6.2 shows an example of a teapot rendered using flat shading.
Notice how you can see each polygon that makes up the teapot.
n o t e
By increasing the number of polygons within your model, you can create a smoother surface using
flat shading. A much smoother surface appearance results from using the Gouraud technique with
a low polycount model.
Figure 6.2 A teapot rendered with flat shading.
06 DX9_GP CH06 3/12/04 4:15 PM Page 121
Shading
121
Gouraud Shading
Gouraud shading produces much better results than flat shading. Whereas flat shading
determines the color of a polygon from a single vertex, Gouraud shading computes the
color using multiple vertices. Assigning different colors to each vertex and then blending
those colors across the face of the polygon results in a much smoother appearance. With
Gouraud shading, individual polygons are more difficult to see and give a more pleasing
result. Figure 6.3 shows the same teapot rendered using Gouraud shading.
Choosing the Shading Mode
Direct3D allows you to change the shading mode that it uses to render the polygons
within your scene. By default, Direct3D is set to render using Gouraud shading, but you
can change it to flat shading with one simple function call.
The shading type is set using the render state setting of
D3DRS_SHADEMODE
. By making a call
to the
SetRenderState
function, you can choose any of the shading types shown in the
D3DSHADEMODE
enumeration listed here:
typedef enum _D3DSHADEMODE {
D3DSHADE_FLAT = 1,
D3DSHADE_GOURAUD = 2,
D3DSHADE_PHONG = 3,
D3DSHADE_FORCE_DWORD = 0x7fffffff
} D3DSHADEMODE;
Figure 6.3 A teapot rendered with Gouraud shading.

06 DX9_GP CH06 3/12/04 4:15 PM Page 122
122
Chapter 6
■
Vertex Colors, Texture Mapping, and 3D Lighting
n o t e
Although Phong shading is mentioned within
D3DSHADEMODE
, it is not currently supported within
Direct3D. Future implementations of Direct3D might make this type of shading available.
The small code sample that follows shows how to change the shading mode to use flat
shading.
// Set to flat shading
HRESULT hr;
// Set the new render state
hr = pd3dDevice->SetRenderState(D3DRS_SHADEMODE, D3DSHADE_FLAT);
// If the call to SetRenderState failed, handle the error here
if(FAILED(hr))
return false;
Fill Mode
The fill mode setting tells Direct3D how you would like your polygons to be displayed.
Three types of fill modes are available to you:
■
Point. Each vertex in the model is rendered as a single point.
■
Wireframe. The model is rendered using nonfilled polygons.
■
Solid. Each polygon is rendered as filled using the shading mode specified.
You set the fill mode using the render state setting of
D3DRS_FILLMODE
. The available values
for the fill mode are shown in the
D3DFILLMODE
enumeration that follows:
typedef enum _D3DFILLMODE {
D3DFILL_POINT = 1,
D3DFILL_WIREFRAME = 2,
D3DFILL_SOLID = 3,
D3DFILL_FORCE_DWORD = 0x7fffffff
} D3DFILLMODE;
The next code sample shows how to properly set the fill mode to use wireframe render-
ing. Figure 6.4 shows the teapot rendered in wireframe.
// Set to use wireframe fill mode
HRESULT hr;
// Set the new render state
hr = pd3dDevice->SetRenderState(D3DRS_FILLMODE, D3DFILL_WIREFRAME);
06 DX9_GP CH06 3/12/04 4:15 PM Page 123
Fill Mode
123
// If the call to SetRenderState failed, handle the error here
if(FAILED(hr))
return false;
n o t e
Wireframe mode is useful when you are trying to track down bugs in your rendering code. By being
able to see through your models, you can confirm that they are placed in the scene correctly.
You use point rendering when you only want to display each vertex without connecting
the polygons with any sort of lines. Figure 6.5 shows the teapot rendered in point fill
mode.
Figure 6.4 The teapot using wireframe.
Figure 6.5 The teapot using point fill mode.

06 DX9_GP CH06 3/12/04 4:15 PM Page 124
124
Chapter 6
■
Vertex Colors, Texture Mapping, and 3D Lighting
Lighting Explained
Lighting is an important element within a 3D scene. It helps to set the mood for a scene,
be it with torches or simulated sunlight shining through the leaves in a forest. Dim light-
ing can instill fear and unease in the player, whereas bright lighting gives a happier, more
comforting effect.
Because you can define a vertex format that requires a vertex color, these objects cannot
be seen without a light source. Light within a scene attempts to re-create the way that light
works in the real world. Because calculating lighting can be intensive, Direct3D attempts
to approximate lighting conditions. The results are normally pretty close to what you
would see in nature, but they are quick enough to be handled in realtime.
Lighting Types
Direct3D allows you to create and use multiple types of lights within your scene. Each
type of light produces a different lighting effect. The following list presents the four types
of lighting that Direct3D provides. You can use each lighting type individually or as part
of a group.
■
Ambient light
■
Directional lights
■
Point lights
■
Spotlights
Each of these light types provides a different kind of lighting effect and is described in
detail in the following sections.
Ambient Light
Ambient light is the most basic type of light that Direct3D provides. Ambient lighting
offers constant nondirectional lighting for a scene. Because the light is not coming from
any particular direction and is equal on all sides of an object, no shadows are produced.
Ambient lighting can be created without the explicit creation of a Direct3D light source.
Figure 6.6 shows the teapot from earlier with a red ambient light. Notice that the teapot
appears flat because of the ambient lighting.
Because ambient lighting is spread across the entire scene, only one ambient light can be
active at a time.
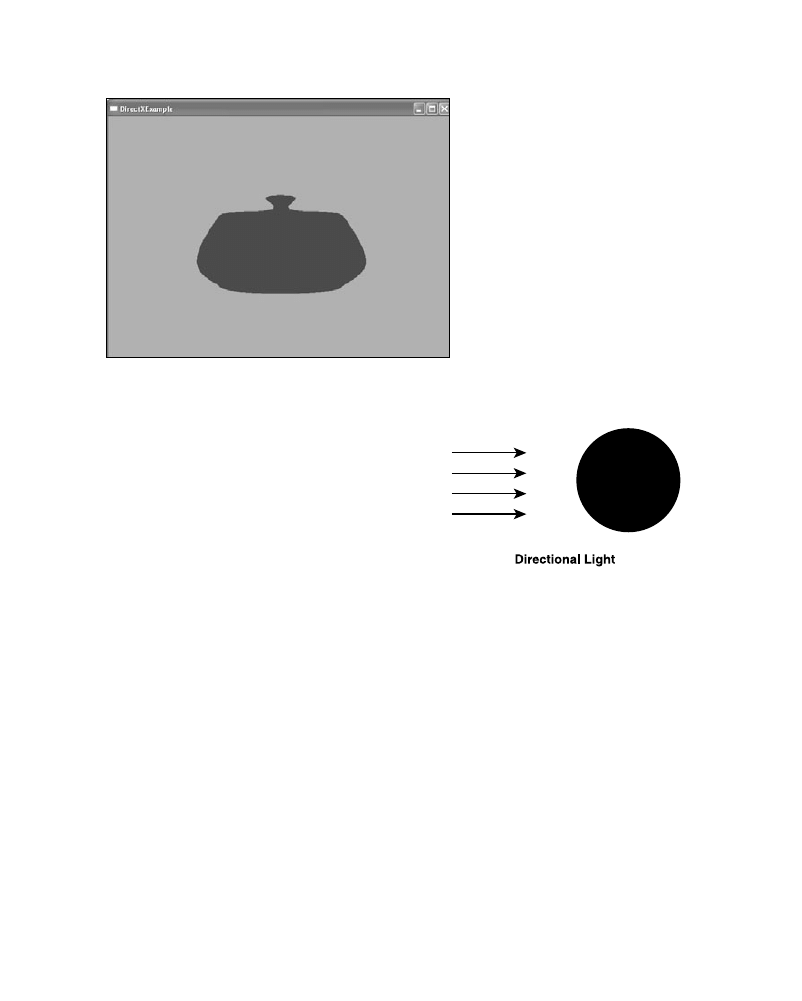
06 DX9_GP CH06 3/12/04 4:15 PM Page 125
Lighting Types
125
Figure 6.6 The teapot with a red ambient light.
Directional Lights
Directional lights provide you with a way of gen-
erating light from a particular direction. All light
from a directional light source travels in parallel.
For instance, if you wanted to create lighting in
your scene that was similar to that of the sun, you
would use a directional light. Directional lights
have color and direction but are positionless.
Figure 6.7 How a directional light
Figure 6.7 shows how a directional light affects a
affects a scene.
scene.
Direct3D allows for multiple directional lights within a scene, each one with different
properties.
Point Lights
Point lights can be used to simulate a source that emits lights in all directions. A light bulb
is an example of a light source that performs in this manner.
Point lights have position as well as color but are directionless. Positioning a point light in
a scene causes the scene to be lit in all directions surrounding the light source.
Multiple point light sources can be present in a scene. Figure 6.8 shows how a point light
to the upper left of the teapot affects how it is rendered.

06 DX9_GP CH06 3/12/04 4:15 PM Page 126
126
Chapter 6
■
Vertex Colors, Texture Mapping, and 3D Lighting
Figure 6.8 The teapot with a point light.
Spotlights
Spotlights are an example of a light source that has position, direction, and color. The
main difference between spotlights and the other types of lights discussed so far is how
the light is spread across an object’s surface.
The light that’s emitted from a spotlight is cone shaped, with the light at the center of the
cone at a higher intensity than the light that’s generated at the outer edges. The intensity
of the light gradually decreases as it spreads from the center of the cone.
A light from a helicopter or a searchlight would be an example of a spotlight. Figure 6.9
shows how a spotlight affects how the teapot is rendered.
Figure 6.9 The teapot with a spotlight.

06 DX9_GP CH06 3/12/04 4:15 PM Page 127
Light Properties
127
n o t e
Spotlights are some of the more commonly used light sources, as well as the most expensive when
it comes to processing time.
Light Properties
Each light you create has properties that determine how it should look after it is created.
The
D3DLIGHT9
structure is defined as follows:
typedef struct _D3DLIGHT9 {
D3DLIGHTTYPE Type;
D3DCOLORVALUE Diffuse;
D3DCOLORVALUE Specular;
D3DCOLORVALUE Ambient;
D3DVECTOR Position;
D3DVECTOR Direction;
float Range;
float Falloff;
float Attenuation0;
float Attenuation1;
float Attenuation2;
float Theta;
float Phi;
} D3DLIGHT9;
The
D3DLIGHT9
structure contains 13 properties when you’re creating a light:
■
Type
. The type of light you want to create. This can be any
D3DLIGHTTYPE
value
shown here.
•
D3DLIGHT_POINT
. Used when creating a point light.
•
D3DLIGHT_SPOT
. Used when creating a spotlight.
•
D3DLIGHT_DIRECTIONAL
. Used when creating a directional light.
■
Diffuse
. The diffuse color generated by this light. This will affect the color of an
object based on its diffuse material property.
■
Specular
. The specular color of this light. This affects the color of any specular
highlights on an object.
■
Ambient
. The ambient color of this light. An ambient light affects all objects in a
scene. The color of this light determines the color that the object reflects.

06 DX9_GP CH06 3/12/04 4:15 PM Page 128
128
Chapter 6
■
Vertex Colors, Texture Mapping, and 3D Lighting
■
Position
. The position of the light.
■
Direction
. The direction that the light is facing.
■
Range
. The distance from the light source where the light no longer reaches.
■
Falloff
. Used only for spotlights. Falloff is the decrease in light between the inner
and outer cones of the light.
■
Attenuation0
. This value controls how the light intensity changes based on its
distance from the light source.
Attenuation0
provides a constant falloff based on
the
Range
property.
■
Attenuation1
. The value that specifies how the light intensity changes as it gets
farther from the light source.
Attentuation1
affects the light from a light source
in a linear way.
■
Attenuation2
. The value that specifies how the light intensity changes as it gets
farther from the light source.
Attentuation2
determines the falloff from the light
based on a quadratic formula.
■
Theta
. Used only for spotlights. The angle in radians of the spotlight’s inner cone.
■
Phi
. Used only for spotlights. The angle in radians of the spotlight’s outer cone.
Before you can create lights, you need to tell Direct3D to enable lighting. Lighting is
turned off by default. You can enable lighting through the render state property
D3DRS_LIGHTING
. Sending a value of
TRUE
to this render state enables lighting, whereas a value
of
FALSE
turns lighting off.
The following code demonstrates how to enable lighting within Direct3D.
pd3dDevice->SetRenderState (D3DRS_LIGHTING, TRUE);
The
pd3dDevice
variable represents a valid Direct3D device.
Creating Lights in a Scene
Each light that you want to place in a scene requires first that you declare a
D3DLIGHT9
struc-
ture. The
D3DLIGHT9
structure includes properties that affect how the light will be created.
For instance, the intensity or color of the light is defined within these properties.
After you have the
D3DLIGHT9
structure properly filled in, you create the light with a call to
the function
SetLight
.
The
SetLight
function is defined as follows:
HRESULT SetLight (
DWORD Index,
CONST D3DLIGHT9 *pLight
);

06 DX9_GP CH06 3/12/04 4:15 PM Page 129
Creating Lights in a Scene
129
The
SetLight
function requires two parameters:
■
Index
. The zero-based index of the light to create. If a light has previously been cre-
ated with an index, the properties for the light are overwritten.
■
pLight
. A pointer to a properly filled-in
D3DLIGHT9
structure.
After you’ve made the call to
SetLight
for the actual light creation, you need to enable it.
By default, all lights are turned off when they are created. Enabling a light requires a call
to the
LightEnable
function that is defined next.
HRESULT LightEnable(
DWORD LightIndex,
BOOL bEnable
);
The
LightEnable
function requires two parameters:
■
LightIndex
. The index of the light that you want to enable. This will be the same
index that you used during the call to
SetLight
.
■
bEnable
. This parameter can be either
TRUE
of
FALSE
. Passing
TRUE
enables the speci-
fied light, whereas passing
FALSE
disables it.
n o t e
If you need to determine whether a particular light in your scene is currently enabled, you can make
a call to the
GetLightEnable
function. If you pass this function the index of the light you want to
check, the function returns a boolean value with the current state of this light.
The following sections demonstrate the code required to create a light of each type that
was discussed previously.
Creating an Ambient Light
Ambient lighting does not require the specific creation of a light source; therefore, it is
simple to enable this type of light.
The following code sample shows how to create an ambient light with a white color. You’ll
notice that the ambient light is created through a
SetRenderState
call and doesn’t need a
D3DLIGHT9
structure to be created. Because ambient light fills the entire scene, Direct3D
restricts this to one light per scene. Ambient lights are created through the
D3DRS_AMBIENT
ren-
der state.
pd3dDevice->SetRenderState (D3DRS_AMBIENT, D3DCOLOR_XRGB (255, 255, 255));
The color of the ambient light is set using one of the
D3DCOLOR
macros described earlier. If
you pass a
D3DCOLOR
of all zeros, the ambient light is effectively disabled.

06 DX9_GP CH06 3/12/04 4:15 PM Page 130
130
Chapter 6
■
Vertex Colors, Texture Mapping, and 3D Lighting
You can find a full source example for the creation of ambient light in the chapter6\exam-
ple3 directory on the CD-ROM.
Creating a Directional Light
The next code sample creates a directional light.
void createDirectionalLight ( void )
{
// Create and turn on a directional light
D3DLIGHT9 light;
// Set the type of light
vlight.Type = D3DLIGHT_DIRECTIONAL;
// Set the direction that this light will generate light from
vD3DXVECTOR3 vDir( 1.0f, 0.0f, 0.0f );
// Normalize the light direction
D3DXVec3Normalize ((D3DXVECTOR3*) &light.Direction, &vDir);
// Set the diffuse color for this light
light.Diffuse.r = 0.0f;
light.Diffuse.g = 0.0f;
light.Diffuse.b = 0.5f;
// Set the ambient color for this light
light.Ambient.r = 0.0f;
light.Ambient.g = 0.0f;
light.Ambient.b = 0.3f;
// Set the range of this light
light.Range
= sqrtf (FLT_MAX);
// Tell Direct3D to set the newly created light
pd3dDevice->SetLight (0, &light);
// Enable the new light
pd3dDevice->LightEnable (0, TRUE);
}
The previous code first declares a variable to contain the light properties. The
light
vari-
able represents the
D3DLIGHT9
structure. Before you fill in the specific properties for this

06 DX9_GP CH06 3/12/04 4:15 PM Page 131
Creating Lights in a Scene
131
light, you must set the light type. In this case, the type of light is set to
D3DLIGHT_DIRECTIONAL
,
which represents a directional light.
Now you can fill in the properties that are relevant to the light. Because a directional light
is positionless, you’ll notice that the
position
property is not set. However, the
Direction
property is required. In this instance, the light is created with a direction vector that points
it in a positive direction along the X axis.
The color of the light is set through the
Diffuse
and
Ambient
properties. Each of these color
properties requires a red, green, and blue component. A specular color property can also
be set for this type of light.
After the properties are set, the light is created and enabled with the calls to
SetLight
and
LightEnable
. You can find the full source code in the chapter6\example4 directory on the
CD-ROM.
Creating a Point Light
The code example that follows demonstrates how to create a point light within a scene.
void createPointLight (void)
{
// Create and turn on a directional light
D3DLIGHT9 light;
// Set the type of light
light.Type
= D3DLIGHT_POINT;
// Set the position for this light
light.Position = D3DXVECTOR3( -2500.0f, 0.0f, 0.0f );
// Set the red, green, and blue diffuse components for this
// light source
light.Diffuse.r
= 1.0f;
light.Diffuse.g = 0.5f;
light.Diffuse.b = 0.5f;
// Set the red, green, and blue ambient components for this
// light source
light.Ambient.r
= 0.5f;
light.Ambient.g = 0.0f;
light.Ambient.b = 0.0f;
light.Range
= sqrtf(FLT_MAX);

06 DX9_GP CH06 3/12/04 4:15 PM Page 132
132
Chapter 6
■
Vertex Colors, Texture Mapping, and 3D Lighting
// Tell Direct3D to create the new light
pd3dDevice->SetLight(0, &light );
// Enable the light
pd3dDevice->LightEnable (0, TRUE);
}
This code first declares a variable to contain the light properties. The
light
variable repre-
sents the
D3DLIGHT9
structure. Before filling in the specific properties for this light, the light
type is set. In this case, the type of light is set to
D3DLIGHT_POINT
, which represents a point
light.
Now you can fill in the properties that are relevant to the light. Because this is a point
light, the
Direction
property is not needed, but the
Position
property is. In the previous
code, the position is set to move the light 2,500 units to the left of origin along the X axis.
Again, the color of the light is set through the
Diffuse
and
Ambient
properties.
After the properties are set, the light is created and enabled with the calls to
SetLight
and
LightEnable
. The full source code for a point light is in the chapter6\example6 directory on
the CD-ROM.
Creating a Spotlight
Creating a spotlight is similar to creating other types of lights, with the addition of a few
extra parameters. Spotlights require these additional values:
■
Phi
. The angle in radians that defines the spotlight’s outer cone edge. This spotlight
does not light any points that fall outside this edge. Values can be between 0 and
pi.
■
Theta
. The angle in radians that defines the spotlight’s inner cone. This area is com-
pletely lit by the full intensity of the spotlight.
■
Falloff
. A value that determines the decrease in lighting between the inner and
outer cones of a spotlight.
The following code example shows how to create a spotlight.
void createSpotLight(void)
{
// Create and turn on a directional light
D3DLIGHT9 light;
// Set the type of light
light.Type
= D3DLIGHT_SPOT;

06 DX9_GP CH06 3/12/04 4:15 PM Page 133
Creating Lights in a Scene
133
// Set the position and the direction for this light
D3DXVECTOR3 vDir (1.0f, -1.0f, 0.0f);
D3DXVec3Normalize ((D3DXVECTOR3*)&light.Direction, &vDir );
light.Position
= D3DXVECTOR3 (-250.0f, 250.0f, 0.0f);
// Set the red, green, and blue diffuse color components
// for this light source
light.Diffuse.r
= 1.0f;
light.Diffuse.g = 0.5f;
light.Diffuse.b = 0.5f;
// Set the red, green, and blue ambient color components
// for this light source
light.Ambient.r
= 0.5f;
light.Ambient.g
= 0.0f;
light.Ambient.b =
0.0f;
// Set the range
light.Range
= sqrtf(FLT_MAX);
// spotlight-specific parameters
light.Phi
= 1.0f;
light.Falloff =
0.5f;
light.Theta
= 0.5f;
// Create the light
pd3dDevice->SetLight(0, &light );
// Enable the new light
pd3dDevice->LightEnable(0, TRUE );
}
This code first declares a variable to contain the light properties. The
light
variable repre-
sents the
D3DLIGHT9
structure. Before you fill in the specific properties for this light, you
must set the light type. In this case, the type of light is set to
D3DLIGHT_SPOT
, which repre-
sents a spotlight.
Now you can fill in the properties that are relevant to the light. A spotlight has both a posi-
tion and a direction. In this case, the light is looking in the positive X direction and down
the Y axis.
Again, the color of the light is set through the
Diffuse
and
Ambient
properties.

06 DX9_GP CH06 3/12/04 4:15 PM Page 134
134
Chapter 6
■
Vertex Colors, Texture Mapping, and 3D Lighting
Spotlights also require setting three additional properties that are specific to this type of
light:
Phi
,
Theta
, and
Falloff
.
After the properties are set, the light is created and enabled with the calls to
SetLight
and
LightEnable
. The full source code for a point light is in the chapter6\example5 directory on
the CD-ROM.
Materials Explained
Materials control how an object reflects or emits light. The material properties describe to
Direct3D how light in a scene is reflected by the polygons that make up an object. The fol-
lowing properties make up the definition of a material:
■
Diffuse reflection
■
Ambient reflection
■
Specular reflection
■
Light emission
Materials consist of these separate properties working together to describe the object. The
properties are described in more detail in the next sections.
Diffuse Reflection
Diffuse lighting is directional lighting within a scene. The diffuse property of a material
describes how diffuse light is reflected off an object. By changing the diffuse property, you
can control the color that the object reflects.
Ambient Reflection
Because ambient lighting is nondirectional, it affects objects within a scene from all sides.
A material’s ambient property determines how ambient lighting is reflected off the sur-
face of an object. Changing the ambient property changes the perceived color of the object
when hit with ambient light.
Specular Reflection
Specular reflection causes highlights on objects, making them appear more realistic. The
specular property of a material controls the color of this highlight, and the power prop-
erty controls the sharpness of the highlight. The higher the power value, the sharper the
highlight will appear. Figure 6.10 shows the teapot from earlier, rendered with a specular
highlight.
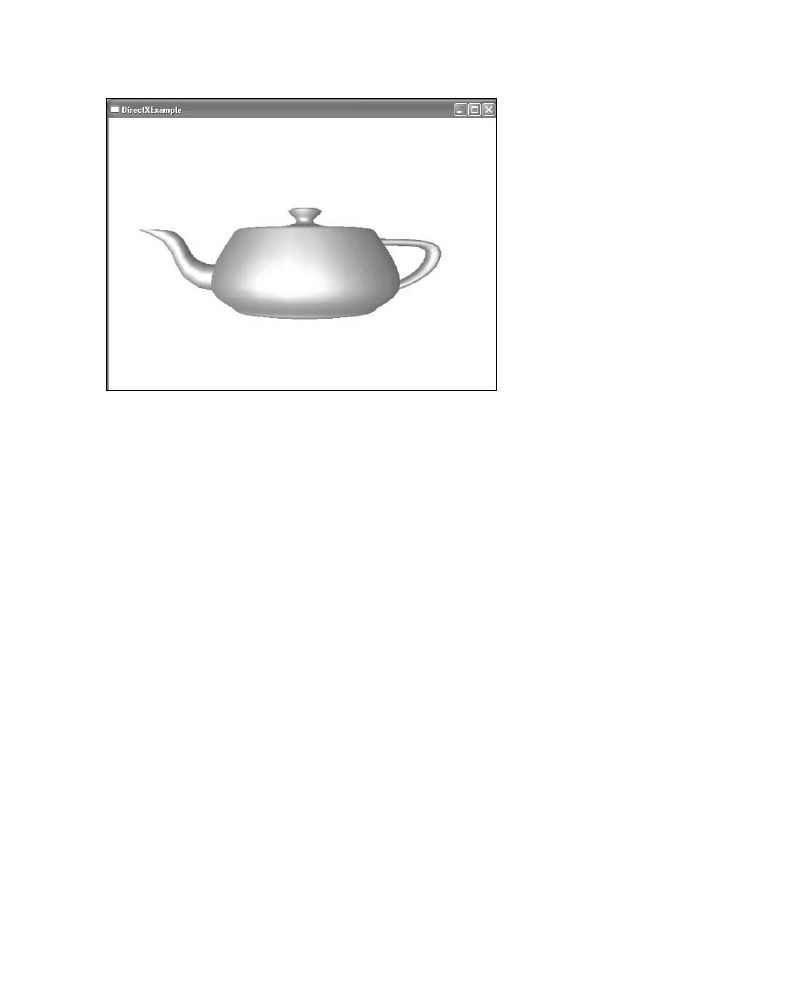
06 DX9_GP CH06 3/12/04 4:15 PM Page 135
Materials Explained
135
Figure 6.10 The teapot rendered with a specular highlight.
Emission
The emissive material property can make an object appear to be emitting light. Other
objects, however, cannot reflect the light from this property because it is not a true light
within the scene. By setting the emissive property, you can control the color of the light
that the object appears to give off.
How Materials Are Used
Materials are created through the use of the
D3DMATERIAL9
structure. This structure contains
all the properties that a material needs to control how light is reflected from an object. The
D3DMATERIAL9
structure is defined here:
typedef struct _D3DMATERIAL9 {
D3DCOLORVALUE Diffuse;
D3DCOLORVALUE Ambient;
D3DCOLORVALUE Specular;
D3DCOLORVALUE Emissive;
float Power;
} D3DMATERIAL9;

06 DX9_GP CH06 3/12/04 4:15 PM Page 136
136
Chapter 6
■
Vertex Colors, Texture Mapping, and 3D Lighting
The
D3DMATERIAL9
structure consists of five variables:
■
Diffuse
. The diffuse color of the material
■
Ambient
. The material’s ambient color
■
Specular
. The specular color of the material
■
Emissive
. The material’s emissive color
■
Power
. A value that specifies the sharpness of specular highlights
Specular Highlights
Setting just the specular property of a material does not allow an object to give off a
specular highlight; you must enable the highlights first. The render state setting
D3DRS_SPECULARENABLE
must be set to
TRUE
. Setting this value to
FALSE
disables specular high-
lights.
The following code sample enables specular highlighting.
// Set to use specular highlights
HRESULT hr;
// Set the new render state
hr = pd3dDevice->SetRenderState (D3DRS_SPECULARENABLE, TRUE);
// If the call to SetRenderState failed, handle the error here
if(FAILED(hr))
return false;
The
pd3dDevice
variable must contain a valid Direct3D device.
Texture Mapping
Up to this point, all the 3D objects you’ve created have looked pretty boring. Sure, they’ve
been colorful, but they really haven’t looked like real-world objects. They’ve had depth
and lighting, but they lack realism. Texture mapping helps give your games the realism
that everyone expects.
Texture mapping is the process of loading a picture or an image and wrapping it around
your 3D objects. For instance, a green square doesn’t look much like grass, but if you apply
an image of grass to the square, things start looking a little more real. That’s what texture
mapping is all about: bringing realism to an otherwise artificial-looking world.
I’ll describe the detailed steps required to add textures to your virtual worlds.

06 DX9_GP CH06 3/12/04 4:15 PM Page 137
Texture Mapping
137
How Direct3D Uses Textures
The
IDirect3DTexture9
IDirect3DTexture9
A cube with texture maps
applied.
interface represents tex-
tures within Direct3D. This interface provides
you with methods for manipulating textures,
such as generating mipmaps, setting the texture’s
level of detail, as well as the ability to lock the tex-
ture, giving you direct access to the pixel data.
Before you can use textures in your game, you
need to load them and assign them to an
interface. Figure 6.11 shows a
cube with a texture map applied to all its sides.
Figure 6.11
How Textures Are Applied
Textures are mapped to 3D objects using texture coordinates. The texture coordinates
describe to Direct3D which portion of the texture will be applied and where.
Texture coordinates normally range in value from
0.0f
to
1.0f
. Because the texture images
that you will apply are rectangular, the
0.0f
value represents the left side and
1.0f
repre-
sents the right side. The texture coordinates work in the same manner in the vertical
direction, where
0.0f
represents the top of the object and
1.0f
represents the bottom.
Figure 6.12 shows the texture coordinates of a square.
Using the texture coordinates shown in Figure 6.12, you would end up mapping the entire
texture image to the square. Figure 6.13 shows what the square would look like with a tex-
ture applied to it.
Figure 6.12 The texture
Figure 6.13 The square with a
coordinates of a square.
texture map applied.

06 DX9_GP CH06 3/12/04 4:15 PM Page 138
138
Chapter 6
■
Vertex Colors, Texture Mapping, and 3D Lighting
t i p
You should try to keep your textures relatively small to increase the chance that they will reside in
video memory. Also, some video cards require that your texture sizes be a power of 2. For example,
a 64
× 64 image meets both the size and power of 2 requirements.
Texture Coordinates
Texture coordinates are commonly represented in code by the two values
u
and
v
. To use
texture mapping within Direct3D, you first need to update your vertex structure. As you
can see in the new
CUSTOMVERTEX
structure that follows, two new float variables—
u
and
v
—
have been added.
struct CUSTOMVERTEX
{
FLOAT x, y, z; // the untransformed, 3D position for the vertex
FLOAT u, v;
};
You also need to add the
D3DFVF_TEX1
flag to your vertex format. The
D3DFVF_TEX1
flag
informs Direct3D that you have added texture coordinates to your vertex definition.
#define D3DFVF_CUSTOMVERTEX (D3DFVF_XYZ | D3DFVF_TEX1)
Finally, you need to add the texture coordinates to the actual vertex definitions. Previ-
ously, only the
X
,
Y
, and
Z
values were indicated for each vertex.
n o t e
Direct3D allows for up to eight textures to be applied using the flags
D3DFVF_TEX1
through
D3DFVF_TEX8
.
Shown next is an updated declaration that includes the set of texture coordinates.
CUSTOMVERTEX g_Vertices [] =
{
// X
Y
Z
U
V
{-1.0f, 1.0f,-1.0f, 0.0f, 0.0f},
{ 1.0f, 1.0f,-1.0f, 1.0f, 0.0f},
{-1.0f,-1.0f,-1.0f, 0.0f, 1.0f},
{ 1.0f,-1.0f,-1.0f, 1.0f, 1.0f}
}

06 DX9_GP CH06 3/12/04 4:15 PM Page 139
Texture Mapping
139
Texture Stages
Texture stages allow you to apply more than one texture to an object in a single rendering
pass. Each rendering pass can consist of up to eight stages, with each stage letting you
apply a single texture and control the type and amount of blending used.
n o t e
Some video hardware has limits to the number of texture stages you can use. Always check the
capabilities of the adapter to confirm that it can handle the number of texture stages you want to
use.
The type of texture blending is controlled through the state of the texture stage.
Texture Stage States
Texture stages affect how a texture is applied to an object. The normal way for a texture to
be applied is with full opacity and no blending. By setting the state for a particular texture
stage, you can change whether two textures get blended together to create an effect like
light mapping, or cause a texture to be applied to an object with transparency.
You change the state of a particular texture stage through the
SetTextureStageState
func-
tion, shown next.
HRESULT SetTextureStageState (
DWORD Stage,
D3DTEXTURESTAGESTATETYPE Type,
DWORD Value
);
The
SetTextureStageState
function requires three parameters:
■
Stage
. The number of the stage to apply the state to.
■
Type
. The type of state that is being applied to the stage. Valid values are found in
the
D3DTEXTURESTAGESTATETYPE
enumeration.
■
Value
. This parameter depends on the value specified in the
Type
parameter.
Loading a Texture
Now that you know what texture mapping is and how it works, you’re probably wonder-
ing how to get textures into your game. Textures are just image files like you’ve used pre-
viously. Commonly, the bitmap image format is used for applications that are written for

06 DX9_GP CH06 3/12/04 4:15 PM Page 140
140
Chapter 6
■
Vertex Colors, Texture Mapping, and 3D Lighting
Direct3D. They can be loaded from disk or can reside within the application executable
itself as a resource. The following two sections describe the steps needed to load textures
using both of these methods.
Texture Loading from a File
Loading texture images from a disk is the best way to deliver your game graphics. Because
the textures are not part of the executable, you can change them easily and without
rebuilding your application.
Direct3D offers the
D3DXCreateTextureFromFile
function from the D3DX utility library for
the loading of textures. The
D3DXCreateTextureFromFile
function is defined next.
HRESULT D3DXCreateTextureFromFile(
LPDIRECT3DDEVICE9 pDevice,
LPCTSTR pSrcFile,
LPDIRECT3DTEXTURE9 *ppTexture
);
The
D3DXCreateTextureFromFile
function requires three parameters:
■
pDevice
. A pointer to a valid Direct3D device
■
pSrcFile
. A string containing the path and file name of the texture image to load
■
ppTexture
. A pointer to a variable of type
IDirect3DTexture9
that will hold the cre-
ated texture
The code sample shown next attempts to create a Direct3D texture from the
test.bmp
file.
HRESULT hr;
// variable to hold the return code
LPDIRECT3DTEXTURE9
g_pTexture
= NULL;
// IDirect3DTexture9 object to
// hold the texture
// Call D3DXCreateTextureFromFile
hr = D3DXCreateTextureFromFile( pd3dDevice, “test.bmp”, &g_pTexture );
// Check the return code to make sure you have a valid texture
if FAILED (hr)
Return false;
At this point, you should have a valid Direct3D texture within the
g_pTexture
variable.

06 DX9_GP CH06 3/12/04 4:15 PM Page 141
Texture Mapping
141
n o t e
The
D3DXCreateTextureFromFile
function allows for the loading of texture image files in the fol-
lowing formats:
■
Bitmap
. These files have the BMP extension.
■
Windows DIB
. These files have the DIB extension.
■
Targa
. These files have the TGA extension.
■
JPEG
. These files have the JPG extension.
■
PNG
. These files have the PNG extension.
■
DDS
. These are DirectDraw surface files. They have the DDS extension.
Texture Loading from a Resource
Sometimes your application requires only one or two textures, and it doesn’t make sense
to ship the textures as separate files. In this instance, you can bundle the textures into the
executable as an image resource. Although this method increases the size of your exe-
cutable, it also gives you the benefit of not requiring outside files to function.
The D3DX utility library provides you with the
D3DXCreateTextureFromResource
helper func-
tion to help you load your textures from the executable.
D3DXCreateTextureFromResource
is
shown here:
HRESULT D3DXCreateTextureFromResource(
LPDIRECT3DDEVICE9 pDevice,
HMODULE hSrcModule,
LPCTSTR pSrcResource,
LPDIRECT3DTEXTURE9 *ppTexture
);
The
D3DXCreateTextureFromResource
function requires four parameters:
■
pDevice
. A pointer to a valid Direct3D device.
■
hSrcModule
. A handle to the module where the resource is located. When you’re
loading an image from the current executable file, this parameter should be
NULL
.
■
pSrcResource
. A string that represents the name of the resource.
■
ppTexture
. A pointer to a variable of type
IDirect3DTexture9
that will hold the newly
loaded texture.
The following sample code shows how to load a texture from a resource.
HRESULT hr;
// IDirect3DTexture9 object to hold the texture
LPDIRECT3DTEXTURE9
g_pTexture
= NULL;

06 DX9_GP CH06 3/12/04 4:15 PM Page 142
142
Chapter 6
■
Vertex Colors, Texture Mapping, and 3D Lighting
// Call D3DXCreateTextureFromResource
hr = D3DXCreateTextureFromResource( pd3dDevice,
NULL,
“IDB_BITMAP1”,
&g_pTexture );
// Check the return code to make sure you have a valid texture
if FAILED (hr)
return false;
In the previous code, the texture image that is trying to load is called
IDB_BITMAP1
.
The name of this image resource is being passed as the third parameter to the
D3DXCreateTextureFromResource
function call. If the call is completed successfully, the vari-
able
g_pTexture
contains a valid Direct3D texture.
Applying a Texture
Textures are applied to objects through the
SetTexture
function. This function tells Direct3D
which texture it should use to render the current set of polygons. If, after the first set of poly-
gons are finished rendering, you want to draw a second set of polygons with another tex-
ture, you would need to make another call to
SetTexture
with the new texture.
n o t e
A call to
SetTexture
is referred to as a
state change. You should always strive to minimize the num-
ber of stage changes you make during a frame because they can slow down your overall frame rate.
The
SetTexture
function is defined next:
HRESULT SetTexture(
DWORD Stage,
IDirect3DBaseTexture9 *pTexture
);
The
SetTexture
function requires two parameters:
■
Stage
. The stage that this texture should be applied to. If you are rendering only a
single texture, this value should be 0.
■
pTexture
. A pointer to the
IDirect3DTexture9
object to use.
The following code shows an example of an updated render function that applies a
texture to the cube that is being drawn. Notice that the call to
SetTexture
is made before
the calls to
DrawPrimitive
. After Direct3D starts drawing, it applies whichever texture is

06 DX9_GP CH06 3/12/04 4:15 PM Page 143
Texture Mapping
143
currently active. If you were to call
SetTexture
again halfway through the
DrawPrimitive
calls, all additional polygons would be rendered with the new texture applied.
void Render(void)
{
// Clear the back buffer and the Z buffer
pd3dDevice->Clear( 0,
NULL,
D3DCLEAR_TARGET | D3DCLEAR_ZBUFFER,
D3DCOLOR_XRGB(255,255,255),
1.0f,
0 );
// Tell Direct3D that rendering is about to begin
pd3dDevice->BeginScene();
// Set the current texture to use
pd3dDevice->SetTexture( 0, g_pTexture );
// Set the vertex stream
pd3dDevice->SetStreamSource( 0, buffer, 0, sizeof(CUSTOMVERTEX) );
pd3dDevice->SetFVF( D3DFVF_CUSTOMVERTEX );
// Draw the triangle strips that make up the cube
pd3dDevice->DrawPrimitive( D3DPT_TRIANGLESTRIP, 0, 2 );
pd3dDevice->DrawPrimitive( D3DPT_TRIANGLESTRIP, 4, 2 );
pd3dDevice->DrawPrimitive( D3DPT_TRIANGLESTRIP, 8, 2 );
pd3dDevice->DrawPrimitive( D3DPT_TRIANGLESTRIP, 12, 2 );
pd3dDevice->DrawPrimitive( D3DPT_TRIANGLESTRIP, 16, 2 );
pd3dDevice->DrawPrimitive( D3DPT_TRIANGLESTRIP, 20, 2 );
// Drawing is now complete
pd3dDevice->EndScene();
// Flip the buffers and display this to the screen
pd3dDevice->Present( NULL, NULL, NULL, NULL );
}
The previous
Render
function requires six calls to
DrawPrimitive
, each rendering a single
side of the cube. You can find a full source example in the chapter6\example7 directory on
the CD-ROM.
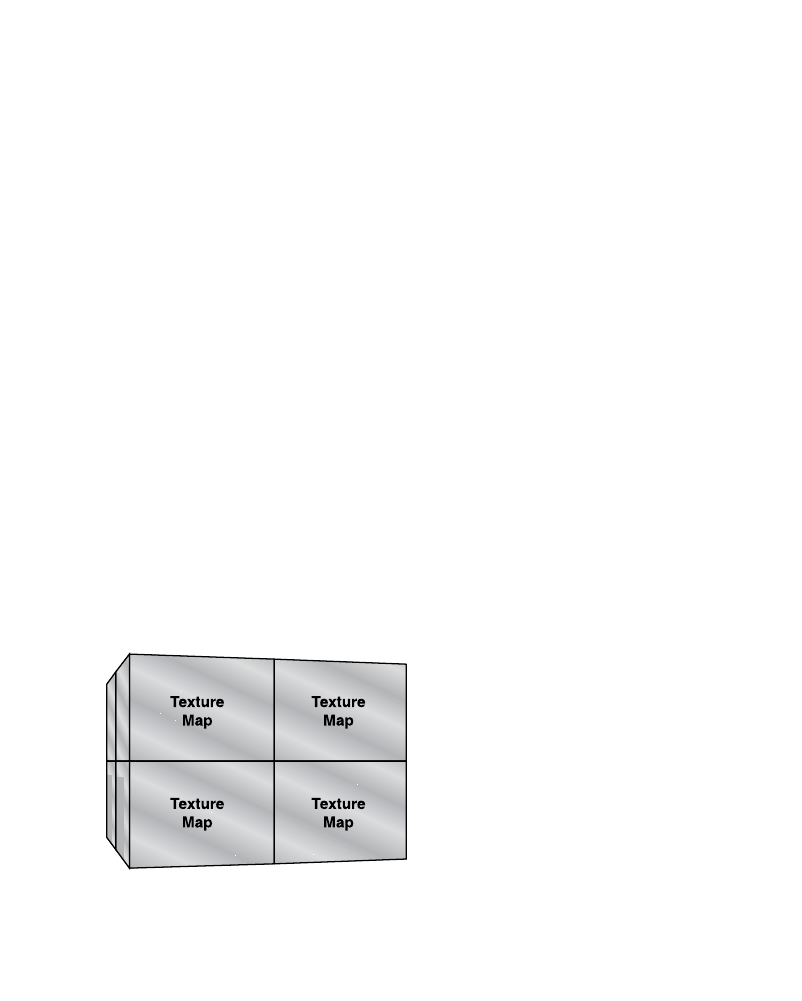
06 DX9_GP CH06 3/12/04 4:15 PM Page 144
144
Chapter 6
■
Vertex Colors, Texture Mapping, and 3D Lighting
As you’ll recall, the texture coordinates tell Direct3D where each part of the texture will
appear on a particular polygon. So far, you’ve been using the standard values of
0.0f
for the
left side of the polygon and
1.0f
for the right side. This causes the texture to be mapped onto
the polygon once. Textures, though, can be repeated multiple times across a polygon if you
manipulate the texture coordinates. You can increase the right-side texture coordinate past
the standard
1.0f
value to represent the number of times to repeat the texture.
For instance, if you want to repeat a texture twice across a polygon, you would change the
right-side texture coordinate to
2.0f
. The bottom texture coordinate works in the same
way, allowing the texture to be repeated in the up-down direction as well.
Look at the updated vertex structure definition that follows. Notice that the texture coor-
dinates have been changed so that the texture repeats twice in each direction.
CUSTOMVERTEX g_Vertices[] =
{
// X
Y
Z
U
V
{-1.0f, 1.0f, -1.0f, 0.0f, 0.0f},
{ 1.0f, 1.0f, -1.0f, 2.0f, 0.0f},
{-1.0f,-1.0f, -1.0f, 0.0f, 2.0f},
{ 1.0f,-1.0f, -1.0f, 2.0f, 2.0f}
}
The ability to repeat textures across a surface is useful when you want to keep your poly-
gon count low and you don’t want to stretch your texture across too large of an area.
Repeating a grass texture across a landscape and a brick texture across a wall are two
sample applications for texture repeating. Figure 6.14 shows how texture repeating affects
how the texture is applied to an object.
Figure 6.14 A cube with texture maps repeating
twice in each direction.

06 DX9_GP CH06 3/12/04 4:15 PM Page 145
Chapter Summary
145
A full source example is located in the chapter6\example8 directory on the CD-ROM.
Chapter Summary
Now that you know how to use textures and lighting, the 3D scenes you create will begin
to get that added touch of realism. As you become more proficient with lighting, you’ll
learn how just the right set of lights can change the mood of a scene.
What You Have Learned
At this point, you know the following:
■
How to properly use vertex colors
■
What the different types of lights available to you are, and how to use each one
■
How materials can affect the look of your objects
■
What texture mapping is and how it can benefit your games
■
How to load and map a texture to a polygon
■
What texture coordinates are and how to properly use them
In the next chapter, you’ll be introduced to the creation and use of 3D meshes.
Review Questions
You can find the answers to Review Questions and On Your Own exercises in Appendix
A, “Answers to End-of-Chapter Exercises.”
1. What does the fill mode change?
2. What are the four different types of lighting in Direct3D?
3. Which light type has a direction but not a position?
4. Which file formats are supported by the D3DX utility library for texture loading?
5. How do you change texture coordinates so that the texture repeats multiple times
across a surface?
On Your Own
1. Create an example using materials that cause the teapot model to reflect only
diffuse lighting.
2. Change example7 on the CD-ROM to use more than one texture on the rotating
cube.

This page intentionally left blank

07 DX9_GP CH07 3/12/04 4:16 PM Page 147
chapter 7
Meshes
S
o far you’ve learned how to create 3D objects directly in your code and display them
on the screen. You’re probably thinking that this is a tedious process, and there’s no
way you would ever create all your game objects in code. Well . . . you’re right. That’s
where 3D models come into play. They describe to your game what everything in it will
look like. The models represent the items and characters in your world, and possibly even
the world itself. After you have loaded a model into your game, you can represent it with
a mesh object that you can move around and manipulate.
Here’s what you’ll learn in this chapter:
■
How Direct3D handles meshes
■
What is needed to properly define a 3D model
■
What the X file format is
■
How to create and save your own meshes
■
How to load a 3D model into your game
Creating a 3D World
3D models help make up the virtual world that you create. They populate it by giving the
gamer an environment to play in and enemies to destroy. So where do the models come
from? If you have a 3D modeling package like 3ds max or Maya, you have the necessary
tools to create everything your game will need. If these programs are a bit out of your
budget, other packages like MilkShape 3D can do the job just as well.
After you’ve created your models, you export them into one of the many 3D file formats
that are available. Just remember that you’ll need to know how to load the file format
147

07 DX9_GP CH07 3/12/04 4:16 PM Page 148
148
Chapter 7
■
Meshes
within your game. For the purposes of this book, you’ll be working with the file format
that Microsoft created.
n o t e
You can find MilkShape 3D at http://www.swissquake.ch/chumbalum-soft/index.html.
What Is a Mesh?
Your code handles 3D models that are loaded into your game as meshes. A mesh is a code
container that holds everything about a 3D object, including its vertices, texture coordi-
nates, and materials. By using the information that is contained within a mesh object, you
can render your 3D models to the screen.
n o t e
The D3DX utility library contains everything you need to use meshes within Direct3D.
How Direct3D Defines a Mesh
Most meshes within Direct3D are based on the
ID3DXBaseMesh
interface. This interface pro-
vides the storage container for your models and makes methods available to you for gain-
ing access to the data within the mesh. For example, the
GetVertexBuffer
method, which is
available through the
ID3DXBaseMesh
interface, gives you direct access to the vertex buffer
within the mesh object.
Following are the different types of meshes:
■
ID3DXMesh
. This is the standard mesh interface that you will be using.
■
ID3DXPMesh
. This interface enables you to use progressive meshes.
■
ID3DXSPMesh
. Simplification mesh objects are handled through this interface.
■
ID3DXPatchMesh
. This interface provides Patch mesh functionality.
Each one of these mesh types can hold all the vertices of a model in a vertex buffer and
give you information about the model, such as the number of faces or vertices.
Creating a Mesh
The first step to using meshes within your game is the creation of a mesh object. The mesh
object is your container, holding all the information needed to describe your model to
Direct3D. After you’ve created the mesh, you are free to copy in all the information that
your model requires.

07 DX9_GP CH07 3/12/04 4:16 PM Page 149
What Is a Mesh?
149
Two Direct3D functions are available for mesh creation:
D3DXCreateMesh
and
D3DXCreateMeshFVF
. Because each of these functions goes about creating the mesh in a
slightly different way, I’ll describe both in the following two sections.
D3DXCreateMesh
The
ID3DXMesh
interface is the simplest of the mesh interfaces and the easiest to get up and
running quickly. In this section, you’ll learn how to create a mesh from the
ID3DXMesh
inter-
face by using the
D3DXCreateMesh
function.
The
D3DXCreateMesh
function is defined here:
HRESULT D3DXCreateMesh (
DWORD NumFaces,
DWORD NumVertices,
DWORD Options,
CONST LPD3DVERTEXELEMENT9 *pDeclaration,
LPDIRECT3DDEVICE9 pDevice,
LPD3DXMESH *ppMesh
);
The
D3DXCreateMesh
function takes six parameters:
■
NumFaces
. The number of faces that the mesh will contain.
■
NumVertices
. The number of vertices that the mesh will contain.
■
Options
. The values from the
D3DXMESH
enumeration.
■
pDeclaration
. An array of
D3DVERTEXELEMENT9
objects. These objects describe the
FVF
for the mesh.
■
pDevice
. A valid Direct3D device.
■
ppMesh
. A pointer to a valid
ID3DXMesh
object.
The following code shows how to create a mesh object that will contain enough vertices
to hold a cube.
HRESULT hr;
// holds the newly created mesh
LPD3DXMESH boxMesh;
// D3DVERTEXELEMENT9 array
D3DVERTEXELEMENT9 Declaration [MAX_FVF_DECL_SIZE];
// Create the declarator needed by the D3DXCreateMesh function
D3DXDeclaratorFromFVF (D3DFVF_CUSTOMVERTEX, Declaration);

07 DX9_GP CH07 3/12/04 4:16 PM Page 150
150
Chapter 7
■
Meshes
hr =D3DXCreateMesh (12,
// the number of faces for the mesh
8,
// the number of vertices
D3DXMESH_MANAGED,
// using managed memory for this mesh
Declaration,
// array of D3DVERTEXELEMENT9 objects
pd3dDevice,
// the Direct3D device
&boxMesh);
// variable that will hold the mesh
// Check the return code to make sure you have a valid mesh object
if FAILED (hr)
return false;
As you can see, the previous code creates a mesh that contains 12 faces and 8 vertices and
places it in the
boxMesh
variable. The third variable,
D3DXMESH_MANAGED
, tells Direct3D to cre-
ate the mesh using managed memory for both the vertex and index buffers.
You should also notice the call to the
D3DXDeclaratorFromFVF
function called directly before
D3DXCreateMesh
.
D3DXDeclaratorFromFVF
creates the necessary
D3DVERTEXELEMENT9
object for the
fourth parameter by using the Flexible Vertex Format that your model uses.
When you use the
D3DXDeclaratorFromFVF
function, you aren’t required to directly create the
D3DVERTEXELEMENT9
objects yourself.
D3DXCreateMeshFVF
The
D3DXCreateMeshFVF
function differs from the
D3DXCreateMesh
in one way: It bases the
mesh creation on a Flexible Vertex Format instead of going through a
Declarator
. The
mesh object is identical to the one created with the
D3DXCreateMesh
function in the previ-
ous section.
The
D3DXCreateMeshFVF
function is defined next:
HRESULT D3DXCreateMeshFVF(
DWORD NumFaces,
DWORD NumVertices,
DWORD Options,
DWORD FVF,
LPDIRECT3DDEVICE9 pDevice,
LPD3DXMESH *ppMesh
);
The
D3DXCreateMeshFVF
function requires six parameters:
■
NumFaces
. The number of faces that the mesh will have
■
NumVertices
. The number of vertices that the mesh will consist of
■
Options
. The values from the
D3DXMESH
enumeration
■
FVF
. The Flexible Vertex Format of the vertices

07 DX9_GP CH07 3/12/04 4:16 PM Page 151
What Is a Mesh?
151
■
pDevice
. A valid Direct3D device
■
ppMesh
. A pointer to an
ID3DXMESH
object
The following code shows a sample call to
D3DXCreateMeshFVF
.
// variable to hold the return code
HRESULT hr;
// the variable that will hold the newly created mesh
LPD3DXMESH boxMesh;
// Create the mesh with a call to D3DXCreateMeshFVF
hr = D3DXCreateMeshFVF(12,
// NumFaces
8,
// NumVertices
D3DXMESH_MANAGED,
// Options
D3DFVF_CUSTOMVERTEX, //
FVF
pd3dDevice,
// pDevice
&boxMesh);
// ppMesh
// Check the return code to make sure you have created a valid mesh
if FAILED (hr)
return false;
Again, you create the mesh by using managed memory for the vertex and index buffer and
specifying the
D3DXMESH_MANAGED
value. When this call is complete, the
boxMesh
variable
should hold a valid mesh object.
The
D3DXCreateMeshFVF
function is the easiest of the two mesh creation functions to use.
Filling the Mesh
Now that you have created the mesh object, you need to fill it with data that will describe
the model you want to display. At this point, you have an empty container that is the
proper size to hold the data needed to create a cube.
To define the cube, you first need to lock the vertex buffer and fill it with the eight vertices
that the cube needs. Next, you need to lock the index buffer and copy the indices into it.
The
SetupMesh
function shown here takes you through the steps to fill the mesh with the
information it needs to create a cube:
/*************************************************************************
* SetupMesh
* Set up the vertex buffer and index buffer of a mesh
*************************************************************************/

07 DX9_GP CH07 3/12/04 4:16 PM Page 152
152
Chapter 7
■
Meshes
HRESULT SetupMesh()
{
HRESULT hr;
// variable to hold return codes
///////////////////////////////////////////////////////////////////////
// vertices for the vertex buffer
CUSTOMVERTEX g_Vertices[ ] = {
// X
Y
Z
COLOR
{-1.0f,-1.0f,-1.0f, D3DCOLOR_ARGB(0,255,0,0)},
// 0
{-1.0f, 1.0f,-1.0f, D3DCOLOR_ARGB(0,0,0,255)},
// 1
{1.0f, 1.0f,-1.0f, D3DCOLOR_ARGB(0,0,255,0)},
// 2
{ 1.0f,-1.0f,-1.0f, D3DCOLOR_ARGB(0,0,0,255)},
// 3
{-1.0f,-1.0f, 1.0f, D3DCOLOR_ARGB(0,0,255,0)},
// 4
{1.0f,-1.0f, 1.0f, D3DCOLOR_ARGB(0,0,0,255)},
// 5
{ 1.0f, 1.0f, 1.0f, D3DCOLOR_ARGB(0,0,255,0)},
// 6
{-1.0f, 1.0f, 1.0f, D3DCOLOR_ARGB(0,0,0,255)}
// 7
};
// Prepare to copy the vertices into the vertex buffer
VOID* pVertices;
// Lock the vertex buffer
hr = boxMesh->LockVertexBuffer(D3DLOCK_DISCARD, (void**)&pVertices);
// Check to make sure the vertex buffer can be locked
if FAILED (hr)
return hr;
///////////////////////////////////////////////////////////////////////
// index buffer data
// The index buffer defines the faces of the cube,
// two faces per each side of the cube
WORD IndexData[ ] = {
0,1,2,
// 0
2,3,0,
// 1
4,5,6,
// 2
6,7,4,
// 3
0,3,5,
// 4
5,4,0,
// 5
3,2,6,
// 6
6,5,3,
// 7
2,1,7,
// 8
7,6,2,
// 9

07 DX9_GP CH07 3/12/04 4:16 PM Page 153
What Is a Mesh?
153
1,0,4,
// 10
4,7,1
// 11
};
// Copy the vertices into the buffer
memcpy( pVertices, g_Vertices, sizeof(g_Vertices) );
// Unlock the vertex buffer
boxMesh->UnlockVertexBuffer();
// Prepare to copy the indices into the index buffer
VOID* IndexPtr;
// Lock the index buffer
hr = boxMesh->LockIndexBuffer( 0, &IndexPtr );
// Check to make sure the index buffer can be locked
if FAILED (hr)
return hr;
// Copy the indices into the buffer
memcpy( IndexPtr, IndexData, sizeof(IndexData)*sizeof(WORD) );
// Unlock the buffer
boxMesh->UnlockIndexBuffer();
return S_OK;
}
The first thing that the
SetupMesh
function does is to create the
g_Vertices
array. This array
contains the vertices and vertex colors that you need to define the cube. Next, the vertex
buffer is locked, as shown in previous examples. A call to
memcpy
copies all the vertices into
the vertex buffer and unlocks the buffer.
Next, you need to fill the index buffer. Like the vertex buffer, you must lock it before
data can be copied into it. The indices that the index buffer will use are defined in the
IndexData
array. Notice that the
IndexData
array is defined as type
WORD
, meaning that these
are 16-bit values.
After you have defined the values, lock the index buffer and copy in the indices through a
call to
memcpy
. Then unlock the index buffer.
n o t e
Both vertex and index buffers are required to create a valid mesh object.

07 DX9_GP CH07 3/12/04 4:16 PM Page 154
154
Chapter 7
■
Meshes
Displaying a Mesh
Now that you have created the mesh and filled it with data, you are ready to render it to
the screen. The
drawMesh
function shown next gives an example of what is needed to ren-
der a mesh. This function causes the cube to rotate on the screen.
/*************************************************************************
* void drawMesh (LPD3DXMESH mesh, D3DMATERIAL9 material)
* draws the mesh
*************************************************************************/
void drawMesh (LPD3DXMESH mesh, D3DMATERIAL9 *material)
{
// Rotate the mesh
D3DXMATRIX matRot;
D3DXMATRIX matView;
D3DXMATRIX matWorld;
// Create the Rotation Matrix
D3DXMatrixRotationY(&matRot, timeGetTime()/1000.0f);
// Multiply the Rotation Matrix by the View Matrix
D3DXMatrixMultiply(&matWorld, &matRot, &matView);
// Set the world transform to the resulting World Matrix
pd3dDevice->SetTransform( D3DTS_WORLD, &matWorld );
// Set the material to use
pd3dDevice->SetMaterial(material);
// Draw the mesh
mesh->DrawSubset(0);
}
The first part of the
drawMesh
function rotates and places the cube on the screen. Next, the
material that the cube will use is set through the call to
SetMaterial
. The most important
part of the
drawMesh
function is the call to
DrawSubset
.
The
DrawSubset
function tells Direct3D which portion of the mesh you want to be rendered
to the screen. Because the mesh that you created previously contained only a single group,
a 0 was passed to
DrawSubset
.
Figure 7.1 shows the resulting mesh being rendered. You can find the full source listing for
creating and rendering a mesh in the chapter7\example1 directory on the CD-ROM.

07 DX9_GP CH07 3/12/04 4:16 PM Page 155
What Is a Mesh?
155
Figure 7.1 The cube being rendered as a mesh.
n o t e
Meshes can contain many attribute groups. Each group holds a set of faces that describe a portion
of the mesh. For example, if you have two areas of a mesh that require different textures, each of
these areas would be placed into a separate attribute group. In this way, you can reset the texture
and materials that Direct3D is using before rendering each group.
Optimizing a Mesh
When a mesh is created, it’s not normally in the most optimized format for Direct3D to
draw. For instance, your mesh might contain vertices that are duplicated and used for
multiple faces, or the vertices and faces might not be in the most efficient order. By opti-
mizing the mesh to use shared vertices and allowing the vertices and faces to be reordered,
you can increase performance when rendering the mesh.
The D3DX Utility Library provides two functions for optimizing a mesh:
Optimize
and
OptimizeInplace
. Each of these functions essentially performs the same job but with one
key difference:
Optimize
causes an output mesh to be created, whereas
OptimizeInplace
makes its changes to the input mesh. I’ll explain how both of these functions are used with
meshes.

07 DX9_GP CH07 3/12/04 4:16 PM Page 156
156
Chapter 7
■
Meshes
The
Optimize
function, defined next, takes an input mesh, optimizes it, and generates an
output mesh.
HRESULT Optimize(
DWORD Flags,
CONST DWORD *pAdjacencyIn,
DWORD *pAdjacencyOut,
DWORD *pFaceRemap,
LPD3DXBUFFER *ppVertexRemap,
LPD3DXMESH *ppOptMesh
);
The
Optimize
function requires six parameters:
■
Flags
. The flags that specify the type of optimization to perform. You can find the
flags for this parameter in the
D3DXMESHOPT
enumeration.
■
pAdjacencyIn
. A pointer to an array that holds the current adjacency data for the
input mesh.
■
pAdjacencyOut
. A pointer to an array that holds the adjacency data for the optimized
output mesh.
■
pFaceRemap
. A pointer to the buffer that holds the new index order for the output
mesh.
■
ppVertexRemap
. An address to a pointer of an
ID3DXBuffer
interface for the output
mesh.
■
ppOptMesh
. An
ID3DXMesh
interface that holds the newly created output mesh.
The
OptimizeInplace
function, which makes changes to the input mesh, is defined next:
HRESULT OptimizeInplace(
DWORD Flags,
CONST DWORD *pAdjacencyIn,
DWORD *pAdjacencyOut,
DWORD *pFaceRemap,
LPD3DXBUFFER *ppVertexRemap
);
The
OptimizeInplace
function requires five parameters:
■
Flags
. The flags that specify the type of optimization to perform. You can find the
flags for this parameter in the
D3DXMESHOPT
enumeration.
■
pAdjacencyIn
. A pointer to an array that holds the current adjacency data for the mesh.
■
pAdjacencyOut
. A pointer to a buffer that holds the adjacency data for the optimized
mesh. If you do not want to collect the adjacency data, you can pass a value of
NULL
for this parameter.

07 DX9_GP CH07 3/12/04 4:16 PM Page 157
What Is a Mesh?
157
■
pFaceRemap
. A pointer to a buffer that holds the new index data for each face. If you
do not want to collect this information, you can pass
NULL
for this parameter.
■
ppVertexRemap
. A pointer to an
ID3DXBuffer
interface that holds the new index for
each vertex.
Table 7.1 shows the
Flags
parameter in more detail.
D3DXMESHOPT Enumeration
Description
D3DXMESHOPT_COMPACT
D3DXMESHOPT_ATTRSORT
Reorders the faces to minimize the number of material state
D3DXMESHOPT_VERTEXCACHE
D3DXMESHOPT_STRIPREORDER
D3DMESHOPT_IGNOREVERTS
D3DMESHOPT_DONOTSPLIT
D3DMESHOPT_DEVICEINDEPENDENT
Causes the vertex cache size to be set to a size that will work well
Table 7.1
Value
Reorders the faces to remove unused vertices and faces.
changes.
Reorders the faces to help with rendering cache performance.
Reorders the faces to maximize the length of the adjacent triangles.
Causes only the faces to be optimized; the vertices are ignored.
Prevents the splitting of vertices that are shared between groups.
on legacy hardware.
Getting the Mesh Details
During the process of optimizing a mesh, you might be curious as to certain details of the
mesh that you are working with. For instance, you might wonder how many vertices or
faces the mesh contains before optimization. The
ID3DXMesh
interface provides two func-
tions that are useful for this purpose:
■
GetNumVertices
. Returns the number of vertices contained within the mesh.
■
GetNumFaces
. Returns the number of faces contained within the mesh.
The following code sample shows how to use both of these functions and display a Win-
dows MessageBox containing the number of faces and vertices.
// Display the number of vertices in the mesh
std::string numVertices;
sprintf ( (char*) numVertices.c_str(),
“numverts=%d”,
pMeshSysMem->GetNumVertices());
MessageBox (NULL, numVertices.c_str ( ), “message”, MB_OK);
// Display the number of faces in the mesh
std::string numFaces;
sprintf ( (char*) numFaces.c_str(),

07 DX9_GP CH07 3/12/04 4:16 PM Page 158
158
Chapter 7
■
Meshes
“ numFaces =%d”,
pMeshSysMem->GetNumFaces());
MessageBox (NULL, numFaces.c_str ( ), “message”, MB_OK);
The
pMeshSysMem
variable must contain a valid mesh before
GetNumVertices
or
GetNumFaces
can be called.
The Attribute Table
During the mesh optimization process, you have the option of generating an attribute
table. This table contains information about the attribute buffer of a mesh. The attribute
buffer itself contains properties of each of the vertices within the mesh.
As I mentioned earlier, each mesh can contain multiple attribute groups. Each group con-
tains a list of the vertices that are part of that group. Using multiple attribute groups, you
can selectively split a mesh into separate pieces. For instance, a mesh of a car can be split
into a group containing the body of the car and another group containing the wheels. If
the group containing the body of the car were set as group 0 and the wheels as group 1,
you would use the two following calls to
DrawSubset
to draw the entire car:
carMesh->DrawSubset(0);
// Draw the body group
carMesh->DrawSubset(1);
// Draw the wheels
Because each of these groups would require different materials as well, calls to
SetMaterial
would be made before each
DrawSubset
call.
To define separate groups within a mesh, you need to create an attribute table. You can
only create an attribute table by calling one of the two optimize functions I mentioned
earlier. When you call the optimize function and reorder the faces, an attribute table is
generated. By default, if the mesh requires more than one material, a subset is generated
for each one. In the case of the cube you created in the previous example, the entire cube
contained only one material. The
OptimizeMesh
function that follows will take the cube
contained in the
boxMesh
variable and split it into two separate subsets. Half of the cube
will then be rendered with one material, and the second half of the cube will be rendered
with an alternative material.
/******************************************************************************
* OptimizeMesh
******************************************************************************/
void OptimizeMesh (void)
{
// Call the OptimizeInplace function to generate the attribute table
boxMesh->OptimizeInplace(D3DXMESHOPT_ATTRSORT, 0, NULL, NULL, NULL);

07 DX9_GP CH07 3/12/04 4:16 PM Page 159
What Is a Mesh?
159
DWORD numAttr;
D3DXATTRIBUTERANGE *attribTable = new D3DXATTRIBUTERANGE [2];
// Get the number of items within the table
boxMesh->GetAttributeTable(NULL, &numAttr);
// Get the whole table into the variable attribTable
boxMesh->GetAttributeTable(attribTable, &numAttr);
// Set up the attributes for the first group
attribTable[0].AttribId
= 0;
attribTable[0].FaceStart
= 0;
attribTable[0].FaceCount
= 6;
attribTable[0].VertexStart = 0;
attribTable[0].VertexCount = 8;
// Set up the attributes for the second group
attribTable[1].AttribId
= 1;
attribTable[1].FaceStart
= 6;
attribTable[1].FaceCount
= 6;
attribTable[1].VertexStart = 0;
attribTable[1].VertexCount = 8;
// Write the attribute table back into the mesh
boxMesh->SetAttributeTable(attribTable, 2);
}
The previous code first calls the
OptimizeInplace
function on the cube mesh contained in
the
boxMesh
variable. Because I used
OptimizeInplace
, I continue to use the original cube
mesh.
Next, because I created two separate attribute groups, I construct an array of two
D3DXATTRIBUTERANGE
structure variables.
D3DXATTRIBUTERANGE *attribTable = new D3DXATTRIBUTERANGE [2];
Each
D3DXATTRIBUTERANGE
structure contains the information that Direct3D needs to define
an attribute group.
The
D3DXATTRIBUTERANGE
structure is shown next.
typedef struct _D3DXATTRIBUTERANGE {
DWORD AttribId;
DWORD FaceStart;

07 DX9_GP CH07 3/12/04 4:16 PM Page 160
160
Chapter 7
■
Meshes
DWORD FaceCount;
DWORD VertexStart;
DWORD VertexCount;
} D3DXATTRIBUTERANGE;
The
D3DXATTRIBUTERANGE
structure contains five variables:
■
AttribId
. The ID number of the current group
■
FaceStart
. The number of the face to start this group with
■
FaceCount
. The number of faces that will be included in this group
■
VertexStart
. The number of the vertex to start the group with
■
VertexCount
. The number of vertices that will be included in this group
After you create the array of
D3DXATTRIBUTERANGE
structures, you have to get access to the
attribute table. You can access the attribute table through a call to the
GetAttributeTable
function. The
GetAttributeTable
function can be used in two different ways.
The first way allows you identify the number of items that are currently contained within
the attribute table. When you pass a
NULL
value as the first parameter to
GetAttributeTable
and a pointer to a
DWORD
variable as the second, the mesh returns back to you the number
of items currently in the table. The item count is returned in the variable passed as the sec-
ond parameter. A sample call to
GetAttributeTable
that works in this way is shown here:
DWORD numAttr;
// variable that will hold the number of items in the table
// using GetAttributeTable to collect the number of items in the attribute table
boxMesh->GetAttributeTable(NULL, &numAttr);
As you can see in the previous call, the
numAttr
variable is passed as the second parameter.
On completion of this function call,
numAttr
will contain the number of items currently in
the attribute table.
Now that you have the number of items, you need to gain access to the data within the
table. You can use the
GetAttributeTable
function in another way to gather this informa-
tion. Earlier, you created an array of two
D3DXATTRIBUTERANGE
structures. When you pass the
attribTable
array as the first parameter and the
numAttr
variable as the second parameter,
the
GetAttributeTable
function fills in the
attribTable
array with the data currently con-
tained in the table. The call to
GetAttributeTable
being used in this way is shown here:
boxMesh->GetAttributeTable(attribTable, &numAttr);
At this point, you are free to manipulate and change the data with the
attribTable
array. If
you look back at the
OptimizeMesh
function, you’ll see that I changed the variables con-
tained within each of the
D3DXATTRIBUTERANGE
structures. I changed the first structure to

07 DX9_GP CH07 3/12/04 4:16 PM Page 161
What Is a Mesh?
161
start at the first face in the mesh and contain only six faces; this accounts for half of the
faces in the cube.
// Set up the attributes for the first group
attribTable[0].AttribId
= 0;
// the ID of the group
attribTable[0].FaceStart
= 0;
// the starting group face
attribTable[0].FaceCount
= 6;
//the number of faces in the group
attribTable[0].VertexStart = 0;
// the starting group vertex
attribTable[0].VertexCount = 8;
// the number of vertices
The second group starts at the sixth face and again continues for six faces. The only other
change to this structure is the assignment of
AttribId
to 1.
// Set up the attributes for the second group
attribTable[1].AttribId
= 1;
attribTable[1].FaceStart
= 6;
attribTable[1].FaceCount
= 6;
attribTable[1].VertexStart = 0;
attribTable[1].VertexCount = 8;
The final step needed to split the cube into two separate attribute groups is to take the
changed attribute table and update the cube mesh with it. Updating the attribute table
within a mesh is accomplished through the
SetAttributeTable
function, defined here:
HRESULT SetAttributeTable (
CONST D3DXATTRIBUTERANGE * pAttribTable,
DWORD cAttribTableSize
);
The
SetAttributeTable
function requires only two parameters:
■
pAttribTable
. A pointer to the attribute table to update the mesh with
■
cAttribTableSize
. A value specifying the size of the attribute table
The following code shows how the
SetAttributeTable
function updates the table within the
mesh. The
attribTable
variable, which represents the array of attributes, is passed as the
first parameter. Because I only wanted to change the cube to include two attribute groups,
I passed a value of 2 for the second parameter.
boxMesh->SetAttributeTable(attribTable, 2);
Now that the cube mesh is split into two separate groups, you must change how the
cube is rendered. There must be two calls to the
DrawSubset
function, each one specifying
the value of the group to draw. The following code shows the updated
DrawSubset
calls.
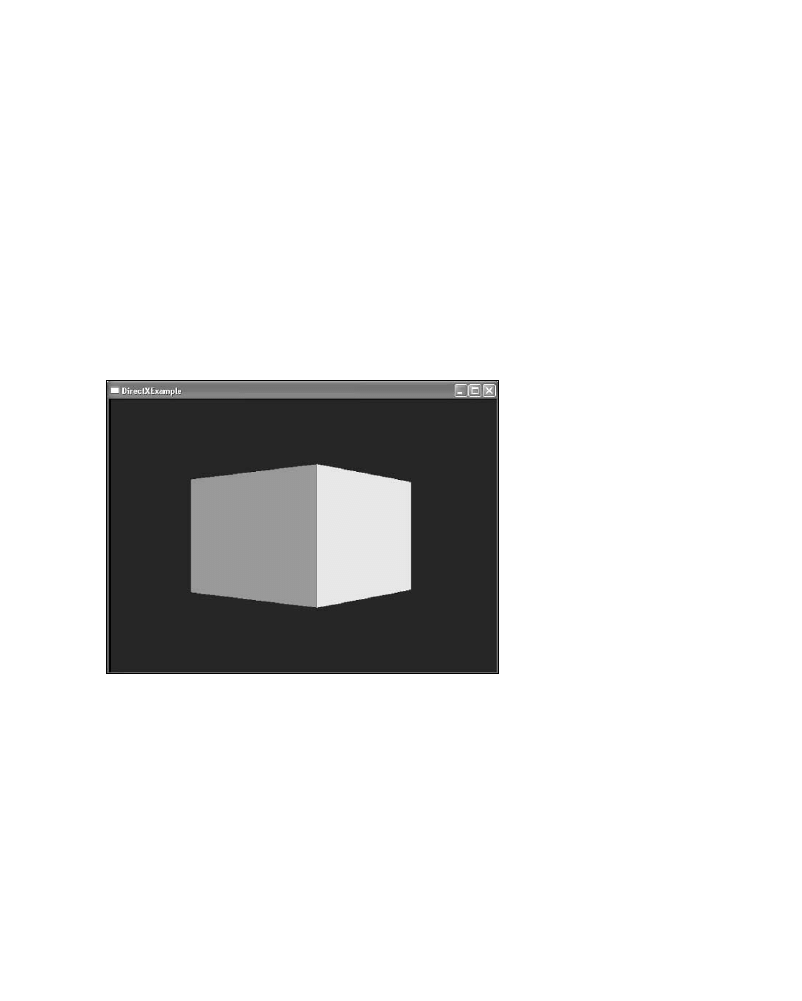
07 DX9_GP CH07 3/12/04 4:16 PM Page 162
162
Chapter 7
■
Meshes
In addition, a call to the
SetMaterial
function before each
DrawSubset
call causes the mate-
rial to change before each half of the cube is rendered.
// Set the material
pd3dDevice->SetMaterial (&materials[0].MatD3D);
// Draw the first subset of the mesh
mesh->DrawSubset(0);
// Set the second material
pd3dDevice->SetMaterial (&materials[1].MatD3D);
// Draw the second subset of the mesh
mesh->DrawSubset(1);
Figure 7.2 shows the updated cube being rendered with separate materials for each group.
Figure 7.2 The cube being rendered with two materials applied.
The first material is green and the second material is red.
Predefined Meshes
Mesh creation by hand is a tedious job and should be avoided at all costs. Luckily, model-
ing programs usually eliminate the need for hand-modeling. There are times, however,
when modeling a simple object like a cube is overkill. In such an instance, DirectX pro-
vides some functions to assist with object creation.

07 DX9_GP CH07 3/12/04 4:16 PM Page 163
Predefined Meshes
163
D3DX Object Creation
So far, all the examples I’ve shown involve creating the 3D model by hand. Because I’ve
only used simple objects, like cubes, they have been easy for the demonstration. DirectX,
however, provides a more hassle-free method of simple object creation through the D3DX
Utility Library.
The following functions, accessed through D3DX, help you in creating simple 3D objects
such as cubes, spheres, and cylinders:
■
D3DXCreateBox
. Creates a cube
■
D3DXCreateSphere
. Creates a sphere
■
D3DXCreateCylinder
. Creates a cylinder
■
D3DXCreateTeapot
. Creates a 3D model of a teapot
Creating a Box
You can use the
D3DXCreateBox
function, defined next, when you want to create a simple
cube. The resulting cube will be a fully complete
ID3DXMesh
object that you can optimize or
manipulate in any way.
HRESULT D3DXCreateBox(
LPDIRECT3DDEVICE9 pDevice,
FLOAT Width,
FLOAT Height,
FLOAT Depth,
LPD3DXMESH *ppMesh,
LPD3DXBUFFER *ppAdjacency
);
The
D3DXCreateBox
function takes six parameters:
■
pDevice
. A pointer to a valid Direct3D device.
■
Width
. The width in units of the cube along the X axis.
■
Height
. The height in units of the cube along the Y axis.
■
Depth
. The depth of the cube along the Z axis.
■
ppMesh
. An address to an
ID3DXMesh
pointer. This variable contains the mesh of the
cube.
■
ppAdjacency
. The adjacency buffer. If you don’t want to store this information, you
can pass
NULL
to this parameter.
The box created with this function will look much like the box that you’ve been using in
the previous sections. Figure 7.3 shows a cube created with the
D3DXCreateBox
function.

07 DX9_GP CH07 3/12/04 4:16 PM Page 164
164
Chapter 7
■
Meshes
Figure 7.3 A cube created with the
D3DXCreateBox
function.
Creating a Teapot
The Utah Teapot, which has long been used as a sample model for 3D graphics, can also
be created easily in Direct3D. You’ve already seen it rendered because I used it as a model
in Chapter 6, “Vertex Colors, Texture Mapping, and 3D Lighting.”
To create a 3D teapot, you need to use the
D3DXCreateTeapot
function defined here:
HRESULT D3DXCreateTeapot(
LPDIRECT3DDEVICE9 pDevice,
LPD3DXMESH *ppMesh,
LPD3DXBUFFER *ppAdjacency
);
The
D3DXCreateTeapot
function requires three parameters:
■
pDevice
. A valid Direct3D object.
■
ppMesh
. An
ID3DXMesh
object in which to place the created mesh.
■
ppAdjacency
. An adjacency buffer, if you want to collect this information. You can
pass
NULL
to this parameter if you do not need this.
Unfortunately, the
D3DXCreateTeapot
function doesn’t let you control the size of the teapot
that is created. The following single line of code creates a teapot for you:
D3DXCreateTeapot(pd3dDevice, &teapotMesh, NULL);

07 DX9_GP CH07 3/12/04 4:16 PM Page 165
Predefined Meshes
165
n o t e
You can find a history of the Utah Teapot and how it came to be at http://sjbaker.org/teapot.
Creating a Sphere
Spheres are useful objects in 3D. Using only spheres, you can create a simulated model
of the solar system. If your scene requires spheres to be generated, you can use the
D3DXCreateSphere
function, shown here:
HRESULT D3DXCreateSphere(
LPDIRECT3DDEVICE9 pDevice,
FLOAT Radius,
UINT Slices,
UINT Stacks,
LPD3DXMESH *ppMesh,
LPD3DXBUFFER *ppAdjacency
);
The
D3DXCreateSphere
function takes six parameters:
■
pDevice
. A valid Direct3D device.
■
Radius
. A float value that specifies the radius of the sphere.
■
Slices
. The number of vertical breaks that will be present.
■
Stacks
. The number of horizontal breaks that will be present.
■
ppMesh
. An
ID3DXMesh
object that will hold the created sphere.
■
ppAdjacency
. An adjacency buffer if you want to collect this information. You can
pass
NULL
to this parameter if you don’t need this.
The following snippet of code shows how to use the
D3DXCreateSphere
function:
// Create the sphere
float sphereRadius = 3.0;
int numSlices = 20;
int numStacks = 20;
D3DXCreateSphere(pd3dDevice,
sphereRadius,
numSlices,
numStacks,
&sphereMesh,
NULL);
Figure 7.4 shows a sphere created with
D3DXCreateSphere
. The higher the value in the
Slices
and
Stacks
, the smoother the resulting sphere will be.

07 DX9_GP CH07 3/12/04 4:16 PM Page 166
166
Chapter 7
■
Meshes
Figure 7.4 A sphere created with
D3DXCreateSphere
.
Creating a Cylinder
The final object that I’ll demonstrate how to create is a cylinder. The
D3DXCreateCylinder
function, shown next, allows you to specify certain properties of the cylinder, such as its
length and the radius of each end.
HRESULT D3DXCreateCylinder(
LPDIRECT3DDEVICE9 pDevice,
FLOAT Radius1,
FLOAT Radius2,
FLOAT Length,
UINT Slices,
UINT Stacks,
LPD3DXMESH *ppMesh,
LPD3DXBUFFER *ppAdjacency
);
The
D3DXCreateCylinder
function requires eight parameters:
■
pDevice
. A valid Direct3D device.
■
Radius1
. A float value specifying the radius of the cylinder’s negative Z end.
■
Radius2
. A float value specifying the radius of the cylinder’s positive Z end.
■
Length
. The length of the cylinder.
■
Slices
. The number of quads that will make up the cylinder along its length.
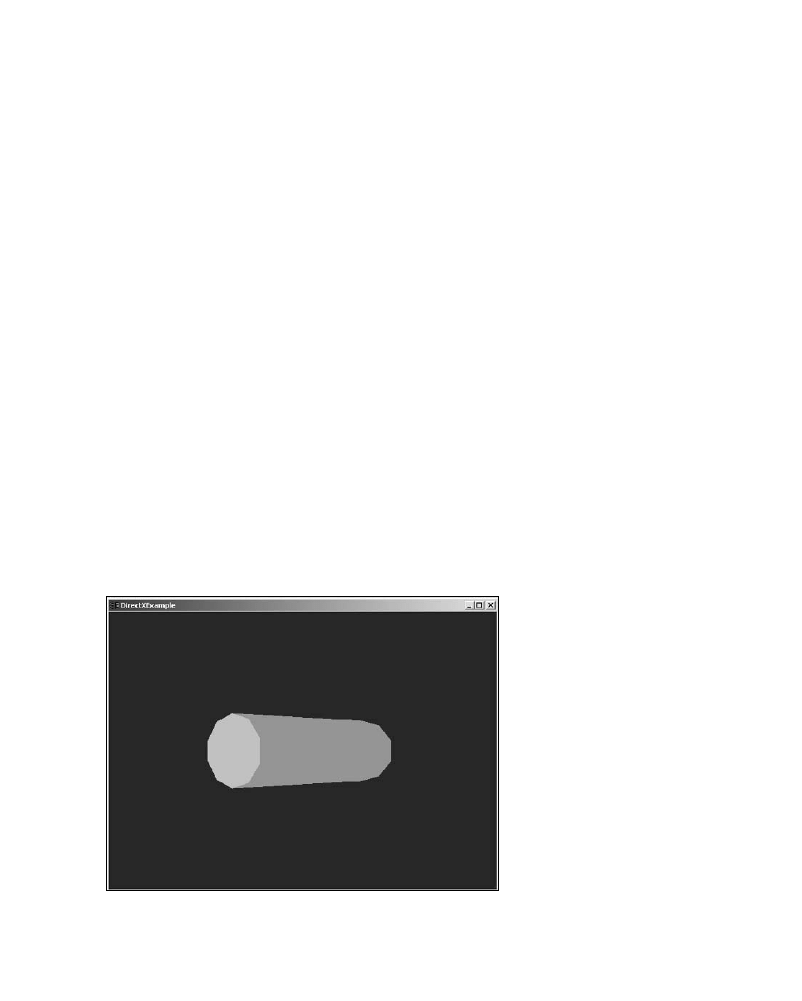
07 DX9_GP CH07 3/12/04 4:16 PM Page 167
Predefined Meshes
167
■
Stacks
. The number of quads that will make up the cylinder around the
circumference.
■
ppMesh
. An
ID3DXMesh
object that will hold the created sphere.
■
ppAdjacency
. An adjacency buffer, if you want to collect this information. You can
pass
NULL
to this parameter if you do not need it.
The following sample of code shows how to create a cylinder.
// Define the properties of the cylinder
float cylRadius1 = 2.0;
float cylRadius2 = 2.0;
float cylLength = 7.0;
int cylSlices
= 10;
int cylStacks
= 10;
// Create the cylinder
D3DXCreateCylinder(pd3dDevice,
cylRadius1,
cylRadius2,
cylLength,
cylSlices,
cylStacks,
&cylMesh,
NULL);
Figure 7.5 shows a cylinder created with the
D3DXCreateCylinder
function.
Figure 7.5 A cylinder created with the
D3DXCreateCylinder
function.

07 DX9_GP CH07 3/12/04 4:16 PM Page 168
168
Chapter 7
■
Meshes
You can find a full source example showing how to use the D3DX functions described ear-
lier in the chapter7\example2 directory on the CD-ROM.
The Direct3D Mesh Format: The X File
Creating meshes within your code isn’t the best way to create a 3D world. Most games
require models that are highly complex and detailed, which would be a pain to create by
hand. As mentioned earlier, modeling tools are available that allow for the offline cre-
ation of 3D models. After you create the models, you can export them into a variety of
file formats.
Microsoft has come up with its own proprietary format for 3D models called the X file.
The X file format, which was introduced in DirectX 2.0, provides developers with a
template-based structure for storing meshes, textures, and animations.
X files can either be text readable or in a binary format. The following code shows a small
piece of an X file in text format:
MeshVertexColors {
8;
0;0.000000; 0.000000; 1.000000; 0.000000;;,
1;0.000000; 1.000000; 1.000000; 0.000000;;,
2;0.000000; 0.000000; 1.000000; 0.000000;;,
3;0.000000; 1.000000; 1.000000; 0.000000;;,
4;0.000000; 0.000000; 1.000000; 0.000000;;,
5;0.000000; 1.000000; 1.000000; 0.000000;;,
6;0.000000; 0.000000; 1.000000; 0.000000;;,
7;0.000000; 1.000000; 1.000000; 0.000000;;;
}
A template that describes the format that the data must be in controls each section within
an X file. A template of the same name, shown here, dictates the previous
MeshVertexCol-
ors
structure:
template MeshVertexColors \
{ \ <1630B821-7842-11cf-8F52-0040333594A3> \
DWORD nVertexColors; \
array IndexColor vertexColors[nVertexColors]; \
}
Each template consists of two pieces: the numerical unique identifier, enclosed in
brackets, and the declaration of the data the template can contain. In this instance, the
MeshVertexColors
template declares two data types: a
DWORD
value that contains the number
of vertex colors, and an array of index colors.

07 DX9_GP CH07 3/12/04 4:16 PM Page 169
Saving a Mesh to an X File
169
How X Files Are Created
X files are normally created with 3D modeling software, although this is not always the
case. You can code an X file by hand, but for complex models, this would be a large chore.
Typically, a graphic artist creates the model and then exports it into the X file format.
Microsoft has released two programs that are capable of converting models into the
proper format. The first program,
conv3ds.exe
, is a command-line application that takes as
input a 3D model in the 3DS file format. 3DS files are typically created with 3ds max, but
other modeling packages support this format as well.
The second program,
XSkinExp.dle
, is a plug-in for 3ds max that allows you to directly
export models from within the modeling environment. Both of these applications are
included with the DirectX Software Development Kit (SDK).
Saving a Mesh to an X File
Because there are already two programs for creating X files, you might be wondering why
I would bother showing you how to programmatically create these files yourself. Well, not
all game programming is about coding graphics engines and Artificial Intelligence (AI);
you need to create tools to make your fellow programmers’ lives easier. For instance, you
might be asked to create an application that can read in any number of 3D file formats
and export X files. Luckily, the D3DX Utility Library comes to the rescue again with func-
tions for creating X files.
D3DXSaveMeshToX
D3DX includes a function called
D3DXSaveMeshToX
that you can use to generate X files.
Before you can use this function, though, your data must reside in an
ID3DXMesh
object. As
you’ll recall from earlier, I took you through the process of creating and displaying a mesh.
In this section, I’m going to refer back to that lesson and show you how to take the meshes
you created earlier and save them as X files.
Just to refresh what you’ve learned about meshes so far: Meshes are created using either
the
D3DXCreateMesh
or
D3DXCreateMeshFVF
function. After you create the mesh, you fill in the
vertex and index buffers with the information pertaining to the model you are creating.
At this point, you should have a perfectly valid
ID3DXMesh
object and be ready to create an
X file from it.
The
D3DXSaveMeshToX
function, defined next, takes the mesh you created and saves it to disk
in the X file format.
HRESULT D3DXSaveMeshToX (
LPCTSTR pFilename,

07 DX9_GP CH07 3/12/04 4:16 PM Page 170
170
Chapter 7
■
Meshes
LPD3DXMESH pMesh,
CONST DWORD* pAdjacency,
CONST D3DXMATERIAL* pMaterials,
CONST D3DXEFFECTINSTANCE* pEffectInstances,
DWORD NumMaterials,
DWORD Format
);
The
D3DXSaveMeshToX
function has seven parameters:
■
pFilename
. A string variable that contains the name of the X file to save to.
■
pMesh
. A pointer to an
ID3DXMesh
variable.
■
pAdjacency
. A pointer to an array of three
DWORDs
per face.
■
pMaterials
. A pointer to an array of
D3DXMATERIAL
structures.
■
pEffectInstances
. A pointer to an array of effect instances.
■
NumMaterials
. The number of
D3DXMATERIAL
structures in the
pMaterials
variables.
■
Format
. The formats in which to save the X file. There are three possible format
flags:
•
DXFILEFORMAT_BINARY
. The X file will be saved in a binary format.
•
DXFILEFORMAT_TEXT
. The X file will be saved in a text-viewable format.
•
DXFILEFORMAT_COMPRESSED
. The X file will be saved as compressed.
The source shown next is an example of how
D3DXSaveMeshToX
is used:
LPD3DXMESH
cubeMesh;
// a pointer to an ID3DXMESH
D3DXMATERIAL
material;
// a single D3DXMATERIAL structure
HRESULT hr;
// Create the mesh that will hold the cube model
hr = D3DXCreateMeshFVF(12,
8,
D3DXMESH_MANAGED,
D3DFVF_CUSTOMVERTEX,
pd3dDevice,
&cubeMesh);
// Set up the vertex and index buffer
// This function is not defined here, but it fills the vertex and index
// buffers of the mesh with the required information for a cube. You can
// review the section on creating a mesh from code for the full description of
// this function.
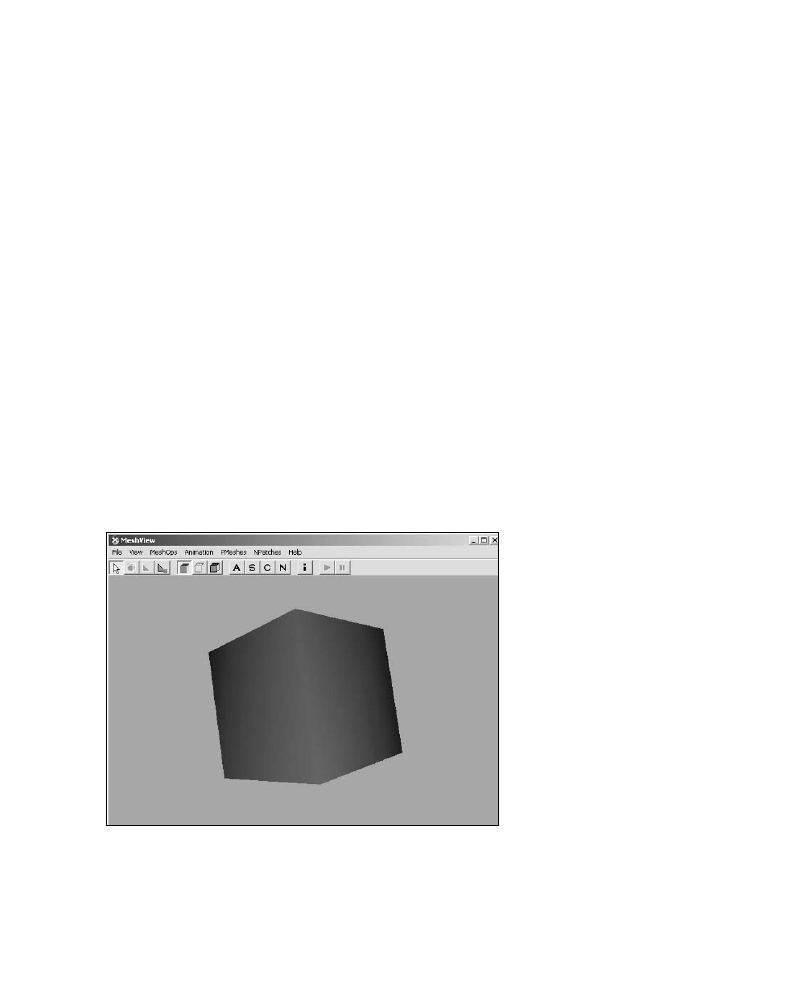
07 DX9_GP CH07 3/12/04 4:16 PM Page 171
Saving a Mesh to an X File
171
SetupVBIB();
// Take the valid mesh object and save it to an X file
D3DXSaveMeshToX (“cube.x”,
// file name to save to
cubeMesh,
// the ID3DXMESH interface
NULL,
// adjacency information; none used
&material,
// array of D3DXMATERIAL structures
NULL,
// array of effect instances; none used
1,
// number of D3DXMATERIAL structures
DXFILEFORMAT_TEXT);
// saving a text version X file
The important portion of this code is the call to
D3DXSaveMeshToX
. This function details the
file name to save the X file as, the mesh object to save out, and the format that X file should
be saved as.
Figure 7.6 shows what the
cube.x
mesh looks like when viewed from the MeshView appli-
cation found in the DXSDK\Bin\DXUtils directory. This application is installed when you
install the DirectX SDK.
You can find a full source example showing how to use the D3DX functions described in
this chapter to save X files in the chapter7\example3 directory on the CD-ROM.
Figure 7.6 The
cube.x
file as shown in the MeshView
application.

07 DX9_GP CH07 3/12/04 4:16 PM Page 172
172
Chapter 7
■
Meshes
Loading a Mesh from an X File
Now that you know how to save an X file, the next logical question is, “How do I load one
from disk?” Well, you could write a loader yourself, which would require you to learn the
X file format extensively, or you can look to the D3DX library once more.
Because the X file is the file format that Microsoft is pushing for DirectX, Microsoft has
also provided a function for loading these files into your application.
Using the D3DXLoadMeshFromX Function
The
D3DXLoadMeshFromX
function, defined here, is used to load X files from disk:
HRESULT D3DXLoadMeshFromX(
LPCTSTR pFilename,
DWORD Options,
LPDIRECT3DDEVICE9 pDevice,
LPD3DXBUFFER* ppAdjacency,
LPD3DXBUFFER* ppMaterials,
LPD3DXBUFFER* ppEffectInstances,
DWORD* pNumMaterials,
LPD3DXMESH* ppMesh
);
The
D3DXLoadMeshFromX
function takes eight parameters:
■
pFilename
. A string specifying the file name to save the X file to.
■
Options
. Flags that detail how the mesh will be loaded. You can find these values in
the
D3DXMESH
enumeration.
■
pDevice
. A valid Direct3D device.
■
ppAdjacency
. The adjacency buffer.
■
ppMaterials
. A pointer to the material buffer.
■
ppEffectInstances
. A pointer to a buffer containing an array of effect instances.
■
pNumMaterials
. The number of materials that you can find in the
ppMaterials
variable.
■
ppMesh
. The
ID3DXMesh
object that will contain the mesh when this function is
complete.
The following code shows how to use
D3DXLoadMeshFromX
to load an X file from disk.
// variable to hold the return code
HRESULT
hr;
// variable to hold the loaded mesh
LPD3DXMESH
pMeshSysMem;
// buffer to hold the adjacency data

07 DX9_GP CH07 3/12/04 4:16 PM Page 173
Loading a Mesh from an X File
173
LPD3DXBUFFER ppAdjacencyBuffer;
// buffer to hold materials
LPD3DXBUFFER pD3DXMtrlBuffer;
// Load the mesh from the disk
hr = D3DXLoadMeshFromX (“cube.x”,
D3DXMESH_SYSTEMMEM,
pd3dDevice,
&ppAdjacencyBuffer,
&pD3DXMtrlBuffer,
NULL,
&m_dwNumMaterials,
&pMeshSysMem);
// Check the return code to make sure the mesh was loaded successfully
if (FAILED(hr))
return false;
The previous code loads the mesh found in the cube.x file and places it into the
pMeshSysMem
variable. During the call to
D3DXLoadMeshFromX
, the
m_dwNumMaterials
variable was filled with
the number of materials within the mesh. Using this value, you can extract the materials
from the mesh and place them into a material buffer for later use. Each buffer is used
when rendering the mesh to change the material associated with each subset.
Because the
pD3DXMtrlBuffer
variable contains all the material information for the mesh,
you need to split each material into separate
D3DMATERIAL9
structures. The following code
gets a pointer to the material information within the mesh and extracts it into
D3DMATERIAL9
structures with a
for
loop.
// Get a pointer to the material buffer within the mesh
D3DXMATERIAL* matMaterials= (D3DXMATERIAL*)pD3DXMtrlBuffer->GetBufferPointer();
// Declare an array of materials
D3DMATERIAL9* m_pMeshMaterials;
//Create two D3DMATERIAL9 structures
m_pMeshMaterials = new D3DMATERIAL9[m_dwNumMaterials];
// Loop through the materials in the mesh and create a D3DMATERIAL for each one
for(DWORD i = 0; i < m_dwNumMaterials; i++)
{
//Copy the material
m_pMeshMaterials[i] = matMaterials[i].MatD3D;
//Set the ambient color for the material (D3DX does not do this)
m_pMeshMaterials[i].Ambient = m_pMeshMaterials[i].Diffuse;
}

07 DX9_GP CH07 3/12/04 4:16 PM Page 174
174
Chapter 7
■
Meshes
Now that the mesh is properly loaded, you are free to render the mesh to the screen. The
drawMesh
function that follows shows a typical way of rendering a mesh loaded from an X
file.
/******************************************************************************
* drawMesh
******************************************************************************/
void dxManager::drawMesh(void)
{
D3DXMATRIX meshMatrix, scaleMatrix, rotateMatrix;
createCamera(1.0f, 750.0f);
// near clip plane, far clip plane
moveCamera(D3DXVECTOR3(0.0f, 0.0f, -450.0f));
pointCamera(D3DXVECTOR3(0.0f, 0.0f, 0.0f));
// Set the rotation
D3DXMatrixRotationY(&rotateMatrix, timeGetTime()/1000.0f);
// Set the scaling
D3DXMatrixScaling(&scaleMatrix, 0.5f, 0.5f, 0.5f);
// Multiply the scaling and rotation matrices to create the meshMatrix
D3DXMatrixMultiply(&meshMatrix, &scaleMatrix, &rotateMatrix);
// Transform the object in world space
pd3dDevice->SetTransform(D3DTS_WORLD, &meshMatrix);
// Loop through the number of materials for this mesh
for(DWORD i = 0; i < m_dwNumMaterials; i++)
{
// Set the material for this mesh subset
pd3dDevice->SetMaterial(&m_pMeshMaterials[i]);
// Draw the current mesh subset
pMeshSysMem->DrawSubset(i);
}
}
At this point, you should be able to see on the screen the mesh that you loaded from the
X file. Figure 7.7 shows a dolphin being rendered. The dolphin X file comes with the
DirectX SDK and can be found in the DXSDK\Samples\Media directory. You can find a
full source code example that shows how to load an X file from disk in the chapter7\exam-
ple4 directory on the CD-ROM.

07 DX9_GP CH07 3/12/04 4:16 PM Page 175
Chapter Summary
175
Figure 7.7 A dolphin model rendered from an X file.
Chapter Summary
Now that you have the ability to load in 3D models, you’ll be able to take your game’s real-
ism to the next level. You’ll no longer be restricted to simple cubes or spheres but be able
to include real-world objects. If you have no 3D modeling skills, you’ll still be able to test
your game by taking advantage of the many free 3D models available on the Internet.
What You Have Learned
In this chapter, you have learned the following:
■
How to create a mesh
■
How to display the mesh you’ve created
■
What it takes to optimize the data that’s contained within a mesh
■
How to split a mesh into subsets to allow more than one material to be applied
■
The steps needed to load a mesh into the X file format from disk
■
How to create and save your own X file meshes
Review Questions
You can find the answers to Review Questions and On Your Own exercises in Appendix
A, “Answers to End-of-Chapter Exercises.”
1. Which two functions can you use to create a mesh?

07 DX9_GP CH07 3/12/04 4:16 PM Page 176
176
Chapter 7
■
Meshes
2. The
OptimizeInplace
function is different from the
Optimize
function in what way?
3. What does the attribute table contained in a mesh do?
4. Which function returns the number of vertices within a mesh?
5. What are the three format flags you can employ when using the
D3DXSaveMeshToX
function?
On Your Own
1. Write a small sample that loads and displays more than one X file.
2. Write a function that returns an optimized version of a mesh.

08 DX9_GP CH08 3/12/04 4:16 PM Page 177
chapter 8
Point Sprites, Particles,
and Pyrotechnics
P
articles are used everywhere in a game to create the effects that make the game
memorable. From the rocket you see heading for your ship to the explosion it cre-
ates when it hits, particles help make virtual worlds exciting.
Here’s what you’ll learn in this chapter:
■
What particles are and how they’re used
■
Which properties a particle can contain
■
How to define and render particles
■
What a particle emitter is and what its uses are
■
How to render particles using Direct3D’s point sprite capability
Particles
Particles are used within games to represent small pieces of debris, sparks from a firework,
or any other small entity that requires motion.
Each particle is a single independent entity, with its movement and behavior predefined
during creation. During a particle’s lifetime, it updates itself using internal properties that
tell it where to go and how fast to get there. Particles for a particular effect are normally
created and spawned from a single point, called an emitter. The emitter’s job is to create
each particle and set its internal properties before releasing it. The emitter also controls
the number of particles and the timing with which they are spawned.
Particles are made up of a textured polygon, called a billboard, that always faces the cam-
era. Although a billboard has many uses, such as clouds or sometimes trees, it is used most
177

08 DX9_GP CH08 3/12/04 4:16 PM Page 178
178
Chapter 8
■
Point Sprites, Particles, and Pyrotechnics
often to create particles. Because each billboard normally contains two triangles with a
single texture, you can render many billboards in quick succession, creating spectacular
special effects.
Before you start tossing particles into your scene, you need to know the details of how they
work.
Particle Properties
Each particle has internal properties that define its look and behavior. Listed next are a few
of the basic properties that most particles have:
■
Position. Where the particle is currently located within your scene.
■
Movement. The property that controls where the particle is going and how quickly.
■
Color. The color of the particle.
■
Alive Flag. A property flag that lets your game know whether a particle is currently
active. Because some particles routinely go offscreen, this flag helps to save system
resources by killing off unseen particles.
■
Texture. The texture that will be applied to the particle.
Each particle released from an emitter contains each of these properties. In the next sec-
tion, I’m going to take these properties and show you to use them to create a structure that
defines a particle.
The Particle Structure
The
Particle
structure groups together all the properties of a single particle. By creating
an array of
Particle
structures, you can update and render more than one particle quickly.
typedef struct
{
D3DXVECTOR3 m_vCurPos;
// the current position vector
D3DXVECTOR3 m_vCurVel;
// the movement vector
D3DCOLOR
m_vColor;
// the color of this particle
BOOL m_bAlive;
// Is this particle currently alive?
} Particle;
The current position of a particle is stored in a
D3DXVECTOR3
structure. This structure allows
a particle to exist in three dimensions.
The movement vector holds both the direction and the velocity of a particle. The color of
a particle is held in a
D3DCOLOR
structure. You can use any of the
D3DCOLOR
macros to define
the color of your particles.

08 DX9_GP CH08 3/12/04 4:16 PM Page 179
Particles
179
The final variable in the
Particle
structure is
m_bAlive
. This variable determines whether a
single particle is currently active. Before a particle is launched from the emitter, this vari-
able is
FALSE
.
How Are the Particles Created?
The particles are created by setting each variable in the
Particle
structure to an initial
value. During the lifetime of each particle, the variables within its structure are updated
based on the effect of the emitter. Because you’ll most often need more than one particle
at a time, it’s best to define an array of
Particle
structures so that you can keep control
over them in one place. The following code shows how to define and initialize a group of
particles.
// Define the number of particles to create
#define MAXNUM_PARTICLES 150
// Define the structure that holds the particle properties
typedef struct
{
// the current position of the particle
D3DXVECTOR3 m_vCurPos;
// the movement vector
D3DXVECTOR3 m_vCurVel;
// the color of the particle
D3DCOLOR
m_vColor;
} Particle;
// Set up an array of particle structures
Particle ParticleArray[MAXNUM_PARTICLES];
// Loop through the number of particles that are to be created
// and init their values
for( int i = 0; i < MAXNUM_PARTICLES; i++ )
{
// Set the position of each particle at the origin
ParticleArray[i].m_vCurPos = D3DXVECTOR3(0.0f,0.0f,0.0f);
// Generate a random value for each part of the direction/velocity vector
float vecX = ((float)rand() / RAND_MAX);
float vecY = ((float)rand() / RAND_MAX);
float vecZ = ((float)rand() / RAND_MAX);

08 DX9_GP CH08 3/12/04 4:16 PM Page 180
180
Chapter 8
■
Point Sprites, Particles, and Pyrotechnics
// Using the random values generated above, set the movement vector
// for this particle
ParticleArray[i].m_vCurVel = D3DXVECTOR3 (vecX, vecY, vecZ);
// Each particle is green and has full alpha
ParticleArray[i].m_vColor = D3DCOLOR_RGBA (0, 255, 0, 255);
}
The previous code first defines the structure that holds the particle properties. Next, an
array of particle structures is created and filled in with the information needed for each
particle.
After the array is created, a
for
loop goes through the particles and sets up the starting
position vector, a random movement vector, and the color.
How Do the Particles Move?
Particles move based on one of their internal properties called the movement vector. This
vector describes both the direction and speed that the particle will move during one
frame. The movement vector is created by using the
D3DXVECTOR3
macro that specifies the
X
,
Y
, and
Z
values.
The code that follows shows how a single particle defines its movement vector and how
the position of the particle is changed by adding together the movement and position vec-
tors. This code uses the variables that are defined in the previous particle structure.
// Create the movement vector for this particle
Particle.m_vCurVel = D3DXVECTOR3 (0.0f,1.0f,0.0f);
// Change the current position of the particle by adding the
// movement vector and position vector
Particle.m_vCurPos += Particle.m_vCurVel;
When the movement vector is defined in the first line of code, the
Y
value is set to
1.0f
,
which, when added to the position vector, causes the particle to move up the screen one
unit in the positive
Y
direction.
The second line of code shows how the position vector is changed when you add the
movement vector to it. Calling this line of code each frame causes the particle to move
around the world based on the values specified in the movement vector.
Figure 8.1 shows what a group of particles could look like after being released from an
emitter.

08 DX9_GP CH08 3/12/04 4:16 PM Page 181
Particles
181
Figure 8.1 A group of particles released from an emitter.
Creating a Random Vector
Occasionally, you’ll need to create a vector that has a random direction and velocity. For instance,
when you’re creating particles, you want each particle to follow its own random path when it’s
released from the emitter. One way of doing this is by using the
rand
function. This function returns
a random value between
0
and
RAND_MAX
. By converting this number to a
float
value and divid-
ing it by
RAND_MAX
, you can generate a random value between
0.0f
and
1.0f
.
This code shows how a random vector can be created using this method:
float vecX = ((float)rand() / RAND_MAX);
float vecY = ((float)rand() / RAND_MAX);
float vecZ = ((float)rand() / RAND_MAX);
D3DXVECTOR3(vecX,vecY,vecZ);
This method only generates positive values for the variables
vecX
,
vecY
, and
vecZ
.

08 DX9_GP CH08 3/12/04 4:16 PM Page 182
182
Chapter 8
■
Point Sprites, Particles, and Pyrotechnics
Particle Systems
A particle system is a way of grouping particle emitters into an easy-to-use interface.
When you group the emitters, rendering multiple particle effects at the same time
becomes easier. During the render portion of your game, the particle system handles
drawing all particle instances, while the rest of your code handles drawing the rest of your
game world.
Designing a Particle System
Designing a particle system is a pretty straightforward process. The particle system con-
trols one or more emitters in a scene, which in turn control the particles.
A particle system implementation consists of three components:
■
Particle emitter objects
■
The particles
■
A particle system manager
The particle system manager controls the creation, movement, and use of particle emit-
ters. The particle emitters handle the actual particles. The emitter starts and stops the par-
ticle streams and controls the streams’ direction and velocity, and even the pattern that the
particles create. The final pieces — the particles — are the simple textured quads that have
properties dictating their behavior, such as movement, position, and color.
n o t e
A particle effect describes the pattern or behavior of a group of particles. Examples of particle
effects are fireworks, fountains, or streams.
Particle emitters are designed to be the birthplace or origin point for a batch of particles
that compose an effect. Emitters initialize the internal properties of each particle to be
released, such as position, starting direction, and velocity. After a particle leaves an emit-
ter, its internal properties completely control its behavior.
Because all particles that are spawned from an emitter normally share a common texture,
they’re easy to render. You have to make a single texture state, and then you can render all
the particles from an emitter.
Emitter Properties
Each particle emitter contains a few properties that control how the emitter behaves, as
well as the behavior of the particles it releases. I’ve listed a few simple properties that an
emitter can contain, but this is in no way an exhaustive list:

08 DX9_GP CH08 3/12/04 4:16 PM Page 183
Particle Systems
183
■
Position. This is the position of the emitter. Emitters can be placed in any spot
within your 3D world.
■
Movement. Not all particle emitters stay in one place. Some emitters, such as those
that generate smoke effects from missiles, are constantly on the move.
■
Texture. The emitter normally holds a pointer to the texture that you should apply
to all the particles it generates.
■
An array or vector of particles. You need a place within the emitter to hold the
particles. You can store the particles in several ways.
■
Number of particles. It’s always a good idea to keep a list of the number of parti-
cles each emitter can generate. This also makes it easy to increase or decrease the
number of particles used.
■
Particle properties. These properties are the values that set the default internal
properties of each particle.
■
Gravity. Some emitters generate gravity. For example, if the particle effect that an
emitter is attempting to generate is a black hole, the gravity defines the amount of
pull that the emitter has on the particles.
Emitter Structure
The
Particle
structure groups together all the properties of a single particle. By creating
an array of
Particle
structures, you can update and render more than one particle quickly.
typedef struct
{
// the current position vector
D3DXVECTOR3 m_vCurPos;
// the movement vector
D3DXVECTOR3 m_vCurVel;
// the texture used for particles from this emitter
LPDIRECT3DTEXTURE9 m_texture;
// an array to hold particle structures
Particle m_aParticles [MAXNUM_PARTICLES];
// the number of particles this emitter has
Int m_NumParticles;
// Is this emitter currently active?
BOOL m_bAlive;
} Emitter;
The emitter structure contains the internal properties of an emitter.
The first variable,
m_vCurPos
, holds the current position of the emitter. Because emitters
can actually move around in the scene, the value in this variable might change.

08 DX9_GP CH08 3/12/04 4:16 PM Page 184
184
Chapter 8
■
Point Sprites, Particles, and Pyrotechnics
The second variable,
m_vCurVel
, is the direction and velocity of the emitter. Again, this
allows the emitter to move around in the scene.
The texture that is going to be used for all the particles from an emitter is stored in the
m_texture
variable.
The emitter holds the particles in an array of
Particle
structures. The
m_NumParticles
vari-
able holds the number of particles that this emitter will be able to handle.
The final variable,
m_bAlive
, is a boolean variable that represents whether the emitter is
currently active.
You can find a code example that demonstrates a simple and generic particle implemen-
tation in the chapter8\example1 directory on the CD-ROM.
Coding a Particle System Manager
Now that you know what needs to go into creating a particle system, I’m going to detail
the code you need to create a particle system manager.
The first class you need is the particle manager. This class handles the creation and place-
ment of emitters in your scene.
The Particle Manager Class
The following code is the header file that relates to a sample particle manager.
#pragma once
#include <vector>
#include <string>
#include “Emitter.h”
#include “Particle.h”
// forward class declarations
class Particle;
class Emitter;
class particleManager
{
// public members and functions
public:
particleManager(void);
~particleManager(void);

08 DX9_GP CH08 3/12/04 4:16 PM Page 185
Particle Systems
185
// inits the particle manager
bool init(void);
// shuts down the particle manager
void shutdown(void);
// Create a new emitter in the scene
void particleManager::createEmitter(LPDIRECT3DDEVICE9 pDevice,
int numParticles,
std::string textureName,
D3DXVECTOR3 position,
D3DCOLOR color);
// Remove an emitter from a scene based on its index in the emitter vector
void removeEmitter(int emitterNum);
// Remove an emitter from a scene based on a pointer to the emitter
void removeEmitter(Emitter *which);
// updates the position of the emitter and the particles it contains
void update(void);
// renders the particles within an emitter
void render(LPDIRECT3DDEVICE9 pDevice);
// private members and functions
private:
// the vector of emitter objects
std::vector <Emitter*> emitters;
};
Because the number of emitters in your scene can vary, I decided to store them in a vec-
tor. A vector can dynamically resize itself based on the number of emitters you are creat-
ing; it doesn’t limit you to a fixed number like an array does.
Here are the important functions within the particle manager class:
■
createEmitter
. This function actually creates another emitter in your scene. Its para-
meters allow you to specify the location, movement, color, and texture to use for
an emitter.
■
removeEmitter
. This function lets you remove an emitter from your scene.

08 DX9_GP CH08 3/12/04 4:16 PM Page 186
186
Chapter 8
■
Point Sprites, Particles, and Pyrotechnics
■
update
. The
update
function causes the emitter’s
update
function to be called. When
update
is called, the positions of the particles and possibly the emitter are changed,
allowing for motion.
■
render
. This function calls the
render
function of the emitter, which in turn actually
draws all the particles within an emitter.
Following is the full code for the
createEmitter
function:
/******************************************************************************
* createEmitter
******************************************************************************/
void particleManager::createEmitter(LPDIRECT3DDEVICE9 pDevice,
int numParticles,
std::string textureName,
D3DXVECTOR3 position,
D3DCOLOR color)
{
// Create a new emitter
Emitter *tempEmitter = new Emitter(pDevice);
// Load the texture
tempEmitter->addTexture(textureName);
// Set the number of particles
tempEmitter->setNumParticles(numParticles);
tempEmitter->initParticles(position, color);
// Add this emitter to the vector
emitters.push_back(tempEmitter);
}
The
createEmitter
function first creates a pointer to an
Emitter
object called
tempEmitter
.
Next, the function passes the name of the texture from the
textureName
parameter into
the new
Emitter
object, along with the
numParticles
parameters.
Afterward, the
initParticles
function is called with the position of the emitter and the
default color of the particles. In the background, the
Emitter
class creates and initializes
the particles.
Finally, the newly created emitter is added to the back of the
emitters
vector.
Now that an emitter has been created successfully and particles have been initialized, the
next question is this: How do the particles get updated? Well, the particle manager calls

08 DX9_GP CH08 3/12/04 4:16 PM Page 187
Particle Systems
187
the emitter’s
update
function. The
update
function, shown next, loops through the emitter’s
vector, checking for active emitters and calling their
update
functions.
/******************************************************************************
* update
******************************************************************************/
void particleManager::update(void)
{
// Loop through the emitters
for (unsigned int i=0; i<emitters.size(); i++)
{
// Check whether this emitter is active
if (emitters[i]->getAlive())
// If so, then update it
emitters[i]->update();
}
}
Instead of constantly storing the number of emitters currently in the vector, I’m using the
size
built-in vector function. As emitters are added or removed, the size of the vector
changes. Using the
size
function, I’m not required to keep track of this.
The
update
function loops through all the emitters in the vector, calling their
update
functions.
After the particles are updated, you need to get them on the screen. You can do this
through the
render
function, shown here:
/******************************************************************************
* render
******************************************************************************/
void particleManager::render(LPDIRECT3DDEVICE9 pDevice)
{
// Loop through the emitters
for (unsigned int i=0; i<emitters.size(); i++)
{
// Check whether this emitter is active
if (emitters[i]->getAlive())
// If so, render this emitter
emitters[i]->render();
}
}

08 DX9_GP CH08 3/12/04 4:16 PM Page 188
188
Chapter 8
■
Point Sprites, Particles, and Pyrotechnics
Again, I’m looping through the vector of emitters, checking for active emitters. When an
active emitter is found, its
render
function is called. This results in all the particles within
an emitter being rendered to the screen.
Creating an Emitter Class
The
emitter
class encapsulates all the functionality needed for an emitter into a single
object. Besides holding the standard emitter properties, the
emitter
class handles the load-
ing and storing of the texture for the particles. Each emitter stores one texture to apply to
all the particles it generates.
The header file that follows shows how the
emitter
class is constructed.
#pragma once
#include <string>
#include <vector>
// Include the needed DirectX headers
#include <d3d9.h>
#include <d3dx9tex.h>
#include the Particle class header and a forward class declaration
#include “Particle.h”
class Particle;
class Emitter
{
// Set up the vertex structure for the particles
struct CUSTOMVERTEX
{
D3DXVECTOR3 psPosition;
D3DCOLOR color;
};
#define D3DFVF_CUSTOMVERTEX (D3DFVF_XYZ|D3DFVF_DIFFUSE)
public:
Emitter(void);
Emitter(LPDIRECT3DDEVICE9 pDevice);
~Emitter(void);
// Add a texture to this emitter
void addTexture(std::string textureName);

08 DX9_GP CH08 3/12/04 4:16 PM Page 189
Particle Systems
189
// Set the number of particles and size the vector
void setNumParticles(int nParticles);
// Init the particles and set the position of the emitter
void initParticles(D3DXVECTOR3 position, D3DCOLOR color);
// Update all the particles in this emitter
void update(void);
// Render the particles in this emitter
void render();
// inline functions
inline bool getAlive(void) { return m_bAlive; }
// inline function that converts a float to a DWORD value
inline DWORD FLOAT_TO_DWORD( FLOAT f ) { return *((DWORD*)&f); }
private:
// Store a copy of the Direct3D device so that it doesn’t have to be passed
// around all the time
LPDIRECT3DDEVICE9 emitterDevice;
// the current position of this particle
D3DXVECTOR3 m_vCurPos;
// the direction and velocity of this particle
D3DXVECTOR3 m_vCurVel;
// vertex buffer to hold the point sprites
LPDIRECT3DVERTEXBUFFER9 pVertexBuffer;
// the texture that will be applied to each particle
LPDIRECT3DTEXTURE9
pTexture;
// a pointer of type Particle; will be used to create an array of particles
Particle *m_particles;
// the number of particles in this emitter
int numParticles;
// value to hold whether this emitter is active
bool m_bAlive;
// Private functions create the vertex buffer to hold the particles
LPDIRECT3DVERTEXBUFFER9 createVertexBuffer(unsigned int size,
DWORD usage,
DWORD fvf);
};

08 DX9_GP CH08 3/12/04 4:16 PM Page 190
190
Chapter 8
■
Point Sprites, Particles, and Pyrotechnics
The
Emitter
class defines a few needed functions:
■
addTexture
. This function loads the texture for the particles and stores it in the
pTex-
ture
variable.
■
setNumParticles
. The particle array is sized in this function to the number of parti-
cles needed for the emitter.
■
initParticles
. The vertex buffer is created and all the internal properties of the par-
ticles are set in this function.
■
createVertexBuffer
. This private member function generates the vertex buffer that
holds all particle vertices.
■
Update
. This function handles moving around the particles within the scene.
■
Render
. This function handles the rendering of the particles to the screen.
The three most important functions are
initParticles
,
update
, and
render
. I’ll explain each
of these functions in more detail next:
/*****************************************************************************
* initParticles
*****************************************************************************/
void Emitter::initParticles(D3DXVECTOR3 position, D3DCOLOR color)
{
// Create the vertex buffer for this emitter and store it in the
// pVertexBuffer variable
pVertexBuffer = createVertexBuffer(numParticles * sizeof(CUSTOMVERTEX),
D3DUSAGE_DYNAMIC | D3DUSAGE_WRITEONLY | D3DUSAGE_POINTS,
D3DFVF_CUSTOMVERTEX);
// Loop through the number of particles for this emitter and set their
// initial properties
for (int i=0; i<numParticles; i++)
{
// This particle is alive
m_particles[i].m_bAlive = true;
// setting the color to the value passed from the particle manager
m_particles[i].m_vColor = color;
// setting the position to the value passed from the particle manager
m_particles[i].m_vCurPos = position;
// Create a random value for each part of the direction/velocity vector
float vecX = ((float)rand() / RAND_MAX);
float vecY = ((float)rand() / RAND_MAX);

08 DX9_GP CH08 3/12/04 4:16 PM Page 191
Particle Systems
191
float vecZ = ((float)rand() / RAND_MAX);
m_particles[i].m_vCurVel = D3DXVECTOR3(vecX,vecY,vecZ);
}
}
The first line in
initParticles
calls for the creation of the emitter’s vertex buffer. Because
the vertex buffer is going to be updated each frame with new information, the buffer is
created with the
D3DUSAGE_DYNAMIC | D3DUSAGE_WRITEONLY
flags.
Next, a
for
loop goes through each of the particles for the emitter and sets the alive flag,
defines the color, and sets the starting position. Normally, particles from an emitter start
off at a single location.
The direction and velocity of the particle are set using random values. This allows each
particle to go off in a different direction when rendered.
The
update
function, shown here, updates the position of each particle every frame:
/******************************************************************************
* update
*****************************************************************************/
void Emitter::update(void)
{
// Loop through and update the positions of the particles
for (int i=0; i<numParticles; i++)
{
// Add the current direction and velocity to the current position
m_particles[i].m_vCurPos += m_particles[i].m_vCurVel;
}
}
Each particle’s position is updated by adding the movement vector — which determines
the particle’s direction and velocity — to the particle’s current position. Because this value
is updated every frame, the particles appear to move around the screen.
The final function is
render
, shown here:
/******************************************************************************
* render
******************************************************************************/
void Emitter::render()
{
CUSTOMVERTEX *pPointVertices;
// Lock the vertex buffer and update the particles within it

08 DX9_GP CH08 3/12/04 4:16 PM Page 192
192
Chapter 8
■
Point Sprites, Particles, and Pyrotechnics
pVertexBuffer->Lock( 0,
numParticles * sizeof(CUSTOMVERTEX),
(void**)&pPointVertices,
D3DLOCK_DISCARD );
// Loop through the particles
for( int i = 0; i < numParticles; ++i )
{
pPointVertices->psPosition = m_particles[i].m_vCurPos;
pPointVertices->color = m_particles[i].m_vColor;
pPointVertices++;
}
// Unlock the vertex buffer
pVertexBuffer->Unlock();
// Set the texture for the particles
emitterDevice->SetTexture( 0, pTexture );
// Set the vertex stream
emitterDevice->SetStreamSource( 0, pVertexBuffer, 0, sizeof(CUSTOMVERTEX) );
// Set the vertex format
emitterDevice->SetFVF( D3DFVF_CUSTOMVERTEX );
// Call DrawPrimitive to render the particles to the screen
emitterDevice->DrawPrimitive( D3DPT_POINTLIST, 0, numParticles );
}
The
render
function first locks the vertex buffer and loops through the array of particles
for the emitter, copying each particle into the buffer. Then the
render
function unlocks the
vertex buffer and sets the texture for the particle with Direct3D through the
SetTexture
function. After that, the function sets the stream source and vertex format before calling
DrawPrimitive
. You’ll notice that
DrawPrimitive
uses a primitive type of
D3DPT_POINTLIST
,
which causes all the particles to be rendered as a series of unconnected points.
Creating a Particle Class
The final class needed for a particle system is the
Particle
class. Because the
emitter
class
handles most of the particle manipulation, this class is really just used to store the inter-
nal properties. The header file for this class is shown here:
#pragma once
#include <d3d9.h>

08 DX9_GP CH08 3/12/04 4:16 PM Page 193
Point Sprites: Making Particles Easy
193
#include <d3dx9tex.h>
class Particle
{
public:
Particle(void);
~Particle(void);
// the current position of this particle
D3DXVECTOR3 m_vCurPos;
// the direction and velocity of this particle
D3DXVECTOR3 m_vCurVel;
// the color of this particle
D3DCOLOR
m_vColor;
// Is this particle alive?
bool m_bAlive;
};
I’ve also made all the properties of the
Particle
class public so that they can be accessed
directly from within the emitter. Because the number of particles can be in the thousands,
keeping them public helps to reduce the overhead of
getter
and
setter
functions.
Point Sprites: Making Particles Easy
The particles I’ve explained so far are based on billboards, which are camera-facing quads
with a texture applied. Each of the particles created in this manner requires two triangles
if you use the methods described so far. To minimize the drawing that needs to be done
for each particle, DirectX has introduced point sprites. A point sprite is plotted like a
generic point, using a single X, Y, and Z coordinate. Unlike normal points, point sprites
have a texture applied and can vary in size.
Point sprites have an advantage over particles that are created using billboards. Whereas
billboards require constant transformation to face the camera, point sprites are camera
facing by default.
Using Point Sprites in Direct3D
The biggest difference between using billboards for particles and using point sprites is
the primitive type used to render them. Billboard particles normally require two trian-
gles rendered in a triangle strip, causing four vertices to be used. Point sprites are ren-
dered as a series of point primitives, minimizing the amount of data that needs to be sent
for rendering.

08 DX9_GP CH08 3/12/04 4:16 PM Page 194
194
Chapter 8
■
Point Sprites, Particles, and Pyrotechnics
The code that follows shows how the call to
DrawPrimitive
changes to support point sprites.
emitterDevice->DrawPrimitive( D3DPT_POINTLIST, 0, 100 );
The
DrawPrimitive
call shown here uses the
D3DPT_POINTLIST
primitive type to render the 100
particles that are being used.
How to Use Point Sprites
Point sprites require only minor changes to what you’ve learned so far. To give you an idea
of what is needed to use point sprites, I’ve detailed the steps here:
1. Load the texture that the point sprites will use. You can do this by using the
D3DXCreateTextureFromFile
function.
2. Create a dynamic vertex buffer. By specifying the
D3DUSAGE_DYNAMIC
,
D3DUSAGE_
WRITEONLY
, and
D3DUSAGE_POINTS
flags, you create a vertex buffer that you can change
and update each frame. Notice that the
D3DUSAGE_POINTS
flag was also specified. This
flag tells Direct3D that the vertex buffer is being used to draw points.
3. Define the
CUSTOMVERTEX
structure that you will use, along with the vertex format.
The following code shows a sample structure and format.
struct CUSTOMVERTEX
{
D3DXVECTOR3 psPosition;
D3DCOLOR color;
};
#define D3DFVF_CUSTOMVERTEX (D3DFVF_XYZ|D3DFVF_DIFFUSE)
4. At this point, you are ready to render the point sprites during your main game
loop. You start off drawing by locking the vertex buffer you created earlier and
copying the data from the particle structure into it. After this data is in the vertex
buffer, unlock the buffer.
5. Change the render states to allow for point sprite rendering.
6. Call
DrawPrimitive
with the
D3DPT_POINTLIST
primitive type.
Following are the render states that pertain to point sprites:
■
D3DRS_ALPHABLENDENABLE
. Alpha blending is turned on through this render state. This
allows the point sprites to be arbitrary shapes based on the texture map that’s
applied to them.
■
D3DRS_ZWRITEENABLE
. This enables the application to write values to the depth buffer.
■
D3DRS_POINTSPRITEENABLE
. This render state enables the full texture to be applied to
the point sprite.

08 DX9_GP CH08 3/12/04 4:16 PM Page 195
Point Sprites: Making Particles Easy
195
■
D3DRS_POINTSCALEENABLE
. If this render state if set to
TRUE
, the point is scaled based on
its distance from the camera.
■
D3DRS_POINTSIZE
. This is the size of the point sprite.
■
D3DRS_POINTSIZE_MIN
. This is the minimum size of a point sprite.
Now that you know what you need to work with point sprites, I’ll show you the updated
render
function that includes everything discussed so far.
/******************************************************************************
* render
* uses point sprites to render the particles
******************************************************************************/
void Emitter::render()
{
emitterDevice->SetRenderState( D3DRS_ZWRITEENABLE, FALSE );
emitterDevice->SetRenderState( D3DRS_ALPHABLENDENABLE, TRUE );
emitterDevice->SetRenderState( D3DRS_DESTBLEND, D3DBLEND_ONE );
// Enable point sprite render states
// Turn on point sprites
emitterDevice->SetRenderState( D3DRS_POINTSPRITEENABLE, TRUE );
// Enable scaling
emitterDevice->SetRenderState( D3DRS_POINTSCALEENABLE, TRUE );
// the point size to use when the vertex does not include this information
emitterDevice->SetRenderState( D3DRS_POINTSIZE,
FLOAT_TO_DWORD(1.0f) );
// the minimum size of the points
emitterDevice->SetRenderState( D3DRS_POINTSIZE_MIN, FLOAT_TO_DWORD(1.0f) );
// These three render states control the scaling of the point sprite
emitterDevice->SetRenderState( D3DRS_POINTSCALE_A, FLOAT_TO_DWORD(0.0f) );
emitterDevice->SetRenderState( D3DRS_POINTSCALE_B, FLOAT_TO_DWORD(0.0f) );
emitterDevice->SetRenderState( D3DRS_POINTSCALE_C, FLOAT_TO_DWORD(1.0f) );
// Lock the vertex buffer and set up our point sprites in accordance with
// your particles that you're keeping track of in your application
CUSTOMVERTEX *pPointVertices;

08 DX9_GP CH08 3/12/04 4:16 PM Page 196
196
Chapter 8
■
Point Sprites, Particles, and Pyrotechnics
// Lock the vertex buffer each frame to allow the point sprites to move
pVertexBuffer->Lock( 0,
numParticles * sizeof(CUSTOMVERTEX),
(void**)&pPointVertices,
D3DLOCK_DISCARD );
// Loop through the particle structures, setting the values in the
// vertex buffer
for( int i = 0; i < numParticles; ++i )
{
pPointVertices->psPosition = m_particles[i].m_vCurPos;
pPointVertices->color = m_particles[i].m_vColor;
pPointVertices++;
}
// Unlock the vertex buffer
pVertexBuffer->Unlock();
// Draw the point sprites
// Set the texture for these point sprites
emitterDevice->SetTexture( 0, pTexture );
// Set the vertex stream
emitterDevice->SetStreamSource( 0,
pVertexBuffer,
0,
sizeof(CUSTOMVERTEX) );
// Set the vertex format
emitterDevice->SetFVF( D3DFVF_CUSTOMVERTEX );
// Draw the point sprites using the D3DPT_POINTLIST primitive
emitterDevice->DrawPrimitive( D3DPT_POINTLIST, 0, numParticles );
// Set the render states back
emitterDevice->SetRenderState( D3DRS_ZWRITEENABLE, TRUE );
emitterDevice->SetRenderState( D3DRS_ALPHABLENDENABLE, FALSE );
emitterDevice->SetRenderState( D3DRS_POINTSPRITEENABLE, FALSE );
emitterDevice->SetRenderState( D3DRS_POINTSCALEENABLE, FALSE );
}
The first thing that the previous
render
function does is set the render states that will be
needed when drawing the point sprites. Next,
render
enables alpha blending and turns on
point sprites. It then sets the minimal point size and values needed for scaling.

08 DX9_GP CH08 3/12/04 4:16 PM Page 197
Chapter Summary
197
After setting the proper render states,
render
updates the vertex buffer. The buffer is locked
and the particle structures are looped through, causing new values to be written to the
vertex buffer.
After unlocking the vertex buffer, the point sprites are rendered to the screen. Finally, the
render
function resets the render states back to their defaults to allow other 3D objects
within the scene to be rendered properly.
You can find a full source code example detailing everything needed to use point sprites
in the chapter8\example2 directory on the CD-ROM.
n o t e
Certain render states, such as
D3DRS_POINTSIZE
and
D3DRS_POINTSCALE_A
, require a
DWORD
value to
be passed in. By defining the following inline function, you easily can convert float values into the
proper format:
inline DWORD FLOAT_TO_DWORD( FLOAT f ) { return *((DWORD*)&f); }
Chapter Summary
At this point, you should have the basics you need to create your own particle system. By
slightly changing the values you use to create each particle, you can create many of your
own amazing particle effects.
What You Have Learned
In this chapter, you learned the following:
■
What particles are used for
■
How particle systems are used
■
How to design and implement particle emitters
■
How point sprites make it easier to create particles
■
How to render point sprites within your scene
Review Questions
You can find the answers to Review Questions and On Your Own exercises in Appendix
A, “Answers to End-of-Chapter Exercises.”
1. Which properties do you need to define a single particle?
2. Which two values are normally combined to make a particle move around a scene?
3. Which object initializes the internal properties of a particle?

08 DX9_GP CH08 3/12/04 4:16 PM Page 198
198
Chapter 8
■
Point Sprites, Particles, and Pyrotechnics
4. Which primitive type is needed in the call to
DrawPrimitive
to enable point sprite
rendering?
5. What are the advantages of point sprites over billboards?
On Your Own
1. Design an update function that makes a particle expire after 300 frames.
2. Code a particle emitter that continually releases particles.

09 DX9_GP CH09 3/12/04 4:20 PM Page 199
A dditional
Needs
Chapter 9
Using DirectInput . . . . . . . . . . . . . . . . . . . . . . . . . . . . . . . . . . . . . . . . .201
Chapter 10
DirectSound . . . . . . . . . . . . . . . . . . . . . . . . . . . . . . . . . . . . . . . . . . . . .237
Chapter 11
The Final Project . . . . . . . . . . . . . . . . . . . . . . . . . . . . . . . . . . . . . . . . .257
PART III

This page intentionally left blank

09 DX9_GP CH09 3/12/04 4:20 PM Page 201
chapter 9
Using DirectInput
B
eing able to interact with your virtual world is critical in any game, whether it’s
through the keyboard, mouse, or any number of other devices. In this chapter, I’ll
explain the benefits of DirectInput and how to use it.
Here’s what you’ll learn in this chapter:
■
How DirectInput can make your life easier
■
The types of devices that DirectInput can support
■
How to detect the input devices that are currently installed
■
How to use keyboards, mice, and joysticks
■
How to use analog or digital controls
■
How to support more than one input device
■
How to use force feedback
I Need Input
Every game needs to be able to interact with its user. Your game requires a way of getting
direction from the player. An input device can be used to drive a car around a track, move
your character around his world, or anything else that you can imagine.
Back in the days of DOS, programmers had little choice but to poll hardware interrupts if
they wanted to get keystrokes from the keyboard. Standard C functions of the time, such
as
getchar
, were too slow and not useful enough for games. They needed a better way.
Enter the Basic Input Output System (BIOS), which is the lowest level of software in a
computer.
201

09 DX9_GP CH09 3/12/04 4:20 PM Page 202
202
Chapter 9
■
Using DirectInput
Stored normally in a flash ROM on the motherboard, the BIOS tells the system how to
initialize and prepares the hardware for the operating system. Under DOS, programmers
had direct access to the BIOS through assembly language. Because the BIOS knew every-
thing that the hardware was doing, developers could ask it for certain information. One
of the important bits of the system that the BIOS was always watching was the keyboard.
Every stroke of a key triggered a hardware interrupt, informing the system that a key had
been pressed. Because this happened almost instantaneously, a quick and efficient method
for getting keystrokes from the keyboard was available.
Windows NT eliminated the ability to read the keyboard directly from the hardware.
Windows became an absolute boundary between applications and the hardware. Any
information needed about the system had to be gained from the operating system because
applications were no longer allowed direct access to the hardware. Windows had its own
way of getting user input, and that was through the message queue. You saw the message
queue earlier in the book:
MSG msg;
ZeroMemory( &msg, sizeof(msg) );
while( msg.message!=WM_QUIT )
{
// Check for messages
if( PeekMessage( &msg, NULL, 0U, 0U, PM_REMOVE ) )
{
TranslateMessage( &msg );
DispatchMessage( &msg );
}
}
The message queue collected events such as mouse movement and keyboard input from
the system. Although this method was normally sufficient for Windows applications, it
wasn’t fast enough for games. Most developers turned to another Windows function —
GetAsyncKeyState
— to get the information they needed.
GetAsyncKeyState
allowed for quick checking of the keys on the keyboard, and even allowed
for checking of multiple keys and the state of the mouse buttons. This method of collect-
ing user input became common among game developers, but it had one major problem:
It didn’t allow for input to be collected from other devices, such as gamepads and joy-
sticks. Game makers were stuck specifically supporting only certain devices because each
device had a different way of collecting and transmitting the input data to the system.
A standard way of getting fast input from the user was needed, regardless of the method
or the device used. DirectInput provided the common layer needed to solve this problem.

09 DX9_GP CH09 3/12/04 4:20 PM Page 203
Using DirectInput
203
DirectInput allows your game to support a myriad of input devices without forcing you
to know the exact details of each device. A small sample of the devices supported by
DirectInput follows:
■
Keyboard
■
Mouse
■
Gamepads
■
Joysticks
■
Steering wheels
Using DirectInput
DirectInput, like other components of DirectX, is initialized in a similar manner to other
DirectX components. It requires the creation of both a DirectInput object and an input
device.
The DirectInput object provides the interface needed to access DirectInput devices.
Through this interface, you can create devices, enumerate the devices on a system, or
check the status of a particular device.
After you’ve created the DirectInput object, you must create the device. The DirectInput
device that you’ll create will enable you to gain specific access to an input device, be it a
keyboard, joystick, or other gaming device.
After creating the device, you need to gain access to its input. This is done through a
process called “acquiring a device.” When you acquire a device, you can initialize the
device, get a list of its capabilities, or read its input.
It might seem like a lot of trouble to go through just to get a couple of keystrokes from a
keyboard or gamepad, but having direct access to your input device will make your life a
lot more simple later on.
Now that you have access to the device, you can read input from it for each frame. For
example, if you are using a gamepad as your input device, you can check to see if the user
has pressed the direction buttons or one of the predefined action buttons. If so, you can
act on this information.
At this point, you should have a clear understanding of getting DirectInput up and run-
ning and getting data from an input device. I’m now going to step you through the code
needed to do just that.

09 DX9_GP CH09 3/12/04 4:20 PM Page 204
204
Chapter 9
■
Using DirectInput
Creating the DirectInput Object
As I mentioned before, the first step to using DirectInput is the creation of the DirectInput
object. The function
DirectInput8Create
creates the DirectInput object.
The
DirectInput8Create
function is defined as follows:
HRESULT WINAPI DirectInput8Create(
HINSTANCE hinst,
DWORD dwVersion,
REFIID riidltf,
LPVOID *ppvOut,
LPUNKNOWN punkOuter
);
Five parameters must be passed to the
DirectInput8Create
function:
■
hInst
. The instance of the application that is creating the DirectInput object.
■
dwVersion
. The version number of DirectInput that this application requires. The
standard value for this parameter is
DIRECTINPUT_VERSION
.
■
riidltf
. The identifier of the required interface. Using the default value of
IID_IDirectInput8
is acceptable for this parameter.
■
ppvOut
. The pointer to the variable that will hold the created DirectInput object.
■
punkOuter
. This parameter is normally set to
NULL
.
Following is a small snippet of code that creates a DirectInput object:
HRESULT
hr;
// variable used to hold return codes
LPDIRECTINPUT8
DI_Object;
// the DirectInput object
// Create the DirectInput object
hr = DirectInput8Create( hInst,
DIRECTINPUT_VERSION,
IID_IDirectInput8,
(void** )&DI_Object,
NULL );
// Check the return code for DirectInput8Create
if FAILED( hr )
return false;
n o t e
As a reminder, make sure to check the return value when you’re creating DirectX objects. This
informs you when an object creation has failed and helps you track down bugs in your code.

09 DX9_GP CH09 3/12/04 4:20 PM Page 205
Using DirectInput
205
The previous creates two variables:
hr
and
DI_object
.
hr
is defined as a standard
HRESULT
. It
checks the return code of a function call. The second variable,
DI_object
, holds the soon-
to-be-created DirectInput object.
The code then continues by making the call to
DirectInput8Create
. A quick check of
the return code in the
hr
variable is done to make sure that the function has returned
successfully.
Creating the DirectInput Device
Now that you have a valid DirectInput object, you are free to create the device by using
the function
CreateDevice
.
HRESULT CreateDevice(
REFGUID rguid,
LPDIRECTINPUTDEVICE *lplpDirectInputDevice,
LPUNKNOWN pUnkOuter
);
The
CreateDevice
function requires three parameters:
■
rguid
. The variable holds a reference to the
GUID
of the desired input device. This
value can be either a
GUID
returned from the function
EnumDevices
or one of the two
default values:
•
GUID_SysKeyboard
•
GUID_SysMouse
■
lplpDirectInputDevice
. The variable that will hold the returned DirectInput device
upon its creation.
■
pUnkOuter
. The address of the controlling object’s interface. This value will normally
be
NULL
.
The following code assumes that you want to create a DirectInput device for an installed
system keyboard.
HRESULT
hr;
// variable used to hold function return codes
LPDIRECTINPUTDEVICE8
DI_Device;
// the DirectInput device
// Retrieve a pointer to an IDirectInputDevice8 interface
hr = DI_object ->CreateDevice( GUID_SysKeyboard, &DI_Device, NULL );
// Check the return code from CreateDevice
if FAILED( hr )
return false;
This code creates the variable
DI_Device
first. This variable of type
LPDIRECTINPUTDEVICE8
holds the created DirectInput device.

09 DX9_GP CH09 3/12/04 4:20 PM Page 206
206
Chapter 9
■
Using DirectInput
The call to
CreateDevice
, which is a method available to you through the DirectInput
object, is made by passing in the value
GUID_SysKeyboard
as the first parameter. This tells
CreateDevice
that you want to create a device based on the system keyboard. The second
parameter is the
DI_Device
variable that was created earlier, and the third parameter is
NULL
.
After this function call is complete, the
DI_Device
variable holds a valid DirectInput device.
Be sure to check the return code for this function to confirm that the device is valid.
Setting the Data Format
After you’ve created a valid DirectInput device, you need to set up the data format that
DirectInput will use to read input from the device. The
SetDataFormat
function defined
next requires a
DIDATAFORMAT
structure as its only parameter.
HRESULT SetDataFormat (
LPCDIDATAFORMAT lpdf
);
The
DIDATAFORMAT
structure describes various elements of the device for DirectInput. The
DIDATAFORMAT
structure is defined here:
typedef struct DIDATAFORMAT {
DWORD dwSize;
DWORD dwObjSize;
DWORD dwFlags;
DWORD dwDataSize;
DWORD dwNumObjs;
LPDIOBJECTDATAFORMAT rgodf;
} DIDATAFORMAT, *LPDIDATAFORMAT;
The
DIDATAFORMAT
structure is described in Table 9.1.
Member
Description
dwSize
dwObjSize
DIOBJECTDATAFORMAT
dwFlags
A
DWORD
DIDF_ABSAXIS
DIDF_RELAXIS
,
dwDataSize
dwNumObjs
rgodf
rgodf
An address to an array of
DIOBJECTDATAFORMAT
Table 9.1 DIDATAFORMAT Structure
The size of this structure in bytes.
The size of the
in bytes.
value that specifies attributes of this data format. Valid values are
, which means that the axes are absolute values, or
which means that the axes of this device are relative.
This value holds the size of the data packet returned from the input device in bytes.
The number of objects with the
array.
structures.

09 DX9_GP CH09 3/12/04 4:20 PM Page 207
Using DirectInput
207
You need to create and use your own
DIDATAFORMAT
structure if the input device you want
to use is not a standard device. Following are the predefined
DIDATAFORMAT
structures for
common input devices:
■
c_dfDIKeyboard
. This is the data format structure that represents a system keyboard
object.
■
c_dfDIMouse
. You use this data format structure when the input device being used is
a mouse with up to four buttons.
■
c_dfDIMouse2
. You use this data format structure when the input device being used
is a mouse or similar device with up to eight available buttons.
■
c_dfDIJoystick
. This is the data format structure for a joystick.
■
c_dfDIJoystick2
. This is the data format structure for a joystick with extended
capabilities.
If the input device you want to use is not included as one of the predefined types, you
need to specifically create a
DIDATAFORMAT
structure. Most of the common input devices
don’t require this.
The code sample that follows calls the
SetDataFormat
function using the predefined
DIDATAFORMAT
structure for a keyboard device.
// variable to hold the return code
HRESULT hr;
// Set the data format for the device
// Call the SetDataFormat function
hr = DI_Device->SetDataFormat(&c_dfDIKeyboard);
// Check the SetDataFormat return code
if FAILED( hr )
return false;
Setting the Cooperative Level
The cooperative level tells the system how the input device that you are creating works
with the system. You can set input devices to use either exclusive or nonexclusive access.
Exclusive access means that only your application can use a particular device and does not
need to share it with other applications that Windows might be running. This is most use-
ful when your game is a full-screen application. When a game is exclusively using a device,
such as a mouse or keyboard, any attempt for another application to use this device fails.
If your game doesn’t mind sharing the device, this is called nonexclusive access. When a
game creates the device with nonexclusive access, other applications that are running can
utilize that same device. This is most helpful when your game is running in windowed

09 DX9_GP CH09 3/12/04 4:20 PM Page 208
208
Chapter 9
■
Using DirectInput
mode on the Windows desktop. Using the mouse as a nonexclusive input device does not
restrict its use in other application windows.
For each game that you want to use with a DirectInput device, you must set the coopera-
tive level for its use. You do this through the
SetCooperativeLevel
function, defined next.
HRESULT SetCooperativeLevel(
HWND hwnd,
DWORD dwFlags
);
The
SetCooperativeLevel
function requires two parameters:
■
hwnd
. A handle to the window that is requesting access to the device.
■
dwFlags
. A series of flags that describe the type of access you are requesting. The
available flags are as follows:
•
DISCL_BACKGROUND
. The application requires background access to the device. This
means that you can use the input device even when the game window is not the
currently active window.
•
DISCL_EXCLUSIVE
. The game requests total and complete control over the input
device, restricting other applications from using it.
•
DISCL_FOREGROUND
. The game requires input only when the window is the current
active window on the desktop. If the game window loses focus, input to this
window is halted.
•
DISCL_NONEXCLUSIVE
. Exclusive access is not needed for this application. Defining
this flag allows other running applications to continue using the device.
•
DISCL_NOWINKEY
. This tells DirectInput to disable the Windows key on the key-
board. When this key is pressed, the Start button on the desktop is activated and
focus is removed from the currently active window. When this flag is set, the
Windows key is deactivated, allowing your game to retain focus.
n o t e
Each application must specify whether it needs foreground or background access to the device by
setting either the
DISCL_BACKGROUND
or
DISCL_FOREGROUND
flag. The application is also required to
set either the
DISCL_EXCLUSIVE
or
DISCL_NONEXCLUSIVE
flag. The
DISCL_NOWINKEY
flag is optional.
The following code sample sets the device to use nonexclusive access and be active only
when the application window has focus.
// Set the cooperative level
hr = DI_Device->SetCooperativeLevel( wndHandle,
DISCL_FOREGROUND | DISCL_NONEXCLUSIVE );

09 DX9_GP CH09 3/12/04 4:20 PM Page 209
Using DirectInput
209
// Check the return code for SetCooperativeLevel
if FAILED( hr )
return false;
The
SetCooperativeLevel
function is a method that’s callable through the DirectInput
device interface. The
DI_Device
variable in the previous code represents the current Direct-
Input device created by the call to
CreateDevice
.
The parameters that are being passed in the sample
SetCooperativeLevel
function consist
of
wndHandle
, which represents the handle to the window requesting access to the input
device, and the flags
DISCL_FOREGROUND
and
DISCL_NONEXCLUSIVE
, telling DirectInput the access
you are requesting for the device.
Acquiring Access
The final step required before you can read input from a particular device is called
“acquiring the device.” When you acquire access to an input device, you are telling the sys-
tem that you are ready to use and read from this device. This function, which is another
method of the DirectInput device, performs this action. This function, defined next, takes
no parameters and returns only whether it was successful.
HRESULT Acquire(VOID);
// The small code example that follows shows how the Acquire function is called.
// Get access to the input device.
hr = DI_Device->Acquire();
if FAILED( hr )
return false;
The return code for this function is checked to make sure it has completed successfully.
Because this is the last step needed before reading input from a device, it’s best to check
the return code to make sure the device is ready and available.
Getting Input
Now that you’ve completed the required steps to initialize an input device through Direct-
Input, it’s time to actually utilize it. All devices use the function
GetDeviceState
when read-
ing input. Whether the input device is a keyboard, mouse, or gamepad, the
GetDeviceState
function is used.
HRESULT GetDeviceState(
DWORD cbData,
LPVOID lpvData
);

09 DX9_GP CH09 3/12/04 4:20 PM Page 210
210
Chapter 9
■
Using DirectInput
The first parameter required is a
DWORD
value that holds the size of the buffer being passed
as the second parameter. The second parameter is a pointer to the buffer that will hold the
data that’s read from the device. As a reminder, the format of the data from the input
device was defined earlier using the
SetDataFormat
function.
The next few sections show how to enumerate the input devices available to your appli-
cation through DirectInput.
Enumerating Input Devices
Most games that are available for the PC allow for the use of input devices other than a
keyboard or a mouse, such as a gamepad or joystick. Many computers do not have these
nonstandard devices by default, so DirectInput cannot just assume their presence. Also,
because Windows allows for multiple gamepads or joysticks to be installed simultane-
ously, DirectInput needs a way of determining how many and of what type these devices
are. The method that DirectInput uses to get the needed information on the input devices
is called enumeration.
Just as Direct3D can enumerate through the video adapters installed in a system and get
their capabilities, DirectInput can do the same for input devices.
Using functions available through the DirectInput object, DirectInput can retrieve the
number of input devices available in a system, as well as each one’s type and functional-
ity. For instance, if your game requires the use of a gamepad with an analog control stick,
you can enumerate the installed devices and see if any of them meet your criteria.
The process of enumerating the installed devices on a system requires gathering a list
of the devices that meet your input needs and then gathering the specific capabilities of
those devices.
DirectInput uses the
EnumDevices
function to gather the list of installed input devices.
Because there might be different types of devices installed on a machine and you proba-
bly wouldn’t be interested in getting a list of all of them,
EnumDevices
allows you to specify
the type of devices you are searching for. For instance, if you’re not interested in the mouse
and keyboard devices and are searching specifically for joystick devices,
EnumDevices
pro-
vides a way of eliminating the unwanted devices from the list.
First, I’m going to explain how
EnumDevices
is used. The function
EnumDevices
is defined as
follows:
HRESULT EnumDevices(
DWORD dwDevType,
LPDIENUMDEVICESCALLBACK lpCallback,
LPVOID pvRef,

09 DX9_GP CH09 3/12/04 4:20 PM Page 211
Using DirectInput
211
DWORD dwFlags
);
This function requires four parameters:
■
dwDevType
. This parameter sets the filter for the device search. As I mentioned ear-
lier, you can tell
EnumDevices
to only search the system for a particular type of
device. This parameter can use any of the following values:
•
DI8DEVCLASS_ALL
. This value causes
EnumDevices
to return a list of all input devices
that are installed in a system.
•
DI8DEVCLASS_DEVICE
. This value causes a search for devices that do not fall into
another class of device, such as keyboards, mice, or game controllers.
•
DI8DEVCLASS_GAMECTRL
. This causes
EnumDevices
to search for all game controller
device types, such as gamepads or joysticks.
•
DI8DEVCLASS_KEYBOARD
.
EnumDevices
searches the system for all keyboard devices.
•
DI8DEVCLASS_POINTER
. This value tells
EnumDevices
to search for pointer devices
such as mice.
■
lpCallback
.
EnumDevices
utilizes a callback mechanism when searching the system for
input devices. This parameter is the address of the function you define to work as
the callback.
■
pvRef
. This parameter passes data to the callback function that is defined in the
lpCallback
parameter. You can use any 32-bit value here. If you don’t need to send
information to the callback function, you can pass
NULL
.
■
dwFlags
. The final parameter is a
DWORD
value consisting of a set of flags letting
EnumDevices
know the scope of the enumeration. For instance, if you want
EnumDevices
to search the system only for installed devices or those that have force
feedback, you need to specify one of the following values:
•
DIEDFL_ALLDEVICES
. This is the default value. All devices in the system are
enumerated.
•
DIEDFL_ATTACHEDONLY
. Only devices that are currently attached to the system are
returned.
•
DIEDFL_FORCEFEEDBACK
. Only the devices that support force feedback are returned.
•
DIEDFL_INCLUDEALIASES
. Windows allows aliases to be created for devices. These
aliases appear to the system as input devices, but they represent another device
in the system.
•
DIEDFL_INCLUDEHIDDEN
. This causes
EnumDevices
to return hidden devices.
•
DIEDFL_INCLUDEPHANTOMS
. Some hardware devices have more than one input device,
such as a keyboard that also includes a built-in mouse. This value causes Direct-
Input to return multiple devices.

09 DX9_GP CH09 3/12/04 4:20 PM Page 212
212
Chapter 9
■
Using DirectInput
The following code sample utilizes the
EnumDevices
function call to gather a list of game
controllers that are currently attached to the system.
HRESULT
hr;
// variable used to hold the return code
// Call the EnumDevices function
hr = DI_Object->EnumDevices( DI8DEVCLASS_GAMECTRL,
EnumJoysticksCallback,
NULL,
DIEDFL_ATTACHEDONLY ) ;
// Check the return value of the EnumDevices function
If FAILED( hr )
return false;
The previous call to
EnumDevices
used the value
DI8DEVCLASS_GAMECTRL
to search for game
controllers. The value
DIEDFL_ATTACHEDONLY
only looked for those devices that were attached
to the system.
The second parameter value of
EnumJoysticksCallback
represents the name of the callback
function to receive the devices found.
The third parameter is
NULL
because no additional information needs to be sent to the call-
back function.
The callback function provided to
EnumDevices
is called every time a device that matches
the search criteria is found. For instance, if you are searching the system for gamepads and
there are currently four of them plugged in, the callback function is called four times.
The purpose of the callback function is to give your application the chance to create a
DirectInput device for each piece of hardware, allowing you to then scan the device for its
capabilities.
The callback function must be defined in your code utilizing a specific format:
DIEnumDevicesCallback
.
BOOL CALLBACK DIEnumDevicesCallback(
LPCDIDEVICEINSTANCE lpddi,
LPVOID pvRef
);
The
DIEnumDevicesCallback
function requires two parameters: a pointer to a
DIDEVICEINSTANCE
structure, and the value passed to the
pvRef
parameter of
EnumDevices
.
The
DIDEVICEINSTANCE
structure, defined next, holds the details concerning an input device,
such as its
GUID
and its product name. The information within this structure is useful when

09 DX9_GP CH09 3/12/04 4:20 PM Page 213
Using DirectInput
213
displaying a choice of devices to the user because it enables him to recognize a device
based on its name.
typedef struct DIDEVICEINSTANCE {
DWORD dwSize;
GUID guidInstance;
GUID guidProduct;
DWORD dwDevType;
TCHAR tszInstanceName[MAX_PATH];
TCHAR tszProductName[MAX_PATH];
GUID guidFFDriver;
WORD wUsagePage;
WORD wUsage;
} DIDEVICEINSTANCE, *LPDIDEVICEINSTANCE;
Table 9.2 describes the
DIDEVICEINSTANCE
structure in more detail.
Member Name
Description
dwSize
guidInstance
GUID
CreateDevice
guidProduct
dwDevType
tszInstanceName
tszProductName
guidFFDriver
GUID
of the
driver being used.
wUsagePage
wUsage
Table 9.2 DIDEVICEINSTANCE Structure
The size of this structure in bytes.
The
for the specific device. This value can be saved and used later with
to gain access to the device.
The unique identifier for the input device. This is basically the device’s product ID.
This value is the device type specifier. This can be any value specified in the
DirectX documentation for this structure.
The friendly name for the device, such as Joystick 1 or AxisPad.
This is the full product name for this device.
If this device supports force feedback, this value represents the
This value holds the Human Interface Device (HID) usage page code.
This is the usage code for an HID.
The
DIEnumDevicesCallback
function requires a boolean value to be returned. DirectInput
has defined two values that should be used instead of the standard
TRUE
or
FALSE
:
■
DIENUM_CONTINUE
. This value tells the enumeration to continue.
■
DIENUM_STOP
. This value forces the device enumeration to stop.
These values control the device enumeration process. If you are searching the system for
only one joystick device, it’s useless to enumerate through all the installed joysticks.
Returning
DIENUM_STOP
after finding the first suitable device is all that’s needed.
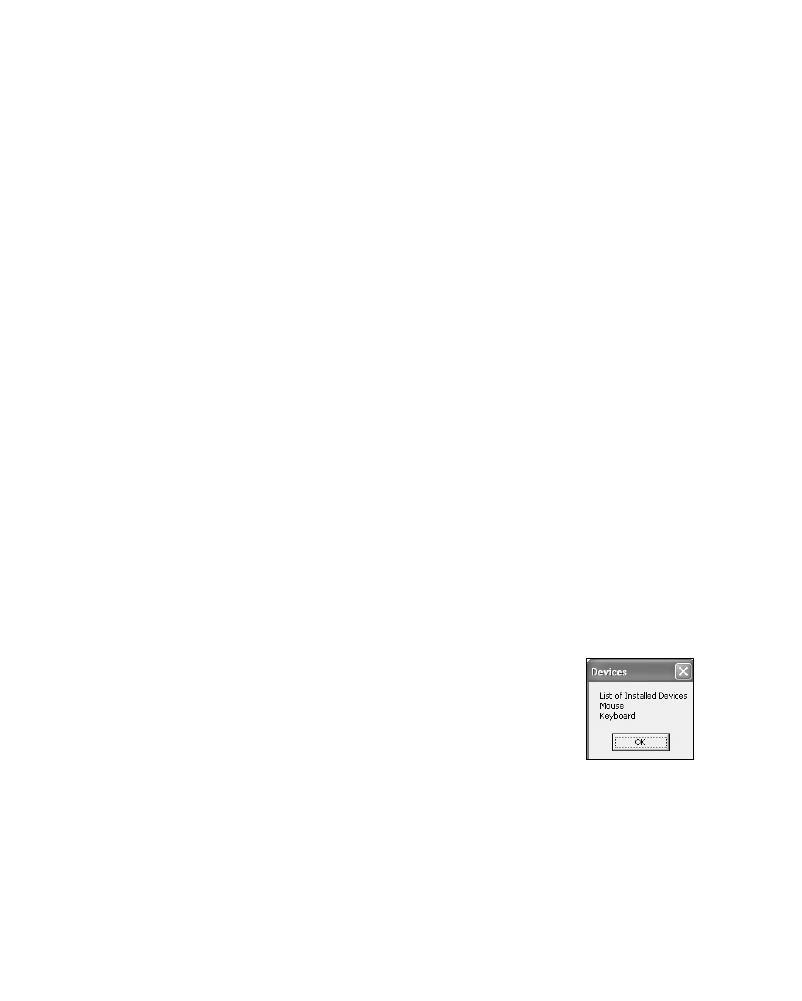
09 DX9_GP CH09 3/12/04 4:20 PM Page 214
214
Chapter 9
■
Using DirectInput
Commonly, you will want to collect a list of all the suitable devices so that the user can
select which specific device he wants to use. Using the callback mechanism, you can cre-
ate DirectInput devices for each piece of hardware and place them in a list. The user can
then select the device he wants to use.
The code example that follows shows the callback function that will return upon finding
the first joystick device that meets the
EnumDevices
criteria:
BOOL CALLBACK DeviceEnumCallback( const DIDEVICEINSTANCE* pdidInstance,
VOID* pContext )
{
// variable to hold the return code
HRESULT hr;
// Use create device
hr = DI_Object->CreateDevice( pdidInstance->guidInstance,
&g_pJoystick,
NULL );
// The call to CreateDevice failed; keep looking for another
if( FAILED(hr) )
return DIENUM_CONTINUE;
// The device was found and is valid; stop the enumeration
return DIENUM_STOP;
}
The previous code first attempts to use the
CreateDevice
function to gain access to the device
passed into the callback function. If the call to
CreateDevice
fails, the callback function
returns
DIENUM_CONTINUE
, which tells the enumeration of input devices to
continue. In contrast, if the call to
CreateDevice
succeeds, the callback
returns the value
DIENUM_STOP
.
You can find an example demonstrating how to enumerate the devices
in your system and display their device names in the chapter9\example3
directory on the CD-ROM. Figure 9.1 shows the dialog box created
from this example.
Figure 9.1 Listing of
installed input devices.
Getting the Device Capabilities
After you have a valid device returned from
EnumDevices
, you might need to check for spe-
cific functionality. For instance, you might need to find the type of force feedback that the
device can support.

09 DX9_GP CH09 3/12/04 4:20 PM Page 215
Using DirectInput
215
Enumerating the capabilities of a device is similar to enumerating the devices. To get
the specific details for a device, you must call the
EnumObjects
function. Like the call to
EnumDevices
, this function works along with a callback method.
HRESULT EnumObjects(
LPDIENUMDEVICEOBJECTSCALLBACK lpCallback,
LPVOID pvRef,
DWORD dwFlags
);
The
EnumObjects
function requires three parameters:
■
lpCallback
. This is the name of the callback function.
■
pvRef
. This is extra data that will be sent to the callback function when it is called.
■
dwFlags
. The flags are a
DWORD
value that specifies the types of objects on the input
device that you are interested in enumerating.
Table 9.3 describes the
dwFlags
parameter in more detail.
EnumObjects Flags
Flag Name
Description
DIDFT_ABSAXIS
Uses an absolute axis
DIDFT_ALIAS
Looks for controls identified by an HID usage alias
DIDFT_ALL
Looks for all types of objects on the device
DIDFT_AXIS
DIDFT_BUTTON
Checks for push or toggle buttons
DIDFT_COLLECTION
Lists the HID link collections
DIDFT_ENUMCOLLECTION
Belongs to a link collection
DIDFT_FFACTUATOR
Contains a force feedback actuator
DIDFT_FFEFFECTTRIGGER
Contains a force feedback trigger
DIDFT_NOCOLLECTION
Looks for objects that do not belong to a link collection
DIDFT_NODATA
Does not generate data
DIDFT_OUTPUT
Supports output
DIDFT_POV
DIDFT_PSHBUTTON
Looks for a push button
DIDFT_RELAXIS
Uses a relative axis
DIDFT_TGLBUTTON
Looks for a toggle button
DIDFT_VENDORDEFINED
Returns an object of a type defined by the manufacturer
Table 9.3
Looks for an axis: relative or absolute
Looks for a POV controller

09 DX9_GP CH09 3/12/04 4:20 PM Page 216
216
Chapter 9
■
Using DirectInput
The purpose of the
EnumObjects
callback function is to gather information regarding a par-
ticular input device. The information collected for each device is passed to the callback as
a
DIDEVICEOBJECTINSTANCE
structure.
The callback function defined in the call to
EnumObjects
must follow the function signature
of
DIEnumDeviceObjectsCallback
.
BOOL CALLBACK DIEnumDeviceObjectsCallback (
LPCDIDEVICEOBJECTINSTANCE lpddoi,
LPVOID pvRef
);
The
DIEnumDeviceObjectsCallback
function takes two parameters. The first parameter is the
structure of type
DIDEVICEOBJECTINSTANCE
that holds the returned information regarding the
device. The second parameter is any value that was passed into the
EnumObjects
function in
its
pvRef
parameter.
The
DIDEVICEOBJECTINSTANCE
structure contains a wealth of valuable information about the
device. It’s useful for setting the limits for force feedback, as well as helping to determine
the specific types and number of controls on the device.
You can find a full explanation of the
DIDEVICEOBJECTINSTANCE
structure in the DirectInput
documentation.
Getting Input from a Keyboard
Getting input from the keyboard is rather simple because it is a default device. The key-
board requires a buffer consisting of a 256-element character array.
char
buffer[256];
The character array holds the state of each key on the keyboard. The state of one or mul-
tiple keys can be held in this array each time the keyboard device is read from. Most games
require that the input device be read from each frame from within the main game loop.
Before you can read from the keyboard, you need an easy way of determining which key
on the keyboard was pressed. The macro
KEYDOWN
, provided next, returns
TRUE
or
FALSE
based on whether the key you are checking for was pressed.
#define KEYDOWN(name, key) (name[key] & 0x80)
Following is an example of reading from the keyboard:
// Define the macro needed to check the state of the keys on the keyboard
#define KEYDOWN(name, key) (name[key] & 0x80)

09 DX9_GP CH09 3/12/04 4:20 PM Page 217
Using DirectInput
217
// This is the required keyboard buffer
char
buffer[256];
// This is the main game loop, read from the input device each frame
while ( 1 )
{
// Check the keyboard and see if any keys are currently
// being pressed
g_lpDIDevice->GetDeviceState( sizeof( buffer ),
(LPVOID )&buffer );
// Do something with the input
// Here the KEYDOWN macro checks whether the left arrow key was pressed
if (KEYDOWN(buffer, DIK_LEFT))
{
// Do something with the left arrow
}
// KEYDOWN is used again to check whether the up arrow key was pressed
if (KEYDOWN(buffer, DIK_UP))
{
// Do something with the up arrow
}
}
As you can see, the main game loop calls the
GetDeviceState
each frame and places the cur-
rent state of the keyboard into the input buffer. The
KEYDOWN
macro then checks for the
state of certain keys.
Figure 9.2 shows a small demonstration of using keyboard input to display which direc-
tional arrow was pressed.
You can find a full source listing for this example in the chapter9\example1 directory on
the CD-ROM.
Getting Input from a Mouse
Reading input from a mouse is similar to reading it from the keyboard. The main differ-
ences are the
GUID
that’s passed to the
CreateDevice
function and the
DIDATAFORMAT
structure
that holds the input for this device.

09 DX9_GP CH09 3/12/04 4:20 PM Page 218
218
Chapter 9
■
Using DirectInput
Figure 9.2 Keyboard demonstration sample.
In the previous example, the call to
CreateDevice
used
GUID_SysKeyboard
as the first parame-
ter. When you’re using the mouse, you must set the
GUID
for
CreateDevice
to
GUID_SysMouse
.
n o t e
Setting the cooperative level to exclusive mode for mouse input keeps the Windows cursor from
being displayed. In exclusive mode, you are responsible for drawing the mouse cursor.
The following code shows how to use the
CreateDevice
function.
// Call the CreateDevice function using the GUID_SysMouse parameter
hr = g_lpDI->CreateDevice(GUID_SysMouse, &g_lpDIDevice, NULL);
// Check the return code for the CreateDevice function
if FAILED(hr)
return FALSE;
The call to
SetDataFormat
used the predefined data format
c_dfDIKeyboard
. You must change
this value to
c_dfDIMouse
when you’re using the mouse as the input device.
// Set the data format for the mouse
hr = g_lpDIDevice->SetDataFormat( &c_dfDIMouse );
// Check the return code for the SetDataFormat function
if FAILED( hr )
return FALSE;

09 DX9_GP CH09 3/12/04 4:20 PM Page 219
Using DirectInput
219
The final change that needs to be made before you can read from the mouse is the buffer
that’s defined by
DIDATAFORMAT
. The keyboard needs a character buffer consisting of 256 ele-
ments, whereas the mouse needs a buffer of type
DIMOUSESTATE
.
The
DIMOUSESTATE
structure consists of three variables for holding the X, Y, and Z position
of the mouse, as well as a
BYTE
array of four elements for holding the state of the mouse
buttons. The
DIMOUSESTATE
structure is defined as follows:
typedef struct DIMOUSESTATE {
LONG lX;
// holds the distance the mouse has traveled in the X direction
LONG lY;
// holds the distance the mouse has traveled in the Y direction
LONG lZ;
// holds the distance the mouse has traveled in the Z direction
BYTE rgbButtons[4]; // the current state of the mouse buttons
} DIMOUSESTATE, *LPDIMOUSESTATE;
Previously, a macro helped determine whether specific keys on the keyboard had been
pressed. You can use a similar macro to check the state of the mouse buttons.
#define BUTTONDOWN( name, key ) ( name.rgbButtons[ key ] & 0x80 )
This macro returns
TRUE
or
FALSE
for each button on the mouse.
n o t e
The X, Y, and Z values in the
DIMOUSESTATE
structure do not hold the current position of the mouse;
rather, they hold the position relative to where the mouse was previously. For example, if you moved
the mouse slightly to the left about 5 units, the X value would be equal to –5. If you moved the
mouse down 10 units, the Y value would be equal to 10.
When you’re reading from a mouse, you must keep track of the values read from the mouse on the
previous frame so that you can correctly interpret the mouse movement.
The following code fragment demonstrates the code needed to read from the mouse
device. This code handles checking both the movement of the mouse and the state of the
mouse buttons.
// Define the macro needed to check the state of the keys on the keyboard
#define BUTTONDOWN (name, key) (name.rgbButtons[key] & 0x80)
// This is required to hold the state of the mouse
// This variable holds the current state of the mouse device
DIMOUSESTATE
mouseState;
// This variable holds the current X position of the sprite
LONG
currentXpos;
// This variable holds the current Y position of the sprite
LONG
currentYpos;

09 DX9_GP CH09 3/12/04 4:20 PM Page 220
220
Chapter 9
■
Using DirectInput
// Set the default position for the sprite
currentXpos = 320;
currentYpos = 240;
// This is the main game loop, read from the input device each frame
while ( 1 )
{
// Check the mouse and get the current state of the device
// being pressed
g_lpDIDevice->GetDeviceState (sizeof ( mouseState ),
LPVOID) &mouseState);
// Do something with the input
// Here the BUTTONDOWN macro checks if the first mouse button is pressed
if (BUTTONDOWN( mouseState, 0 ) )
{
// Do something with the first mouse button
}
// BUTTONDOWN is used again to check if the second mouse button is pressed
if ( BUTTONDOWN( mouseState, 1 ) )
{
// Do something with the up arrow
}
// Next, check the movement of the mouse
// See how far in the X direction the mouse has been moved
currentXpos += mouseState.lX;
// See how far in the Y direction the mouse has been moved
currentYpos += mouseState.lY;
// Do something with the mouse movement
}
You can find a full code example in the chapter9\example2 directory on the CD-ROM.
This sample demonstrates the movement of the mouse using a 2D sprite, as well as the
pressing of the left and right mouse buttons by displaying directional arrows on the
screen. Figure 9.3 shows this sample in action.

09 DX9_GP CH09 3/12/04 4:20 PM Page 221
Using DirectInput
221
Figure 9.3 Showing mouse movement with a sprite.
n o t e
The structure
DIMOUSESTATE2
provides variables to hold the current state of up to eight mouse
buttons.
Using a Gamepad or Joystick
Gamepads and joysticks have been common game input devices for a while now. Whereas
most joystick controllers used to be plugged into the game port on sound cards, most
devices sold now utilize a Universal Serial Bus (USB) connection. The USB connection
gives devices an advantage over the previous devices. USB devices are easily detectable by
the system and are handled through the common HID interface. Because of this, reading
from gamepads and joysticks has become easier.
The main difference between using a joystick and using a gamepad is the absolute need to
enumerate the input devices. Because multiple joysticks can be plugged into a system,
DirectInput does not have a
GUID
predefined for these devices. Before you can call
CreateDevice
to prepare a joystick for use, you must enumerate the input devices that are
installed on the system.

09 DX9_GP CH09 3/12/04 4:20 PM Page 222
222
Chapter 9
■
Using DirectInput
Joystick Enumeration
Enumerating the devices causes DirectInput to query each device against the search crite-
ria you have set. For instance, if you called
EnumDevices
like this
hr = g_lpDI ->EnumDevices( DI8DEVCLASS_GAMECTRL,
EnumDevicesCallback,
NULL,
DIEDFL_ATTACHEDONLY ) ;
then the devices returned to the
EnumDevicesCallback
function would only be of type
DI8DEVCLASS_GAMECTRL
, which is exactly what you need when searching for joysticks.
Polling a Joystick
Keyboards and mice generate hardware interrupts informing the system that there is new
input data available. Most joysticks require that they be “polled” occasionally. The term
polling refers to the checking of the device for new input. After a device has been polled,
you can retrieve the new valid input from it.
n o t e
Joysticks and gamepads use the predefined
DIDATAFORMAT
structures
DIJOYSTATE
and
DIJOYSTATE2
.
Joysticks are not completely digital devices; they consist of an analog piece as well. Com-
monly, joysticks utilize digital input for buttons, meaning that they are either up or down,
and they use analog input for the stick itself. Analog input allows you detect the distance
that the joystick was moved.
A slight movement of the joystick toward the right sends a small value to the controlling
program, whereas pulling the joystick completely to the right sends a much higher value.
The amount of this value is determined by the range property of the device.
The range property is normally set for the analog portions of a joystick and consists of the
maximum and minimum value that the device will generate. For instance, setting the
minimum portion of the range to –1000 and the maximum range to 1000 provides your
game only with values that fall into this range. Moving the joystick all the way to the left
sends the value of –1000, whereas moving it to the right sends up to a value of 1000. You
can set the range of the device to any values that will make sense to your application.
Setting the Range of a Joystick
To set the range property for the analog portion of the joystick, you must use the
EnumObjects
function. As you will recall from earlier, the
EnumObjects
function works

09 DX9_GP CH09 3/12/04 4:20 PM Page 223
Using DirectInput
223
similarly to
EnumDevices
but instead sends its callback function details on the different
pieces of the device. A sample callback function is shown next.
/*********************************************************************
* EnumObjCallback
*********************************************************************/
BOOL CALLBACK EnumObjCallback( const DIDEVICEOBJECTINSTANCE* pdidoi,
VOID* pContext )
{
// If this object is an axis type object, attempt to set its range
if( pdidoi->dwType & DIDFT_AXIS )
{
// Create a DIPROPRANGE structure
DIPROPRANGE diprg;
// Each structure requires that a DIPROPHEADER structure
// be initialized
diprg.diph.dwSize
= sizeof(DIPROPRANGE);
diprg.diph.dwHeaderSize = sizeof(DIPROPHEADER);
diprg.diph.dwHow
= DIPH_BYID;
diprg.diph.dwObj
= pdidoi->dwType; // Specify the enumerated axis
// The minimum and maximum portions of the range are being set here
diprg.lMin
= -100;
diprg.lMax
= 100;
HRESULT hr;
// Set the range for the axis
hr = g_joystickDevice->SetProperty( DIPROP_RANGE, &diprg.diph ) ;
// Check to see if setting the range property was successful
if FAILED ( hr )
return DIENUM_STOP;
}
// Tell EnumObjects to continue to the next object in this device
return DIENUM_CONTINUE;
}
This example first checks to see if the object being passed to the callback is an axis type.
An axis object is a type representing the analog stick portions of a joystick controller. If a
valid axis device is used, the code attempts to set its range.

09 DX9_GP CH09 3/12/04 4:20 PM Page 224
224
Chapter 9
■
Using DirectInput
First, a
DIPROPRANGE
structure is created, which holds the information regarding the range.
A
DIPROPRANGE
structure is defined like this:
typedef struct DIPROPRANGE {
DIPROPHEADER diph;
LONG
lMin;
LONG
lMax;
} DIPROPRANGE, *LPDIPROPRANGE;
The second and third variables within this structure —
lMin
and
lMax
— actually represent
the minimum and maximum range values. You can set these two values to anything that
your game requires, as long as the
lMin
variable is less than the value stored in
lMax
.
The first variable within the
DIPROPRANGE
structure is actually another structure:
DIPROPHEADER
.
The
DIPROPHEADER
structure is required for all property structures.
typedef struct DIPROPHEADER {
DWORD
dwSize;
DWORD
dwHeaderSize;
DWORD
dwObj;
DWORD
dwHow;
} DIPROPHEADER, *LPDIPROPHEADER;
The
DIPROPHEADER
structure requires only four variables to be set. The first variable,
dwSize
,
represents the size of the enclosing structure in bytes. In this instance, it’s the
DIPROPRANGE
structure.
The second variable,
dwHeaderSize
, is the size of the
DIPROPHEADER
structure.
The third and fourth variables work together. The contents of the
dwHow
variable describe
the type of data within the
dwObj
variable.
dwHow
can be any of the following values:
■
DIPH_DEVICE
.
dwObj
must be set to 0.
■
DIPH_BYOFFSET
.
dwObj
is the offset into the current data format.
■
DIPH_BYUSAGE
.
dwObj
must be set to the HID usage page and usage values.
■
DIPH_BYID
.
dwObj
is set to the object identifier. You can find this in the
DIDEVICEOBJECTINSTANCE
structure that’s passed to the callback function.
Finally, after these structures are filled in, you can call the
SetProperty
function. This func-
tion accepts the
GUID
of the property to be set as its first parameter and an address to the
structure containing the new property information.
n o t e
Some devices do not allow the range to be changed. The range property is read-only.

09 DX9_GP CH09 3/12/04 4:20 PM Page 225
Using DirectInput
225
You can change other properties of a device via the same method by which the range
property was changed. Properties exist for other settings. For example,
DIPROP_DEADZONE
is
a range value that specifies which portion of the joystick movement to ignore.
DIPROP_FFGAIN
sets the gain for force feedback, and
DIPROP_AUTOCENTER
tells the device
whether it should auto-center itself when the user releases the device.
Reading from a Joystick
Joysticks, like other input devices, require the use of the
GetDeviceState
function. In the
instance of joysticks and gamepads, though, the buffer that must hold the input data is
either of type
DIJOYSTATE
or
DIJOYSTATE2
. The main difference between the two structures is
the number of objects on a joystick device that can be read. The
DIJOYSTATE
structure
allows for just two analog devices, whereas the
DIJOYSTATE2
structure can handle more.
Because the input from the joystick is not an absolute position, you must keep track of any
previous movement by your game. For instance, if you’re using joystick input to control the
movement of a sprite around the screen, you need to keep in separate variables the sprite’s
current X and Y positions. When new input is read from the joystick, the new input is
added to the current X and Y positions. The code sample that followsdemonstrates this.
// These two variables will hold the current position of the sprite
LONG curX;
LONG curY;
// Here, the default sprite positions are set
curX = 320;
curY = 240;
while (1)
{
// Use the DIJOYSTATE2 structure to hold the data from the joystick
DIJOYSTATE2 js;
// First, poll the joystick
g_joystickDevice->Poll();
// Get the current input from the device
g_joystickDevice->GetDeviceState( sizeof(DIJOYSTATE2), &js ) );
// Add the new values to the current X and Y positions
curX += js.lX;
curY += js.lY;
// Draw the sprite in its updated position
}

09 DX9_GP CH09 3/12/04 4:20 PM Page 226
226
Chapter 9
■
Using DirectInput
This small bit of code first polls the joystick device for new input. Then the new input is
placed into the
DIJOYSTATE2
structure. Finally, the
lX
and
lY
values are added to the current
X and Y position of the sprite. The
lX
and
lY
variables represent the returned input from
the first analog stick.
You can find a full source example of reading from the joystick in the chapter9\example4
directory on the CD-ROM.
Supporting Multiple Input Devices
Most console games allow more than one player. PCs are no different. With the ability to
plug in many USB gamepads or joysticks, games on the PC are limited only by what you
can think of. In this section, I’m going to explain the process needed to support multiple
devices.
As you’ll recall from earlier, each input device requires its own DirectInput device.
Because of this, your code needs to be able to hold multiple DirectInput devices. Creating
either an array or a vector of
IDirectInputDevice8
objects enables you to do this.
The next step is the enumeration of the installed devices. For instance, if your game needs
to support four gamepads, you must call
EnumDevices
and gather the information returned
through its callback function for each gamepad device. After you have stored the data for
each device, you can call
CreateDevice
. You need to use the
CreateDevice
function for each
device that your callback has saved. After you have created all the devices, you will have
access to do whatever you want with them.
The code that follows shows an elementary example of this process.
#define NUM_DEVICES 4
// The four DirectInput devices
LPDIRECTINPUTDEVICE8 devices[ NUM_DEVICES ];
// The DirectInput object
LPDIRECTINPUT8
g_lpDI = NULL;
Int curCount = 0;
// holds the number of devices you currently have
int APIENTRY WinMain( HINSTANCE hInst, HINSTANCE, LPSTR, int )
{
// variable to hold the return code
HRESULT
hr;
// Create the DirectInput object
hr = DirectInput8Create(hInstance,
DIRECTINPUT_VERSION,

09 DX9_GP CH09 3/12/04 4:20 PM Page 227
Using DirectInput
227
IID_IDirectInput8,
( void** ) &g_lpDI,
NULL );
// Call the EnumDevices function
hr = g_lpDI ->EnumDevices( DI8DEVCLASS_GAMECTRL,
EnumDevicesCallback,
NULL,
DIEDFL_ATTACHEDONLY ) ;
// Check the return value of the EnumDevices function
if FAILED( hr )
return false;
// Do something interesting with the devices here
}
/***********************************************************************
* EnumDevicesCallback
***********************************************************************/
BOOL CALLBACK EnumDevicesCallback( const DIDEVICEINSTANCE* pdidInstance,
VOID* pContext )
{
// variable to hold the return code
HRESULT hr;
// Call CreateDevice for this returned device
hr = g_lpDI->CreateDevice( pdidInstance->guidInstance,
&devices[curCount]
NULL );
// If the call to CreateDevice fails, stop enumerating more devices
if( FAILED(hr) )
{
return DIENUM_CONTINUE;
}
// else, increase the curCount variable by one and grab another device
else
{
curCount++;
if (curCount >= NUM_DEVICES)

09 DX9_GP CH09 3/12/04 4:20 PM Page 228
228
Chapter 9
■
Using DirectInput
return DIENUM_STOP;
}
// Continue the enumeration
return DIENUM_CONTINUE;
}
This callback function doesn’t do much. It attempts to call
CreateDevice
on each input
device that is passed to it. If a device can be created, it increments the counter variable and
keeps looking for more. The code currently supports up to four devices. If more than four
gamepads are needed, the size of the array holding the DirectInput devices must change.
If you don’t know how many devices you might have or you want to keep things dynamic,
use a vector of
IDIRECTINPUTDEVICE8
objects.
Reacquiring an Input Device
Sometimes during the course of a game, the input device is lost. If your game has set the
cooperative level for the device to nonexclusive, another application might start and
restrict your access to the device. In this case, you would need to reacquire the device
before you could continue to read from it and use its input.
When access to a device has been lost, the return code from the
GetDeviceState
function is
equal to
DIERR_INPUTLOST
. When this happens, you need to call the
Acquire
function in a
loop until access to the device is restored.
The following sample code demonstrates how to reacquire a device once access to it has
been lost.
HRESULT
hr;
// variable to hold return codes
// This is the main game loop; read from the input device each frame
while ( 1 )
{
// Call the GetDeviceState function and save the return code
hr = DI_Device->GetDeviceState( sizeof( DIMOUSESTATE ),
( LPVOID )&mouseState );
// Check the return state to see whether the device is still accessible
if ( FAILED ( hr ) )
{
// Try to reacquire the input device
hr = DI_Device->Acquire( );
// Do a continuous loop until the device is reacquired

09 DX9_GP CH09 3/12/04 4:20 PM Page 229
Using DirectInput
229
while( hr == DIERR_INPUTLOST )
hr = DI_Device->Acquire( );
// Just return and do nothing this frame
continue;
}
// Check the input and do something with it
}
n o t e
Most games require more than one input device for multiple people to play. By creating multiple
DirectInput devices, you can support a number of separate devices.
Cleaning Up DirectInput
DirectInput, like Direct3D, requires that you release the objects you’ve created upon com-
pletion of your application. In addition to the DirectInput objects, you must also unac-
quire any devices that you have gained control over. If you forget to unacquire the input
devices you’ve been using, when your game ends, those devices might still be locked by the
system so you can’t use them. Although a locked joystick or gamepad wouldn’t be too big
of a deal, forgetting to release the mouse or keyboard could make you have to restart your
machine to get them back.
The
Unacquire
function releases a device that had been acquired previously through
DirectInput.
HRESULT Unacquire( VOID );
Unacquire
is a method that the DirectInput device interface provides.
The following sample code correctly unacquires the input devices and releases both the
DirectInput device and the object.
// Check whether you have a valid DirectInput object
if ( DI_Object )
{
// Check to see whether you have a valid DirectInput device
if ( DI_Device )
{
// Unacquire the input device
DI_Device->Unacquire( );

09 DX9_GP CH09 3/12/04 4:20 PM Page 230
230
Chapter 9
■
Using DirectInput
// Release the DirectInput device
DI_Device->Release( );
// Set the DirectInput device variable to NULL
DI_Device = NULL;
}
// Release the DirectInput object
DI_Object->Release( );
// Set the DirectInput object variable to NULL
DI_Object = NULL;
}
At this point, you should have a clear understanding of initializing and reading from stan-
dard input devices through DirectInput. In the next section, you will learn how to use
force feedback to help immerse the player in your world.
Force Feedback
Since the release of the current generation of video game consoles onto the market,
gamers have become familiar with the concept of force feedback. Force feedback is the abil-
ity to send different levels of vibration to an input device. Gamepads for console systems
commonly support force feedback, whereas feedback in PC input devices is still rare.
Force Feedback Effects
Force feedback devices perform their vibrations based on effects. A force feedback effect
is made up of one or more forces acting on the controller. Forces within DirectInput are
the push or resistance felt on a controller during the playing of an effect. Effects come in
a few different flavors:
■
Constant Force
. A steady continual force in a single direction
■
Ramp Force
. A force that increases or decreases in intensity steadily over time
■
Periodic Effect
. A pulsating force
■
Conditional
. An effect that is triggered as a reaction to a particular motion
Each force has a magnitude, or intensity, and a duration, or length of time. Changing the
magnitude allows you to increase or decrease the amount of vibration or resistance the
user feels while playing your game.

09 DX9_GP CH09 3/12/04 4:20 PM Page 231
Force Feedback
231
t i p
Overusing force feedback or using it at the wrong times within your game might annoy the player.
Use force feedback sparingly.
To use a force feedback device — such as a gamepad — with your game, you need to do the
following:
1. Create the DirectInput object.
2. Enumerate the installed game controller devices that support force feedback.
3. Create a device based on the gamepad.
4. Create the force feedback effect you want to use.
5. Start the effect.
Enumerating the Input Devices for Force Feedback
Because force feedback is still not widespread in game controllers, you need to specifically
look for this feature when enumerating the input devices. Previously, the only flag that
you sent to
EnumDevices
was
DIEDL_ATTACHEDONLY
, which specified that this function should
only return installed and attached devices to the callback. If this is left as the only flag, the
callback will receive both force feedback and nonfeedback devices. Because you know
from the start that you want to look only for force feedback devices, you should add the
flag
DIEDFL_FORCEFEEDBACK
to the
EnumDevices
call. This informs
EnumDevices
to only report
back with force feedback-enabled devices.
The example code that follows shows the updated call to EnumDevices.
// the variable used to hold the input device
LPDIRECTINPUTDEVICE8 FFDevice
= NULL;
// Enumerate through the installed devices looking for a game controller
// or joystick that supports force feedback
HRESULT hr;
hr = g_pDI->EnumDevices( DI8DEVCLASS_GAMECTRL,
FFDeviceCallback,
NULL,
DIEDFL_ATTACHEDONLY | DIEDFL_FORCEFEEDBACK ) );
The previous
EnumDevices
function call has been updated with the
DIEDFL_FORCEFEEDBACK
flag.

09 DX9_GP CH09 3/12/04 4:20 PM Page 232
232
Chapter 9
■
Using DirectInput
The code that follows shows the callback function needed to find the force feedback
device.
/******************************************************************************
* FFDeviceCallback
******************************************************************************/
BOOL CALLBACK FFDeviceCallback ( const DIDEVICEINSTANCE* pInst,
VOID* pContext )
{
HRESULT
hr;
// Create the device
hr = g_pDI->CreateDevice( pInst->guidInstance, & FFDevice, NULL );
// This device could not be created, so keep looking for another one
if( FAILED(hr) )
return DIENUM_CONTINUE;
// We found a device; stop the enumeration
return DIENUM_STOP;
}
At this point, only valid force feedback devices are being reported to the callback function.
The callback attempts to create a device based on the first one it comes across. If the call-
back succeeds in creating the device, it stops the enumeration; otherwise, the enumeration
continues to look for a suitable device.
Creating a Force Feedback Effect
After you’ve found the controller you’re going to use and you’ve created a DirectInput
device for it, you need to create an effect object. DirectInput force feedback effect objects
are based on the
IDirectInputEffect
interface. Each
IDirectInputEffect
object details the
effect to the system.
The effect is created first by filling in a
DIEFFECT
structure. This structure describes the dif-
ferent aspects of the effect, such as the duration, which axes are affected, and its force.
The
DIEFFECT
structure is then passed as a parameter to the
CreateEffect
function. The
CreateEffect
function registers the effect with DirectInput and downloads the effect to the
device. After the effect has been downloaded to the force feedback device, it’s ready to be
played.

09 DX9_GP CH09 3/12/04 4:20 PM Page 233
Force Feedback
233
n o t e
For an effect to be downloaded to a force feedback device, the device must be set to a cooperative
level of exclusive. Force feedback devices cannot share their feedback functionality among differ-
ent applications.
I’m going to take you through a quick rundown of the
DIEFFECT
structure and using
CreateEffect
so that you can see the process in more detail.
You must declare the
DIEFFECT
structure for each effect object that you want to create. The
DIEFFECT
structure is defined here:
typedef struct DIEFFECT {
DWORD
dwSize;
DWORD
dwFlags;
DWORD
dwDuration;
DWORD
dwSamplePeriod;
DWORD
dwGain;
DWORD
dwTriggerButton;
DWORD
dwTriggerRepeatInterval;
DWORD
cAxes;
LPDWORD rgdwAxes;
LPLONG rglDirection;
LPDIENVELOPE lpEnvelope;
DWORD
cbTypeSpecificParams;
LPVOID lpvTypeSpecificParams;
DWORD
dwStartDelay;
} DIEFFECT, *LPDIEFFECT;
The
DIEFFECT
structure consists of the following variables:
■
dwSize
. The size of the
DIEFFECT
structure in bytes.
■
dwFlags
. The flags that describe how some of the variables are to be used.
•
DIEFF_CARTESIAN
. The values within the
rglDirection
variable are considered to be
Cartesian coordinates.
•
DIEFF_OBJECTIDS
. The values within the
dwTriggerButton
and
rgdwAxes
variables are
object identifiers.
•
DIEFF_OBJECTOFFSETS
. The values within the
dwTriggerButton
and
rgdwAxes
variables
are data format offsets.
•
DIEFF_POLAR
. The values within the
rglDirection
variable are considered to be
Polar coordinates.
•
DIEFF_SPHERICAL
. The values within the
rglDirection
variable are considered to be
Spherical coordinates.

09 DX9_GP CH09 3/12/04 4:20 PM Page 234
234
Chapter 9
■
Using DirectInput
■
dwDuration
. The duration of the effect in microseconds. If the duration of the effect
should be continuous, use the value of
INFINITE
.
■
dwSamplePeriod
. The sample rate of the effect playback. 0 indicates that the default
sample rate is to be used.
■
dwGain
. The gain of the effect.
■
dwTriggerButton
. The identifier of the button to be used to trigger the effect. This
variable depends on the value within the
dwFlags
variable.
■
dwTriggerRepeatInterval
. The delay time between repeating the effect. This value is
in microseconds.
■
cAxes
. The number of axes that the effect uses.
■
rgdwAxes
. A pointer to a
DWORD
array that contains the IDs or offsets to the axes that
the effect will use.
■
rglDirection
. An array of coordinates corresponding to the types of coordinates
selected in the
dwFlags
variable.
■
lpEnvelope
. An optional pointer to a
DIENVELOPE
structure. This structure defines the
envelope to be applied to this effect. Because no effects require this, you can use
NULL
.
■
cbTypeSpecificParams
. The number of bytes of additional parameters for the type of
effect.
■
lpvTypeSpecificParams
. This variable holds the parameters discussed in the previous
variable. This variable can hold any of the following defined structures:
•
DIEFT_CUSTOMFORCE
. A structure of type
DICUSTOMFORCE
is passed.
•
DIEFT_PERIODIC
. A structure of type
DIPERIODIC
is used.
•
DIEFT_CONSTANTFORCE
. A constant force structure,
DICONSTANTFORCE
, is used.
•
DIEFT_RAMPFORCE
. A ramp force structure of
DIRAMPFORCE
is used.
•
DIEFT_CONDITION
. A structure of type
DICONDITION
must be passed.
■
dwStartDelay
. The time in microseconds that the device should wait before playing
an effect.
The complete
DIEFFECT
structure is then passed to the
CreateEffect
function. The
CreateEffect
function requires four parameters and is defined like this:
HRESULT CreateEffect(
REFGUID rguid,
LPCDIEFFECT lpeff,
LPDIRECTINPUTEFFECT *ppdeff,
LPUNKNOWN punkOuter
);

09 DX9_GP CH09 3/12/04 4:20 PM Page 235
Force Feedback
235
The first parameter refers to the
GUID
of the type of force to be created. For instance, if
you are trying to create a constant force effect, use the predefined
GUID
of
GUID_ConstantForce
.
The second parameter is the passed-in
DIEFFECT
structure defined earlier. The third parame-
ter is the address of the variable that will hold the newly created effect. This variable must
be of type
IDirectInputEffect
. The final parameter to
CreateEffect
is normally
NULL
.
After you have your effect created and ready to go, the next step is playing it.
Starting an Effect
Before the user can feel your effect in action, it has to be played. The playback of a force
feedback effect is handled through the
Start
function, which is a member function of
IDirectInputEffect
.
The
Start
function requires two parameters. The first is the number of times the effect
should be played. The second parameter is a set of flags that relate to how the effect should
be played on the device.
There are only two valid flags for the second parameter. Both can be applied. If no flags
are required, you can set this parameter to 0.
■
DIES_SOLO
. Any other effects that are currently playing stop when this effect is
played.
■
DIES_NODOWNLOAD
. The effect is not automatically downloaded to the device.
n o t e
If an effect is currently playing and the
Start
function is called, this effect is started over from the
beginning.
This sample call to the
Start
function tells DirectInput to play the effect once and speci-
fies that no flags should be applied.
g_pEffect->Start( 1, 0 );
After calling the
Start
function, the effect begins to play on the device. If the effect has a
duration, the effect ends when the duration is reached. If the duration of the effect is infi-
nite, you must stop the effect.
Stopping an Effect
As mentioned previously, if an effect has a duration, it ends when the duration is
reached. But what about an effect whose duration is infinite, or what if the user has hit
the pause button? Both of these instances require that an effect be stopped manually.

09 DX9_GP CH09 3/12/04 4:20 PM Page 236
236
Chapter 9
■
Using DirectInput
This is accomplished through the
Stop
function. This function requires no parameters
and returns only whether the call was successful. The
Stop
function is declared here:
HRESULT Stop(VOID);
A return code of
DI_OK
means that the call to the
Stop
function was successful.
Chapter Summary
Input is such an integral part of any game that you should pay special attention to it dur-
ing the development cycle. When games are reviewed, the performance of the input can
make or break it. Paying proper attention to the input system during development
enhances the gamer’s experience.
What You Have Learned
In this chapter, you learned how to use input devices. You should now understand the fol-
lowing points:
■
How to use the mouse and keyboard devices
■
The difference between analog and digital controls
■
How to support more than one input device
■
How to create and play force feedback effects through a game controller
■
The proper way to release and shut down DirectInput
In the next chapter, you’ll be introduced to DirectSound and how to use music and sound
to enhance your game.
Review Questions
You can find the answers to Review Questions and On Your Own exercises in Appendix
A, “Answers to End-of-Chapter Exercises.”
1. DirectInput allows for what type of input devices?
2. Which function creates the IDirectInput8 interface?
3. What is the detection of input devices on a system called?
4. Reading from the keyboard requires what kind of buffer?
5. What is the data format type for mouse input?
On Your Own
1. Change the mouse input example to remove the Windows cursor.
2. Modify the gamepad example to read from the controller buttons.

10 DX9_GP CH10 3/12/04 4:21 PM Page 237
chapter 10
DirectSound
D
irectSound helps your game come to life. When you take advantage of back-
ground music and sound effects, the world you create takes on a whole
new depth. In this chapter, you’ll learn how you can use sound effectively in
your game.
Here’s what you’ll learn in this chapter:
■
What DirectSound is
■
How to use DirectSound
■
What sound buffers are
■
How to play a sound file
■
How to cause a sound file to loop
■
How to set and change a sound’s volume
Sound
Sound is important in every game. It’s used to set the mood, building tension or celebra-
tion at the end of a level. Sound helps create your environment, from the sound of cars
racing around a track to the gunfire you hear as it zooms over your head. Without sound,
games would lose their ability to bring you into their world. DirectX provides you with
DirectSound, allowing you to easily add an audio element to your game.
237

10 DX9_GP CH10 3/12/04 4:21 PM Page 238
238
Chapter 10
■
DirectSound
DirectSound
DirectSound provides a single Application Programming Interface (API) for the playback
of sounds and music. Previously, developers had to make do with support for only certain
sound cards because they were tasked with writing software for each one. With the birth
of DirectX and its Hardware Abstraction Layer (HAL), developers only need to write to
one common set of functions, which can support a wide array of sound cards.
How Does DirectSound Work?
DirectSound manages the sound data through the use of buffers. Buffers are areas of
memory that hold sound data. When you’re using DirectSound, you can have multiple
buffers that hold any sound data you want to load. You can then manipulate or play the
data within these buffers. DirectSound mixes these sounds into a single buffer. This sin-
gle buffer contains the final sound that the user hears.
The sound buffers can reside either on sound card memory or in system memory.
n o t e
You can access buffers that are contained in memory on the sound card more quickly than those
buffers in system memory. You should use the latter type of buffers sparingly because they are lim-
ited by the amount of memory on the sound card.
Sound buffers are the areas that hold the sound data. For example, if you were loading a
WAV file to be played, the sound data within that file would be placed into a sound buffer.
You could then change, manipulate, or play the data within that buffer.
Following are the types of buffers that DirectSound uses:
■
Primary buffer. All sounds played are mixed into the primary buffer. The sound
card uses the resulting mixed sound in the primary buffer to create the actual
sound that you hear.
■
Secondary buffer. These are the buffers that hold all the sound data that your
game needs. DirectSound lets you play multiple sounds by accessing more than
one secondary buffer simultaneously.
■
Static buffer. When sound data is of limited size, you can create a static or fixed-
size buffer. This buffer allows for the complete loading of a particular sound into
memory.
■
Streaming buffer. Sometimes, sounds that you want to play might be too large to
fit into memory at one time. In this instance, you need a streaming buffer. The
streaming buffer allows for only a portion of a sound to be loaded into it before

10 DX9_GP CH10 3/12/04 4:21 PM Page 239
DirectSound
239
being sent off to be played. As the sound within the streaming buffer is played, new
sound data is loaded into it.
Using DirectSound
Before you can use DirectSound, you need to know the steps involved. Like other DirectX
components, DirectSound must be initialized before you can use it. The first step to
using DirectSound is creating the DirectSound device. This device is represented by the
IDirectSound8
interface, which provides methods for creating sound buffers, getting sound
hardware capabilities, and setting the cooperative level of the sound card.
The DirectSound Device
The DirectSound device represents an interface to a specific piece of sound hardware
within your machine. For DirectSound to work, you must select a sound card and create
a DirectSound device to represent it. Because most machines contain only a single sound
card, DirectSound allows you to create a DirectSound device based on a default sound
card. If a machine has more than one sound card, you might need to enumerate through
them to find the one that best meets your application’s needs.
You create the DirectSound device by using the
DirectSoundCreate8
function, defined next:
HRESULT WINAPI DirectSoundCreate8(
LPCGUID lpcGuidDevice,
LPDIRECTSOUND8 * ppDS8,
LPUNKNOWN pUnkOuter
);
The
DirectSoundCreate8
function requires three parameters:
■
lpcGuidDevice
. The
GUID
that represents the sound device to use. This can be either
DSDEVID_DefaultPlayback
or
NULL
. Use
NULL
if you want to use the default sound
device.
■
ppDS8
. The address to the variable that will hold the newly created DirectSound
device.
■
pUnkOuter
. The controlling object’s
IUnknown
interface. This value should be
NULL
.
A standard call to
DirectSoundCreate8
that uses the default sound device is shown next:
// variable that will hold the return code
HRESULT hr;
// variable that will hold the created DirectSound device
LPDIRECTSOUND8 m_pDS;

10 DX9_GP CH10 3/12/04 4:21 PM Page 240
240
Chapter 10
■
DirectSound
// Attempt to create the DirectSound device
hr = DirectSoundCreate8( NULL, &m_pDS, NULL ) ;
// Check the return value to confirm that a valid device was created
if FAILED ( hr )
return false;
If the previous code fails to create a valid
DirectSound
device, the function returns
FALSE
.
Enumerating the Sound Devices
Occasionally, you might want to enumerate the sound hardware within a system. If, for
instance, the default sound device does not have all the functions that your game might
need, you can search for another device in the system.
If you’re not going to use the default sound device, you need to enumerate through
the available devices before calling the
DirectSoundCreate8
function. When your enumera-
tion is complete, you will have the needed
GUID
for the device, which you will then pass to
DirectSoundCreate8
instead of
NULL
.
The process of enumeration is handled through the function
DirectSoundEnumerate
. Like
previous components within DirectX, enumerating the devices requires a callback func-
tion. The
DirectSoundEnumerate
function calls the callback every time a new sound device is
detected. Within the callback function, you can determine the capabilities of the device
and choose whether you want to use it.
The DirectSoundEnumerate function is defined as follows:
HRESULT WINAPI DirectSoundEnumerate(
LPDSENUMCALLBACK lpDSEnumCallback,
LPVOID lpContext
);
The
DirectSoundEnumerate
function requires just two parameters:
■
lpDSEnumCallback
. The address of the callback function
■
lpContext
. Any data that you want to be sent to the callback function
The following code shows a sample
DirectSoundEnumerate
function call:
// variable to hold the return code
HRESULT
hr;
// Call DirectSoundEnumerate
hr = DirectSoundEnumerate( (LPDSENUMCALLBACK)DSoundEnumCallback, 0);

10 DX9_GP CH10 3/12/04 4:21 PM Page 241
DirectSound
241
// Check the return code to make sure that the call was successful
if FAILED ( hr)
return false;
The previous code creates a callback function called
DSoundEnumCallback
. The second para-
meter is
0
because no information needs to be sent to the callback function.
The DirectSoundEnumerate Callback Function
The callback function provided to
DirectSoundEnumerate
is called every time the enumera-
tion finds a new sound device. If multiple sound devices are installed in the system, the
callback function is called once for each of them.
The main purpose of the callback function is to give your code a chance to create a Direct-
Sound device and to use it to gather information about the device. If you were searching
for a sound device that allowed for sound capture, you would check the capabilities of
each device passed to the callback function to see if this functionality existed.
The
DirectSoundEnumerate
function requires the callback function to be in the
DSEnumCallback
format.
BOOL CALLBACK DSEnumCallback(
LPGUID lpGuid,
LPCSTR lpcstrDescription,
LPCSTR lpcstrModule,
LPVOID lpContext
);
You must declare the callback function using the signature shown next. The callback func-
tion requires four parameters:
■
lpGuid
. The address to the
GUID
that identifies the current sound device. If this value
is
NULL
, then the current device being enumerated is the primary device.
■
lpcstrDescription
. A
NULL
-terminated string that provides a text description of the
current device.
■
lpcstrModule
. A
NULL
-terminated string that provides the module name of the
DirectSound driver for this device.
■
lpContext
. The extra data that was passed to the callback function through the
lpContext
variable in
DirectSoundEnumerate
.
The
DSEnumCallback
function returns a boolean value. If the return value is
TRUE
, the
DirectSoundEnumerate
function continues to enumerate additional devices. If the return
value is
FALSE
, the enumeration of additional devices stops.

10 DX9_GP CH10 3/12/04 4:21 PM Page 242
242
Chapter 10
■
DirectSound
n o t e
The primary device is always enumerated twice: once with a value of
NULL
being passed to the
lpGuid
parameter, and a second time with its proper
GUID
.
The sample callback function that follows creates a message box that displays the name of
the current sound device and its driver.
/******************************************************************************
* DirectSoundEnumerate callback function
******************************************************************************/
BOOL CALLBACK DSCallback( GUID* pGUID,
LPSTR strDesc,
LPSTR strDrvName,
VOID* pContext )
{
// temporary variable to hold the information about the device
string tempString;
// Build the string using the information provided to the callback function
tempString = “Device name = “;
tempString += strDesc;
tempString += “\nDriver name = “;
tempString += strDrvName;
// Pop up the message box and display the results
MessageBox (NULL, tempString.c_str(), “message”, MB_OK );
// Continue to enumerate additional devices; return TRUE
return true;
}
A temporary
string
variable is created to hold the informa-
tion. The function returns a value of
TRUE
, so it will enu-
merate all the sound devices in the system. The full source
listing for this example is located in the chapter10\exam-
ple1 directory on the CD-ROM. Figure 10.1 shows what the
message box will look like when displaying the sound
Figure 10.1 Message box
showing the sound device’s
device information.
name and driver.

10 DX9_GP CH10 3/12/04 4:21 PM Page 243
DirectSound
243
Setting the Cooperative Level
Because DirectSound gives you access to a hardware device, it needs to have a cooperative
level set. Similar to DirectInput, DirectSound attempts to gain primary access to a device.
In DirectInput, you can gain exclusive access to an input device, restricting its use to only
your application. In DirectSound, you cannot gain exclusive access to the sound device,
but you can let the operating system know that you want your application to have the
highest priority when it comes to using the sound hardware. Because you cannot gain
exclusive access to the sound card, other applications — including the operating system —
can still trigger sounds to be played.
The three DirectSound cooperative levels are shown next:
■
DSSCL_NORMAL
. This level works best with other applications that still allow other
events. Because your application must share the device, though, you cannot change
the format of the primary buffer.
■
DSSCL_PRIORITY
. If you want more control over the primary buffer and your sounds,
you should use this cooperative level. Most games should use this level.
■
DSSCL_WRITEPRIMARY
. This level gives your application write access to the primary
buffer.
The cooperative level is set using the
SetCooperativeLevel
function. The
IDirectSound8
inter-
face provides this function. The
SetCooperativeLevel
function is defined as follows:
HRESULT SetCooperativeLevel(
HWND hwnd,
DWORD dwLevel
);
The previous function requires two parameters:
■
hwnd
. The handle of the application window requesting the change in cooperative
level
■
dwLevel
. One of the three cooperative levels shown earlier
Here is a sample call to
SetCooperativeLevel
:
// variable to hold the return code
HRESULT hr;
// variable that contains a valid DirectSound device
LPDIRECTSOUND8 g_pDS = NULL;

10 DX9_GP CH10 3/12/04 4:21 PM Page 244
244
Chapter 10
■
DirectSound
hr = DirectSoundCreate8( NULL, & g_pDS, NULL ) ;
// Set DirectSound cooperative level
hr = g_pDS->SetCooperativeLevel( hwnd, DSSCL_PRIORITY );
// Check the return code
if FAILED ( hr )
return false;
In the previous code sample, the cooperative level is being set to the value of
DSSCL_PRIORITY
.
Before you can call the
SetCooperativeLevel
function, you must have a valid pointer to a
DirectSound device.
Now that the cooperative level is set, you can create buffers and load sound data.
Sound Files
You must load sound data within DirectSound into secondary buffers before using it. You
can load background music or sound effects into either a static buffer or a streaming buffer.
A static buffer is a fixed-length buffer that has full sound loaded into it. A streaming buffer
is needed when the sound being loaded is larger than what the buffer can accommodate.
In this case, a small buffer is used, and parts of the sound data are continuously loaded in
and played. The next section discusses how buffers are used in DirectSound.
The Secondary Buffer
DirectSound uses buffers to store the audio data that it needs. Before you can play a
sound, you must create a secondary buffer where the sound can reside. After the buffer is
created, the sound is loaded into it fully (or partially for a streaming sound) and then
played. DirectSound allows for any number of secondary buffers to be played simultane-
ously, all being mixed into the primary buffer.
Before you can create a secondary buffer, you need to know the format of the sound that
will reside in it. DirectSound requires that the buffers you create are of the same format
as the sound within them. For example, if you are loading a 16-bit WAV file that needs two
channels of sound, the secondary buffer you create must be of this format.
Most of the time, all the sounds you use for your game will share a common format,
allowing you to know beforehand which format your buffers require. If you are tasked
with writing a generic audio player, though, you cannot be guaranteed that all the sound
files you load will be the same format.

10 DX9_GP CH10 3/12/04 4:21 PM Page 245
Sound Files
245
The formats of the buffers in DirectSound are described using the
WAVEFORMATEX
structure.
The
WAVEFORMATEX
structure is defined next:
typedef struct {
WORD wFormatTag;
WORD nChannels;
DWORD nSamplesPerSec;
DWORD nAvgBytesPerSec;
WORD nBlockAlign;
WORD wBitsPerSample;
WORD cbSize;
} WAVEFORMATEX;
This structure consists of seven variables.
■
wFormatTag
. The type of waveform audio. For one- or two-channel PCM data, this
value should be
WAVE_FORMAT_PCM
.
■
nChannels
. The number of channels needed.
■
nSamplesPerSec
. The sample rate.
■
nAvgBytesPerSec
. The average data-transfer rate in bytes per second.
■
nBlockAlign
. The alignment in bytes. You determine the value needed here by multi-
plying the number of channels by the bits per sample and then dividing by 8.
■
wBitsPerSample
. The number of bits per sample. This value will be either 8 or 16.
■
cbSize
. The extra number of bytes to append to this structure.
You can create a standard
WAVEFORMATEX
structure if you know the format of the WAV file
data that you will be using. If you aren’t sure, you can create this structure and fill it in
after opening the audio file.
The
WAVEFORMATEX
structure is only part of the information you need when creating a sec-
ondary buffer. Besides specifying the format of the buffer, you need to know additional
information, such as the size of the audio data that the buffer needs to hold.
You need a second structure to finish describing the secondary buffer to DirectSound:
DSBUFFERDESC
. The
DSBUFFERDESC
structure is defined here:
typedef struct {
DWORD
dwSize;
DWORD
dwFlags;
DWORD
dwBufferBytes;
DWORD
dwReserved;
LPWAVEFORMATEX lpwfxFormat;
GUID
guid3DAlgorithm;
} DSBUFFERDESC, *LPDSBUFFERDESC;

10 DX9_GP CH10 3/12/04 4:21 PM Page 246
246
Chapter 10
■
DirectSound
The
DSBUFFERDESC
structure contains six variable components:
■
dwSize
. The size of the
DSBUFFERDESC
structure in bytes.
■
dwFlags
. A
DWORD
set of flags that specify the capabilities of the buffer.
■
dwBufferBytes
. The size of the new buffer. This is the number of bytes of sound data
that this buffer can hold.
■
dwReserved
. A reserved value that must be 0.
■
lpwfxFormat
. An address to a
WAVEFORMATEX
structure.
■
guid3DAlgorithm
. A
GUID
identifier to the two-speaker virtualization algorithm to use.
The
dwFlags
parameter is described in detail in Table 10.1.
Buffers, besides having a format associated with them, also have controls. The controls of
a buffer allow you to manipulate the volume, frequency, and movement. You must spec-
ify the types of controls you want in the
DSBUFFERDESC
structure, shown earlier.
Description
DSBCAPS_CTRL3D
DSBCAPS_CTRLFREQUENCY
DSBCAPS_CTRLFX
DSBCAPS_CTRLPAN
DSBCAPS_CTRLPOSITIONNOTIFY
DSBCAPS_CTRLVOLUME
DSBCAPS_GLOBALFOCUS
If this flag is set and the user switches focus to another application,
DSBCAPS_LOCDEFER
DSBCAPS_LOCHARDWARE
DSBCAPS_LOCSOFTWARE
to be used.
DSBCAPS_MUTE3DATMAXDISTANCE
DSBCAPS_PRIMARYBUFFER
DSBCAPS_STATIC
DSBCAPS_STICKYFOCUS
Table 10.1 DSBUFFERDESC Flags
Value
The buffer has 3D control.
The buffer can control the frequency of the sound.
The buffer supports effects processing.
The buffer can pan the sound.
This is the position notification buffer.
You can control the volume of this buffer.
the sounds in the current application continue to play.
You can place the buffer in software or hardware memory at runtime.
The buffer is to use hardware mixing. If this flag is specified and not
enough memory is available, the call to create the buffer fails.
The buffer is to be placed in software memory, and software mixing is
The sound in this buffer is reduced as its virtual position gets farther
away.
This is the primary buffer.
The buffer is to be placed in on-board hardware memory.
When you’re switching focus to another application, you can still hear
buffers with sticky focus. Normal buffers are muted when this occurs.

10 DX9_GP CH10 3/12/04 4:21 PM Page 247
Sound Files
247
Creating a Secondary Buffer
Now that you’ve created the
DSBUFFERDESC
structure, you are ready to create the actual sec-
ondary buffer. The secondary buffer is created with a call to
CreateSoundBuffer
, defined
here:
HRESULT CreateSoundBuffer(
LPCDSBUFFERDESC pcDSBufferDesc,
LPDIRECTSOUNDBUFFER * ppDSBuffer,
LPUNKNOWN pUnkOuter
);
The
CreateSoundBuffer
function requires only three parameters:
■
pcDSBufferDesc
. Address to an already-defined
DSBUFFERDESC
structure.
■
ppDSBuffer
. Address to the variable that will hold the newly created buffer.
■
pUnkOuter
. Address to the controlling object’s
IUnKnown
interface. This value should
be
NULL
.
A sample call to
CreateSoundBuffer
is shown here:
// Define a WAVEFORMATEX structure
WAVEFORMATEX wfx;
// Clear the structure to all zeros
ZeroMemory( &wfx, sizeof(WAVEFORMATEX) );
// Set the format to WAVE_FORMAT_PCM
wfx.wFormatTag
= (WORD) WAVE_FORMAT_PCM;
// Set the number of channels to 2
wfx.nChannels
= 2;
// Set the samples per second to 22050
wfx.nSamplesPerSec = 22050;
// Compute the nBlockAlign value
wfx.wBitsPerSample = 16;
wfx.nBlockAlign
= (WORD) (wfx.wBitsPerSample / 8 * wfx.nChannels);
// Compute the nAvgBytesPerSec value
wfx.nAvgBytesPerSec = (DWORD) (wfx.nSamplesPerSec * wfx.nBlockAlign);
// Define a DSBUFFERDESC structure
DSBUFFERDESC dsbd;
// Clear the structure to all zeros
ZeroMemory( &dsbd, sizeof(DSBUFFERDESC) );

10 DX9_GP CH10 3/12/04 4:21 PM Page 248
248
Chapter 10
■
DirectSound
// Set the size of the structure
dsbd.dwSize
= sizeof(DSBUFFERDESC);
// Set the flags
dsbd.dwFlags
= 0;
// the size of the buffer
dsbd.dwBufferBytes
= 64000;
// the GUID of the algorithm
dsbd.guid3DAlgorithm = GUID_NULL;
// the address of the WAVEFORMATEX structure
dsbd.lpwfxFormat
= &wfx;
// Define the variable to hold the newly created buffer
LPDIRECTSOUNDBUFFER DSBuffer = NULL;
// Create the sound buffer
hr = g_pDS->CreateSoundBuffer( &dsbd, &DSBuffer, NULL );
// Check the return code to make sure the call to CreateSoundBuffer succeeded
if FAILED (hr)
return NULL;
If the call to
CreateSoundBuffer
was successful, the variable
DSBuffer
will be a valid
DirectSoundBuffer
. In the previous example, the format of the
WAVEFORMATEX
structure was
hard-coded, forcing any sound files that were loaded into this buffer to be of the specified
format and up to 64000 bytes long.
Loading a Sound File into a Buffer
Now that you’ve created the sound buffer, you need to load the sound data into it. Load-
ing sound data into a buffer requires you to first open the file containing the sound data
and then copy its contents into the buffer you created. With a static buffer, all the sound
data is copied into the buffer.
Because a sound buffer is an area of memory controlled by DirectSound, you must lock it
before you can write to it. Locking the buffer prepares the memory to be written to. After
a buffer is locked, your application can begin loading sound data into it. When you are
finished loading the sound data, you must remember to unlock the buffer. Unlocking the
buffer allows DirectSound to manipulate the buffer’s contents again.
Locking the Sound Buffer
Locking the sound buffer gives your code a chance to manipulate and change the sound
data within a buffer. Locking the buffer requires the
Lock
function, defined here:
HRESULT Lock(
DWORD dwOffset,

10 DX9_GP CH10 3/12/04 4:21 PM Page 249
Sound Files
249
DWORD dwBytes,
LPVOID * ppvAudioPtr1,
LPDWORD pdwAudioBytes1,
LPVOID * ppvAudioPtr2,
LPDWORD pdwAudioBytes2,
DWORD dwFlags
);
The
Lock
function requires seven parameters.
■
dwOffset
. This variable specifies where in the buffer the lock should begin.
■
dwBytes
. This is the number of bytes within the buffer to lock.
■
ppvAudioPtr1
. This variable receives a pointer to the first part of the locked buffer.
■
pdwAudioBytes1
. This variable receives the number of bytes in the block pointer by
ppvAudioPtr1
.
■
ppvAudioPtr2
. This variable receives a pointer to the second part of the locked
buffer. If you are filling the whole buffer with sound data, this variable should be
NULL
.
■
pdwAudioBytes2
. This variable receives the number of bytes in the block pointer by
ppvAudioPtr2
. This variable should be
NULL
if you are filling the whole buffer with
sound data.
■
dwFlags
. These are the flags that specify how the lock should occur:
•
DSBLOCK_FROMWRITECURSOR
. Start the lock from the write cursor.
•
DSBLOCK_ENTIREBUFFER
. Lock the entire buffer. If this flag is set, the
dwBytes
variable
is ignored.
Unlocking the Sound Buffer
At this point, you are free to read in the sound data and load it into the buffer. After that
is complete, you can unlock the buffer using the
Unlock
function, shown next:
HRESULT Unlock(
LPVOID pvAudioPtr1,
DWORD dwAudioBytes1,
LPVOID pvAudioPtr2,
DWORD dwAudioBytes2
);

10 DX9_GP CH10 3/12/04 4:21 PM Page 250
250
Chapter 10
■
DirectSound
The
Unlock
function requires four parameters:
■
pvAudioPtr1
. The address of the value from the
ppvAudioPtr1
parameter used in
Lock
.
■
dwAudioBytes1
. The number of bytes written to
pvAudioPtr1
.
■
pvAudioPtr2
. The address of the value from the
ppvAudioPtr2
parameter used in
Lock
.
■
dwAudioBytes2
. The number of bytes written to
pvAudioPtr2
.
Reading the Sound Data into the Buffer
Reading the sound data into the secondary buffer can be complex. To make the explana-
tion easier to understand, I’ll detail this process using the
CWaveFile
class found in the
DirectSound framework classes. The DirectSound framework provides a simple way to
load in sound data using the WAV file format. WAV files are the default Windows sound
format; they have a file extension of
WAV
.
n o t e
The DirectSound framework classes declared within the dsutil.cpp and dsutil.h files provide com-
mon functions that pertain to DirectSound. You can find them in the Samples\C++\Common\Src and
Samples\C++\Common\Inc directories in the folder where you installed the DirectX Software Devel-
opment Kit (SDK).
The first step in loading a WAV file in a DirectSound buffer is to create a
CWaveFile
object.
This object provides you with methods for opening, closing, and reading WAV files. The line
of code that follows shows you how to create a
CWaveFile
object.
CWaveFile wavFileObj = new CWaveFile( );
Next, using the
Open
method provided by
CWaveFile
, you can gain access to the WAV file
you want to use. The code that follows uses the
Open
function and checks to see if the WAV
file contains data.
// Open the WAV file test.wav
wavFile->Open(“test.wav”, NULL, WAVEFILE_READ );
// Check to make sure that the size of the data within the wave file is valid
if( wavFile->GetSize( ) == 0 )
return false;
The previous code opens a file called
test.wav
for reading. It then checks the size of the
data within this file. If the file does not contain data, the code stops reading it.

10 DX9_GP CH10 3/12/04 4:21 PM Page 251
Sound Files
251
The next step is the creation of the secondary sound buffer to hold the WAV data. This
process was shown earlier. After you create the sound buffer, you need to lock it before you
can write the WAV data to it. The following code demonstrates use of the
Lock
function in
preparing a buffer for reading an entire WAV file.
HRESULT hr;
VOID*
pDSLockedBuffer
= NULL;
// pointer to locked buffer memory
DWORD
dwDSLockedBufferSize
= 0; // size of the locked DirectSound buffer
// Start the beginning of the buffer
hr = DSBuffer->Lock( 0,
// This assumes a buffer of 64000 bytes
64000,
// The variable holds a pointer to the start of the buffer
&pDSLockedBuffer,
// holds the size of the locked buffer
&dwDSLockedBufferSize,
NULL,// No secondary is needed
NULL, // No secondary is needed
// Lock the entire buffer
DSBLOCK_ENTIREBUFFER);
// Check the return code to make sure the lock was successful
if FAILED (hr)
return NULL;
The previous code locks a buffer using the
DSBLOCK_ENTIREBUFFER
flag. This causes the buffer
to be locked from beginning to end. The
DSBuffer
variable must be a valid
DirectSoundBuffer
.
Now that the buffer is properly locked, you can write the WAV data into it. Again, I’ll be
using methods provided through the
CWaveFile
class. Before you read the WAV data into
the buffer, you need to reset the WAV data to the beginning. You accomplish this by using
the
ResetFile
method. Next, you use the
Read
method to place the WAV data into the
buffer. The following code sample resets the WAV file for reading and then places the data
into the buffer.
HRESULT hr;
// variable to hold the return code
DWORD
dwWavDataRead
= 0;
// amount of data read from the WAV file
wavFile->ResetFile( );
// Reset the WAV file to the beginning
// Read the WAV file

10 DX9_GP CH10 3/12/04 4:21 PM Page 252
252
Chapter 10
■
DirectSound
hr = wavFile->Read( ( BYTE* ) pDSLockedBuffer,
dwDSLockedBufferSize,
&dwWavDataRead );
// Check to make sure that this was successful
if FAILED (hr)
return NULL;
The
wavFile
variable must contain a valid
CWaveFile
object before its use. First, the
ResetFile
function is called, followed by a call to the
Read
function. The
Read
function requires three
parameters. The first parameter is a pointer to the area of buffer memory to copy the WAV
data into. The second parameter is the size of the locked buffer. The last parameter
receives the amount of data read from the WAV file, in bytes.
After the call to the
Read
function, the buffer is filled with the data from the WAV file. You
can now safely unlock the buffer.
Playing Sound in a Buffer
Now that you have valid sound data in your
DirectSoundBuffer
, you can play the sound that
it contains. After all the work it’s taken to create the buffer and fill it with sound data, play-
ing it is easy. A simple function called
Play
accomplishes this. The
Play
function is a
method provided to you through the
DirectSoundBuffer
object. It’s defined like this:
HRESULT Play(
DWORD dwReserved1,
DWORD dwPriority,
DWORD dwFlags
);
The
Play
function requires three parameters:
■
dwReserved1
. A reserved value that must be set to 0.
■
dwPriority
. The priority level to play the sound. This can be any value between
0
and
0xFFFFFFFF
. You must set the priority level to
0
if the
DSBCAPS_LOCDEFER
flag was
not set when the buffer was created.
■
dwFlags
. The flags that specify how the sound should be played. The only flag that
I’ll explain here is
DSBPLAY_LOOPING
. This flag causes the sound to loop when the end
of the buffer is reached. If this sound should only be played once, a value of
0
should be passed in the
dwFlags
parameter.
The following code causes a sound buffer to play its contents.
DSBuffer->Play( 0, 0, DSBPLAY_LOOPING);

10 DX9_GP CH10 3/12/04 4:21 PM Page 253
Sound Files
253
The
DSBuffer
variable must contain a valid
DirectSoundBuffer
object filled with sound data.
In this instance, the
DSBPLAY_LOOPING
flag is being passed, which causes this sound to loop
after it finishes playing.
Stopping a Sound
Normally, after you start playing a sound, you don’t need to worry about it unless you
have told the sound to loop. In this case, you would need to specifically cause the sound
to stop playing. You do this through the
Stop
method provided by the
DirectSoundBuffer
object, defined next.
HRESULT Stop( );
The
Stop
function does not require parameters. It passes back only a return code that
informs you whether the call was successful.
You can find a full source example that shows how to load a sound file and play it in the
chapter10\example2 directory on the CD-ROM.
Using the Buffer Controls
As I mentioned earlier, DirectSound buffers can control certain aspects of the sound
within them. For instance, through a buffer, you can change the volume, change the fre-
quency, or pan a sound. In this section, you’re going to learn how to use these controls.
Changing the Volume
You can adjust the volume of a sound through the buffer in which it resides. You are
able to adjust the volume between the values of
DSBVOLUME_MIN
and
DSBVOLUME_MAX
. The
DSBVOLUME_MIN
value represents silence, and the
DSBVOLUME_MAX
value represents the original
volume of the sound.
n o t e
DirectSound does not support amplifying sounds, so you can never increase the volume.
You can adjust the volume of a sound through the
SetVolume
function defined here:
HRESULT SetVolume (
LONG lVolume
);
The
SetVolume
function requires only one parameter:
lVolume
. You can set the
lVolume
value
to any value between
0 (DSBVOLUME_MAX)
and
-10000 (DSBVOLUME_MIN)
.

10 DX9_GP CH10 3/12/04 4:21 PM Page 254
254
Chapter 10
■
DirectSound
You can get the current volume at which a sound is playing by using the
GetVolume
func-
tion. This function is defined next:
HRESULT GetVolume (
LPLONG plVolume
);
The
GetVolume
function requires only one parameter: a pointer to a variable that will receive
the current volume.
n o t e
Before you can use the
SetVolume
and
GetVolume
functions, you must set the buffer to use these
controls. You need to set the flag
DSBCAPS_CTRLVOLUME
in the
DSBUFFERDESC
structure when you
create the secondary buffer.
Panning the Sound
DirectSound buffers allow a sound to be panned between the left and right speakers. Pan-
ning is lowering the volume of a sound in one speaker and increasing it in the opposite
speaker. Sounds seem to move around.
Panning uses a similar concept to the
SetVolume
function. The left and right speakers can
be made to raise and lower their volumes independently using two values:
DSBPAN_LEFT
and
DSBPAN_RIGHT
.
The
DSBPAN_LEFT
value, which is equivalent to –10000, increases the volume of sound in the
left speaker to full while silencing the sound in the right speaker. The
DSBPAN_RIGHT
value,
which is defined as 10000, does the opposite, increasing the volume in the right speaker
while silencing the sound in the left. By using values between
DSBPAN_LEFT
and
DSBPAN_RIGHT
,
sounds can be made to pan from one speaker to the other.
A third value,
DSBPAN_CENTER
, defined as 0, resets both the left and right sides to full volume.
The amount of panning that the sound in the buffer uses is set using the function
SetPan
,
defined next:
HRESULT SetPan(
LONG lPan
);
The
SetPan
function requires only one parameter,
lPan
, which takes any value between
DSBPAN_LEFT
and
DSBPAN_RIGHT
.

10 DX9_GP CH10 3/12/04 4:21 PM Page 255
Chapter Summary
255
If you want to get the current pan value, use the function
GetPan
, shown here:
HRESULT GetPan(
LPLONG plPan
);
The
GetPan
function needs one parameter:
plPan
. The
plPan
variable is a pointer to a
LONG
that will receive the current value of panning.
n o t e
Before you can use the
SetPan
and
GetPan
functions, you must set the buffer to use these controls.
You need to set the
DSBCAPS_CTRLPAN
flag in the
DSBUFFERDESC
structure when you create the
secondary buffer.
Chapter Summary
Using what you’ve learned in this chapter, you should be able to play background music
or simple sound effects within your game. You can extend the lessons in this chapter to
playing multiple sounds simultaneously, creating dynamic music that can be changed and
manipulated within your game.
In the next chapter, you’ll put together everything you’ve learned to create a simple game
that utilizes each of the areas covered in this book.
What You Have Learned
In this chapter, you learned the following:
■
How DirectSound is used
■
Which different types of sound buffers are available
■
How to enumerate sound devices installed on the system
■
How to load and play a WAV file
■
How to control the playback of a sound file
Review Questions
You can find the answers to Review Questions and On Your Own exercises in Appendix
A, “Answers to End-of-Chapter Exercises.”
1. When must you use the
DirectSoundEnumerate
function?
2. Which three important pieces of data are passed to the enumeration callback
function?

10 DX9_GP CH10 3/12/04 4:21 PM Page 256
256
Chapter 10
■
DirectSound
3. Does the format of a buffer need to match the format of its contents?
4. What is the purpose of the primary buffer?
5. What value is passed to
DirectSoundCreate8
to specify that the default sound device
is used?
On Your Own
1. Write a small sample that allows you to adjust the volume of a sound while it’s
playing.
2. Write a small sample to allow the sound to be panned using the arrow keys.

11 DX9_GP CH11 3/12/04 4:21 PM Page 257
chapter 11
The Final Project
Y
ou’ve made it to the final chapter! Congratulations! You’ve seen DirectX take a
simple empty window and fill it with a virtual world. Now it’s your turn to create
a working 3D demo using the components of DirectX.
After the demo is completed, I’ll explain how you can release your game creation to the
world.
Here’s what you’ll learn in this chapter:
■
How to create a DirectX Manager to simplify DirectX creation
■
How to design and code a simple game framework
■
Why it’s best to use inheritance when creating game objects
■
How to encompass rendering of all your in-game objects
■
How to allow your 3D objects to move in relative directions
■
How to bundle and release your game to the world
Welcome to the Final Project
The final project takes a lot of what you’ve learned throughout this book and applies it to
a single application. I’m going to show you how to encapsulate the functionality of the
DirectX components to keep your game code neat and easy to maintain. Even though this
is the final project, I’m still going to explain each step in detail, reducing the amount of
time you’ll need to spend rereading other chapters.
257
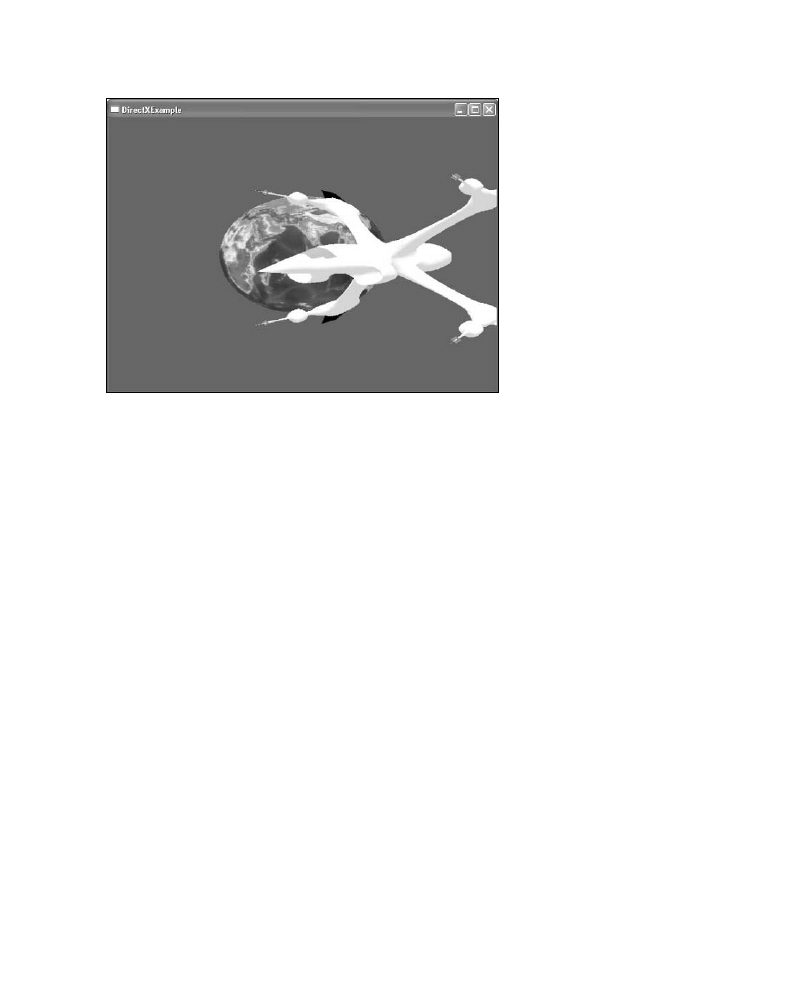
11 DX9_GP CH11 3/12/04 4:21 PM Page 258
258
Chapter 11
■
The Final Project
Figure 11.1 This is what the final project will look like.
The final project gives you the chance to take flight in a spaceship as you circle an Earth-
like planet. The spaceship, which can fly in multiple directions, will be yours to control.
Figure 11.1 shows what the final outcome of this project will be.
Now that you know where you’re going, let’s get started.
Creating the Application Window
The application window is the container in which your game world will live; it’s the first
thing you need to create. You can start out by loading the
winmain.cpp
file from the chap-
ter11\part1 directory on the CD-ROM and following along, or just look at the code list-
ings in this chapter.
I’ve chosen to encapsulate all the main interface and window creation code in a single
place. The
WinMain
function is the entry point for any Windows application, and this is
where you’ll start.
WinMain
The
WinMain
function serves two main purposes. First, it’s where you initialize your appli-
cation; second, it provides your application with a message loop. The message loop, which
is required by every windowed application, handles the collecting and processing of mes-
sages that the system sends to the application.

11 DX9_GP CH11 3/12/04 4:21 PM Page 259
Creating the Application Window
259
The
WinMain
function that I’ve provided in the following code has only the absolute mini-
mum code you need to start the application.
/******************************************************************************
* WinMain
******************************************************************************/
int WINAPI WinMain(HINSTANCE hInstance,
HINSTANCE hPrevInstance,
LPTSTR lpCmdLine,
int nCmdShow)
{
// Call the function to init and create the window
if (!initWindow (hInstance))
{
MessageBox (NULL, “Unable to create window”, “ERROR”, MB_OK);
return false;
}
// main message loop
// Enter the message loop
MSG msg;
ZeroMemory (&msg, sizeof (msg));
while ( msg.message!=WM_QUIT )
{
// Check for messages
if (PeekMessage ( &msg, NULL, 0U, 0U, PM_REMOVE ) )
{
TranslateMessage (&msg);
DispatchMessage (&msg);
}
}
return (int) msg.wParam;
}
Because the code needed to create the application window can be cumbersome, I’ve sep-
arated it into the
initWindow
function.
initWindow
The
initWindow
function handles the actual window creation. As you might recall, each
application window that is created needs to have a window class registered with the
system. The window class, defined in the
WNDCLASSEX
structure, contains a collection of

11 DX9_GP CH11 3/12/04 4:21 PM Page 260
260
Chapter 11
■
The Final Project
properties that the system uses to define the window. After the window class is defined in
the
WNDCLASSEX
structure, it is passed to the
RegisterClassEx
function to notify the system of
its existence.
After the window class is registered, you can create your window. You create the applica-
tion by using the
CreateWindow
function. This function pulls together the properties from
the window class and its own parameters to define and create the application window. The
size of the window and its name are passed as parameters to the
CreateWindow
function.
/******************************************************************************
* initWindow
******************************************************************************/
bool initWindow (HINSTANCE hInstance)
{
WNDCLASSEX wcex;
// Register the window class for this application
wcex.cbSize
= sizeof (WNDCLASSEX);
wcex.style
= CS_HREDRAW | CS_VREDRAW;
wcex.lpfnWndProc
= (WNDPROC) WndProc;
wcex.cbClsExtra
= 0;
wcex.cbWndExtra
= 0;
wcex.hInstance
= hInstance;
wcex.hIcon
= 0;
wcex.hCursor
= LoadCursor (NULL, IDC_ARROW);
wcex.hbrBackground
= (HBRUSH) (COLOR_WINDOW+1);
wcex.lpszMenuName
= NULL;
wcex.lpszClassName
= “DirectXExample”;
wcex.hIconSm
= 0;
RegisterClassEx (&wcex);
// Create the application window
wndHandle = CreateWindow(“DirectXExample”,
“DirectXExample”,
WS_OVERLAPPEDWINDOW,
CW_USEDEFAULT,
CW_USEDEFAULT,
640,
480,
NULL,
NULL,
hInstance,

11 DX9_GP CH11 3/12/04 4:21 PM Page 261
Creating the Application Window
261
NULL);
// Make sure that the window handle is valid
if (!wndHandle)
return false;
// Show and update the newly created window
ShowWindow (wndHandle, SW_SHOW);
UpdateWindow (wndHandle);
return true;
}
At this point, the system considers you to have a valid and usable window that you can
display using the
ShowWindow
and
UpdateWindow
functions. Although you might have a win-
dow, without a window procedure, you won’t be able to process messages that come to
your application. The final step needed in window creation is the addition of the window
procedure.
WndProc
The window procedure is where the messages for your application from the user and the
system are sent. Using a simple
switch
statement, you determine the messages that your
application needs to handle.
For this example, only one message needs to be handled:
WM_DESTROY
. This message is sent
to an application when the user clicks on the X button of the window.
/******************************************************************************
* WndProc
******************************************************************************/
LRESULT CALLBACK WndProc(HWND hWnd, UINT message, WPARAM wParam, LPARAM lParam)
{
switch (message)
{
case WM_DESTROY:
PostQuitMessage(0);
break;
}
return DefWindowProc(hWnd, message, wParam, lParam);
}
You can find everything that I’ve explained so far in the chapter11\part1 directory on the
CD-ROM. If you load the project in that directory and compile it, you’ll see the blank
window shown in Figure 11.2.

11 DX9_GP CH11 3/12/04 4:21 PM Page 262
262
Chapter 11
■
The Final Project
Figure 11.2 A blank application window.
Initializing DirectX
Getting DirectX up and running is the next step in the project. You’ll be using multiple
components from DirectX to provide your application with 3D object rendering, as well
as input. To make setting up DirectX easy, I’ve packed all the functions you need into the
DirectX Manager class.
The DirectX Manager
The DirectX Manager is responsible for setting up your application and giving it a place
to render game objects. Because it’s easiest to keep all the needed DirectX functions
together, I’ve placed them into a class called
dxManager
.
The
dxManager
class contains functions for creating the Direct3D object, setting the default
rendering states, and preparing your scene for rendering. The following list presents
dxManager
functions:
■
init
. Initializes the
dxManager
and creates the Direct3D object.
■
shutdown
. Cleans up and releases the Direct3D object.
■
beginRender
. Prepares DirectX for rendering. This function is called before you
draw anything to the screen.
■
endRender
. Ends drawing and presents the objects to the screen.
■
getSurfaceFromBitmap
. Loads a bitmap from disk and applies it to an offscreen
surface.

11 DX9_GP CH11 3/12/04 4:21 PM Page 263
Initializing DirectX
263
■
getBackBuffer
. Returns a pointer to the current back buffer.
■
blitToSurface
. Copies a rectangular portion of an offscreen surface to the back
buffer.
■
createVertexBuffer
. Simplifies the creation of a vertex buffer.
The following code defines the structure of the
dxManager
class.
/*****************************************************************************
* dxManager class
*****************************************************************************/
class dxManager
{
public:
~dxManager(void);
// The dxManager is treated as a single object using the
// singleton design pattern
static dxManager& getInstance()
{
static dxManager pInstance;
return pInstance;
}
// Initialize the dxManager
bool init(HWND hwnd);
// Shut down the dxManager
void shutdown(void);
// called before any rendering
void beginRender(void);
// follows any rendering
void endRender(void);
// loads a bitmap into a Direct3D surface
IDirect3DSurface9* getSurfaceFromBitmap(std::string filename);
// returns a pointer to the back buffer
IDirect3DSurface9* getBackBuffer(void);
// an inline function used to return the current Direct3D device
inline LPDIRECT3DDEVICE9 getD3DDevice(void) { return pd3dDevice; }

11 DX9_GP CH11 3/12/04 4:21 PM Page 264
264
Chapter 11
■
The Final Project
// Copy an offscreen surface to the back buffer
void blitToSurface(IDirect3DSurface9* srcSurface,
const RECT *srcRect,
const RECT *destRect);
// used to easily create a vertex buffer
LPDIRECT3DVERTEXBUFFER9 createVertexBuffer(int size, DWORD usage);
private:
dxManager(void);
// the Direct3D object
LPDIRECT3D9
pD3D;
// the Direct3D device
LPDIRECT3DDEVICE9
pd3dDevice;
// screen details
int screen_width;
int screen_height;
};
If you are interested in the implementation of all the functions found in the
dxManager
, you
can find the source code for this class in the chapter11\part2 directory on the CD-ROM.
The
dxManager
class resides in the
dxManager.h
and
dxManager.cpp
files.
Hooking in the DirectX Manager
You access the
dxManager
class primarily from within the application’s
WinMain
function. The
dxManager
waits until the main application window is created before trying to start up
DirectX. If the
dxManager
class successfully initializes DirectX using the
init
function, the
application is then allowed to start the application’s message loop.
The second
dxManager
function used by
WinMain
is
shutdown
. The
shutdown
function is called
after the game is over and the application window is closing. Called directly after the mes-
sage loop ends, the
shutdown
function releases the Direct3D object and device before exiting.
An updated
WinMain
function is shown here, using functions from the
dxManager
class. The
changes to the default
WinMain
function are highlighted in bold.
/* Get a reference to the DirectX Manager */
static dxManager& dxMgr = dxManager::getInstance();
/*****************************************************************************
* WinMain - updated to include the DirectX Manager class
******************************************************************************/
int WINAPI WinMain(HINSTANCE hInstance,

11 DX9_GP CH11 3/12/04 4:21 PM Page 265
Initializing DirectX
265
HINSTANCE hPrevInstance,
LPTSTR lpCmdLine,
int nCmdShow )
{
// Call the function to init and create the window
if (!initWindow(hInstance))
{
MessageBox(NULL, “Unable to create window”, “ERROR”, MB_OK);
return false;
}
// Initialize DirectX through the dxManager
if (!dxMgr.init(wndHandle))
{
MessageBox(NULL, “Unable to init DirectX”, “ERROR”, MB_OK);
return false;
}
// main message loop
// Enter the message loop
MSG msg;
ZeroMemory( &msg, sizeof(msg) );
while( msg.message!=WM_QUIT )
{
// Check for messages
if( PeekMessage( &msg, NULL, 0U, 0U, PM_REMOVE ) )
{
TranslateMessage( &msg );
DispatchMessage( &msg );
}
}
// Shut down the DirectX Manager
dxMgr.shutdown();
return (int) msg.wParam;
}
You probably noticed immediately the first line of code before
WinMain
:
static dxManager& dxMgr = dxManager::getInstance();

11 DX9_GP CH11 3/12/04 4:21 PM Page 266
266
Chapter 11
■
The Final Project
This single line of code allows the code within the winmain.cpp source file to gain access
to the functions in the
dxManager
class. The
dxManager
class is defined as a singleton, mean-
ing that only one instance of this class can exist in the application. You’ll have use for the
dxManager
multiple places in the project. Defining the class as a singleton prevents your
application from accidentally creating multiple instances.
n o t e
Singletons are just one instance of C++ design patterns that help make your code more robust.
Coding the Demo
Now that you see what’s needed just to get an application and DirectX up and running,
it’s time to move on to coding the actual project demo.
The Game Application Class
I created the
Game
application class to serve as a container for the base functionality that
each game needs. This class provides you with a single point to initialize your game, as well
as a way to update your game objects and render them to the screen. The
Game
class also pro-
vides your game with the needed variables and functions to implement a game timer.
The
Game
application class provides you with four functions:
■
init
. This function gives you a place to initialize your game objects.
■
shutdown
. The
shutdown
function provides you with a place to release your objects
and the memory they use.
■
update
. Each game object’s position and internal properties are updated in this
function.
■
render
. The scene is rendered and sent to the screen for display.
As you go further into the project, you’ll add more functionality to the
Game
application
class. The
Game
class definition is shown here.
/*****************************************************************************
* Game class
******************************************************************************/
class Game
{
public:
Game(void);
~Game(void);

11 DX9_GP CH11 3/12/04 4:21 PM Page 267
Coding the Demo
267
bool init(HWND wndHandle);
void shutdown(void);
int update(void);
void render(void);
private:
// timer variables
LARGE_INTEGER timeStart;
LARGE_INTEGER timeEnd;
LARGE_INTEGER timerFreq;
float
anim_rate;
};
Creating the Game Timer
The game timer is an important piece of any game. It helps to keep your animation
smooth and your game moving at a constant rate. For the purposes of this project, I’m
going to go with the simple timer method that I introduced previously.
The
Game
class contains four variables that provide a timer to your application:
■
timeStart
. Holds the value of when the timer starts
■
timeEnd
. The value of when the timer is stopped
■
timerFreq
. The frequency of the hardware timer
■
anim_rate
. A value calculated each frame to provide your game with a timer-based
animation value
The timer variables work together, providing your game with a steady animation rate. The
timeStart
variable is filled with the current time at the beginning of each frame. Your game
then updates and renders the game objects. Afterward, the
timeEnd
variable is filled with
the new time. The animation rate, stored in the
anim_rate
variable, is then calculated by
determining the difference in time between the
timeEnd
and
timeStart
variables. To get the
final animation rate, you divide the result by the timer frequency. Each frame, the anima-
tion rate is passed to the
update
function of in-game objects to affect how far they can
move around in the world.
The following code demonstrates how to calculate the animation rate.
// Determine the animation rate
anim_rate = ( (float)timeEnd.QuadPart –
(float)timeStart.QuadPart ) /
timerFreq.QuadPart;

11 DX9_GP CH11 3/12/04 4:21 PM Page 268
268
Chapter 11
■
The Final Project
Hooking the Game Application into WinMain
Now that the
Game
application object is defined, you need to add it to the
WinMain
function.
You create the
Game
application object after the application window appears and you’ve
initialized DirectX.
The following code shows how the
Game
application object fits into the
WinMain
function.
Again, the changes to the
WinMain
function are highlighted in bold.
/* Get a reference to the DirectX Manager */
static dxManager& dxMgr = dxManager::getInstance();
/******************************************************************************
* WinMain - updated to include the DirectX Manager class
*******************************************************************************/
int WINAPI WinMain(HINSTANCE hInstance,
HINSTANCE hPrevInstance,
LPTSTR lpCmdLine,
int nCmdShow )
{
// Call your function to init and create your window
if (!initWindow(hInstance))
{
MessageBox(NULL, “Unable to create window”, “ERROR”, MB_OK);
return false;
}
// Initialize DirectX through the dxManager
if (!dxMgr.init(wndHandle))
{
MessageBox(NULL, “Unable to init DirectX”, “ERROR”, MB_OK);
return false;
}
// Create a pointer to a new Game application object
Game *pGame = new Game();
// Initialize the Game application object
if (!pGame->init(wndHandle))
return 0;
// main message loop
// Enter the message loop

11 DX9_GP CH11 3/12/04 4:21 PM Page 269
Coding the Demo
269
MSG msg;
ZeroMemory( &msg, sizeof(msg) );
while( msg.message!=WM_QUIT )
{
// Check for messages
if( PeekMessage( &msg, NULL, 0U, 0U, PM_REMOVE ) )
{
TranslateMessage( &msg );
DispatchMessage( &msg );
}
else
{
// Call the Game application object’s update
//
and render functions
pGame->update();
pGame->render();
}
}
// Shut down the Game application object
pGame->shutdown();
// Remove the pGame object
if (pGame)
delete pGame;
// Shut down the DirectX Manager
dxMgr.shutdown();
return (int) msg.wParam;
}
The
Game
application object is created by calling the constructor of the
Game
class. In the
previous code, a pointer called
pGame
holds the newly created
Game
object. After the
Game
application object comes to life, you must initialize it by calling the
init
function. Now
that the object is up and running, you can call its two most important functions:
update
and
render
. You place the
update
and
render
functions in an
else
block following the mes-
sage loop, which causes them to be called once per frame. The
update
function handles get-
ting user input, as well as updating the position of objects in the game world. The main
task of the
render
function is drawing each of the in-game objects to the screen.

11 DX9_GP CH11 3/12/04 4:21 PM Page 270
270
Chapter 11
■
The Final Project
The
render
function, shown here, also has the job of updating the animation rate by query-
ing the amount of time it takes to render the scene.
/******************************************************************************
* render - Draws all the in-game objects to the screen
******************************************************************************/
void Game::render(void)
{
// Get the time before rendering
QueryPerformanceCounter(&timeStart);
// Call your render function
dxMgr.beginRender();
// End rendering
dxMgr.endRender();
// Get the updated time
QueryPerformanceCounter(&timeEnd);
// Determine the animation rate
anim_rate = ( (float)timeEnd.QuadPart –
(float)timeStart.QuadPart ) /
timerFreq.QuadPart;
}
The
render
function calls the
beginRender
and
endRender
functions from the
dxManager
object
to prepare Direct3D for drawing. Between these two calls is where the actual rendering
takes place. In the previous code, a
for
loop iterates through the in-game objects, calling
their individual
render
functions.
Adding Objects to the World
Up until now, you’ve been building the basic framework you need to support your game.
Taking the code that has been presented so far, you can begin any number of game
projects.
Now that the basic framework is complete, you can start adding objects to the world.
Every object, regardless of its type, has the following properties and functions:
■
position
. Every object needs a position in world space. The position is stored in a
vector.
■
model
. The
model
property represents the actual vertices of the object.
■
create
function. The object is created and initialized with the
create
function.

11 DX9_GP CH11 3/12/04 4:21 PM Page 271
Adding Objects to the World
271
■
render
function. This function performs the actual drawing of the object.
When you’re creating your game objects, you can implement each of these properties in
each object individually, or you can take advantage of inheritance. Inheritance in C++
allows you to create a parent class from which you can derive additional classes that con-
tain the parent’s functionality. Because of the common properties that all in-game objects
share, I’ve chosen to create a parent class called
CGameObject
upon which all objects in the
game are based.
The CGameObject Class
The
CGameObject
class, which is shown in the next block of code, contains the properties I
described earlier. The
create
and
render
functions are defined as pure virtual functions,
which means that any class that inherits from the
CGameObject
class must implement these
two functions.
In addition, two variables —
Model
and
position
— are listed in the
protected
area of the
CGameObject
class definition. By creating these variables as
protected
, you make them acces-
sible to a child class.
/*****************************************************************************
* CGameObject class
* The parent class for all in-game objects
******************************************************************************/
class CGameObject
{
public:
CGameObject(void);
virtual ~CGameObject(void);
// Abstract methods must be overridden in child classes
virtual bool create(LPDIRECT3DDEVICE9 device) = 0;
virtual void render(LPDIRECT3DDEVICE9 device) = 0;
protected:
CModel *Model;
// a pointer to a model object
D3DXVECTOR3 position;
// the position of this object in world space
};
The
CGameObject
definition primarily contains data types you’ve seen before, except for the
CModel
type. The
CModel
type is a class I’ve defined that holds the actual object vertices. By
abstracting out this functionality, you can have game objects that contain more than one
model.

11 DX9_GP CH11 3/12/04 4:21 PM Page 272
272
Chapter 11
■
The Final Project
The CModel Class
The
CModel
class is essentially a wrapper for a
D3DXMESH
object. I’ve chosen to encapsulate
the loading and rendering of a
D3DXMESH
object away from the code needed to position it.
Each object that is created from the
CModel
class has the built-in functionality you need to
both load and render an X file model. Because I restricted the
CModel
class to performing
a single task, I can reuse this class in multiple projects whenever I need to work with X
files. Future projects that require model loading will take less time to code because I now
have drop-in reusable code.
n o t e
A black box is a way of describing an object in which you are aware of only what data goes in and
what data you expect out. How the data is returned is unimportant.
How CModel Is Put Together
The
CModel
class is essentially used as a black box. I tell the class to load a mesh from disk,
and the class performs that action. The rest of the code has no idea how this task is per-
formed, and that’s okay. The rest of the game can just assume that
CModel
will contain a
valid
D3DXMESH
object.
The
CModel
function contains two functions:
■
loadModel
. This function loads an X file from disk and places it in a
D3DXMESH
object.
■
render
. This function handles the actual drawing of the vertices and materials
contained within a
D3DXMESH
object.
In addition, the
CModel
class contains the following private member variables:
■
mesh
. The
mesh
variable is a pointer to the
D3DXMESH
object.
■
numMaterials
. This
DWORD
type variable is responsible for counting the number of
materials contained in the mesh.
■
matBuffer
. The
matBuffer
variable holds the material buffer for the mesh. Each item
in the material buffer contains information describing the color, texture, or
amount of light that the mesh reflects.
■
m_pMeshTextures
. This variable is an array of
DIRECT3DTEXTURE9
objects. Each of these
objects describes the texture used for a portion of the mesh.
■
m_pMeshMaterials
. The
m_pMeshMaterials
variable contains an array of
D3DMATERIAL9
objects. Each of these objects describes the material used for a portion of the
mesh.

11 DX9_GP CH11 3/12/04 4:21 PM Page 273
Adding Objects to the World
273
The
CModel
class definition is shown next.
/******************************************************************************
* CModel class
* Contains the needed functions to support a D3DXMESH object
******************************************************************************/
class CModel
{
public:
CModel(void);
virtual ~CModel(void);
// loads an X file from disk
bool loadModel(LPDIRECT3DDEVICE9 device, std::string filename);
// renders the mesh
void render(LPDIRECT3DDEVICE9 pDevice);
private:
// pointer to a D3DXMESH object
LPD3DXMESH mesh;
// holds the number of materials contained within the mesh
DWORD
numMaterials;
// the mesh’s material buffer
LPD3DXBUFFER matBuffer;
// an array of DIRECT3DTEXTURE9 objects
LPDIRECT3DTEXTURE9* m_pMeshTextures;
// an array of D3DMATERIAL9 objects
D3DMATERIAL9* m_pMeshMaterials;
};
How CModel Works
Because the
CModel
class is potentially useful in other projects, I’m going to take the time
to describe the implementation of the
loadModel
and
render
functions.
The
loadModel
function consists of all the code you need to load in an X file from disk con-
taining both materials and textures. The
loadModel
function starts out by calling
D3DXLoad-
MeshFromX
, which is responsible for loading the model. If this call is successful, the materials
and textures that are contained in the material buffer are extracted into separate arrays.

11 DX9_GP CH11 3/12/04 4:21 PM Page 274
274
Chapter 11
■
The Final Project
The two arrays, shown next, are created based on the number of materials contained in
the
numMaterials
variable.
m_pMeshMaterials = new D3DMATERIAL9 [numMaterials];
m_pMeshTextures = new LPDIRECT3DTEXTURE9 [numMaterials];
After the arrays are created, a
for
loop iterates through the material buffer, assigning the
materials and textures to their appropriate places in the arrays.
Following is the full source code for the
loadModel
function.
/*****************************************************************************
* loadModel
* Performs the loading of an X file model from disk
*****************************************************************************/
bool CModel::loadModel(LPDIRECT3DDEVICE9 device, std::string filename)
{
HRESULT hr;
hr = D3DXLoadMeshFromX(filename.c_str(),
D3DXMESH_SYSTEMMEM,
device,
NULL,
&matBuffer,
NULL,
&numMaterials,
&mesh);
if FAILED(hr)
return false;
D3DXMATERIAL* matMaterials;
matMaterials = (D3DXMATERIAL*)matBuffer->GetBufferPointer();
//Create two arrays: to hold the materials and the textures
m_pMeshMaterials = new D3DMATERIAL9 [numMaterials];
m_pMeshTextures = new LPDIRECT3DTEXTURE9 [numMaterials];
// Iterate through the materials
for (DWORD i = 0; i < numMaterials; i++)
{
//Copy the material
m_pMeshMaterials[i] = matMaterials[i].MatD3D;

11 DX9_GP CH11 3/12/04 4:21 PM Page 275
Adding Objects to the World
275
//Set the ambient color for the material (D3DX does not do this)
m_pMeshMaterials[i].Ambient = m_pMeshMaterials[i].Diffuse;
// Make sure the texture name is valid
if (matMaterials[i].pTextureFilename != NULL)
{
// Load the texture
hr = D3DXCreateTextureFromFile( device,
matMaterials[i].pTextureFilename,
&m_pMeshTextures[i]);
If (FAILED (hr))
return false;
}
// If there is no texture name, then NULL this spot in the list
else
m_pMeshTextures[i] = NULL;
}
// Release the material buffer
if (matBuffer)
matBuffer->Release();
return true;
}
The
render
function is responsible for drawing the mesh that is contained in the
D3DXMESH
object.
Each frame, the
render
function loops through the material and texture arrays, drawing
each portion of the mesh using the
DrawSubset
function. The mesh is separated in the
D3DXMESH
object based on the material and texture that are applied to each portion. If a
mesh contains more than one material, multiple calls to
DrawSubset
must be made to draw
the entire mesh.
The full source code for the
render
function is shown next.
/******************************************************************************
* render
* Renders a mesh contained in a D3DXMESH object
******************************************************************************/
void CModel::render(LPDIRECT3DDEVICE9 pDevice)
{
for( DWORD i=0; i<numMaterials; i++ )
{

11 DX9_GP CH11 3/12/04 4:21 PM Page 276
276
Chapter 11
■
The Final Project
// Set the material and texture for this subset
pDevice->SetMaterial( &m_pMeshMaterials[i] );
// Set the texture if a texture is used for this material
if (m_pMeshTextures != NULL)
pDevice->SetTexture( 0, m_pMeshTextures[i] );
// Draw the mesh subset
mesh->DrawSubset( i );
}
}
The Game Object List
Now that you know how each of the in-game objects is going to be stored, the only other
thing you need to know is how you will access these objects. Because each object in the
game is going to inherit from the
CGameObject
class, you can store the objects in a vector
within the
Game
application object.
std::vector <CGameObject*> objects;
The vector of
CGameObjects
, referred to by the
objects
variable, is responsible for keeping
valid pointers to each object in the game. During the
Game
object’s
render
function, the
CGameObjects
vector is iterated through and each of the models contained within it is ren-
dered to the screen. The updated
render
function is shown here.
/*****************************************************************************
* render - Draws all the in-game objects to the screen
******************************************************************************/
void Game::render(void)
{
// Get the time before rendering
QueryPerformanceCounter(&timeStart);
// Call the render function
dxMgr.beginRender();
// Render by looping through all the objects in the list
for (unsigned int i=0; i<objects.size(); i++)
objects[i]->render(dxMgr.getD3DDevice());
// End rendering
dxMgr.endRender();

11 DX9_GP CH11 3/12/04 4:21 PM Page 277
Creating the Planet
277
// Get the updated time
QueryPerformanceCounter(&timeEnd);
// Determine the animation rate
anim_rate = ( (float)timeEnd.QuadPart –
(float)timeStart.QuadPart ) /
timerFreq.QuadPart;
}
Creating the Planet
The first object you’re going to create for your game universe is a single planet. The planet,
which will reside directly in the center of the universe, will consist of a simple spherical
mesh covered with a texture of the earth. You can call this planet Earth if you want to, but
it’s just a coincidence that the planets will end up looking the same.
The first step to bringing your planet into being is creating the
CPlanet
class.
The CPlanet Class
The
CPlanet
class contains everything that your game needs to know to both load and ren-
der the planet. Because the
CPlanet
class is inherited from
CGameObject
, it automatically has
a model and position associated with it. It wouldn’t make sense to inherit from the
CGameObject
class without specifying properties that were unique to the planet, so I’ve
added two additional private variables:
size
and
rotationRate
.
n o t e
The planet requires the sphere.x and earth.bmp files from the DirectXSDK\Samples\Media directory.
The
CPlanet
class uses the
size
variable to describe how large the planet should be when
it’s drawn. The
rotationRate
specifies how quickly the planet makes a complete orbit.
The
CPlanet
class definition is shown here.
/******************************************************************************
* CPlanet class
******************************************************************************/
class CPlanet : CGameObject
{
public:
CPlanet(void);
~CPlanet(void);
// helper function to set the size of the planet

11 DX9_GP CH11 3/12/04 4:21 PM Page 278
278
Chapter 11
■
The Final Project
void setSize(float planetSize);
// overridden methods from the parent class
bool create(LPDIRECT3DDEVICE9 device);
void render(LPDIRECT3DDEVICE9 device);
private:
// the size of the planet
float size;
// the rotation rate of the planet
float rotationRate;
};
The
create
and
render
functions are declared in the class definition. Because these two
functions were declared as pure virtual in the
CGameObject
class, you have to implement
them in the
CPlanet
class.
The Create Function
The
create
function initializes the planet object to a default location and loads the X file
model. First, set the position vector, placing the planet at the origin of the universe.
Because this is where the planet will reside anyway, there is no point in moving it. Next,
create the
CModel
object and send the
sphere.x
file to the
loadModel
function. If the
loadModel
function succeeds, it causes the
create
function to return
TRUE
to its caller. Because the
sphere.x
file also specifies a texture, the
CModel
class automatically loads it.
Following is the full source code for the
create
function.
/*****************************************************************************
* create
* Handles positioning the object to a default location (origin) and loading
* in the object model.
*****************************************************************************/
bool CPlanet::create(LPDIRECT3DDEVICE9 device)
{
position.x = 0.0f;
position.y = 0.0f;
position.z = 0.0f;
// Create the model for this planet
Model = new CModel();
return Model->loadModel(device, “sphere.x”);
}

11 DX9_GP CH11 3/12/04 4:21 PM Page 279
Creating the Planet
279
The Render Function
The
render
function has two jobs: setting up the matrices to correctly position and orient
the planet, and rendering the model. The
render
function starts by translating the planet
to its proper position with a call to
D3DXMatrixTranslation
, which generates the
transMatrix
variable. Next, you use the
D3DXMatrixRotationY
function to create the rotation matrix.
Finally, you scale the planet to the correct size by using the
D3DXMatrixScaling
function,
where the
scaleMatrix
is created.
Now that you’ve created all three matrices, you must generate a final transformation that
will place the planet in the correct position in world space. The first step is to multiply the
rotation and translation matrices.
// Multiply the rotation matrix by the translation
D3DXMatrixMultiply(&transMatrix, &rotateMatrix, &transMatrix);
rotateMatrix
is multiplied by
transMatrix
, placing the result back into
transMatrix
. The
transMatrix
variable now contains the planet’s properly positioned and rotated orientation.
Next, you must apply scaling to properly resize the planet model. Here, multiply
scaleMatrix
by
transMatrix
. The result is placed back into the
transMatrix
variable.
// Multiply the translation matrix by the scale
D3DXMatrixMultiply(&transMatrix, &scaleMatrix, &transMatrix);
Finally, you have a matrix, contained in the
transMatrix
variable, that will take the
planet model and place it where you want it in world space. The final step is to call the
SetTransform
function, passing in the
transMatrix
variable.
// Transform the object into world space
device->SetT7ransform(D3DTS_WORLD, &transMatrix);
Now that you have set the transform for the planet correctly, you must call the
CModel
ren-
der function to draw the planet.
Following is the full source code listing for the
render
function.
/****************************************************************************
* render
* Sets up the appropriate matrices for positioning and rendering the planet
****************************************************************************/
void CPlanet::render(LPDIRECT3DDEVICE9 device)
{
D3DXMATRIX transMatrix;
// the translation matrix
D3DXMATRIX scaleMatrix;
// the scale matrix
D3DXMATRIX rotateMatrix;
// the rotation matrix
// Set up the translation matrix

11 DX9_GP CH11 3/12/04 4:21 PM Page 280
280
Chapter 11
■
The Final Project
D3DXMatrixTranslation(&transMatrix, position.x, position.y, position.z);
// Cause the planet to rotate
D3DXMatrixRotationY(&rotateMatrix, timeGetTime()/1000.0f);
// Scale the planet by the size amount
D3DXMatrixScaling(&scaleMatrix, size, size, size);
// Multiply the rotation matrix by the translation
D3DXMatrixMultiply(&transMatrix, &rotateMatrix, &transMatrix);
// Multiply the translation matrix by the scale
D3DXMatrixMultiply(&transMatrix, &scaleMatrix, &transMatrix);
// Transform the object into world space
device->SetTransform(D3DTS_WORLD, &transMatrix);
// Render the planet
Model->render(device);
}
Adding the Planet to the Scene
Remember the vector of
CGameObjects
that I explained earlier? Before you can draw the
planet into the scene, you must add the
CPlanet
object to the list. You can add new objects
to the back of a vector’s list by calling the
push_back
function. The code that follows shows
how to create and add a
CPlanet
object to the
objects
vector.
// Create the planet object
CPlanet *pPlanet = new CPlanet();
// Scale the planet to make it larger
pPlanet->setSize(7);
// Create the planet
if (!pPlanet->create(dxMgr.getD3DDevice()))
return false;
// Add the planet to the in-game objects list
objects.push_back((CGameObject*)pPlanet);
First, initialize the
pPlanet
pointer by creating a new
CPlanet
object. Next, set the planet’s
size and load the model by calling the
create
function. Finally, add the created planet to
the
objects
vector using the
push_back
function.

11 DX9_GP CH11 3/12/04 4:21 PM Page 281
Adding a Spaceship
281
At this point, you should have a happily positioned and rotating planet. The planet is
shown in Figure 11.3.
Figure 11.3 A happily rotating planet.
Adding a Spaceship
Although a rotating planet is nice, it isn’t much fun by itself. That’s why I’m going to show
you how to bring in a spaceship. Like the planet, you will load the spaceship from an X file
and display it. The biggest difference between the planet and the spaceship is user control.
Using DirectInput, I’m going to show you how to move the spaceship within the world
using the mouse.
The
Game
application object considers the spaceship to be just another in-game object. You
will add the spaceship to the
CGameObjects
vector and render it each frame, just like the
planet. Because the spaceship is being considered as a standard in-game object, it will
inherit from the
CGameObjects
class.
n o t e
The spaceship requires the bigship1.x file from the DirectXSDK\Samples\Media directory.
You will use the
CShip
class to represent the spaceship in the game world. As before, the
CShip
class automatically inherits a
position
and a
CModel
object and needs to implement its
parent’s
create
and
render
functions.

11 DX9_GP CH11 3/12/04 4:21 PM Page 282
282
Chapter 11
■
The Final Project
In addition, the
CShip
function implements two other functions:
■
setPosition
. The
setPosition
function updates the position of the spaceship each
frame.
■
move
. The
move
function receives input from the user and updates the spaceship’s
position vector.
Two new variables are also added to the
CShip
class:
■
forwardVector
. This is a
D3DVECTOR3
object that holds the current direction the space-
ship is traveling. By adjusting the forward vector, you can make the spaceship turn
and move in multiple directions.
■
moveRate
. The movement rate determines the speed at which the spaceship moves.
The full definition for the
CShip
class is shown here.
/*****************************************************************************
* CShip class
*****************************************************************************/
class CShip : CGameObject
{
public:
CShip(void);
~CShip(void);
// overridden functions from the CGameObject class
bool create(LPDIRECT3DDEVICE9 device);
void render(LPDIRECT3DDEVICE9 device);
// The setPosition function repositions the spaceship each frame
void setPosition(D3DXVECTOR3 newPosition);
// The move function is used to tell the spaceship the direction
// it should move
void move(int direction);
private:
// The forward vector of the spaceship; this vector describes the
// direction in which the ship is heading
D3DXVECTOR3 forwardVector;
// The movement rate determines how fast the object moves in the scene
float moveRate;
};

11 DX9_GP CH11 3/12/04 4:21 PM Page 283
Moving in the Universe
283
Moving in the Universe
You have both a spinning globe and a spaceship sitting at the origin. The spaceship might
be interesting to look at, but the inhabitants of the planet don’t want a spaceship sitting
on their planet, so it’s time to move the ship. Instead of just repositioning the ship in code,
you will move the ship interactively using the mouse. I’m going to describe how to do this
by introducing you to the
CShip move
function.
The Spaceship Move Function
The
move
function is the main point of interest in the
CShip
class. Using input sent to it
from the
Game
application, the
move
function manipulates the internal properties of the
spaceship to move it around the scene.
Previously, when you wanted to move an object away from you, you simply subtracted the
amount of movement from the object’s current Z position value. Moving an object in this
manner forces it into absolute directions. I’m going to demonstrate how you can change
this to allow for relative movement. Moving an object forward will not necessarily mean
moving along the Z axis anymore.
When I created the
CShip
class, I introduced you to a new variable called
forwardVector
. The
forwardVector
variable keeps track of the direction in which the spaceship is facing. When
forwardVector
is initialized, the X and Y values are set to
0.0f
, and the Z value is set to
1.0f
.
Because the Z value is set to
1.0f
, the spaceship is pointing along the Z axis. The follow-
ing code shows how to initialize
forwardVector
.
forwardVector.x = 0.0f;
forwardVector.y = 0.0f;
forwardVector.z = 1.0f;
Whatever value resides in the
forwardVector Z
value is what the spaceship will consider for-
ward, whereas the value residing in Y will be the spaceship’s relative left direction. By
manipulating these two values, you can change the ship’s direction and allow it to move
in a relative forward direction.
For instance, if you wanted to turn the spaceship to the left, you would do so by manipu-
lating the
forwardVector Y
value. To turn the ship 5 units to the left, you would do the fol-
lowing:
// The direction of the ship is changed 5 units to the left
forwardVector.y -= 5.0f;
The forward vector of the ship would then be pointing in a new direction. Moving along
this new vector is a bit more complicated, though. You must update three variables when
moving forward.
First, you need to remove the current movement rate from the
forwardVector X
value.

11 DX9_GP CH11 3/12/04 4:21 PM Page 284
284
Chapter 11
■
The Final Project
Next, you need to change the current X position of the spaceship by removing the new
forwardVector X
value and multiplying it by the negative sine of the
forwardVector Y
value.
Finally, you must update the current Z position of the ship by adding the product of the
forwardVector X
value and the cosine of the
forwardVector Y
value.
The code that follows shows how you can make the ship move forward.
forwardVector.x = -MOVE_RATE;
position.x -= forwardVector.x * -sin(D3DXToRadian(forwardVector.y));
position.z += forwardVector.x * cos(D3DXToRadian(forwardVector.y));
As you can see, the forward vector and the position of the ship must work together to
allow for relative movement. The full source code for the
move
function is shown next.
/******************************************************************************
* move
******************************************************************************/
void CShip::move(int direction)
{
switch (direction)
{
case FORWARD:
forwardVector.x = -MOVE_RATE;
position.x -= forwardVector.x *
-sin(D3DXToRadian(forwardVector.y));
position.z += forwardVector.x *
cos(D3DXToRadian(forwardVector.y));
break;
case BACKWARD:
forwardVector.x = MOVE_RATE;
position.x -= forwardVector.x *
-sin(D3DXToRadian(forwardVector.y));
position.z += forwardVector.x *
cos(D3DXToRadian(forwardVector.y));
break;
case LEFT:
forwardVector.y -= 5.0f;
break;
case RIGHT:
forwardVector.y += 5.0f;

11 DX9_GP CH11 3/12/04 4:21 PM Page 285
Moving in the Universe
285
break;
}
}
Bringing in DirectInput
DirectInput provides you with a quick and elegant method of gathering user input.
Because DirectInput allows for lower-level access to the input hardware, reading input
changes from the user is quick.
The amount of code it takes to work with DirectInput can be quite large; therefore, I’ve
enclosed the DirectInput code in the DirectInput manager class.
The DirectInput Manager Class
The DirectInput manager class removes the complexity of input away from the game
code, keeping it contained within the class called
diManager
. The
diManager
class uses the
singleton design pattern to restrict itself to a single instance, which prevents DirectInput
from accidentally being initialized more than once.
diManager
includes the following main functions:
■
initDirectInput
. Initializes DirectInput and returns
TRUE
if it’s successful
■
shutdown
. Releases DirectInput and frees up its memory usage
■
getInput
. Gathers the device state of the currently selected input device
Because I’ll be explaining the mouse device specifically, I’ve chosen to include three helper
functions within the
diManager
class:
■
isButtonDown
. Returns
TRUE
or
FALSE
when queried for a particular mouse button
■
getCurMouseX
. Returns the amount the mouse has moved in the X direction since
the last frame
■
getCurMouseY
. Returns the amount the mouse has moved in the Y direction since the
last frame
The full
diManager
class definition is shown next.
/******************************************************************************
* diManager class
******************************************************************************/
#define BUTTONDOWN(name, key) (name.rgbButtons[key] & 0x80)
class diManager
{
public:
~diManager(void);

11 DX9_GP CH11 3/12/04 4:21 PM Page 286
286
Chapter 11
■
The Final Project
// setting up the diManager as a singleton
static diManager& getInstance()
{
static diManager pInstance;
return pInstance;
}
// initializes and cleans up DirectInput
bool initDirectInput(HINSTANCE hInst, HWND wndHandle);
void shutdown(void);
// gathers input from the user and stores it in the mouseState variable
void getInput(void);
// returns whether a particular mouse button is pressed
bool isButtonDown(int which);
// These functions return the amount the mouse has moved
// since the last frame
inline int getCurMouseX(void) { return mouseState.lX; }
inline int getCurMouseY(void) { return mouseState.lY; }
private:
diManager(void);
// the direct input object
LPDIRECTINPUT8
g_lpDI;
// the direct input device
LPDIRECTINPUTDEVICE8 g_lpDIDevice;
// the current state of the mouse device
DIMOUSESTATE mouseState;
};
Again, because I’ll be working specifically with the mouse, I created the
mouseState
vari-
able to hold the current input from the mouse. Each frame, the
getInput
function places
the current mouse state into this variable.
Adding the DirectInput Manger to the Game
The DirectInput manager is easy to use. Simply call the
initDirectInput
function at the
beginning of your application. If the
diManager
object is created and initializes successfully,
the
initDirectInput
function returns a value of
TRUE
. You can place this call in your
Winmain.cpp
file or anywhere before you try to get user input.

11 DX9_GP CH11 3/12/04 4:21 PM Page 287
Moving in the Universe
287
Now that you have a valid
diManager
object, you are free to query it each frame for input.
In the next block of code, I’ve changed the
Game
application’s
update
function to show how
to use
diManager
to read from the mouse.
First, you call the
getInput
function. This queries the current state of the mouse and places
the result in the
mouseState
variable. Next, you use the current input to make your game
decisions. In the example code that follows, I’ve used the mouse movement and button
presses to control the spaceship’s movement using the
move
function.
/********************************************************************
* update
* This function is called once per frame. It’s used to get the user
* input and move the objects in the game accordingly.
********************************************************************/
int Game::update(void)
{
// Get the current user input
diMgr.getInput();
// If the left mouse button is pressed, move forward
if (diMgr.isButtonDown(0))
pShip->move(CShip::FORWARD, anim_rate);
// If the right mouse button is pressed, move backward
if (diMgr.isButtonDown(1))
pShip->move(CShip::BACKWARD, anim_rate);
// If the mouse is moved to the left, turn left
if (diMgr.getCurMouseX() < 0)
pShip->move(CShip::LEFT, anim_rate);
// If the mouse is moved to the right, turn right
if (diMgr.getCurMouseX() > 0)
pShip->move(CShip::RIGHT, anim_rate);
return 1;
}
The previous
update
function responds to the left and right mouse buttons by moving the
spaceship forward and backward, respectively. Also, by moving the mouse to the left or
right, you can change the direction the spaceship is traveling.

11 DX9_GP CH11 3/12/04 4:21 PM Page 288
288
Chapter 11
■
The Final Project
At this point, you’ve brought together a lot of what you’ve learned to create a simple 3D
demo. Check out the chapter11\part5 directory on the CD-ROM to find all the source
code you need to create the spaceship demo.
Releasing Your Creation to the World
Your game is ready and you want to share it with the world. There’s just one problem: Your
game requires DirectX to be installed. Most Windows PC users already have some version
of DirectX on their machines, but not all versions work the same. It’s always a good idea
to require the installation of the latest version of the DirectX runtime. This chapter cov-
ers exactly what’s needed to make your game ready for release, as well as installing and
running DirectX on a user’s machine.
Packaging Your Game for Release
Typically, games are distributed across the Web in either a Zip file format or a self-
extracting EXE file.
The Zip file format is the simplest method. All the files and directories within your game
are compressed and included in a single file ending in the ZIP extension. When users are
preparing to play your game, they will need to first uncompress the ZIP file to gain access
to the files compressed within it. The downside of releasing your game using the ZIP file
method is that users will need to have a utility already installed on their computers that is
capable of opening and uncompressing the ZIP file.
The second type of distribution is the self-extracting EXE file. Although the EXE file uses
a similar method to the ZIP file, this type does not require an external utility to uncom-
press its contents. All the files and directories within your game are again compressed and
placed into one file, but instead of having a ZIP extension, the file ends with EXE. The
EXE extension tells the system that the file is an executable program and can be run. When
the user double-clicks on this executable, the files contained within it are extracted and
placed on the user’s hard drive.
Most games don’t require extensive installation procedures, and packaging them in a ZIP
or self-extracting file is quite common. On occasion, though, games need a full installa-
tion program, especially if they are being released as a commercial product.
The installation programs present the users with an easy-to-use interface that allows them
to change the directory where they would like to install the game and select the features
they want to install. When your game gets to be the size of a CD-ROM, an installation
program makes it much easier to install and run.

11 DX9_GP CH11 3/12/04 4:21 PM Page 289
The DirectX Runtime
289
What Tools Are Available to Bundle My Game?
Many programs are available to help you package your game into a ZIP file or self-
extracting executable. Following are two of the more common programs:
■
WinZip
■
WinRAR
Shareware versions of these applications are available on the Internet.
If you want to create a full installation program for your game, you might have to look
into professional installation software like the following:
■
InstallShield
■
Wise Installer
■
NSIS: The Nullsoft Scriptable Install System
The DirectX Runtime
The DirectX Runtime is the bundled collection of all the files that DirectX needs to have
installed on a machine. Before you can run any software that uses DirectX, you need to
install the runtime on that machine. During the installation process, the DLLs that pro-
vide all the DirectX functionality are copied to the system. After the DLLs are installed and
the machine is rebooted, applications that rely on the DirectX DLLs are able to run.
When you are distributing your game, you have the option of either packaging the DirectX
runtime with your software or relying on the end user to find and install it himself.
If you chose to have the user download and install the DirectX runtime, you should pro-
vide a link to the Microsoft DirectX Web site with your game. Full instructions for down-
loading and installing the runtime from Microsoft are available on the Microsoft site.
Shipping the DirectX Runtime with Your Game
Shipping the DirectX runtime with your game is simple. The major downside to shipping
the DirectX runtime is its size requirement. If your game is already in the hundreds of
megabytes, adding the DirectX runtime is no big deal; however, if your game is small, it
might be a hassle to package the runtime along with it.
Shipping the DirectX runtime requires you to package the following files from the
DirectX SDK with your game, preferably in a directory called DirectX:
■
dxsetup.exe
■
bdaxp.cab
■
manageddx.cab
■
Dsetup.dll
■
bdant.cab
■
mdxredist.msi
■
dsetup32.dll
■
bda.cab
■
directx.cab
■
dxnt.cab
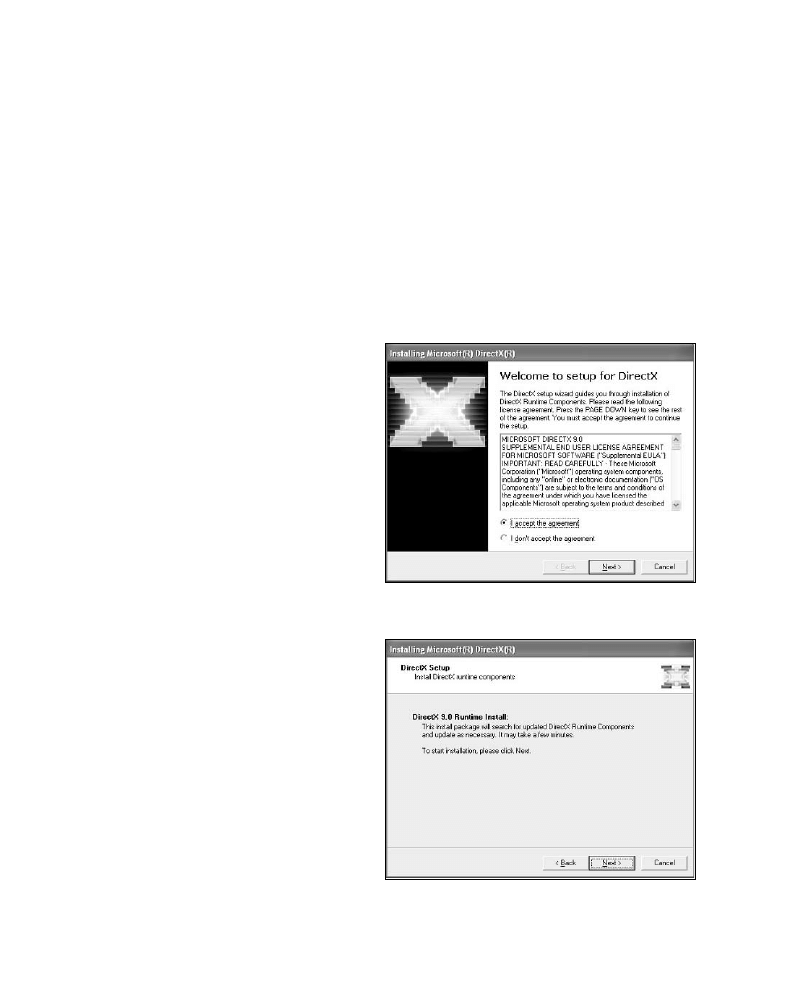
11 DX9_GP CH11 3/12/04 4:21 PM Page 290
290
Chapter 11
■
The Final Project
Users navigate to the DirectX directory within your installation and run the dxsetup.exe
file. The DirectX installation then proceeds.
You might be asking yourself, “Just where do I get the DirectX runtime?” Well, the DirectX
runtime just so happens to be in a directory called Redist within the DirectX SDK folder.
When you installed the SDK, the Redist directory was created and all the required files
were placed there.
Installing the DirectX Runtime
Now that you have packaged the DirectX runtime with your software, you might want to
provide instructions for the end user to install it.
Installing the DirectX runtime happens
through a series of wizard dialog boxes
that begin when the user double-clicks
on the dxsetup.exe file.
Following are the steps necessary to
install the DirectX runtime:
1. Double-click on the dxsetup.exe
file. This file launches the setup
program that installs DirectX on
the user’s machine.
2. The license dialog box appears,
requesting that the user accept
the End User License Agreement
from Microsoft. This dialog box
is shown in Figure 11.4.
3. The user must select the I Accept
the Agreement option button and
click on the Next button to pro-
ceed with the installation.
4. A confirmation dialog box
appears, informing the user that
the DirectX runtime is about to
be installed. This dialog box is
shown in Figure 11.5.
Figure 11.4 The DirectX license dialog box.
Figure 11.5 The DirectX install confirmation dialog
box.
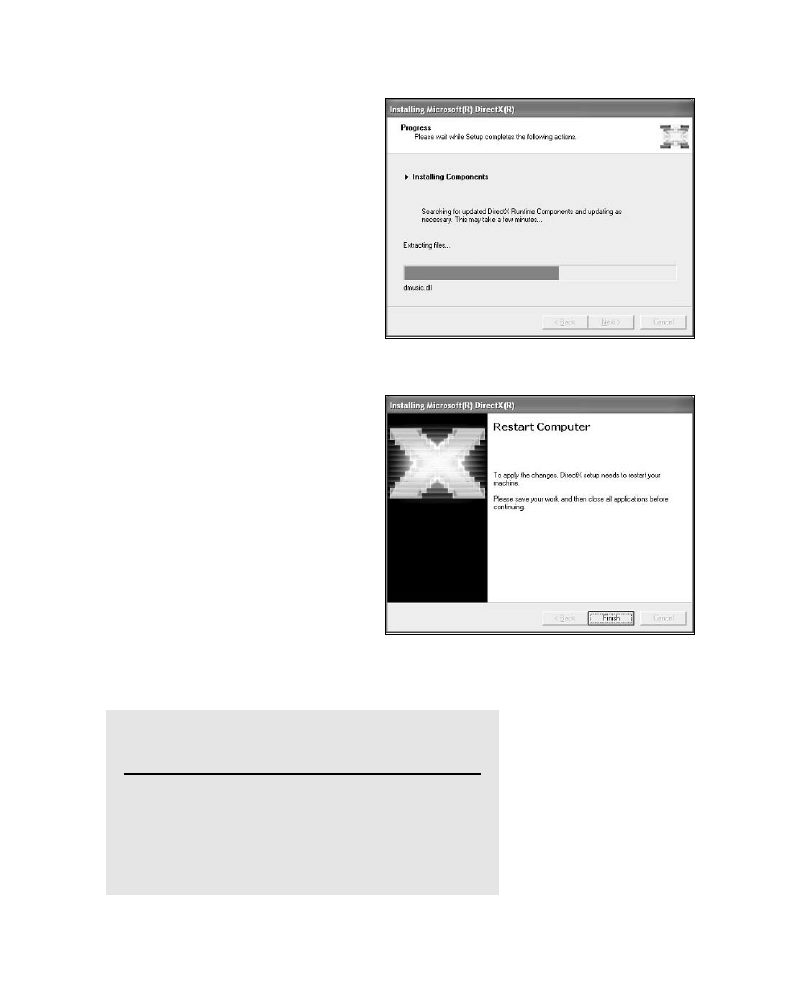
11 DX9_GP CH11 3/12/04 4:21 PM Page 291
The DirectX Runtime
291
5. Pressing the Next button starts
the installation.
6. The necessary files start
installing. A progress meter con-
tinually updates the installation’s
progress. Figure 11.6 shows the
progress dialog box.
7. After a few m oments, the instal-
lation finishes and a final dialog
box is displayed. This dialog box
is shown in Figure 11.7.
8. The final dialog box requests that
the user reboot the machine. This
step is necessary because the
DirectX install has copied new
device drivers to the system.
After the computer reboots, the DirectX
installation is complete.
Table 11.1 lists some products that can
help you in your game distribution.
Figure 11.6 The installation progress dialog box.
Figure 11.7 The DirectX runtime is done installing.
WinZip
WinRAR
NSIS
InstallShield
Wise Installer
Table 11.1 Tools to Help Distribute Your Game
Product Name
Web Site
http://www.winzip.com
http://www.rarsoft.com
http://nsis.sourceforge.net
http://www.installsheild.com
http://www.wise.com

11 DX9_GP CH11 3/12/04 4:21 PM Page 292
292
Chapter 11
■
The Final Project
Chapter Summary
You’ve made it to the end of the book! Congratulations! I’m hoping that you’ve enjoyed
learning about DirectX and are prepared to tackle its challenges. I’ve only opened the door
into the world of 3D graphics. There’s still a whole range of topics to learn, including 3D
animation, terrain rendering, object culling using binary space partitioning, and so much
more.
What You Have Learned
At this point, you know the following:
■
Why inheritance is important in game development
■
How to create a simple game framework
■
How to load and manipulate multiple objects in a scene
■
How to encapsulate common functionality into classes
■
How to create a complete 3D demo with user input

12 DX9_GP AppA 3/12/04 4:22 PM Page 293
A ppendixes
Appendix A
Answers to End-of-Chapter Exercises . . . . . . . . . . . . . . . . . . . . . . . . .295
Appendix B
Using the CD-ROM . . . . . . . . . . . . . . . . . . . . . . . . . . . . . . . . . . . . . . . .311
PART IV

This page intentionally left blank

12 DX9_GP AppA 3/12/04 4:22 PM Page 295
appendix A
A nswers to End-of-
Chapter Exercises
Chapter 2
Review Questions
1. You must create the
IDirect3D9
object first. It allows you to create the additional
Direct3D components that you need.
2. The
GetAdapterCount
function queries the host machine and returns the number of
video adapters in the system.
3. 8 bits for red, 8 bits for green, 8 bits for blue, and 8 bits for an alpha component.
4.
D3DDEVTYPE_HAL
is the device type that specifies that hardware acceleration should be
used.
5. The
Clear
function clears the back buffer to a specific color.
On Your Own
1. You need to change the
Clear
function from the blue value of
D3DCOLOR_XRGB(0,0,255)
to a value of
D3DCOLOR_XRGB(0,255,0)
to clear the screen to green. The updated line of
code is shown here:
pd3dDevice->Clear( 0, NULL, D3DCLEAR_TARGET, D3DCOLOR_XRGB(0,0,255), 1.0f, 0 );
2. You must change the second parameter to the
GetAdapterModeCount
function
from the value
D3DFMT_X8R8G8B8
to another chosen format. For instance, if you
want to check for adapters that support a 16-bit graphics mode, you can pass
the value
D3DFMT_R5G6B5
to the
GetAdapterModeCount
function. An updated call to
GetAdapterModeCount
is shown here:
UINT numModes = pD3D->GetAdapterModeCount(D3DADAPTER_DEFAULT, D3DFMT_R5G6B5);
295

12 DX9_GP AppA 3/12/04 4:22 PM Page 296
296
Appendix A
■
Answers to End-of-Chapter Exercises
Chapter 3
Review Questions
1. You use the
CreateOffscreenPlainSurface
function to create offscreen surfaces. These
surfaces commonly hold graphics data that has been loaded from disk.
2. The
StretchRect
function copies a rectangular area of image data between surfaces.
You can use this function in 2D rendering to copy sprites from an offscreen surface
to the back buffer.
3. Most commonly, offscreen surfaces store images that will be used during the game,
such as backgrounds, character sprites, or world objects.
4. You should clear the back buffer at the start of each frame to eliminate any drawing
that took place in the previous frame. Occasionally, you’ll want to skip clearing the
back buffer if the scene you’re drawing will fill the entire buffer.
5. The
QueryPerformanceCounter
function is a millisecond timer. It has a higher timing
resolution than
GetTickCount
.
On Your Own
1. The
StretchRect
function has two parameters that determine the size of the source
and destination rectangles. The code that follows creates two variables of type
RECT
:
one for the source rectangle and one for the destination. The source rectangle is cre-
ated as a 64
× 64 area. The destination rectangle has an area of only 32 × 32. When
the
srcRect
and
destRect
variables are passed to the
StretchRect
function, they affect
how the image is copied between sources. Because the source rectangle was larger
than the destination, the image data being copied is scaled to fit.
RECT srcRect;
RECT destRect;
// Set the source rectangle
srcRect.top = 0;
srcRect.left = 0;
srcRect.right = 64;
srcRect.bottom = 64;
// Set the destination rectangle
destRect.top = 0;
destRect.left = 0;
destRect.right = 32;
destRect.bottom = 32;
// Call the StretchRect function to copy from the srcSurface to the back buffer
pd3dDevice->StretchRect(srcSurface,
srcRect,

12 DX9_GP AppA 3/12/04 4:22 PM Page 297
Answers to End-of-Chapter Exercises
297
getBackBuffer(),
destRect,
D3DTEXF_NONE);
2. Scrolling a text message consists of changing the location of the destination rectan-
gle that is being sent to the
StretchRect
function. The following code creates a
destX
variable that positions the destination rectangle. Each frame, this value is decre-
mented by 1, causing the image to be copied one pixel to the left from its previous
position. When the image scrolls off the left side of the screen, you can reset it to the
right side of the screen by resetting the
destX
value.
void Render(void)
{
// This is the X position of the destination rectangle
static int destX = 128;
// src and dest rectangles
RECT src, dest;
// Set the source rectangle
src.top = 0;
src.left = 0;
src.right = src.left + 64;
src.bottom = src.top + 64;
// Set the destination rectangle
dest.top = 0;
dest.left = destX;
dest.right = dest.left + 64;
dest.bottom = dest.top + 64;
if( NULL == pd3dDevice )
return;
// Clear the back buffer to a blue color
pd3dDevice->Clear( 0,
NULL,
D3DCLEAR_TARGET,
D3DCOLOR_XRGB(255,255,255),
1.0f,
0 );
// Call StretchRect to copy the image to the screen
pd3dDevice->StretchRect(srcSurface,
srcRect,

12 DX9_GP AppA 3/12/04 4:22 PM Page 298
298
Appendix A
■
Answers to End-of-Chapter Exercises
getBackBuffer(),
destRect,
D3DTEXF_NONE);
pd3dDevice->Present( NULL, NULL, NULL, NULL );
// Decrement the X position
destX—;
// If the image goes off the screen, reset it to the far side of the screen
if (destX < -64)
destX = 640;
}
Chapter 4
Review Questions
1. A point is defined by three vertices: X, Y, and Z. Each vertex refers to the point’s
location on each of the three axes.
2. You use the Z axis when determining the depth of objects within a 3D scene.
3. The
SetFVF
function sets the
Flexible Vertex Format
that will be used when rendering
the vertex data from a vertex buffer.
4. The line strip primitive type consists of a series of connected lines.
5. Seven vertices are needed to create a triangle strip consisting of five triangles. The
first triangle requires three vertices, whereas each additional triangle needs only a
single vertex to be created.
On Your Own
1. The first step in creating a line list series is declaring the vertices for the lines.
You then copy the vertices into a vertex buffer. Finally, you render the lines using
DrawPrimitive
.
// a structure for the custom vertex type
struct CUSTOMVERTEX
{
FLOAT x, y, z, rhw;
// the untransformed, 3D position for the vertex
DWORD color;
// the vertex color
};
// your custom FVF, which describes your custom vertex structure
#define D3DFVF_CUSTOMVERTEX (D3DFVF_XYZRHW|D3DFVF_DIFFUSE)

12 DX9_GP AppA 3/12/04 4:22 PM Page 299
Answers to End-of-Chapter Exercises
299
CUSTOMVERTEX g_Vertices[] =
{
// line 1
{ 50.0f, 50.0f, 0.5f, 1.0f, D3DCOLOR_ARGB(0,255,0,0), },
{ 150.0f, 50.0f, 0.5f, 1.0f, D3DCOLOR_ARGB(0,255,0,0), },
// line 2
{ 25.0f, 75.0f, 0.5f, 1.0f, D3DCOLOR_ARGB(0,255,0,0), },
{ 150.0f, 75.0f, 0.5f, 1.0f, D3DCOLOR_ARGB(0,255,0,0), },
// line 3
{ 50.0f, 100.0f, 0.5f, 1.0f, D3DCOLOR_ARGB(0,255,0,0), },
{ 150.0f, 100.0f, 0.5f, 1.0f, D3DCOLOR_ARGB(0,255,0,0), },
// line 4
{ 50.0f, 150.0f, 0.5f, 1.0f, D3DCOLOR_ARGB(0,255,0,0), },
{ 150.0f, 150.0f, 0.5f, 1.0f, D3DCOLOR_ARGB(0,255,0,0), },
};
// Create the vertex buffer
g_pVB = createVertexBuffer(8*sizeof(CUSTOMVERTEX), D3DFVF_CUSTOMVERTEX);
// Render the four lines using the D3DPT_LINELIST primitive
void render(LPDIRECT3DVERTEXBUFFER9 buffer)
{
pd3dDevice->SetStreamSource( 0, buffer, 0, sizeof(CUSTOMVERTEX) );
pd3dDevice->SetFVF( D3DFVF_CUSTOMVERTEX );
pd3dDevice->DrawPrimitive( D3DPT_LINELIST, 0, 1 );
pd3dDevice->DrawPrimitive( D3DPT_LINELIST, 2, 1 );
pd3dDevice->DrawPrimitive( D3DPT_LINELIST, 4, 1 );
}
2. You can create a series of triangles by generating a triangle list. Each triangle consists
of three vertices defined in the
g_Vertices
array. After you create the vertices and
copy them into the vertex buffer, you draw them by using the
DrawPrimitive
func-
tion.
// a structure for your custom vertex type
struct CUSTOMVERTEX
{
FLOAT x, y, z, rhw;
// the untransformed, 3D position for the vertex
DWORD color;
// the vertex color
};
// the custom FVF, which describes your custom vertex structure

12 DX9_GP AppA 3/12/04 4:22 PM Page 300
300
Appendix A
■
Answers to End-of-Chapter Exercises
#define D3DFVF_CUSTOMVERTEX (D3DFVF_XYZRHW|D3DFVF_DIFFUSE)
CUSTOMVERTEX g_Vertices[] =
{
// triangle 1
{ 50.0f, 50.0f, 1.0f, 1.0f, D3DCOLOR_ARGB(0,255,0,0), },
{ 100.0f, 75.0f, 1.0f, 1.0f, D3DCOLOR_ARGB(0,255,0,0), },
{ 25.0f, 75.0f, 1.0f, 1.0f, D3DCOLOR_ARGB(0,255,0,0), },
// triangle 2
{ 150.0f, 50.0f, 1.0f, 1.0f, D3DCOLOR_ARGB(0,255,0,0), },
{ 200.0f, 75.0f, 1.0f, 1.0f, D3DCOLOR_ARGB(0,255,0,0), },
{ 125.0f, 75.0f, 1.0f, 1.0f, D3DCOLOR_ARGB(0,255,0,0), },
// triangle 3
{ 50.0f, 150.0f, 1.0f, 1.0f, D3DCOLOR_ARGB(0,255,0,0), },
{ 100.0f, 175.0f, 1.0f, 1.0f, D3DCOLOR_ARGB(0,255,0,0), },
{ 25.0f, 175.0f, 1.0f, 1.0f, D3DCOLOR_ARGB(0,255,0,0), },
};
// Create the vertex buffer
g_pVB = createVertexBuffer(9*sizeof(CUSTOMVERTEX), D3DFVF_CUSTOMVERTEX);
// Render the four lines using the D3DPT_LINELIST primitive
void render(LPDIRECT3DVERTEXBUFFER9 buffer)
{
pd3dDevice->SetStreamSource( 0, buffer, 0, sizeof(CUSTOMVERTEX) );
pd3dDevice->SetFVF( D3DFVF_CUSTOMVERTEX );
pd3dDevice->DrawPrimitive( D3DPT_TRIANGLELIST, 0, 1 );
pd3dDevice->DrawPrimitive( D3DPT_TRIANGLELIST, 3, 1 );
pd3dDevice->DrawPrimitive( D3DPT_TRIANGLELIST, 6, 1 );
}
Chapter 5
Review Questions
1. An index buffer stores the indices for an object.
2. A matrix is a multidimensional array of values. In a 3D world, a matrix that consists
of 4 rows and 4 columns transforms an object from one space to another.
3. The world transformation, the view transformation, and the projection
transformation.
4. The identity matrix sets a projection or an object back to the origin.
5. The aspect ratio of a virtual camera affects the projection transformation.

12 DX9_GP AppA 3/12/04 4:22 PM Page 301
Answers to End-of-Chapter Exercises
301
On Your Own
1. Translating an object along an axis is simple if you use the helper functions that
D3DX provides. The
D3DXMatrixTranslation
function creates a translation matrix that
you can multiply by a rotation matrix. The resulting output matrix is the product of
rotating and translating an object.
D3DXMATRIX translationMatrix;
D3DXMATRIX rotationMatrix;
D3DXMATRIX outMatrix;
// Rotate the object by 90 degrees on the X axis
D3DXMatrixRotationX(&rotationMatrix, D3DXToRadian(90));
// Translate the object 5 units along the X axis
D3DXMatrixTranslation(&translationMatrix, 5.0f, 0.0f, 0.0f);
// Multiply the rotation matrix by the translation matrix, storing the result
// in the outMatrix
D3DXMatrixMultiply(&outMatrix, &rotationMatrix, &translationMatrix);
2. You can rotate an object constantly around an axis by continually increasing the
angle being passed to the
D3DXMatrixRotationY
function. In the following example, the
object is set to rotate using the
timeGetTime
function.
void render(void)
{
// the matrix that stores the current matrix for an object
D3DXMATRIX
MeshMat;
// the matrix that stores the object’s rotation
D3DXMATRIX
meshRotate;
// Clear the back buffer to a black color
pd3dDevice->Clear( 0,
NULL,
D3DCLEAR_TARGET,
D3DCOLOR_XRGB(255,255,255),
1.0f,
0 );
pd3dDevice->BeginScene();
pd3dDevice->SetStreamSource( 0, vertexBuffer, 0, sizeof(CUSTOMVERTEX) );
pd3dDevice->SetFVF( D3DFVF_CUSTOMVERTEX );
// Set meshMat to identity; this resets the matrix

12 DX9_GP AppA 3/12/04 4:22 PM Page 302
302
Appendix A
■
Answers to End-of-Chapter Exercises
D3DXMatrixIdentity(&meshMat);
// Set the rotation along the Y axis
D3DXMatrixRotationY(&meshRotate, timeGetTime()/1000.0f);
// Multiply the meshMat and the meshRotate matrix
D3DXMatrixMultiply(&meshMat, &meshMat, &meshRotate);
// Transform the object in world space
pd3dDevice->SetTransform(D3DTS_WORLD, &meshMat);
pd3dDevice->DrawPrimitive( D3DPT_TRIANGLESTRIP, 0, 2 );
pd3dDevice->EndScene();
// Present the back buffer contents to the display
pd3dDevice->Present( NULL, NULL, NULL, NULL );
}
Chapter 6
Review Questions
1. The fill mode affects how objects are rendered. The wireframe fill mode draws all
the objects as a series of lines. The solid fill mode renders each object as a solid
series of triangles.
2. Direct3D has four types of lighting: ambient, directional, point, and spot lighting.
3. A directional light is a light source that has a direction but not a position in space.
4. The
D3DXCreateTextureFromFile
function supports loading of the following types of
files: bitmap, Windows DIB, Targa, JPEG, PNG, and DDS.
5. When you change the texture coordinates to a value greater than
1.0f
, the texture is
repeated across a polygon’s surface.
On Your Own
1. To cause the teapot to reflect only diffuse lighting, you must create a material struc-
ture that contains diffuse values. In addition, you must set the ambient values in the
structure to
0.0f
. The following code demonstrates a material structure that does
this.
// Create the material that the mesh will use
D3DMATERIAL9
mtrl;
// Clear out the material structure

12 DX9_GP AppA 3/12/04 4:22 PM Page 303
Answers to End-of-Chapter Exercises
303
ZeroMemory(&mtrl, sizeof(D3DMATERIAL9));
// Set the diffuse properties for the material
mtrl.Diffuse.r = 1.0f;
mtrl.Diffuse.g = 0.5f;
mtrl.Diffuse.b = 0.5f;
// Set the ambient properties for the material
// Turn off these properties
mtrl.Ambient.r = 0.0f;
mtrl.Ambient.g = 0.0f;
mtrl.Ambient.b = 0.0f;
mtrl.Power = 8.0f;
2. Because you’ll be using two textures, the first step is to create an additional
IDirect3DTexture9
object. After you have two texture objects, you need to load the
textures you will be using. You’ll notice in the code that follows that I have two calls
to the
D3DXCreateTextureFromFile
function. This function loads each texture and
assigns it to the appropriate texture object. The most important step in drawing an
object with multiple textures is changing the texture during rendering by using the
SetTexture
function.
In the following code, the
SetTexture
function sets the current texture to the first tex-
ture object for three triangle strips and then switches to the second texture for the
remainder of the triangles.
// texture info
LPDIRECT3DTEXTURE9
g_pTexture
= NULL;
LPDIRECT3DTEXTURE9
g_pTexture2
= NULL;
// Load the multiple textures and assign them to the texture objects
D3DXCreateTextureFromFile( pd3dDevice, “test.bmp”, &g_pTexture );
D3DXCreateTextureFromFile( pd3dDevice, “test2.bmp”, &g_pTexture2);
// Tell Direct3D to use the first texture for three of the triangle strips
pd3dDevice->SetTexture( 0, g_pTexture );
pd3dDevice->DrawPrimitive( D3DPT_TRIANGLESTRIP, 0, 2 );
pd3dDevice->DrawPrimitive( D3DPT_TRIANGLESTRIP, 4, 2 );
pd3dDevice->DrawPrimitive( D3DPT_TRIANGLESTRIP, 8, 2 );
// Switch over to the second texture to render the rest of the triangle strips
pd3dDevice->SetTexture( 0, g_pTexture2 );
pd3dDevice->DrawPrimitive( D3DPT_TRIANGLESTRIP, 12, 2 );
pd3dDevice->DrawPrimitive( D3DPT_TRIANGLESTRIP, 16, 2 );
pd3dDevice->DrawPrimitive( D3DPT_TRIANGLESTRIP, 20, 2 );

12 DX9_GP AppA 3/12/04 4:22 PM Page 304
304
Appendix A
■
Answers to End-of-Chapter Exercises
Chapter 7
Review Questions
1. You can use both the
D3DXCreateMesh
and
D3DXCreateMeshFVF
functions to create a
mesh object.
2. The
OptimizeInplace
function does not require the creation of an additional mesh
object.
3. A mesh’s attribute table allows the mesh to contain one or more materials.
4.
GetNumVertices
returns the number of objects in a mesh.
5.
DXFILEFORMAT_BINARY
creates a binary X file,
DXFILEFORMAT_TEXT
creates a text version of
an X file, and the final flag,
DXFILEFORMAT_COMPRESSED
, causes the X file to be com-
pressed.
On Your Own
1. Previously, you loaded a single mesh by using the
D3DXLoadMeshFromX
function. To
load more than one X file mesh, you create multiple
D3DXMESH
objects and use
D3DXLoadMeshFromX
. The code that follows shows how you can use this technique to
display more than one model.
The first step in loading more than one model is to provide an easy way to call the
D3DXLoadMeshFromX
function and assign the model to a
D3DXMESH
object. The
loadMesh
function that follows performs this task.
Next, you create two
D3DXMESH
objects and assign them to the result of the
loadMesh
function. At this point, you should have two valid
D3DXMESH
objects. The final step is
rendering the two meshes by using the
DrawSubset
function.
/******************************************************************************
* loadMesh
******************************************************************************/
LPD3DXMESH loadMesh(LPDIRECT3DDEVICE9 pd3dDevice, std::string filename)
{
HRESULT hr;
LPD3DXMESH tempMesh = NULL;
DWORD numMaterials = 0;
// Load the mesh from the specified file
hr = D3DXLoadMeshFromX( filename.c_str(),
D3DXMESH_SYSTEMMEM,
pd3dDevice,
&NULL,
&NULL,
NULL,

12 DX9_GP AppA 3/12/04 4:22 PM Page 305
Answers to End-of-Chapter Exercises
305
&numMaterials,
&tempMesh );
if( FAILED(hr) )
return NULL;
return tempMesh;
}
// These are the variables that will hold the loaded meshes
LPD3DXMESH mesh1;
LPD3DXMESH mesh2;
// Load the first mesh
mesh1 = dxMgr->loadMesh(“mesh1.x”);
if (!mesh1)
{
MessageBox(wndHandle, “can’t load xfile”, “ERROR”, MB_OK);
return false;
}
// Load the second mesh
mesh2 = dxMgr->loadMesh(“mesh2.x”);
if (!mesh2)
{
MessageBox(wndHandle, “can’t load xfile”, “ERROR”, MB_OK);
return false;
}
/******************************************************************************
* render
******************************************************************************/
void render(void)
{
mesh1->DrawSubset(0);
mesh2->DrawSubset(0);
}
2. You optimize a mesh through the
Optimize
function. The code that follows shows
how to use
Optimize
to create a function whose job it is to optimize and return a
mesh.
/******************************************************************************
* optimizeThisMesh
******************************************************************************/

12 DX9_GP AppA 3/12/04 4:22 PM Page 306
306
Appendix A
■
Answers to End-of-Chapter Exercises
LPD3DXMESH optimizeThisMesh(LPD3DXMESH inMesh)
{
LPD3DMESH outMesh = NULL;
inMesh->Optimize(D3DXMESHOPT_ATTRSORT, 0, NULL, NULL, &outMesh);
return outMesh;
}
Chapter 8
Review Questions
1. The basic properties of a particle are position, color, and movement.
2. By adding together a particle’s current position and its movement rate, you can
make the particle move around a scene.
3. An emitter initializes the properties of each particle it creates.
4. The
D3DPT_POINTLIST
type is used when rendering particles as point sprites.
5. You can render point sprites more quickly than billboards within Direct3D because
point sprites are treated as single points.
On Your Own
1. When you were shown how to create a particle previously, each particle lived for-
ever. That causes a lot of problems when the particles go off the screen. Because the
particles never die, they are rendered continuously even though they can’t be seen.
To make sure that a particle can die, you must add two variables to the particle
structure:
m_alive
and
lifetime
. The
m_alive
variable is a boolean value that is
TRUE
if
the particle is alive or
FALSE
if it is not. The
lifetime
variable is an integer that holds
the number of frames that the particle has been alive.
In each time through the render loop, your code must check to see if each particle
is alive. If the particle is alive, its lifetime counter is incremented and the particle is
rendered. If the particle is dead, it is skipped and the next particle in the list is checked.
The code that follows shows how to kill off a particle after just 300 frames.
typedef struct
{
D3DXVECTOR3 m_vCurPos;
D3DXVECTOR3 m_vCurVel;
D3DCOLOR
m_vColor;
bool m_alive;
int lifetime;

12 DX9_GP AppA 3/12/04 4:22 PM Page 307
Answers to End-of-Chapter Exercises
307
} Particle;
// Define the single particle
Particle oneParticle;
// Set the particle’s current position
oneParticle.m_vCurPos = D3DXVECTOR3(0.0f,0.0f,0.0f);
// Generate a random value for each part of the direction/velocity vector
float vecX = ((float)rand() / RAND_MAX);
float vecY = ((float)rand() / RAND_MAX);
float vecZ = ((float)rand() / RAND_MAX);
oneParticle.m_vCurVel = D3DXVECTOR3(vecX,vecY,vecZ);
// This particle is white
oneParticle.m_vColor = D3DCOLOR_RGBA( 255, 255, 255, 255);
// Set this particle to alive
oneParticle.m_alive = true;
// Set the lifetime to 0
oneParticle.lifetime = 0;
/******************************************************************************
* renderParticle
******************************************************************************/
void renderParticle(void)
{
// Check whether this particle is alive
if (oneParticle.m_alive)
{
// The particle is alive; check to see if it reached its life
// limit of 300 frames
if (lifetime == 300)
// If the particle has reached the end of its life, set the
// m_alive variable to FALSE
oneParticle.m_alive = false;
else
// Increment the lifetime counter; this particle is still alive
oneParticle.lifetime++;
// Render the particle
}
}

12 DX9_GP AppA 3/12/04 4:22 PM Page 308
308
Appendix A
■
Answers to End-of-Chapter Exercises
2. If you want a particle emitter that constantly releases particles, you would think that
you could just increase the number of particles that the emitter has available.
Although this would make sense, your computer doesn’t have the power or the
memory to meet this requirement. The easiest way to accomplish this task is
through particle recycling. Particle recycling involves reusing particles that have
exhausted their lifetime. Each frame, a particle gets closer to the end of its lifetime.
When the particle’s death is reached, its
m_bAlive
flag is set to
FALSE
, and it’s available
to be born again from the emitter.
The
recycle
function that follows shows how to cause a particle to be reborn.
void Emitter::recycle(void)
{
// Loop through the number of particles and recycle the dead ones
for (int i=0; i<numParticles; i++)
{
if (!m_particles[i].m_bAlive)
{
m_particles[i].reset();
m_particles[i].m_vColor = D3DCOLOR_ARGB(0,255,0,0);
m_particles[i].m_vCurPos = m_vCurPos;
// Generate a random value for each direction/velocity vector
float vecX = ((float)rand() / RAND_MAX);
float vecY = ((float)rand() / RAND_MAX);
float vecZ = ((float)rand() / RAND_MAX);
m_particles[i].m_vCurVel = D3DXVECTOR3(vecX,vecY,vecZ);
}
}
}
Chapter 9
Review Questions
1. You use DirectInput to get input from a device, such as the keyboard, mouse, joy-
sticks, and game pads.
2. The
DirectInput8Create
function creates a DirectInput object that can access all the
functionality of DirectInput.
3. Enumeration is the process of searching and detecting devices that are installed on a
system.
4. The
GetDeviceState
function needs a buffer of 256 characters.
5.
c_dfDIMouse
is the format that the
SetDataFormat
function uses to access the mouse
input device.

12 DX9_GP AppA 3/12/04 4:22 PM Page 309
Answers to End-of-Chapter Exercises
309
On Your Own
1. Removing the Windows cursor while using the mouse is a simple matter of restrict-
ing mouse access to your application only. When you set the cooperative level of the
mouse to
DISCL_EXCLUSIVE
, the Windows cursor is removed.
HRESULT hr = SetCooperativeLevel(wndHandle, DISCL_EXCLUSIVE);
2. Reading from a game pad or joystick buttons is just as simple as reading their direc-
tion. Each time through the game loop, you capture the state of the device and place
it into the
js
structure below. Afterward, you can check this structure for the state of
each button. The code that follows shows how to capture the state of the device and
check each button for use.
DIJOYSTATE2 js;
// DInput joystick state
// Get the input’s device state
if( FAILED( hr = g_pJoystick->GetDeviceState( sizeof(DIJOYSTATE2), &js ) ) )
return hr;
// Loop through the buttons that are available in the DIJOYSTATE2 structure
for( int i = 0; i < 128; i++ )
{
// If this button is done, print a message
if ( js.rgbButtons[i] & 0x80 )
printf(“button #[%d] is pressed\n”, i);
}
Chapter 10
Review Questions
1. You use the
DirectSoundEnumerate
function when you want to get a list of the sound
devices that are installed on your machine. You normally use
DirectSoundEnumerate
when you don’t want to use the default sound device.
2. The
lpGuid
contains the
GUID
of the sound device,
lpcstrDescription
gives you a text
description of the device, and
lpcstrModule
gives you the text description of the
sound driver being used.
3. The format of a secondary buffer does need to match the sound data that is con-
tained within it.
4. The primary buffer is where the final mixed sound data from all the secondary
buffers is stored before being played.
5.
DSDEVID_DefaultPlayback
is passed to
DirectSoundCreate8
to specify that the default
sound device is to be used.

12 DX9_GP AppA 3/12/04 4:22 PM Page 310
310
Appendix A
■
Answers to End-of-Chapter Exercises
On Your Own
1. You change the volume of a sound through the
SetVolume
function, which is available
to you through the
DIRECTSOUNDBUFFER
interface. When you change the value that is
passed to
SetVolume
during the game loop, you can decrease or increase the volume
of the sound.
int curVolume = 0;
// variable to hold the current volume
int volChange = 1000;
// the amount to change the volume by each frame
{
// main game loop
curVolume+= volChange;
// Allow the volume to range from 0 to -10000
if ((curVolume <= 10000) || (curVolume >= 0))
volChange *= -1;
// Set the current volume
DSBuffer->SetVolume(curVolume);
// End game loop
}
2. Panning a sound between speakers involves the use of the
SetPan
function. By chang-
ing the value passed to the
SetPan
function, you can increase or decrease the volume
in the left or right speakers, giving the impression that the sound is moving from
one speaker to the other.
// The current pan value, 0, sets both speakers to equal volume
int panVolume = 0;
// This is the amount to pan each frame
int panChange = 500;
{
// main game loop
if ((panVolume <= DSBPAN_LEFT) || (panVolume >= DSBPAN_RIGHT))
panChange *= -1;
// Increment the panVolume by the panChange value
panVolume += panChange;
// Change the pan volume
DSBuffer->SetPan(panVolume);
// End main loop
}

13 DX9_GP AppB 3/12/04 4:22 PM Page 311
appendix B
Using the CD-ROM
T
he included CD-ROM contains all the source code from the examples in this
book. The DirectX SDK from Microsoft is also included.
What’s on the CD-ROM
The code samples are located in the folder corresponding to the approprriate chapter
number. For example, you can find all code samples used in Chapter 3, “Surfaces, Sprites,
and Salmon,” in the chapter3 directory on the CD-ROM.
The code samples within these directories are split into separate folders and are labeled
example1, example2, and so on.
Within the example folders are the complete source code listings, the Visual Studio .NET
2003 project files, and a debug folder that includes a ready-to-run executable of that par-
ticular sample.
You can run the executables from the CD-ROM, but if you want to recompile the source
code, you must copy the example folders to your hard drive. You also might need to
remove the Read-Only attribute from the files after they are copied to your hard drive.
Installing the DirectX SDK
To get started programming for DirectX, you must first install the DirectX SDK on your
machine. The DirectX SDK is the software development kit from Microsoft that includes
all the header files, libraries, and samples you need to write software for DirectX.
311
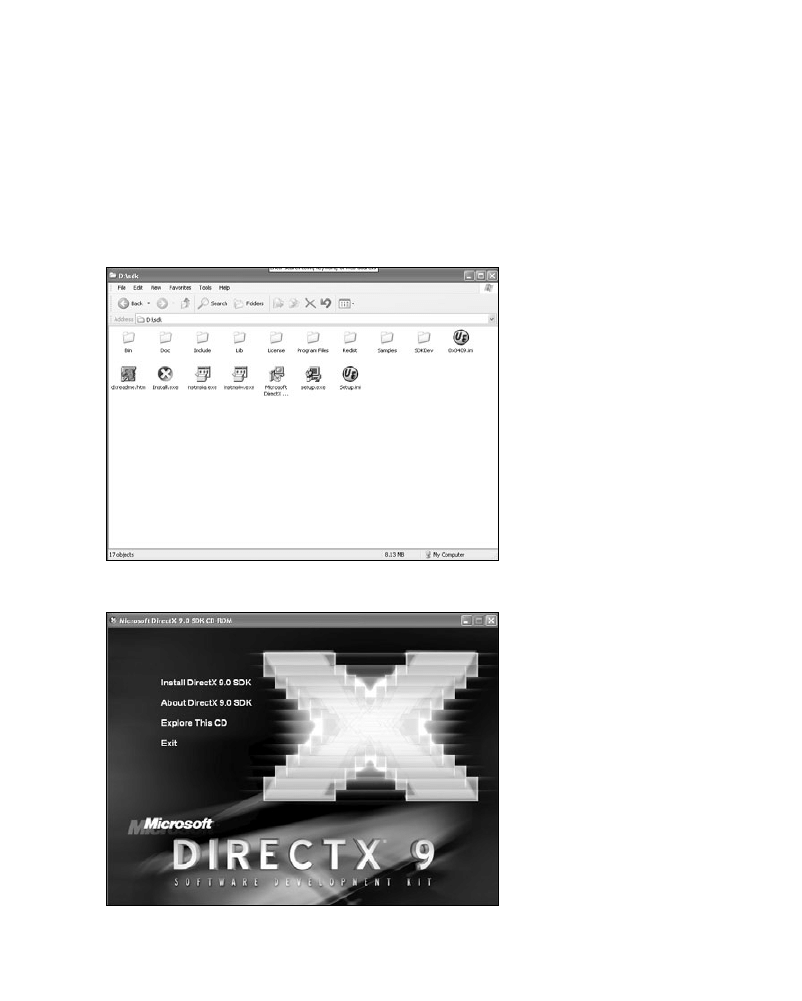
13 DX9_GP AppB 3/12/04 4:22 PM Page 312
312
Appendix B
■
Using the CD-ROM
The DirectX SDK takes up approximately 300 MB on your hard drive, so make sure you
have enough room before running the installation.
You can find the installation program for the DirectX SDK in the DXSDK directory on
the included CD-ROM. Figure B.1 shows the files you should find in this directory.
You begin the SDK installation by clicking the install.exe icon. The dialog box shown in
Figure B.2 should appear.
Figure B.1 The contents of the DXSDK directory on the CD-ROM.
Figure B.2 The launch screen for the DirectX SDK.

13 DX9_GP AppB 3/12/04 4:22 PM Page 313
Using the CD-ROM
313
Select the option Install DirectX 9.0
SDK.
The installer launches and presents you
with the dialog box shown in Figure
B.3. Click the Next button to continue
with the installation.
Next you are presented with the End-
User License Agreement (EULA) from
Microsoft. You must accept this license
agreement to install the SDK. The
license dialog box is shown in Figure
B.4. Click the Next button to continue.
The next dialog box, Custom Setup,
presents you with multiple choices for
the install. You want to install the entire
SDK, so leave the default options as
they are. If you would like to change the
directory that the SDK will be installed
into, click the Change button and enter
the new directory path.
Click the Next button to continue. The
Custom Setup dialog box is shown in
Figure B.5.
One more option is required: the type
of DirectX runtime that you would like
to be installed.
Figure B.3 The installation welcome dialog box.
Figure B.4 The End-User License Agreement dialog
box.
Figure B.5 The Custom Setup dialog box.
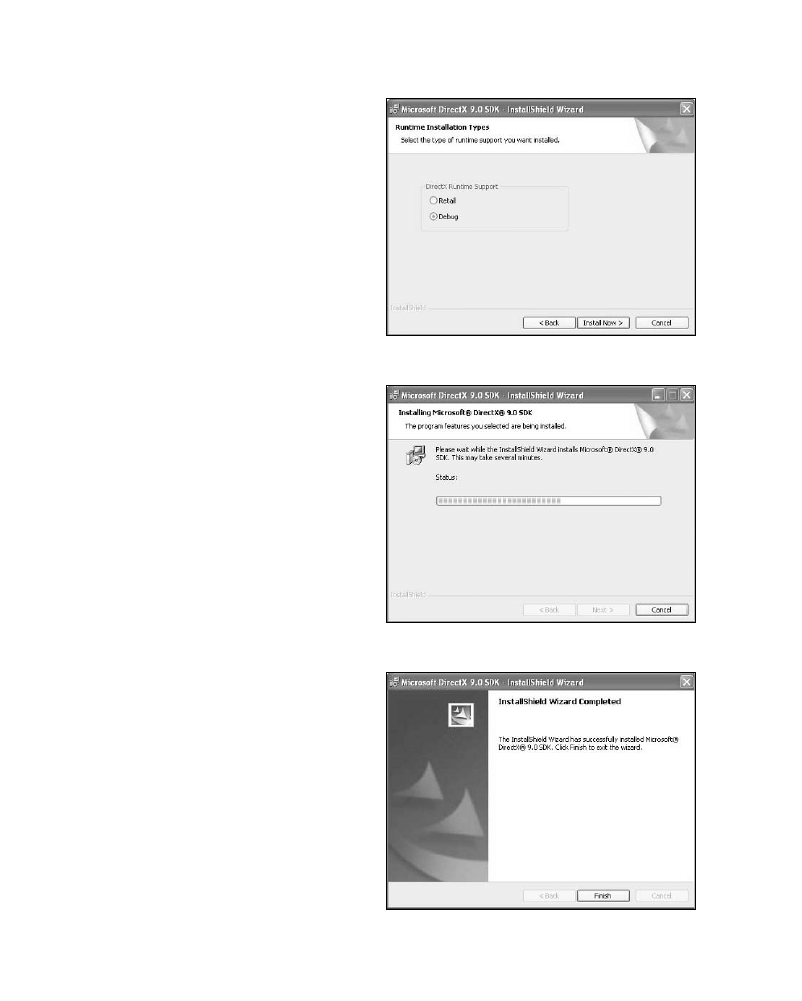
13 DX9_GP AppB 3/12/04 4:22 PM Page 314
314
Appendix B
■
Using the CD-ROM
Because you will be developing DirectX
applications, it’s best to choose the
Debug runtime. Although the perfor-
mance of this runtime is not as fast as the
retail version, it does help when you’re
trying to track down a difficult bug.
The runtime selection dialog box is
shown in Figure B.6. After you click the
Next button again, the installation of
the DirectX SDK begins.
The progress dialog box should appear.
This dialog box continually updates you
as to the progress of the installation.
This dialog box is shown in Figure B.7.
The installation continues for a few
minutes, so don’t be worried if it’s tak-
ing some time. A dialog box informs
you when the installation is complete.
Figure B.8 shows the completion dialog
box.
Clicking the Finish button ends the
installation.
Figure B.6 The runtime selection dialog box.
Figure B.7 The installation progress dialog box.
Figure B.8 The installation completion dialog box.

14 DX9_GP GLOSS 3/12/04 4:23 PM Page 315
GLOSSARY
2D animation — The process of displaying
still frames in quick succession to create
the illusion of motion.
alpha blending — A graphical technique used
to make 3D surfaces appear transparent.
ambient lighting — Lighting that is uniform
and does not appear to come from any
particular direction.
Application Programming Interface (API) —
A set of functions that an application uses
to carry out tasks.
back buffer — An area of memory to which
graphics can be drawn before being dis-
played on the screen.
Basic Input Output System (BIOS) — The
lowest level of software in a computer that
handles setting up the hardware for use by
the operating system.
billboard — A normally four-sided polygon
often used in particle systems. A billboard
always faces toward the camera.
bitmap — A series of pixels that represent a
graphical image.
Component Object Model (COM) — An
architecture developed by Microsoft to
create component-based software.
constant force — A force that retains a
consistent direction and pressure during
its duration.
cooperative level —The level of access permit-
ted to a hardware device within DirectX.
coordinate systems — The way of defining
positions within 3D space.
culling — The act of removing objects or ver-
tices from a scene before it is rendered.
Device Driver Kit (DDK) — A set of develop-
ment code libraries used for the creation of
device drivers.
Direct3D — A portion of DirectX that pro-
vides functions for creating, manipulating,
and viewing 3D data.
Direct3D device — An interface of DirectX
that represents the graphics adapter.
DirectDraw — A DirectX component that
handles 2D surfaces and images.
DirectInput — A DirectX component that
gathers and receives input data from vari-
ous devices.
directional lighting — Light that travels in a
straight line from its source.
DirectMusic — The DirectX component used
to play dynamic sounds.
DirectPlay — The DirectX component that
provides networking and multiplayer
support.
DirectSetup — The DirectX component that
provides an easy way to install the DirectX
runtime on a client machine.

14 DX9_GP GLOSS 3/12/04 4:23 PM Page 316
316
Glossary
DirectSound — The component of DirectX
that handles the manipulation and playing
of sounds.
DirectX — A set of APIs used in the develop-
ment of game and multimedia applications
on the Windows platform.
DirectX Graphics — The component of
DirectX that handles graphics output.
DirectX Runtime — The DLL component that
provides the functionality of DirectX.
Disk Operating System (DOS) — The low-
level program that tells the system how to
operate. DOS as an operating system is no
longer in wide use.
display adapter —The video output hardware.
enumeration — The process of programmati-
cally searching a system for a particular
type of hardware device based on search
criteria.
feedback effect — A series of vibrations sent
to a force feedback device.
force feedback — The addition of motors
within input devices that provide the user
with vibration.
frame — A single still image that is usually
part of an animation.
front buffer —The area of memory that repre-
sents the viewable area of a display screen.
Globally Unique Identifier (GUID) — A
number that is used to identify a software
component.
Graphical User Interface (GUI)— A user inter-
face that represents the system through a
series of icons, pictures, or menus.
Hardware Abstraction Layer (HAL) — A layer
of software that provides a standard way to
access different hardware without knowing
the specifics of the device.
Hardware Emulation layer (HEL) — A layer
of software that provides missing function-
ality of a hardware device.
index buffer — Memory buffers that contain
index data, which are offsets into a list of
vertices.
matrix — An ordered array of numbers.
mesh — An interconnected set of polygons
that represent an object in 3D space.
message loop — The process within a
Windows application of retrieving and
dispatching system messages.
message queue — The area within the
Windows operating system that holds
events and messages created by
applications.
multitexturing — Applying more than one
texture to a given set of vertices.
normal — A directional vector at a right
angle to a plane.
offscreen surface — An area of memory into
which graphical data can be loaded and
manipulated without being displayed.
page flipping — The swapping of the front
and one or more offscreen buffers.
particle — A normally four-sided polygon
used to represent small objects such as dirt,
smoke, or sparks within a game.
periodic effect — A force feedback effect that
occurs on a given time interval.
perspective — A type of projection that dis-
plays objects that are farther away from the
camera in 3D space as smaller than objects
that are closer to the camera.
point sprite — A way of representing particles
within Direct3D.
polling — Periodically checking an input
device like a joystick for input.
primary buffer — A DirectSound buffer into
which sounds from secondary buffers are
mixed for output.
primitive — A standard 3D object upon which
meshes are created.

14 DX9_GP GLOSS 3/12/04 4:23 PM Page 317
projection — The process of transforming 3D
space into a 2D viewable form.
ramp force — A force feedback effect that
gradually increases in intensity over time.
refresh rate — The rate at which the screen is
updated.
return code — A value returned from a func-
tion that determines whether the function
was successful.
secondary buffer — An area of memory that
loads sound data within DirectSound.
self-extracting file — An executable file that
contains compressed data, with the ability
to uncompress this data without an exter-
nal helper application.
sound buffer — An area of memory that holds
sound data.
sprite — A graphic that is used to represent
2D characters or items within a game.
static buffer — An area of memory that holds
sound data within DirectSound. The static
buffer is commonly used when the entire
sound can be loaded.
streaming buffer — An area of memory that
holds a portion of sound data. The stream-
ing buffer is used when all the sound data
is too large to fit in memory at one time.
surface — A linear piece of memory that
stores graphic data. The surface is repre-
sented as a rectangular area into which
graphics can be held.
texture coordinates — A set of coordinates on
a polygon that defines the portion of the
texture map to apply.
texture mapping — Applying an image to a
polygon to give it the illusion of a real-
world object.
timer — An internal counting mechanism that
keeps a constant rate of time for animations.
Glossary
317
tranformation — Converting a 3D object
from one coordinate system to another.
triangle fan — A series of triangles that share
a single vertex in a fan pattern.
triangle strip — A series of triangles that are
connected, where only a single vertex is
needed to specify an addition triangle.
Universal Serial Bus (USB) — A standard port
that enables users to connect a wide variety
of devices, such as mice, cameras, and
game pads.
vector — A straight line segment in 3D space
consisting of both direction and magni-
tude. The length of a vector is defined as its
magnitude, whereas its orientation repre-
sents its direction.
vertex — A single point of a polygon consist-
ing of an X, Y, and Z coordinate defining
its position in 3D space.
vertex buffer — A buffer containing vertex
data.
video resolution — The width, height, and bit
depth of a particular video mode.
viewport — A rectangular area that defines
where in a target surface a scene should be
rendered.
windowed application — An application that
runs within a window on the desktop.
Windows — An operating system from
Microsoft that provides the user with a
Graphical User Interface (GUI).
WinMain — The entry point function for
Windows applications.
X file — The native DirectX 3D object format.
Z-Buffer — An array used to store the Z coor-
dinate of polygons plotted in 3D space.
Direct3D uses the Z value of each polygon
to determine which 3D objects are in front
of others.

15 DX9_GP INDEX 3/12/04 11:34 PM Page 318
INDEX
Symbols
3D models. See also 3D space
cubes, rending, 91–92
index buffers, 92–96
overview, 87–88
vertex buffers, 88–90
3D space. See also 3D models
coordinate systems, 66–68
depth, 65
discussed, 65
planet creation, 277–279, 290–291
primitive types, 82–85
spaceship creation, 281–282
vertex buffers
copying vertices to, 76
creating, 71–72
Flexible Vertex Format, 72–74
loading data into, 74–78
locking, 74–75
rendering, 79–80
scenes, rendering, 81–82
stream source, setting, 78–79
unlocking, 76–78
vertex shader, setting, 79
vertices, 68–70
A
A variable, alpha color component, 70
access
acquiring, 209
nonexclusive, 207
Acquire function, 209, 228–229
Adapter parameter, CreateDevice function, 18
adapters
display modes for, 30–31
information, gathering, 29–30
querying, 32–33
Add New Item command (Project menu), 11
Add New Item dialog box, 11
addItemToList function, 32
addTexture function, 190
alpha color component, A variable, 70
ambient lighting
creating, 129–130
overview, 124
reflection, 134
Angle parameter, 106
animation
anim_rate variable, 60, 267
sprites, 53–57
timers, 57–61
API (Application Programming Interface), 6
Application Settings tab (Application Wizard dialog
box), 10–11
application window
initializing, 11–15
initWindow function, 259–261
WinMain function, 258–259
WndProc function, 261
Application Wizard dialog box
Application Settings tab, 10–11
Overview tab, 10
architecture, DirectX, 6–7
arrays
attribTable, 160
IndexData, 94
attenuation, lighting, 128
AttribId variable, 160
attribTable array, 160
attribute table, meshes, 158–162
AutoDepthStencilFormat parameter, 19
axis objects, 223
B
B variable, blue color component, 70
back buffers
discussed, 19–20, 36
page flipping, 20

15 DX9_GP INDEX 3/12/04 11:34 PM Page 319
BackBufferCount parameter, 19
BackBufferFormat parameter, 19, 28
BackBufferHeight parameter, 19
BackBufferWidth parameter, 19
BaseVertexIndex parameter, 96
Basic Input Output System (BIOS), 201–202
beginRender function, 262, 270
BeginScene function, 81–82
BehaviorFlags parameter, CreateDevice function, 18
bEnable parameter, 129
BIOS (Basic Input Output System), 201–202
bitmaps
loading to surfaces, 37–39
with multiple sprite images, 48
rendering, 39–41
texture images, 141
blank window application, 15
blending, textures, 139
blitToSurface function, 263
blue background screen color, 24, 26
blue color component, B variable, 70
boxes, creating, 163
buffers
back buffers, 19–20, 36
depth buffers, 25
display buffers, 36
front buffers, 36
index buffers
creating, 92–93
creating and filling, 94–96
cubes, generating, 93–94
cubes, rendering, 95–96
static buffers, 244
stencil buffers, 25
streaming buffers, 244
vertex buffers
copying vertices to, 76
creating, 71–72
defining, 88–90
Flexible Vertex Format, 72–74
loading data into, 74–78
locking, 74–75
rendering, 79–80
scenes, rendering, 81–82
stream source, setting, 78–79
unlocking, 76–78
vertex shader, setting, 79
callback functions, DirectSound, 241–242
camera effects, positioning and pointing, 113–114
camera space, view transformation, 98
cAttribTableSize parameter, 161
cAxes parameter, 234
cbSize parameter, 245
Index
319
cbTypeSpecificParams parameter, 234
CD-ROM contents, 311–314
center of rotation, 108–110
CGameObject class, 271, 276–277
classes
CGameObject, 271, 276–277
CModel, 272–276
CPlanet, 277–278
diManager, 285–286
dxManager, 262–265
emitter, 188–192
Game, 266–268
particle, 192–193
particle manager, 184–188
RegisterClassEx function, 14
cleanUp function, 25
Clear function, 19–20, 24
CModel class, 272–276
code
Acquire function, 209
BeginScene function, 81–82
CGameObject class, 271, 276–277
cleanUp, 25
Clear function, 19
color macros, 119
CPlanet class, 277–278
CreateDevice function, 17, 205
CreateIndexBuffer function, 92–93
CreateOffscreenPlainSurface function, 36–37
CreateVertexBuffer function, 71, 73–74
CreateWindow function, 27–28, 260–261
cubes, rendering, 91
D3DXCreateBox function, 163
D3DXCreateSphere function, 165
D3DXCreateTeapot function, 164
D3DXLoadMeshFromX function, 172–175
D3DXLoadSurfaceFromFile function, 38
D3DXMatrixRotationX function, 106
D3DXMatrixTranslation function, 104–105
D3DXSaveMeshToX function, 169–171
DIDATAFORMAT structure, 206–207
DirectInput8Create function, 204–205
DirectSoundEnumerate function, 240–241
DrawPrimitive function, 79–80
dxManager class, 263–264
EndScene function, 81–82
EnumAdapterModes, 31
EnumDevices function, 210–211
Game class, 266–267
GetAdapterIdentifier function, 29–30
GetAdapterModeCount function, 30
GetBackBuffer function, 40–41
GetDeviceState function, 209–210
getSurfaceFromBitmap function, 47–48
index buffers, creating and filling, 94–96
initDirect3D, 23
C

15 DX9_GP INDEX 3/12/04 11:34 PM Page 320
320
Index
code (continued)
initSprites function, 49
initWindow function, 13–14
keyboards, getting input from, 216–217
lighting
ambient lighting, 129
directional, 130–131
point lights, 131–132
SetLight function, 128–129
spotlights, 132–133
loadModel function, 274–275
Lock function, 75
matrices
D3DMATRIX structure, 102–103
identity matrix, 100
initializing, 100
meshes
creating, 149–151
filling, 151–153
optimization, 156–160
particles
creation, 179–180
emitter class, 188–192
emitter structure, 183–184
movement, 180
particle class, 192–193
particle manager class, 184–188
structure of, 178
PeekMessage function, 22
Present function, 21
Release function, 21
render function, 24, 39–40
rotation, 106–110
SetFVF function, 79
SetIndices function, 96
SetStreamSource function, 78
SetTransform function, 112–113
SetupVB function, 77–78
shading, 122
sound
CreateSoundBuffer function, 247–248
DirectSoundCreate8, 239–240
panning, 254–255
sound buffers, locking, 248–249
sound buffers, unlocking, 249–250
volume, changing, 254
sprites
animated, 53–56
displaying, 50
moving, 51–53
point sprites, 195–196
structure of, 46–47
StretchRect function, 40–41, 43–44
textures
D3DXCreateTextureFromFile function, 140
D3DXCreateTextureFromResource function,
141–142
SetTexture function, 142–143
SetTextureStageState function, 139
triangles and vertices, 69–70
Unacquire, 229–230
vertex buffers, copying vertices to, 76
vertices, color, 70
WinMain function, 12, 259
WndProc function, 15, 261
color
alpha component, 70
blue background screen color, 24, 26
blue component, 70
diffuse, lighting, 127
green component, 70
macros, 119
of objects, changing, 117–119
red component, 70
vertices, 70
ColorKey parameter, 39
COM (Component Object Model), 6
commands
File menu, New Project, 9
Project menu
Add New Item, 11
Properties, 25
Component Object Model (COM), 6
components, DirectX, 4
conditional effects, force feedback, 230
constant force, force feedback, 230
cooperative level
DirectInput, 207–209
DirectSound, 243–244
coordinate systems
camera space, 98
left-hand systems, 68
model space, 97
points, 66–67
right-handed systems, 68
textures, 138
world space, 97
world transformation, 97
X axes, 67
Y axes, 68
Z axes, 68
copying vertices to vertex buffers, 76
Count parameter, Clear function, 20
CPlanet class, 277–278
create function, 278–279
CreateDevice function
DirectInput, 205–206
discussed, 24
HRESULT value, 17
parameters, list of, 18
CreateEffect function, 232–233

15 DX9_GP INDEX 3/12/04 11:34 PM Page 321
Index
321
createEmitter function, 185
CreateIndexBuffer function, 92–93
CreateOffscreenPlainSurface function, 36–37
CreateSoundBuffer function, 247–248
createVertexBuffer function, 190, 263
CreateWindow function
code, 27–28
discussed, 14, 260–261
WS_OVERLAPPEDWINDOW parameter, 27
cubes
generating, using index buffers, 93–94
rending, 91–92
curFrame variable, 54
cylinders, creating, 166–167
D
D3CMatrixPerspectiveFovLH function, 113
D3DCLEAR_TARGET parameter, 24
D3DFORMAT parameter, 31
D3DFVF_DIFFUSE flag, 118
D3DMATRIX structure, 102–104
D3DMatrixScaling function, 111
D3D_SDK_VERSION parameter, 16
D3DXCreateBox function, 163–164
D3DXCreateCylinder function, 166–167
D3DXCreateMesh function, 149–150
D3DXCreateMeshFVF function, 150–151
D3DXCreateSphere function, 165
D3DXCreateTeapot function, 164
D3DXCreateTextureFromFile function, 140–141
D3DXCreateTextureFromResource function, 141–142
D3DXLoadMeshFromX function, 172–175
D3DXLoadSurfaceFromFile function, 38
D3DXMatrixLookAtLH function, 114
D3DXMatrixRotationX function, 106
D3DXMatrixTranslation function, 104–105
D3DXSaveMeshToX function, 169–171
data format, DirectInput, 206–207
DDK (Device Driver Kit), 7
dds file format, texture images, 141
depth, 3D space, 65
depth buffers, 25
Depth parameter, 163
Device Driver Kit (DDK), 7
devices
capabilities, DirectInput, 214–216
pd3dDevice variable, 21
rendering, 17
DeviceType parameter, CreateDevice function, 18
dialog boxes
Add New Item, 11
Application Wizard
Application Settings tab, 10–11
Overview tab, 10
New Project, 9–10
Project Properties
Input option, 25
Linker option, 25–26
DIDATAFORMAT structure, 206–207
DIEnumDevicesCallback function, 213–214
diffuse color, lighting, 127
diffuse reflection, 134
diManager class, 285–286
DIMOUSESTATE structure, 219
Direct3D
discussed, 4
headers, 22
overview, 16
DirectDraw, 4
DirectInput
access, acquiring, 209
cooperative level, setting, 207–209
CreateDevice function, 205–206
data format, setting, 206–207
device capabilities, 214–216
DirectInput8Create function, 204–205
enumeration, 210–214
force feedback, 230–235
gamepads, 221
GetDeviceState function, 209
input devices
reacquiring, 228–229
supporting multiple, 226–228
joysticks, 221–226
keyboards, 216–217
mouse functions, 217–220
overview, 4, 203
directional lighting
creating, 130–131
overview, 124
DirectMusic, 4
DirectPlay, 4
DirectSetup, 4
DirectShow, 4
DirectSound. See also sound
buffer types, 238
callback functions, 241–242
cooperative level, setting, 243–244
DirectSoundCreate8 function, 239–240
overview, 4
secondary buffer, 244–248
sound devices, enumerating, 240–241
DirectX
architecture, 6–7
COM (Component Object Model), 6
components, list of, 4
defined, 3
history of, 4–5
integration, 6
libraries, 25–26
Runtime, 289–291
uses for, 4–5

15 DX9_GP INDEX 3/12/04 11:34 PM Page 322
322
Index
DirectX Graphics, 4
DispatchMessage function, 13
display buffers, 36
display modes, for video adapters, 30–31
displaying
animated sprites, 55–56
meshes, 154
scenes, 20–21
sprites, 49–51
DrawIndexedPrimitive function, 95–96
DrawPrimitive function, 79–80
drawSprite function, 60
DrawSubset function, 154, 275
driver and video adapter information, gathering,
29–30
dwBufferBytes parameter, 246
dwBytes parameter, 249
dwDevType parameter, 211, 213
dwDuration parameter, 234
dwFlags parameter, 208, 211, 215, 233,
246, 249
dwGain parameter, 234
dwLevel parameter, 243
dwOffset parameter, 249
dwReserved parameter, 246
dwSamplePeriod parameter, 234
dwSize parameter, 213, 233, 246
dwTriggerButton parameter, 234
dwTriggerRepeatInterval parameter, 234
dwVersion parameter, 204
dxManager class, 262–265
E
else statement, 22
emissive property, lighting, 135
emitter class, particles, 188–192
emitter properties, particles, 182–183
emitter structure, particles, 183–184
EnableAutoDepthStencil parameter, 19
End User License Agreement (EULA), 313
endRender function, 262, 270
EndScene function, 81–82
entry point function, main, 12
EnumAdapterModes function, 31
EnumDevices function, 210–214
enumeration
DirectInput, 210–214
enumerated values, PrimitiveType parameter,
80
joysticks, 222
sound devices, 240–241
EnumObjects function, 215–216
EULA (End User License Agreement), 313
examples. See code
F
FaceCount variable, 160
FaceStart variable, 160
Falloff property, spotlights, 134
field of view (FOV), 112
File menu command, New Project, 9
files, loading textures from, 140–141
fill modes, shading, 122–123
filling meshes, 151–153
Filter parameter, 39–40
Flags parameter
Clear function, 20
discussed, 19
Lock function, 75
Optimize function, 156
OptimizeInPlace function, 156–157
flat shading, 120
Flexible Vertex Format, 72–74
flicker, screen, 20
force feedback effects
creating, 232–235
discussed, 230
input devices for, enumerating, 231–232
starting, 235
stopping, 235–236
Format parameter
CreateIndexBuffer function, 92
D3DXSaveMeshToX function, 170
discussed, 37
formats and video modes, 29
forwardVector variable, 282
FOV (field of view), 112
frames
curFrame variable, 54
numFrames variable, 54
front buffers, 36
FullScreen_RefreshRateInHz parameter, 19
functions. See also parameters; variables
Acquire, 209, 228–229
addItemToList, 32
addTexture, 190
beginRender, 262, 270
BeginScene, 81–82
blitToSurface, 263
cleanUp, 25
Clear, 19–20, 24
create, 278–279
CreateDevice
DirectInput, 205–206
discussed, 17, 24
HRESULT value, 17
parameters, list of, 18
CreateEffect, 232–233
createEmitter, 185–186
CreateIndexBuffer, 92–93

15 DX9_GP INDEX 3/12/04 11:34 PM Page 323
Index
323
CreateOffscreenPlainSurface, 36–37
initDirect3D, 22–23, 32
CreateSoundBuffer, 247–248
initDirectInput, 285
createVertexBuffer, 190, 263
initParticles, 190
CreateWindow
initSprites, 49, 54–55
code, 27–28
initWindow, 13–14, 259–261
discussed, 14, 260–261
isButtonDown, 285
WS_OVERLAPPEDWINDOW parameter, 27
LightEnable, 132
D3DMatrixLookAtLH, 114
loadModel, 272, 274–275
D3DMatrixPerspectiveFovLH, 113
Lock, 75, 248–249
D3DMatrixScaling, 111
memcpy, 76, 94
D3DXCreateBox, 163–164
move, 282
D3DXCreateCylinder, 166–167
Optimize, 156
D3DXCreateMesh, 149–150
OptimizeInPlace, 156–157
D3DXCreateMeshFVF, 150–151
OptimizeMesh, 158–159
D3DXCreateSphere, 165
OptimizePlace, 159
D3DXCreateTeapot, 164
PeekMessage, 22
D3DXCreateTextureFromFile, 140–141
pointCamera, 114
D3DXCreateTextureFromResource, 141–142
Present, 20–21, 25
D3DXLoadMeshFromX, 172–175
push_back, 280
D3DXLoadSurfaceFromFile, 38
QueryPerformanceCounter, 58
D3DXMatrixRotationX, 106
QueryPerformanceFrequency, 59, 61
D3DXMatrixTranslation, 104–105
RegisterClassEx, 14, 260
D3DXSaveMeshToX, 169–171
Release, 21
DIEnumDevicesCallback, 213–214
removeEmitter, 185
DirectInput8Create, 204–205
render, 22, 24, 39–40, 186, 190
DirectSoundCreate8, 239–240
SetAttributeTable, 161
DirectSoundEnumerate, 240–241
SetCooperativeLevel, 208–209
DispatchMessage, 13
SetFVF, 79
DrawIndexedPrimitive, 95–96
SetIndices, 96
DrawPrimitive, 79–80
SetLight function, 128–129
drawSprite, 60
SetMaterial, 154
DrawSubset, 154, 275
setNumParticles, 190
endRender, 262, 270
SetPan, 254–255
EndScene, 81–82
setPosition, 282
EnumAdapterModes, 31
SetRenderState, 121
EnumDevices, 210–214
SetStreamSource, 78–79
EnumObjects, 215–216
setter, 193
GetAdapterCount, 16
SetTexture, 142–143
GetAdapterIdentifier, 29–30, 32
SetTextureStageState, 139
GetAdapterModeCount, 30–32
SetTransform, 109, 112–113
GetAsnycState, 202
SetupMesh, 151–153
GetAttributeTable, 160
SetupVB, 76–78
GetBackBuffer, 40–41
ShowWindow, 261
getBackBuffer, 263
shutdown, 262, 264, 285
getCurMouseX, 285
sizeof, 79
getCurMouseY, 285
srcRect, 49
GetDeviceState, 209–210
Start, 235
getInput, 285
StretchRect, 40–41, 43–44
GetMessage, 13, 22
TranslateMessage, 13
GetPan, 255
Unacquire, 229–230
getSurfaceFromBitmap, 47–49, 262
Unlock, 76, 249–250
getter, 193
update, 186, 190
GetTickCount, 57–58
UpdateWindow, 261
GetVolume, 254
WinMain, 12, 258–259
init, 262
WndProc, 261

15 DX9_GP INDEX 3/12/04 11:34 PM Page 324
324
Index
FVF parameter
D3DXCreateMeshFVF function, 150
discussed, 71
SetFVF function, 79
G
G variable, green color component, 70
Game class, 266–268
game release, packaging, 288
game timers, 267
gamepads, DirectInput, 221
geometry pipeline
overview, 97
projection transformation, 98–99
stages of, 97
view transformation, 98
world transformation, 98
GetAdapterCount function, 16
GetAdapterIdentifier function, 29–30, 32
GetAdapterModeCount function, 30–32
GetAsyncState function, 202
GetAttributeTable function, 160
GetBackBuffer function, 40–41, 263
getCurMouseX function, 285
getCurMouseY function, 285
GetDeviceState function, 209–210
getInput function, 285
GetMessage function, 13, 22
GetNumFaces parameter, 157
GetNumVertices parameter, 157
GetPan function, 255
getSurfaceFromBitmap function, 47–49, 262
getter function, 193
GetTickCount function, 57–58
GetVolume function, 254
gourand shading, 121
gravity property, 183
green color component, G variable, 70
guid3DAlgorithm parameter, 246
guidFFDriver parameter, 213
guidInstance parameter, 213
guidProduct parameter, 213
g_Vertices array, 91
H
HAL (Hardware Abstraction Layer), 6
Hardware Emulation Layer (HEL), 7
hDestWindowOverride parameter, Present
function, 21
hDeviceWindow parameter, 19
headers, Direct3D, 22
Height parameter
D3DXCreateBox function, 163
discussed, 37
HEL (Hardware Emulation Layer), 7
hFocusWindow parameter, CreateDevice function, 18
hInst parameter, 204
HRESULT value, CreateDevice function, 17
hSrcModule parameter, 141
hwnd parameter, 208, 243
I
identity matrix, 100
IDirect3D9 interface, 16, 29
IDirect3DTexture9 interface, 137
if statement, 21
images, sprite images, loading, 47–49
index buffers
creating, 92–93
creating and filling, 94–96
cubes
generating, 93–94
rendering, 95–96
Index parameter, SetLight function, 129
IndexData array, 94
init function, 262
initDirect3D function, 22–23, 32
initDirectInput function, 285
initializing
matrices, 100
sprites, 49
initParticles function, 190
initSprites function, 49, 54–55
initWindow function, 13–14, 259–261
input. See DirectInput
Input option (Project Properties dialog box), 25
installation software, 289
InstallShield installation software, 289
integration, DirectX, 6
interfaces
IDirect3D9, 16, 29
IDirect3DTexture9, 137
isButtonDown function, 285
J
joysticks
data format structure, 207
enumeration, 222
polling, 222
range of, setting, 222–225
reading from, 225–226
jpeg file format, texture images, 141
K
keyboard objects
data format structure, 207
getting input from, 216–217

15 DX9_GP INDEX 3/12/04 11:34 PM Page 325
L
Index
325
left-handed systems, coordinate systems, 68
Length parameter
CreateIndexBuffer function, 92
D3DXCreateCylinder function, 166
discussed, 71
libraries
DirectX, 25–26
STL (Standard Template Library), 34
licensing
DirectX Runtime, 290
EULA (End User License Agreement), 313
LightEnable function, 132
LightIndex parameter, 129
lighting
ambient lighting
creating, 129–130
overview, 124
attenuation, 128
diffuse color, 127
directional
creating, 130–131
overview, 124
emissive property, 135
nondirectional, 124
point lights
creating, 131–132
overview, 125
positioning, 128
properties, list of, 127–128
range, 128
reflection, 134–136
SetLight function, 128–129
specular highlights, 136
spotlights
creating, 132–134
overview, 126
types of, 124
line lists, 83
line strips, 83
Linker option (Project Properties dialog box), 25–26
loading
bitmaps to surfaces, 37–39
data into vertex buffers, 74–78
meshes to X files, 172–175
sprite images, 47–49
textures
discussed, 139
from files, 140–141
from resources, 141–142
loadModel function, 272, 274–275
locations
sprites, 46
vertices, 69
Lock function, 75, 248–249
locking
sound buffers, 248–249
vertex buffers, 74–75
loops, message loop, 22
lpCallback parameter, 211, 215
lpcGuidDevice parameter, 239
lpContext parameter, 241
lpcstrDescription parameter, 241
lpcstrModule parameter, 241
lpDirectInputDevice parameter, 205
lpEnvelope parameter, 234
lpGuid parameter, 241
lpPerformanceCount variable, 58
lpvTypeSpecificParams parameter, 234
lpwfxFormat parameter, 246
M
macros, colors, 119
matBuffer parameter, 272
matrices
D3DMATRIX structure, 102–104
identity matrix, 100
initializing, 100
multiplication, 101–102
order of operations, 111–112
overview, 99
memcpy function, 76, 94
mesh parameter, 272
meshes
attribute table, 158–162
creating
D3DXCreateMesh function, 149–150
D3DXCreateMeshFVF function, 150–151
discussed, 148
defined, 148
displaying, 154
filling, 151–153
optimization, 155–159
predefined
boxes, creating, 163
cylinders, creating, 166–167
discussed, 162
spheres, creating, 165
teapot creation example, 164
types of, 148
X files
loading meshes to, 172–175
mesh format, 168–169
saving meshes to, 169–171
message loop, 22
messages
DispatchMessage, 13
GetMessage function, 13, 22
PeekMessage function, 22
TranslateMessage function, 13

15 DX9_GP INDEX 3/12/04 11:34 PM Page 326
326
Index
MinIndex parameter, 96
model space, 97
mouse object
data format structure, 207
getting input from, 217–220
move function, 282
moveRate variable, 282
moveX variable, moving sprites, 52
moveY variable, moving sprites, 52
moving
objects, 104–105
particles, 180
sprites, 51–53
m_pMeshMaterials parameter, 272
m_pMeshTextures parameter, 272
multiplication, matrices, 101–102
MultiSampleType parameter, 19
N
nAvgBytesPerSec parameter, 245
nBlockAlign parameter, 245
nChannels parameter, 245
New Project command (File menu), 9
New Project dialog box, 9–10
nondirectional lighting, 124
nonexclusive access, 207
nSamplePerSec parameter, 245
Nullsoft Scriptable Install System installation
software, 289
numAttr variable, 160
NumFaces parameter, 149–150
numFrames variable, 54
NumMaterials parameter, 170, 272
NumVertices parameter
D3DXCreateMesh function, 149
D3DXCreateMeshFVF function, 150
discussed, 96
O
objects
axis, 223
boxes, creating, 163
color of, changing, 117–119
COM objects, 6
cylinders, creating, 166–167
moving, 104–105
releasing, 21, 229–230
rotating, 105–108, 112
scaling, 110–111
size of, changing, 110–111
spheres, creating, 165
teapot creation example, 164
offscreen surfaces, 36–37
OffsetInBytes parameter, 78
OffsetToLock parameter, 75
optimization, meshes, 155–159
Optimize function, 156
OptimizeInPlace function, 156–157, 159
OptimizeMesh function, 158–159
Options parameter, 149–150, 172
Overview tab (Application Wizard dialog box), 10
P
pAdjacency parameter, 170
pAdjacencyIn parameter, 156
pAdjacencyOut parameter, 156
page flipping, defined, 20
panning sound, 254–255
parameters. See also functions; variables
Angle, 106
anim_rate, 267
AutoDepthStencilFormat, 19
BackBufferFormat, 19, 28
BackBufferHeight, 19
BackBufferWidth, 19
BaseVertexIndex, 96
bEnable, 129
cAttribTableSize, 161
cAxes, 234
cbSize, 245
cbTypeSpecificParams, 234
ColorKey, 39
Count, Clear function, 20
CreateDevice function, 18
D3DCLEAR_TARGET, 24
D3DFORMAT, 31
D3D_SDK_VERSION, 16
Depth, 163
dwBufferBytes, 246
dwBytes, 249
dwDevType, 211, 213
dwDuration, 234
dwFlags, 208, 211, 215, 246, 249
dwGain, 234
dwLevel, 243
dwOffset, 249
dwReserved, 246
dwSamplePeriod, 234
dwSize, 213, 233, 246
dwTriggerButton, 234
dwTriggerRepeatInterval, 234
dwVersion, 204
EnableAutoDepthStencil, 19
Filter, 39–40
Flags
Clear function, 19–20
Lock function, 75
Optimize function, 156
OptimizeInPlace function, 156–157

15 DX9_GP INDEX 3/12/04 11:34 PM Page 327
Index
327
Format
CreateIndexBuffer function, 92
D3DXSaveMeshToX function, 170
discussed, 37
FullScreen_RefreshRateInHz, 19
FVF
D3DXCreateMeshFVF function, 150
discussed, 72
SetFVF function, 79
GetNumFaces, 157
GetNumVertices, 157
guid3DAlgorithm, 246
guidFFDriver, 213
guidInstance, 213
guidProduct, 213
hDestWindowOverride, Present function, 21
hDeviceWindow, 19
Height, 37, 163
hInst, 204
hSrcModule, 141
hwnd, 208, 243
Index, SetLight function, 129
Length
CreateIndexBuffer function, 92
D3DXCreateCylinder function, 166
discussed, 72
LightIndex, 129
lpCallback, 211, 215
lpcGuidDevice, 239
lpContext, 241
lpcstrDescription, 241
lpcstrModule, 241
lpDirectInputDevice, 205
lpEnvelope, 234
lpGuid, 241
lpvTypeSpecificParams, 234
lpwfxFormat, 246
MinIndex, 96
m_pMeshMaterials, 272
m_pMeshTextures, 272
MultiSampleQuality, 19
MultiSampleType, 19
nAvgBytesPerSec, 245
nBlockAlign, 245
nChannels, 245
nSamplesPerSec, 245
NumFaces, 149–150
NumMaterials, 170
NumVertices
D3DXCreateMesh function, 149
D3DXCreateMeshFVF function, 150
discussed, 96
OffsetInBytes, 78
OffsetToLock, 75
Options, 149–150, 172
pAdjacency, 170
pAdjacencyIn, 156
pAdjacencyOut, 156
pAttribTable, 161
pcDSBufferDesc, 247
pDeclaration, 149
pDestRect
D3DXLoadSurfaceFromFile format, 38
discussed, 40
Present function, 21
pDestSurface, 40
pDevice
D3DXCreateBox function, 163
D3DXCreateCylinder function, 166
D3DXCreateMesh function, 149
D3DXCreateMeshFVF function, 151
D3DXCreateSphere function, 165
D3DXCreateTeapot function, 164
D3DXCreateTextureFromResource function,
141
D3DXLoadMeshFromX function, 172
discussed, 140
pDirtyRegion, Present function, 21
pdwAudioBytes1, 249
pdwAudioBytes2, 249
pEffectInstances, 170
pFaceRemap, 156–157
pFilename, 170, 172
pHandle
CreateIndexBuffer function, 92
CreateVertexBuffer function, 72
discussed, 37
pLight, 129
pMaterials, 170
pMatrix, 113
pNumMaterials, 172
Pool
CreateIndexBuffer function, 92
CreateVertexBuffer function, 72
discussed, 37
pOut
D3DMatrixScaling function, 111
D3DMatrixTranslation function, 104
ppAdjacency
D3DXCreateBox function, 163
D3DXCreateCylinder function, 167
D3DXCreateSphere function, 165
D3DXCreateTeapot function, 164
discussed, 172
ppbData, 75
ppDS8, 239
ppDSBuffer, 247
ppEffectInstances, 172
ppIndexBuffer, 92
ppMaterials, 172

15 DX9_GP INDEX 3/12/04 11:34 PM Page 328
328
Index
parameters (continued)
ppMesh
D3DXCreateBox function, 163
timerFreq, 267
timeStart, 267
tszInstanceName, 213
D3DXCreateCylinder function, 167
D3DXCreateSphere function, 165
D3DXCreateTeapot function, 164
D3DXLoadMeshFromX function, 172
D3DXSaveMeshToX function, 170
discussed, 149, 151
Type, 96, 139
Usage, 72, 92
Value, 139
wBitsPerSample, 245
wFormatTag, 245
Width
ppOptMesh, 156
PpSurface, 37
ppTexture, 140
ppvAudioPtr1, 249
ppvAudioPtr2, 249
ppVertexBuffer, 72
ppVertexRemap, 156–157
ppVout, 204
pRects, Clear function, 20
PresentationInterval, 19
PrimitiveCount, 80, 96
D3DXCreateBox function, 163
discussed, 37
Windowed, 19, 28
WS_OVERLAPPEDWINDOW, 27
wUsage, 213
wUsagePage, 213
x, D3DMatrixTranslation function, 104
y, D3DMatrixTranslation function, 104
z, D3DMatrixTranslation function, 104
particles
creation of, 179–180
PrimitiveType, 80
pSouceRect, 21
pSourceRect, 40
pSourceSurface, 40
pSrcFile, 39, 140
pSrcInfo, 39
pSrcResource, 141
pStreamData, 78
pTexture, 142
pUnkOuter, 205, 239, 247
punkOuter, 204
pvRef, 211, 215
Radius, 165
Radius1, 166
Radius2, 166
rgdwAxes, 234
rglDirection, 234
rguid, 205
riidltf, 204
discussed, 177
movement, 180
particle systems
emitter class, 188–192
emitter properties, 182–183
emitter structure, 183–184
particle class, 192–193
particle manager class, 184–188
properties, 178
random vectors, 181
structure of, 178–179
pAttribTable parameter, 161
pcDSBufferDesc parameter, 247
pd3dDevice variable, 21
pDeclaration parameter, 149
pDestPalette parameter, 38
pDestRect parameter
D3DXLoadSurfaceFromFile format, 38
Present function, 21
SizeToLock, 75
Slices, 165–166
Stacks, 165, 167
pDestSurface parameter, 38, 40
pDevice parameter
D3DXCreateBox function, 163
Stage, 139, 142
StartIndex, 96
D3DXCreateCylinder function, 166
D3DXCreateMesh function, 149
StartVertex, 80
D3DXCreateMeshFVF function, 151
State, 113
Stencil, Clear function, 20
StreamNumber, 78
D3DXCreateSphere function, 165
D3DXCreateTeapot function, 164
D3DXCreateTextureFromResource function,
Stride, 78
141
SwapEffect, 19
sx, 111
D3DXLoadMeshFromX function, 172
discussed, 140
sy, 111
sz, 111
timeEnd, 267
pDirtyRegion parameter, Present function, 21
pdwAudioBytes1 parameter, 249
pdwAudioBytes2 parameter, 249

15 DX9_GP INDEX 3/12/04 11:34 PM Page 329
Index
329
PeekMessage function, 22
D3DXSaveMeshToX function, 170
pEffectInstances parameter, 170
discussed, 149, 151
periodic effect, force feedback, 230
ppOptMesh parameter, 156
pFaceRemap parameter, 156–157
ppReturnDeviceInterface parameter, CreateDevice
pFilename parameter, 170, 172
function, 18
pHandle parameter
PpSurface parameter, 37
CreateIndexBuffer function, 92
ppTexture parameter, 140
CreateVertexBuffer function, 72
ppvAudioPtr1 parameter, 249
discussed, 37
ppvAudioPtr2 parameter, 249
Phi property, spotlights, 134
ppVertexBuffer parameter, 72
planet creation, 277–279, 290–291
ppVertexRemap parameter, 156–157
pLight parameter, 129
ppvOut parameter, 204
pluggable software devices, DDK, 7
pRects parameter, Clear function, 20
pMaterials parameter, 170
predefined meshes
pMatrix parameter, 113
boxes, creating, 163
pMesh parameter, 170
cylinders, creating, 166–167
png file format, texture images, 141
discussed, 162
pNumMaterials parameter, 172
spheres, creating, 165
Point fill mode, shading, 122
teapot creation example, 164
point lights
Present function, 20–21, 25
creating, 131–132
PresentationInterval parameter, 19
overview, 125
PresentationParameters parameter, CreateDevice
point lists, 83
function, 18
point sprites, 193–197
primitive types
pointCamera function, 114
discussed, 82
points, coordinate systems, 66–67
line lists, 83
polling, joysticks, 222
line strips, 83
Pool parameter
point lists, 83
CreateIndexBuffer function, 92
triangle fans, 85
CreateVertexBuffer function, 71
triangle lists, 83
discussed, 37
triangle strips, 83
positioning, lighting, 128
PrimitiveCount parameter, 80, 96
pOut parameter
PrimitiveType parameter, 80
D3DMatrixScaling function, 111
Project menu commands
D3DMatrixTranslation function, 104
Add New Item, 11
D3DXMatrixRotationX function, 106
Properties, 25
ppAdjacency parameter
Project Properties dialog box
D3DXCreateBox function, 163
Input option, 25
D3DXCreateCylinder function, 167
Linker option, 25–26
D3DXCreateSphere function, 165
project transformation, 98–99
D3DXCreateTeapot function, 164
projections, creating cameras using, 112–114
D3DXLoadMeshFromX function, 172
projects
ppbData parameter, 75
source files, adding, 11
ppDS8 parameter, 239
Visual Studio projects, creating, 9–10
ppDSBuffer parameter, 247
properties
ppEffectInstances parameter, 172
Falloff, spotlights, 134
ppIndexBuffer parameter, 92
gravity, 183
ppMaterials parameter, 172
particles, 178
ppMesh parameter
Phi, spotlights, 134
D3DXCreateBox function, 163
Theta, spotlights, 134
D3DXCreateCylinder function, 167
Properties command (Project menu), 25
D3DXCreateSphere function, 165
pSourceRect parameter
D3DXCreateTeapot function, 164
Present function, 21
D3DXLoadMeshFromX function, 172
StretchRect function, 40

15 DX9_GP INDEX 3/12/04 11:34 PM Page 330
330
Index
pSourceSurface parameter, 40
pSrcFile parameter, 39, 140
pSrcInfo parameter, 39
pSrcResource parameter, 141
pStreamData parameter, 78
pTexture parameter, 142
pUnkOuter parameter, 205, 239, 247
punkOuter parameter, 204
push_back function, 280
pvRef parameter, 211, 215
Q
queries, video adapters, 32–33
QueryPerformanceCounter function, 58
QueryPerformanceFrequency function, 59, 61
R
R variable, red color component, 70
Radius parameter, 165
Radius1 parameter, 166
Radius2 parameter, 166
ramp force, force feedback, 230
random vectors, 181
range
joysticks, 222–225
lighting, 128
reading from joysticks, 225–226
rectangles
pDestRect parameter, 21
source and destination area, 42
red color component, R variable, 70
reflection, lighting, 134–136
RegisterClassEx function, 14, 260
registering windows, 13–14
Release function, 21
releasing objects, 21, 229–230
removeEmitter function, 185
render function, 22, 24, 39–40, 186, 190
rendering
bitmaps, 39–41
cubes, 91–92
scenes, 81–82
vertex buffers, 79–80
rendering device, 17
resources, loading textures from, 141–142
rgdwAxes parameter, 234
rglDirection parameter, 234
rguid parameter, 205
RHW variable, 73
right-handed systems, coordinate systems, 68
riidltf parameter, 204
rotation
center of rotation, 108–110
objects, 105–108, 112
Runtime, DirectX, 289–291
S
saving meshes to X files, 169–171
scenes
displaying, 20–21
rendering, 81–82
screens
blue color background, 24, 26
clearing, 19–20
flicker, 20
SDK (Software Development Kit), 5
secondary buffer, DirectSound, 244–248
SetAttributeTable function, 161
SetCooperativeLevel function, 208–209
SetFVF function, 79
SetIndices function, 96
SetLight function, 128–129
SetMaterial function, 154
setNumParticles function, 190
SetPan function, 254–255
setPosition function, 282
SetRenderState function, 121
SetStreamSource function, 78–79
setter function, 193
SetTexture function, 142–143
SetTextureStageState function, 139
SetTransform function, 109, 112–113
SetupMesh function, 151–153
SetupVB function, 76–78
shading
fill modes, 122–123
flat, 120
gourand, 121
overview, 119
shading modes, finding, 121–122
shapes, creating. See also objects, 69–70
ShowWindow function, 261
shutdown function, 262, 264, 285
size
of objects, changing, 110–111
of textures, considerations for, 138
sizeof function, 79
SizeToLock parameter, 75
Slices parameter, 165–166
Software Development Kit (SDK), 5
Solid mode, shading, 122
sound. See also DirectSound
panning, 254–255
sound buffer
locking, 248–249
playing sound in, 252–253
reading data into, 250–252
unlocking, 249–250
static buffers, 244
stopping, 253

15 DX9_GP INDEX 3/12/04 11:34 PM Page 331
Index
331
streaming buffers, 244
volume, adjusting, 253–254
source files, adding to projects, 11
space. See 3D space
spaceship creation, 281–282
specular highlights, lighting, 136
specular reflection, 134
spheres, creating, 165
spotlights
creating, 132–134
overview, 126
sprites
animated, 53–57
defined, 46
displaying, 49–51
drawSprite function, 60
images, loading, 47–49
initializing, 49
location, 46
moving, 51–53
point sprites, 193–197
structure of, 46–47
srcRect function, 49
Stacks parameter, 165, 167
Stage parameter, 139, 142
stages, textures, 139
Standard Template Library (STL), 34
Start function, 235
StartIndex parameter, 96
starting force feedback effects, 235
StartVertex parameter, 80
State parameter, 113
statements
else, 22
if, 21
states, textures, 139
static buffers, 244
stencil buffer, 25
Stencil parameter, Clear function, 20
STL (Standard Template Library), 34
stopping
force feedback effects, 235
sound, 253
streaming buffers, 244
StreamNumber parameter, 78
streams, source, setting, 78–79
StretchRect function, 40, 43–44
Stride parameter, 78
surfaces
bitmaps, rendering, 39–41
display buffers, 36
loading bitmaps to, 37–39
offscreen, 36–37
overview, 35
SwapEffect parameter, 19
sx parameter, 111
sy parameter, 111
sz parameter, 111
T
tabs
Application Settings (Application Wizard dialog
box), 10–11
Overview (Application Wizard dialog box), 10
targa file format, texture images, 141
textures
applying, 137, 142–145
blending, 139
coordinates, 138
IDirect3DTexture9 interface, 137
loading
discussed, 139
from files, 140–141
from resources, 141–142
repeating, 144
size considerations, 138
stages, 139
states, 139
texture mapping, 136
Theta property, spotlights, 134
timeEnd parameter, 267
timerFreq parameter, 267
timers
animated, 57–61
timeStart parameter, 267
transformation
projection, 98–99
SetTransform function, 109
view, 98
world, 98
TranslateMessage function, 13
triangles
triangle fans, 85
triangle lists, 83
triangle strips, 83
vertices and, 69–70
tszInstanceName parameter, 213
tszProductName parameter, 213
Type parameter
discussed, 96
SetTextureStageState function, 139
U
Unacquire function, 229–230
Universal Serial Bus (USB), 221
Unlock function, 76, 249–250
unlocking
sound buffers, 249–250
vertex buffers, 76–78

15 DX9_GP INDEX 3/12/04 11:34 PM Page 332
V
332
Index
update function, 186, 190
UpdateWindow function, 261
Usage parameter
CreateIndexBuffer function, 92
overview, 71
USB (Universal Serial Bus), 221
Value parameter, 139
variables. See also functions; parameters
A, alpha color component, 70
AttribId, 160
B, blue color component, 70
curFrame, 54
FaceCount, 160
FaceStart, 160
forwardVector, 282
G, green color component, 70
lpPerformanceCount, 58
moveRate, 282
moveX, moving sprites, 52
moveY, moving sprites, 52
numAttr, 160
numFrames, 54
pd3dDevice, 21
R, red color component, 70
RHW, 73
VertexCount, 160
VertexStart, 160
vectors, random, 181
vertex buffers
copying vertices to, 76
creating, 71–72
defining, 88–90
Flexible Vertex Format, 72–74
loading data into, 74–78
locking, 74–75
rendering, 79–80
scenes, rendering, 81–82
stream source, setting, 78–79
unlocking, 76–78
vertex shader, setting, 79
VertexCount variable, 160
VertexStart variable, 160
vertices
color, adding, 70
copying to vertex buffers, 76
discussed, 68
location, 69
shapes, creating, 69–70
video adapter
driver information and, gathering, 29–30
querying, 32–33
video devices, querying number of, 16
video modes and formats, 29
view transformation, 98
Visual Studio projects, creating, 9–10
volume, adjusting, 253–254
W
wBitsPerSample parameter, 245
wFormatTag parameter, 245
Width parameter
D3DXCreateBox function, 163
discussed, 37
Windowed parameter, 19, 28
windows
blank application example, 15
creating, 14
message loop, 22
registering, 13–14
windows procedure, 14–15
WinMain function, 12, 258–259
Wireframe mode, shading, 122
Wise Installer installation software, 289
WNDCLASSEX structure, 14
WndProc function, 14–15, 261
world space, 97
world transformation, 97–98
WS_OVERLAPPEDWINDOW parameter, 27
wUsage parameter, 213
wUsagePage parameter, 213
X
X axes, coordinate systems, 67
X files
loading meshes to, 172–175
mesh format, 168–169
saving meshes to, 169–171
x parameter, D3DMatrixTranslation function, 104
Y–Z
Y axes, coordinate systems, 67
y parameter, D3DMatrixTranslation function, 104
Z axes, coordinate systems, 67
z parameter, D3DMatrixTranslation function, 104
Zip file formats, 288

Professional
■
Trade
■
Reference
RISE TO THE TOP OF YOUR
GAME WITH COURSE PTR!
Check out more titles in the
Beginning series from Course PTR—full
of tips and techniques for the game developers of tomorrow!
Perfect your programming skills and create eye-catching art for your
games to keep players coming back for more.
Beginning C++
Game Art for Teens
Game Programming
ISBN: 1-59200-307-9
ISBN: 1-59200-205-6
$29.99
$29.99
Beginning OpenGL
Game Programming
Game Programming
for Teens
ISBN: 1-59200-369-9
ISBN: 1-59200-068-1
$29.99
$29.99
Check out advanced books and the full
Game Development series at
WWW.COURSEPTR.COM/GAMEDEV
Call 1.800.354.9706 to order
Order online at www.courseptr.com

Professional
■
Trade
■
Reference
GOT GAME?
COMING SPRING 2004!
3D Game Programming
Beginning OpenGL
All in One
Game Programming
1-59200-136-X
■
$49.99
1-59200-369-9
■
$29.99
The Dark Side
3D Game Engine
PHP
of Game Texturing
Programming
Game Programming
1-59200-350-8
■
$39.99
1-59200-351-6
■
$59.99
1-59200-153-X
■
$39.99
™
A division of Course Technology
Call
1.800.354.9706
to order
Order online at
www.courseptr.com

15 DX9_GP INDEX 3/12/04 11:34 PM Page 336
License Agreement/Notice of Limited Warranty
By opening the sealed disc container in this book, you agree to the following terms
and conditions. If, upon reading the following license agreement and notice of limited
warranty, you cannot agree to the terms and conditions set forth, return the unused
book with unopened disc to the place where you purchased it for a refund.
License:
The enclosed software is copyrighted by the copyright holder(s) indicated on the software
disc. You are licensed to copy the software onto a single computer for use by a single user
and to a backup disc. You may not reproduce, make copies, or distribute copies or rent or
lease the software in whole or in part, except with written permission of the copyright hold-
er(s). You may transfer the enclosed disc only together with this license, and only if you
destroy all other copies of the software and the transferee agrees to the terms of the
license. You may not decompile, reverse assemble, or reverse engineer the software.
Notice of Limited Warranty:
The enclosed disc is warranted by Course PTR to be free of physical defects in materials
and workmanship for a period of sixty (60) days from end user’s purchase of the book/disc
combination. During the sixty-day term of the limited warranty, Course PTR will provide a
replacement disc upon the return of a defective disc.
Limited Liability:
THE SOLE REMEDY FOR BREACH OF THIS LIMITED WARRANTY SHALL CONSIST
ENTIRELY OF REPLACEMENT OF THE DEFECTIVE DISC. IN NO EVENT SHALL
COURSE PTR OR THE AUTHOR BE LIABLE FOR ANY OTHER DAMAGES, INCLUDING
LOSS OR CORRUPTION OF DATA, CHANGES IN THE FUNCTIONAL CHARACTERIS-
TICS OF THE HARDWARE OR OPERATING SYSTEM, DELETERIOUS INTERACTION
WITH OTHER SOFTWARE, OR ANY OTHER SPECIAL, INCIDENTAL, OR CONSEQUEN-
TIAL DAMAGES THAT MAY ARISE, EVEN IF COURSE PTR AND/OR THE AUTHOR HAS
PREVIOUSLY BEEN NOTIFIED THAT THE POSSIBILITY OF SUCH DAMAGES EXISTS.
Disclaimer of Warranties:
COURSE PTR AND THE AUTHOR SPECIFICALLY DISCLAIM ANY AND ALL OTHER
WARRANTIES, EITHER EXPRESS OR IMPLIED, INCLUDING WARRANTIES OF MER-
CHANTABILITY, SUITABILITY TO A PARTICULAR TASK OR PURPOSE, OR FREEDOM
FROM ERRORS. SOME STATES DO NOT ALLOW FOR EXCLUSION OF IMPLIED WAR-
RANTIES OR LIMITATION OF INCIDENTAL OR CONSEQUENTIAL DAMAGES, SO THESE
LIMITATIONS MIGHT NOT APPLY TO YOU.
Other:
This Agreement is governed by the laws of the State of Massachusetts without regard to
choice of law principles. The United Convention of Contracts for the International Sale of
Goods is specifically disclaimed. This Agreement constitutes the entire agreement between
you and Course PTR regarding use of the software.
Document Outline
- Beginning DirectX 9
- Contents
- Introduction
- Part I Getting Down the Basics
- Chapter 1 The What, Why, and How of DirectX
- Chapter 2 Your First DirectX Program
- Chapter 3 Surfaces, Sprites, and Salmon
- Part II It's a 3D World After All
- Chapter 4 3D Primer
- Chapter 5 Matrices, Transforms, and Rotations
- Chapter 6 Vertex Colors, Texture Mapping, and 3D Lighting
- Chapter 7 Meshes
- Chapter 8 Point Sprites, Particles, and Pyrotechnics
- Part III Additional Needs
- Chapter 9 Using DirectInput
- I Need Input
- Using DirectInput
- Creating the DirectInput Object
- Creating the DirectInput Device
- Setting the Data Format
- Setting the Cooperative Level
- Acquiring Access
- Getting Input
- Enumerating Input Devices
- Getting the Device Capabilities
- Getting Input from a Keyboard
- Getting Input from a Mouse
- Using a Gamepad or Joystick
- Supporting Multiple Input Devices
- Reacquiring an Input Device
- Cleaning Up DirectInput
- Force Feedback
- Chapter Summary
- Chapter 10 DirectSound
- Chapter 11 The Final Project
- Chapter 9 Using DirectInput
- Part IV Appendixes
- Index
- Team DDU
Wyszukiwarka
Podobne podstrony:
The main press station is installed in the start shaft and?justed as to direction
Cambridge University Press A Guide to MATLAB for Beginners and Experienced Users J5MINFIO6YPPDR6C36
Direct3D 11 Tessellation
NLP for Beginners An Idiot Proof Guide to Neuro Linguistic Programming
Beijing Language University Press HSK Answer Form A
Focke Wulf Fw 190 A F G cz 2 (AJ PRESS Monografie Lotnicze 018)
Active Directory
5. Prensa, Hiszpański, Kultura, España en directo
Barclays Premier League 11 2012
Active Directory
Direct3D Vertex shader 1
Artificial Neural Networks for Beginners
adobe premiere 6 biblia zaawansowane techniki montażu (helion) fake OCYCGOTBVADD5AIZJNVFVB7K5LDHKD3V
crc press cyber crime investigator 27s field guide
beginner test
I Wunn, Beginning of Religion
więcej podobnych podstron