Date of issue 9/97
Bulletin Number 307-03 Page 1 of 3
DATE
307-03
9/97
V8 Sedan & XK8
SERVICE
TECHNICAL BULLETIN
1997 MY-ON XK8 Range
1998 MY-ON V8 Sedan NA
001001-ON
812256-ON
MODEL
VIN
Replacing Valve Body – ZF 5HP 24 E –
Replacement Procedure –
Not In Workshop Manual
Issue:
This bulletin outlines points to consider when removing and installing a valve body on the
ZF 5 HP 24 E transmission.
Action:
Observe the following points when replacing a valve body:
•
Cleanliness is of paramount importance in all aspects of the installation procedure.
•
Temperature:
WARNING: Do not attempt to remove the oil pan and valve body if the
transmission temperature is above 50 degrees Celsius. There is a danger of
sustaining severe burns from hot oil and components.
•
Oil condition: Installation of a replacement valve body should not be attempted if the oil
pan contains debris (friction material or excess metal deposits).
NOTE: The oil in this transmission is not red in color but has an appearance
similar to an engine oil which will darken in service. This is normal and
should not be mistaken for burnt oil.
Do not install a replacement valve body on a transmission with burnt or contaminated oil.
The transmission should be replaced as excessive damage has occurred.
•
Removal of valve body:
1.
Drain oil and remove oil pan.
2.
Remove the clip securing the electrical connector to the transmission housing prior to
removing the valve body screws, note its position for reinstallation.
2.
Remove the output speed sensor and oil filter prior to removing the valve body screws.
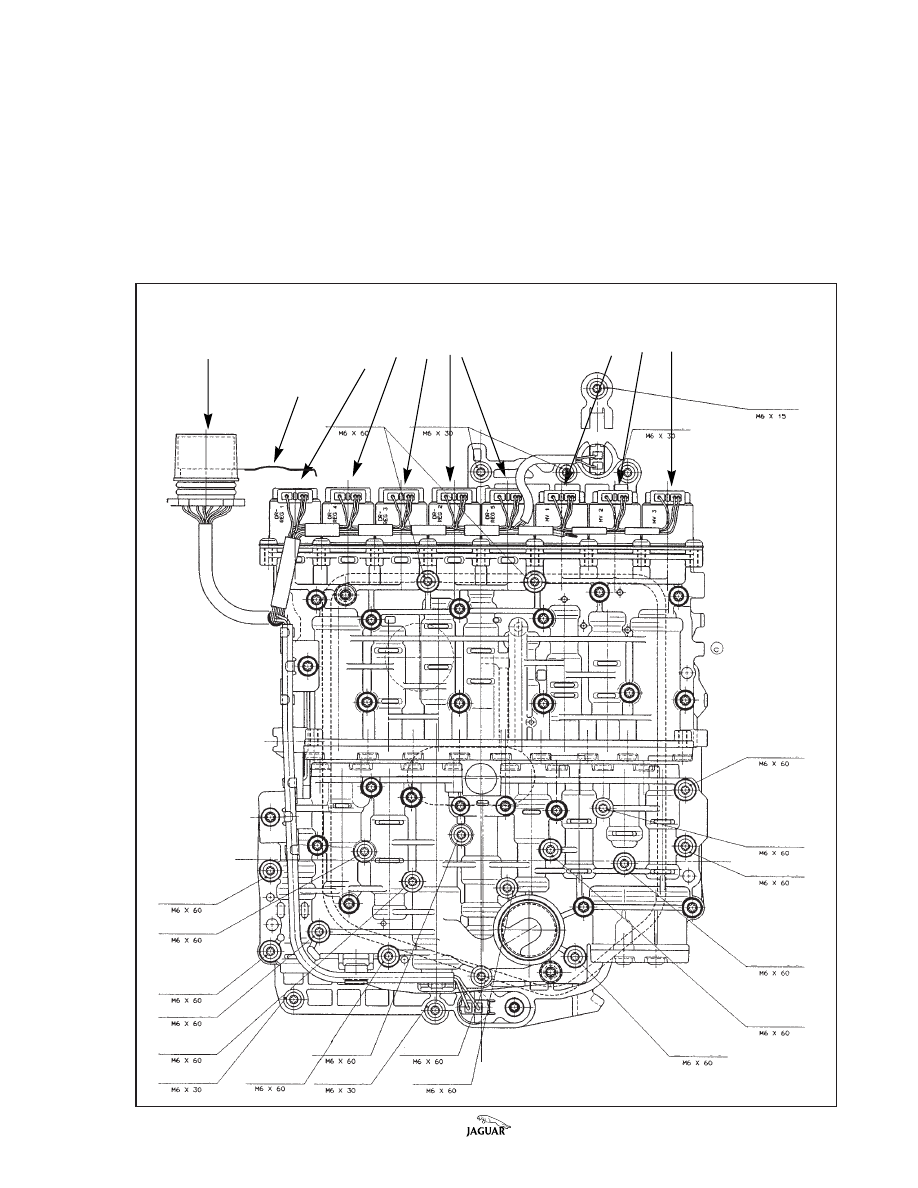
CAUTION: The screws that secure the valve body to the transmission
have larger heads than the other valve body screws. Remove the larger
headed screws only (17 of M6 X 60 and 5 of M6 X 30). Removing the other
screws will cause the valve body to separate.
3.
The valve body is located by a dowel on the main housing and will not always drop
immediately as the last screw is removed. Do not use any type of lever to remove the valve
body from the main housing once the screws are removed, since damage to transmission
sealing/pressure surfaces is likely.

Page 2 of 3
Bulletin Number 307-03
Date of issue 9/97
•
Installing replacement valve body: Assistance may be required to support the valve body
while the electrical connector is positioned in the transmission housing.
1.
Ensure the correct location of the valve body in the housing. As the valve body is
positioned in the transmission housing, ensure the selector valve is located in the selector
pin and that the dowel is located correctly. The valve body is secured by 22 screws (17 of
M6 X 60 and 5 of M6 X 30, refer to illustration on next page). Do not tighten the screws
before the valve body is flush with the main casing. Tighten only the large headed screws -
at first until only very slight resistance is felt then in sequence (working from the inside to
the outside) gradually to 8 Nm ± 1 Nm.
NOTE: Ensure also that none of the smaller headed screws are accidentally
torqued to the higher torque of the large headed screws, as this will lead to
transmission malfunction (correct torque for small headed screws, 6 Nm).
Reinstall the oil filter and tighten to 5-6 Nm and the output sensor and
retainer (8 Nm).
Do not over-tighten the valve body screws, since this will cause the valves to
stick leading to shifting problems and/or a loss of drive.
2.
Ensure that both speed sensors are securely located by their retaining clips. Failure to check
this can result in transmission default or substitute function after start up. (Code P0715
Input speed sensor, code P0721 Output speed sensor)
•
Reinstalling oil pan:
1.
Hold the replacement gasket in position with Vaseline as the oil pan is positioned on the
main case. DO NOT USE ANY TYPE OF GASKET SEALANT (this will lead to
contamination inside the transmission resulting in malfunction).
2.
Do not tighten any of the 22 screws (M6 x 20) until all are at least started on the threads
(this will help to ensure the gasket is correctly aligned) Tighten the screws until they can be
felt to “grip” the oil pan then tighten gradually to 10 Nm ± 1 Nm.
CAUTION: Do not overtighten the oil pan screws. Overtightening the
screws will distort the oil pan and damage the gasket, resulting in oil leakage.
•
Oil: Use only Esso LT71141 - This transmission is designed to operate with this oil only
DO NOT USE ANY ALTERNATIVE OIL. (The use of oil other than Esso LT71141 will
lead to transmission clutch failure within a short period of time)
•
Oil filling: A dedicated pump is required to add oil through the level plug, located towards
the rear of the transmission. Do not use any container or pump previously used for any
other liquid since this will contaminate the oil.
1. Add transmission fluid via the filler plug until it begins to spill out.
2. Set up the PDU to monitor the transmission oil temperature by making the following
menu selections: DIAGNOSTICS, TOOLBOX, POWERTRAIN, DATALOGGER,
TRANSMISSION, TOT (transmission oil temperature). Start the engine.
3. Move the selector lever through all positions (in car) and return to “P”.
Date of issue 9/97
Bulletin Number 307-03 Page 3 of 3
ZF 5HP 24 E VALVE BODY
4. Continue to add oil until a continual dribble is seen to run out of the level orifice. The
temperature must be between 30 - 50 degrees Celsius. (30 degrees is the optimum
temperature and equates to maximum oil level; 50 degrees Celsius equates to minimum oil
level). Once the correct level is achieved, reinstall and tighten the oil level plug before the
engine is switched off.
ELECTRICAL CONNECTOR
PRESSURE REGULATORS
SOLENOID VALVES
CLIP
Wyszukiwarka
Podobne podstrony:
How To Read Body Language www mixtorrents blogspot com
body nadwaga wyszczupl
BODY SWITCH
opis body
Body language is something we are aware of at a subliminal level
elektro body
Body Parts 3
Body Parts 2
20 body interio and exterior
kids flashcards body 1
Fringeworthy Body Guide
kids flashcards body 2
body ujedrniajaco wyszczuplajacy
body zimne?ndaże projekt
Kurs HTML HTML BODY i META
BODY skeleton song, skeleton
więcej podobnych podstron