
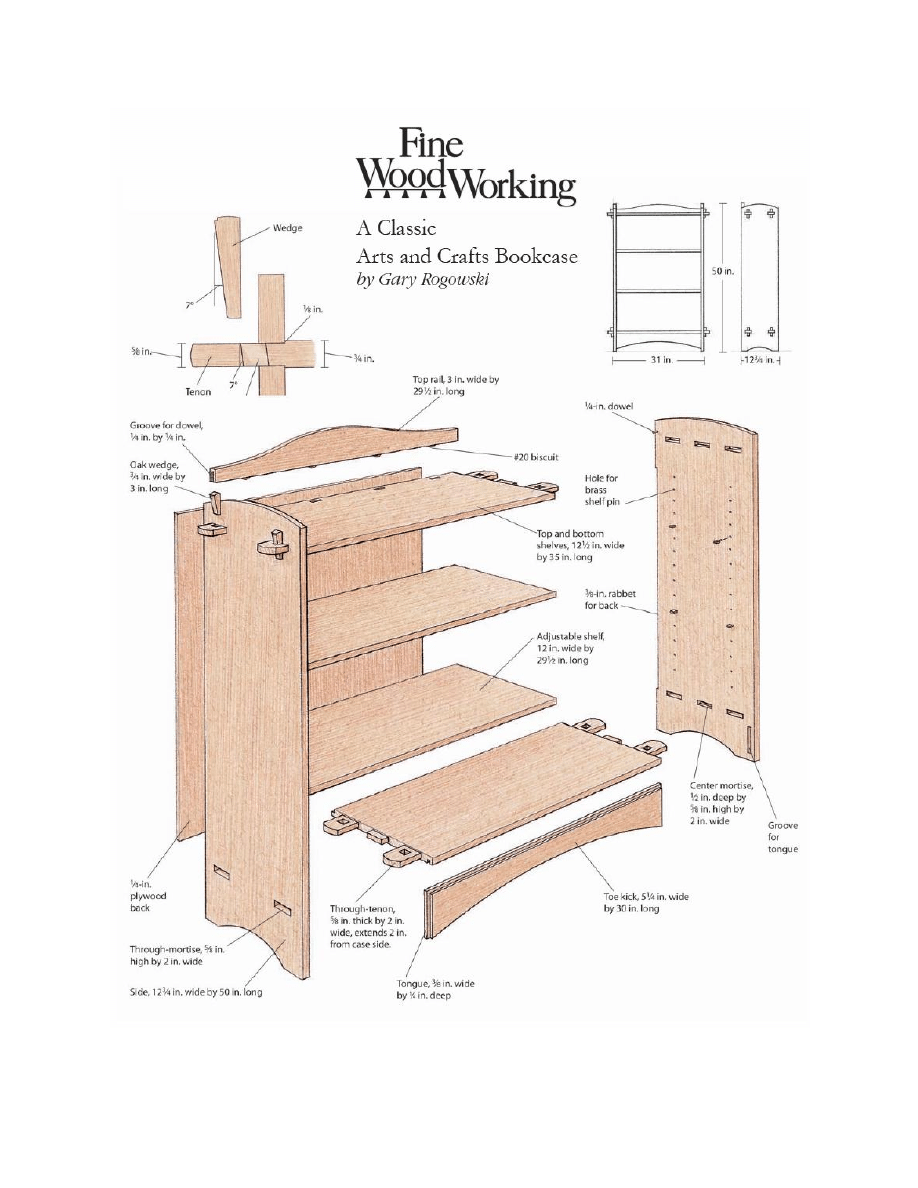
Weekend Project: Build an Arts and Crafts Bookcase
Wedged tenons and clean lines define this oak original. You cut the through
mortises with a plunge router and template.
Of the many qualities that help define the Arts and Crafts style, perhaps the
most apparent is straightforward and honest joinery. Wedged joints and
through-tenons show the world how a piece was made. Quartersawn white
oak, the quintessential Arts and Crafts material, was clearly the wood of
choice for this bookcase.
Mortise-and-tenon joinery usually requires precise fitting; however, these
long through-tenons need to be a bit loose to fit easily through the mortises.
The wedges provide holding power at three locations. The back of the wedge
pushes against the outside face of the side. This does nothing until the
angled front of the wedge starts to press against the angled slot cut into the
tenon. Then the wedge pulls the tenon through the joint until the tenon
shoulders lock against the inside face of the case side.
Cut Mortises With a Plunge Router and Template
I cut the mortises using a plunge router, a 5/8-in. straight bit, a 3/4-in.
template guide, and a mortising template . The template, made of 1/2-in.
medium-density fiberboard (MDF), is milled as wide as my case side and
with perfectly square ends.
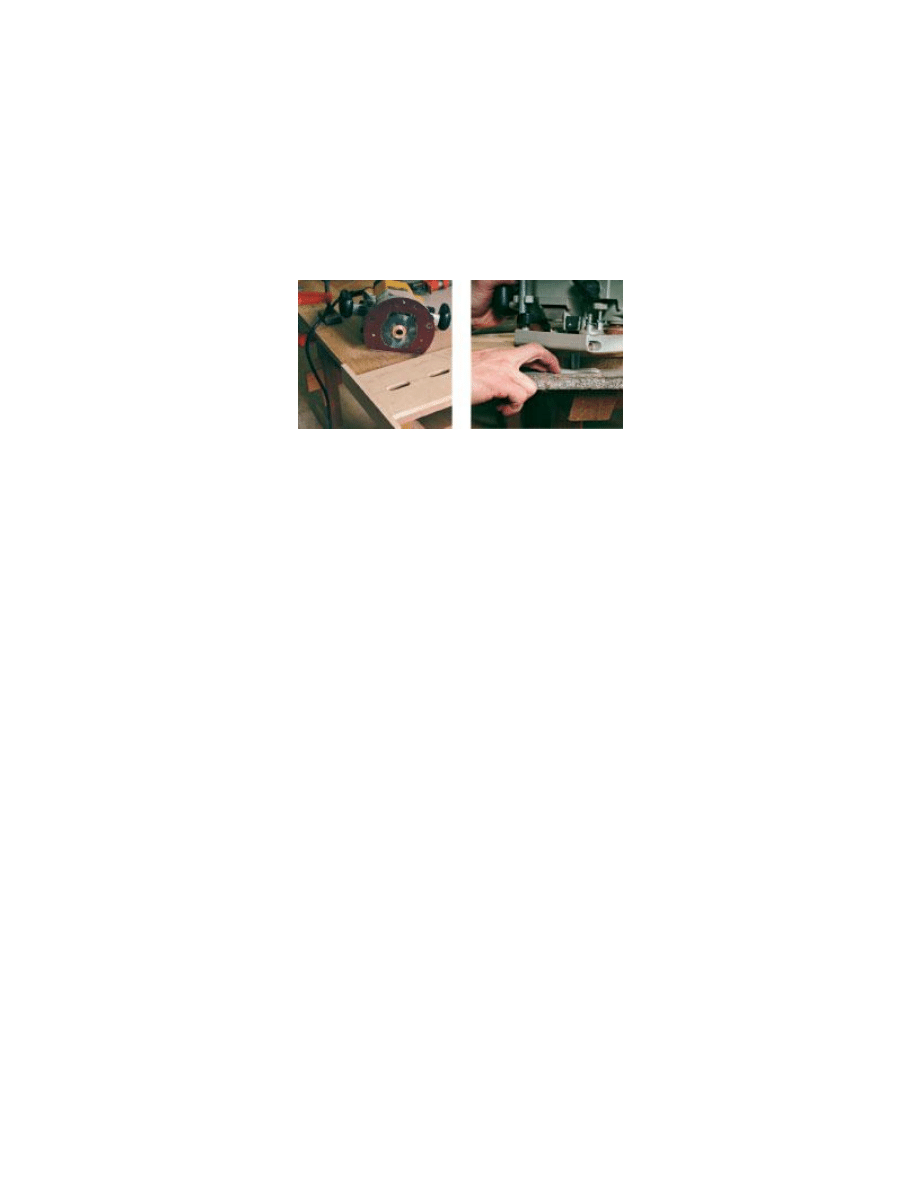
With the template made of MDF (left photo), you don't have to mark
mortises on the case sides, just centerlines. Use a folded index card
(right photo) to set your router depth so that the bit won't blow out
the opposite face. Pop out the thin waste with a chisel.
First mark the centerline of the template. On this centerline, lay out the
mortises. Cut the mortises with a 3/4-in. straight bit on the router table,
using a fence with stops clamped onto it. Cut the two outer mortises using
the same stops and fence setting; flip the board over to cut the second one.
For the center mortise, simply move the stops over to the proper position. If
the template is square, the mortises will locate properly and be the same
size. Finally, glue and screw a fence onto one end of the template.
Only the centerlines of the mortises need to be laid out on the case sides.
Clamp a side to the bench, align the centerlines on the template with the
centerlines on the side and clamp the template in place. Next, set the bit
depth. Put a folded index card on the benchtop and rest your router on the
edge of the case. Then zero the bit down to the card and set the turret stop
on the router to its lowest depth. This setting will allow you to rout almost
through the case side but without blowing out the mortise or marring your
benchtop. Then set another turret stop for the center mortises, which aren’t
through-mortises.
After routing, chop the mortise corners square with a chisel. I use a block of
wood as wide as my mortises to check each for consistency. I also bevel the
edges of the mortise with my chisel to prevent tearout when fitting the
tenons.
Cut Tenons and Wedges to Fit Easily
Cut the cheeks and shoulders of the tenons with a plunge router and a
straight fence. The fence rides tightly against the end of the board to locate
the tenon shoulder. Cut one face of all of the boards about 1⁄16 in. deep and
back to the tenon depth, then cut the second face so that the tenons will fit
easily into the mortises. Next, on the bandsaw, rough out the waste between
each of the tenons. Then reset your router bit to the full depth of the board
and, in several passes, cut the shoulders between the tenons.
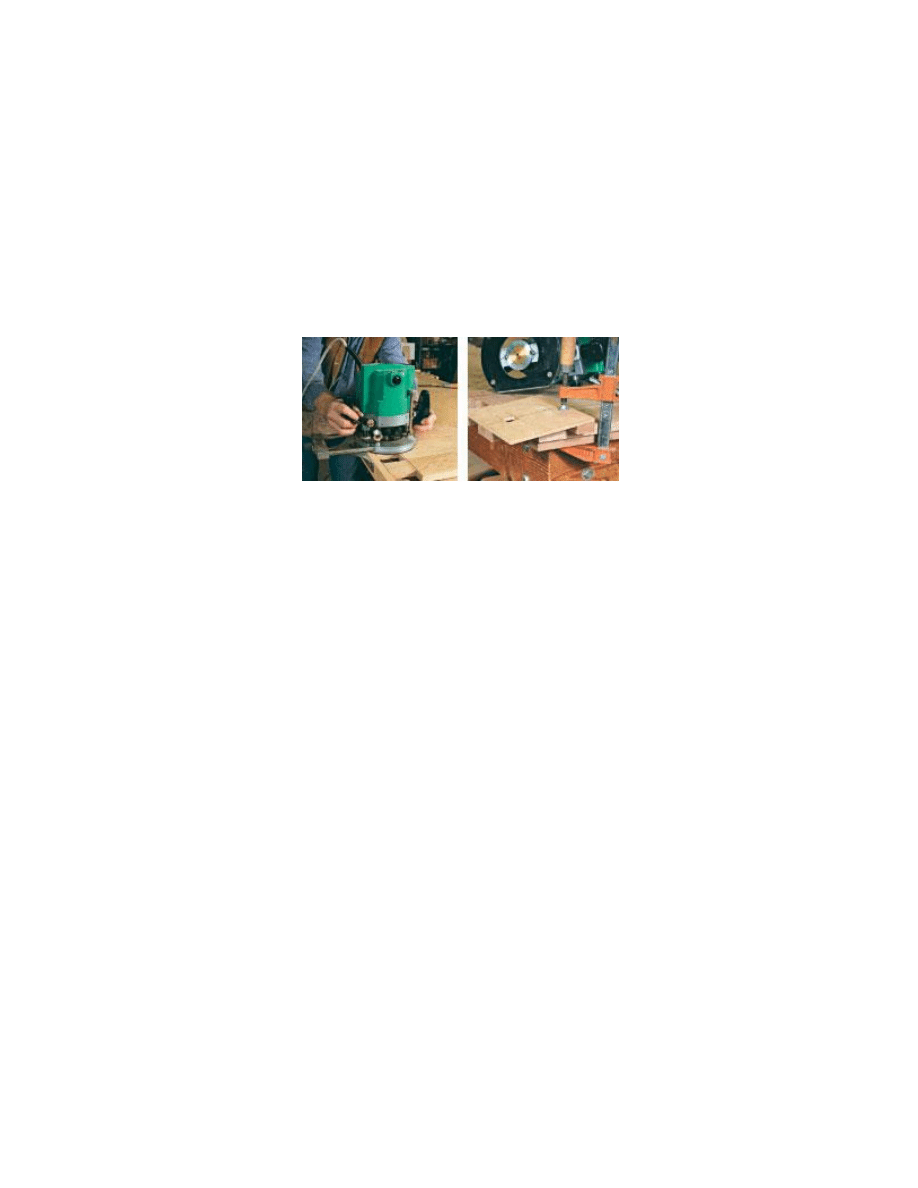
Router with a fence (left photo) cuts clean shoulders between
tenons and an angled block (right photo) sets the bevel. First,
bandsaw the waste between the tenons. Then with the template
tipped 7 degrees, the router will automatically bevel the slot in the
through-tenon to accept a tapered wedge.
I set up the router table with a fence to finish-cut the roughed-out edges of
the tenons so that they slide easily through the mortises. Use a rabbeting
plane to pare the tenons down on both their faces and edges. Work one
tenon at a time until you can push all of the joints home by hand.
Dry-assemble the case, then mark the outside face of the case side onto
each tenon. Be sure to locate the end of the slot for the wedges 1/8 in. in
from this line so that part of the slot lies inside the face of the case side. If
you cut the slot flush with the case side, the inside face of the slot will push
against the wedge, preventing it from providing a totally snug fit.
Next, make a mortising template to router-cut the wedge slots in the
tenons. The slot needs to be angled on its front edge, so glue a 7° angled
block to the bottom of the template. Your plunge router will then rout at that
angle. Rout each wedge slot with a 1/4-in. straight bit and a 5⁄16-in. o.d.
template guide, and chop its corners square with a chisel.
To make all of the wedges the same size and angle, you’ll need to make a
simple tapering jig for the bandsaw. Cutting out the triangular shape of the

wedges on a 3-in. by 5-in. piece of 1/4-in.-thick scrap ply gives you a place
in which to hold your wedge stock as you pass it by the blade. Move the
fence over to the proper spot and cut all of the wedges. Next, plane each
wedge edge until the wedge fits easily through the mortise. Then clean up
the angled face until it just starts to snug up when it’s about 1 in. above the
top face of the tenon.
Have a Plan Before Assembly and Glue-Up
The top rail doesn’t need the strength of a tongue-and-groove joint, so after
the case is together, glue the rail onto the top with biscuits. To keep it from
twisting, add two dowels to the case sides. These dowels fit slots cut into the
ends of the top rail. For easy assembly, use the offcuts from the top rail and
toe kick as clamping blocks when gluing up these two curved rails.
Shape the bottom of the case sides on the bandsaw and finish with a
template router. Rabbet the case sides for the back on a router table. For a
long-grain cut like this, a climb cut—one made with the rotation of the router
bit—can help avoid tearout. File the shaped edges slightly round, then
scrape and sand the entire case with 180-grit paper. Raise the grain with a
damp rag and resand to get rid of any puffed fibers.
Glue up one side at a time. With one side in place but unglued, apply glue to
the tenons of the other side, gluing only the long grain. Don’t over-glue
these joints or you’ll have a mess to clean up.
After clamping, place the wedges and bang them home. I use a metal
hammer for this because the sound it makes will change when the wedge is
in far enough. Do not bang the wedge past this point. You’ll bust out the
short-grain end of the tenon. This is why I left the tenon ends poking
through the case sides at a relatively long 2 in. This much wood provides
enough room to put in the wedges safely.
Wyszukiwarka
Podobne podstrony:
Create an Aged Arts and Crafts Finish
Arts and Crafts Chair
słowka 1, agricultural- rolniczy, arts and crafts- rękodzięło artystyczne, aspect- dziedzina, assemb
Arts and Crafts
Microteaching Katarzyna Piotrowska Arts and Crafts
Build an old fashioned smokehouse for delicious meat and bett
Build An Internet Marketing Website
How to build an arbor id 206318 Nieznany
Power Amplifiers With Valves An Approach And A Practical Circuit (Claus Byrith)
Distillation How to build an Electric Still
How To Build an Acid Alkaline Water Charger health healing search for [!B!]
build an avr programmer
Language Arts and Minifigs
Prosecuting Computer Virus Authors The Need for an Adequate and Immediate International Solution
AN SM T AND T
Quick and Clean Bookcases
A worldwide geographical distribution of the neurotropic fungi, an analysis and discussion (Gastón G
Kitayama, Duffy, Kawamura Perceiving an Object and its Con
więcej podobnych podstron