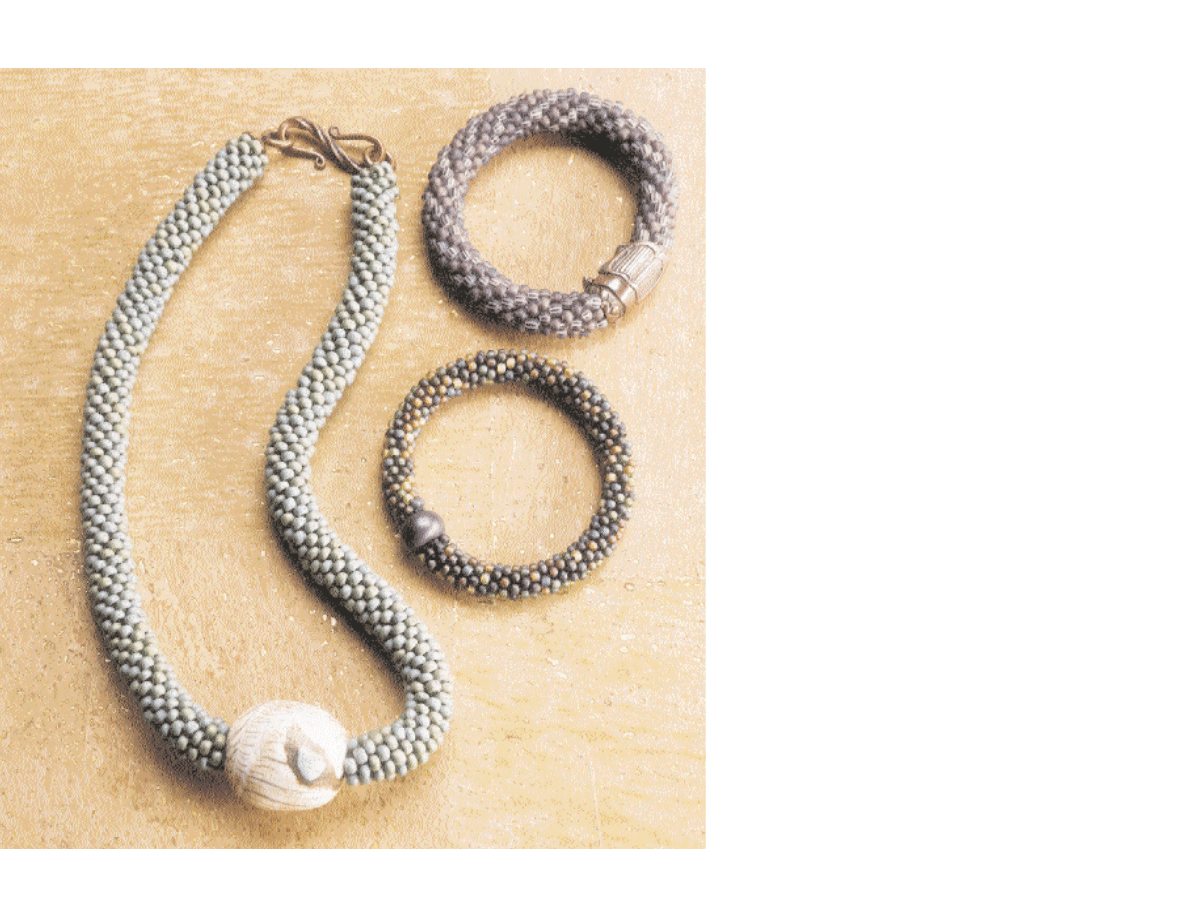
B
ack in the ’60s, people in Hawaii used to crochet “leis” of faux pearls to
sell to the tourists. I didn’t like the look of the large plastic pearls, so I
crocheted long lariat-style necklaces with size 11
0 seed beads. These were
more reminiscent of the beautiful vintage ropes of the ’20s, like the example
shown on p. 54, which is made of three-cuts.
When crocheted bead ropes became fashionable again – especially for
displaying one or more special beads – my customers began asking me if I knew
how to do the technique and whether I would teach them. Of course, I was
happy to share my knowledge, but two things bothered me about the ropes
most people were making. They stretched, which meant that bracelets often fell
off; and necklaces, especially those with heavy beads, grew and showed thread.
In addition, the crocheted ends often looked clunky with the beads going in dif-
ferent directions. So I kept fiddling with the technique until I’d found easy solu-
tions for both problems.
step
by
step
After stringing the beads, making a crocheted bead rope is a two-step process.
The first time around you put on the beads, and the next time around you lock
the beads of the previous round into place as you put on the beads for the next
round. I recommend that you start with a bracelet and alternate two colors or a
stripe and a solid (end with a solid) so you’ll be able to keep count easily.
Everyone makes stringing mistakes, so if you have to remove a prestrung
bead, use your rattiest cutters. Tighten the cord with the bead on it around your
finger, insert the tip of the cutters into the hole, and squeeze. Break beads under
a table edge to avoid flying bits of glass. The technique for a long necklace with-
out a clasp is the same as for the bracelet.
B e a d
&
B u t t o n • F e b r u a r y 2 0 0 1
53
What goes around
comes
around
The revival of crocheted bead ropes
by Nicolette Stessin
photo by Jim Forbes
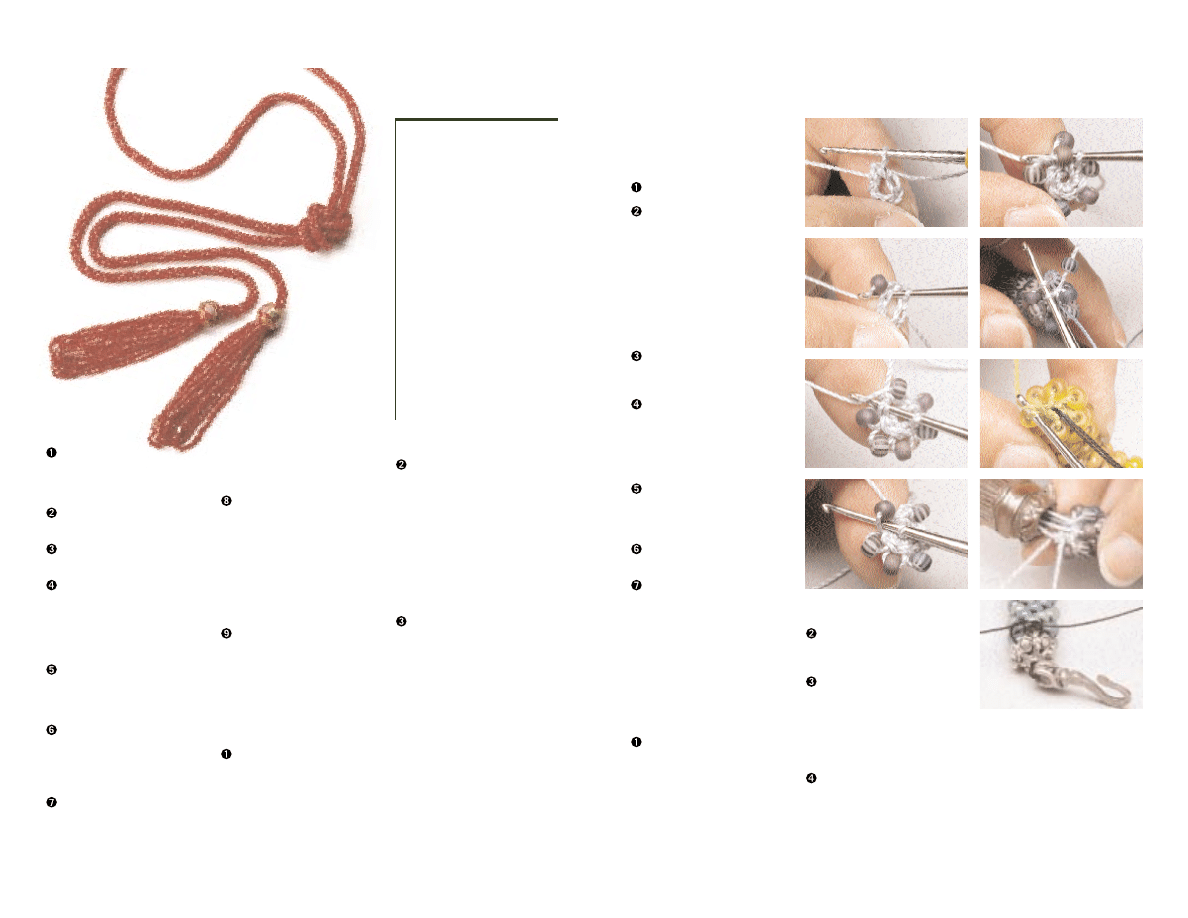
the first spoke; then pull the thread
through the loop.
finishing the bracelet
This step is easier to work with help.
String the centerpiece bead onto one
end of the core cord.
With your hand folded as narrow as
possible (tuck the thumb under the mid-
dle fingers), tie or have a friend tie a sur-
geon’s knot (see “Basics,” p. 98) with the
core cord ends around the widest part of
your hand. The ends of the rope will be
anywhere from
1
⁄
2
to 1
1
⁄
2
in. (1.3-3.8cm)
apart. This is how much the bracelet will
stretch to go over your hand but still fit
your wrist properly. The core ensures that
it will never stretch any more than that
amount. Be sure the knot is solid.
Then use the butt end of the hook to
open one end of the tube and pull the
knot into the tube to bury it. Trim the
tails and pull the knot in a bit further.
Thread one perle cotton end onto a
#10 tapestry needle and go under the
chain row (I call this the crown) from the
inside to the outside. Go through the cen-
terpiece bead. Then go under the crown
opposite the tail from outside to inside
and go back through the bead.
Go under the crown on the starting
side from outside to inside opposite the
first stitch. Finally go through the bead
and outside to inside under the crown
next to the tail (photo h).
Now jiggle the beadwork until the
thread is snug and tie the tails together
with a square knot (see “Basics”).
Use the threaded tail to snug in
thread still showing on the crowns. End
this thread by going back through the
rope. Take a small backstitch around a
thread, go through some more of the
rope and repeat. Backstitch the other tail
into the rope. Do not sew through a bead.
clasped necklace with centerpiece
Make two crocheted rope sections the
desired length of the necklace minus the
centerpiece bead and the clasp. Use one
doubled core cord (about 1 yd./.9m).
After completing the first rope piece
around the core cord, string the center-
piece bead on the core cord. Then crochet
the second rope around the core cord.
Join the ropes through the centerpiece
bead as for the bracelet finishing, steps 4-
7. At this point, also bury the cotton tails
at the clasp ends.
Thread a pair of core cords through
one bead cap from inside to outside, go
through the clasp ring, and come back
through the cap.
Tie the core ends in a square knot on
one side of the core strand, turn the work
over and tie another square knot on the
other side of the strand. Repeat on the
first side. Seal the knot with G-S Hypo
Tube Cement. When dry, feed the core
strands back into the tube. Backstitches
are optional.
Repeat steps 2-3 on the other end of
the necklace, pulling the core strand tight
before knotting (photo i).
w
B e a d
&
B u t t o n • F e b r u a r y 2 0 0 1
55
starting the tube
Thread all the beads
on the cord, alternating
stripe and solid. It’s better to have too
many beads rather than too few. Leave
the ball attached to the cord.
To start, make 6 medium-sized chain
stitches and join the end to the beginning
with a slip stitch (photo a).
Go through two loops of the first
stitch from the inside of the circle with
the hook tip facing out away from you.
Slide the first bead (solid) down to
the circle and hold it in place with your
middle finger. Catch the thread on the
other side of the bead and pull it through
the stitch and the loop (photo b). This is
a slip stitch; one loop remains. (Note:
Europeans call this stitch single crochet.)
Go through the next pair of loops and
slip the striped bead down against the
circle. Catch the thread and pull it
through the stitch and the loop on the
hook. One loop remains.
After adding the 5th bead, you’ll be
back at the tail. Go through the stitch just
left of the tail (right for lefties) to add the
6th bead (photo c). Notice how the beads
fan out around the circle. They won’t
form a neat tube until the third row.
You are at what I call the “curb,”
which is the starting place for the second
row. This is where you are most likely to
lose a stitch, but after you’ve passed the
curb two to three times, it won’t be there
anymore to confuse you.
To begin row 2, insert the hook to the
left (right for lefties) of the solid bead
(photo d). Push the new bead up between
the last and first beads of row 1. The
thread may want to loop under the first
bead. Don’t allow it to do so! It must loop
above the first bead of the first row
(photo e) or the beads won’t sit straight
with their holes in a vertical position. Pull
the thread through both loops. This step
is the key to the entire technique.
Bead 2 is a stripe and should sit above
and slightly to the right (left) of the stripe
below. As you insert the hook from inside
to outside and to the left (right) of the
stripe below, hold the thread out at a 45°
angle to the hook so it won’t loop under
the bead. Slide the new bead in place and
pull the thread through both loops.
crocheting the tube
After row 3, the beadwork will have
consolidated into an obvious tube and
the curb will be gone. As you continue
working, the bead colors will spiral like a
candy cane. A little thread will show at
first, but keep working snugly (not tight),
and it will soon disappear.
When you’ve worked 4-5 rounds,
stick the butt end of your hook into the
tube to widen it and thread the nylon
core cord through. The core cord keeps
the rope from continuing to stretch
indefinitely even after the project is fin-
ished. Insert it when the rope is short. Tie
a safety pin on each end or a cluster of 3
beads so it can’t pull through the tube.
Continue beading around the core
(photo f) until the bracelet plus the cen-
terpiece bead is about 1
1
⁄
2
in. (3.8cm)
longer than your wrist measurement.
If your start was messy, you can fix it
before joining the ends of the bracelet.
Here’s how: Carefully cut off the starting
chain. Pull up the first bead. Then pull
out the inside part of the loop, the part
that’s closer to the next bead. Continue
removing beads this way until you’ve
removed the messy row(s) and have a tail
that’s at least 6-8 in. (15-20cm) long. As
you look down on the tube end, each
bead will seem to be attached to the tube
center by a single line (spoke) of thread.
To align the first row properly, you need
to crochet a slip stitch under each spoke
in the opposite direction to your work
(photo g). Slip stitch once more under
materials
• #7 or 6 Steel crochet hook, Clover hook #2
(Full Circle, 206-783-3322)
• #7 Suture needle, #10 tapestry needle, or
twisted wire needle
• 2 Small safety pins or leftover beads
bracelet
• 30-35g (1-1
1
⁄
4
oz.) 6
0
seed beads (half
striped, half solid or 2 colors)
• 1 Ball or skein #5 DMC perle cotton or
equivalent to match beads
• 1 Centerpiece bead (2mm or larger hole is
easier; metal bead by Robert Burkett)
•36 in. (.9m) Nylon bead cord #3 or larger
necklace with clasp
• 75-80g (2
2
⁄
3
-2
4
⁄
5
oz.) 6
0
seed beads 1-2 colors
• 1 Ball #5 DMC perle cotton to match beads
• 1 Centerpiece bead (shell bead from Bhutan
on p. 52 has copper-inlaid turquoise and
coral, Beadworld or Kamol, ad p. 9)
• 2 yd. (1.8m) Nylon bead cord #3 or larger
• 2 Bead caps, 10-12mm diameter
• 1 Clasp with 2 soldered rings or split rings
• G-S Hypo Tube Cement
54
b e a d a n d bu t t o n . c o m
a
b
c
d
e
f
g
h
i
Nicolette owns Beadworld in Seattle, WA.
Contact her there, 9520 Roosevelt Way NE,
Seattle, WA; (206) 523-0530. For good visual
instruction on bead crochet, she recommends
Carol Perrenoud’s video, Bead Crochet. You
can order it from Carol at Unisyn/Beadcats,
(503) 625-2323.
Wyszukiwarka
Podobne podstrony:
(CRAFTS) Beading russian bead and crochet magazine 1
(CRAFTS) Beading russian bead and crochet magazine 1
(Ebook English) Crafts Beading Triangle Bead Bracelet
(CRAFTS) Beading Bead Crochet Pattern
(CRAFTS) Beading Tutorial Spiral Bead Weave
(Ebook English) Crafts Beading A New Slant On Bead Stringing(1)
(CRAFTS) Beading Make pearl bead tassels
(Ebook English) Crafts Beading Caught in the Bead Net(1)
Crafts Beading Making Jewelry Basics
(Ebook English) Crafts Beading Working With Metal Clay
(CRAFTS) Beading Swarovski Tutorial Kette Anleitung
Bizuteria z drutu Beading Bead Crochet With Wire
(CRAFTS) An Insider Look at Jewelry Making and Beading Chapter 1
Bead Crafts glitter bead cards
beading Varvara Tulip Necklace bead patterns com No 3721
więcej podobnych podstron