“Tulip” Necklace
Materials needed:
1 oz of red seed beads, size 11
2 oz of green seed beads, size 11
12 yellow seed beads, size 11
Flexible metal wire (~1mm in
diameter) about 20” long.
Estimated Time:
20-30 hours depending on your
experience.
1
2
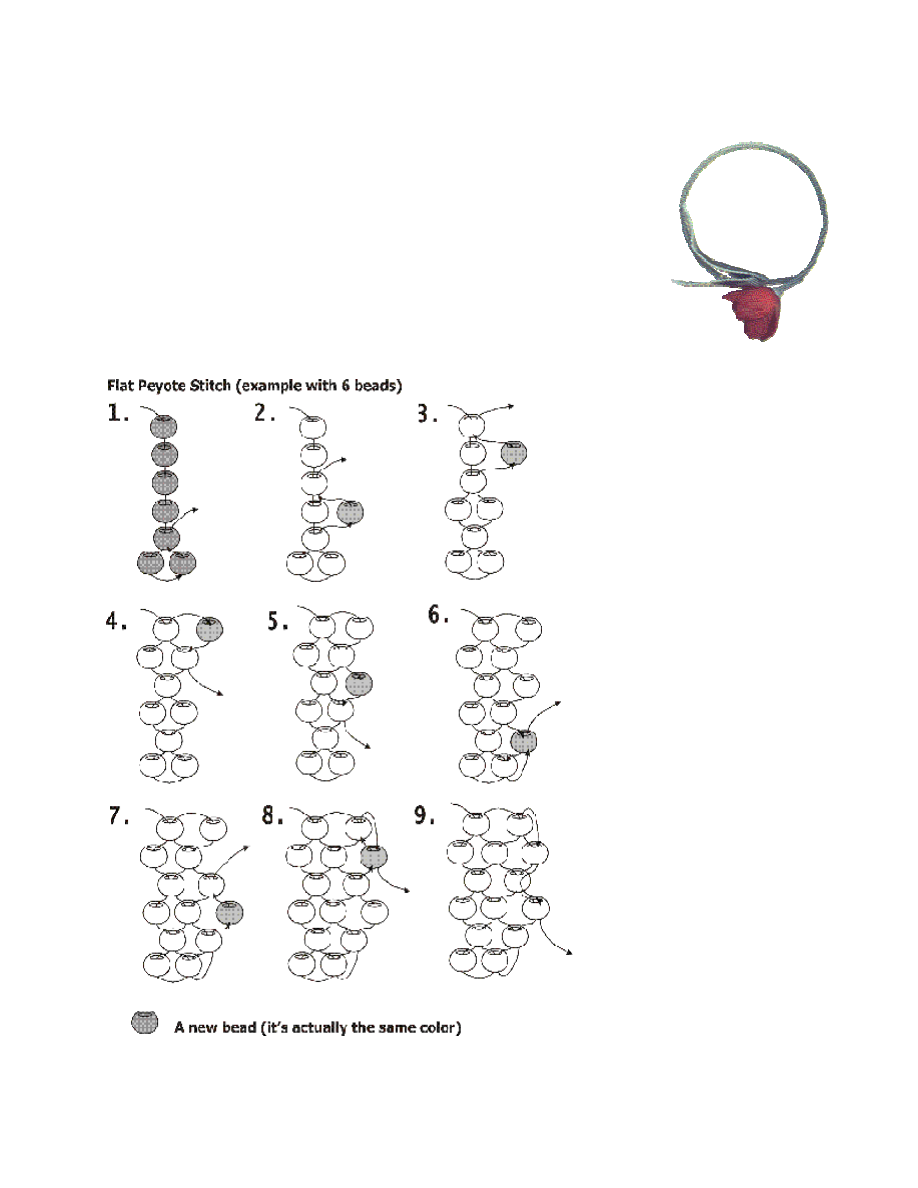
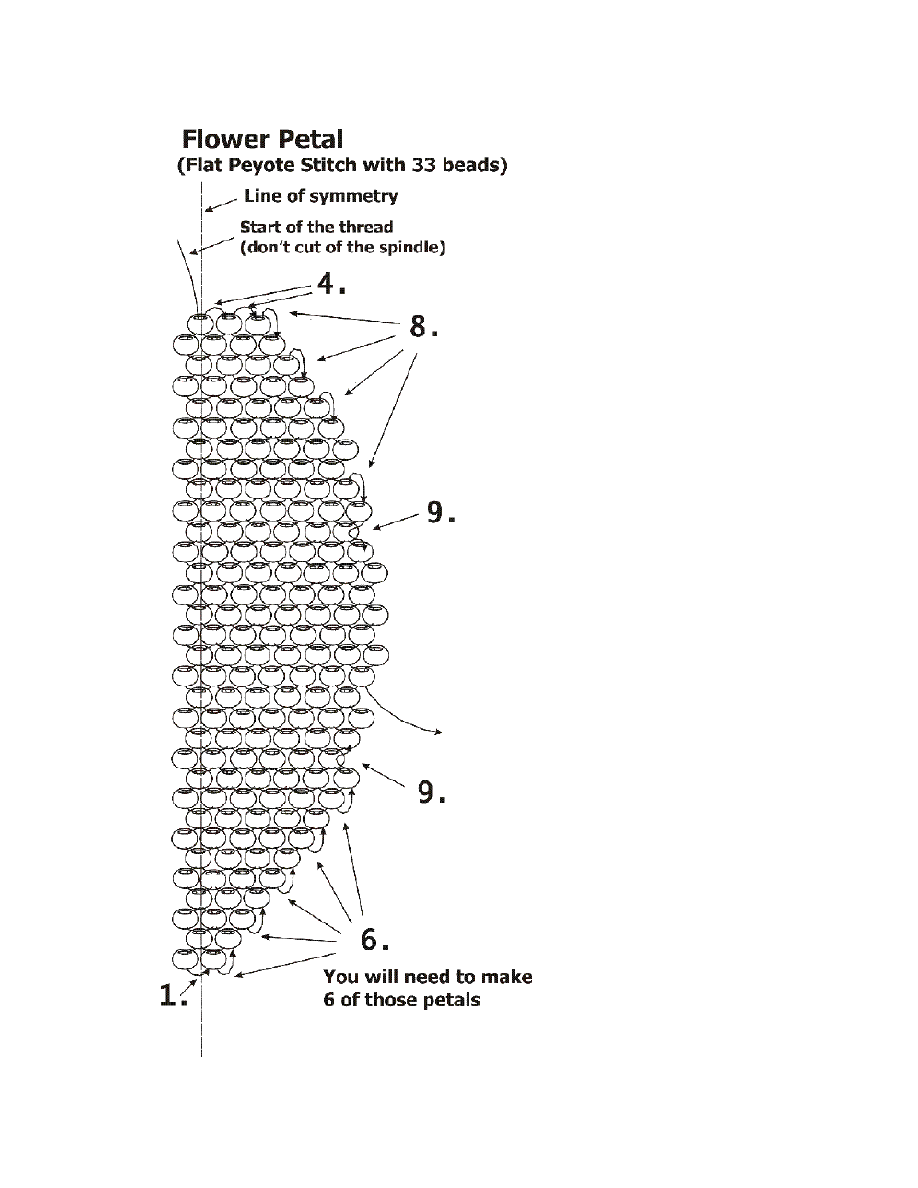
Making a flower:
1. Thread the needle, but don’t cut it
from the spindle.
2. Start from the center of the petal,
threading through 33 beads.
3. Continue beading according to the
diagram. Numbers 4, 6, 8 and 9
correspond to the previous picture.
4. When you are done with half of the
petal, return to the start of the thread, cut
off a long piece of it and continue with
the other half of the petal using the same
diagram.
3
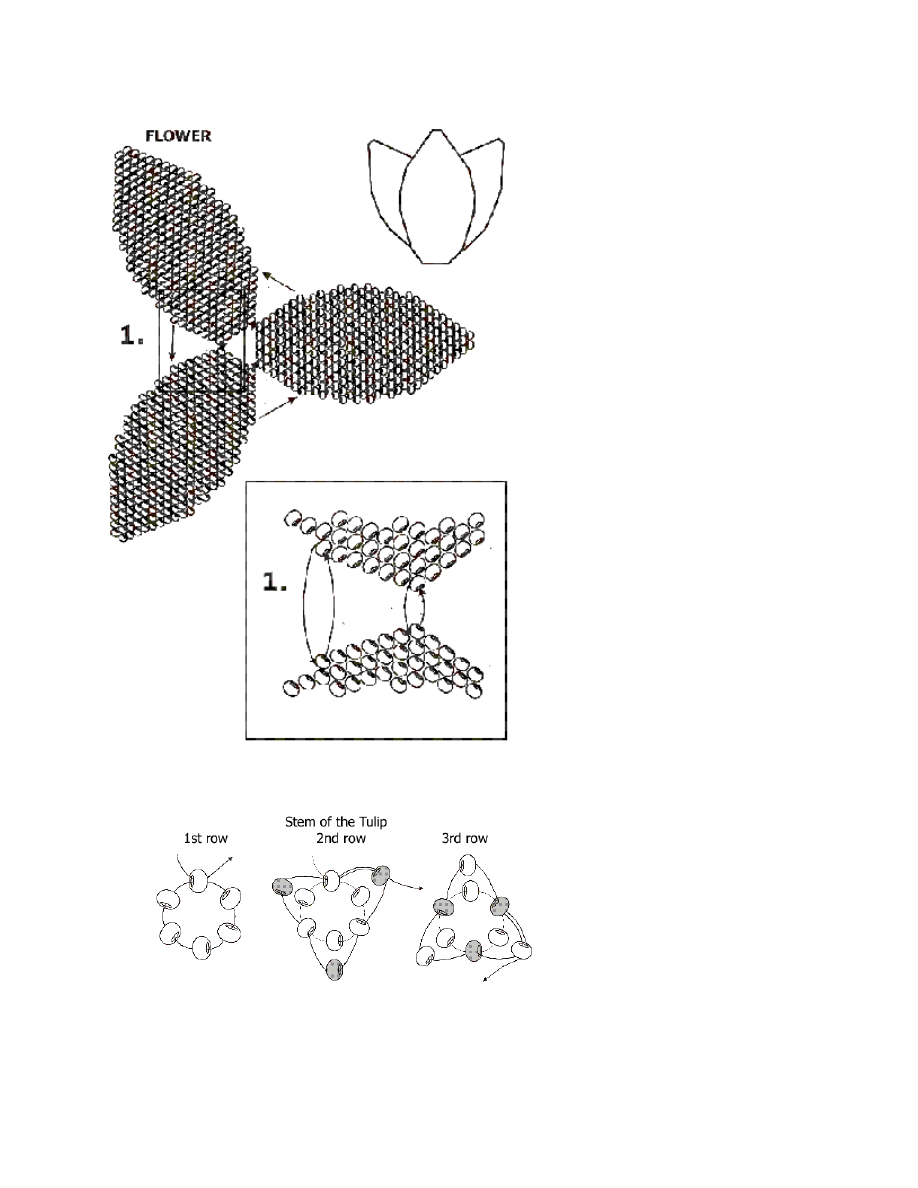
Connecting petals into a flower:
Connect three petals according to the
Diagram, looping several times for
durability (see pic. 1). You will have
two “half-flowers”. Insert one into
another and connect beads of the
bottom rows of each “half-flower”
together.
Making a stem:
Start by threading through 6 beads.
Bring the needle through the 1st bead
a second time to create a circle.
The second row consists of 3 beads:
String a first bead and bring the needle
through the 3rd bead in row 1.
String a second bead and bring the needle through the 5th bead in row 1.
String a third bead and bring the needle through the 1st bead in row 1 and the first bead in row 2.
That completes the second row.

The third row and all consequent rows will consist of 3 beads as well.
String a first bead and bring the needle through the 2nd bead in row 2.
String a second bead and bring the needle through the 3rd bead in row 2.
String a third bead and bring the needle through the 1st bead in row 2 and the first bead in row 3.
That completes the third row. Continue beading following the same pattern until you reach the
desired length (approximately 20”).
For the last row use three yellow seed beads. They will become part of the pistil.
When stem is ready, insert a flexible metal wire approximately 1mm in diameter. Gather 3 bottom
beads together and tie them up to close the opening on one end and make a pistil on another end as
shown on the picture below.
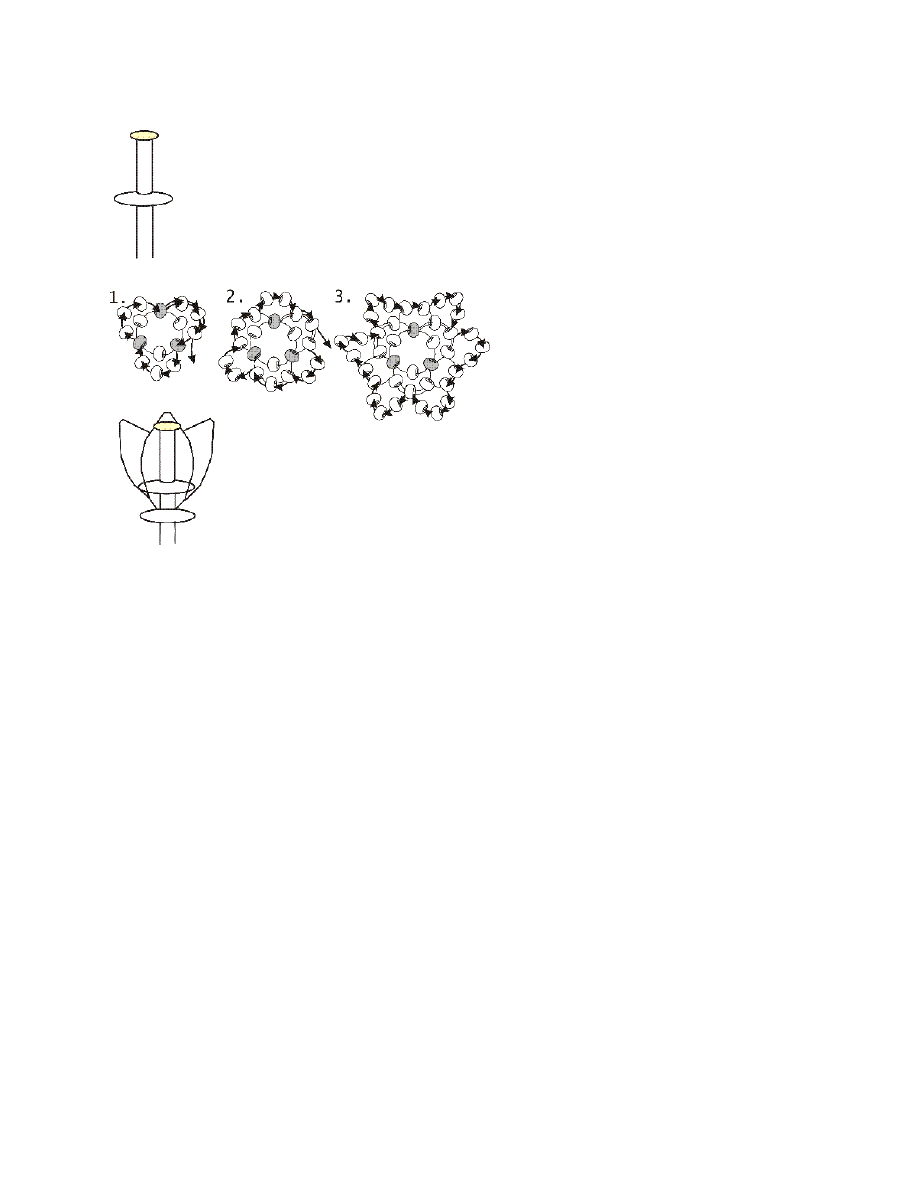
Making a pistil:
Gather 3 top yellow beads together (they are
gray on my picture) and tie them up just like
you did on the bottom of the stem. To each
of those 3 beads add three other yellow
beads as shown on the picture to thicken the
end.
4
Attaching flower to the stem:
After you are done with a pistil, you will
need to create a bulge about 1-1,5” below it,
which will help to attach the flower.
First row of the bulge:
Start by threading through the first bead on
the selected row of the stem, string 3 more
beads and bring the needle through the
second bead, string 3 more beads, and bring
the needle through the third bead, string 3
beads and bring the needle through the 1
st
bead and through the first 3 beads of the
bulge (pic.1).
Second row of the bulge:
Now string 2 beads and bring the needle
through the second 3 beads of the first row
of the bulge, string 2 beads and bring the
needle through the third 3
beads of the first row, string 2 beads and bring the needle through the first two(!) beads of the
second row. This completes the second row (pic.2)
Third row of the bulge:
String 3 beads and bring the needle through the first 2 beads of the second row.
String 3 beads and bring the needle through the middle bead of the second 3 beads of the first row.
String 3 beads and bring the needle through the second 2 beads of the second row.
String 3 beads and bring the needle through the middle bead of the third 3 beads of the first row.
String 3 beads and bring the needle through the third 2 beads of the second row.
String 3 beads and bring the needle through the middle bead of the first 3 beads of the first row.
This complete the row 3 (pic.3)
After you are done with the bulge, insert the stem into the opening in the flower, so that the bulge
will be inside of the flower and make another bulge right below the flower (see picture above).
5
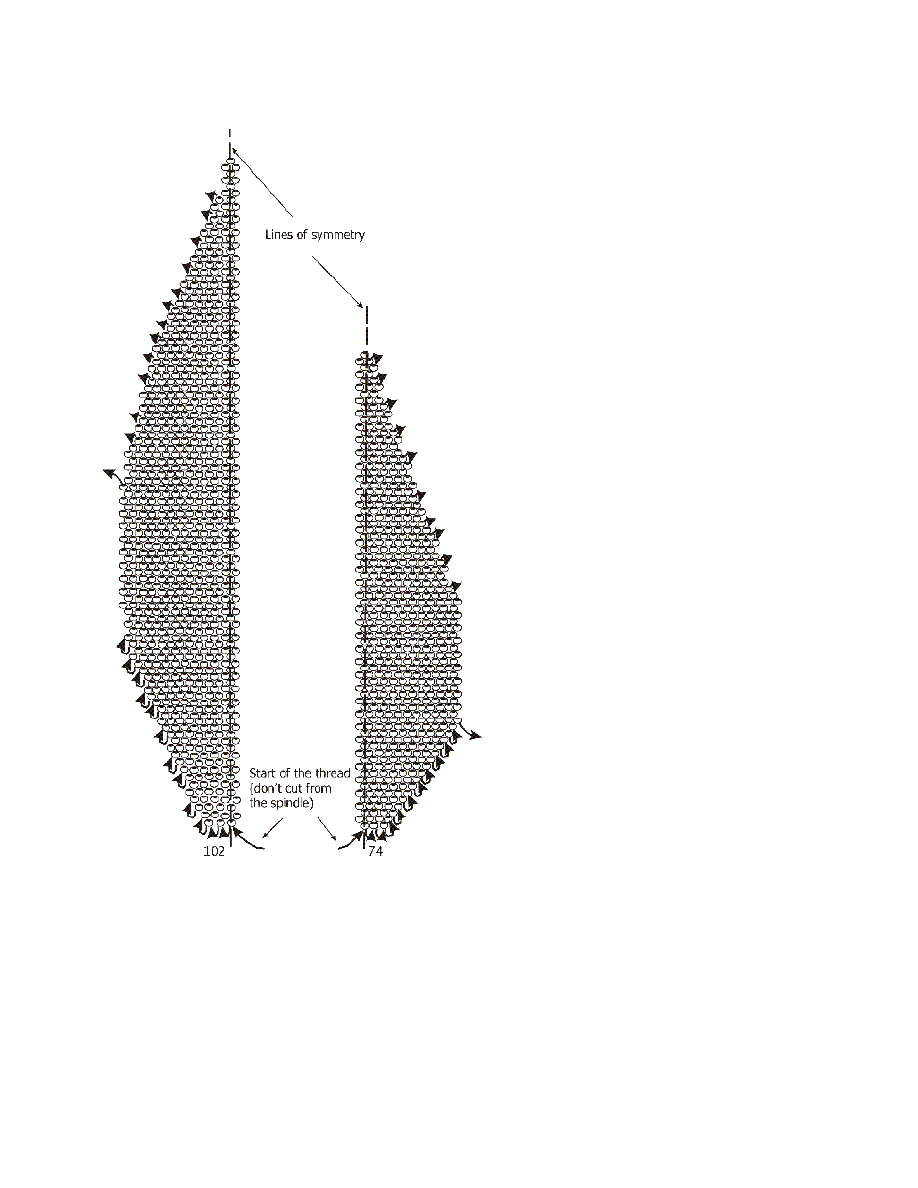
Making leaves:
Leaves are done in exactly the same way as
petals. For the bigger one start with 102
beads, for the smaller one start with 74 beads
and follow the diagram.
You will need to attach them by the bottom
row to the stem. You can position them
anywhere you like. On my necklace they are
about 3-4” above the bottom of the stem.
Copyright © 2002 Jewelry by Varvara
6
Wyszukiwarka
Podobne podstrony:
bead pattern central beading tutorial
bead pattern central beading tutorial brick stitch
Beading Titanic relic necklace
bead pattern central spiral
Instructions for Reading a DB Bead Pattern
Patterns in No Limit Hold Em
bead pattern central loom
Shell Pendant Necklace Crochet Pattern
(Ebook English) Crafts Beading A New Slant On Bead Stringing(1)
beading peyote leafs necklace
beading two pansies necklaces
bead pattern central daisy chain
beading Chalcedony Lapis Necklace
bead pattern central peyote
bead pattern central surfacebeading
(Ebook English) Crafts Beading Caught in the Bead Net(1)
beading netted leaves necklace
beading red tube bead necklace
Beading Bead & Button Primary Twist netted necklace
więcej podobnych podstron