STEP 5
(
THROUGH
)
You now have two loops on the hook and the thread is wrapped
around the hook. Pull the wrapped thread through both loops.
NOTE: YOU CAN PULL THE
WRAPPED THREAD THROUGH ONE LOOP AT A TIME, USING TWO MOTIONS TO COMPLETE
THIS STEP, UNTIL YOU ARE COMFORTABLE PULLING THE WRAPPED THREAD THROUGH
BOTH LOOPS.
Flatten the work; from overhead, you
should already see six “spokes” of thread.
At the end of each spoke is one bead. Note
that the next beaded stitch into which you
will insert the hook has a cream bead,
which is the color of the next bead you will
slide down the thread. You will know that
you are working correctly if this happens
consistently.
Seen from the side (photo C), the beads will show the
beginning stages of a spiral pattern even at this early
stage. Note that the lower beads (those of the origi-
nal six chains) are positioned horizontally, while the
beads of the new round are somewhat vertical. This
will happen consistently if you are working correctly.
As the tube lengthens, the spiral pattern will become
more visible, and the relative positioning of the beads
(horizontal, vertical) will be more pronounced.
Troubleshooting common problems
After every few rounds, check your tube to be sure
you have six beads around the spokes when you flat-
ten the top. If you see less or more than six, pull out
the work until you have six. You have either missed
one stitch or placed more than one bead into a
stitch.
A bead appears in the
center of your tube
You don’t have six beads in the round
you are working on.
If you look at the side of the tube, one
bead seems to be receding. If you look
at the top of the tube, a bead is in the
center of the spokes. This means that
the bead you moved to the far side of
the hook has slipped through as you
pull the thread through the loops. If
this happens, you can either push the
bead back out again, or, if that is too
difficult, pull out stitches until your
work looks correct again. It may also
mean that your wrapped thread did
not come from the right of the bead
on the hook.
A
B
C
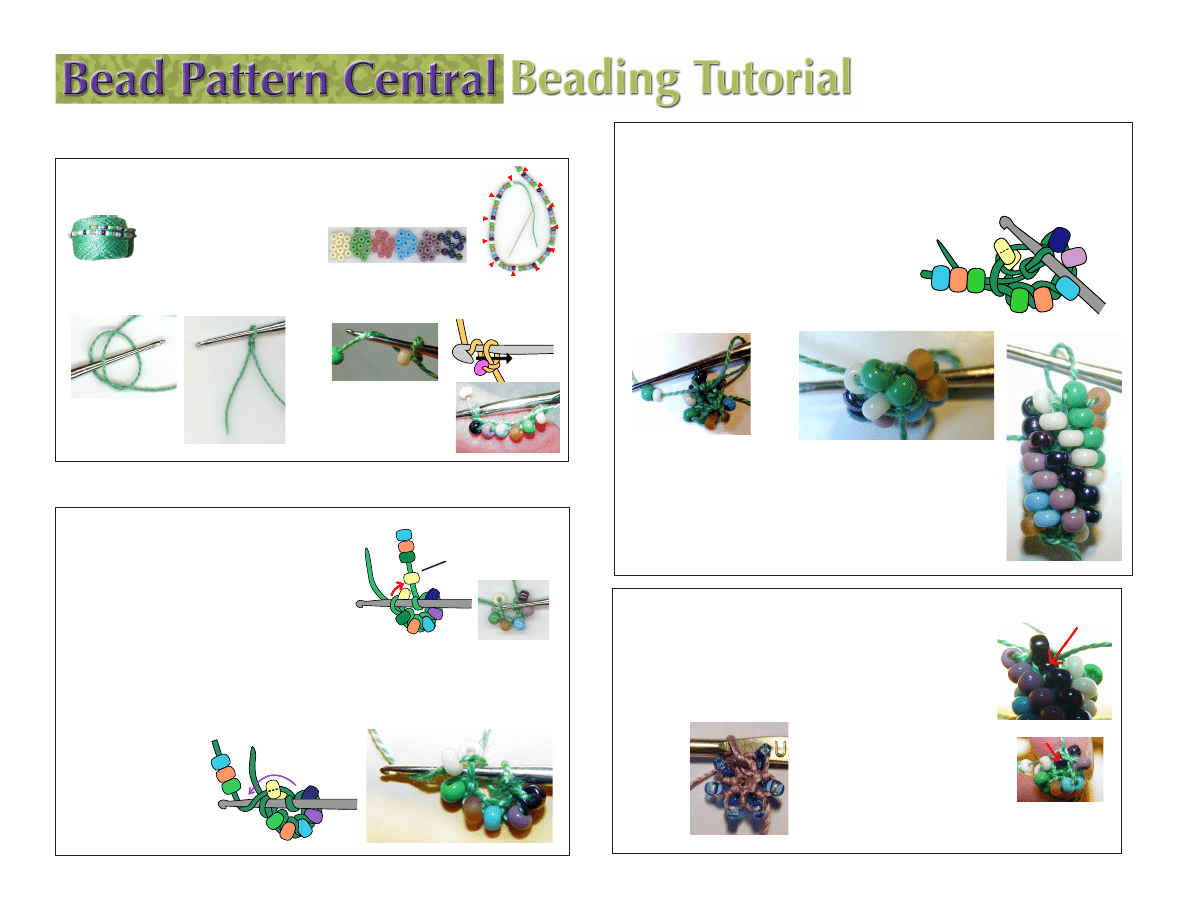
BASIC TUBE CROCHET
You’ll need #10 perle cotton, six different colors of size 8o seed beads, a #9 or 10
threading needle and a #10 steel crochet hook.
After threading on the beads,
make a
slip knot on the hook.
Position the hook in a loop
of thread as showin the
photos and pull so the slip
knot forms on the hook.
After making the slip knot,
make six chain
stitches, each with one bead
To chain with a bead, slide a
bead down the thread until it
hangs below the hook. Wrap the
thread around the hook and pull
it through the loop.
STEP 1 (
IN
)
Insert the hook into the first beaded chain.
Don’t pierce the thread with your hook or put the hook
through the hole in the bead.
STEP 2 (
OVER
)
then slide the bead over to the far side
of the hook. This is an important step; in order for the
whole process to be successful, all the beads must
“land” on the outside of the tube. The thread that car-
ries your beads must be positioned to the right of the
bead that has been passed over the hook.
Beads loaded
in a specific
repeat
Loaded beads rolled
onto the spool
Lay out six piles of beads and
pick up one from each pile
STEP 3 (
DOWN
)
Bring a bead down the thread as shown above. The thread must be positioned to
the right of the bead that has been passed over the hook in step 2 (OVER).
STEP 4 (
AROUND
)
Wrap the thread around the hook from back to front (toward yourself) so the
new bead and the bead that has been passed over the hook are touching. The new thread will
cross over the loop that’s on the hook.
The bead that you slide down the
thread will be the same color as
the bead you just moved to the
far side of the tube. This will
happen with each new “pair” of
beads, the one you have already
crocheted, and the one you slide
down the thread.
The thread is positioned to
the right of the bead that
was passed over the hook
Each stitch you make after the initial chain is complete will consist of five distinct steps:
IN, OVER, DOWN, AROUND, and THROUGH.
This completes the stitch. Repeat the five numbered
steps until you have six completed stitches. Photos
A & B below show an overhead and side view of how
the work should look at this point. Photo C shows the
tube as you progress.
Getting started
Thread beads onto your fiber, repeating the same pattern of six col-
ors until you have about 45” of beads on the thread. Do not cut or knot the thread,
but wind it back onto the ball or spool, leaving a working tail of about 36”.
Wyszukiwarka
Podobne podstrony:
bead pattern central beading tutorial brick stitch
bead pattern central spiral
bead pattern central loom
bead pattern central daisy chain
bead pattern central peyote
bead pattern central surfacebeading
beading Varvara Tulip Necklace bead patterns com No 3721
(CRAFTS) Beading Tutorial Spiral Bead Weave
Instructions for Reading a DB Bead Pattern
(CRAFTS) Beading Bead Crochet Pattern
[2003 12p Metastock] CHART PATTERNS Tutorial [Trading ebook]
Bizuteria z drutu Beading Bead Crochet With Wire
(CRAFTS) Beading russian bead and crochet magazine 1
PATTERNKennedyBag tutorial torba
Eni Oken tutorial Fat wrap bead(1)
beading red tube bead necklace
(CRAFTS) Beading russian bead and crochet magazine 1
więcej podobnych podstron