How to Read a DB Bead Crochet Chart
For those who bead crochet, the free DB program, DB-BEAD by Damian Brunold offers a great way to see
what a pattern will look like before you start crocheting. However, this free software does not give elaborate
instructions on how to follow the pattern. Offered here are more detailed procedures for understanding what you
have with a DB pattern.
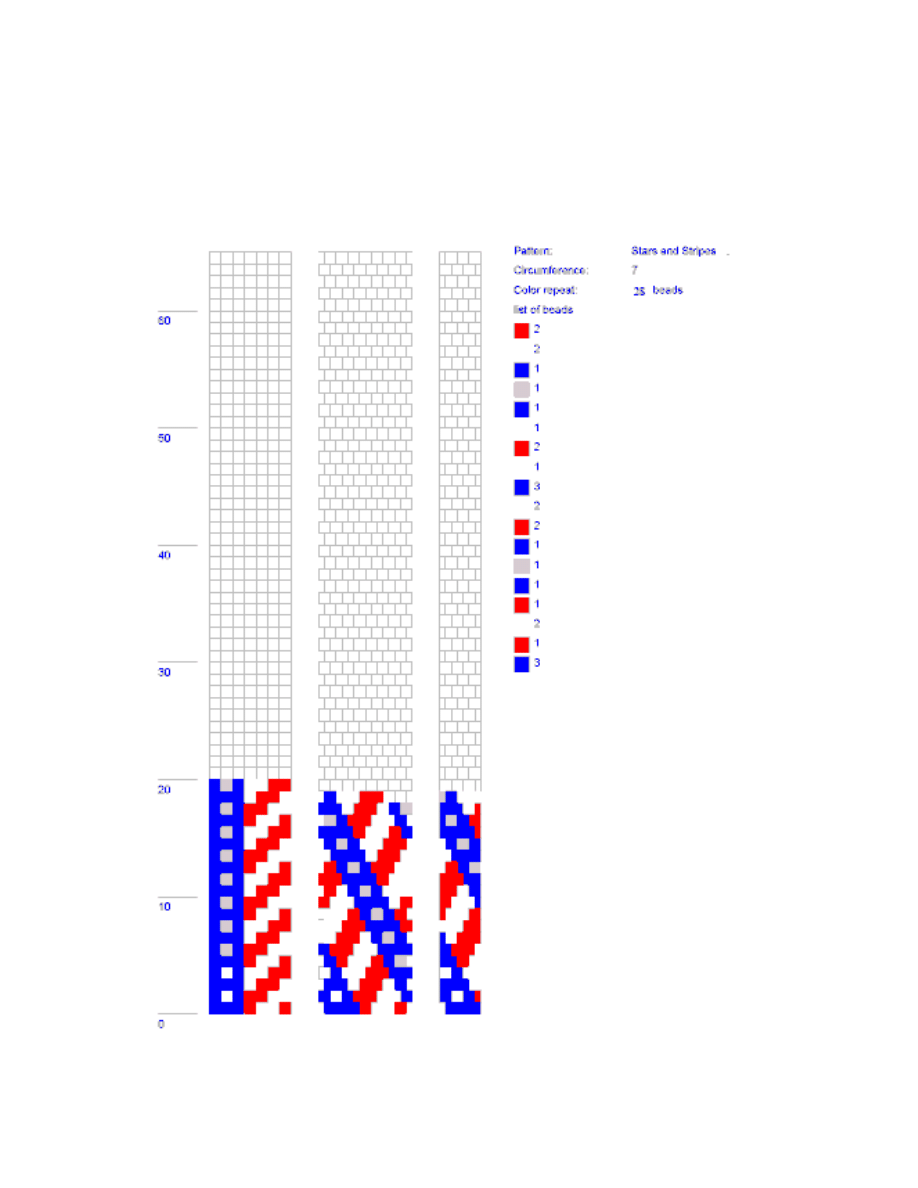
The output from the pattern gives you three graphs (Figure 1).
Figure 1

In bead crochet, you string all the beads before you start crocheting, and you do not cut the thread from the
spool. As you crochet, the beads will move down the thread as you use up the available thread. The following
instructions will help you understand the DB graphs, and get your beads strung correctly.
What the Graphs Represent
The graph furthest to the left, gives you the stringing order. It helps with stringing if you like to use a graph to
do so. The stringing order starts at the top right, and goes to the bottom, right to left for each row., but doesn't
show you much of how the end result will look Some may find it even easier to string the beads by following
the List of Beads in the center of the page, or in this case 2 red, 2 white, 1 blue, 1 gray, 1 blue, etc. Detailed
instructions for that and how to be sure your beads are strung exactly for each round are below.
Another aspect of the graph on the left is this graph portrays the pattern laid flat and in even rows to make
stringing easier. The graph in the middle is "corrected" to show how the pattern will look crocheted, but is still a
flat representation of the pattern. You can string from that, but it's harder to follow. The graph on the right is a
3D simulation of the final crocheted result, but of course, you are only seeing one side of the bracelet. You
cannot string the beads from this graph.
Stringing the Beads Using the List of Beads
You can also string the beads using the List of Beads to the right of the graph. For this pattern, you would
string:
2 red
2 white
1 blue
1 gray
1 blue
1 white
2 red
1 white
3 blue
2 white
2 red
1 blue
1 gray
1 blue

1 red
2 white
1 red
3 blue
Those add up to 28 beads. That is the repeat, those 28 beads, as the pattern description on the top right indicates.
How to Get Each Repeat Correct – Every Time
Once you have strung 28 beads, lay them down and start the next repeat by using that strand of beads as a guide.
When you complete the second repeat, line the second repeat up with the first repeat, and check them
again. If you check each repeat as you finish one, you have a very good chance of making no stringing errors.
To do an invisible join for your piece, you need to end with a complete repeat. If you are using bead caps, bead
cones, or other findings to make a clasp, you can end your stringing anywhere. Just be sure to make the length
crocheted suitable for your clasp so that the final length of the bracelet is what you expect.
What to Do If You Made a Mistake Stringing
Even with the most care, you may still string the sequence wrong and discover this after you start crocheting.
Here are a few suggestions for correcting the stringing sequence after your beads are strung.
If you string an extra bead, break it with a awl, pushing through the center of the bead. Another method is to
crush it with pliers, held hole to hole of the bead. Some beaders like to crush the bead side to side, but that
increases the chances that the broken glass will cut the thread unless you put a needle through the bead first to
protect the thread. I prefer using the awl, as this breaks the bead outwards, away from the thread.
If you find you have skipped a bead, you can crochet without a bead and then sew in the correct bead
afterwards. Anther method is to cut the thread after crocheting the last correct bead, add the missing bead to
your thread, and then join with the new thread.
You should find these workarounds very helpful; however the best method to follow is to take the time to be
sure the pattern beads are strung correctly in the first place.
How Many Beads in a Round?
The DB pattern maker indicates the circumference of the beaded tube for this pattern as being seven beads. This
means there are seven beads in the round. To start, you crochet seven beads (slipstitch). Then, for the eighth
bead, go under the first bead crocheted, push it over the hook (to the right if you are right handed and to the left
if you are left handed), and join the beads into a round with seven beads. At this point beads # 2-8 are
the current round, and bead 1 is under bead eight.
Wyszukiwarka
Podobne podstrony:
Instructions for?sicLog
instructions for zen meditation 2GVX7YJXPQNLC74CRS3FJNXUAOIXYARA5IRHJXY
petle, Instrukcja for
JS 10 Instrukcja for, Programowanie, instrukcje - teoria
Instructions For Living by Rabbi Noach Weinberg
CIM Lab Instruction for KSPT 2013
lab4, Typ tablicowy, instrukcja for
Kurs C++2, m 3, Instrukcja for
Instructions for your download
Kurs C++2, m 4, Instrukcja for
Budżet instrukcja, Instructions for the presentation of the budget - Macro-projects
Longman Stories for Reading Comprehension 2
Instrukcja FOR
Instrukcja for
beading Varvara Tulip Necklace bead patterns com No 3721
bead pattern central spiral
więcej podobnych podstron