
Copyright
© US Positioning Group, LLC
All Rights Reserved
Rhino
®
is registered in the U.S. Patent and
Trademark Office
Copyright
i

Rhino Post-Processor
1. Welcome to Rhino Post-Processor.................................................. 1
a. Introduction...................................................................................2
2. Getting Started..................................................................................3
a. Supported Windows Desktop Platforms.................................. 4
b. Installing Rhino Post-Processor...................................................4
c. Rhino Post-Processor Licensing..................................................5
e. Getting Help and Support..........................................................6
3. Usinig Rhino Post-Processor............................................................. 7
a. Main Screen.................................................................................. 8
b. Post-Process a RINEX FIle............................................................ 9
c. Choosing Files for Post-Processing a RINEX File(s)................. 10-12
d. Post-Process a Shape File........................................................... 13
e. Choosing Files for Post-Processing a Shape File....................14
f. Type of Differentially Correcting and there Options............15
g. Filtering Options........................................................................... 16-17
h. Processing Your Data..................................................................18
i. Viewing Log Files......................................................................... 19
Table of Contents
ii

4. Contact Information.................................................................. 20
a.
Headquarters.......................................................................... 21
b. Help and Support................................................................... 21
Table of Contents
iii

Welcome to Rhino Post-Processor

Introduction
Rhino Post-Processor
The Rhino Post-Processor guides the user through the process of differentially
correcting differential GPS data that was recorded in the field. Rhino Post-
Processor requires that the input files of the rover, reference, and ephemeris to be
formatted in RINEX format.
Note: In order for Rhino Post-Processor to correct shape files, they must have been collected with Rhino Rover for
Arcpad.
2

Getting Started

Supported Windows Desktop Platforms
Windows XP
Windows 2000
Windows NT
Windows 98
Windows 95
Installing Rhino Post-Processor on a Desktop Windows machine
- Close all applications that are currently running on your PC.
- Insert the Rhino Post-Processor CD-ROM.
- Run “Setup.exe” from the CD-ROM.
- Follow the on-screen instructions to complete the setup process.
Getting Started
4
Getting Started
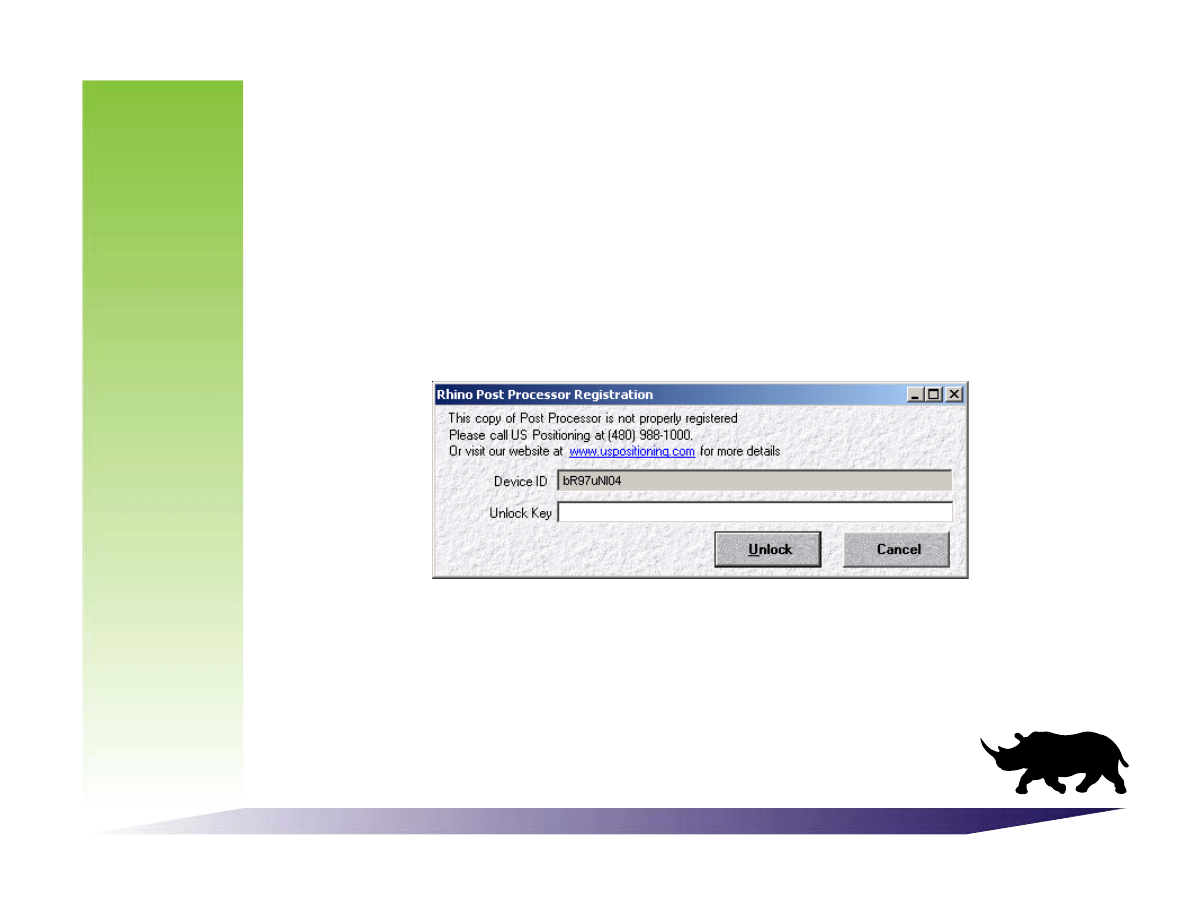
Note: When a valid key is entered, the following message will be displayed and the copy protection form will not be
shown again.
Rhino Post-Processor Licensing
If a valid license is not found on your computer, you will need to license your ver-
sion of Rhino Post-Processor before you can begin
differentially correcting posi-
tions.
Contact US Positioning with your Device ID and you will be provided an
Unlock Key. Enter your Unlock Key into the text box and press the Unlock button.
If an invalid key is entered, a message box will appear and request that you call
US Positioning.
5

Getting Started
Getting help and support
US Positioning Home Page
www.uspositioning.com
Software Demos & Product Literature
www.RhinoGPS.com
Support by e-mail
support@uspositioning.com
Information by e-mail
info@uspositioning.com
Phone Numbers
800.6 G P S L O G or
480.988.1000
6

Using Rhino Post-Processor
Using Rhino Post-Processor
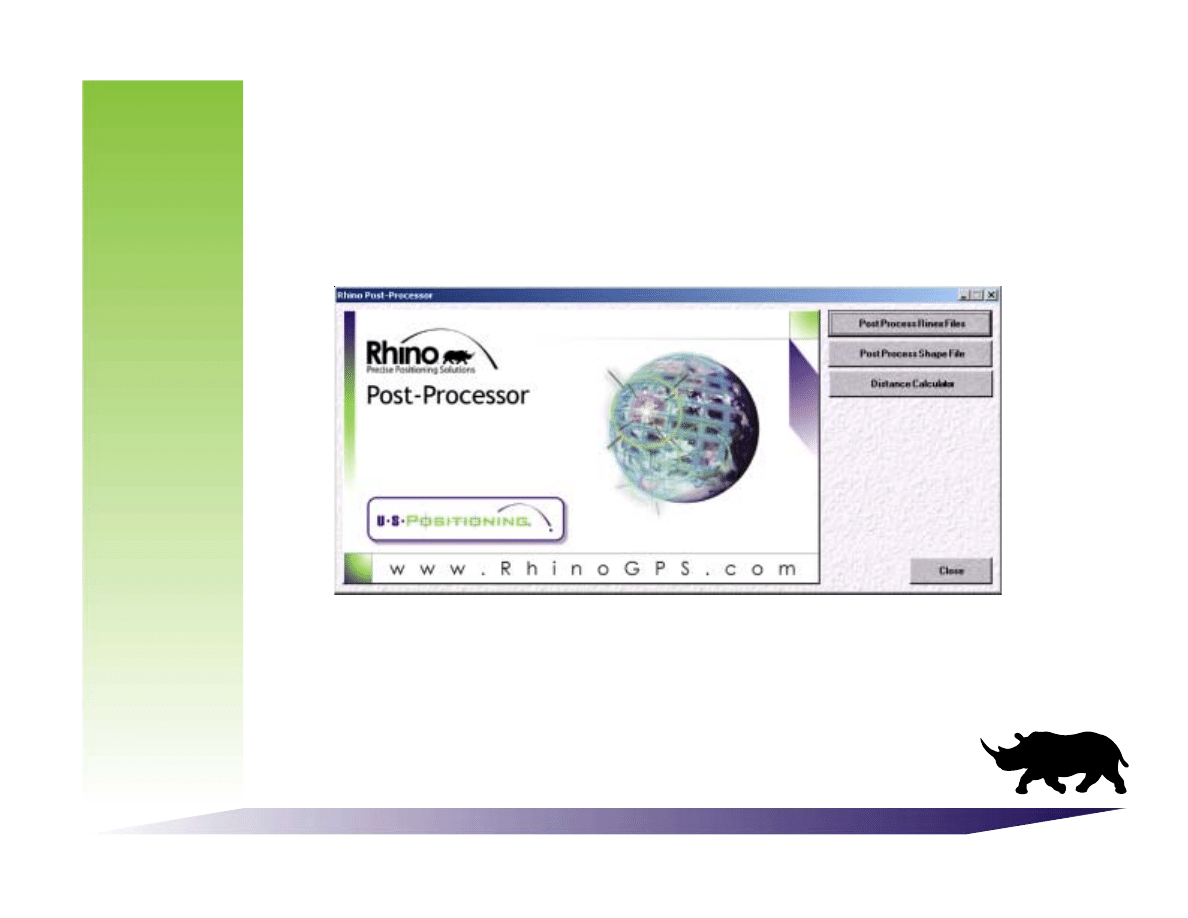
Rhino Post-Processor Main Screen
Once you accept the license agreement, Rhino Post-Processing’s Main screen will
appear. The figure below shows the main screen and defines the controls and
displays available on it. The usage and application of these controls will be
explained in the following sections of this user manual.
8
Using Rhino Post-Procesor
Post-Process a RINEX File
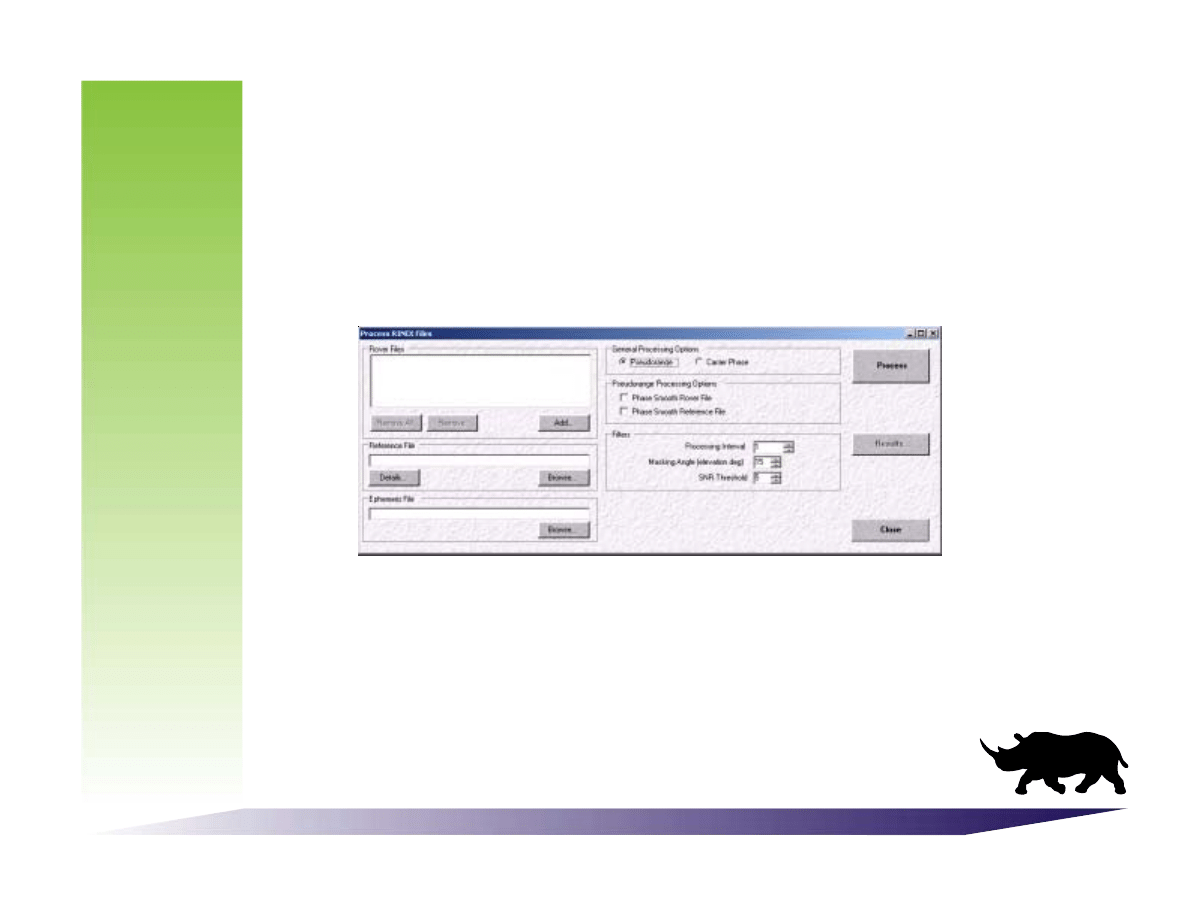
The Post-Process a RINEX File form looks like the figure bellow. Here you will be
able to choose your Rover, Reference and Ephemeris files needed for post-pro-
cessing. You will also be able to choose the type of differentially correcting you
will be using whether it be Pseudorange or Carrier Phase. Filtering options such as
Masking Angles, SNR Thresholds, and processing intervals can also be set or ma-
nipulated on this screen.
Note: The Rover, Reference and Ephemeris file must be supplied in RINEX format. Most RINEX Rover and
Reference files usually have the filename extension in the form “yyO”, where “yy” represents the last two digits of
the year, and “ o” is used to denote an “Obersvation” data file. While the Ephemeris filename extension are in
the form of “yyN” where the “N” denotes a Navigation data file. Rhino Post-Processor will also accept .SP3 precise
ephemeris files.
9
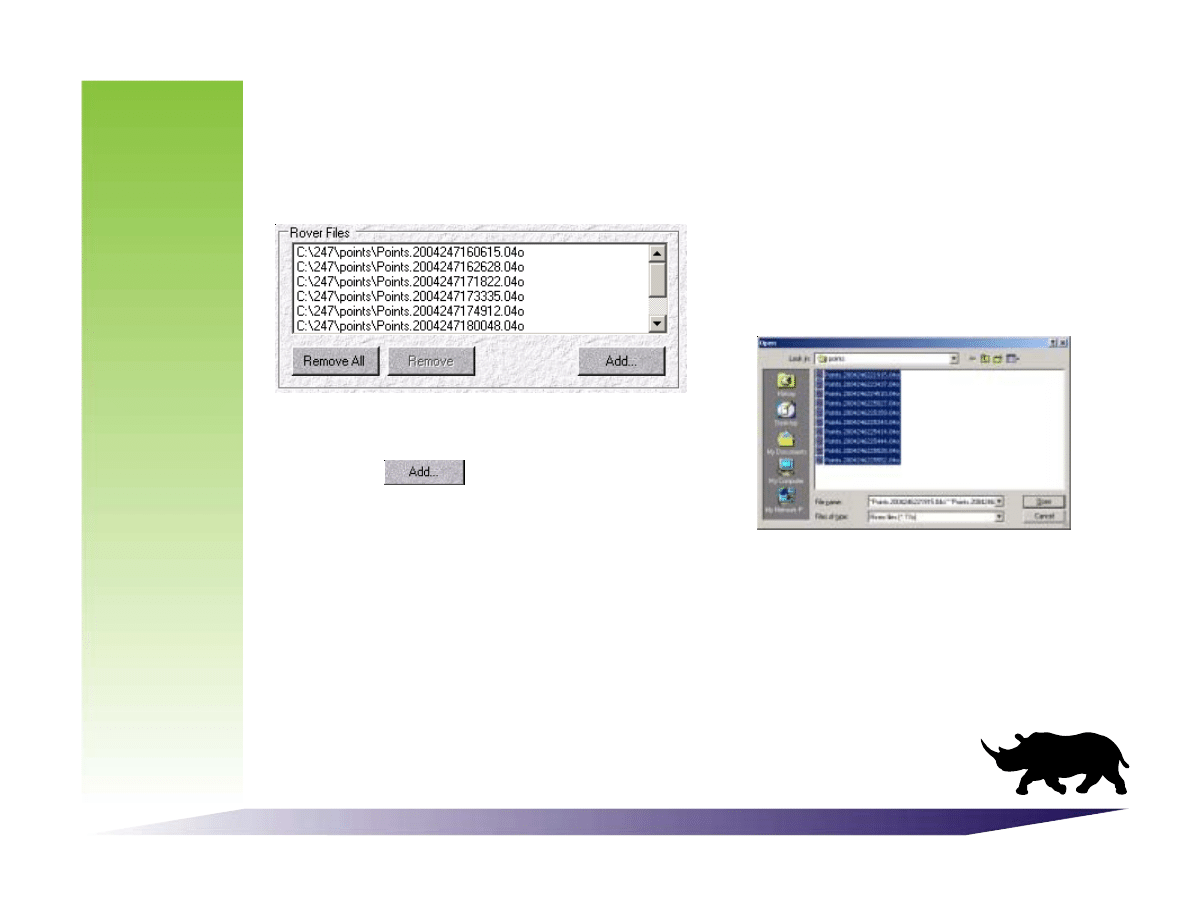
Using Rhino Post-Processor
The figure to the left shows where you
can add, remove or remove all RINEX
files in the current list.
Note: You can Select more than one RINEX file to post-process, but keep in mind that the more files you choose the
longer it will take to get the results.
To add RINEX files to be post-processed
press the “
” button and the
following screen will appear.
Use this to
locate and open the desired Rover file(s).
Choosing Files for Post-Processing a RINEX File(s)
10
Choosing Rover file(s) is done here. Rover file(s) are collected out in the field on a
Pocket PC an
d are then opened using a Post-Processor. The figure below show how to
open, or remove Rover file(s).
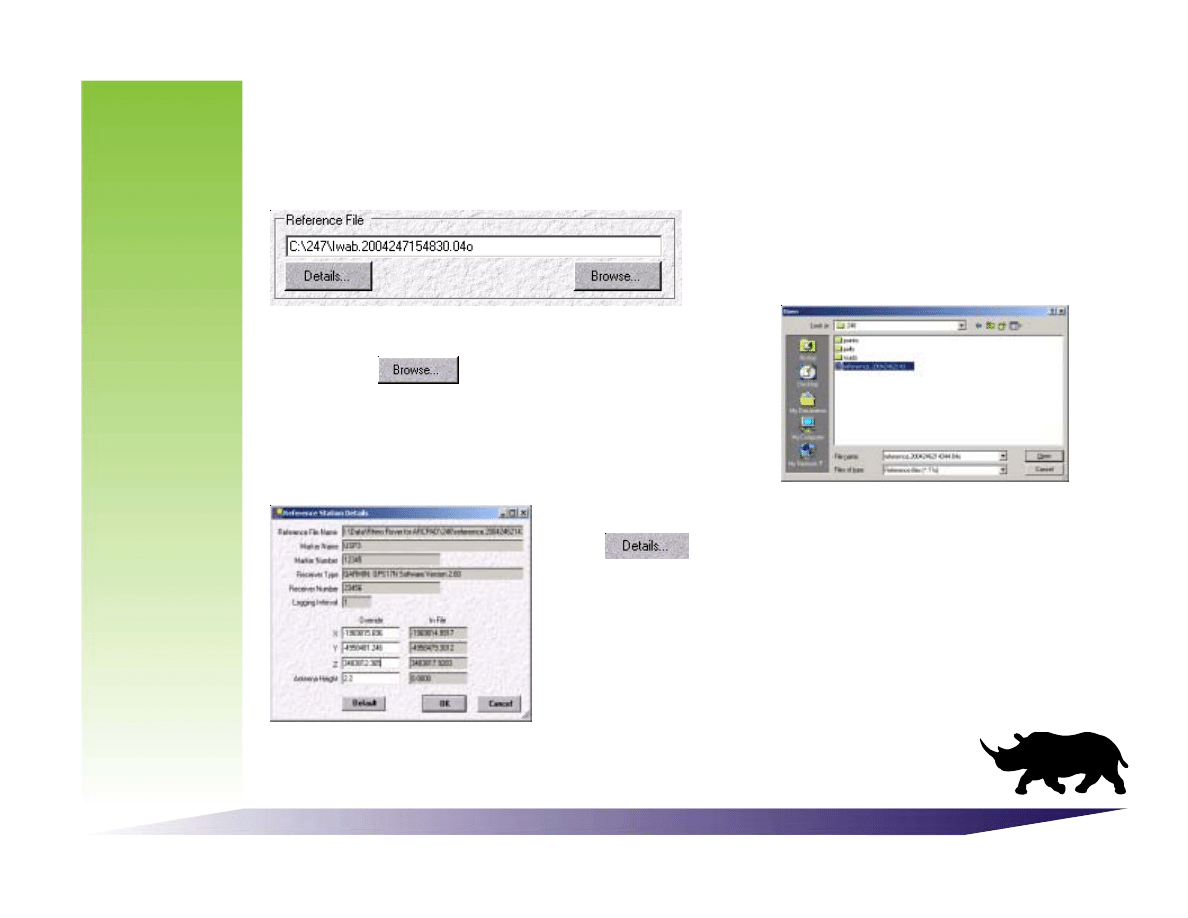
Using Rhino Post-Processor
Here you will be able to add a
Reference file or view its details.
To add a Reference file to be post-processed
press the “
” button and the screen on
on the right will appear.
Use this to locate and
open the Reference file
.
To view the details of a Reference files press the
“
” button. The screen to the left will then
appear. Here you will be able to enter the exact
antenna height and coordinates of your
reference station.
Note: once you change the coordinates to this file, the program will
save the changes that you made. The next time that you use this file
the changes will be the same.
Choosing Files for Post-Processing a RINEX File(s)
To differentially correct GPS data, you will need a reference file. This file is
collected with a GPS receiver that was located on a known position.
11
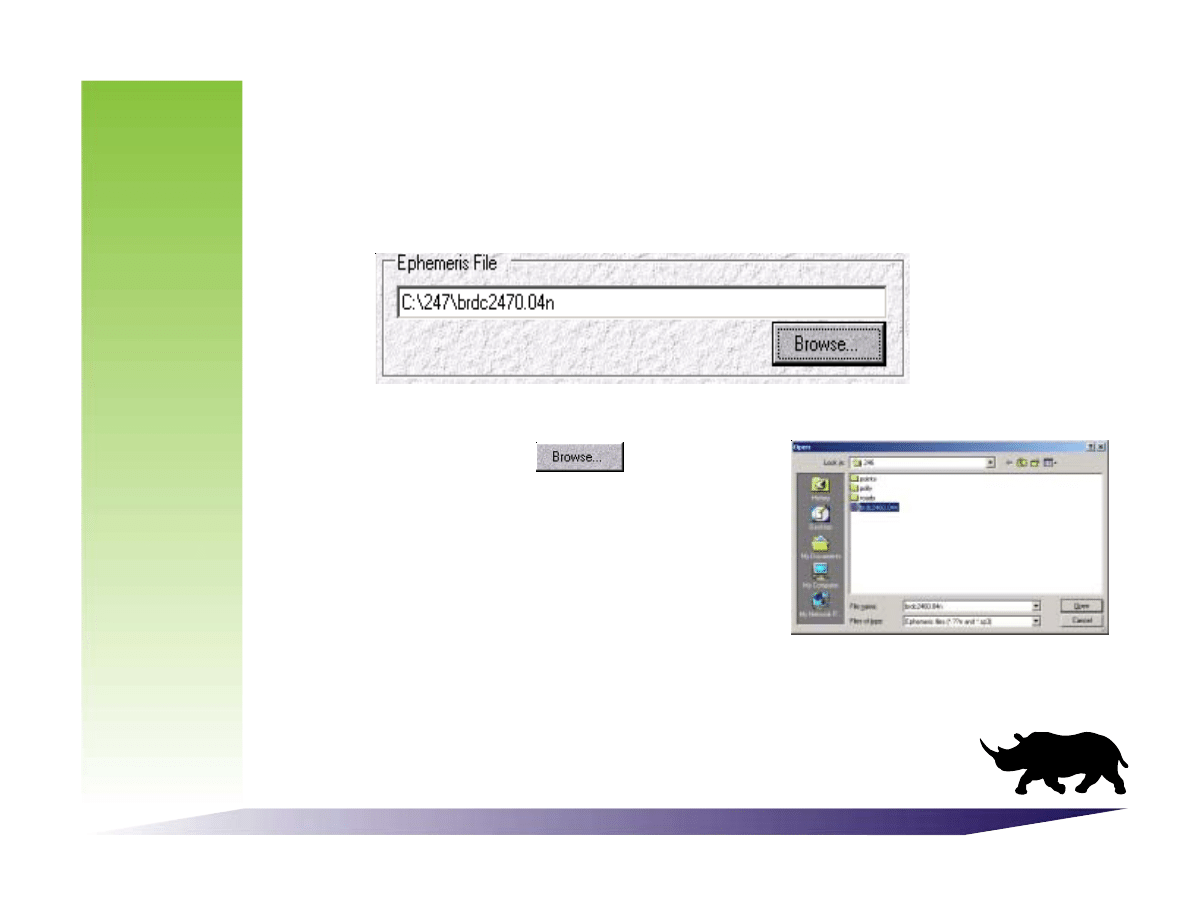
Using Rhino Post-Processor
To post-process GPS data, you will need an ephemeris file. The ephemeris file
contains the information required to compute the coordinates of the GPS satellites
whenever a pseudorange or carrier phase measurement is being processed.
To add an Ephemeris file “
” button and
the screen to the right will appear.
Use this to
locate and open the ephemeris file
.
Choosing Files for Post-Processing a RINEX File(s)
12

Using Rhino Post-Processor
Post-Process a Shape File
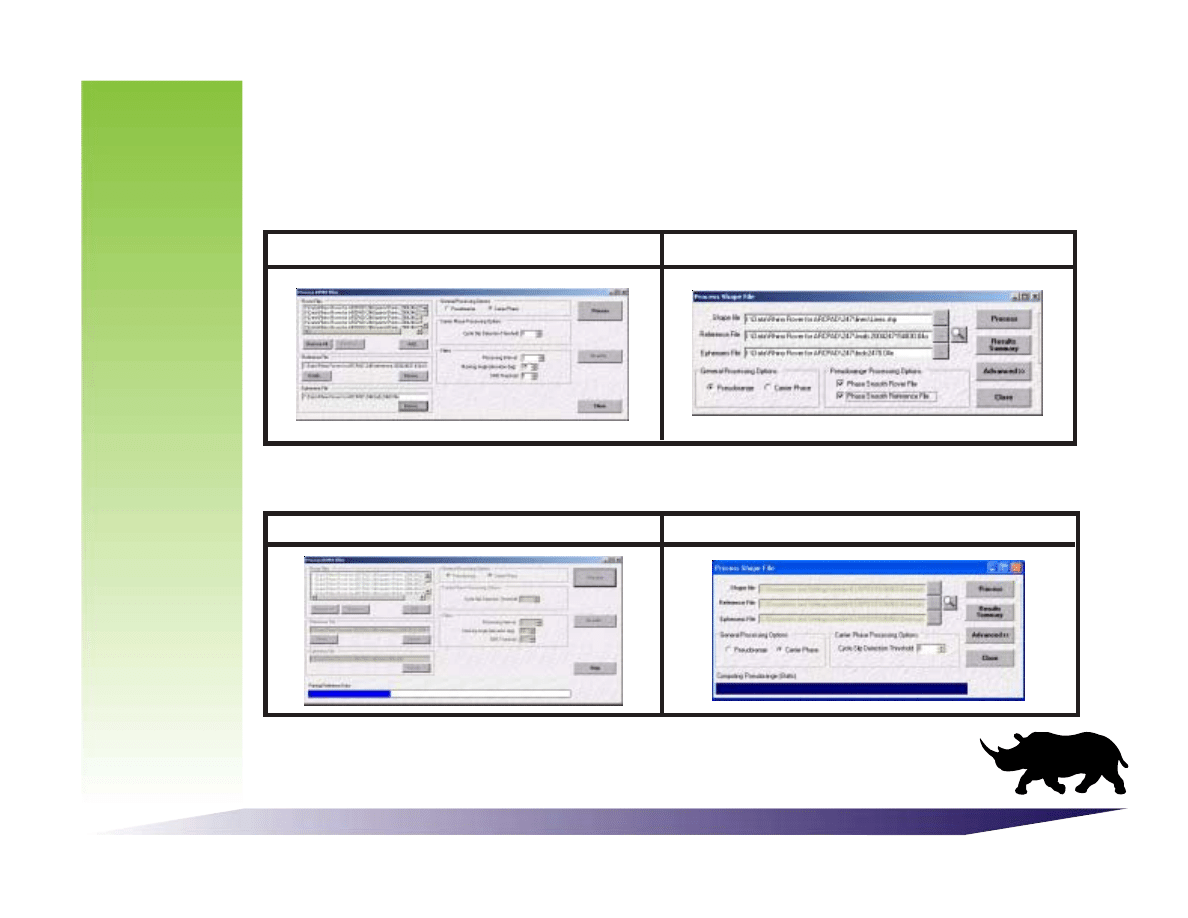
The Post-Process a Shape File form looks like the figure directly below. Here you
will be able to choose your Shape file, Reference file and Ephemeris files to use for
processing. You may also choose the type of differentially correcting
whether it be Pseudorange or Carrier Phase. It also has an advanced but
ton
which will show the different filtering optionsthat are available.
When you press the “Advanced” button, the form will extend and reveal the filter
options. This is where you can adjust the Processing Interval, Masking Angle and
the Signal-to-Noise threshold (SNR). The figure below shows what the form looks
like when the advanced options are shown. To Change back to the way the
form was simply press the “Normal” Button.
13
Using Rhino Post-Processor
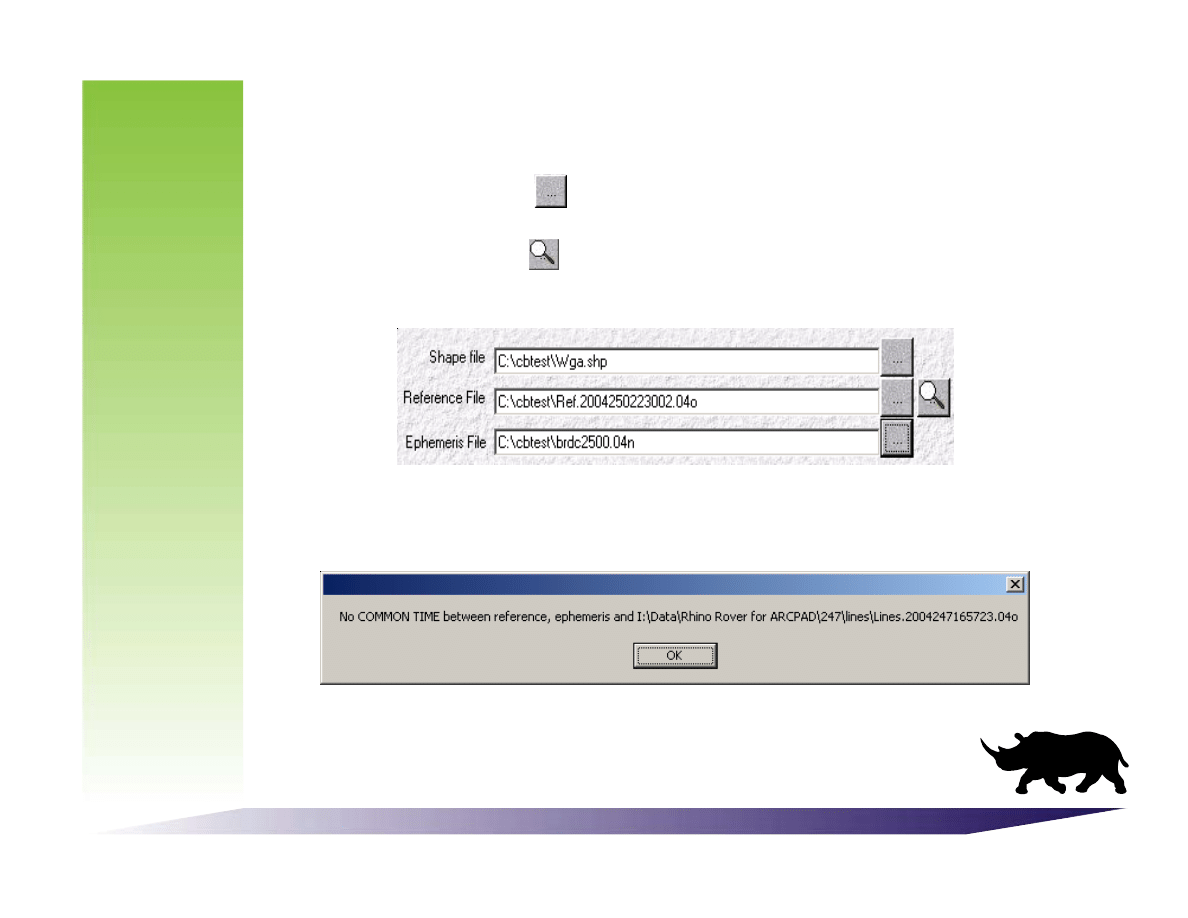
Choosing Files for Post-Processing a Shape File
To add a shape file, reference file, or emphemeris file, press browse button witch
looks like the image here.
This will allow you to locate and open the files that
you need. Next to the reference file browse button is a show details button. This
looks like the image here
. It will allow you to change your reference station
coordinates and antenna height values.
Note: Remember that if the data files of the Rover, Reference and Emphemeris do not overlap you will not be able
to Post-Process and an error message will be shown which states that there is no common data. See the figure
below for an example.
14
Using Rhino Post-Processor
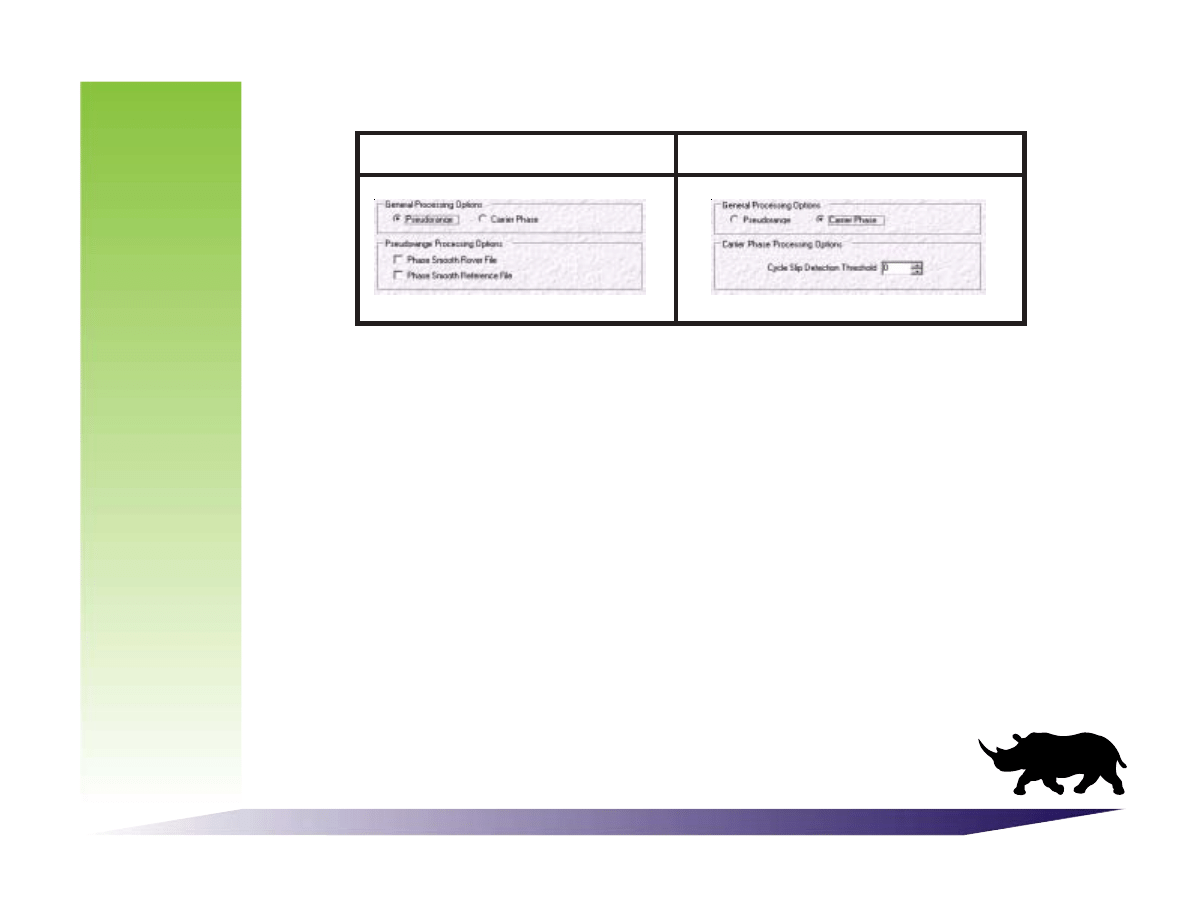
Type of Differentially Correcting and There Options
Pseudorange Smoothing Options
You can choose to use the carrier phase data in the roving and/or reference
receiver data files to smooth the pseudorange data. Although the phase
measurements cannot give an indication of the true distance between the
satellite and the receiver, phase smoothing uses the principle that changes in
carrier phase measurements from one epoch to the next can give a more precise
indication of the changing distance than the pseudoranges do. They can
therefore be used to smooth the pseudoranges. The result is a smoother post-
processed track.
Cycle Slip Detection Threshold
Rhino Post-Processor has an option to select a threshold for the detection of cycle
slips. The default is set at zero. This forces the Post-Processor to identify and solve
for any cycle slips. If your data set has a lot of cycle slips, you may wish to try a
higher threshold initially, so that only the gross slips are
corrected.
Pseudorange Selected
Carrier Phase Selected
15
Using Rhino Post-Processor
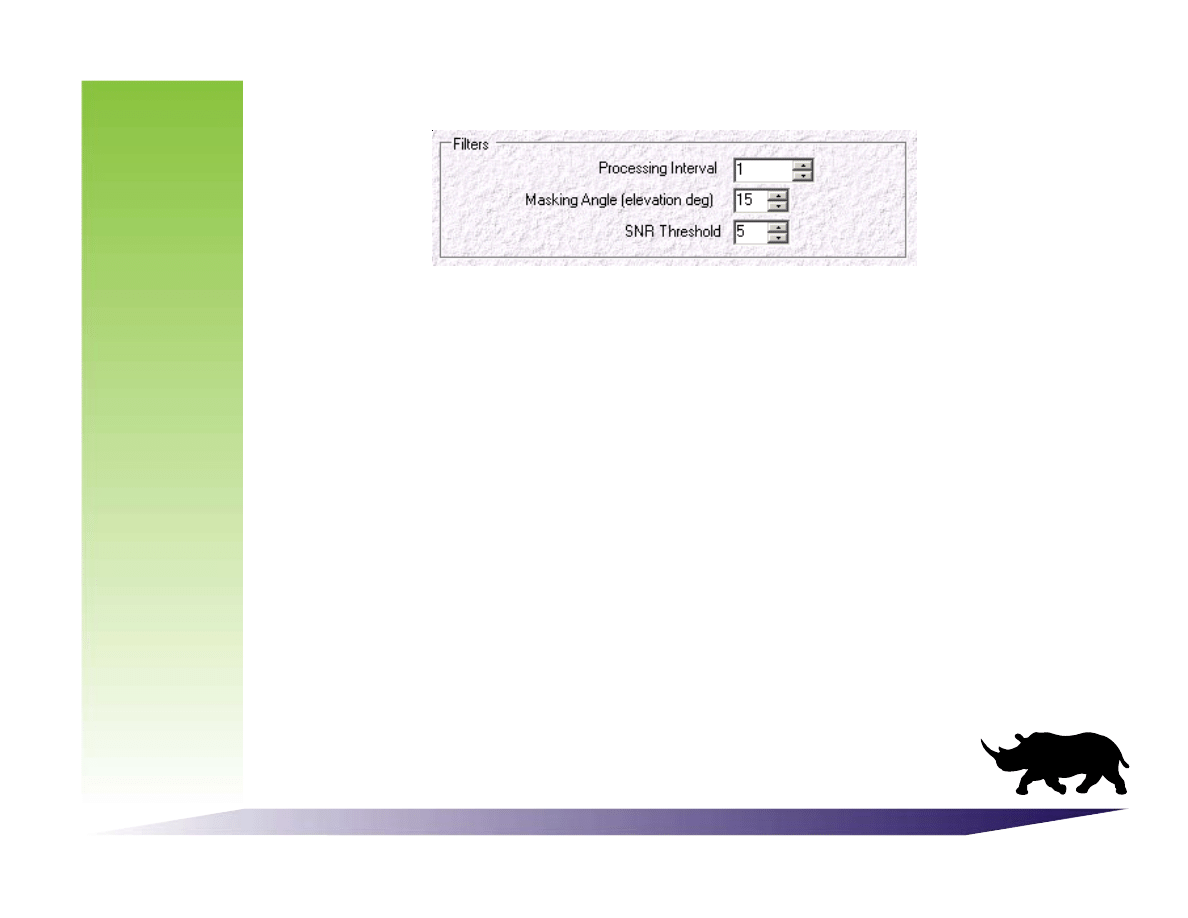
Filtering Options
Processing Interval:
This option allows you to specify the interval between the processed epochs. For
instance, a RINEX data file with observations every second could be processed to
give a solution every 30 seconds. The intervening epochs would simply be ignored,
they would not contribute in any way to the solutions at the 30-second intervals.
Note: The processing interval cannot be shorter than the natural data interval of either the roving or reference
receivers.
Masking Angle:
This frame allows you to select an elevation mask angle (in degrees), so that
observed satellites below this angle are not used in the solution. This is useful to
exclude satellites which are close to the horizon where atmospheric errors are at
their greatest. However, if you only have a few satellites in your data file, you may
prefer to include low elevation satellites despite their atmospheric errors, in order
to improve the geometry of your solution
16

Using Rhino Post-Processor
Filtering Options for Shape and RINEX Files
Signal-To-Noise Ratio Thresholds:
The RINEX format includes a field that records the quality of the observations,
according to the signal-to-noise ratio reported by the receiver. RINEX defines a
scale from 1 (worst) to 9 (best). The RINEX-recommended minimum is 5, which
means that observations with a signal-to-noise indicator below 5 should not be
used in data processing.
17
Using Rhino Post-Processor
Processing Your Data
The screen below shows that the Rover, Reference and Emphemeris has been
enter and that you are now ready for differentially correcting for both shape and
RINEX Files. Once you press the “Process” button data processing will being.
When the correction process starts, a blue status bar will apear at the bottom of
the screen, as shown below.
Post-Processing a RINEX FILE
Post-Processing a Shape FILE
Post-Processing a RINEX FILE
Post-Processing a Shape FILE
18
Using Rhino Post-Processor
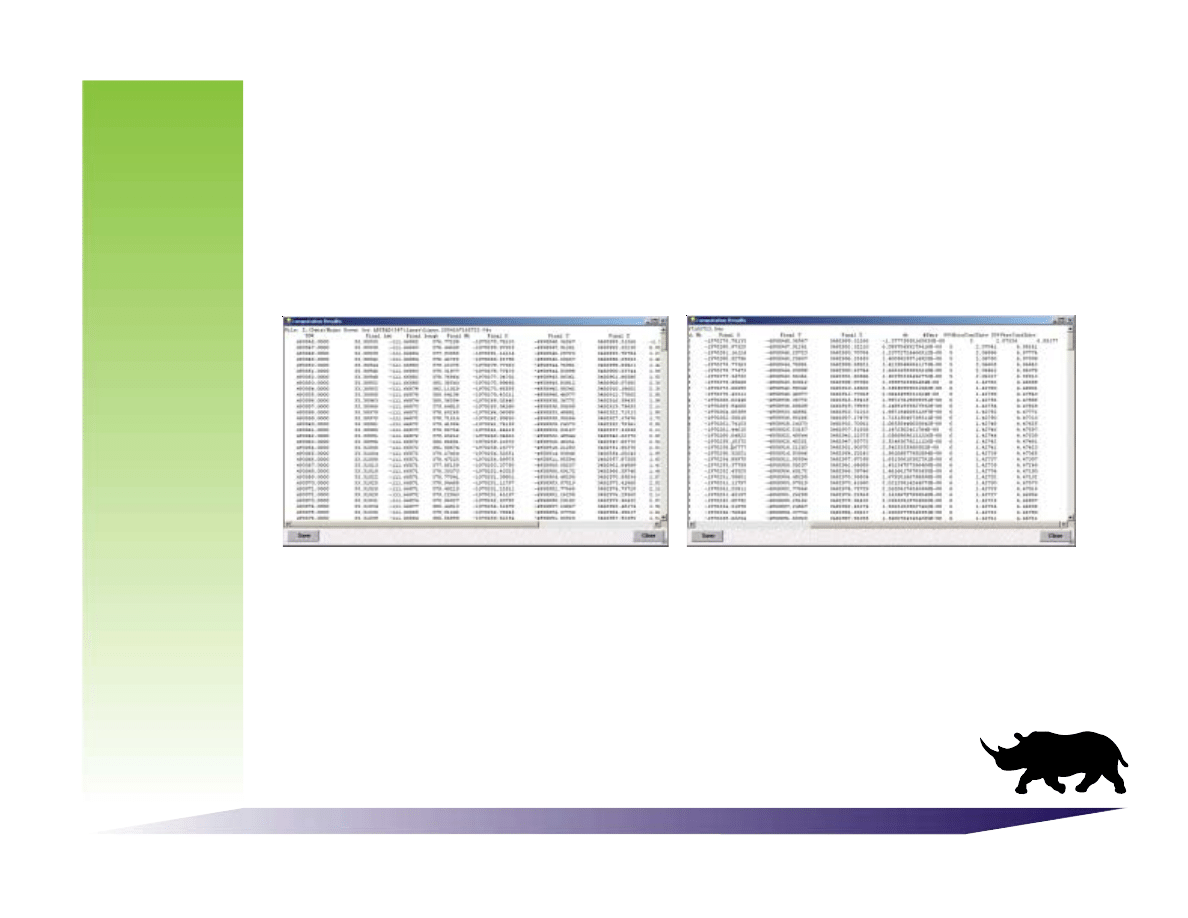
Viewing Log Files
Once the processing is complete, a results screen will be shown. From this screen,
you will be able to view or save the results and final calculated corrdinates of
your processing session. To save the results, press the “Save” button in the lower
left-hand corner of this page.
19

Contact Information

Contact Information
US Positioning Contact Information
Headquarters
US Positioning Group, LLC
5865 S. Sossaman Road
Mesa, Arizona 85212
Help and support
US Positioning Home Page
www.uspositioning.com
Software Demos & Product Literature
www.RhinoGPS.com
Support by e-mail
support@uspositioning.com
Information by e-mail
info@uspositioning.com
Phone Numbers
800.6 G P S L O G or
480.988.1000
21
Wyszukiwarka
Podobne podstrony:
3 Data Plotting Using Tables to Post Process Results
cas test platform user manual
CARPROG Opel ECU programmer user manual
elm327 interface viecar obd2 bluetooth scanner user manual
autel power scan ps100 user manual
2 Advanced X Sectional Results Using Paths to Post Process
Chartplanner user manual
INPA User manual
all100 user manual
CARPROG user manual
FX2N 485 BD User's Manual JY992 Nieznany
mb sbc tool user manual
07 Altistart48 user manual
iphone user manual pdf
PRDM 0010 Upgrade user manual UPG 0001
TK105 GPS Tracker User Manual
ATDSK1118 User Manual
FX2N 232 IF User's Manual JY992D66701
Protek 3502C USER MANUAL
więcej podobnych podstron