http://www.r-techwelding.co.uk
GUIDE TO TIG WELDING
This is a free basic guide on how to do TIG welding using a
TIG welder
(Tungsten Inert Gas)
Tig welding is a skill that needs to be developed over time, with a piece of metal in front of
you and with a welding torch in your hands. TIG welding requires patience and practice.
© R-Tech Welding Equipment Ltd. 2009
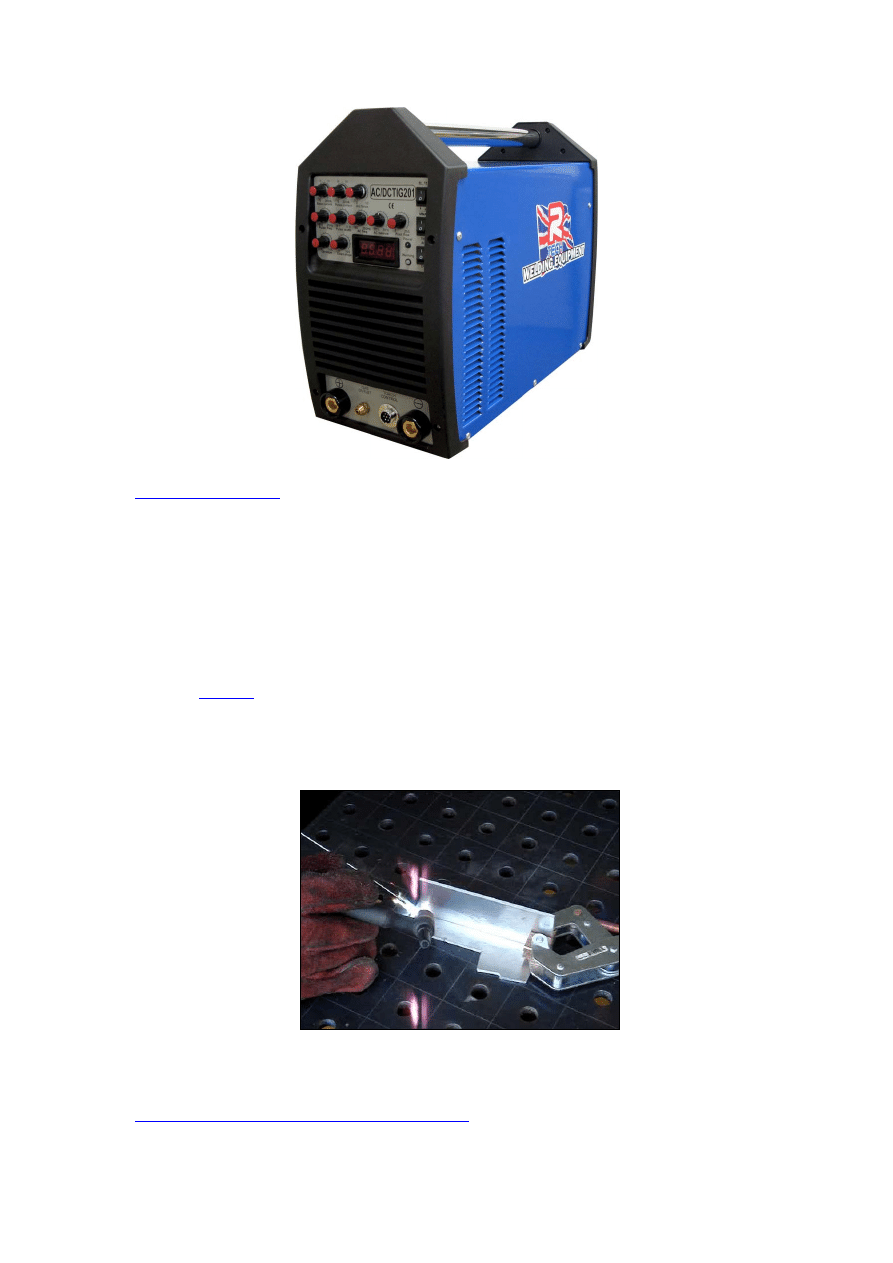
The R-Tech Tig201 AC/DC Tig Welder used in this guide
1. WHAT IS TIG WELDING?
•
TIG Welding can be used to weld aluminium, copper, titanium etc… and even two dissimilar metals. This process
is ideally suited to handling tricky welds such as S-Shapes, curves, corners or where the weld is going to be
visible and where accuracy and finish is important. TIG welding allows a greater variety of metals to be welded
than other forms of welding
•
With superior arc and weld puddle control, TIG welding allows you to create clean welds when appearances
count. Because the heat input is often controlled by pressing on a foot pedal, similar to driving a car, TIG welding
allows you to heat up or cool down the weld puddle giving you precise weld bead control. This makes TIG welding
ideal for cosmetic welds like sculptures, architectural and automotive welds
•
The TIG welder generates heat via an arc of electricity jumping from a tungsten metal electrode to the metal
surface that you intend to weld – which is usually aluminium or steel
•
TIG stands for Tungsten Inert Gas – named from the tungsten electrode and the sheild of inert gas (Argon or
argon mixture) surrounding it.
•
A
TIG welder
needs a filler rod to provide the welding bead when joining two pieces of metal together
•
TIG welding produces no sparks or spatter because only the necessary amount of filler metal is added to the
welding pool.
•
TIG welding produces no smoke and fumes unless the base metal contains contaminants or has a dirty surface
•
TIG welding doesn’t produce slag and requires no flux because the argon gas protects the weld pool from
contamination
© R-Tech Welding Equipment Ltd. 2008
2. CHOOSING AND PREPARING THE TUNGSTEN ELECTRODE
A tungsten electrode is required when TIG welding and this is inserted into the welding torch. This electrode carries the
welding current to the work. For welding aluminium the most popular choice is a
Zirconiated TIG tungsten electrode
(White
tipped), for steel the most popular is a
Thoriated TIG tungsten electrode
(Red Tip)
A number of tungsten alloys are also available (including Thoriated Tungsten)
There are different sizes of tungsten’s available which relate to the welding power
you are using for a particular job. It is important to use the correct size of
electrode for the welding power you are going to use. See below:
ELECTRODE
RATINGS
Electrode
Diameter
(mm)
2% Thoriated
on DC
(amps)
Pure
Tungsten on
DC (amps)
Zirconiated
Tungsten on AC
(amps)
1.0 80 30 60
1.6 150 80 120
2.4 250 130 180
3.2 400 180 250
4.0 500 240 320
4.8 750 300 390
6.4 1000 400 525
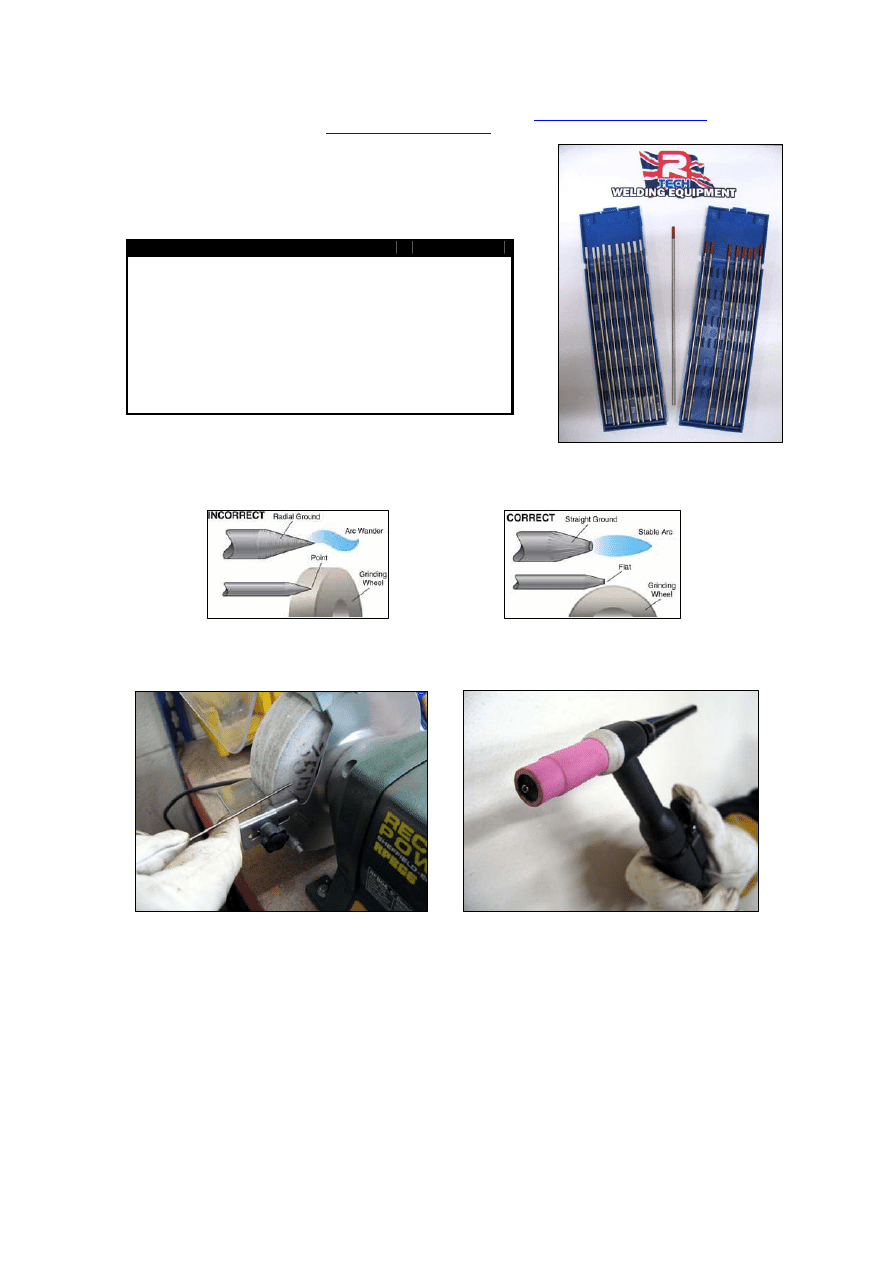
Preparation of the tungsten electrode is important. The end needs to be ground to a point (see images below). Brand new
electrodes will always need to be prepared in this way. When welding on aluminium the tungsten will begin to form a ball, this
is perfectly normal. When welding steel the electrode will always stay pointed.
Below you can see me holding a new tungsten electrode ready to start the grinding process. I prefer to use the side of a
clean wheel as I have more control. Position the tip where you feel comfortable. Remember to ensure all health and safety
requirements are taken when using a grinding wheel.
The picture on the right hand side of this page shows the tungsten in the end of the torch, you can see the ball formed on end
of the tungsten as this has been used for aluminium welding
With the introduction of new power source technologies, the use of pure tungsten is decreasing.
Pure tungsten melts at a lower temperature causing it to easily form a rounded ball at the tip. When the ball grows too large,
it interferes with your ability to see the weld puddle and causes the arc to become unstable.
Ceriated tungsten can withstand higher temperatures and works very well with the new squarewave and inverter machines
for the following reasons:
•
Holds a point longer and starts well at low amperages.
•
Can be used on both AC and DC polarities. When welding aluminum, it has become very acceptable to grind a
point on ceriated tungsten (especially when welding on thinner materials).
•
Allows welding amperages to be increased by 25-30% compared to Pure tungsten of the same diameter.
3. SAFTEY GEAR
TIG welding
can be a pretty safe thing to do so long as you follow a few important safety precautions. TIG welding produces
lots of heat and lots of harmful light, you need to take a few steps to protect yourself.
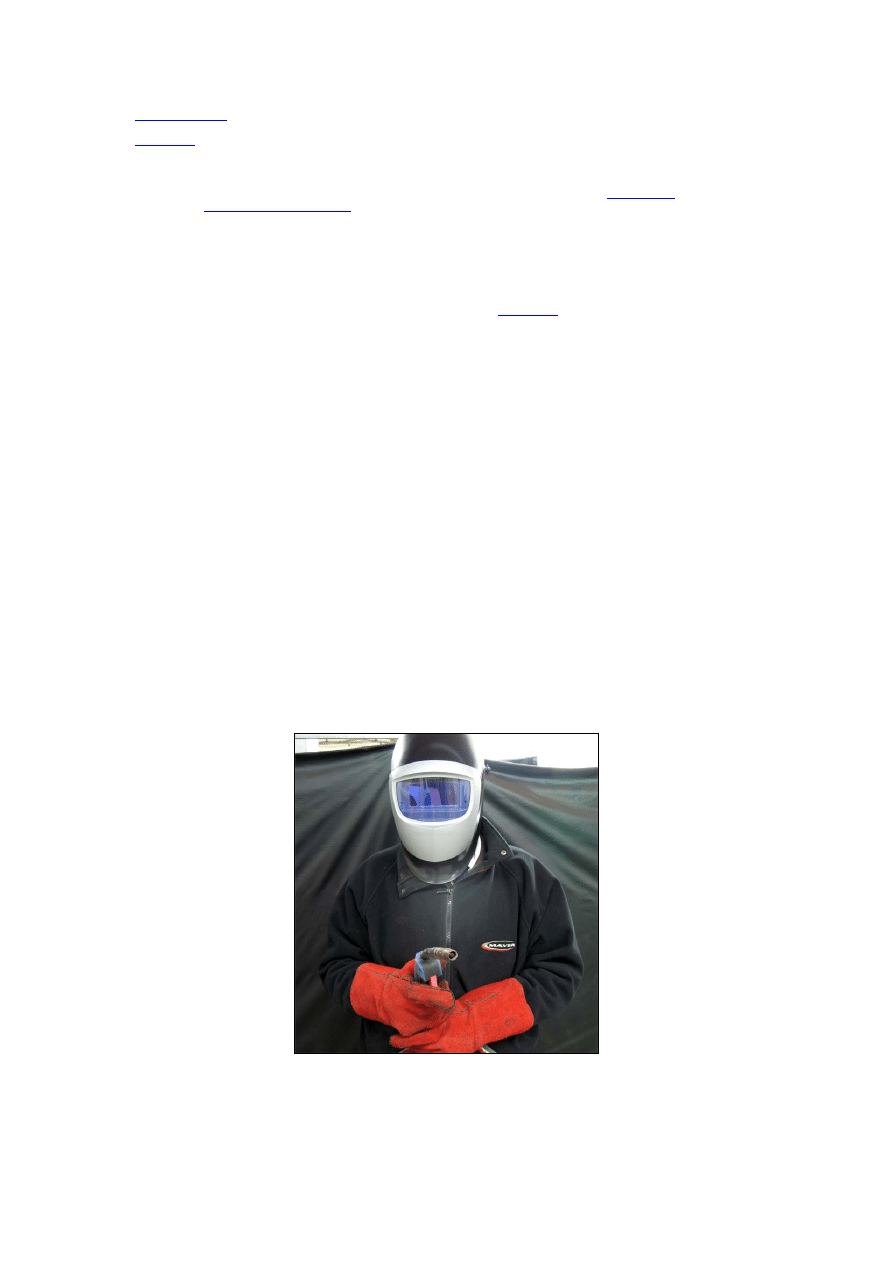
•
The light that is generated by any form of arc welding is extremely bright. It will burn your eyes and your skin just
like the sun will if you don't protect yourself. The first thing you will need to weld is a
welding mask
. I am wearing
an
auto-darkening welding mask
below. They are really helpful if you are going to do a lot of welding and make a
great investment if you think you will be working with metal often. Manual masks require you to jerk your head
dropping the mask into position or require to use a free hand to pull the mask down. This allows you to use both
your hands to weld, and not worry about the mask. Always ensure to protect others from the light as well and use
a welding screen to make a border around yourself. The light has a tendency to draw on lookers who might need
to shielded from being burned too.
•
Wear gloves and leathers to protect yourself from molten metal splattering off of your work piece. Some people
like thin gloves for welding so you can have a lot of control. In
TIG welding
this is especially true. The leathers will
not only protect your skin from the heat produced by welding but they will also protect your skin from the UV light
produced by welding. If you are going to be doing any amount of welding more than just a minute or two you will
want to cover up because UV burns happen fast!
•
If you are not going to wear leathers at least make sure that you are wearing clothing made from cotton. Plastic
fibers like polyester and rayon will melt when they come into contact with molten metal and will burn you. Cotton
will get a hole in it, but at least it won't burn and make hot metal goop.
•
Do not wear open toed shoes or synthetic shoes that have mesh over the top of your toes. Hot metal often falls
straight down and I have burned many holes through the tops of my shoes. Molten metal + hot plastic goo from
shoes = no fun. Wear leather shoes or boots if you have them or cover your shoes in something non-flammable to
stop this.
•
Weld in a well ventilated area. Welding produces hazardous fumes which you shouldn't breathe in if you can avoid
it. Wear either a mask, or a respirator if you are going to be welding for a prolonged amount of time.
Important Safety Warning
DO NOT WELD GALVANIZED STEEL. Galvanized steel contains a zinc coating that produces carcinogenic and poisonous
gas when it is burned. Exposure to the stuff can result in heavy metal poisoning (welding shivers) - flu like symptoms that can
persist for a few days, but that can also cause permanent damage.
Fire hazards
Molten metal can spit several feet from a weld. Grinding sparks are even worse. Any sawdust, paper or plastic bags in the
area can smolder and catch fire, so keep a tidy area for welding. Your attention will be focused on welding and it can be hard
to see what's going on around you if something catches fire. Reduce the chance of that happening by clearing away all
flammable objects from your weld area.
Keep a fire extinguisher beside the exit door from your workshop. CO2 is the best type for welding. Water extinguishers are
not a good idea in a welding shop since you are standing next to a whole lot of electricity.
Gloves, auto-darkening helmet and a suitable cotton based jacket are essential to keep safe
4. PREPARING FOR THE WELD
Before you start welding make sure things are properly setup at both the welder and on the piece you are about to weld.
The Welder
Getting the correct settings for type of weld you are doing requires some trial and error, especially if you are new to using
TIG
welders
. Some basic parameters are consistent to all TIG welding whereas many other functions may only be available on
higher specification machines. For welding today we will be using an R-Tech Tig201 Tig Welder which is a fully featured Tig
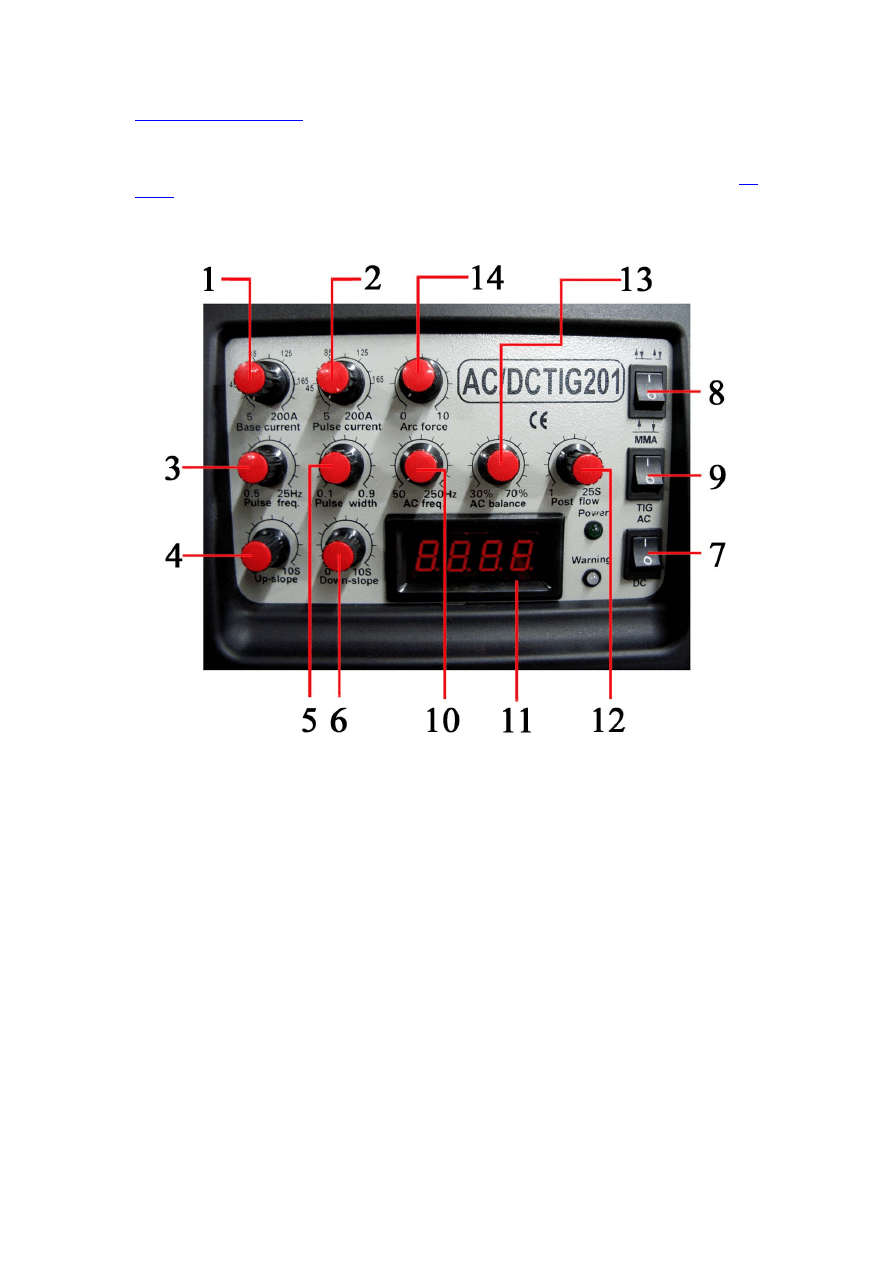
Welder and in the picture below you can see the front panel with a description of the controls and what they actually do.
Fig 4
1.
Base current control
This adjusts the main welding current and is shown in L.E.D (Fig 4.11)
2.
Pulse peak current adjustment
This sets pulse amperage and must be set above the base (main) current amperage. If set to zero pulse welding
is disabled.
3.
Pulse frequency adjustment
This sets how often pulse will occur 0.5 – 25hz
4.
Up slope
Adjustment 0-10 seconds. The main welding current raises from minimum amperage to main current selected in
time selected when weld started
5.
Pulse width
Pulse width adjustment – This sets length of pulse 0.1 – 0.9 seconds
6.
Down slope
Down-Slope adjustment 0-10 seconds. The main welding current decreases from main amperage to minimum
amperage in time selected when weld finished – Sometimes known as crater fill.
7.
AC – DC Selector switch
This switch selects either DC for welding steels or AC for welding alloys
DO NOT SWITCH WHEN WELDING AS DAMAGE TO MACHINE CAN OCCUR.
8.
2/4 Way selector switch
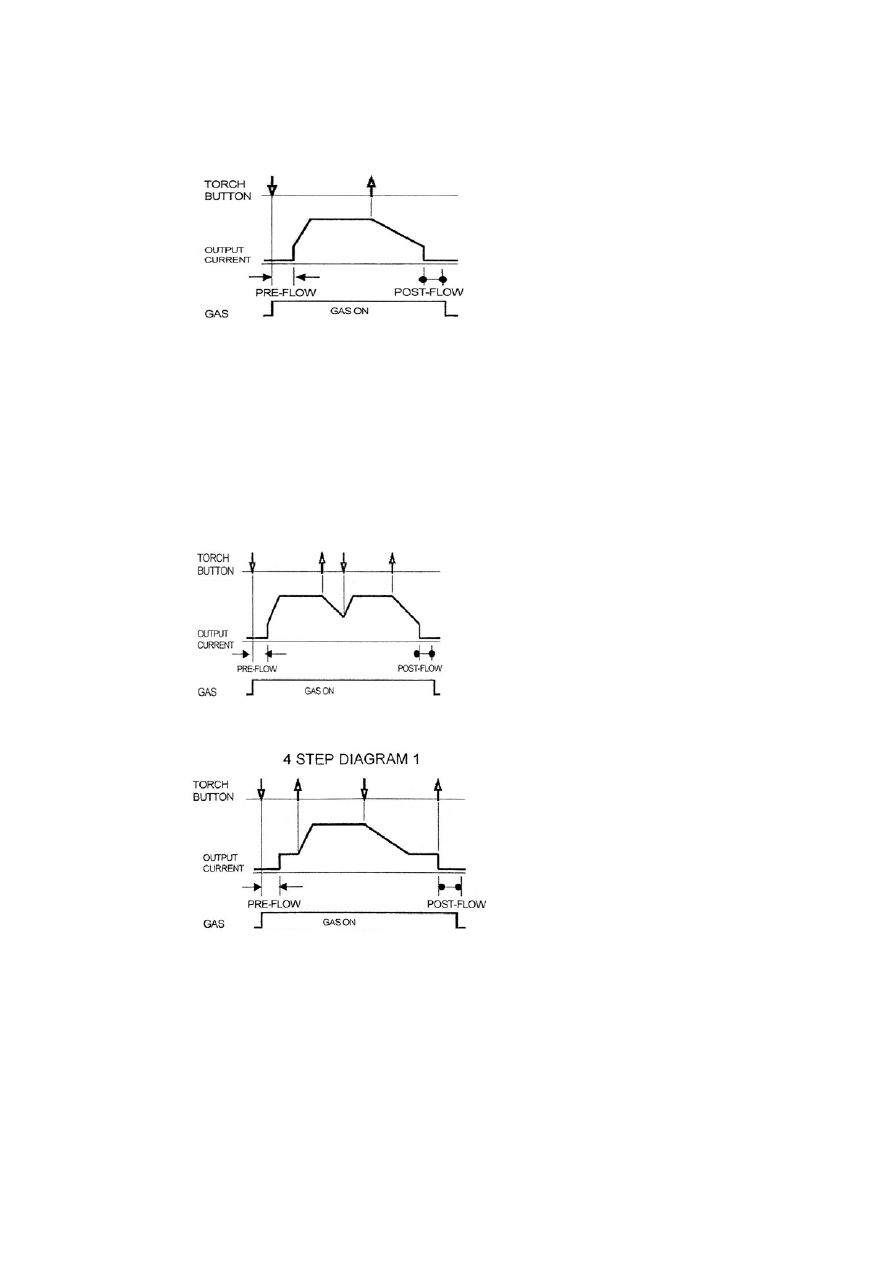
2/4 Step trigger mode switch – TIG welding can either be done in 2 or 4 step mode.
When the trigger mode is in the 2 step position the following sequence will occur
Press and hold the TIG torch switch to start sequence.
The machine will open gas valve to start flow of shield gas, after a 0.5 seconds pre-flow time to purge air from
torch hose the welding output of machine will be turned on and the arc will be started. After the arc is started the
output current will increase from the start (min) current to base (main) current in time selected by slope-up. Main
power will be achieved instantly if no slope up is in the ‘0’ minimum position.
Release the TIG torch switch to end sequence.
The machine will now decrease output to finish (min) current in time set by slope-down, once at finish (min)
current the machine will stop output and the gas valve will continue to operate for the selected time (post flow)
Possible variations of this standard sequence are shown in diagram below. It is possible to press and hold tig
torch switch a second time during downslope time to restart. After the switch is pressed the output current will
raise to base (main) current
When the trigger mode is in the 4 step position the following sequence will occur
Press and hold the TIG torch switch to start sequence.
The machine will open gas valve to start flow of shield gas, after a 0.5 seconds pre-flow time to purge air from
torch hose the welding output of machine will be turned on and the arc will be started. After the arc is started the
output current will be at start (min) current
This condition can be maintained as long as required.
Release the TIG torch switch to go to step 2
The machine will now increase output to base (main) current in time set by slope-up.
Press and hold the TIG torch switch when main weld is complete
The machine will now decrease the welding output current to finish (min) in down-slope time set. Once at finish
(min) output you can release the TIG torch switch to end weld the gas post-flow will continue to run for set time.
9.
MMA – TIG mode switch
MMA-TIG mode switch. Switches between TIG (GTAW) & MMA STICK (SMAW) welding
10. AC squarewave frequency adjuster
AC Squarewave frequency adjustment 20-250Hz.
Traditional TIG welders have a fixed frequency of 60Hz, the TIG201 advanced technology allows AC frequency
adjustment from 20-250hz, as you turn up the frequency the width of arc from tungsten decreases allowing more
control of weld pool and an increase travel speed
The pitch noise of weld will increase when AC frequency is turned up, this is normal.
100 - 120Hz is the ‘sweet spot’ for most AC welding.
11. LED Display
3 digit LED meter is used to display the pre-set (before welding) amperage and actual amperage (when welding).
12. Gas post flow adjustment
Gas post flow adjustment 1 – 25 seconds. The gas keeps flowing after weld has finished, this cools & stops
tungsten from getting contaminated.
Note: Gas pre-flow time is fixed at 0.5 seconds in TIG mode but no pre-flow time will occur if the arc is restarted
during post flow time as gas is already flowing.
13. AC squarewave balance (SP%)
SP% AC Squarewave balance control 30% – 70%
Set at 50% this provides balanced control suitable for most AC Welding. 30% is max cleaning and 70% is max
penetration.
When welding dirty/contaminated material more cleaning may need to be selected.
Tip. If you are welding close to the tungsten limits, I.E 200amps on a 2.4mm tungsten and the end of tungsten is
wobbling and falling off, turning down the SP% will give better tungsten stability
14.
Arc force (Stick – SMAW only)
This provides better arc starting when in MMA stick mode, useful when you are welding dirty/rusty material or
cold/damp welding electrodes
The Metal
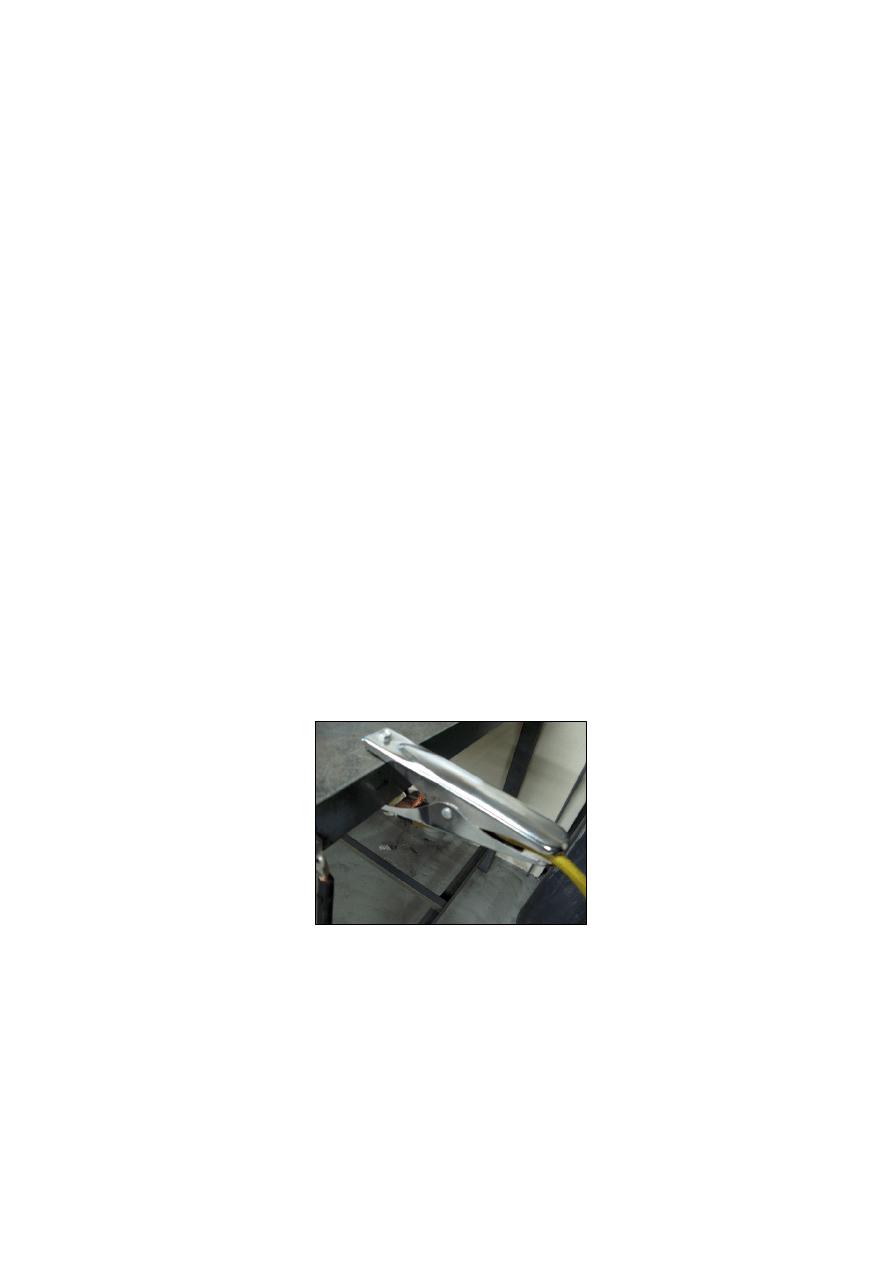
An earthing clamp should be present and attached to your workpiece or, as in the picture below, the bench. The other end
should be attached to your welding machine. Some kind of large metallic area is necessary to let electricity flow through your
metal. If you don’t have a welding bench then a large sheet of metal will do the job. Be sure to securely clamp down the
metals you are working on
1. Earth clamp secured to the workpiece or bench
5. GETTING STARTED ON THE WELD
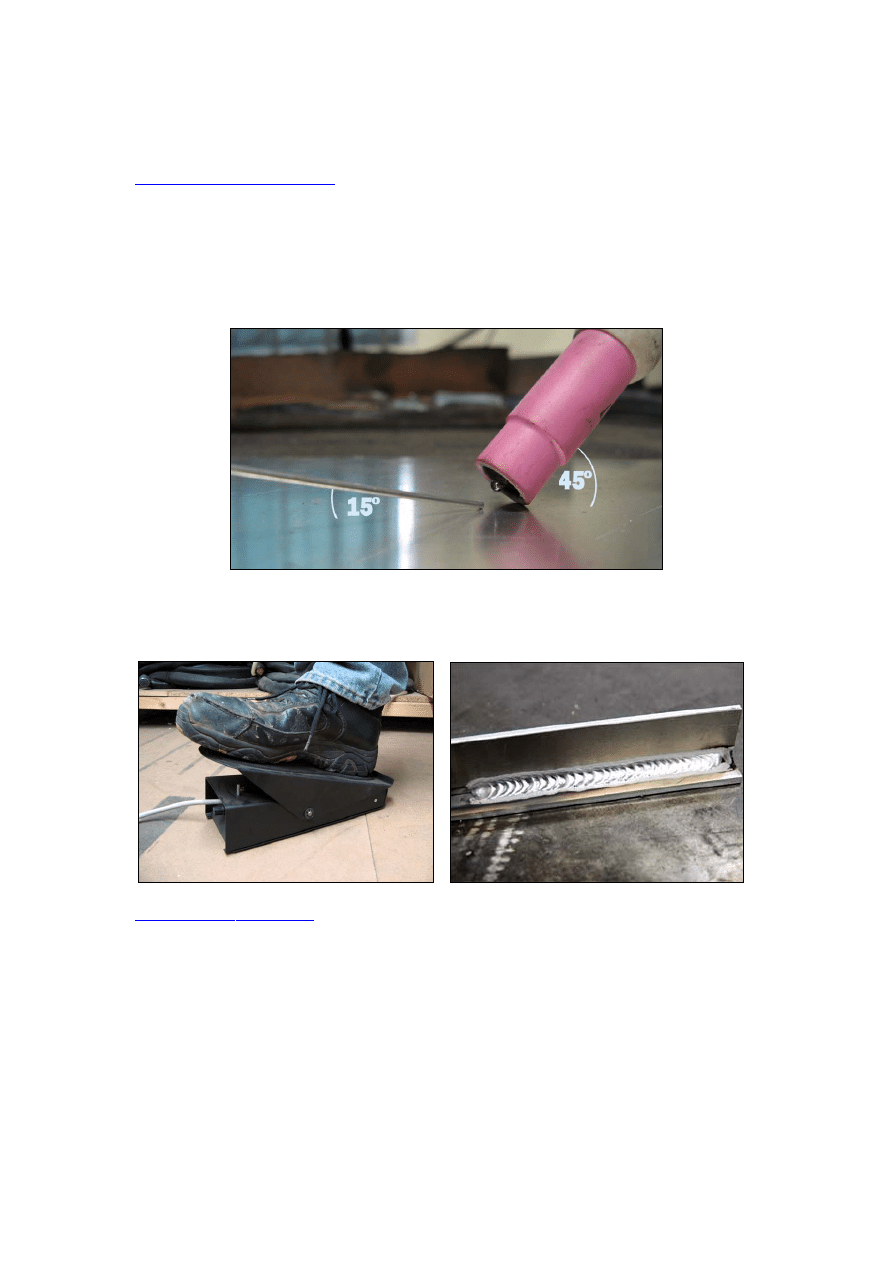
Holding the torch
Hold the torch as shown in the photograph below. The tungsten should be raised from the surface of the work by about 3-
6mm. Do not let the tungsten touch the work or it will contaminate your material and you will have to re-grind the tungsten.
aim for a working angle of about 45
° to the work surface.
Grab a filler rod
Take a filler rod in your left hand and position horizontally so that it rests at a 15
° angle to the work, when you insert the filler
rod into weld pool, do so by adding it to the edge of the pool keeping it away from the tungsten to avoid tungsten
contamination. The filler rod will melt and flow into the weld pool.
Foot Pedal Control
Controlling the weld current is best done by using a foot pedal (pictured on the left). Check to see if your machine can run
one of these. This kind of control will help you keep the weld pool steady and help make sure that the pool doesn’t grow,
shrink, spread or narrow during the weld. It’s a good idea to practice controlling the welding amperage with a foot pedal on
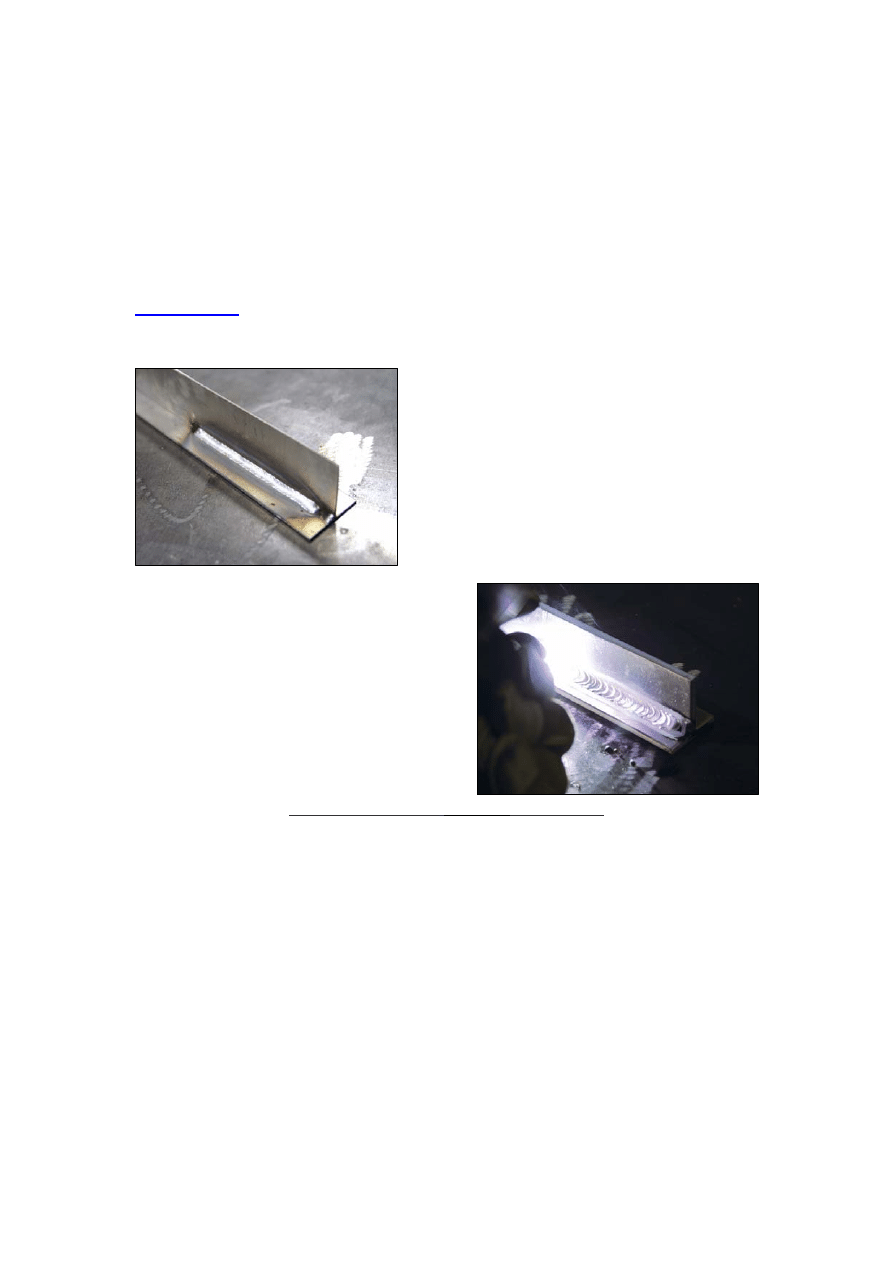
some scrap before you start welding for real. The picture on the right shows a good, controlled weld.
6. LETS DO SOME TIG WELDING!
Establishing the arc with torch switch operation
Set the amperage desired on the main amperage control on machine and press the torch switch and the arc will be started.
Establishing the arc with foot pedal operation
Getting the arc started requires at least a half press of the foot pedal especially if welding at very low amperages. NOTE: A
foot pedal in operation will only allow the maximum amperage that you have set on the machine to travel to the torch head. If
you experience difficulty starting the arc this is very commonly down to an insufficient amperage setting on the welder and
not related to the operation of the foot pedal.
Tacking
Tack welding two pieces together will hold your work in place and prevent the work from moving as you progress along the
weld. Metals like aluminium spread heat very quickly so work that is not tacked may have a tendency to warp or distort by the
time you reach the end of a section of the weld. Tacking to stop distortion is very important.
Creating a weld pool
The arc will rapidly build heat into the metal and form a ‘pool’ of fluid metal. At this point the filler rod needs to be presented to
the edge of the pool. The filler rod will become fluid and form into the weld pool. If you heat the metal in one place for too
long the metal will warp and deform. (If practicing, try backing off the pressure on the foot pedal and lowering the amperage
to the weld pool to see what happens). Do not put the filler rod to close to the tungsten electrode as it will contaminate the
tungsten and you will have to grind it down and restart, a contaminated tungsten will produce a dirty weld and can be very
hard to start the arc too.
Creating a bead
Once a pool is established and the filler rod presented you must move along with the torch – pushing the pool along the joint
and repeating the process of adding in the filler rod as you go. This is called ‘leading’ the electrode
If the metal starts to burn or melt away then too much current is being fed to the pool and you should lift off the foot pedal
If the metal gets a flaky but not liquid look to it, put in more power by increasing the pressure on the foot pedal
7. TYPES OF WELD
The real secret of producing quality TIG welds is mostly in getting the weld pool to form, at the same time, on both pieces of
metal. The easiest type of weld is the ‘fillet’, two metals joined at right angles. See below:
To make a sound weld you must learn to
combine all the mechanical techniques into o
fluid motion. A good weld should look like a
stack of fish scales lying on top of each oth
Practice so that welding on all joints in all
positions becomes second nature.
ne
er.
aster
um's
he
ot
A
anced features found on
Visually and structurally test your welds on
pieces of scrap before starting a real piece of
work.
TIG welding aluminum progresses at a f
travel rate than steel. Due to alumin
high thermal conductivity and low melting
point, the travel speed will increase as t
welding progresses. If the travel speed is n
increased, there is a chance of excessive
melt-through on thin aluminum parts
dv
Tig Welders
and their benefits
•
Slope Up (only use
welding the machine will start at minimum amps and slope up
•
ding the machine will slope down to minimum amps you
•
e the gas will keep flowing once the weld is finished, this cools the torch on air cooled
,
•
%)
netration of the arc. On the above tig welder 50% is balanced and will perform best for
irty, you can turn the balance control down towards 30% and the machine will spend
d with torch trigger operation)
This enables you to set a time that that when you start
to the main amperage you have set on control panel in the time you have set on slope up control.
Slope Down (only used with torch trigger operation)
This enables you to set a time that that when you stop wel
have set on control panel in the time you have set on slope down control. This is also known as crater fill and allows
you to have a better finish off weld and no crater
Gas post flow adjustment
This allows you to set the tim
torch systems and stops the tungsten from getting contaminated. If the tungsten turns blue on gets pitted after welding
turn the post flow up. The rule of thumb is to set the gas post flow time to 4 x size of tungsten being used, I.E 2.4mm
tungsten set post flow to 9-10 seconds. The amperage you are welding at will also affect this, higher amperages need
longer post flow time
AC Balance control (SP
This controls the cleaning / pe
most welding requirements.
If the work material is very d
more time cleaning (lifting the oxidization of the work) and less time penetrating the work.

If
much and falling of, turning the balance to more cleaning can stop this happening and also can lengthen electrode l
T
time cleaning (lifting the oxidization of the work), this can speed up the process of welding and give better penetrat
at the cost of the finished look of the weld. Also when turning up penetration it will cause more heat on the tungsten
and hence quicker wear of tungsten and if set to high it can cause the end of tungsten to wobble and fall off into work
It is quite normal never to turn the balance control past 50% balanced
A
you are welding at amperages close to the tungsten limit and are experiencing the end of tungsten wobbling too
ife
urning the balance control up towards 70% makes the machine spend more time penetrating the work and less
ion
.
•
C Squarewave frequency control
d TIG welders and has many benefits
n most TIG welders this is fixed at 60Hz – On the Tig201 Tig welder we used above you control the AC frequency
hen turning up the AC frequency you have more weld cycles per second so this gives you first of all:-
faster travel speed helping you to keep ahead of the heat transfer.
he width of the arc from tungsten gets smaller the higher the frequency is set so you get pinpoint accuracy and the
hen you turn up the AC frequency the pitch of the weld will increase this is completely normal.
eginners will find welding with a tig welder that has AC frequency control is a lot easier than using one without this
o not confuse AC frequency control with pulse frequency which I will cover next, this is for pulse welding.
•
ulse Welding (used only on torch trigger operation)
k, instead of welding at one amperage for the entire weld
ase / Main amperage 40amps
hat will happen is the welder will switch between the two amperages and this allows you to limit the amount of heat
ou can also set the following.
ulse width – This is how long the pulse will last and on the Tig201 we used above can be set between 0.1 to 0.9
ulse frequency adjustment - This sets how often pulse will occur and on the Tig201 can be adjusted between 0.5 –
o turning up the pulse width will make the pulse last longer than the base/main current set and turning up the
etting up pulse welding is down to the individual user and its best to get some scrap and play about with the settings,
•
emote foot pedal
ntrol the amperage when actually welding which can be very beneficial especially when welding
ou set the main control amperage on machine to the maximum you wish the foot pedal to go to on a maximum
nce a weld pool is formed and you are moving along the weld as the heat has transferred along the work you may
ost experienced tig welders prefer to use a foot pedal, unless the welding in not being done at a workbench i.e. in
To see mo
information on the R-Tech range of welding equipment visit:
www.r-techwelding.co.uk
This is only found on the very advance
O
from 20 – 250Hz
W
A
T
weld width is much easier to control.
W
B
feature.
D
P
Pulse welding is not as complicated and some people thin
you can set two amperage for the machine to use I.E
B
Pulse amperage 100amps
W
going into work, especially good for welding stainless steel, it can give a very small width of weld or limit heat
deformation.
Y
P
seconds
P
25hz
S
frequency will mean the pulse amperage will happen more often.
S
pulse welding when mastered can really help with the appearance of finished weld and on this machine be used on
both DC and AC settings.
R
This allows you to co
aluminium. You simply unplug the torch switch plug from machine and plug in the foot pedal.
Y
depression. So if you set the main amperage control to 100amps the foot pedal when fully depressed with give
100amps.
O
require less amperage as you move along otherwise the weld pool width / penetration will get too big, reducing the
welding current will stop this happening. Over a 300mm long weld, you may need 100amps at the beginning and
only 80 amps at the end of weld.
M
the back off a lorry trailer etc.
re
For further support information see our
welding support page
Wyszukiwarka
Podobne podstrony:
How to Do Viking Chain Knitting
how to do mb sd c4 self test
Grep how to do
lesson plan how to do it
How To do Macro Insect Photography (10p)
How to Do Your Dissertation in Geography
How To Do VSCOcam Effects in Photoshop
How to do TarotCards
Grep how to do
Do It Yourself How To Make Hash Oil
Do we really know how to promote?mocracy
DIY Guide How to research companies
Atracting Prosperity A how to guide
więcej podobnych podstron