
Ripping for Dummies
Page 1 of 28
Ripping for Dummies
Created by Gaidin
V2.0 – 06/21/2002

Ripping for Dummies
Page 2 of 28
The Basics............................................................................................................................................................... 3
Required Hardware/Software.................................................................................................................................. 3
Swap Methods......................................................................................................................................................... 4
Game Files .............................................................................................................................................................. 4
Copying from Disc.................................................................................................................................................. 4
Windows Explorer .............................................................................................................................................. 4
Atlantis ................................................................................................................................................................ 4
IsoBuster ............................................................................................................................................................. 5
Copying Large Files in Win9x............................................................................................................................ 5
Video ................................................................................................................................................................... 6
Audio ................................................................................................................................................................... 6
Demultiplexing, Multiplexing and Downsizing ................................................................................................. 6
Munge (really, really big) Files........................................................................................................................... 7
Driver Files ......................................................................................................................................................... 7
What is a DVD Check and Why Remove It?...................................................................................................... 9
How to Find DVD Checks .................................................................................................................................. 9
Getting Started with IDA Pro ............................................................................................................................. 9
Finding the main DVD check routine ............................................................................................................... 10
Example 1 : Army Men: Sarges 2 NTSC.......................................................................................................... 11
Example 2: Triple Play 2k2 NTSC ................................................................................................................... 13
Example 3: Tiger Woods 2k2 NTSC ................................................................................................................ 16
Example 4: Pirates: The Legend of Black Kat NTSC ...................................................................................... 17
Original DVD Check ........................................................................................................................................ 19
cdMode Pattern................................................................................................................................................. 20
Another New Type of DVD Check (i.e. Thunderhawk Phoenix)..................................................................... 21
Removing DVD Checks ................................................................................................................................... 22
What is an LBA Table?..................................................................................................................................... 23
Finding Tables................................................................................................................................................... 23
Reindexing Tables............................................................................................................................................. 24
Creating ISO’s....................................................................................................................................................... 25
Burning.................................................................................................................................................................. 25
Rip Kits ................................................................................................................................................................. 27
Multiple CD Rips .................................................................................................................................................. 27
Contributors .......................................................................................................................................................... 27
Glossary ................................................................................................................................................................ 28

Ripping for Dummies
Page 3 of 28
The Basics
This guide is for educational purposes only and it is assumed that you are backing up a game that you legally own. Please, do not ask
me anything about pirated games. I don’t condone piracy and will not help you to pirate other people’s hard work.
First, let’s define what ripping is and why we would want to do it. Let’s assume that you went to the store and bought a $50 (U.S.
Dollars) copy of the Virtua Fighter 4 and a $50 copy of Grand Theft Auto 3. That’s $100 dollars that you have invested in these
games that are on disc. Since you don’t want anything to happen to your investment, you decide that you want to backup your games,
as is your right. That way, if your kid brother gets hold of your disc and mangles it, you can still turn to your backup.
Now, with Virtua Fighter 4, the answer is simple. Since it was published on CD-Rom format, you can pop it into your CD-Rom drive
and copy to a new CD-R. But, with Grand Theft Auto 3, you’re going to have a problem if you don’t have a DVD-R burner. Since
there is no way on this earth that you can copy an entire DVD to a CD-R you need to take special steps to back it up. Ripping is “the
process of making a DVD-Rom game small enough to backup to a CD -R”. The following is the basic general order taken to backup
your DVD game:
1. Copy the game to your Hard Drive (HD).
2. Remove or replace (a.k.a. rip) files so that the total size is small enough to fit on a CD-R.
3. Remove any DVD Checks the game developers put into the game.
4. Find and Reindex any LBA Tables in the game, if necessary.
5. Create an ISO image of all the files.
6. Burn the ISO image to a CD-R.
We’ll go thru these steps in more detail below. For now, almost all DVD games follow this established pattern when you need to back
them up.
Required Hardware/Software
Here is an overview of many of the tools which are used in ripping. Please do not contact me asking how to obtain these tools. That is
YOUR responsibility! I can not and WILL NOT give out information on how or where you may obtain ANY copyrighted materials.
•
DVD ROM drive (can't read the DVD without the drive)
•
CDR (can't burn a backup without a burner)
•
HEX EDITOR - for editing files. Hex Workshop (Shareware) and Hackman (Freeware) are 2 very good programs.
•
Sony CD\ DVD Generator software (copyrighted software) - for creating IML files.
•
IsoBuster (Freeware) - Used in extracting files and creating a FileList.
•
Atlantis PS2 Backup Toolkit (Freeware) - General purpose app for extracting files, removing DVD Checks and working with
LBA tables.
•
PSS Plex (Freeware) – for downsizing PSS video files.
•
MFAudio (Freeware) – for downsizing audio files.
•
Gaidin’s File Replacer (Freeware) – for replacing on o r more files with another, smaller file.
•
Gaidin’s LBA Table Finder (Freeware) – for finding LBA Tables.
•
Gaidin’s ZeroFile shell extension (Freeware) – replacing files with 0 byte dummies in Windows Explorer.
•
IDA Pro (copyrighted software) – for finding DVD Checks.
•
Adrenalin Patcher (Freeware) – for removing certain checks in a file.
•
IML2ISo.EXE (Freeware) – for creating an ISO file from an IML.
•
CDR-Win or equivalent (Shareware) – for burning and ISO file to CD-R.
•
Gaidin’s Rip Kit Creator (Freeware) – for creating rip kits

Ripping for Dummies
Page 4 of 28
Swap Methods
There are quite a few methods for swapping discs in order to be able to play your backups in your PS2. They are: SBox/USB Mod
Swap, 6-Wire Mod Swap, 8-Wire Mod Swap, COG/Knife Swap, Card Tool Swap, LH Method Swap, Pulley Swap, Tray Switch
Swap, Paperclip Swap, DVD-R Swap. Please don’t ask me about the different methods for swapping. To be honest, the only one I
know about is the SBox/USB Mod Swap because it’s the one that I use. Please be advised though, that opening up your PS2 voids the
warranty, so think carefully before attempting.
Additional information as well as pictures on these methods can be found at
Game Files
There are many, sometimes hundreds of files in a game. However, all games have a few things in common. 1
st
, all games have a
System.cnf file and a game executable. You can open up the System.cnf file in any text editor like Notepad and see the contents. It
always contains the name of the game executable (BOOT2), the version of the game (VER) and region indicator (VMODE). The
name of the game executable depends on the region that the game is published in. NTSC game executables are usually named
(SLUS_***. ** or SCUS_***. **) while PAL game executables are usually named (SLES_***. ** or SCES_***. **). These game
executables are unique names which mean that the Hot Shots Golf 3 game executable will not have the same name as Grand Theft
Auto 3. Also, it is not uncommon to have different game executable names within the PAL region (i.e. SLES_111.11 and
SLES_111.12 for the same game).
Along with the System.cnf and game executable, are driver files (usually named *.IRX), video files, audio files, munge files (really,
really big files) and other miscellaneous files. We’ll go over most of these types of files below, but know that IRX files are never
ripped from a game. Ripping usually involves removing or replacing audio and/or video files to get it to the proper size. Munge files
are a special case which we will also cover.
Copying from Disc
As your read above, the first step in ripping a game is to get the files and folders off the disc and get it onto your hard drive. You’ll
need a lot of free space on your drive to rip games. As a good rule of thumb, you must have enough space to hold all the files of the
game (up to 4GB) plus the size of your ISO file (~700MB). You may also want to copy the disc to your hard drive twice. I use this
technique a lot just in case something happens to the disc before you get a chance to finish ripping it. That way, you can use the
second copy just like the original disc. Let’s look at some of the methods for getting the files off the disc.
Windows Explorer
Explorer is the old handy tried and true method of copying files. I’m not about to tell you how to copy files in Windows Explorer. If
you don’t know that much, then ripping is not for you. Typically, I create a folder on the hard drive which is the same name as the
volume name on the disc. How do you know the volume name? If you look in Windows Explorer at your DVD Drive while the disc
is in it, instead of saying Compact Disc, it will display the volume name of the disc that is in the drive. Not all discs have a volume
name, which is perfectly acceptable. In that case, you can create a folder with whatever name you like.
Once the folder is created on your hard drive, you can simply copy all the files from the disc to your new folder. It’s good practice
after the files are done copying to remove the read-only attribute. What is a read-only attribute? It’s an indicator to Windows that the
file can be read, but not changed in any way. Any file that is copied from a CD or DVD is automatically read-only because a CD or
DVD is always read only. Ho w do we remove the read-only attribute? At the command prompt, change the directory to your newly
created folder and type: attrib *.* -r /s This means remove the read-only (-r) attribute on all (*.*) files, even in the subdirectories (/s).
Atlantis
Another method of getting files off the disc and onto your hard drive is by using the Atlantis PS2 Backup Toolkit. There are many
advantages to using this tool. First and foremost is that it saves a huge amount of time when you know what you’re doing. Let’s say
that you have a 4GB game like World of Outlaws Sprintcars. In the Movies folder, there is a MOVIES.BIG (2.8GB) file and a

Ripping for Dummies
Page 5 of 28
TUTOR.PSS (458MB) file. If you want to copy all the files off the disc except for these 2 files to save time, you have that option.
Additionally, Atlantis will allow you to create dummies, demultiplex and replace pss files all during the copy process. Also, the read-
only attribute is automatically removed on the files that are copied which saves you a step. For a full listing of the features as well as a
comprehensive tutorial, see the Atlantis web site.
IsoBuster
IsoBuster is another way of extracting files from a disc. When you open IsoBuster with your disc in the drive, you are shown a tree on
the left and a list of all the files and folders in the root folder on the right. Right-clicking on the volume name (or the red ISO image)
in the left pane will display a popup menu from which you can choose to extract. If the disc does not have a volume name, you’ll
need to create a folder to extract to using Windows Explorer. If the disc has a volume name, the disc will be extracted to your hard
drive using the volume name as a folder name. It ’s good practice after the files are done copying to remove the read-only attribute.
See the Windows Explorer method above for details on how to do this.
Copying Large Files in Win9x
If you are using Win9x to rip your games, you may encounter the following error message: “Cannot copy data: An attempt was made
to load a program with an incorrect format”. If you already have a Windows9x Startup disk, you can skip the rest of this paragraph.
If not you need to go to control panel, then to add/remove programs and create a Windows 9x Startup disk. Insert a floppy into your
Floppy Drive and click Create Disk… Wait until it is 100% and then you are completed with the making of your boot disk.
Insert your Windows 9x Startup disk in the floppy drive. Restart you computer. Wait for it to boot up you’ll get a screen that says:
1. Boot with CDROM s upport
2. Boot without CDROM support
You want to choose choice 1, boot with CDROM support.
Then you have to wait for all the booting process and when you finally reach a screen that says C:\ or whatever you Hard Drive is
labeled. So when you reach C:\ you want to switch it to your DVDRom drive which for me is the F drive. So I type C:\ >F:\
Then it should say F:\>
When you have reached this you want to type this;
copy X:\*.dat C:\ mystorage
x=you drive letter
*= name such as data.dat or zoe.dat
Then click enter after all this is completed and it should start to copy the data.dat file directly onto you Hard Drive.

Ripping for Dummies
Page 6 of 28
Ripping Files
The files that we usually rip from a game are video or audio files. That’s because these files are generally the biggest and are not that
important overall to the game. This means that your backup will not have some or all of the cut scenes and/or audio that the original
has, but since it’s a backup, it’s OK. In order to determine how much needs to be ripped from a game, you can use Windows Explorer
to highlight all the files and folders of the game, right-click and select Properties. A dialog will be displayed that shows you the total
size of all the selected files and folders. The object of ripping is to get the size under 700MB, so you know what you have and what
you need to work toward.
Video
Video files on the disc are usually the files that have an ending of MPC, M3V or PSS with PSS being the most common type. PSS
files are typically MPEG files and you can usually view the actual video with a custom freeware application called PS2Play or
Windows Media Player. Personally, I use Windows Media Player because it seems more reliable. Viewing a video with Media Player
is an excellent way to determine if the video is worth keeping in a ripped game. Almost always, any videos containing credits (like
movie credits) or intros are automatically ripped since it seems that people care the least about these types.
There are different methods to ripping video files. One way is to replace all of the movie files with the smallest one that you can find.
For example, let’s say you have 5 20MB movie files (100MB total) and 1 1MB movie file. If you copy the 1MB movie file over the 5
20MB ones (Gaidin’s File Replacer is an easy way to do this), you’ve just cut down 95MB from the total size of the game. To
accomplish this in Windows Explorer, you would select the 1MB file, and paste it 5 times. Then delete the 5 20MB files and rename
each 1MB file to one of the 5 20MB names.
Another technique is to completely replace the video file with a dummy file. A dummy file is a file that contains no actual data and is
usually 0 or 1 byte in size. Gaidin’s ZeroFile Windows Shell Extension will let you create 0 byte dummy files in Windows Explorer.
Just select the files you want to replace with dummies in Explorer and right-click on them. From the popup menu, select Replace with
Dummy and all selected files are deleted to the Recycle Bin and 0 byte dummies are put in their place. Zandal has cre ated a dummy
file maker program that let’s you replace files with 1 byte dummies, as well. To create a 0 byte file in Windows Explorer without
using these tools, you can right click in the white space in the right pane, select New… Text Document and rename the file that is
created to whatever you choose.
Care must be taken whenever you replace a video file with a dummy to check the game executable in a hex editor. You can open up
the hex editor and do a search for the string [filename].pss. If the editor finds that string in the game executable, you’ll have to replace
the name of the file with all 0’s. This is so that the game executable doesn’t look for this video and freak out because it’s not an actual
video.
Audio
Audio have many different types o f extensions including RAW, VAG, STZ, SS2, VSS, PSS and WAV. Ripping audio works much
the same way as ripping video. You can replace big audio files with a smaller audio file or with dummy files. This decreases the
overall size of the game and can go a long way towards making it fit on a CD-R.
Demultiplexing, Multiplexing and Downsizing
There are quite a few people out there, myself included, that like to keep as much audio and video as is humanly possible. Thanks to
Muzzleflash and others, there is a way to do just that. Muzzleflash created 2 applications that help us with downsizing: PSS Plex and
MFAudio.
PSS Plex takes a PSS file and will split it out into a separate video (M2V) file and a separate audio (WAV) file. This is also known as
demult iplexing. When a PSS file has been demultiplexed, the video file can be downsized using a program called TmpgEnc and the
audio file can be downsized using MFAudio. When the downsized files are joined back together, or multiplexed, the size of the file is
significantly reduced and in many cases, you can keep movies that would otherwise be ripped. The exact process is beyond the scope
of this guide, but Muzzleflash has included an excellent tutorial with PSS Plex, if you would like to try this route.

Ripping for Dummies
Page 7 of 28
Downsizing audio does not require you to demultiplex. You can use MFAudio to downsize an audio file easily. To get an audio file
to the smallest size possible, you should set the kilohertz (khz) of the output file to no less than 11025. Many sound files have 2
channels, one for the left and one for the right. This is also known as stereo sound. You can cut the size of an audio file in half by
decreasing the number of channels to 1. This makes the sound file mono, but unless you’re an audiophile, it won’t make too much of
a difference and the size is what matters here.
Some sound files, VAG for instance, usually are 1 channel only and have a left and right counterpart (i.e. MYSOUNDL.VAG and
MYSOUNDR.VAG which represent left and right channel files, respectively. Both are played at the same time by the game to
produce a stereo sound). In this instance you can replace either the left or the right with a 0 byte dummy and downsize the other
channel to cut the total size for these 2 files by 75% or more. For more specific information on downsizing, MFAudio comes with
excellent tutorials to get you on your way.
The following is a short tutorial by justanotherguy and oopsy on downsizing a PSS file:
1: Use PSS Plex to Demultiplex the file.
2: Run DVD2AVI. Select File > Open > choose PSS file > Click OK…. Then go back to File > Save Project and save the file as a
*.d2v file.
3: Run TmpgEnc > stream type > video only. Browse for your source (the .d2v file you just made) then setting > video > stream type
MPEG2 video > size 720 x 480 > aspect 4:3 display > framerate 30fps > rate control CBR > bitrate 1000 > VBV buffer automatic >
profile Main profile Main level > video format NTSC encode interlace > YUV 4:2:0 > DC 8 bits > motion low quality
fast……….Advanced tab > video type interlace > field order bottom field first > source 4:3 525 line (NTSC 704 x 480) > video
arrange full screen > check ghost reduction nothing else > OK > Start > done …….
Some things change from PSS to PSS such as frame rate on some were 30fps some 29.97fps. Do not mess with the frame rate! If
TmpgEnc says it’s 29.97, leave it at that.
Lowering the bitrate is what lowers the quality and ultimately the file size. You should play around with this setting to determine
what quality you can live with.
4: Use MF Audio and set the output File format to WAV Microsoft RIFF Uncompressed PCM > Frequency 11025hz > Samples 16
bits > Channels 2 (stereo). Click OK and you’re done.
5: Use PSS Plex to Multiplex the files back together.
Munge (really, really big) Files
Munge files are becoming more and more common lately with games. Some game developers like to munge a group of files into one
huge one. This makes it especially difficult to rip a game because a custom extractor needs to be created for each munge file with
little possibility to reuse it on other games. An extractor splits a munge file into its smaller files and you can rip these files and rebuild
the munge so that it’s smaller. Another holdup in this area has been the difficulty of finding the table of contents for the munge file.
You must know the start and end point to each file that is in the munge for an extractor to be successful.
Luckily, Sonix has created a filescan program to indicate what a munge file is made up of and Digix has come up with a universal
extractor called splitoff. With these 2 tools, it should be a simple matter to extract munge files into their components for ripping.
You’ll need to see the ReadMe that come with these tools for proper usage.
Driver Files
Driver files are files that end with an IRX extension and I would even include the IOPR*.IMG files in this group. There are a couple
of things to look at with these files. First, let’s take the IOPR*.IMG files. There have been many times when the .IMG file would
have to be patched with a patcher. What’s a patcher? I patcher is a program that looks at the file and automatically knows if it needs
to make changes to remove copy protection. The best one that I’ve seen is Adrenalin’s Patcher. I say it’s the best because I’ve never

Ripping for Dummies
Page 8 of 28
had a problem with it removing stuff that needed to stay or keeping stuff that needed to be removed. You can run the patcher and
have it search for a generic EA boot fix on a file. If the file needs to be patched, the program will inform you and give you the option
to perform the patch.
IRX files are usually grouped in a separate MODULES folder, or in the root directory of the disc. They are generally small in size,
but are extremely important during ripping. IRX files are known to have LBA Tables (see LBA Tables section below) and DVD
Checks (see DVD Checks section below). Files of this type must be carefully looked at to make sure that these forms of copy
protection are not included in them. The IRX files that just about every game that I’ve ever seen are: MCMAN.IRX, MCSERV.IRX,
PADMAN.IRX, PANICSYS.IRX and SIO2MAN.IRX.

Ripping for Dummies
Page 9 of 28
DVD Checks
What is a DVD Check and Why Remove It?
A DVD check is a query the programmer puts into the program. Basically, the program asks, “Am I being run on a DVD or am I
being run on a CD?” If the game was published on a DVD, the program expects the answer “I’m running on a DVD” to be returned.
When you back a game up onto a CD and try to play the game without removing the checks , the answer returned will be “I’m running
on a CD”. The game developer, in his infinite wisdom, assumes that the game is pirated. He apparently hasn’t taken into account that
you may be playing a backup of your own game, so he stops the game from continuing.
It should be obvious that because of this, we must make the game think that nothing is wrong with it being on a normal CD. So, when
a DVD check is removed, the game doesn’t care what kind of media its being run on and continues loading even though it’s being run
on a CD instead of a DVD. In most cases, if a backup hangs at the blue Game Shark or Action Replay screen, a DVD check has not
been properly removed.
How to Find DVD Checks
The old method of searching for 0200 0424 with a hex editor is not recommended because there is too much room for error. The best
method for finding DVD checks is to load the game executable or IRX file into IDA Pro and look for them. You must know what you
are looking for before attempting this. If you don’t understand what’s going on, let someone else handle finding DVD checks. This
section written by bit_man99 does a great job at explaining how to use IDA Pro to find DVD Checks:
The examples provided here are the most common types of checks. A working knowledge of any type of assembler makes this
learning process much easier but the tutorial was written for people with little or no knowledge of assembly language but who still
want to find DVD checks correctly. In this case, a working knowledge of the MIPS instruction set is not necess ary, and the checks can
be found by looking at the pattern of instructions that make up the main check routine itself. In many instances, the patterns from
game to game are very similar with some minor variations.
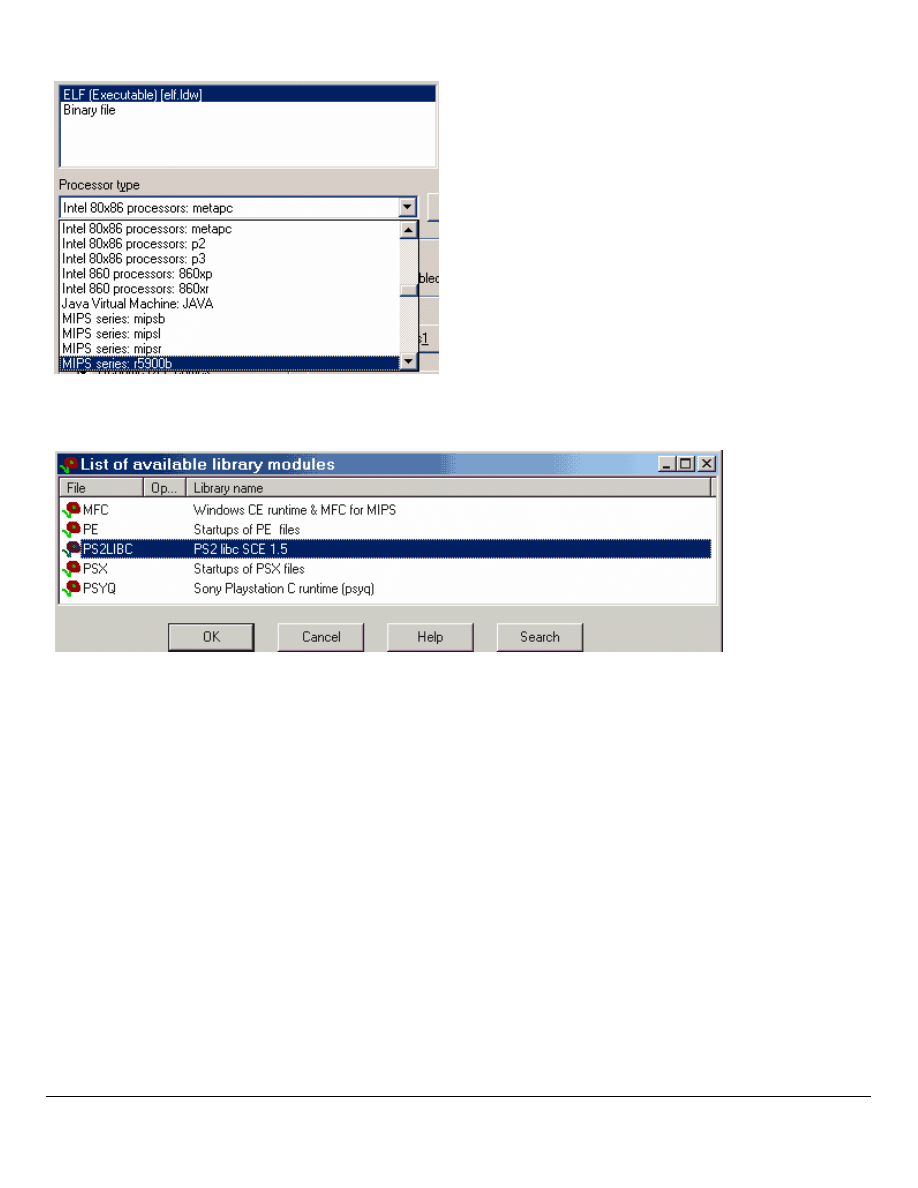
Getting Started with IDA Pro
The following instructions and examples were documented by Bit__man99. First, you must have the correct version of IDA and the
ps2 flirts installed (the flirts can be found in this forum). You can verify this by trying to open a file (e.g. a SLUS file) with IDA. If
you see the options shown in the screen shots, you should have a working version.
1. Select New File, Open (select all files), find your file and select it. The Load File menu opens and then select MIPS: Series r5900b
as shown below. If you don’t see this option, u probably have the wrong version of IDA and u will not be able to continue.
Ripping for Dummies
Page 10 of 28
2. The file will now load and u will get error and warning messages which u can ignore.
3. The flirt file must now be loaded. Select File -Load File -Flirt signature file, and load the ps2 flirt as shown below.
4. The next step is to wait for the IDA program to completely process the file (bottom left box on IDA screen will say: AU idle). This
can take quite long depending on how big the file is.
Finding the main DV D check routine
The main check routine will be in the SLUS (SLES, etc) file. Other files can contain checks which reference the main routine in the
SLUS file (the SLUS is loaded into memory). When you look at the main routines in the examples, you can see how similar they are,
and with a little practice, you will be able to identify it correctly, every time. To initially find the main routine, once you have the
SLUS file loaded in IDA, you can use several methods of text searching to quickly locate it. Once you find the main routine, finding
checks that reference it, is made much simpler. With practice, you quickly be able to identify the correct routine.
In the examples that follow, I quickly located the main routine in each case by searching for a common instruction in check routine,
but not commonly used in the rest of the SLUS.
li $a0, 0x22
(this instruction is not in all check routines)
Ripping for Dummies
Page 11 of 28
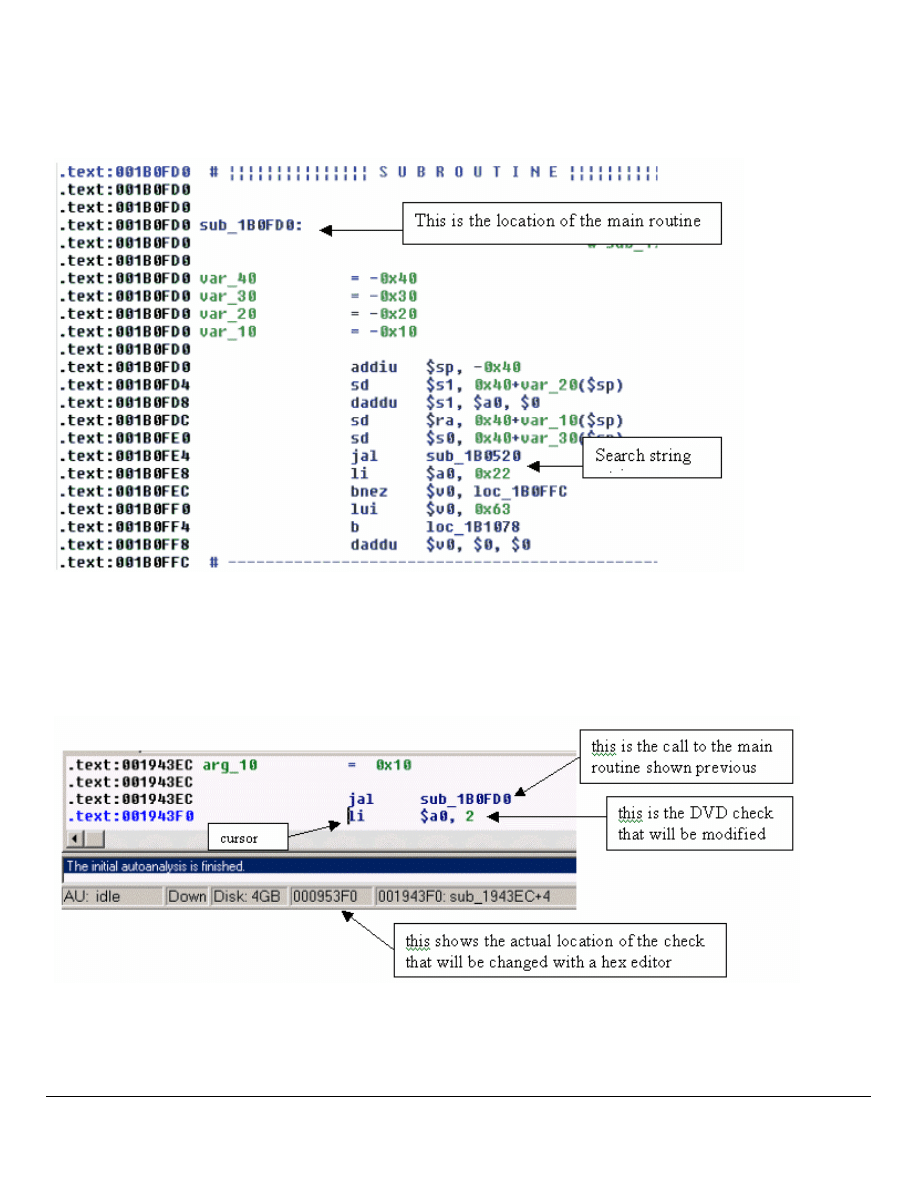
Example 1 : Army Men: Sarges 2 NTSC
A search of the SLUS with the above string, should bring u to the main routine here:
In this case the location of the main routine is called with the reference:
sub_1B0FD0
This will now be the new string used to search for the actual checks.
(Note: This routine does not contain the instruction,
daddu $s0, $a0, $0
,commonly found in newer check routines)
A search of
sub_1B0FD0
reveals :
When the cursor is placed in front of an instruction in the IDA window, the actual address of that instruction in the file is displayed at
the bottom of the screen (see previous diagram). This is the address that we will modify later with a hex editor. (I use a hex editor to
make the actual changes)
Ripping for Dummies
Page 12 of 28
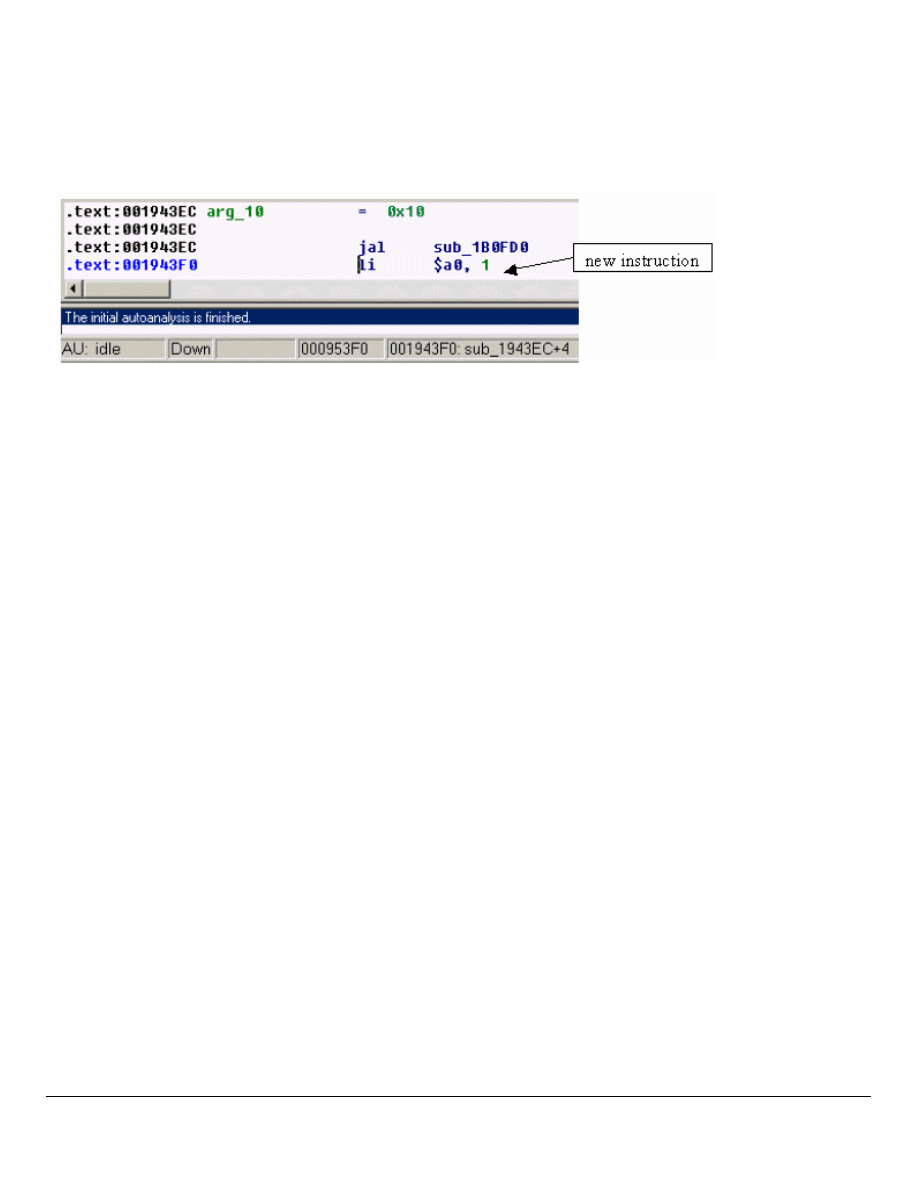
In this case, the infamous instruction:
Li $a0, 2
hex:0200 0424 (dvd)
will be changed to:
Li $a0, 1
hex:0100 0424 (cd)
This is the only check in the file, so close IDA and open a hex editor and change location 000953F0 (from previous diagram) from
0200 to 0100. The change is shown below (after disassembling the corrected SLUS again).
The reference to the main routine
jal sub_1B0FD0
is normally referred to as
jal sceCdMmode
in other tutorials
but this reference is rarely used in SLUS files (that would be too easy), so searching for this string doesn’t usually help much. The
type of call here (referencing the actual address of the main routine) is by far much more common.

Ripping for Dummies
Page 13 of 28
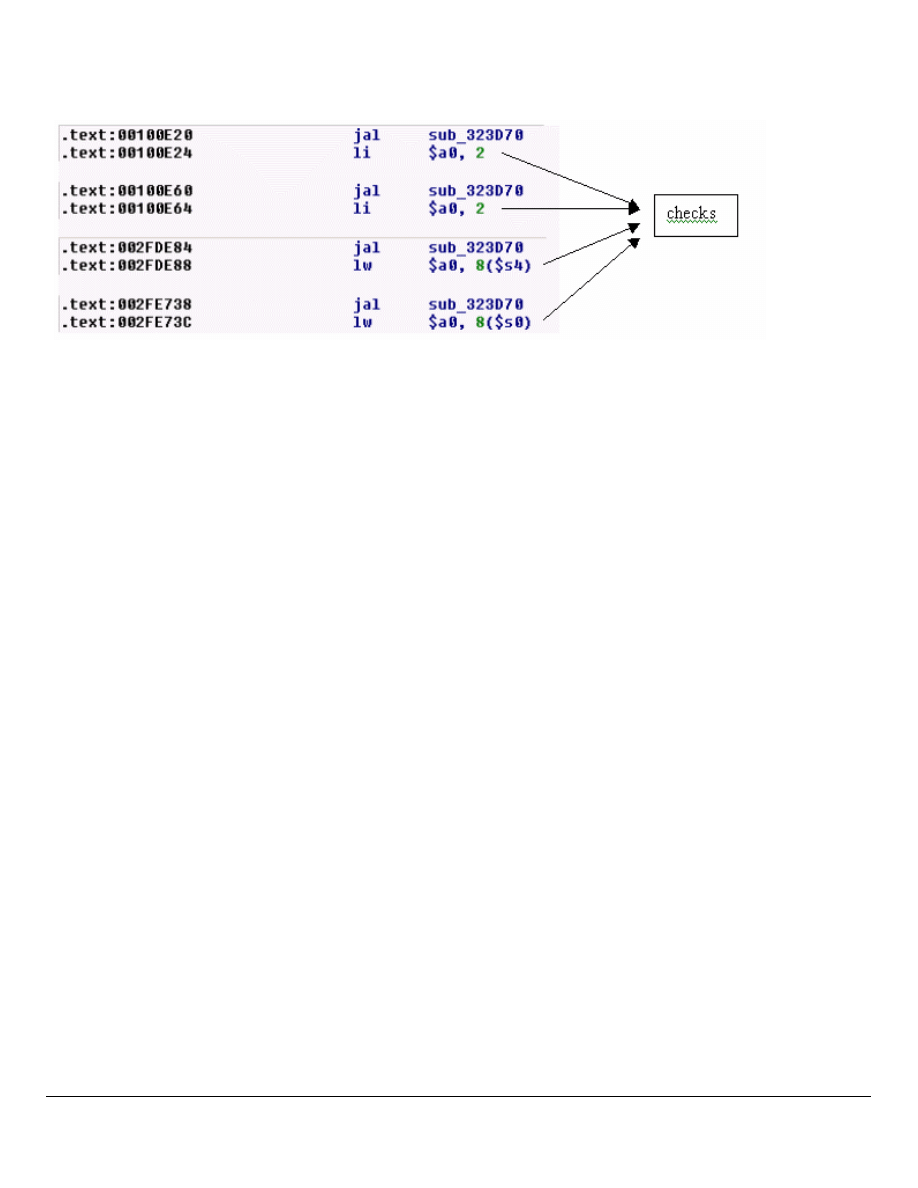
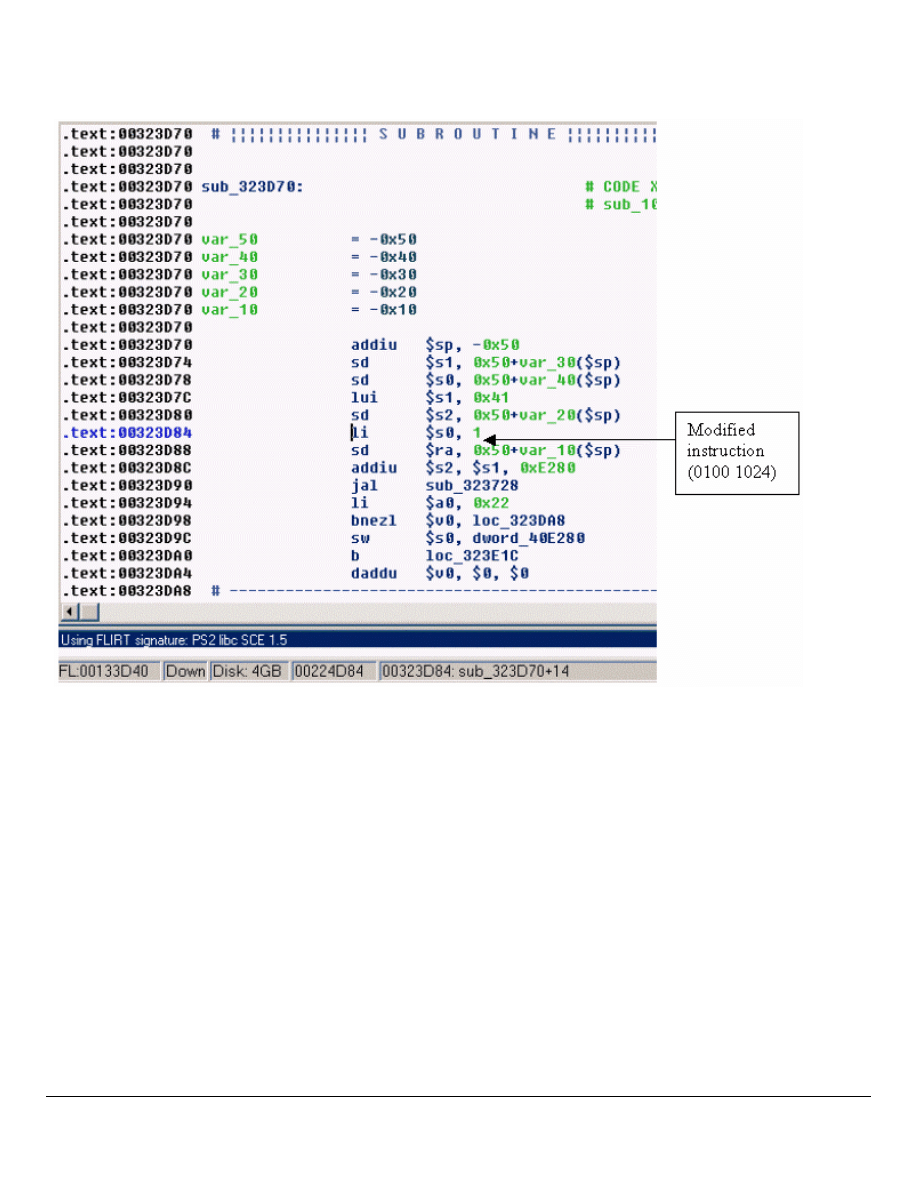
Example 2: Triple Play 2k2 NTSC
This is another game with just one change to make, however the type of change to make here is usually referred to as one of the ‘new’
DVD checks. Again a search of the SLUS with the
li $a0, 0x22
string reveals the following
:
Ripping for Dummies
Page 14 of 28
There are 4 references in the SLUS to the main routine
(
sub_323D70
)
shown below:
Changing the checks
(
li $a0, 2 and lw $a0 ,8
)
at the 4 locations to
li $a0, 1
(0100 0424)
, as in the
last example, would accomplish the task, but there is a simpler method.
In this case, the main routine contains the instruction
daddu $s0, $a0, $0
(hex: 2D80 8000)
The daddu instruction can be changed to
Li $s0, 1
(hex: 0100 1024)
Ripping for Dummies
Page 15 of 28
It is not necessary to make the changes to the 4 checks once this one change has been made. Shown below is the modified routine:
Ripping for Dummies
Page 16 of 28
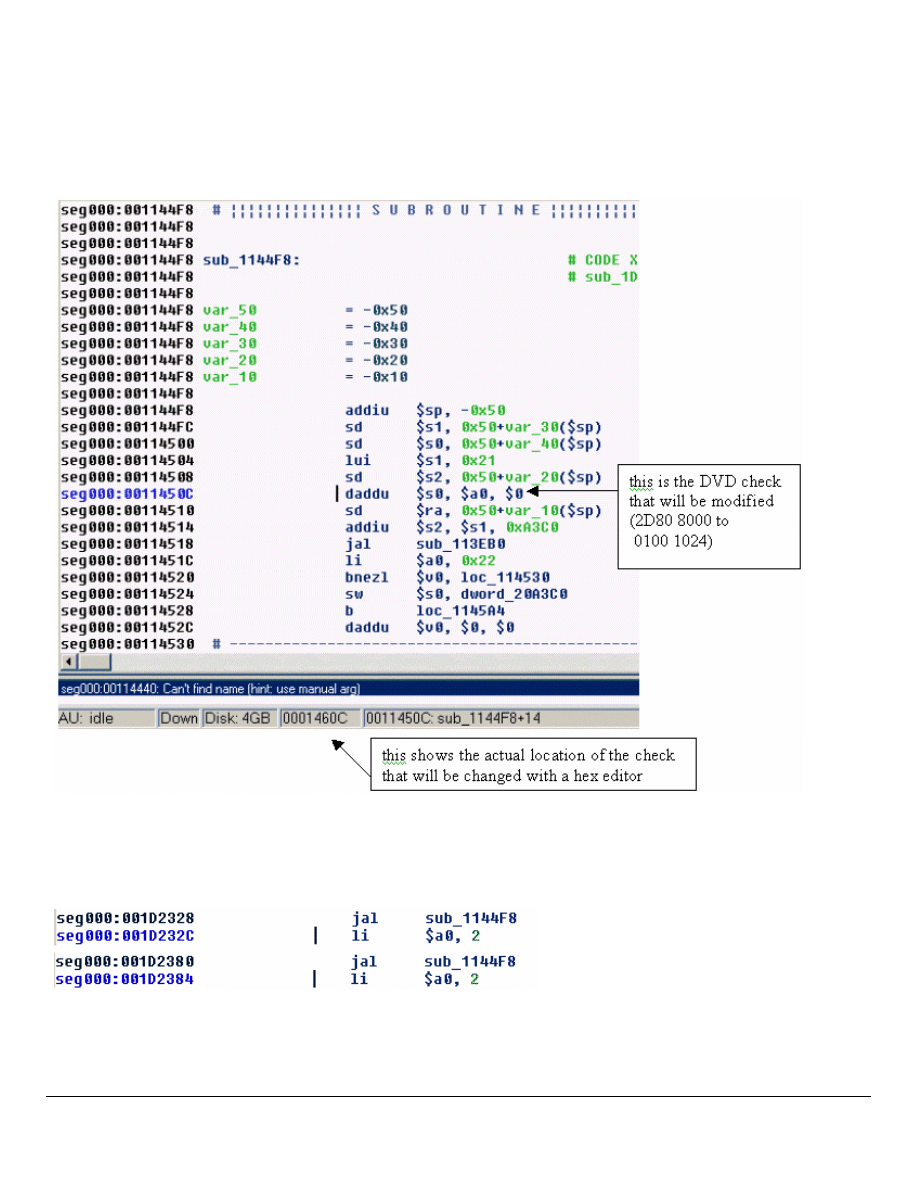
Example 3: Tiger Woods 2k2 NTSC
This is a similar SLUS check to the one in last example, except there is an additional check in one of the IRX files.
Starting with the SLUS file, a search of the SLUS with the
li $a0, 0x22
string reveals the following:
The same change is made as in triple play, and in this case there are 2 references to the main routine that do not need to be modified.
They are shown below:
Ripping for Dummies
Page 17 of 28
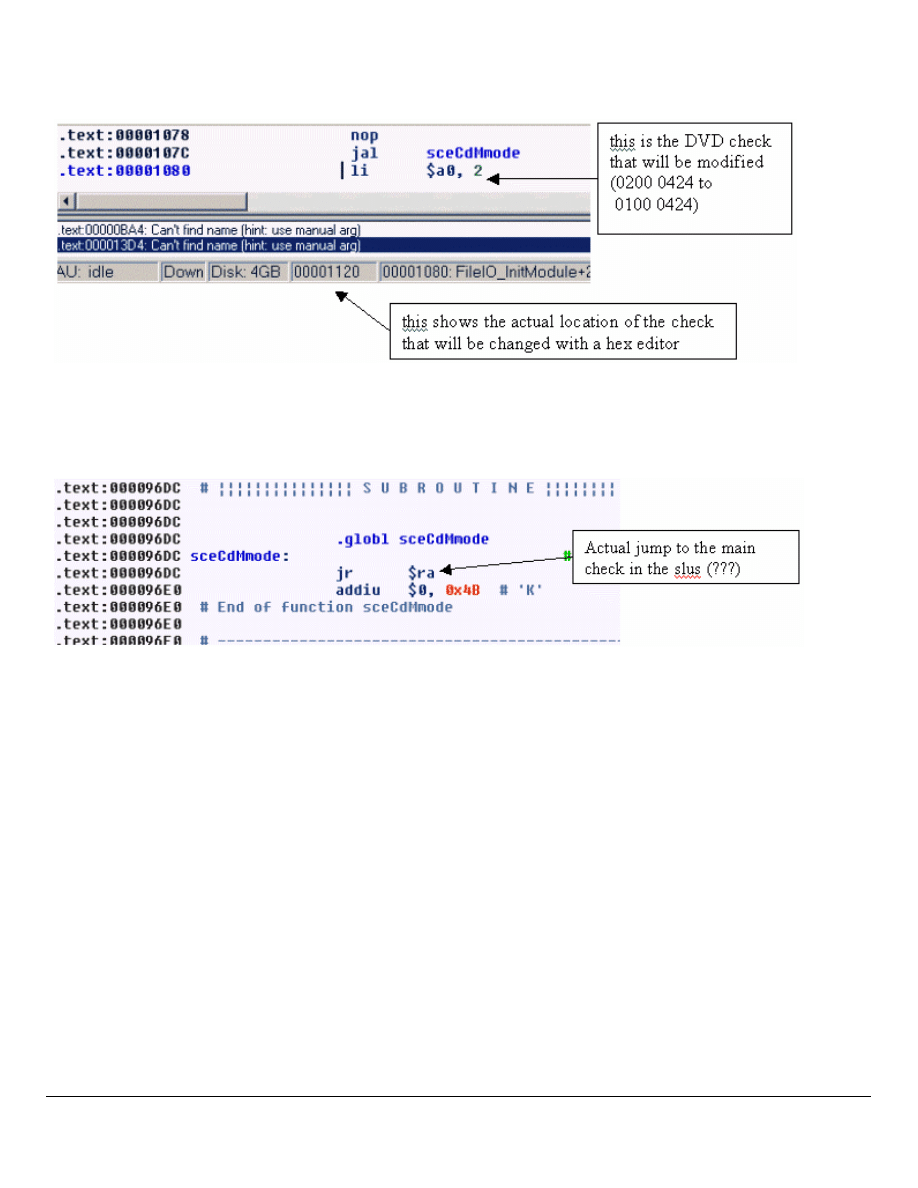
A further search of the IRX files will reveal the following check in the audiopx.irx file as shown below:
In this case, the search string that was used is the
li $a0, 2
instruction. This check becomes obvious with the
jal
sceCdMmode
call, preceding the check. Shown below is the actual call to the main check from the
sceCdMmode
sub in the IRX
file. This is just for reference.
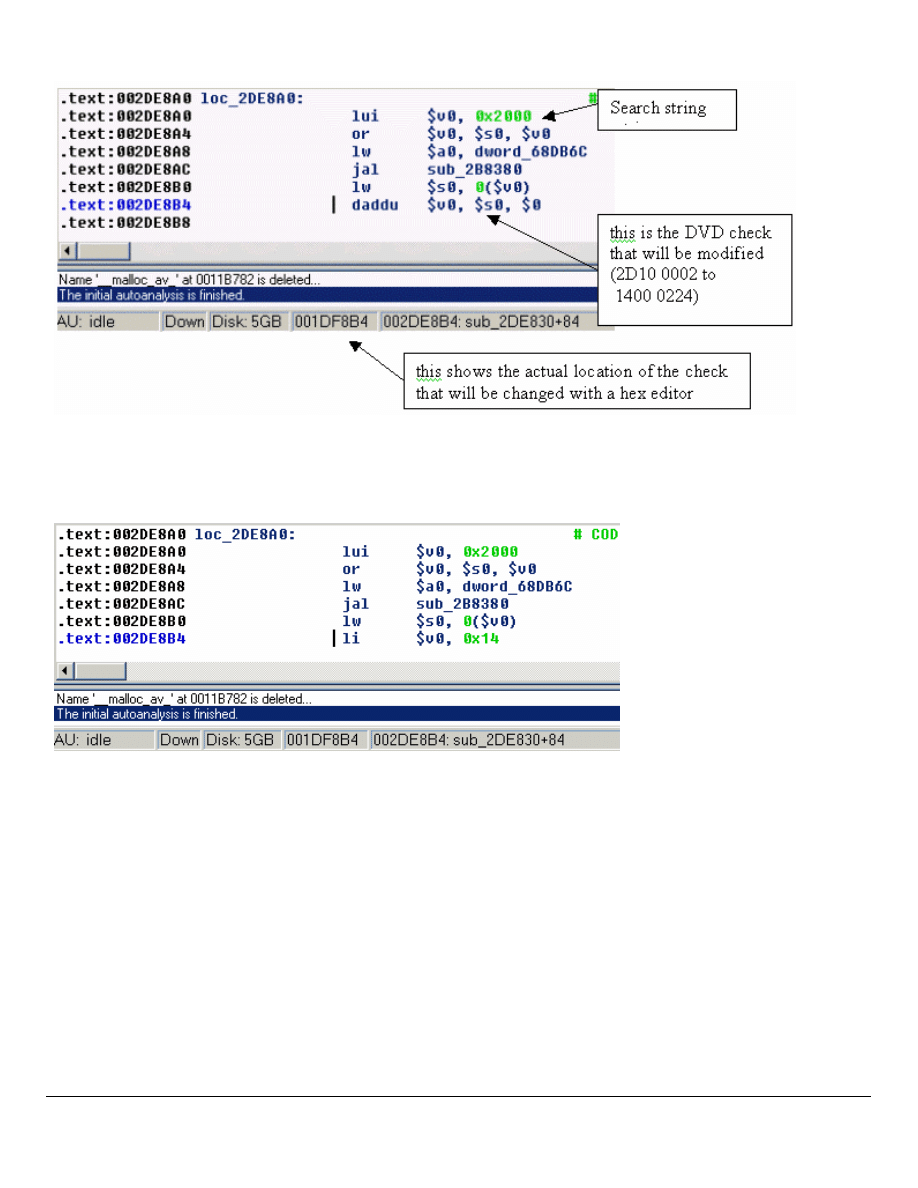
Example 4: Pirates: The Legend of Black Kat NTSC
Im goin to keep this one short since it follows the same method as the previous 2 examples for the main check. Again a search of the
SLUS with the
li $a0, 0x22
string reveals the main routine and the instruction
daddu $s0, $a0, $0
(hex:
2D80 8000)
which is changed to
Li $s0, 1
(hex: 0100 1024).
You can try to find this one.
The important thing in this SLUS file is that there is another type of newer check. This double DVD check routine appears to be
similar in different games that use it. So we can use the same type of search to find these double checks. Shown below is the double
check routine which is quickly located with a search of the
lui $v0, 0x2000
instruction
.
Ripping for Dummies
Page 18 of 28
In this case the instruction
daddu $v0, $s0, $0
(2D10 0002)
is changed to
li $v0, 0x14
(1400 0224)

Ripping for Dummies
Page 19 of 28
Original DVD Check
Click on search/text menu and do a text search for the string
sceCdMmode
. You are looking for the string after a jump from
sceCdMmode. The full string would look like this :
jal sceCdMmode
li $a0, 2
You need to alter the 2 to a 1 which would make it look like this :
jal sceCdMmode
li $a0, 1
Not all games use these methods of DVD checks. Such problem games as Sky Odyssey did, though. Here’s an example from the Sky
Odyssey (PAL) game:
OFFSET:
26F8 jal sceCdMmode
li $a0, 2
2738 jal sceCdMmode
li $a0, 2
BA2D0 jal sceCdMmode
li $a0, 2
EECF8 jal sceCdMmode
li $a0, 2
To know the exact offset to change, position your cursor in from of the
$a0
and look at the bottom of the screen. There are 2 sets of
offsets . The one on the left is the hex offset (the one you need). The one on the right is the IDA offset (not needed). Write the offset
the check occurs and go to the Removing DVD Checks section below

Ripping for Dummies
Page 20 of 28
cdMode Pattern
We have discovered how to find the DVD Check with the sceCdMmode for the first generation of games. There has been a new type
of DVD check to search for. Here it is the IDA list of a cdMode routine that checks the type of media.
CdMode :
.text:0034B7D8 sub_34B7D8:
.text:0034B7D8
.text:0034B7D8
.text:0034B7D8 var_50 = -0x50
.text:0034B7D8 var_40 = -0x40
.text:0034B7D8 var_30 = -0x30
.text:0034B7D8 var_20 = -0x20
.text:0034B7D8 var_10 = -0x10
.text:0034B7D8
.text:0034B7D8 addiu $sp, -0x50
.text:0034B7DC sd $s1, 0x50+var_30($sp)
.text:0034B7E0 sd $s0, 0x50+var_40($sp)
.text:0034B7E4 lui $s1, 0x37
.text:0034B7E8 sd $s2, 0x50+var_20($sp)
.text:0034B7EC daddu $s0, $a0, $0
.text:0034B7F0 sd $ra, 0x50+var_10($sp)
.text:0034B7F4 addiu $s2, $s1, 0x5940
.text:0034B7F8 jal scmd_prechk
.text:0034B7FC li $a0, 0x22
.text:0034B800 bnezl $v0, loc_34B810
.text:0034B804 sw $s0, dword_375940
.text:0034B808 b loc_34B884
.text:0034B80C daddu $v0, $0, $0
This routine isn’t in the FLIRTS of PS2 so you can find it with a simple TEXT SEARCH of
scmd_prechk
. You can find many
scmd_prechk
, but if you compare the routine with your results, you can be sure that this is the
routine you are searching for.
Now you must search the name of SUB (in this case sub_34B7D8 for SMUGGLERS RUN).
You will find the CALL of SUB and after that the normal:
li $a0, 2
So make the normal change.....
li
$a0, 1
Another, cleaner way of removing this type of check is to change this from the above routine (sub_34B7D8) :
daddu $s0, $a0, $0 (in hex editor 2D80 8000)
to
li $s0,1
(in hex editor 0100 1024)

Ripping for Dummies
Page 21 of 28
Another New Type of DVD Check (i.e. Thunderhawk Phoenix)
This is yet another type of DVD check that Zandal found. You can be rest assured that they will come up with new and creative ways
to do the DVD check in order to make it as hard as possible for us to backup our legally owned games.
000020F0 C8 8C 84 8F (DVD CHECK)
000020F0 01 00 04 24
original:
.text:001010EC loc_1010EC: # CODE XREF: sub_100F68+178 j
.text:001010EC jal sceCdMmode
.text:001010F0 lw $a0, -0x7338($gp)
< NOTE THIS
.text:001010F4 jal sub_1028A0
.text:001010F8 nop
.text:001010FC nop
patched:
.text:001010EC loc_1010EC: # CODE XREF: sub_100F68+178 j
.text:001010EC jal sceCdMmode
.text:001010F0 li $a0, 1
< NOTE THIS
.text:001010F4 jal sub_1028A0
.text:001010F8 nop
.text:001010FC nop
-----------------------------------------------------------------------------------------
00002134 C8 8C 84 8F (DVD CHECK)
00002134 01 00 04 24
original:
.text:0010112C daddu $a0, $0, $0
.text:00101130 jal sceCdMmode
.text:00101134 lw $a0, -0x7338($gp) <<<< NOTE THIS
.text:00101138 jal sub_1028A0
.text:0010113C nop
patched:
.text:0010112C daddu $a0, $0, $0
.text:00101130 jal sceCdMmode
.text:00101134 li $a0, 1 <<<< NOTE THIS
.text:00101138 jal sub_1028A0
.text:0010113C nop
-----------------------------------------------------------------------------------------
00002160 C8 8C 84 8F (DVD CHECK)
00002160 01 00 04 24
original:
.text:00101158 daddu $a0, $0, $0
.text:0010115C jal sceCdMmode
.text:00101160 lw $a0, -0x7338($gp) <<<<< NOTE THIS
.text:00101164 jal sub_1028A0
.text:00101168 nop

Ripping for Dummies
Page 22 of 28
patched:
.text:00101158 daddu $a0, $0, $0
.text:0010115C jal sceCdMmode
.text:00101160 li $a0, 1 <<<<< NOTE THIS
.text:00101164 jal sub_1028A0
.text:00101168 nop
Similar at:
0004fa28 C8 8C 84 8F (DVD CHECK)
0004fa28 01 00 04 24
-----------------------------------------------------------------------------------------
00002438 FC 2C 05 0C
(JUMP VIDEO LOGO)
00002438 00 00 00 00
original:
.text:00101434 la $a1, aCdrom0VideoLog # "cdrom0:\\VIDEO\\LOGO.PSS"
.text:00101438 jal sub_14B3F0 <<<<< NOTE THIS!
patched:
.text:00101434 la $a1, aCdrom0VideoLog # "cdrom0:\\VIDEO\\LOGO.PSS"
.text:00101438 nop <<<<< NOTE THIS!
-----------------------------------------------------------------------------------------
00002470 FC 2C 05 0C
(JUMP VIDEO INTRO)
00002470 00 00 00 00
original
.text:0010146C la $a1, aCdrom0VideoInt #
"cdrom0:\\VIDEO\\INTROP.PSS"
.text:00101470 jal sub_14B3F0 <<<<<< NOTE THIS!!!!
patched:
.text:0010146C la $a1, aCdrom0VideoInt #
"cdrom0:\\VIDEO\\INTROP.PSS"
.text:00101470 nop <<<<<<< NOTE THIS!!!!!
Removing DVD Checks
To remove a DVD check, you must know the offset you are changing. How to find the offset has been described in the Original DVD
Check section above. Once you know the offset, you can open the file in a hex editor like Hex Workshop and go to the offset
indicated. You then change the instruction so that the game doesn’t care about the answer returned, or that the correct answer is
returned. For example,
i
n a hex editor, the
li $a0, 2
instruction would look like
0200 0424
, while the
li $a0, 1
instruction
would look like
0100 0424
. Since you know the offset of the instruction you want to change from IDA, you can go to that
particular offset in a hex editor and change the 02 to a 01. Do this for all instances that you found in IDA and you’ll have removed the
DVD Checks.

Ripping for Dummies
Page 23 of 28
LBA Tables
What is an LBA Table?
Before we answer this question, let’s define what an LBA is. LBA stands for Logical Block Address. As the name indicates, it’s an
address. More specifically, it’s the address on a disc for a file. It’s very simila r to the address of your house. Every house has its own
unique address and when the Postman needs to deliver mail to your house, he looks for your house number to find the correct one. In
the same way, when a file on the disc needs to be read, the game looks for that file at a specific address.
To some games, it doesn’t matter where each file starts on the disc. The game will just search for it on the entire disc and load it when
it finds it. To other games, it makes a huge difference where the file is . These games have the start address (at least) of each file on
the disc. This is known as an LBA Table. As near as I can figure, there are two reasons for creating an LBA Table. First, it’s much
faster for the game to load a file from the disc if it knows exactly where it lives. Therefore, you have less waiting time while the game
is loading which is a good thing. The second is to make it harder for someone to pirate the game. Unfortunately, it also makes it
harder for someone to backup their legally owned game.
Since we know what an LBA is and we know what an LBA Table is, let’s examine why we need to modify the table when we backup
a game. All files on a disc are stored back to back with absolutely no gaps between them. This is done to make the best use of all the
space on the disc. Let’s say that you have 4 rectangular blocks. These blocks represent files and each block takes up 2 spaces. Your
LBA Table would say:
Block A starts at 1 and ends at 2
Block B starts at 3 and ends at 4
Block C starts at 5 and ends at 6
Block D starts at 7 and ends at 8
Now, let’s say that we cut Block B in half so that it starts at 3 and also ends at 3. Since we know that there is never a space between
files on a disc, Block C would be moved forward to start at 4 and end at 5 and Block D would be moved forward to start at 6 and end
at 7. So far so good, but unfortunately, our table is still looking at Block C to start at 5 and Block D to start at 7. We need to modify
(reindex) the table so that it looks likes this:
Block A starts at 1 and ends at 2
Block B starts at 3 and ends at 3
Block C starts at 4 and ends at 5
Block D starts at 6 and ends at 7
This is the exact same principle that’s applied when reindexing an LBA table for a game. A table for a game has the LBA information
for each file on the disc. When we take one of the files and create a 0 byte dummy file in its place, the next file in line gets shoved
forward so that there are no spaces between the 2. This means that the table needs to be changed for the next file in line and every file
after it so that the game knows where the starting point of the file will now be.
LBA Tables come in all different varieties. Some have Start LBA and End LBA. Some have Start LBA, End LBA, File Size. Some
have Start LBA, End LBA, File Size, and how many sectors (blocks) are used by the file. Some have values that are translated into
hex and some keep their numbers in decimal format. Let’s go over finding and reindexing.
Finding Tables
There once was a time when you would have quite a task ahead of you in regards to finding and reindexing LBA Tables if the game
has one. You would have to take the original start LBA of the first file in the game, translate it into hex, swap some bytes around and
search for every occurrence of this value in Hex Workshop. If you found the value, you would need to take the original start LBA of
the second file, translate it, swap it and see if this value could be found relatively close after the first value. Then do the same for the
original start LBA of the third and so on.
Luckily, there are tools out to help in the process which drastically reduces the amount of time it takes to find tables. Atlantis
(freeware) contains a feature for finding LBA tables and that functionality was split out into a stand -alone program, the LBA Table

Ripping for Dummies
Page 24 of 28
Finder (freeware). This program is quicker than Atlantis v2.2.14 and can find more types of LBA Tables. All you need is the
original FileList (from IsoBuster or Atlantis), and the program will notify you if it finds the table, the approximate location and at
what interval the start LBAs occur. I would highly recommend using this tool instead of doing it by hand.
Reindexing Tables
As with finding tables, there once was a time when you would have to reindex the table manually. You would have to calculate the
start and end LBA for each and every file on the disc, translate it to hex, swap the bytes and then go into Hex Workshop to make the
changes along with file size and sector count. Thankfully, you don’t have to go through this anymore. There is a DOS program called
ReindexTool which uses a text file and an IML file to make the changes to the table. Atlantis can also reindex the LBA table and uses
a GUI interface to allow you to indicate the format of the table. See the instructions and/or tutorials that come with these programs for
exact usage.

Ripping for Dummies
Page 25 of 28
Creating ISO’s
Once you have ripped the game to the correct size, removed DVD checks, reindexed LBA tables, etc. you are ready to create an ISO
which you can use for burning. IML2ISO takes an IML and IMS file produced by CD/DVD Generator and forms an ISO from these
files. To use CD/DVD Generator, you specify that you want to create a new CD Master Disc, go to the volume tab and enter the Disc
Na me and whatever other information you would like. The go to the directory tab and drag and drop all the files and folders of the
game in the exact order they appear on the disc. You can then go to file and export the IML file (which also automatically creates the
IMS file). Once the IML file is created you can type the following at the DOS prompt to generate your ISO:
Iml2iso MyIMLFile.iml IsotoCreate.iso
One thing that I’ve found particularly useful with CD/DVD Generator is to save your work as a CCZ file (by doing File/Save) before
exporting to an IML, especially if you are experimenting with how much you need to rip out. The start and end LBAs of every file in
the project is automatically calculated whenever you open a CCZ file. So, you can save the CCZ, rip more files, reopen the CCZ and
see the effect it has on your total project size. This also comes in handle for multiple CD rips so that you don’t have to tell the
program the order every time. The CCZ keeps the order of the files while the IM L keeps the start and end LBA for each file.
The other established method for creating ISOs is using MKISOFS. This is another DOS utility that has a bunch of input parameters
that it uses to create the ISO file. More information is available on the Internet as to the specifics of the parameters. It uses a
weighted method for sorting the files in the correct order on the disc, which I have found does not work 100% of the time. If the order
isn’t that important, it certainly does work. Bjohnsons’s KitBu ilder application makes use of MKISOFS to create ISOs. Atlantis will
allow you to use either method you are comfortable with to create an ISO.
Burning
Usually, burning an ISO is done with CDR-Win. I’ve seen many people try Nero to burn and have tried it myself. I couldn’t get it to
work consistently, so I switched back to CDR-Win. I’m sure there are many other CD writing programs out there that would work
too. To use CDR-Win, click the “File Backup and Tools” button. In the dialog that comes up, s elect “Record ISO9660” from the
drop-down box. At the bottom of the dialog make sure Disc Type is CDROM-XA and Track Mode is Mode2. Only “Finalize/Close
Session” and “Write Postgap” should be checked.
Let’s talk about Speed for a second. If you have really good CDs, like Verbatim or TDK, burn speed should not be an issue for you
and you can burn at the max speed. If you have a substandard CD-Writer or you have poor quality media, you should burn your ISOs
at 2X. This seems to fix a lot of the issues with coasters being made. The rule of thumb is: the higher the quality of the writer and
media, the higher the burn speed.
Now, there are some of you who might be wondering: If I burn in Mode 1, will the game still work? No, it must be Mode 2. Why? I
believe that the operating system of the PS2 can only handle certain types of discs. A normal CD has 2048 bytes per sector, but a
XA/Mode 2 CD uses 2324 bytes per sector because of some error checking that's attached to the end of each sector. That means bytes
2049 - 2324 are all error checking.
For those that want more technical detail, I’ll give it. For those that don’t care and just want to get to the ripping, skip the rest of this
section.
The CD-ROM specification (Yellow Book) defines the use of two types of sectors, mode 1 and mode 2. Mode 2 sectors are used for
CD-ROM XA formats.
Data stored on a CD-ROM disc is divided into sectors which are equivalent to the audio frames for a CD audio disc. At normal (1x)
playback speed, 75 sectors are read every second. For double speed CD-ROM drives this increases to 150 sectors per second and so
on. Seek times, while the disc rotates to the required starting position, will also reduce as speeds increase.
Because CDs were designed primarily for audio, their use for computer data requires the addition of header data and error correction
codes which are included in every sector. There are two different types of sectors defined in the CD-ROM specification, Mode 1 and
Mode 2 (the latter being used for CD -ROM XA d iscs).
Video CD discs use Mode 2, Form 2 sectors for the MPEG video, allowing faster data rates (172 kbytes/sec instead of 150 kbytes per
second).

Ripping for Dummies
Page 26 of 28
Mode 1 sectors are intended for the storage of computer data and contain the following fields.
* Sync (12 bytes) which is used to enable the player to identify the start of each sector.
* Header (4 bytes) consisting of Minutes, Seconds, Sectors and Mode (= 1).
* ECC (Error Correction Code - 276 bytes), which comprises an additional level of CIRC error protection.
* EDC (Error Detection Code - 4 bytes) for detecting errors to be corrected.
Mode 1 sectors are the simplest type and are used for most CD-ROM based formats which follow the Yellow Book.
Mode 2 sectors are used for those formats based o n CD-ROM XA and can be either Form 1 or 2.
* Mode 2 Form 1 sectors contain 2048 bytes with the same ECC as Mode 1 sectors.
* Mode 2 Form 2 sectors contain 2324 bytes of user data per sector, with no ECC are are suitable only for data where errors can b e
concealed (eg audio or video data).
Mode 2 sectors comprise the following fields:
* Sync (12 bytes) which is used to enable the player to identify the start of each sector.
* Header (4 bytes) consisting of Minutes, Seconds, Sectors and Mode (= 1).
* Subheader (8 bytes) contains content related parameters eg data type.
* ECC (Error Correction Code - 276 bytes) which comprises an additional level of CIRC error protection for Form 1 only.
* EDC (Error Detection Code) for Forms 1 and 2.
Note that Mode 1 and Mode 2 Form 1 use the same error correction so can be used interchangeably, but not within the same track and
preferably not on the same disc. Software used to write CD-Rs can be set for Mode 1 or Mode 2 Form 1. Almost all PCs and Macs
will read Mode 2 Form 1 CD-ROMs as well as Mode 1.
Note that any CD-ROM will contain at least some Mode 1 or Mode 2 Form 1 sectors.

Ripping for Dummies
Page 27 of 28
Rip Kits
A rip kit downsizes the DVD-based game so that it fits on a blank CD or a few blanks depending on the game. Typically, the movies
are removed or shortened and/or audio removed. These kits are designed by knowledgeable people to be as simple as possible,
usually involving clicking just one file and everything is taken care of for you with the exception of burning the IS O that’s created.
One thing to keep an eye out for is that kits come in 2 flavors. A “nomod” kit rips the game to fewer than 632.5MB and is for those
that don’t have a mod chip installed. A “mod only” or “modchip only” kit rips the game to fewer than 700MB and due to the size it
will only work for people with mod chips installed.
There are quite a few people out there that put together a rip kit from the kindness of their heart. There is usually one or more BAT
files to run the rip, 1 or more PPF files to make the changes to binary files like removing DVD checks, an IML and IMS file used to
generate the ISO and a ReadMe file with instructions on how to use it. If you are brand new to ripping, I suggest you edit the batch
file and look at the commands so that you have an idea of what’s involved with the rip. If you create rip kits, I also suggest you
download and try Gaidin’s Rip Kit Creator which goes thru the hassle of comparing the original files to the ripped files and creating a
kit based on the differences.
A Word on PPF Patches
If you use a rip kit to rip a game, there is normally a .BAT file which applies a PPF patch to the game. A PPF contains all the
differences between 2 binary files. You can create a PPF using MakePPF3 (freeware). This PP F file is included in the batch file (as
well as ApplyPPF3 which is used to run it) and applied to an unmodified binary file for such things as removing DVD checks. You
can also use PPF-O-Matic to manually apply the PPF to the file.
Multiple CD Rips
As much as we try, there are times when you cannot rip a game down to a single CD-R. If that’s the case, you’ll have to rip the game
onto multiple CD’s. This method typically splits the courses, tracks, or levels onto different CD’s. You only need to be concerned
with swapping CDs when required. For instance if you start a game on CD1 and need to jump to a level or course on CD2, you may
be able to swap just before going to the level or course without rebooting, also known as hot-swapping. Hot-swapping will not always
work and if your game freezes after you swap, it’s a good indication that you need to boot up with the second CD and then go to the
desired level or course.
Contributors
There are many people that I should thank for supplying the information to put this together, but it would take several pages. If you
have contributed your knowledge to the rest of the scene, I am profoundly grateful. In this document, I have referenced material
provided by: Alakazam, NightDC, ZNoore, CFizz, SpaceMonkey, Terry.Diamond, Go-kun, Zandal, justanotherguy and Bit__man99.
If you see your material in here without mention of your name, please accept my sincerest apologies.

Ripping for Dummies
Page 28 of 28
Glossary
AR = Action Replay. (UK, EURO, PAL versions)
CCZ = A saved CD/DVD Generator file. This differs from an IML file in that it does not contain the start and
end LBA for a file, only the specific order of the files.
GS = Game Shark. (USA, NTSC versions)
DVD X = DVD Region X. (available in PAL & NTSC)
DONGLE = Attachment for Action Replay and Game Shark disks which fits into memory card slot.
Demultiplexing = Splitting a video file into 2 separate files: a video file and an audio file.
Downsizing = Taking an audio or video file and making it of lower quality which greatly reduces the size of the
file and, ultimately, the size of the game.
FileList = A file generated by IsoBuster or Atlantis PS2 Backup Toolkit which contains the start LBA and name
for each file on a disc.
IML = A file exported by CD/DVD Generator which contains a listing of all files on the disc in their correct
order as well as start and end logical block address (LBA). An IML file is always accompanied by an IMS file.
ISO = a digital image of a disc that can be burned directly onto a disc using CDR-Win.
LBA = Logical Block Address. The exact address (or sector) on a disc that a file begins or ends.
LBA Table = A table contained within a file which indicates at least the start LBA for each file on a disc. The
table may also contain the end LBA, number of sectors used by the file and size as well.
Multiplexing = Joining an audio and video file into a video file.
PPF = A file created by noting the binary differences between 2 files. The PPF file can be applied to an
unchanged file using the PPF-O-Matic program to make it look exactly like the modified file.
Document Outline
- Table of Contents
- The Basics
- Required Hardware/Software
- Swap Methods
- Game Files
- Copying from Disc
- Ripping Files
- DVD Checks
- LBA Tables
- Creating ISO's
- Burning
- Rip Kits
- Multiple CD Rips
- Contributors
- Glossary
Wyszukiwarka
Podobne podstrony:
ps2 burning for dummies 3TRMSPJUUQW6CG2JVYD224CEHQ7EMMLDS7QIEPI
Guitar For Dummies
CCNA for Dummies (2000)
Making Money For Dummies
Chronic Pain for Dummies
Making Money Online For Dummies
Arabic For Dummies
hacking for dummies [ EN ] Hacking For Dummies
Korean for Dummies Cheat Sheet
For Dummies Visual Studio NET C++ for Dummies Quick Reference Guide
Intermediate Spanish for Dummies
SQL FOR DUMMIES
Guitar For Dummies
Hacking For Dummies
Tcp
(2008) Trading Futures For Dummies (Isbn 0470287225)
Dating And Seduction For Dummies
więcej podobnych podstron