WINDSURF TECHNOLOGY
WWW.NORTH-WINDSURF.COM
WINDSURF TECHNOLOGY
WWW.NORTH-WINDSURF.COM
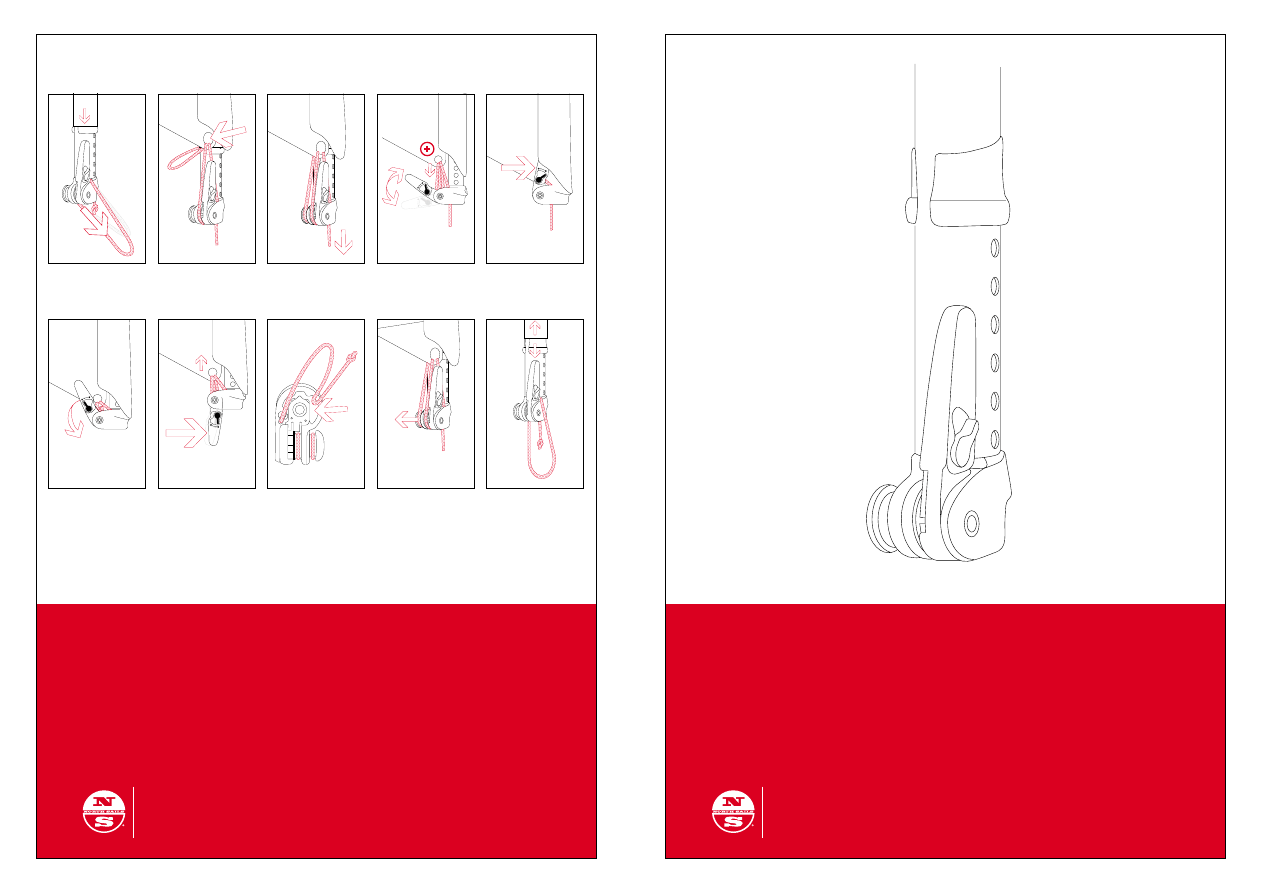
QUICK REFERENCE RIGGING
>>>>
QUICK REFERENCE DERIGGING
>>>>
POWER.XT
USER MANUAL
BEDIENUNGSANLEITUNG
MODE D´ EMPLOI
Congratulations on becoming the new owner of a NORTH SAILS POWER.XT – you now have
the most innovative mast foot system on the market. Completely newly developed and already
patented, this is the result of careful research by engineers that gives you an exquisitely manu-
factured mastfoot, guaranteed for the highest quality and length of use. This is state of the art
technology, further tuned by our international test centers to make your NORTH SAILS
POWER.XT a properly developed piece of equipment. Please read the information below to
ensure that you get the maximum power potential from your sails with the POWER.XT. All that
remains to be said is that we wish you a whole lot of fun in great winds with your NORTH SAILS
POWER.XT.
Wir gratulieren Ihnen zu Ihrer neuen NORTH SAILS POWER.XT. Mit diesem neu entwickelten,
patentierten Mastfuß haben Sie sich für den innovativsten Mastfuß am Markt entschieden.
Durchdachte Ingenieursarbeit und perfekte Verarbeitung garantieren höchste Qualität und
Langlebigkeit. Weltweite Test- und Entwicklungscenter sorgen für ausgereifte Produkte und
Sie können sicher sein, mit Ihrer neuen NORTH SAILS POWER.XT den letzten Stand der
Technik erworben zu haben. Um das volle Leistungsspektrum Ihrer Segel mit dem Mastfuß
ausschöpfen zu können, bitten wir Sie, sich die Zeit zu nehmen und diese Gebrauchsanleitung
aufmerksam durchzulesen. Wir wünschen Ihnen viel Spaß mit Ihrer NORTH SAILS POWER.XT
und allzeit guten Wind.
Nous vous félicitions pour l ‘achat votre nouveau NORTH SAILS POWER.XT. Avec ce produit
breveté et redeveloppé, vous avez choisi le pied de mât le plus innovant du marché. Un travail
d’ingénierie réfléchi et une parfaite transformation garantissent la meilleure qualité et la longé-
vité de ce produit. Des centres de développement et d’essai implantés dans le monde entier
veillent à créer des produits sophistiqués et vous pouvez être sûr d’avoir acquis un pied de mât
à la pointe de la technologie avec le nouveau NORTH SAILS POWER.XT. Dans le but d’exploiter
pleinement les capacités de votre voile, nous vous demandons de prendre le temps de lire
attentivement ce mode d’emploi. Nous vous souhaitons beaucoup de plaisir avec votre
NORTH SAILS POWER.XT et bon vent.
Advantages during rigging
- quicker preparation:
thread the downhaul line in,
pull, ratchet. Finished!
- much reduced force (power
ratio around 1 to 30)
- no need to sit down, worry
about your foot slipping or
worry about damaging your
wetsuit when trimming the sail
- downhaul aids are no longer
necessary (e.g. a trim handle
or a harness hook)
Adjustment on the water
- at any time you can adjust
your trim should the wind
strength change while you
are out
- increased safety
- easy to experiment in finding
the best trim point
- completely new possibilities
e.g. punch through the surf
with reduced down-haul
tension, but with maximum
planning power through the
wind shadow; but once you
are through and have a
feeling for the wind you can
make a really easy adjust-
ment through two ratchet
movements
Komfort beim Segelaufbau
- schnelleres Aufbauen:
Tampen einziehen, anziehen,
ratschen und fertig!
- wesentlich weniger Kraft-
aufwand (Kraftverhältnis ca.
1/30)
- kein Hinsetzen vor dem
Mastfuß und evtl. Neopren
beschädigen
- keine Trimmhilfen mehr not-
wendig (z.B. Trimmknochen)
Verstellbarkeit auf dem
Wasser
- nötiger Feintrimm bei sich
ändernder Windstärke auf
dem Wasser möglich
- erhöhte Sicherheit
- einfaches Ausprobieren und
Finden des optimalen Trimm-
punktes
- ganz neue Möglichkeiten
(z.B. mit wenig Vorliek-
spannung aber max. Angleit-
power an Windabdeckung
vorbei durch die Brandungs-
zone, nach dem ersten
Feeling Feintrimm durch
zwei Ratschengänge)
- Segelleistung und Einsatz-
bereich kann voll ausgenutzt
werden
Installation de la voile en
tout confort
- assemblage plus rapide:
enfiler la ralonge, actionner
le cliquet, et c’est fini.
- effort beaucoup moins
important (rapport de force,
env. 1/30)
- plus besoin de s’asseoir
devant le pied du mât et
donc d’endommager votre
combinaison néoprène
- plus besoin de matériel de
réglage (p.ex. écrou d’équili-
brage)
Réglage sur l’eau
- possibilité de procéder à un
réglage précis lorsque la
force du vent change sur
l’eau
- sécurité renforcée
- simplifie les essais et permet
de trouver le point d’équili-
brage optimal immédiatement
- nouvelles possibilités (p.ex.
lorsque le guindant est sous
faible tension, mais que le
vent forcit, il est possible de
se rééquilibrer avec précision
en procédant à deux
encliquetages après la pre
mier bord)
- exploitation complète des
capacités et du champ
d’activité de la voile
POWER.XT
REVOLUTION
OVERVIEW
>>>>
ÜBERBLICK
>>>>
APERÇU
>>>>
WINDSURF TECHNOLOGY
WWW.NORTH-WINDSURF.COM
supported by www
.ub-tech.de
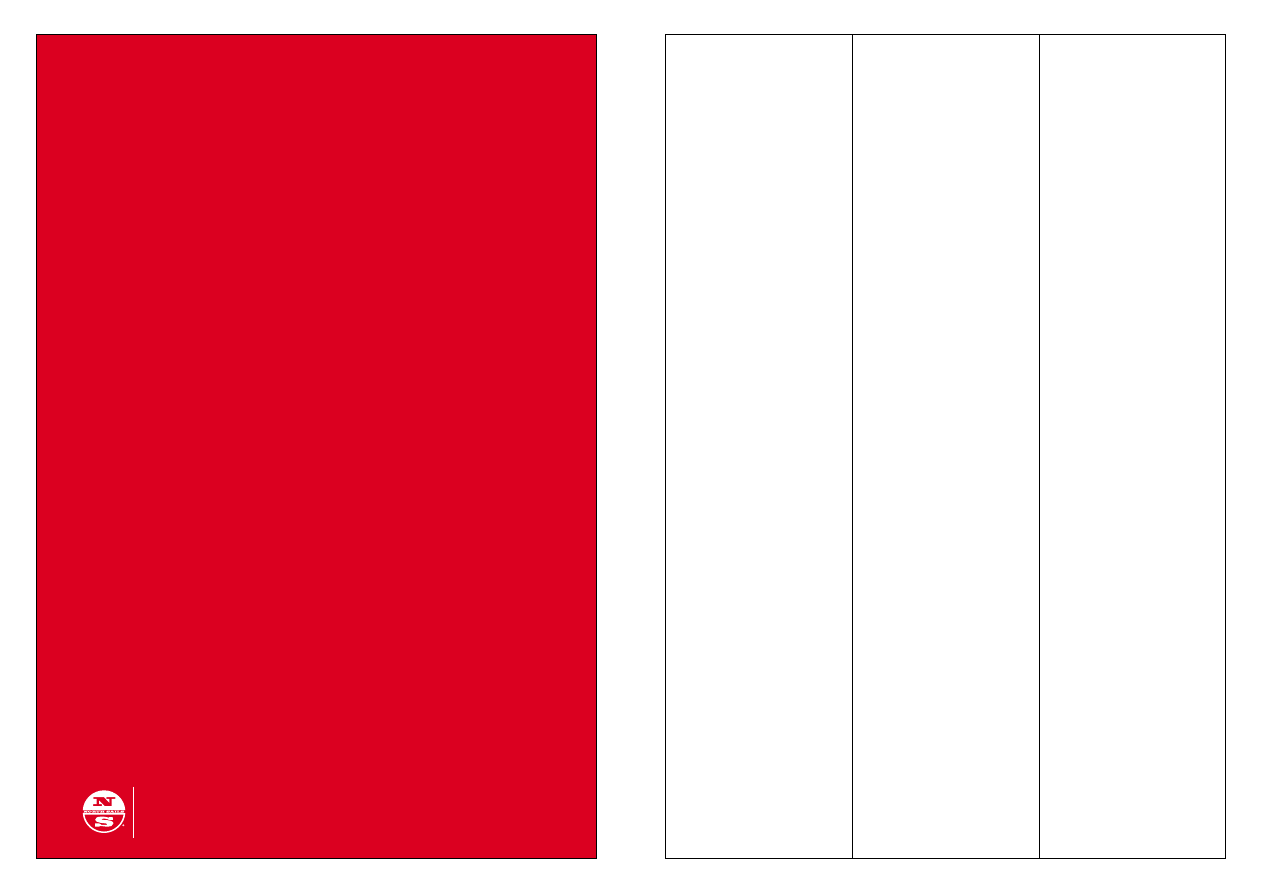
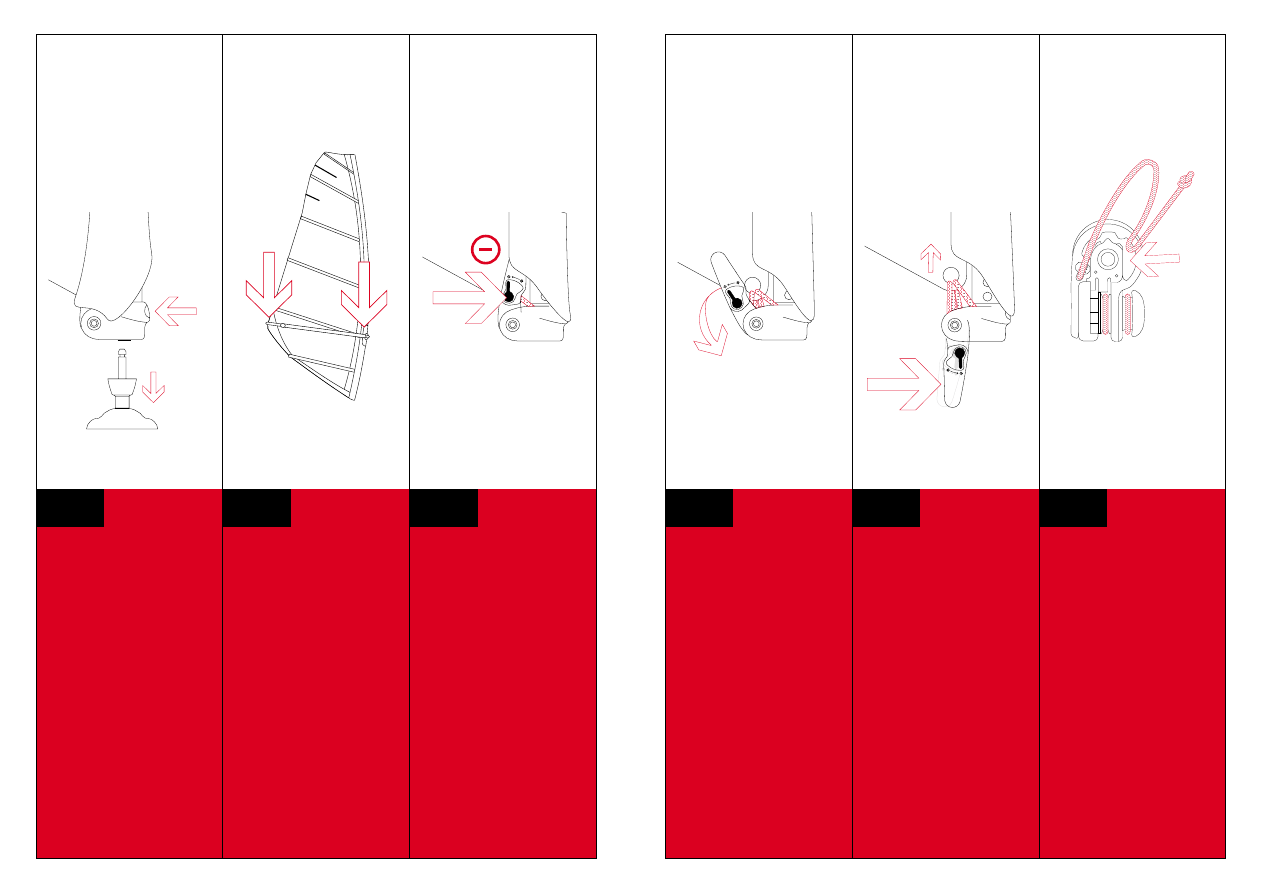
Attention: Please make sure to
check the condition of the rope
BEFORE sailing each time!
Set the adjustment ring according
to the information given on the sail.
The printed measurements makes
this really easy.
Achtung: bitte überprüfen Sie
die Beschaffenheit des Tampens
VOR jedem Einsatz!
Stellen Sie den Verstellring der Ver-
längerung entsprechend der Segel-
angaben ein. Mittels der Echtlängen-
Bedruckung ist das kinderleicht.
Attention: Merci de vous assurer
de l'état du bout AVANT chaque
navigation!
Positionner la bague de réglage
de l’extension conformément aux
informations concernant la voile.
Avec les longueurs indiquées, c’est
un jeu d’enfant.
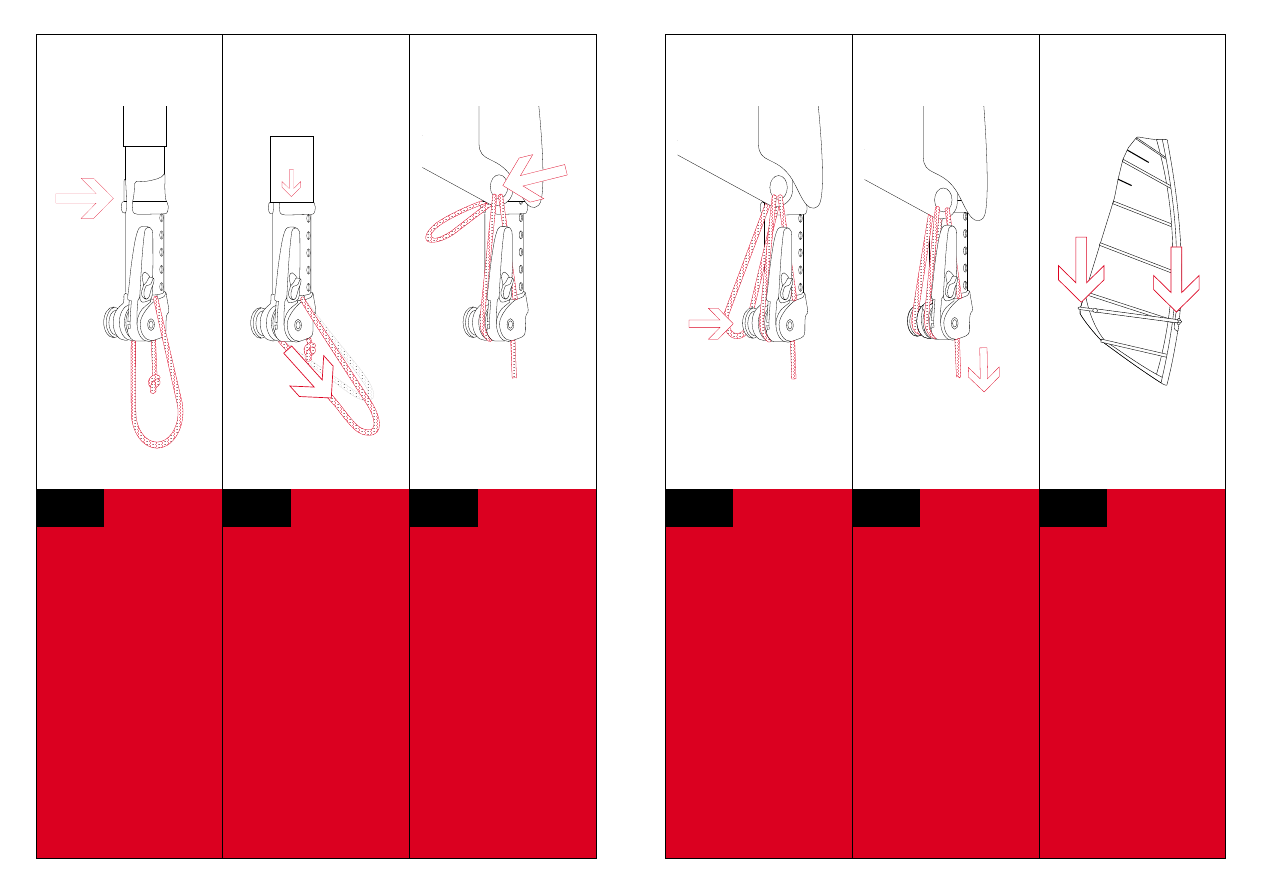
On the POWER.XT you will find
the end of a line and a loop.
IMPORTANT: increase the size
of the loop by pulling back the
line on the side of the cleat plate.
An der POWER.XT befindet
sich ein Tampenende und eine
Tampenschlaufe.
WICHTIG: Vergrößern Sie die
Tampen-schlaufe, indem Sie
den Tampen an der Klemm-
scheibenseite nachziehen.
Une poulie et une boucle de
cordage se trouvent sur le
POWER.XT.
IMPORTANT: agrandir la boucle
en serrant le bout au côté du
disque de serrage.
Pull the line strap through the tack
eyelet and then back to the mast-
foot around the loose roller.
Ziehen Sie die Tampenschlaufe
durch die Segelöse und zurück
zum Mastfuß um die lose Rolle.
Tirer la boucle au travers de l’œillet
de la voile et la repasser ver le
pied de mât, autour de la poulie
mobile.
1.0
Pull the line strap through the tack
eyelet and then back to the mast-
foot around the loose roller.
Ziehen Sie die Tampenschlaufe
durch die Segelöse und zurück
zum Mastfuß um die lose Rolle.
Tirer la boucle au travers de l’œillet
de la voile et la repasser ver le
pied de mât, autour de la poulie
mobile.
By pulling on the line end, pre-
tension the sail.
Fix the line end in the clam cleat.
Durch Zug am Tampenende
spannen Sie das Segel vor.
Fixieren Sie das Tampenende
in der Belegklemme.
Tirer sur le bout pour tendre la voile.
Fixer le bout de la corde dans le
taquet coinceur.
Attach the boom and tension the
outhaul completely.
Bringen Sie den Gabelbaum an
und spannen Sie das Schothorn
voll durch.
Poser le wishbone et tendre le
point d’écoute complètement.
RIGGING
>>>>
RIGGING
>>>>
1.1
1.2
1.2
1.3
1.4
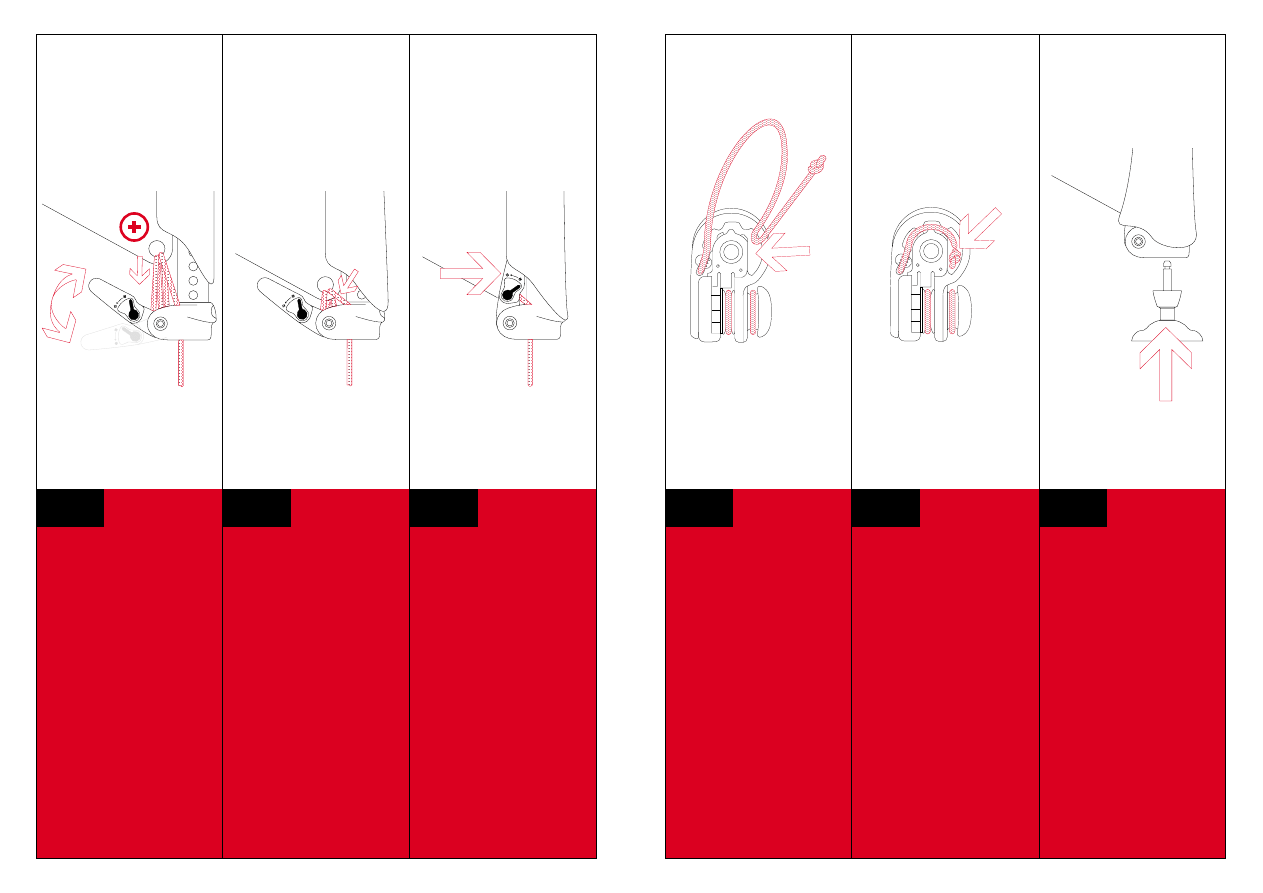
Set the black release lever on the
mast foot to + [Plus].
Stellen Sie am Mastfuß den
schwarzen Entspannhebel auf
+ [Plus].
Positionner le levier de détente
noir, qui se trouve sur le pied de
mât, sur le + [Plus].
Ratchet the luff of the sail down to
the mastfoot until the sail is tensioned
correctly according to the manu-
facturer’s instructions.WARNING:
you have a power ratio of 1/30
with the POWER.XT. Please
take care not to damage the sail
through over tensioning it.
Mit dem Hebel das Vorliek entspre-
chend den Herstellerangaben zum
Mastfuß ratschen. WARNUNG: Die
POWER.XT hat eine hohe Kraft-
übersetzung von ca. 1/30. Das
Segel durch Überspannen nicht
beschädigen!
Encliqueter le guindant au pied de
mât à l’aide du levier, conformément
aux indications du fabricant.
ATTENTION: le POWER.XT per-
met une transmission de force
élevée d’env. 1/30. Veiller à ne
pas endommager la voile en la
tendant excessivement !
Stow the lever in the mast foot
protector.
Verstauen Sie den Hebel im
Mastfußprotektor.
Placer le levier dans la protection
de pied de mât.
RIGGING
>>>>
1.5
1.6
1.7
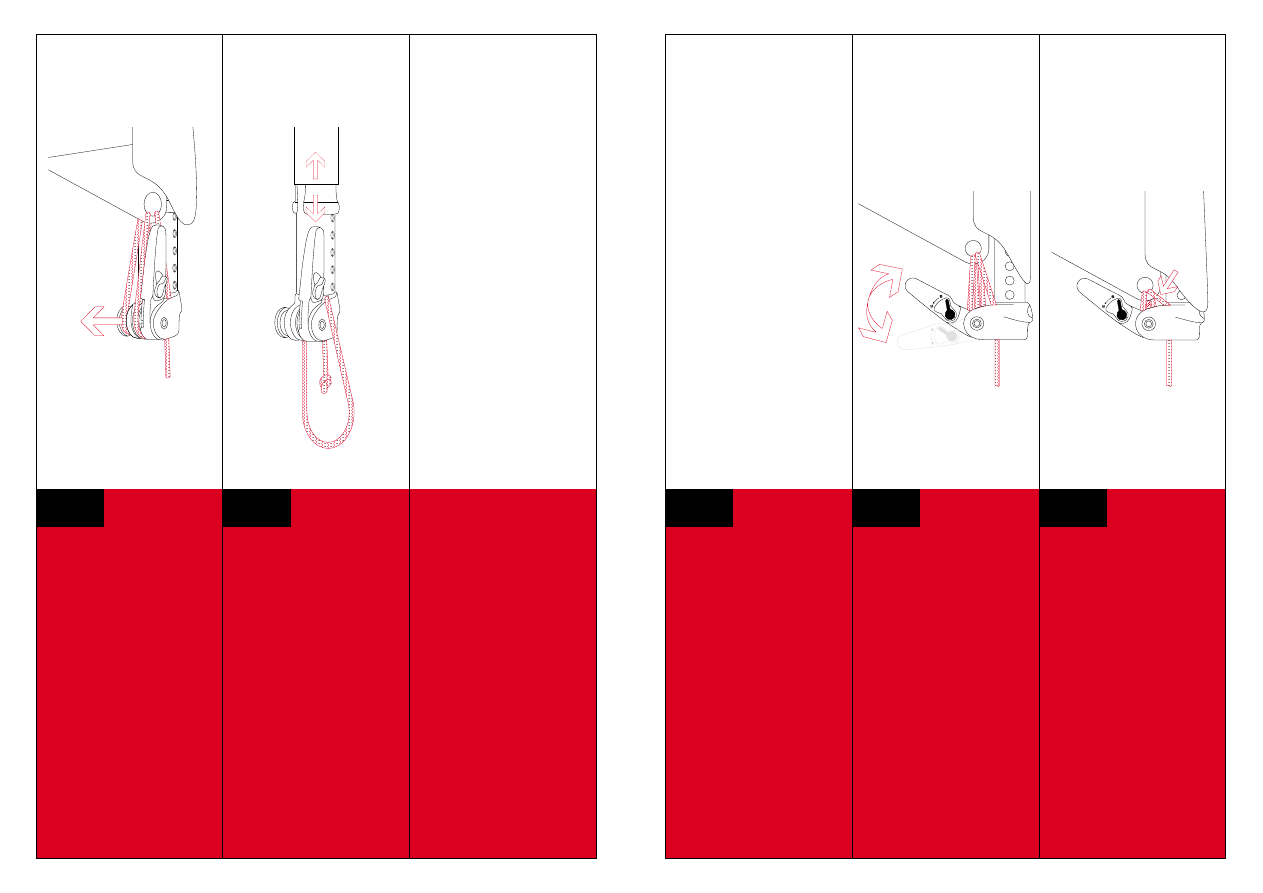
Make a loop with the line end and
push this into the mast foot.
Bilden Sie mit dem noch heraus-
stehenden Tampenende eine
Schlaufe und schieben Sie diese
in den Mastfuß.
Former une boucle avec le bout
de la corde qui ressort et la
pousser dans le pied de mât.
Make a loop with the line end and
push this into the mast foot.
Bilden Sie mit dem noch heraus-
stehenden Tampenende eine
Schlaufe und schieben Sie diese
in den Mastfuß.
Former une boucle avec le bout
de la corde qui ressort et la
pousser dans le pied de mât.
Push the mast foot spigot – the
mast foot should already be
mounted on the board – into the
mast extension and ensure that
it is pushed in completely.
Enjoy your sailing.
Schieben Sie den am Board
bereits monierten Mastfußzapfen
in die Verlängerung, bis der Zapfen
spürbar einrastet.
Und los geht´s!
Pousser la carotte de pied de mât,
déjà montée sur la planche, dans
l’extension jusqu’à ce que l’en-
clenchement soit perceptible.
Bon plaisir à la voile.
RIGGING
>>>>
1.8
1.8
1.9
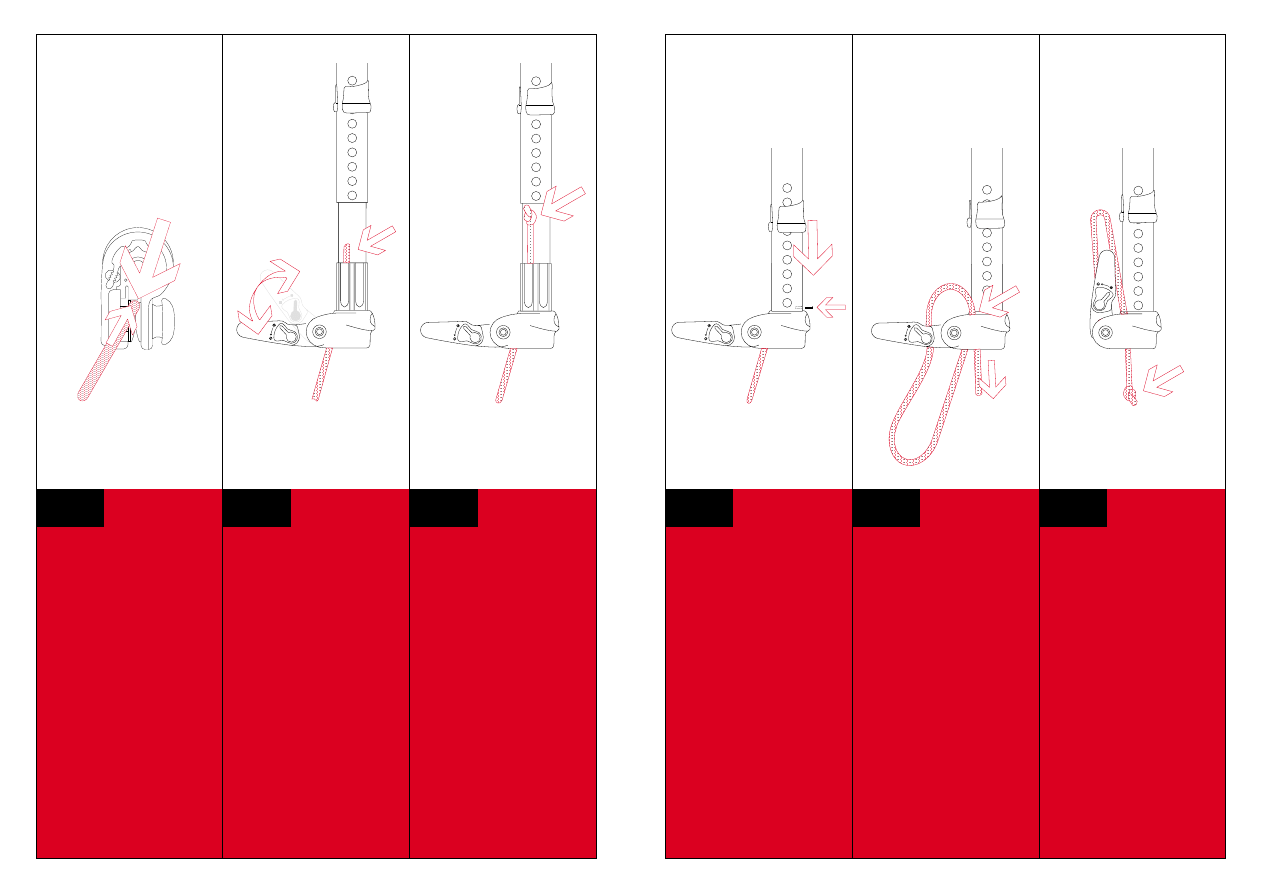
Press the release button and
remove the rig from the board.
Drücken Sie die Auslösetaste und
trennen Sie das Board vom Segel.
Appuyer sur le bouton de libération
du pied de mat et séparer la
planche de la voile.
Release the outhaul tension and
remove the boom.
Entspannen Sie das Schothorn
und schnappen Sie den
Gabelbaum ab.
Détendre le point d’écoute et
retirer le wishbone.
Set the black adjustment lever
on the mast foot to + [Minus].
Stellen Sie am Mastfuß den
schwarzen Entspannhebel am
Hebel auf + [Minus].
Positionner le levier de détente
noir, qui se trouve sur le pied de
mât, sur - [Moins].
Remove the lever from the mast-
foot protector.
MPORTANT: The main lever
will be released if it is slightly
pushed towards the mast
Ziehen Sie den Hebel aus dem
Mastfußprotektor.
WICHTIG: Der Haupthebel wird
erst freigegeben nachdem er
kurz in Richtung Mast
gedrückt wurde.
Retirer le levier de la protection de
pied de mât.
IMPORTANT: le levier principal
se libère seulement après avoir
été brièvement pressé en
direction du mât.
Open the lever completely and
push it against resistant point until
the ratchet is released by one
step. Pull the lever back and repe-
at the action until the sail is
no longer under tension.
Öffnen Sie den Hebel ganz und
drücken Sie ihn gegen den
Anschlag, bis die Ratsche eine
Stufe auslöst. Ziehen Sie den
Hebel wieder zurück und wieder-
holen Sie den Vorgang mehrmals
bis sich das Segel entspannt hat.
Ouvrir le levier en entier et le presser
contre le butoir, jusqu’à ce que le
cliquet libère un cran. Retirer le
levier et répéter la manœuvre plus-
ieurs fois jusqu’à ce que la voile se
détende.
DERIGGING
>>>>
DERIGGING
>>>>
2.0
2.1
2.2
2.3
2.4
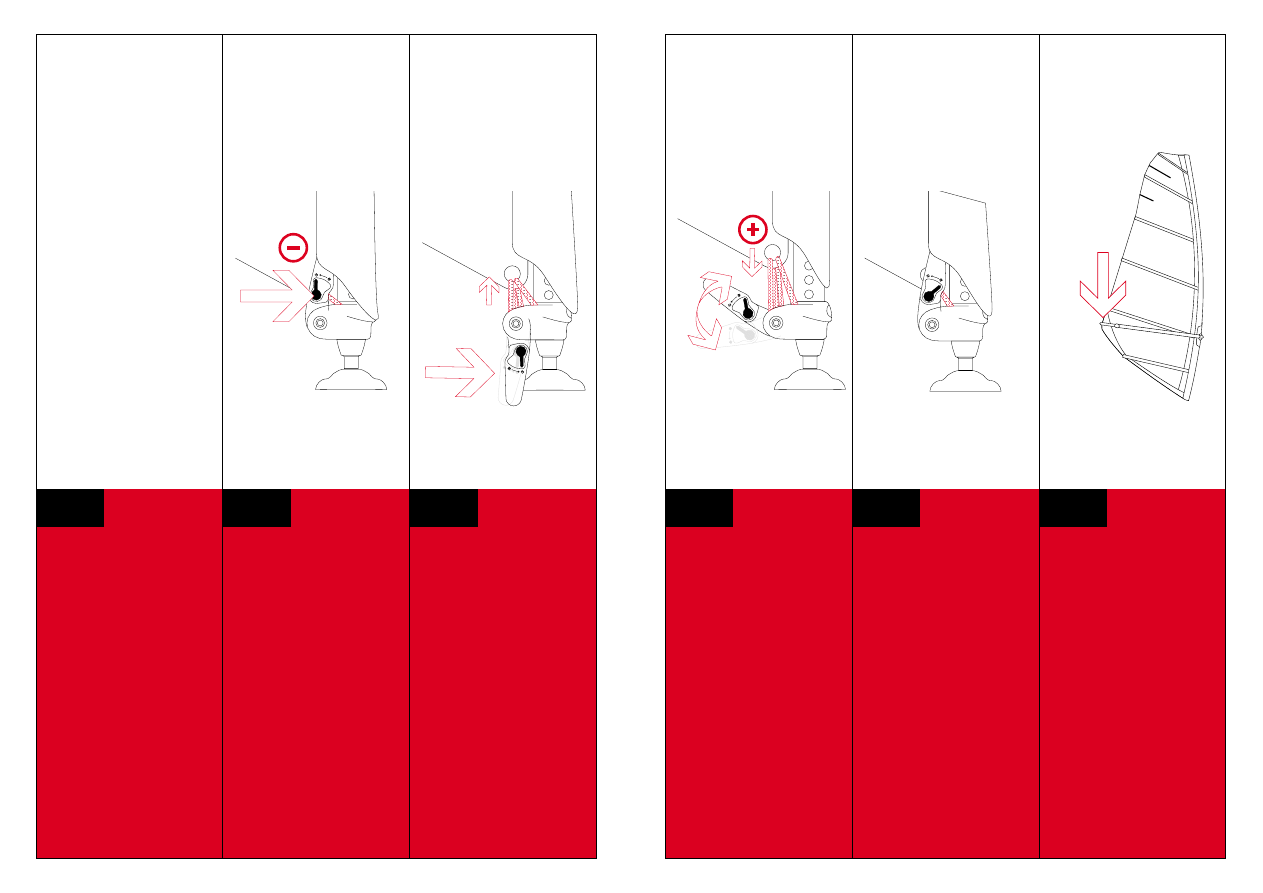
Pull the free end of the line out of
the extension and remove the line
from the clam cleat.
Holen Sie das lose Ende des
Tampens aus der Verlängerung
und lösen Sie das Tampenende
jetzt aus der Belegklemme.
Retirer l’extrémité libre du bout
de l’extension et la détacher du
taquet coinceur.
2.5
DERIGGING
>>>>
TUNING
>>>>
2.6
2.7
3.1
3.2
3.0
Remove the line loop or strap from
the loose roller on the extension
and pull it out of the tack cringle.
Lösen Sie die Tampenschlaufe von
der losen Rolle der Verlängerung
und ziehen Sie sie aus der
Segelöse.
Détacher la boucle de la poulie
mobile de l’extension et la sortir
de l’œillet de la voile.
Pull the mast-foot out of the mast.
Ziehen Sie den Mastfuß aus dem
Mast.
Retirer le pied de mât du mât.
Professional
This new extension means that
you can now squeeze every last
bit of performance out of your sail
by simply and easily adjusting it to
the actual wind strength.
Mit der neuen Verlängerung haben
Sie erstmals die Möglichkeit die
Leistung Ihres Segels voll auszu-
schöpfen, indem Sie es sehr einfach
an die jeweiligen Windverhältnisse
anpassen können.
La nouvelle extension vous permet,
pour la première fois, d’exploiter
pleinement les capacités de votre
voile, puisque vous pouvez l’ajuster
très facilement en fonction des
différentes conditions de vent.
• If the wind increases, increase
the luff tension.
• If the wind decreases, reduce
the luff tension
• Nimmt der Wind zu, Vorliek-
spannung erhöhen.
• Nimmt der Wind ab, Vorliek-
spannung reduzieren.
• Si le vent se lève, augmenter
la tension du guindant.
• Si le vent diminue, diminuer
la tension du guindant.
• One ratchet step changes the
luff length by around 3 mm.
• The current trim range for North
Sails from VTS
®
Min to VTS
®
Max is around 5 ratchet clicks
• Ein Ratschengang ergibt eine
Änderung des Vorlieks um ca.
3 mm.
• Die Trimmrange der aktuellen
North Sails Segel beträgt von
VTS
®
Min auf VTS
®
Max ca.
5 Ratschengänge.
• L’encliquetage modifie la tension
du guindant de 3 mm environ.
• La marge d’équilibrage de l’ac
tuelle voile North Sails est com-
prise entre VTS
®
Min et VTS
®
Max, soit environ 5 encliquetages.
Ensure when rigging that you have
left enough room between the
clew and the boom end as well as
between the tack and mast-foot to
allow any necessary adjustment.
Adjust the length of the mast
extension appropriately.
Achten Sie beim Segelaufbau dar-
auf, dass zwischen Achterliek und
Gabelbaumende und zwischen
Vorliek und Verlängerung noch
ausreichend Platz für ein Nach-
trimmen besteht. Eventuell Verlän-
gerung anpassen.
Lors de l’installation de la voile,
veiller à ce qu’il y ait assez de place
entre le bout du wishbone et l’ex-
trémité du point d’écoute et entre
le guindant et l’extension pour
effectuer un équilibrage ultérieur.
Ajuster éventuellement l’extension.
Get into a surf free zone and
fall into the water.
IMPORTANT: the rig must
always be attached to the
board!
Suchen Sie eine brandungsge-
schützte Stelle und lassen Sie
sich ins Wasser fallen.
WICHTIG: Lassen Sie das
Board immer mit dem Rigg
verbunden!
Chercher un endroit à l’abri des
vagues et se laisser tomber dans
l’eau.
IMPORTANT : toujours laisser
la planche reliée au gréement!
Set the black release lever to
– [minus]. Remove the lever from
the mast foot protector.
IMPORTANT: the main lever
will be released if it is slightly
pushed in towards the mast
Stellen Sie den schwarzen Ent-
spannhebel auf – [Minus]. Ziehen
Sie den Hebel aus dem Mastfuß-
protektor.
WICHTIG: Der Haupthebel wird
erst freigegeben nachdem er
kurz in Richtung Mast
gedrückt wurde.
Diminuer la tension du guindant:
Positionner le levier de détente
noir sur – [Moins]. Retirer le levier
de la protection de pied de mât.
IMPORTANT: le levier principal
se libère seulement après avoir
été brièvement pressé en
direction du mât.
Reduce the luff tension:
Open the lever completely and
push it against resistant point until
the ratchet is released by one
step.
Vorliekspannung reduzieren:
Öffnen Sie den Hebel ganz und
drücken Sie ihn gegen den
Anschlag, bis die Ratsche
eine Stufe auslöst.
Ouvrir le levier en entier et le
presser contre le butoir, jusqu’à
ce que le cliquet libère un cran.
Increase luff tension:
Set the release lever to + [plus] and
set the required tension using the
lever. ATTENTION: due to the
reduced friction in water, less
force is needed when tensioning
the rig. Do not damage the sail
by over tensioning the downhaul!
Vorliekspannung erhöhen:
Den Entspannhebel auf + [Plus] stel-
len und mit dem Hebel nachspannen.
ACHTUNG: Durch verringerte
Reibung erfordert das Spannen
im Wasser weniger Kraftaufwand.
Das Segel nicht überspannen
und beschädigen!
Augmenter la tension du guindant:
Positionner le levier de détente sur +
[Plus] et retendre avec le levier.
Attention: un frottement réduit
requiert moins d’effort pour
retendre. Ne pas tendre trop
pour éviter de l’endommager!
Fine tuning on the water:
Feintuning auf dem Wasser:
Ajustage précis sur l’eau :
Stow the lever in the mast foot
protector when you are finished.
IMPORTANT: so that the lever
does not fall out accidentally,
set the release lever to + [plus].
Verstauen Sie anschließend den
Hebel im Mastfußprotektor.
WICHTIG: Damit der Hebel
nicht unbeabsichtigt herunter-
fällt, Entspannhebel auf
+ [Plus] stellen.
Ensuite, placer le levier dans la
protection de pied de mât.
Important : pour éviter que le
levier ne lache involontaire-
ment, positionner le levier
de détente sur + [Plus].
The adjustment to the luff tension
will also change the clew tension.
Adjust this as necessary.
Durch das Verstellen am Vorliek
ändert sich die Schothornspannung.
Eventuell auch hier nachtrimmen.
L’orientation du guindant modifie
la tension du point d’écoute.
Il sera peut-être nécessaire
d’effectuer un rééquilibrage.
FINE
TUNING
>>>>
FINE
TUNING
>>>>
4.0
4.1
4.2
4.3
4.4
4.5
Should the downhaul line snap
whilst sailing, you could be in real
danger. Check the line before going
out to ensure that it is in perfect
condition. When exchanging the
rope make sure to ONLY use the
original POWER.XT rope.
Reißt der Tampen während des
Windsurfens können Sie in Seenot
geraten. LEBENSGEFAHR! Achten
Sie immer auf den einwandfreien
Zustand des Tampens. Wird der
Tampen ausgetauscht, verwenden
Sie bitte AUSSCHLIESSLICH den
original POWER.XT-Tampen.
Si le bout se rompt sur l´ eau, vous
pouvez être en danger. DANGER DE
MORT! Ainsi, assurez-vous que le
bout est toujours dans un état impec-
cable. Lorsque vous changez le bout,
assurez vous d'utiliser UNIQUEMENT
le bout original POWER.XT.
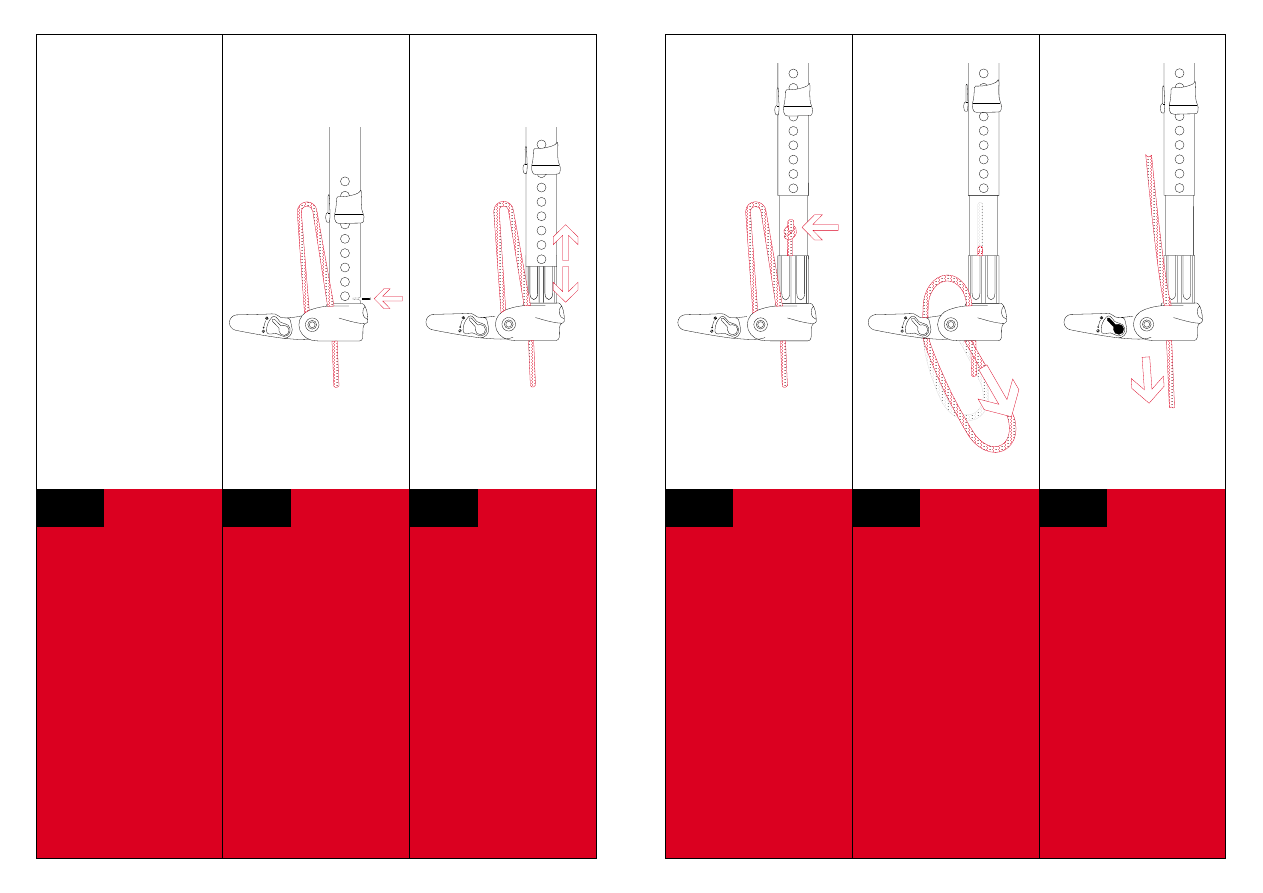
Replacement as follows:
remove the mast foot tube from
the mast foot cup (Philips).
Der beschädigte oder abgenutzte
Tampen wird folgendermaßen ersetzt:
lösen Sie das Mastfußrohr vom
Mastfußbecher (Kreuzschlitz).
Remplacer le bout endommagé ou
usé comme suit:
détacher le tube du pied de mat
(empreinte cruciforme).
Remove the mast foot tube from
the mast foot cup (Philips).
Lösen Sie das Mastfußrohr vom
Mastfußbecher (Kreuzschlitz).
Détacher le tube du pied de mat
(empreinte cruciforme).
Undo the knot in the cup.
Knoten im Becher lösen.
Détacher le nœud dans le godet.
Line Change
Tampenwechsel
Changement du bout
Pull the old line out from inside the
mast foot.
Ziehen Sie den alten Tampen vom
Innern des Mastfußes heraus.
Retirer l’ancien bout de l’intérieur
du pied de mât en le tirant.
Remove the other end of the line.
Entfernen Sie nun die andere
Tampenseite.
Puis, retirer l’autre côté du bout.
LINE
CHANGE
>>>>
LINE
CHANGE
>>>>
5.0
5.1
5.1
5.2
5.3
5.4
Press the end of the new line onto
the jam disc and ratchet the end
into the mast foot.
Drücken Sie das Ende des neuen
Tampen auf die Klemmscheibe
und ratschen Sie das Ende in den
Mastfuß.
Presser l’extrémité du nouveau
bout sur le disque de serrage et
encliqueter l’extrémité dans le
pied de mât.
Press the end of the new line onto
the jam disc and ratchet the end
into the mast foot.
Drücken Sie das Ende des neuen
Tampen auf die Klemmscheibe
und ratschen Sie das Ende in den
Mastfuß.
Presser l’extrémité du nouveau
bout sur le disque de serrage et
encliqueter l’extrémité dans le
pied de mât.
Knot this end internally in the mast
foot using a figure-of-eight knot.
Verknoten Sie dieses Ende im
Innern des Mastfußes mit einem
Achterknoten.
Nouer cette extrémité à l’intérieur
du pied de mât en faisant un
nœud en huit.
Screw the mast foot and the tube
together.
Verschrauben Sie den Mastfuß mit
dem Rohr.
Visser le pied de mât au tube.
Feed the end of the line in again at
the top.
Tampenende oben wieder einführen.
Réintroduire l’extrémité du bout en
haut.
Don’t forget the knot.
Auch hier Knoten nicht vergessen.
Ne pas oublier les nœuds.
LINE
CHANGE
>>>>
LINE
CHANGE
>>>>
5.5
5.5
5.6
5.7
5.8
5.9

1. Always rinse the mast foot in
fresh water after use in salt
water or on sandy beaches.
During the rinsing, move the
ratchet back and forth with the
lever.
2. Whenever possible, store the
mast foot when dry. Do not oil
or grease.
3. Before every use check the line
for damage or wear and replace
if necessary.
4. Should the line become stuck in
the mast foot due to improper
use, pull the line back by care
fully pulling on one end. Do not
use force on the lever. If pulling
on the line is not effective, you
will need to unscrew the mast
foot tube to gain access to the
line.
1. Den Mastfuß nach Gebrauch
im Salzwasser und an Sand-
stränden immer mit Süßwasser
abspülen. Während dem Spülen
den Hebel der Ratsche bewegen.
2. Den Mastfuß möglichst immer
trocken lagern. Nicht ölen oder
einfetten.
3. Vor jedem Benutzen den
Tampen auf Beschädigungen
prüfen, gegebenenfalls den
Tampen ersetzten.
4. Bei unsachgemäßer Bedienung
kann es vorkommen, dass sich
der Tampen im Mastfuß ver-
klemmt. Dabei keine Gewalt
über den Hebel anwenden,
sondern den Tampen an seinem
Ende vorsichtig zurückziehen.
Gelingt dies nicht, Mastfußrohr
abschrauben.
1. Toujours rincer le pied de mât
avec de l’eau douce après une
utilisation dans de l’eau salée
ou sur des plages de sable.
Pendant le rinçage, bouger le
levier du cliquet.
2. Si possible, conserver le pied
de mât sec en permanence.
Ne pas le huiler ou le graisser.
3. Avant chaque utilisation du
bout, vérifier qu’il n’est pas
endommagé, le cas échéant, le
changer.
4. Si le bout est utilisé de manière
incorrecte, il se peut qu’il se
coince dans le pied de mât.
Dans ce cas, ne pas actionner
le levier avec violence, mais
retirer le bout avec précaution
par son extrémité.
Si cela ne fonctionne pas,
déviser le tube du pied de mât.
CARE
HINTS
>>>>
PFLEGE
HINWEISE
>>>>
CONSEILS
D’ENTRETIEN
>>>>
NOTES
>>>>
Wyszukiwarka
Podobne podstrony:
PANsound manual
als manual RZ5IUSXZX237ENPGWFIN Nieznany
hplj 5p 6p service manual vhnlwmi5rxab6ao6bivsrdhllvztpnnomgxi2ma vhnlwmi5rxab6ao6bivsrdhllvztpnnomg
BSAVA Manual of Rabbit Surgery Dentistry and Imaging
Okidata Okipage 14e Parts Manual
Bmw 01 94 Business Mid Radio Owners Manual
Manual Acer TravelMate 2430 US EN
manual mechanika 2 2 id 279133 Nieznany
4 Steyr Operation and Maintenance Manual 8th edition Feb 08
Oberheim Prommer Service Manual
cas test platform user manual
Kyocera FS 1010 Parts Manual
juki DDL 5550 DDL 8500 DDL 8700 manual
Forex Online Manual For Successful Trading
ManualHandlingStandingAssessment
Brother PT 2450 Parts Manual
Jabra CLIPPER Manual PL 10311 (1)
więcej podobnych podstron