Joomla and Mambo template tutorial: The Complete Guide to Joomla Templates and Mambo templates using Dreamweaver and MSAS
A guide to creating Mambo 4.5.1 - 4.5.3 and Joomla 1.0.x templates in Dreamweaver with our
free mambo dreamweaver template builder extension and Mambo Stand Alone Server [MSAS]
from www.mambosolutions.com or Joomla Stand Alone Server (JSAS) from Joomlasolutions.com
Professional Mambo and Joomla Templates
T.O.C
So, you have discovered this great tool called
and you want to try to make your own Mambo
template huh? Well, I know how you feel and share your enthusiasm. Back in 2002 I was working with Xoops,
a similar system to Mambo, and after I discovered Mambo, it did not take long for me to switch and have a
go at making my own Mambo templates. At that time there were no tutorials around the web, so like others,
I looked at the existing default templates for Mambo and started reverse engineering. Here, I will attempt
to clearly layout the steps in creating a Mambo template so that you may have a nice resource that was
not available when I got started. Well, what are we waiting for? Lets get started at the beginning, I find that
is usually a good a place as any to get started.
First of all, lets talk about what a mambo template is. A mambo template defines the overall 'look and feel'
of your mambo website. Normally this includes things like, colors, header image, 2 or 3 column layout,
footer etc. The template
(index.php)
works hand in hand with the CSS
(template_css.css)
to give you
control over many things such as module placement, font colors, borders, hyperlink hover effects, and
a gazillion other things that you will discover if you dig deeper.
There are many ways to go about creating/designing a Mambo template. In this guide, we will be creating
a 100% width 'autostretch' 3 column table layout. The layout is 3 seperate 100% tables 'stacked' vertically-
the top table is for the header area, the middle table is for the mambo left, center and right columns, and
the bottom table is for the footer area. Additionally, the middle table will contain a 3 column 100%
nested table.
We will be using Dreamweaver to to the first phase of the layout and coding. After we reach a certain point,
we will switch over to our local Mambo test server [MSAS] to preview how our template will actually look on
the web. Ok enough overview already right? You want to start making a template...comon!
Update: Joomla! is a seprate application but shares the same templates as Mambo at this time. (Mambo
4.5.1 - 4.5.3 same as Joomla 1.0.x templates) Joomla! was created when the entire mambo development
team split from mambo and started this new project called Joomla!. More info at
What you will need to follow this tutorial:
●
http://www.mambosolutions.com/dw_tutorial/ (1 of 23) [12/03/2008 20:39:41]
Joomla and Mambo template tutorial: The Complete Guide to Joomla Templates and Mambo templates using Dreamweaver and MSAS
●
Mambo Stand Alone Server [MSAS]4.5.1a:
●
-or optionally you can use the newer JSAS - Joomla Stand Alone Server
●
Mambo 4.5.1a Dreamweaver Template builder extension:
●
-or optionally use the Joomla Dreamweaver Template extension-
●
Some time, perhaps 1 hour - maybe more, maybe less
●
Perhaps a beverage (optional-I am using Maestro Lorenzo brand coffee today)
●
Windows 2000 or XP
●
Actually, I have added copy/paste snippets of code for Mac/Linux/non Windows people :) So read on....
First Phase, we need to open Dreamweaver and get the
*note: If you need to download the newest version of the extension manager from Macromedia, get it
●
Open Dreamweaver. On the top menu, locate 'Commands' then 'manage Extensions'. This will open
the extension manager.
●
In the extension manager, choose 'File' then 'Install Extension'. Browse to the location of
and install it.
●
After installation, exit the Dreamweaver application.
●
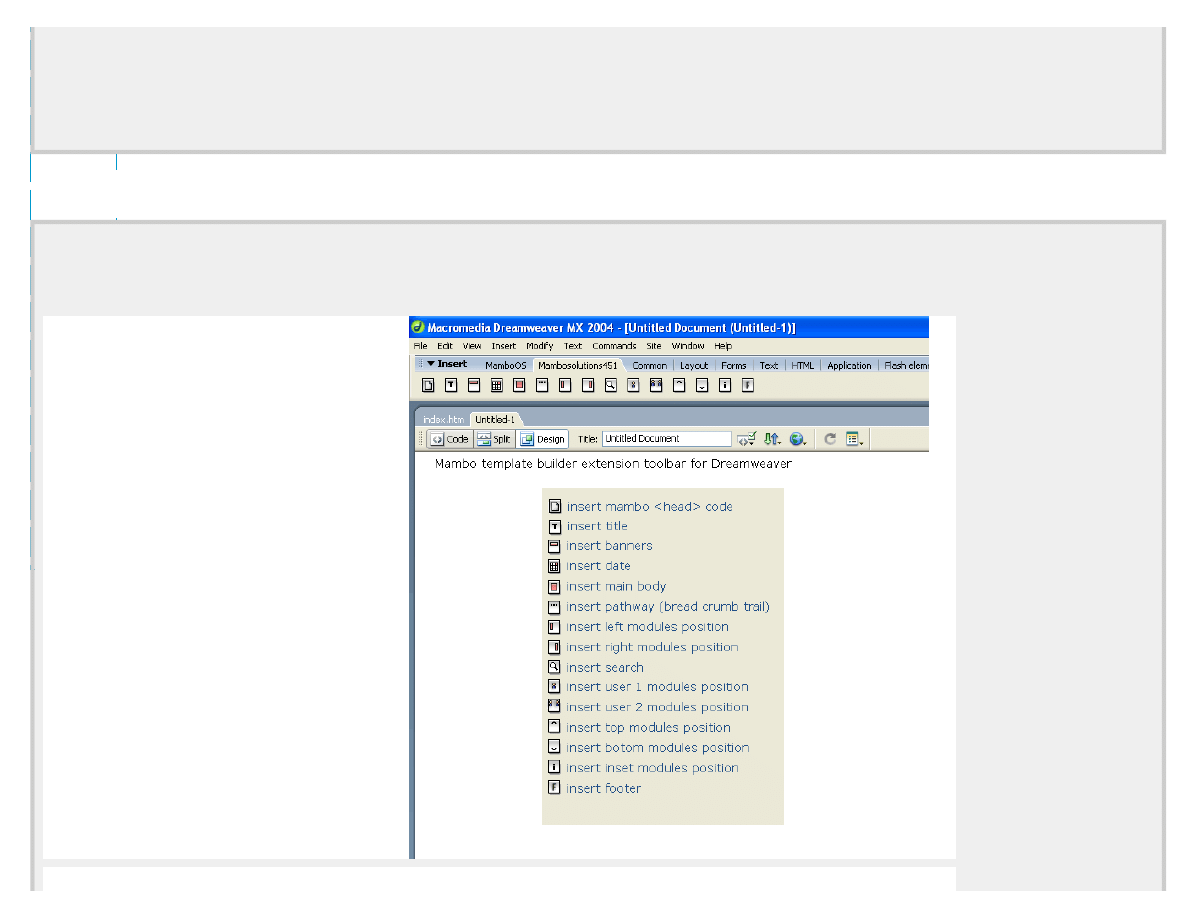
Now restart Dreamweaver. You should see a new toolbar titled' MamboOS'
Figure 1: Mambo Toolbar in Dreamweaver
If you are with me to this point, pat yourself on the back, grab a tasty beverage (your choice), and get ready for the
http://www.mambosolutions.com/dw_tutorial/ (2 of 23) [12/03/2008 20:39:41]
Joomla and Mambo template tutorial: The Complete Guide to Joomla Templates and Mambo templates using Dreamweaver and MSAS
second phase of setting up your local template development environment: MSAS !
note: you can also use JSAS, the screens will look slightly different but the basics are same
Second Phase. [MSAS] Let's get our
local server environment
running so we can play Mambo!
Mambo is a web applictaion that is dependant on other web applictaions to create its magic. Namely MySql database, PHP
and Apache webserver. Actually we dont need to worry about the extra steps of installing and configuring all of
those applications because luckily I have created for you an 'all-in-one' server package based on MiniServer for Windows
called
'Mambo Stand Alone Server' or [MSAS]
Put your hands in the air and say'Yeah mambosolutions!' :) Ok, if you don't put your hands in the air its up to you.
●
If you haven't already done so,
●
install it as as you would any appliaction
●
locate the msas.exe(inside the Distribution folder) then double click
●
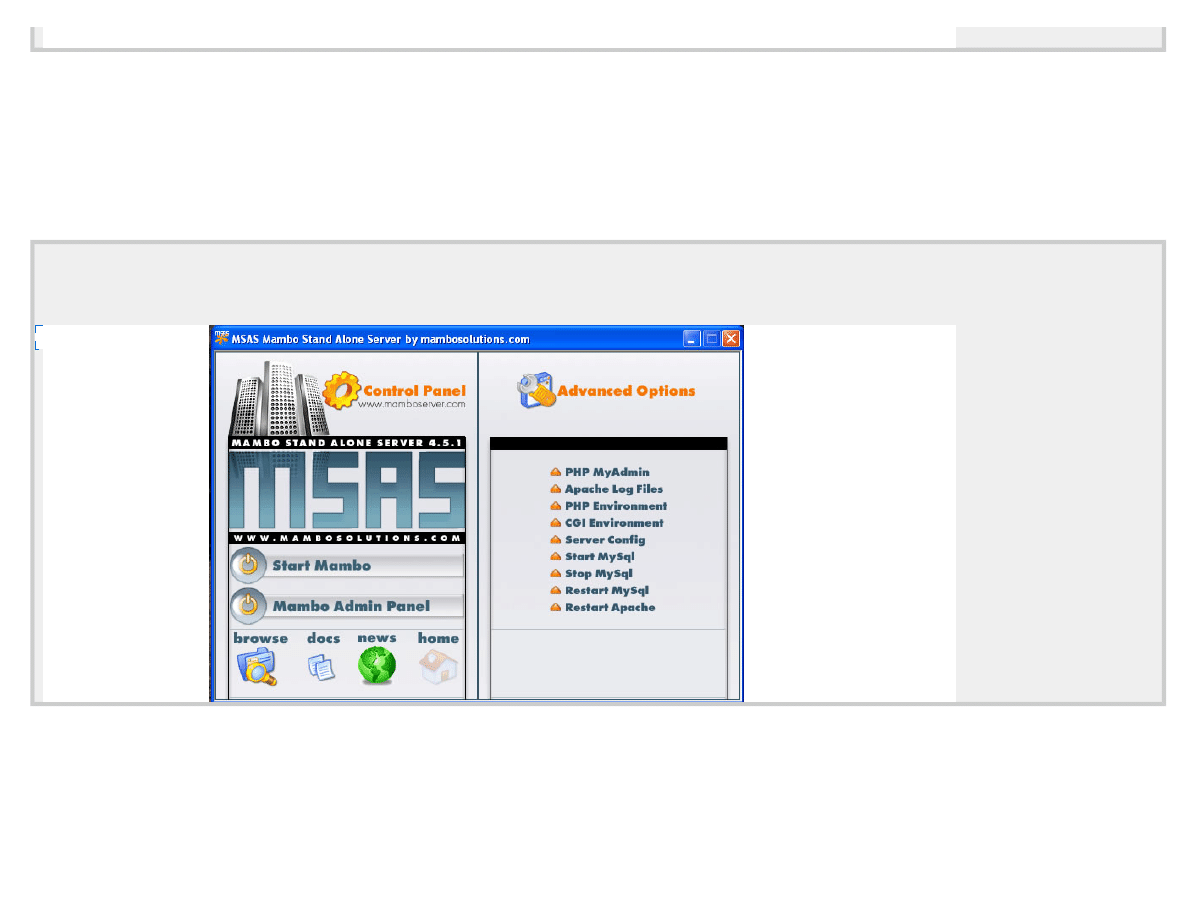
At this point you should see the MSAS inteface window on your desktop
●
Login/Password for Mambo administrator: admin/admin
Figure 2: MSAS Interface
Whew! are you having fun yet? Man I sure am. OK time for me to grab a coffee. BRB!
Allrighty then, finally we get to the template building part....
Let's see how mambosolutions builds a template, shall we?
I am sure that there are several different ways to go about building a mambo template. In fact, I know there are. My goal
here is to show you in the simplest way I know how, to create a basic mambo template using tables, inserting all the
mambo jambo code with my dreamweaver extension, and creating a sort of 'live preview' environment using MSAS. Sound
ok? Will the code validate? Probably not. Will it show you the basic idea of how mambo templates work and how you can
create one? I sure hope so! Lets roll....
http://www.mambosolutions.com/dw_tutorial/ (3 of 23) [12/03/2008 20:39:41]

Joomla and Mambo template tutorial: The Complete Guide to Joomla Templates and Mambo templates using Dreamweaver and MSAS
Third Phase : Building a 3-column table template for Mambo
Step 1: Head's Up!
●
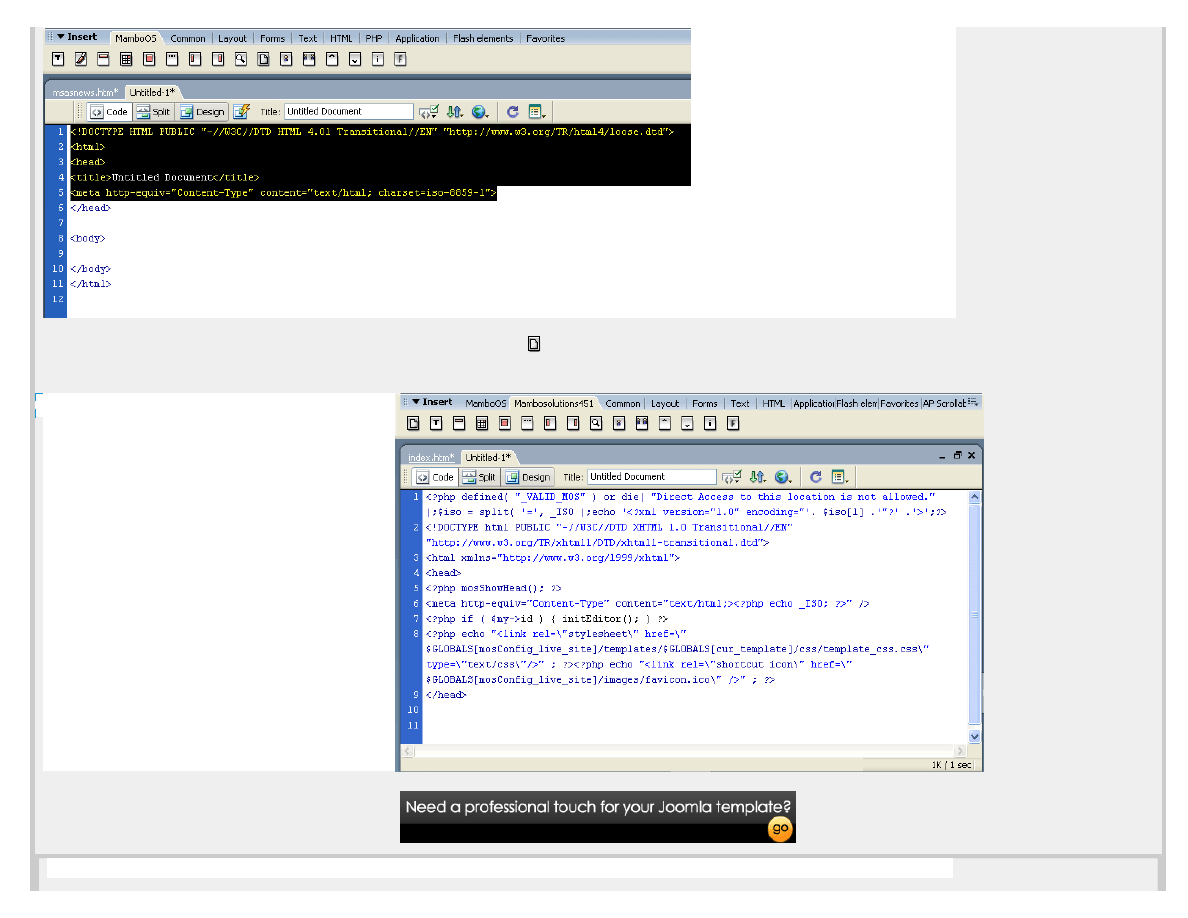
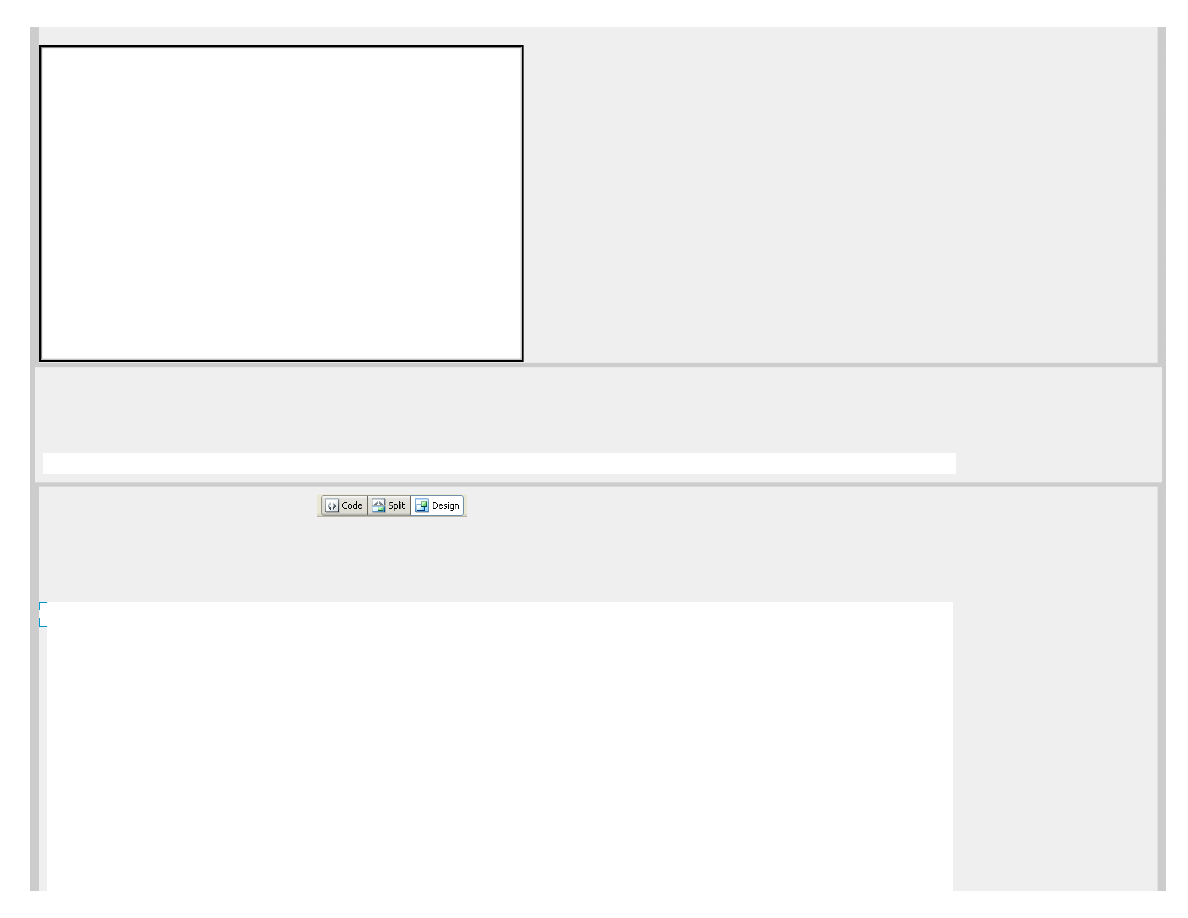
Open Dreamweaver and create a new 'dynamic page' --> php
Figure 3: New Document in Dreamweaver
●
Switch to Code view and you should have something like this:
Figure 4: Code View in Dreamweaver
●
Select all the code above the closing </head> tag and delete it
Figure 5: Delete head code in Dreamweaver
http://www.mambosolutions.com/dw_tutorial/ (4 of 23) [12/03/2008 20:39:41]
Joomla and Mambo template tutorial: The Complete Guide to Joomla Templates and Mambo templates using Dreamweaver and MSAS
●
Insert the mambo Head code by locating and clicking on the 'Insert Head Code' button
in
the Mambosolutions451 toolbar
●
Your code should now look like this:
Figure 6: Insert Mambo Head Code in Dreamweaver
MAMBO 4.5.1 TEMPLATE HEAD CODE (copy/paste from below)
http://www.mambosolutions.com/dw_tutorial/ (5 of 23) [12/03/2008 20:39:41]
Joomla and Mambo template tutorial: The Complete Guide to Joomla Templates and Mambo templates using Dreamweaver and MSAS
(Click to select contents and copy them to the clipboard)
Check out my Amazon.com Wishlist
Step 2: John, John young and able, get your elbows off the table!
Ok, hopefully my tutorial is better then my humor. Lets layout some tables for our template.
●
Switch over to 'Design View' in Dreamweaver.
●
Click once anywhere in the white area on the canvas to activate the cursor
●
We will be creating 3 seperate tables at 100% with for an varaible width 'auto-stretch' template. The top table
will be for our header area; the middle table will be for our left middle and right content columns; and the
bottom table will be for our footer area.
●
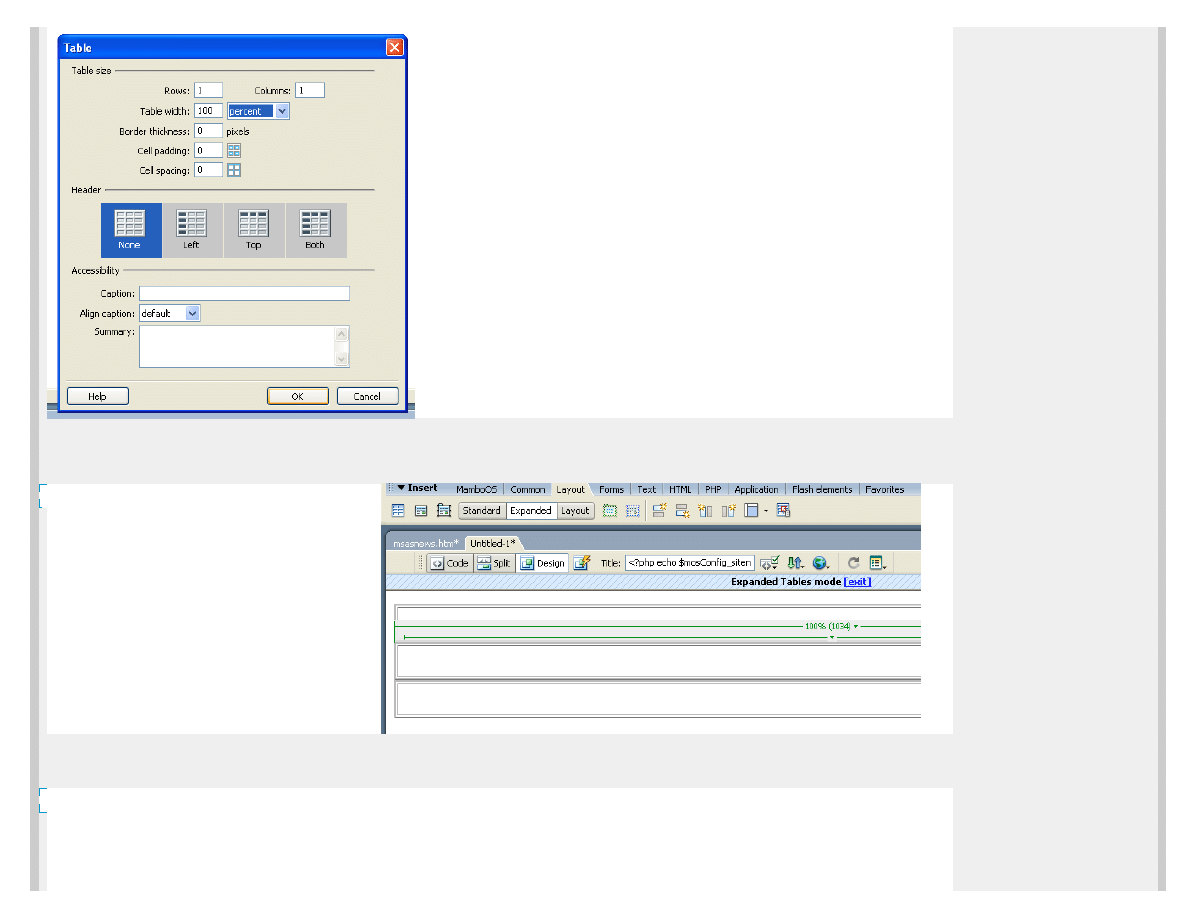
From the top menu, go to Insert>Table (Ctrl+Alt+T) This brings up the table dialouge box
●
Enter the following settings:
Figure 8: Insert Table Dialogue in Dreamweaver
http://www.mambosolutions.com/dw_tutorial/ (6 of 23) [12/03/2008 20:39:41]
<?php
/**
* template_name - Mambo 4.5.1 template
* @version 4.5.1
* @copyright (C) 2004 by yourname
* @license licensce info here
*/
defined( '_VALID_MOS' ) or die( 'Direct Access to this location is not allowed.' );
$iso = split( '=', _ISO );
echo '<?xml version="1.0" encoding="'. $iso[1] .'"?' .'>';
?>
<!DOCTYPE html PUBLIC "-//W3C//DTD XHTML 1.0 Transitional//EN"
"http://www.w3.org/TR/xhtml1/DTD/xhtml1-transitional.dtd">
<html xmlns="http://www.w3.org/1999/xhtml">
<head>
<?php if ( $my->id ) initEditor(); ?>
<meta http-equiv="Content-Type" content="text/html; <?php echo _ISO; ?>" />
<?php mosShowHead(); ?>
<?php echo "<meta name=\"author\" content=\"www.mambosolutions.com\" />" ?>
<?php echo "<link rel=\"stylesheet\" href=\"$GLOBALS
[mosConfig_live_site]/templates/$GLOBALS[cur_template]/css/template_css.css\" type=
\"text/css\"/>" ; ?>
<?php echo "<link rel=\"shortcut icon\" href=\"$GLOBALS
[mosConfig_live_site]/images/favicon.ico\" />" ; ?>
</head>
Joomla and Mambo template tutorial: The Complete Guide to Joomla Templates and Mambo templates using Dreamweaver and MSAS
●
Repeat this process a total of three times - until you have 3 tables stacked vertically at 100% width each
●
TIP: Locate the 'Layout' tab, and choose 'Expanded' view-this is optional but I find it helps you see what you
are doing better.
Figure 9: Expanded Design View in Dreamweaver
●
Click once in the middle table to select it
●
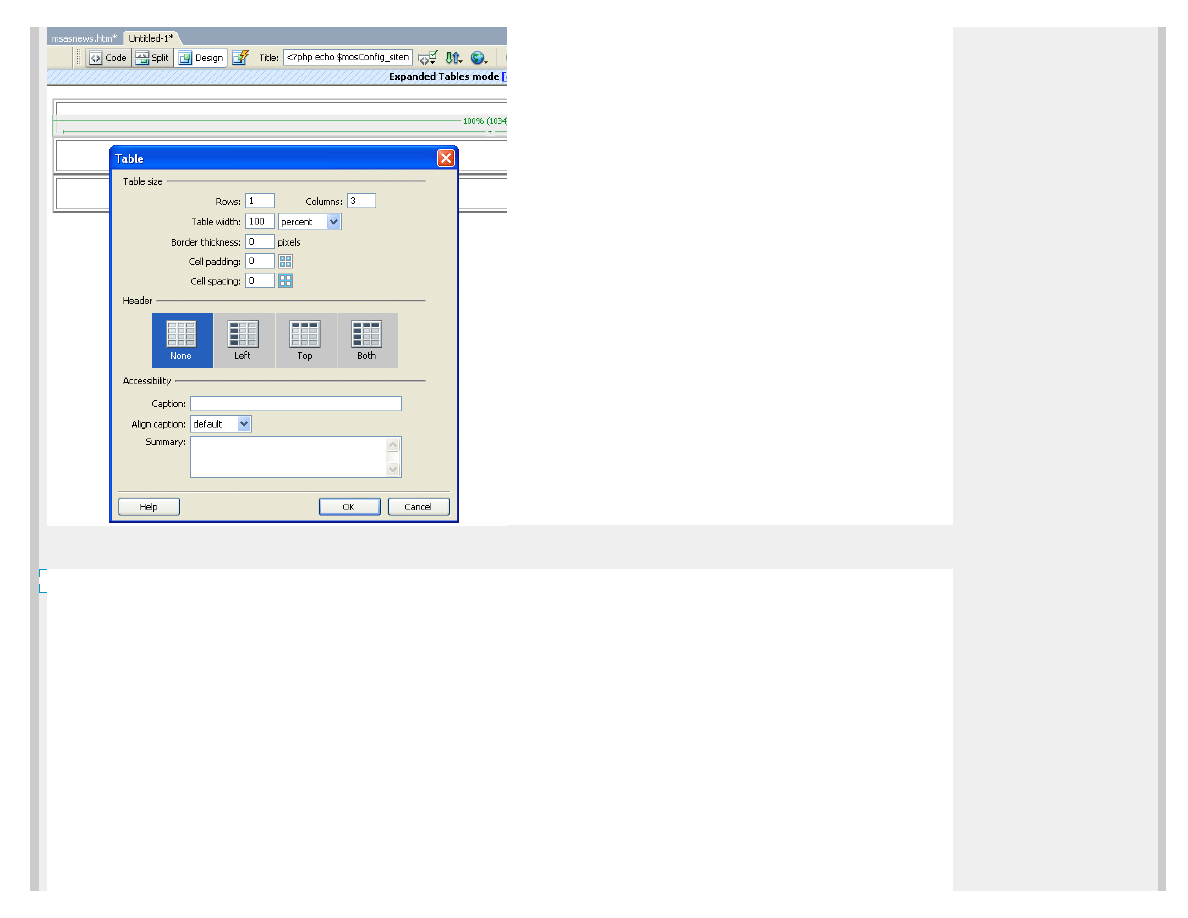
Next, go to ' Insert' >'Table' (CTRL+ALT+T) and create a 3 column 100% width table
Figure 10: Insert nested table in Dreamweaver
http://www.mambosolutions.com/dw_tutorial/ (7 of 23) [12/03/2008 20:39:41]
Joomla and Mambo template tutorial: The Complete Guide to Joomla Templates and Mambo templates using Dreamweaver and MSAS
●
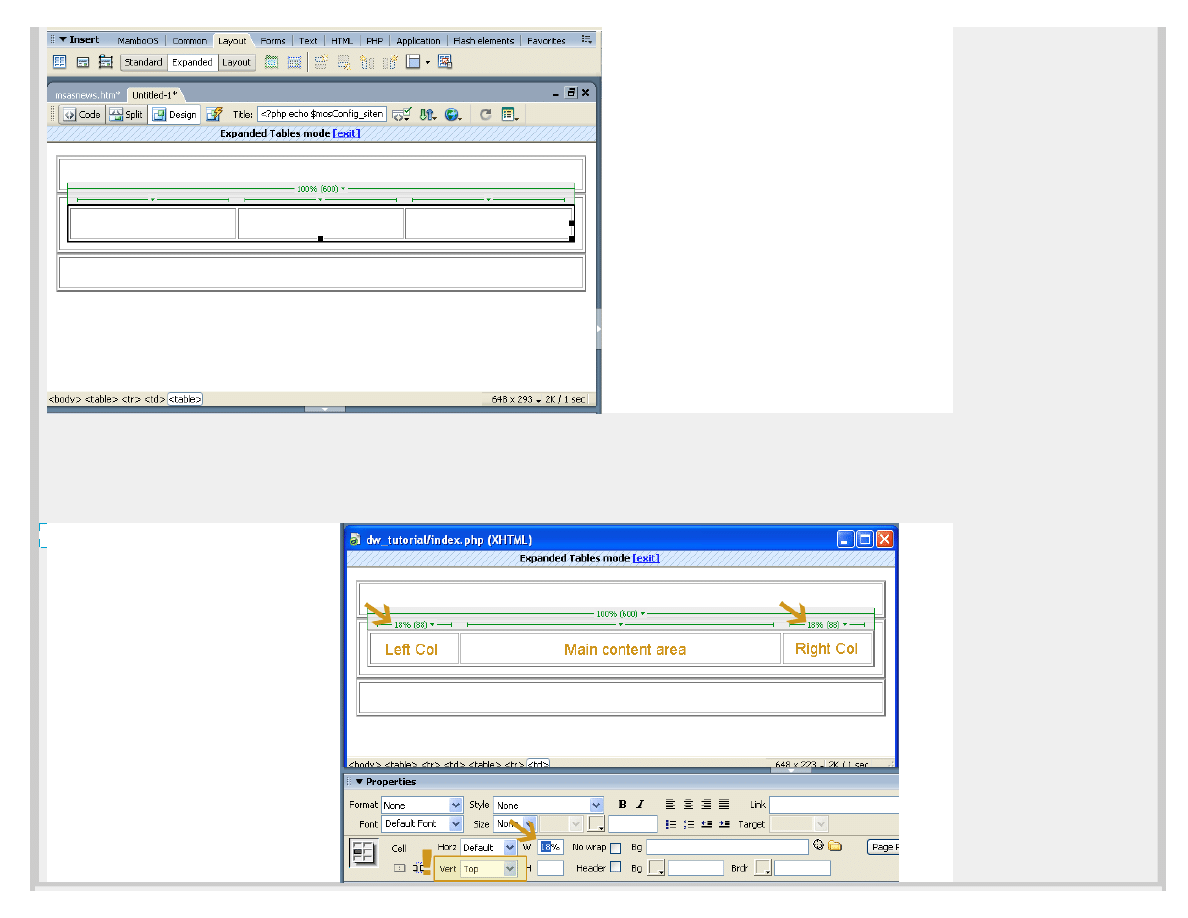
Now you should be looking like this:
Figure 11: Nested 3 column table in Dreamweaver
http://www.mambosolutions.com/dw_tutorial/ (8 of 23) [12/03/2008 20:39:41]
Joomla and Mambo template tutorial: The Complete Guide to Joomla Templates and Mambo templates using Dreamweaver and MSAS
●
can you begin to see how the template layout is functioning? We will now resize the left and right cells of this
table - these will be our left column and right column in the template-the middle area will be for the main content.
●
place your cursor in the left cell and click to select it
●
in the Properties, enter 18% for the width (18% is the width I chose, but you can later adjust this what you want)
●
While your here, set the vertical align to 'Top'
●
Click in the right column, repeat this step for the right column
●
see below:
Figure 12: Resize columns in Dreamweaver
http://www.mambosolutions.com/dw_tutorial/ (9 of 23) [12/03/2008 20:39:41]

Joomla and Mambo template tutorial: The Complete Guide to Joomla Templates and Mambo templates using Dreamweaver and MSAS
Step 3: Calling all Code Monkeys!
Now we can start inserting the mambo specific php code in our templates, don't worry if you don't know the difference
between PHP and a hole in the ground, this will be painless!
●
Locate the Insert Main Body
code button on the Mambosolutions451a extension toolbar in Dreamweaver
●
Click once anywhere in the middle column?Main Content Area' to select it-then click the Insert Main Body button
●
for those of you on Macs or Linux, the 'Main Body'code to insert at this point is:
(Click to select contents and copy them to the clipboard)
Below is codeview of the table layout code with the Mambo 'Main Body' code (with added comments)
Okay, so how are we doing so far? Are you getting it? I sure hope so because this is taking a heck of a lot longer than I
had thought it would. Normally anything worth doing means taking the time to do it right, and in this case that means a
long time :)
Let's continue adding code, shall we?
●
Click once in the left column to select it, then click on the Insert Left Modules button
to insert the
following code:
(Click to select contents and copy them to the clipboard)
●
Cool? did you get that? Let's go ahead and add 'user1' module position directly underneath the 'left' position
●
Make sure the code placeholder
is not selected while in wysiwyg mode by clciking anywhere in the white are
of the left cell.
●
Locate the Insert User1 Modules position button
and click it to insert the following code in the left column:
(Click to select contents and copy them to the clipboard)
●
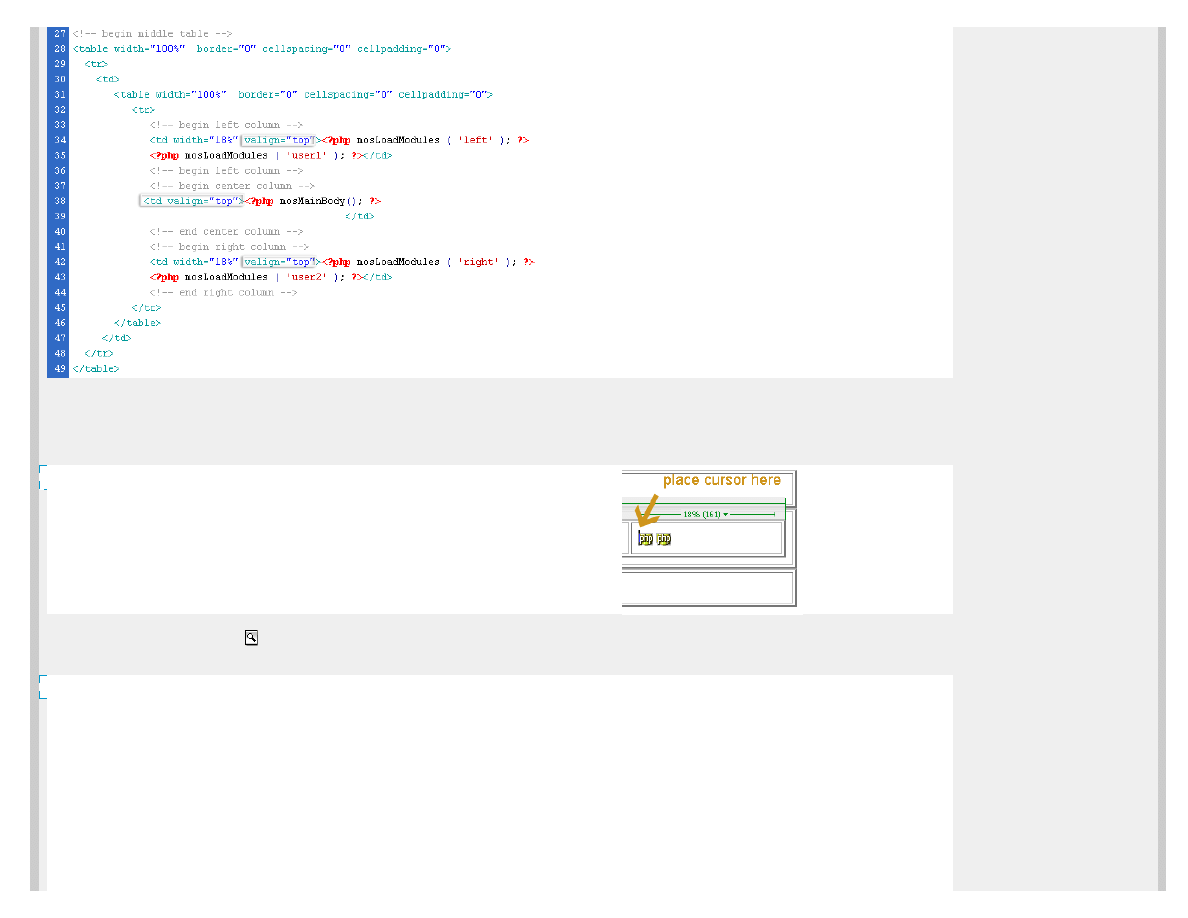
Now let's jump over to the right column, click anywhere in the right column to select it
●
Locate the Insert Right Modules position button
and click it once to insert the code:
(Click to select contents and copy them to the clipboard)
●
Now lets add the User2 position below the 'Right' position, make sure the code placeholder
is not
selected while in wysiwyg mode by clciking anywhere in the white are of the right cell.
●
Locate and click once on the Insert User2
button to insert the User2 php code:
(Click to select contents and copy them to the clipboard)
Our tables in 'code view' should look like this about now:
Figure 13: Tables layout with Mambo php code added in Dreamweaver
http://www.mambosolutions.com/dw_tutorial/ (10 of 23) [12/03/2008 20:39:41]
<?php mosMainBody(); ?>
<?php mosLoadModules ( 'left' ); ?>
<?php mosLoadModules ( 'user1' ); ?>
<?php mosLoadModules ( 'right' ); ?>
<?php mosLoadModules ( 'user2' ); ?>
Joomla and Mambo template tutorial: The Complete Guide to Joomla Templates and Mambo templates using Dreamweaver and MSAS
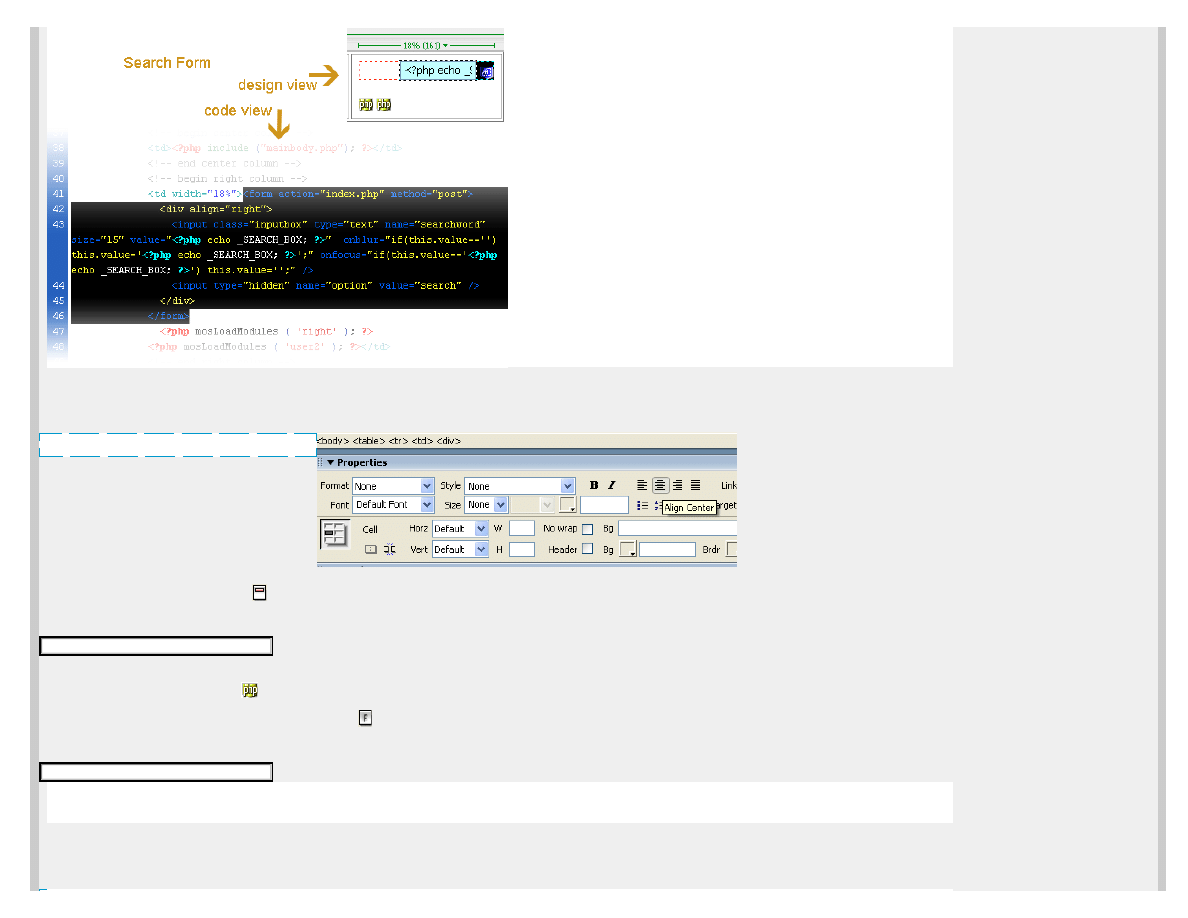
●
Let's insert the search code, (
note
: search is now a module in Mambo 4.5.1- so this is optional if you want
to hardcode it in the template)
●
We are going to be placing the search field at the top of the right column for now just for learning purposes
●
In the right column, where you just added the code for positions 'Right' and 'User2', click your mouse
to the left
of the first php code placeholder
Figure 14: Insert cursor to the left of the existing code placeholder in Dreamweaver
●
Click once on the 'Insert Search'
button to insert the Search code
●
It should look like this:
Figure 15: Search field in Dreamweaver
http://www.mambosolutions.com/dw_tutorial/ (11 of 23) [12/03/2008 20:39:41]
Joomla and Mambo template tutorial: The Complete Guide to Joomla Templates and Mambo templates using Dreamweaver and MSAS
●
Moving right along, let's add our banners area.
●
Click anywhere in the bottom table (footer table) to select it.
●
Center align our banners by clciking the Center Align in Properties panel:
Figure 16: Align center in Dreamweaver
●
Click once on the 'Insert Banners'
button to insert the banners code:
(Click to select contents and copy them to the clipboard)
●
Lets put our Footer code in as well:
●
Make sure the code placeholder
is not selected while in wysiwyg mode by clicking anywhere in the white are
of the bottom table. In fact to place the footer below the banners, just click to the right of the code placeholder.
●
Insert the footer code by clicking on the Insert Footer
button
(Click to select contents and copy them to the clipboard)
Thats it for the footer, lets move up to the header area, shall we?
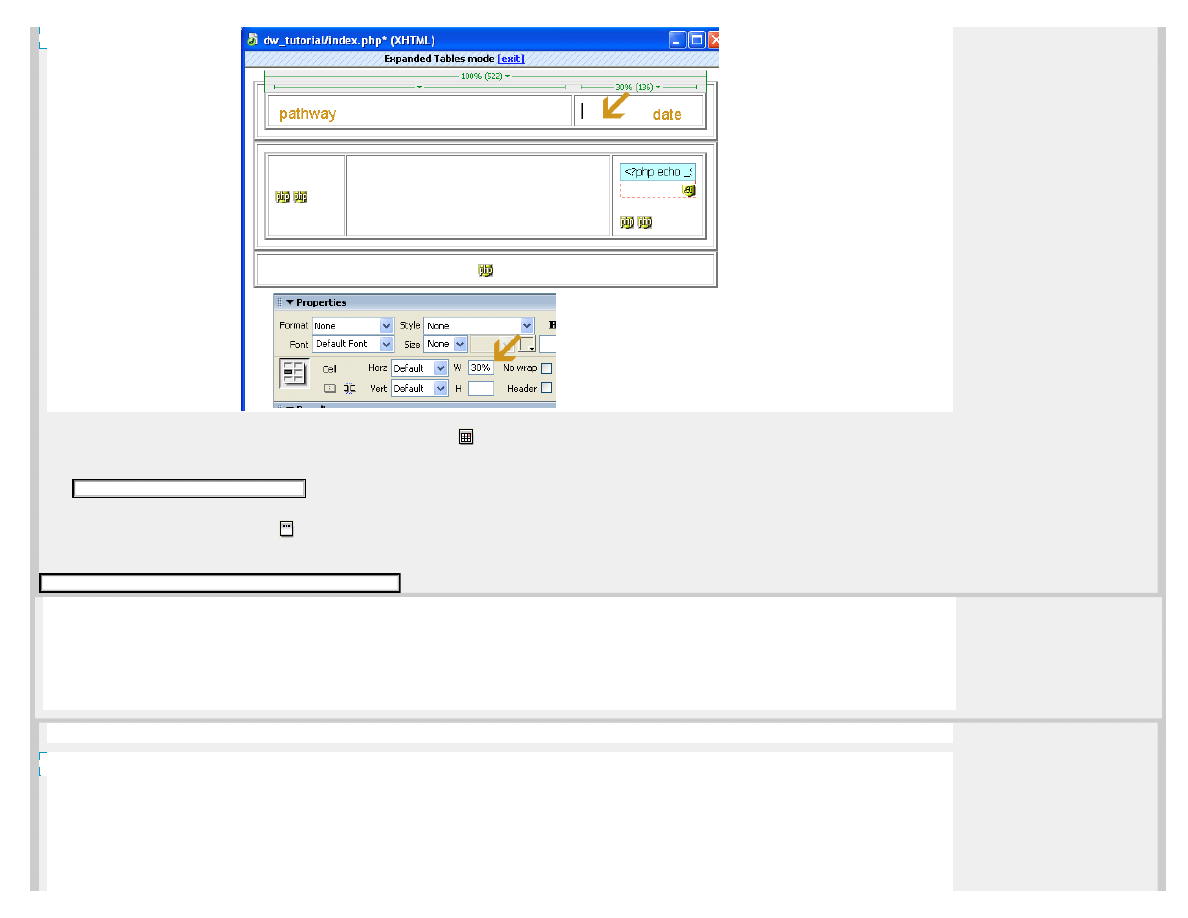
We will be creating a new nested table in the top 'header' table for the pathway and the date display
●
Click anywhere in the top table to select it
●
From theDreamweaver top menu, Insert a new 2 column 100% width table by going to Insert>Table
●
Click once in the right cell of the new table, go to Properties Inspector and manually set the width to 30%
http://www.mambosolutions.com/dw_tutorial/ (12 of 23) [12/03/2008 20:39:41]
<?php mosLoadComponent
( "banners" ); ?>
<?php include_once
('includes/footer.php'); ?>
Joomla and Mambo template tutorial: The Complete Guide to Joomla Templates and Mambo templates using Dreamweaver and MSAS
Figure 17: Date and Pathway
●
With your cursor in the right column of the top table, click on Insert Date
button
(Click to select contents and copy them to the clipboard)
●
Now lets add our 'breadcrumb trail', or Pathway
●
Click anywhere in the left column of the top header table to select that cell
●
Locate and click on the Insert Pathway
button
(Click to select contents and copy them to the clipboard)
Well then, I guess you are getting anxious to see how this is all going to look in Mambo, right? I know I sure am...but
remember -so far we have been creating the layout of our template and adding the php code snips that will let Mambo do
its dynamic content magic. We have not done any design yet, so don't not expect to see an awesome looking template...in
fact at this stage it is bare bones text and tables!
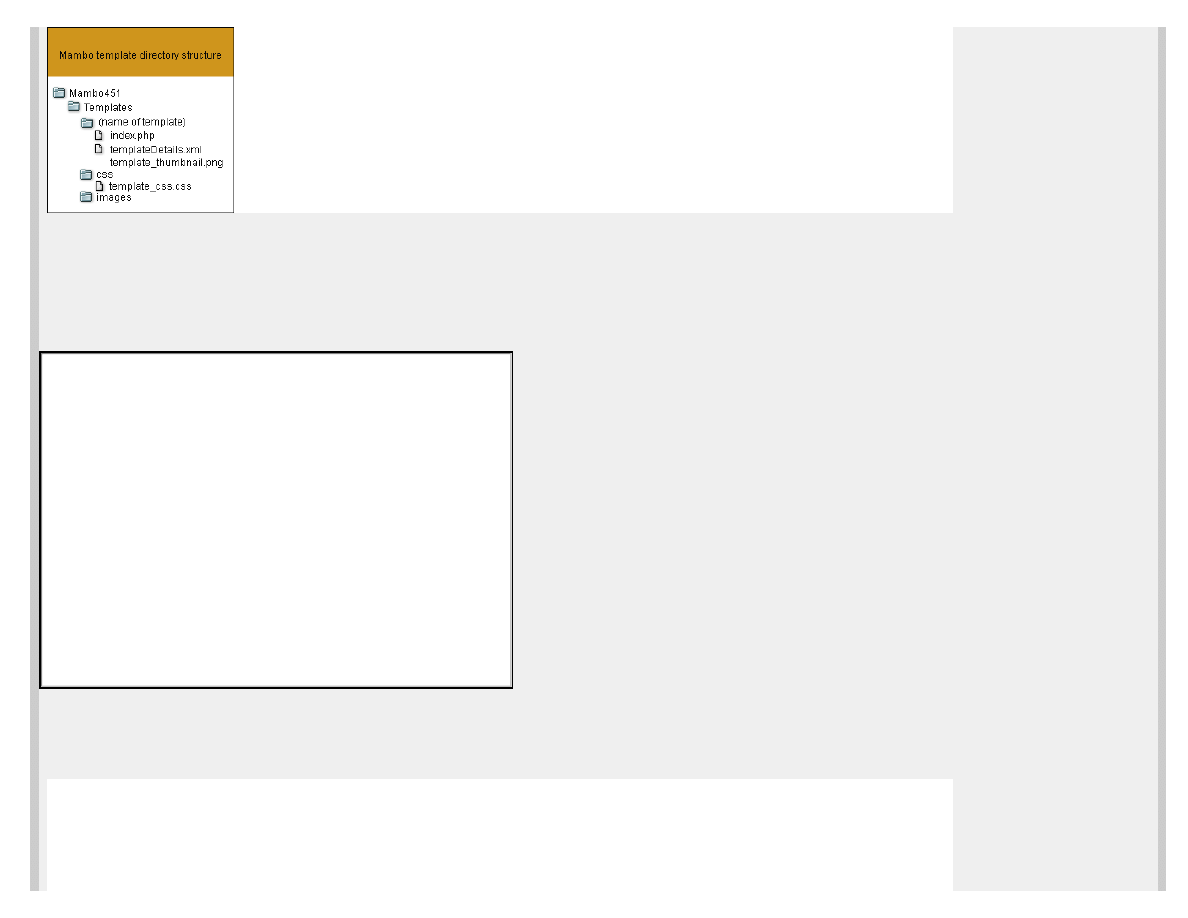
Phase Four: Creating our template directory structure in Mambo and moving over to MSAS.
A mambo template is structured as follows.
Figure 18: Directory structure of a template
http://www.mambosolutions.com/dw_tutorial/ (13 of 23) [12/03/2008 20:39:41]
<span class="small"><?php echo (strftime
(_DATE_FORMAT_LC)); ?></span>
<span class="pathway"><?php mosPathWay(); ?></span>
Joomla and Mambo template tutorial: The Complete Guide to Joomla Templates and Mambo templates using Dreamweaver and MSAS
●
Start MSAS.exe if it is not already running
●
Navigate to the templates directory of Mambo in MSAS
●
W:\www\mambo45\templates
●
Create a new folder and name it 'ms_dwtutorial'
●
Open this folder named 'ms_dwtutorial' , and create 2 folders-one named 'css' and one named 'images'
●
Save this file we have been working in Dreamweaver as index.php in the 'ms_dwtutorial' folder
●
Next we need to create our templateDetails.xml file Create a new xml (plain text file with .xml extension
on windows), copy the code below in it and place it in the 'ms_dwtutorial' folder-save it as 'templateDetails.xml'
(Click to select contents and copy them to the clipboard)
●
Next its time to create the stylesheet that will control the things like font style, colors, link rollovers,
borders around content, etc....the almighty template_css.css
●
Open the CSS folder and create a new css file named 'template_css.css'
●
Copy/paste the following css into the 'template_css.css file and save it.
●
For a list of all the CSS styles used in Mambo 4.5 check out this
that Visualdensity put together
(Click to select contents and copy them to the clipboard)
http://www.mambosolutions.com/dw_tutorial/ (14 of 23) [12/03/2008 20:39:41]
<?xml version="1.0" encoding="iso-8859-1"?>
<mosinstall type="template">
<name>ms_dwtutorial</name>
<creationDate>Dec 2004</creationDate>
<author>mambosolutions</author>
<copyright>This template is released under GNU/GPL License.</copyright>
<authorEmail>info@mambosolutions.com</authorEmail>
<authorUrl>www.mambosolutions.com</authorUrl>
<version>1.0</version>
<description>mambosolutions dreamweaver/MSAS tutorial template</description>
<files>
<filename>index.php</filename>
<filename>template_thumbnail.png</filename>
</files>
<images>
<filename>images/header.jpg</filename>
<filename>images/header_bg.jpg</filename>
</images>
<css>
<filename>css/template_css.css</filename>
</css>
</mosinstall>

Joomla and Mambo template tutorial: The Complete Guide to Joomla Templates and Mambo templates using Dreamweaver and MSAS
http://www.mambosolutions.com/dw_tutorial/ (15 of 23) [12/03/2008 20:39:41]

Joomla and Mambo template tutorial: The Complete Guide to Joomla Templates and Mambo templates using Dreamweaver and MSAS
http://www.mambosolutions.com/dw_tutorial/ (16 of 23) [12/03/2008 20:39:41]
Joomla and Mambo template tutorial: The Complete Guide to Joomla Templates and Mambo templates using Dreamweaver and MSAS
http://www.mambosolutions.com/dw_tutorial/ (17 of 23) [12/03/2008 20:39:41]
BODY {
margin : 0px 0px 0px 0px;
background-color : #FFFFFF;
color : #000000;
background-color: #F8F8FF;
scrollbar-base-color: #778899;
}
td, tr, p, div {
font-family : Verdana, Arial, Helvetica, sans-serif;
font-size : 11px;
color : #333333;
}
ul {
margin : 0px 0px 0px 0px;
}
hr {
background : #CCCCCC;
height : 1px;
width : 100%;
}
.title {
font-family: sans-serif;
font-size: 24px;
font-weight: bold;
color : #7B8DA1;
}
.pathway {
font-family: Verdana, Arial, Helvetica, sans-serif;
font-size: 11px;
color: #000000;
}
a.pathway:link, a.pathway:visited {
color : #000000;
font-weight : normal;
}
a.pathway:hover {
color : #000000;
font-weight : normal;
text-decoration : underline;
}
/* --Default Class Settings-- */
a.mainlevel:link, a.mainlevel:visited {
color: #333333;
background-position: left;
text-align: left;
font-weight: bold;
}
a.mainlevel:hover {
color: #00000;
background-position: left;
text-align: left;
}
a.mainmenu:link, a.mainmenu:visited {
color: #333333; font-family: Trebuchet MS, Verdana, Geneva, Arial, Helvetica, serif;
font-weight: bold;
}
a.mainmenu:hover, {
color: #000000; text-decoration: underline;
}
a.sublevel:hover {
color: #000000; text-decoration: underline;
}
a.sublevel:link, a.sublevel:visited {
color: #333333; font-family: Trebuchet MS, Verdana, Geneva, Arial, Helvetica, serif;
font-weight: normal;
}
table.moduletable {
margin: 0px 0px 0px 0px;
width: 95%;
border-left: solid 0px #000000;
border-right: solid 0px #000000;
border-top: solid 0px #000000;
border-bottom: solid 0px #000000;
margin-left: 5px;
}
table.moduletable th {
font-size : 11px;
font-weight : bold;
color : #000000;
text-align : left;
width : 100%;
padding: 10px 10px 10px 10px;
margin: 20px 5px 20px 5px;
}
table.moduletable td {
font-size: 10px;
font-weight: normal;
border: 1px solid #333;
padding: 10px 10px 10px 10px;
margin: 20px 5px 20px 5px;
background-color: #F8F8FF;
}
.poll {
font-family : Arial, Helvetica, sans-serif;
font-size : 10px;
color : #666666;
line-height : 14px;
}
.sectiontableheader {
background-color : #CCCCCC;
color : #7B8DA1;
font-weight : bold;
}
.sectiontableentry1 {
background-color : #F0F0F0;
}
.sectiontableentry2 {
background-color : #E0E0E0;
}
.small {
font-family : Verdana, Arial, Helvetica, sans-serif;
font-size : 10px;
color : #3366C0;
text-decoration : none;
font-weight : medium;
}
.smalldark {
font-family : Verdana, Arial, Helvetica, sans-serif;
font-size : 10px;
color : #000000;
text-decoration : none;
font-weight : normal;
}
.contentpane {
background : #FFFFFF;
}
.contentpaneopen {
background : #FFFFFF;
}
.contentheading, .componentheading {
font-family : Verdana, Arial, Helvetica, sans-serif;
font-size : 11px;
font-weight : bold;
color : #7B8DA1;
text-align : left;
}
.createdate {
font-family : Arial, Helvetica, sans-serif;
font-size : 10px;
color : #999999;
text-align : left;
}
.button {
font-family : Verdana, Arial, Helvetica, sans-serif;
font-style : normal;
font-size : 10px;
font-weight : bold;
background-color : #F0F0F0;
color : #000000;
border : 1px solid #CCCCCC;
}
.inputbox {
font-family : Verdana, Arial, Helvetica, sans-serif;
font-size : 10px;
color : #000000;
background-color : #F0F0F0;
border : 1px solid #CCCCCC;
}
a:link, a:visited {
font-size : 11px;
color : #000000;
text-decoration : none;
font-family : Verdana, Arial, Helvetica, sans-serif;
}
a:hover {
color : #000000;
text-decoration : underline;
}
/* For content item titles that are hyperlink instead of Read On */
a.contentpagetitle:link, a.contentpagetitle:visited {
font-family: Tahoma, Verdana, Arial, Helvetica, sans-serif;
font-size: 13px;
font-weight: bold;
color: #000000;
text-align:left;
}
a.contentpagetitle:hover {
font-family: Tahoma, Verdana, Arial, Helvetica, sans-serif;
font-size: 13px;
font-weight: bold;
text-align:left;
color: #7B8DA1;
text-decoration: underline;
font-weight: bold;
}
a.category:link, a.category:visited {
color : #333333;
font-weight : bold;
}
a.category:hover {
color : #7B8DA1;
}
/* Styles for dhtml tabbed-pages */
.ontab {
background-color: #ffae00;
border-left: outset 2px #ff9900;
border-right: outset 2px #808080;
border-top: outset 2px #ff9900;
border-bottom: solid 1px #d5d5d5;
text-align: center;
cursor: hand;
font-weight: bold;
color: #FFFFFF;
}
.offtab {
background-color : #e5e5e5;
border-left: outset 2px #E0E0E0;
border-right: outset 2px #E0E0E0;
border-top: outset 2px #E0E0E0;
border-bottom: solid 1px #d5d5d5;
text-align: center;
cursor: hand;
font-weight: normal;
}
.tabpadding {
}
.tabheading {
background-color: #ffae00;
text-align: left;
}
.pagetext {
visibility: hidden;
display: none;
position: relative;
top: 0;
}
/* for modifying {moscode} output. Dont set the colour! */
.moscode {
background-color: #f0f0f0;
}
/* Text passed with mosmsg url parameter */
.message {
font-family : Verdana, Arial, Helvetica, sans-serif;
font-weight: bold;
font-size : 10pt;
color : #ff6600;
text-align: center;
}
/* custom stuff */
.container
{
border: solid;
border-width: 1px;
border-color: #efefef;
background-color: White;
}
.boxes {
border: solid;
border-color: #efefef;
border-width: 1px;
}

Joomla and Mambo template tutorial: The Complete Guide to Joomla Templates and Mambo templates using Dreamweaver and MSAS
http://www.mambosolutions.com/dw_tutorial/ (18 of 23) [12/03/2008 20:39:41]
Joomla and Mambo template tutorial: The Complete Guide to Joomla Templates and Mambo templates using Dreamweaver and MSAS
Phase 5: Adding a header image
You may want to adda graphical image in the header area, here's how i do it
First I open Photoshop and create my header image, in this case i decide to make my image 700px wide and
100 px height. I am going to assume you know how to work the basics of Photoshop, if not there are plenty
of Photoshop tutorials around. Take a look at the images in the example tempate.
The trick to getting your header image right on a 100% variable width template is the background image that
tiles. To create this image, simple take your header image and make a selection on the right side of the
image ofabout 3 pixels width and the entire height. Next copy this selection (CTRL +C), open a new document
in Photoshop, and paste this in. Then hit (CTRL +T) to get into the Scale mode. Grab the handles and stretch
your image on both sides. Save this image as header_bg.jpg in the images folder.
Next let's add the relevant HTML code to our template's index.php file. We simply need to add the following
row and cell to our code:
At this stage, you can go MSAS, open the Mambo Admin panel....
Browse to http://localhost/mambo451/administrator
login as : username: admin
password: admin
go to the Template Manager and select 'dw_tutorial' as your default template. Then go to Site>Preview to see
how the template looks so far.
http://www.mambosolutions.com/dw_tutorial/ (19 of 23) [12/03/2008 20:39:41]
Joomla and Mambo template tutorial: The Complete Guide to Joomla Templates and Mambo templates using Dreamweaver and MSAS
Should be looking something like this at this stage:)
Save this file (right click-save as...)
for the final template index.php (you can download this and rename it) code with
some background colors added and alignments. You can copy paste this as 'index.php' for the base of your template.
can download the ALL the files including the Photoshop stuff here
So, I have shown you the basics of creating your own Mambo template, but do not sit back just yet - there is lots more to
be learned. The CSS file is your friend, really it is :) Explore it, play around with the different values, get comfortable with
the CSS - it is the key to making endless tweaks and small details to your template. While I will not be going in depth about
the CSS, I will be covering a few important points. I also suggest that if you like to learn more about CSS, explore these
great resources:
http://www.mambosolutions.com/dw_tutorial/ (20 of 23) [12/03/2008 20:39:41]
Joomla and Mambo template tutorial: The Complete Guide to Joomla Templates and Mambo templates using Dreamweaver and MSAS
If you are finding this useful, have suggestions, feedback etc. please post at the thread on mamboserver forums:
http://forum.mamboserver.com/showthread.php?t=15295
Don't forget to make a thumbnail image for your template. Just take a screenshot of your finished template in your
browser, edit in Photoshop to be 200px X 200px, save it to your 'ms_dwtutorial' directory as 'template_thumbnail.png
For a nice list of the differences between 4.5 and 4.5.1 code in Mambo templates
see this nice chart from Arthur konze
at www.mamboportal.com
Bonus for Flashers! how to add a flash header and use a flash shared object so that the flash intro only plays
one time.
download the example template with the source .fla (Flash MX)
The main thing to remember when using flash in a mambo template is that the path to the swf must be relative
to the root of the mambo site. In my example, i put the .swf file in my templates/ms_dwtutorial_flash/
images/ folder so the code looks like this:
<OBJECT classid="clsid:D27CDB6E-AE6D-11cf-96B8-444553540000"
codebase="http://download.macromedia.com/pub/shockwave/cabs/flash/
swflash.cab#version=6,0,0,0"
WIDTH="780" HEIGHT="100" id="ms_flash_playonce_demo" ALIGN="">
<PARAM NAME=movie VALUE="templates/ms_dwtutorial/images/ms_flash_playonce_demo.swf">
<PARAM NAME=quality VALUE=high> <PARAM NAME=bgcolor VALUE=#FFFFFF>
<EMBED src="templates/ms_dwtutorial/images/ms_flash_playonce_demo.swf"
quality=high bgcolor=#FFFFFF
WIDTH="780" HEIGHT="100" NAME="ms_flash_playonce_demo" ALIGN=""
TYPE="application/x-shockwave-flash" PLUGINSPAGE="http://www.macromedia.com/
go/getflashplayer"></EMBED>
</OBJECT>
To code your flash so that it only place once, add this code to the first frame
of your flash movie:
function checkSO()
{
// If a shared object called siteSO already exists this will retrieve it otherwise it
// creates a new shared object called siteSO
http://www.mambosolutions.com/dw_tutorial/ (21 of 23) [12/03/2008 20:39:41]
Joomla and Mambo template tutorial: The Complete Guide to Joomla Templates and Mambo templates using Dreamweaver and MSAS
var SO = SharedObject.getLocal("siteSO");
if(SO.data.visitedAlready)
{
gotoAndPlay("end");
}
else
{
SO.data.visitedAlready = true;
SO.flush();
}
}
// Put that and this in the first keyframe of your movie, before the intro
checkSO();
then on the last frame of your movie, create a frame label named: end
Thats it !
Thanks for tuning in, hope you have fun with Mambo/Joomla and I hope I have had the opportunity to taech you
something about creating Mambo/Joomla templates.
If you would like to show your thanks, please consider to either donate or join my Template of the Month Club - links can
Join for only $50 - download over 30 templates with source
photoshop graphics. One new template added to the club each month!
Joomlathemes.org Mambo/Joomla Template Store
If that does not interst you then how about sending me a small gift from my
http://www.mambosolutions.com/dw_tutorial/ (22 of 23) [12/03/2008 20:39:41]

Joomla and Mambo template tutorial: The Complete Guide to Joomla Templates and Mambo templates using Dreamweaver and MSAS
http://www.mambosolutions.com/dw_tutorial/ (23 of 23) [12/03/2008 20:39:41]
Document Outline
- mambosolutions.com
Wyszukiwarka
Podobne podstrony:
Peachpit Press Layers The Complete Guide to Photoshops Most Powerful Feature 2nd Edition Oct 2010
011231 [Dating Seduction] Wayne Ross The complete guide to attracting women Bonus reports
The Complete Guide to Internal Martial Healing Arts June 2003 OCR 6 0
THE ULTIMATE?GINNER'S GUIDE TO HACKING AND PHREAKING
The Official Guide to UFOs Compiled by the Editors of Science and Mechanics first published 1968 (
Complete Guide to Lesson Planning and Preparation
Skin Deep The Essential Guide to Whats in the Toiletries and Cosmetics You Use
Book of the Ancients (A Guide to Dark Magick and Mythology) by Rev Xul
Carol Dunlop Fiji Islands Yachting The Official Guide to Sailing and Cruising in the Fiji Islands
BRIDGMANS Complete Guide to Drawing from Life
The Essential Guide To Baking
Warn The Basic Guide to Winching Techniques
Complete Guide to Ramadhan
Tea at Downton Afternoon Tea Recipes From The Unofficial Guide to Downton Abbey
SERGIS Dog sacrifice in ancient and modern greece from the sacrificial ritual to dog torture
The Definitive Guide to Apache mod rewrite 2619
drug ! The Beginner s Guide to Hash Growing
więcej podobnych podstron