
Pavithra Srinivasan
Anjana Suparna Sriram
Divya Divya Muntimadugu
Red Hat Storage 2.1
Quick Start Guide
Getting Started with Red Hat Enterprise Virtualization 3.3 and Red Hat
Storage 2.1
Edition 1

Red Hat Storage 2.1 Quick Start Guide
Getting Started with Red Hat Enterprise Virtualization 3.3 and Red Hat
Storage 2.1
Edition 1
Pavithra Srinivasan
Red Hat Engineering Co ntent Services
psriniva@redhat.co m
Anjana Suparna Sriram
Red Hat Engineering Co ntent Services
asriram@redhat.co m
Divya Divya Muntimadugu
Red Hat Engineering Co ntent Services
divya@redhat.co m

Legal Notice
Copyright © 2013-2014 Red Hat Inc.
This document is licensed by Red Hat under the
Creative Commons Attribution-ShareAlike 3.0 Unported
. If you distribute this document, or a modified version of it, you must provide attribution to Red
Hat, Inc. and provide a link to the original. If the document is modified, all Red Hat trademarks must be
removed.
Red Hat, as the licensor of this document, waives the right to enforce, and agrees not to assert, Section
4d of CC-BY-SA to the fullest extent permitted by applicable law.
Red Hat, Red Hat Enterprise Linux, the Shadowman logo, JBoss, MetaMatrix, Fedora, the Infinity Logo,
and RHCE are trademarks of Red Hat, Inc., registered in the United States and other countries.
Linux ® is the registered trademark of Linus Torvalds in the United States and other countries.
Java ® is a registered trademark of Oracle and/or its affiliates.
XFS ® is a trademark of Silicon Graphics International Corp. or its subsidiaries in the United States
and/or other countries.
MySQL ® is a registered trademark of MySQL AB in the United States, the European Union and other
countries.
Node.js ® is an official trademark of Joyent. Red Hat Software Collections is not formally related to or
endorsed by the official Joyent Node.js open source or commercial project.
The OpenStack ® Word Mark and OpenStack Logo are either registered trademarks/service marks or
trademarks/service marks of the OpenStack Foundation, in the United States and other countries and
are used with the OpenStack Foundation's permission. We are not affiliated with, endorsed or
sponsored by the OpenStack Foundation, or the OpenStack community.
All other trademarks are the property of their respective owners.
Abstract
This document is a step-by-step guide for first-time users to install and configure a basic Red Hat
Enterprise Virtualization environment and enable Red Hat Storage for virtualization.

. . . . . . . . . . . . . . . . . . . . . . . . . . . . . . . . . . . . . . . . . . . . . . . . . . . . . . . . . . . . . . . . . . . . . . . . . . . . . . . . . . . . . . . . . . . . . . . . . . . . . . . . . . . . . . . . . . . . . . . . . . . . . . . . . . . . . . . . . . . . . . . . . . . . . . . . . . . . . . . . . . . . . . . . . . . . . . . . . . . . . . . . . . . . . . . . . . . . . . . . . . . . . . . . . . . . . . . . . . . . . . . . . . . . . . . . . . . . . . . . . . . . . . . . . . . . . . . . . . . . . . . . . . . . . . . . . . . . . . . .
. . . . . . . . . . . . . . . . . . . . . . . . . . . . . . . . . . . . . . . . . . . . . . . . . . . . . . . . . . . . . . . . . . . . . . . . . . . . . . . . . . . . . . . . . . . . . . . . . . . . . . . . . . . . . . . . . . . . . . . . . . . . . . . . . . . . . . . . . . . . . . . . . . . . . . . . . . . . . . . . . . . . . . . . . . . . . . . . . . . . . . . . . . . . . . . . . . . . . . . . . . . . . . . . . . . . . . . . . . . . . . . . . . . . . . . . . . . . . . . . . . . . . . . . . . . . . . . . . . . . . . . . . . . . . . . . . . . . . . . .
. . . . . . . . . . . . . . . . . . . . . . . . . . . . . . . . . . . . . . . . . . . . . . . . . . . . . . . . . . . . . . . . . . . . . . . . . . . . . . . . . . . . . . . . . . . . . . . . . . . . . . . . . . . . . . . . . . . . . . . . . . . . . . . . . . . . . . . . . . . . . . . . . . . . . . . . . . . . . . . . . . . . . . . . . . . . . . . . . . . . . . . . . . . . . . . . . . . . . . . . . . . . . . . . . . . . . . . . . . . . . . . . . . . . . . . . . . . . . . . . . . . . . . . . . . . . . . . . . . . . . . . . . . . . . . . . . . . . . . . .
. . . . . . . . . . . . . . . . . . . . . . . . . . . . . . . . . . . . . . . . . . . . . . . . . . . . . . . . . . . . . . . . . . . . . . . . . . . . . . . . . . . . . . . . . . . . . . . . . . . . . . . . . . . . . . . . . . . . . . . . . . . . . . . . . . . . . . . . . . . . . . . . . . . . . . . . . . . . . . . . . . . . . . . . . . . . . . . . . . . . . . . . . . . . . . . . . . . . . . . . . . . . . . . . . . . . . . . . . . . . . . . . . . . . . . . . . . . . . . . . . . . . . . . . . . . . . . . . . . . . . . . . . . . . . . . . . . . . . . . .
. . . . . . . . . . . . . . . . . . . . . . . . . . . . . . . . . . . . . . . . . . . . . . . . . . . . . . . . . . . . . . . . . . . . . . . . . . . . . . . . . . . . . . . . . . . . . . . . . . . . . . . . . . . . . . . . . . . . . . . . . . . . . . . . . . . . . . . . . . . . . . . . . . . . . . . . . . . . . . . . . . . . . . . . . . . . . . . . . . . . . . . . . . . . . . . . . . . . . . . . . . . . . . . . . . . . . . . . . . . . . . . . . . . . . . . . . . . . . . . . . . . . . . . . . . . . . . . . . . . . . . . . . . . . . . . . . . . . . . . .
. . . . . . . . . . . . . . . . . . . . . . . . . . . . . . . . . . . . . . . . . . . . . . . . . . . . . . . . . . . . . . . . . . . . . . . . . . . . . . . . . . . . . . . . . . . . . . . . . . . . . . . . . . . . . . . . . . . . . . . . . . . . . . . . . . . . . . . . . . . . . . . . . . . . . . . . . . . . . . . . . . . . . . . . . . . . . . . . . . . . . . . . . . . . . . . . . . . . . . . . . . . . . . . . . . . . . . . . . . . . . . . . . . . . . . . . . . . . . . . . . . . . . . . . . . . . . . . . . . . . . . . . . . . . . . . . . . . . . . . .
Table of Contents
1. Audience
2. Document Conventions
2.1. Typographic Conventions
2.2. Pull-quote Conventions
2.3. Notes and Warnings
3. Getting Help and Giving Feedback
3.1. Do You Need Help?
3.2. We Need Feedback!
Chapter 1. Introduction to Red Hat Storage for Virtualization
1.1. Architecture Overview
1.2. Prerequisites
Chapter 2. Enabling Red Hat Storage in Red Hat Enterprise Virtualization Manager
2.1. Using Red Hat Storage Volumes in the Red Hat Enterprise Virtualization Manager
2.2. Optimizing Virtual Machines On Red Hat Storage Volumes
Chapter 3. Managing Virtual Machine Images on Red Hat Storage Servers
3.1. Configuring Volumes Using the Command Line Interface
3.2. Adding a Red Hat Storage Server for Virtualization using Red Hat Enterprise Virtualization
Manager
Chapter 4 . Creating and Configuring Volumes using Red Hat Enterprise Virtualization
Manager
3
3
3
3
4
5
6
6
6
7
7
8
11
11
13
15
15
16
22
28
29
Table of Contents
1

Red Hat Storage 2.1 Quick Start Guide
2

Preface
Red Hat Storage is a software-only, scale-out storage solution that provides flexible and agile
unstructured data storage for the enterprise. Red Hat Enterprise Virtualization uses a centralized
shared storage system for virtual machine disk images, snapshots and templates.
This guide enables you to install and configure Red Hat Enterprise Virtualization and create virtual
machines using Red Hat Storage as storage domains.
1. Audience
This document is designed to act as a guide for system administrators to configure Red Hat Storage for
Red Hat Enterprise Virtualization and create Red Hat Storage (volumes) as storage domains.
2. Document Conventions
This manual uses several conventions to highlight certain words and phrases and draw attention to
specific pieces of information.
In PDF and paper editions, this manual uses typefaces drawn from the
set. The
Liberation Fonts set is also used in HTML editions if the set is installed on your system. If not, alternative
but equivalent typefaces are displayed. Note: Red Hat Enterprise Linux 5 and later include the Liberation
Fonts set by default.
2.1. Typographic Conventions
Four typographic conventions are used to call attention to specific words and phrases. These
conventions, and the circumstances they apply to, are as follows.
Mono-spaced Bold
Used to highlight system input, including shell commands, file names and paths. Also used to highlight
keys and key combinations. For example:
To see the contents of the file my_next_bestselling_novel in your current working
directory, enter the cat my_next_bestselling_novel command at the shell prompt
and press Enter to execute the command.
The above includes a file name, a shell command and a key, all presented in mono-spaced bold and all
distinguishable thanks to context.
Key combinations can be distinguished from an individual key by the plus sign that connects each part of
a key combination. For example:
Press Enter to execute the command.
Press Ctrl+Alt+F2 to switch to a virtual terminal.
The first example highlights a particular key to press. The second example highlights a key combination:
a set of three keys pressed simultaneously.
If source code is discussed, class names, methods, functions, variable names and returned values
mentioned within a paragraph will be presented as above, in mono-spaced bold. For example:
File-related classes include filesystem for file systems, file for files, and dir for
Preface
3

directories. Each class has its own associated set of permissions.
Proportional Bold
This denotes words or phrases encountered on a system, including application names; dialog-box text;
labeled buttons; check-box and radio-button labels; menu titles and submenu titles. For example:
Choose System → Preferences → Mouse from the main menu bar to launch Mouse
Preferences. In the Buttons tab, select the Left-handed mouse check box and click
Close to switch the primary mouse button from the left to the right (making the mouse
suitable for use in the left hand).
To insert a special character into a gedit file, choose Applications → Accessories →
Character Map from the main menu bar. Next, choose Search → Find… from the
Character Map menu bar, type the name of the character in the Search field and click
Next. The character you sought will be highlighted in the Character T able. Double-click
this highlighted character to place it in the Text to copy field and then click the Copy
button. Now switch back to your document and choose Edit → Paste from the gedit menu
bar.
The above text includes application names; system-wide menu names and items; application-specific
menu names; and buttons and text found within a GUI interface, all presented in proportional bold and all
distinguishable by context.
Mono-spaced Bold Italic or Proportional Bold Italic
Whether mono-spaced bold or proportional bold, the addition of italics indicates replaceable or variable
text. Italics denotes text you do not input literally or displayed text that changes depending on
circumstance. For example:
To connect to a remote machine using ssh, type ssh username@domain.name at a shell
prompt. If the remote machine is example.com and your username on that machine is
john, type ssh john@example.com.
The mount -o remount file-system command remounts the named file system. For
example, to remount the /home file system, the command is mount -o remount /home.
To see the version of a currently installed package, use the rpm -q package command. It
will return a result as follows: package-version-release.
Note the words in bold italics above: username, domain.name, file-system, package, version and release.
Each word is a placeholder, either for text you enter when issuing a command or for text displayed by
the system.
Aside from standard usage for presenting the title of a work, italics denotes the first use of a new and
important term. For example:
Publican is a DocBook publishing system.
2.2. Pull-quote Conventions
Terminal output and source code listings are set off visually from the surrounding text.
Output sent to a terminal is set in mono-spaced roman and presented thus:
Red Hat Storage 2.1 Quick Start Guide
4
books Desktop documentation drafts mss photos stuff svn
books_tests Desktop1 downloads images notes scripts svgs
Source-code listings are also set in mono-spaced roman but add syntax highlighting as follows:
static
int
kvm_vm_ioctl_deassign_device(
struct
kvm *kvm,
struct
kvm_assigned_pci_dev *assigned_dev)
{
int
r = 0;
struct
kvm_assigned_dev_kernel *match;
mutex_lock(&kvm->lock);
match = kvm_find_assigned_dev(&kvm->arch.assigned_dev_head,
assigned_dev->assigned_dev_id);
if
(!match) {
printk(KERN_INFO
"%s: device hasn't been assigned before, "
"so cannot be deassigned
\n
"
, __func__);
r = -EINVAL;
goto
out;
}
kvm_deassign_device(kvm, match);
kvm_free_assigned_device(kvm, match);
out:
mutex_unlock(&kvm->lock);
return
r;
}
2.3. Notes and Warnings
Finally, we use three visual styles to draw attention to information that might otherwise be overlooked.
Note
Notes are tips, shortcuts or alternative approaches to the task at hand. Ignoring a note should
have no negative consequences, but you might miss out on a trick that makes your life easier.
Important
Important boxes detail things that are easily missed: configuration changes that only apply to the
current session, or services that need restarting before an update will apply. Ignoring a box
labeled “Important” will not cause data loss but may cause irritation and frustration.
Warning
Warnings should not be ignored. Ignoring warnings will most likely cause data loss.
Preface
5

3. Getting Help and Giving Feedback
3.1. Do You Need Help?
If you experience difficulty with a procedure described in this documentation, visit the Red Hat Customer
Portal at
. Through the customer portal, you can:
search or browse through a knowledgebase of technical support articles about Red Hat products.
submit a support case to Red Hat Global Support Services (GSS).
access other product documentation.
Red Hat also hosts a large number of electronic mailing lists for discussion of Red Hat software and
technology. You can find a list of publicly available mailing lists at
https://www.redhat.com/mailman/listinfo
.
Click on the name of any mailing list to subscribe to that list or to access the list archives.
3.2. We Need Feedback!
If you find a typographical error in this manual, or if you have thought of a way to make this manual
better, we would love to hear from you! Please submit a report in Bugzilla:
against the product Red Hat Storage.
When submitting a bug report, be sure to mention the manual's identifier: Quick_Start_Guide
If you have a suggestion for improving the documentation, try to be as specific as possible when
describing it. If you have found an error, please include the section number and some of the surrounding
text so we can find it easily.
Red Hat Storage 2.1 Quick Start Guide
6

Chapter 1. Introduction to Red Hat Storage for Virtualization
Red Hat Storage provides a POSIX-compatible file system that allows you to store virtual machine
images in a Red Hat Storage Server cluster instead of network-attached storage (NAS) appliances or a
storage area network (SAN) array.
Red Hat provides a way to create and optimize Red Hat Storage volumes using the Red Hat Enterprise
Virtualization Manager. Red Hat Enterprise Virtualization platform and Red Hat Storage platform
comprise various components that work seamlessly together, enabling system administrators to install,
configure, and manage a virtualized environment using Red Hat Storage as the virtual machine image
store.
1.1. Architecture Overview
Red Hat Enterprise Virtualization 3.3 and later versions support the use of POSIX-compliant file systems
for storage. Red Hat Storage provides a POSIX-compatible file system in which you can create Red Hat
Storage volumes as storage domains.
Red Hat Enterprise Virtualization and Red Hat Storage integration consists of:
Red Hat Enterprise Virtualization environment.
See Red Hat Enterprise Virtualization Architecture in Introduction in Red Hat Enterprise Virtualization
Installation Guide.
Red Hat Storage environment.
A Red Hat Storage environment consists of bricks that are used to build volumes. Different types of
optimized storage volumes can be used as virtual machine stores to hold resources such as virtual
disks, templates, and snapshots.
The following diagram illustrates Red Hat Enterprise Virtualization integration with Red Hat Storage 2.1:
Chapter 1. Introduction to Red Hat Storage for Virtualization
7

Figure 1.1. Integration architecture
Important
Red Hat Enterprise Virtualization 3.3 onwards, the GlusterFS storage domain uses the same
access mechanism as the POSIXFS domain. The GlusterFS storage domain is introduced to
support the libgfapi protocol in the future releases.
1.2. Prerequisites
To install and integrate Red Hat Storage with Red Hat Enterprise Virtulaization, the system needs to
satisfy the following requirements:
1. Update Red Hat Storage 2.1
If your environment is already on Red Hat Storage 2.1, ensure that your system is up to date with
the latest patches and upgrades. Use the following command to install software updates:
# yum update
Red Hat Storage 2.1 Quick Start Guide
8
Important
If the storage environment uses the Red Hat Storage 2.0 version, refer to the upgrade
steps mentioned in the Red Hat Storage Installation Guide to upgrade to the 2.1 version.
Additionally, perform an in-service software upgrade on the 2.1 version of the Red Hat
Storage to obtain the latest packages. For detailed information on the in-service software
upgrade, see chapter Setting up Software Updates in the Red Hat Storage Installation
Guide.
2. Download the .iso file for Red Hat Storage 2.1
Download an .iso file that holds the installation sources before you start the installation on your
local computer and proceed from there.
After downloading the .iso file, check the MD5 checksums for the .iso file to ensure that the
download was successful.
If you have a subscription or evaluation subscription, follow these steps to obtain the Red Hat
Storage .iso files:
a. Visit the customer portal at
https://access.redhat.com/login
and enter your Red Hat Login
and Password.
b. Click Downloads to visit the Software & Download Center.
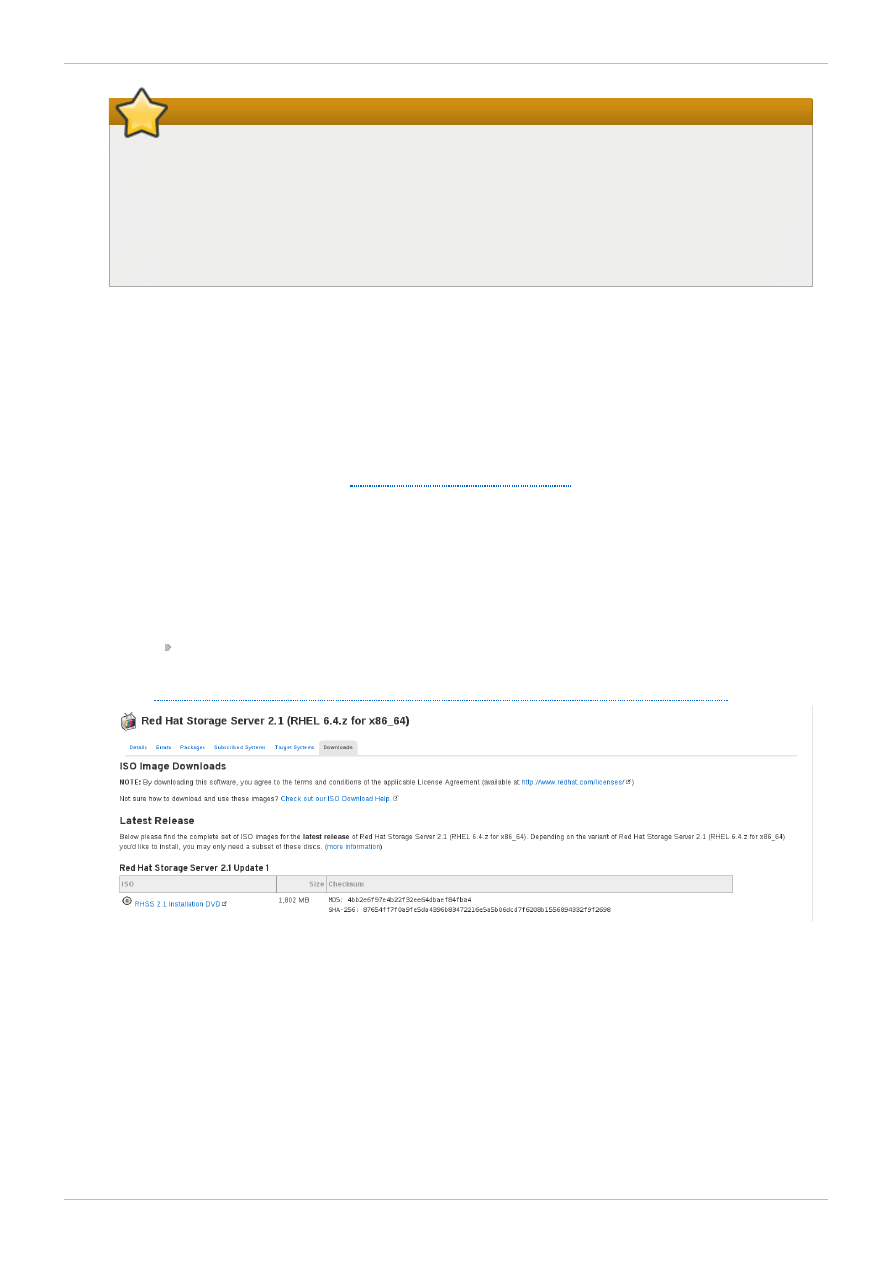
c. In the Red Hat Storage Server area, click Download Software.
d. In Download Software, click Red Hat Enterprise Linux EUS Server (v.
6.4 .z for 64 -bit x86_64 ), and then click Red Hat Storage Server 2.1 (RHEL
6.4 .z for x86_64 ). Expand the node to download the following software:
RHSS 2.1 Installation DVD
Alternatively, visit the following link to obtain the software
https://rhn.redhat.com/rhn/software/channel/downloads/Download.do?cid=19269
.
Figure 1.2. A system configured for RHN installation of Red Hat Storage 2.1
3. Check system requirements.
The system needs to satisfy the requirements to ensure smooth integration of Red Hat Enterprise
Virtualization and Red Hat Storage. See System Requirements in Red Hat Enterprise Virtualization
3.3 Installation Guide, which outlines the minimum system requirements required to install,
configure, and operate a Red Hat Enterprise Virtualization environment. Also, see the hardware
compatibility matrix and system requirements outlined in the topic Planning Red Hat Storage
Installation in the Red Hat Storage 2.1 Installation Guide.
When creating a data center in Red Hat Enterprise Virtualization Manager, ensure that you select
Chapter 1. Introduction to Red Hat Storage for Virtualization
9

the compatibility version 3.3. Refer to the compatibility matrix for information on backward
compatibility of earlier versions.
4. Subscribe to the Red Hat Enterprise Virtualization channels.
Subscribe to the Red Hat Enterprise Virt Management Agent channel on all Red Hat Enterprise
Linux 6.3, 6.4, and 6.5 hypervisors that now act as the clients for your Red Hat Storage volumes.
5. Subscribe to the Red Hat Storage Native Client channel.
Subscribe to all Red Hat Enterprise Linux 6.3, 6.4, and 6.5 hypervisors to the Red Hat Storage
Native Client channel to get the latest version.
6. Set the fully qualified domain name for each hypervisor.
Correct DNS records must exist for each hypervisor and Red Hat Storage server node. A fully
qualified domain name must be resolvable via both forward and reverse DNS lookup.
7. Set SELinux booleans.
If you are using QEMU/KVM as a hypervisor, ensure that you set the following SELinux booleans:
# setsebool -P sanlock_use_fusefs on
# setsebool -P virt_use_sanlock on
# setsebool -P virt_use_fusefs on
Red Hat Storage 2.1 Quick Start Guide
10
Chapter 2. Enabling Red Hat Storage in Red Hat Enterprise
Virtualization Manager
2.1. Using Red Hat Storage Volumes in the Red Hat Enterprise
Virtualization Manager
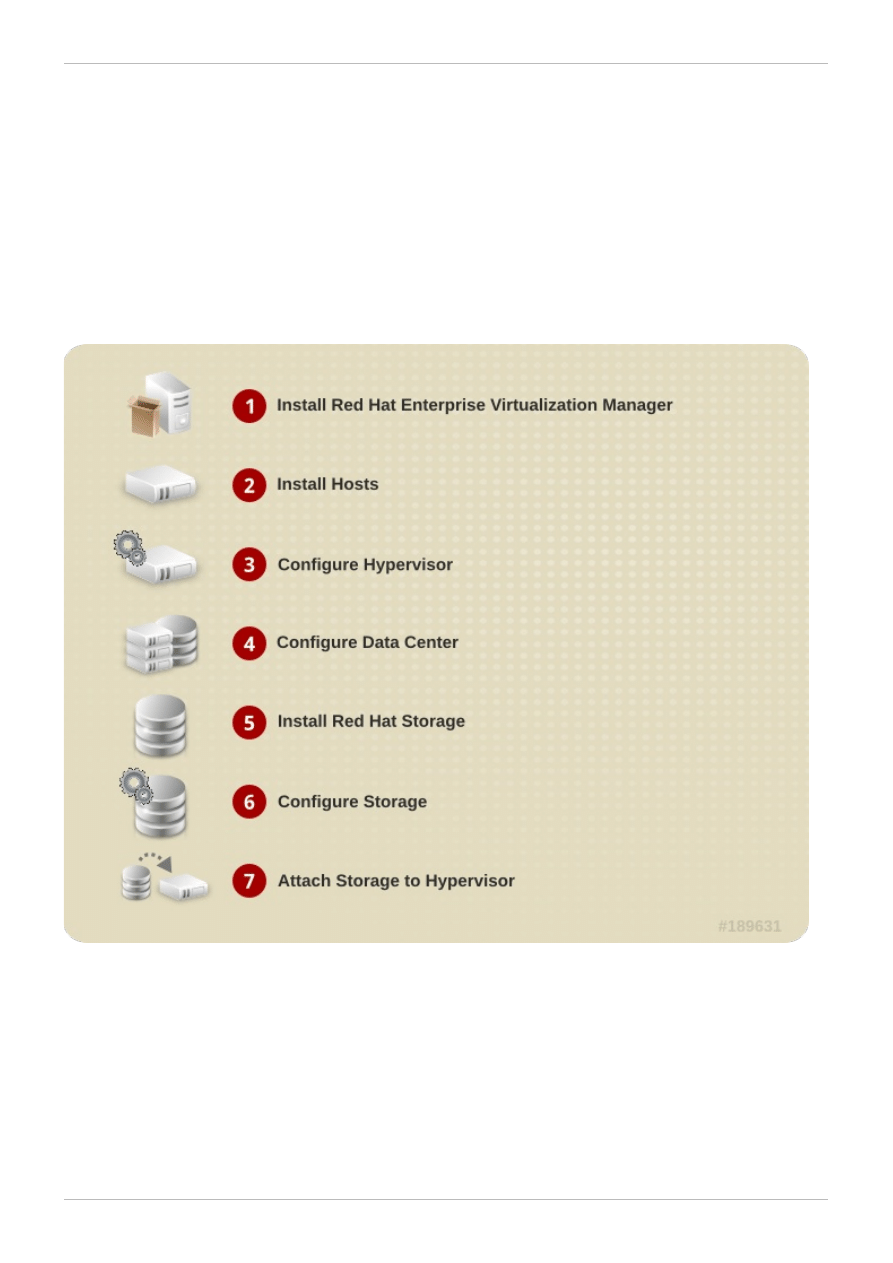
Red Hat Enterprise Virtualization supports Red Hat Storage volumes as storage domains. Enabling Red
Hat Storage volumes in Red Hat Enterprise Virtualization Manager requires installation and configuration
of several components to create a functioning virtualization environment. You must install and configure
each component in the following order:
Figure 2.1. Installation Workflow
Procedure 2.1. To Enable Red Hat Storage in Red Hat Enterprise Virtualization Manager
1. Install Red Hat Enterprise Virtualization Manager
The Red Hat Enterprise Virtualization Manager is the control center of the Red Hat Enterprise
Virtualization environment. Ensure that Red Hat Enterprise Virtualization Manger is installed and
configured.
Install and configure Red Hat Enterprise Virtualization Manager. See the Manager Installation
Chapter 2. Enabling Red Hat Storage in Red Hat Enterprise Virtualization Manager
11
chapter of the Red Hat Enterprise Virtualization Installation Guide for more information.
2. Install Hosts
Install the virtual machine hosts using either Red Hat Enterprise Virtualization Hypervisor or Red
Hat Enterprise Linux as hosts. Before beginning the installation process, ensure that all
virtualization hosts meet the hardware requirements and that the installation of Red Hat
Enterprise Virtualization Manager is complete.
You can use the following hypervisors as hosts:
Red Hat Enterprise Virtualization Hypervisor 3.3
Red Hat Enterprise Linux 6.3
Red Hat Enterprise Linux 6.4
Red Hat Enterprise Linux 6.5
During installation, set the fully qualified domain name (FQDN) and IP address for the server in
order to avoid network conflicts. See the Installing Red Hat Enterprise Virtualization Hypervisor
Hosts chapter of the Red Hat Enterprise Virtualization Installation Guide for information on
installing the hypervisor.
Note
You must install Red Hat Enterprise Linux 6.3, Red Hat Enterprise Linux 6.4 Server or Red
Hat Enterprise Linux 6.5 on a system to use it as a virtualization host in a Red Hat
Enterprise Virtualization environment. See the Installing Red Hat Enterprise Linux Hosts
chapter of the Red Hat Enterprise Virtualization Installation Guide or the Red Hat Enterprise
Linux 6 Installation Guide for detailed instructions.
Subscribe to the channels
Red Hat Enterprise Linux hosts need to be registered and subscribed to a number of entitlements
using either Subscription Manager or Red Hat Network Classic. For more information, refer to the
topic Subscribing to Required Channels using RHN Classic in the chapter Installing Red Hat
Enterprise Linux Hosts in the Red Hat Enterprise Virtualization Installation Guide.
Subscribe Red Hat Enterprise Linux 6.3, 6.4, and 6.5 hosts to the channels listed below:
rhel-x86_64-server-6
rhel-x86_64-rhev-mgmt-agent-6
Apart from the above channels, you must also subscribe to the Red Hat Storage 2.1 Native Client
channels to get the latest version:
rhel-x86_64-server-6-rhs-2.1
See Installing Native Client in Red Hat Storage 2.1 Administration Guide for information on how
to install native clients.
3. Configure the Hypervisor
Red Hat Enterprise Virtualization Hypervisor host
Install Red Hat Enterprise Virtualization Hypervisor 3.3 on bare metal. See Configuring the
Hypervisor and Attaching the Hypervisor to the Red Hat Enterprise Virtualization Manager in
the Installing the Red Hat Enterprise Virtualization Hypervisor chapter of the Red Hat
Enterprise Virtualization Installation Guide for more information.
Red Hat Enterprise Linux 6.3, Red Hat Enterprise Linux 6.4 or Red Hat
Enterprise Linux 6.5 host
A Red Hat Enterprise Linux virtualization host must be registered and subscribed to a number
of entitlements using either Subscription Manager or Red Hat Network Classic. See
Subscribing to Required Channels using RHN Classic in the Installing Red Hat Enterprise Linux
Red Hat Storage 2.1 Quick Start Guide
12

Hosts chapter of the Red Hat Enterprise Virtualization Installation Guide for more information.
Subscribe to the Red Hat Storage Native Client from the Additional Services Channels to
ensure the server has the latest clients installed:
# yum install glusterfs-fuse glusterfs
See the Installing Native Client section in the Red Hat Storage 2.1 Administration Guide for
more information.
4. Configure the data centers
Define data centers and clusters to organize the virtualization hosts. The installation process
creates a data center and associated cluster named Default.
Note
A server can be a Red Hat Enterprise Virtualization Hypervisor or a Red Hat Enterprise
Linux host. A trusted storage pool requires a minimum of one storage host, and at least
one active virtualization host is required to connect the system to a storage pool.
5. Install Red Hat Storage
Install RHS 2.1 Update 2 Installation DVD on bare metal.
Refer to the topic, "Prerequisites" of the Red Hat Storage Installation Guide for more information
on obtaining the software. For information on installing Red Hat Storage from an ISO, refer to the
Red Hat Storage Installation Guide.
6. Configure Storage
Configure the Red Hat Storage installation for your requirements.
For instructions on creating a Red Hat Storage Volume, see chapter Red Hat Storage Volume in
the Red Hat Storage Administration Guide.
Red Hat Enterprise Virtualization uses a centralized storage system for virtual machine disk
images. Before adding storage ensure that you have a working Red Hat Enterprise Virtualization
Manager environment. You must be able to access the Administration Portal, and there must be at
least one host connected with a status of Up.
Note
Red Hat Storage recommends that you use Replicate or Distributed Replicate volume type
for hosting virtual machine disk images.
7. Attach Storage to Hypervisor
Attach the Red Hat Storage volume as a storage domain.
Now you can create virtual machines and its disk images on the Red Hat Storage volumes. To optimize
the virtual machines on the Red Hat Storage volumes, see
Section 2.2, “Optimizing Virtual Machines On
2.2. Optimizing Virtual Machines On Red Hat Storage Volumes
The readahead mechanism is essential for guest sequential read performance on virtual machines. The
virtual machine-tuned profile provides insufficient readahead. You can optimize the virtual machine
performance by changing the multiply_disk_readahead 4 to multiply_disk_readahead 16.
Chapter 2. Enabling Red Hat Storage in Red Hat Enterprise Virtualization Manager
13

If you are running a Red Hat Enterprise Linux host, run the following commands to enable read-ahead.
1. Install the Tune daemon
Install the tuned daemon that tumes the system settings dynamically.
# yum install tuned
2. Edit the virtual-guest profile provided by the Tune daemon.
Edit the /etc/tune-profiles/virtual-guest/ktune.sh
Identify the line multiply_disk_readahead 4 and replace it with
m ultiply_disk_readahead 16
3. Apply the virtual-guest profile on the virtual machines
The updated profile is activated with the command:
# tuned-adm profile virtual-guest
Red Hat Storage 2.1 Quick Start Guide
14

Chapter 3. Managing Virtual Machine Images on Red Hat
Storage Servers
Red Hat Storage provides a POSIX-compatible file system to store virtual machine images in Red Hat
Storage volumes.
This chapter describes how to configure volumes using the command line interface, and how to prepare
Red Hat Storage servers for virtualization using Red Hat Enterprise Virtualization Manager.
3.1. Configuring Volumes Using the Command Line Interface
Red Hat recommends configuring volumes before starting them. For information on creating volumes,
see Setting up Red Hat Storage Volumes in the Administration Guide.
Procedure 3.1. To Configure Volumes Using the Command Line Interface
1. Configure the Red Hat Storage volume using the following command:
# gluster volume set VOLNAME group virt
Important
After tagging the volume as group virt, use the volume for storing virtual machine
images only and always access the volume through the glusterFS native client.
2. The gluster volume set command configures the specified volume using the settings in the
/var/lib/glusterd/groups/virt file. The following settings are the recommended defaults:
quick-read=off
read-ahead=off
io-cache=off
stat-prefetch=off
eager-lock=enable
remote-dio=on
quorum-type=auto
server-quorum-type=server
Important
When you upgrade to Red Hat Storage 2.1 Update 2, a new virt file is created in
/var/lib/glusterd/groups/virt.rpm new. Ensure to apply the new virt file on the
existing volumes by renaming the virt.rpmnew file to virt, along with the customized
settings.
All the performance-related settings other than cluster.eager-lock prevent caching within
GlusterFS client stack as it is the preferred mode for attaching disks to a virtual machine. The
cluster.eager-lock option optimizes write performance with synchronous replication when
there is a single writer to a file. For description on each of these performance-related settings, see
chapter Configuring Volume Options in the Red Hat Storage Administration Guide.
Chapter 3. Managing Virtual Machine Images on Red Hat Storage Servers
15

Note
Server-Side and Client-Side Quorum are enabled by default in the
/var/lib/glusterd/groups/virt file to minimize split-brain scenarios. If Server-
Side Quorum is not met then the Red Hat Storage volumes become unavailable causing
the Virtual Machines (VMs) to move to a paused state. If Client-Side Quorum is not met,
although the replica pair in a Red Hat Storage volume is available in the read-only mode,
the VMs to move to a paused state.
Manual intervention is required to make the VMs resume the operations after quorum is
restored. Consistency is achieved at the cost of fault tolerance. If fault-tolerance is
preferred over consistency, disable server-side and client-side quorum with the commands:
gluster volume reset <vol-name> server-quorum-type
gluster volume reset <vol-name> quorum-type
For more information on these configuration settings, see Managing Red Hat Storage Volumes in
the Red Hat Storage Administration Guide.
3. Set the brick permissions for vdsm and kvm. If you do not set the required brick permissions,
creation of virtual machines fails.
a. Set the user and group permissions using the following commands:
# gluster volume set VOLNAME storage.owner-uid 36
# gluster volume set VOLNAME storage.owner-gid 36
b. If you are using QEMU/KVM as a hypervisor, set the user and group permissions using the
following commands:
# gluster volume set VOLNAME storage.owner-uid 107
# gluster volume set VOLNAME storage.owner-gid 107
3.2. Adding a Red Hat Storage Server for Virtualization using Red
Hat Enterprise Virtualization Manager
The following procedure describes how to add a Red Hat Storage server for virtualization using Red Hat
Enterprise Virtualization Manager.
Note
It is recommended that you use a separate data center for Red Hat Storage nodes.
Procedure 3.2. To Add a Red Hat Storage Server for Virtualization Using Red Hat Enterprise
Virtualization Manager
1. Create a data center:
a. Select the Data Centers resource tab to list all data centers.
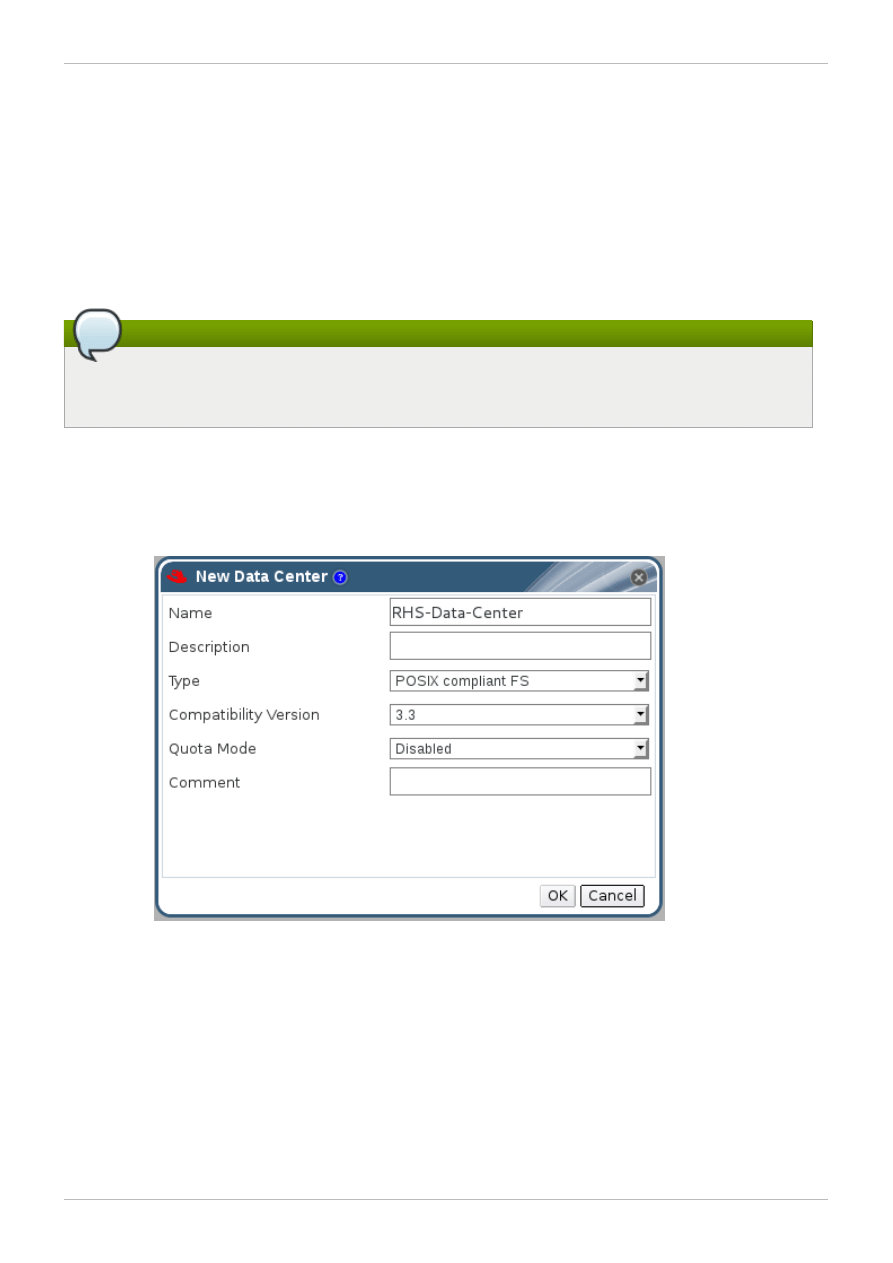
b. Click New to open the New Data Center window.
Red Hat Storage 2.1 Quick Start Guide
16
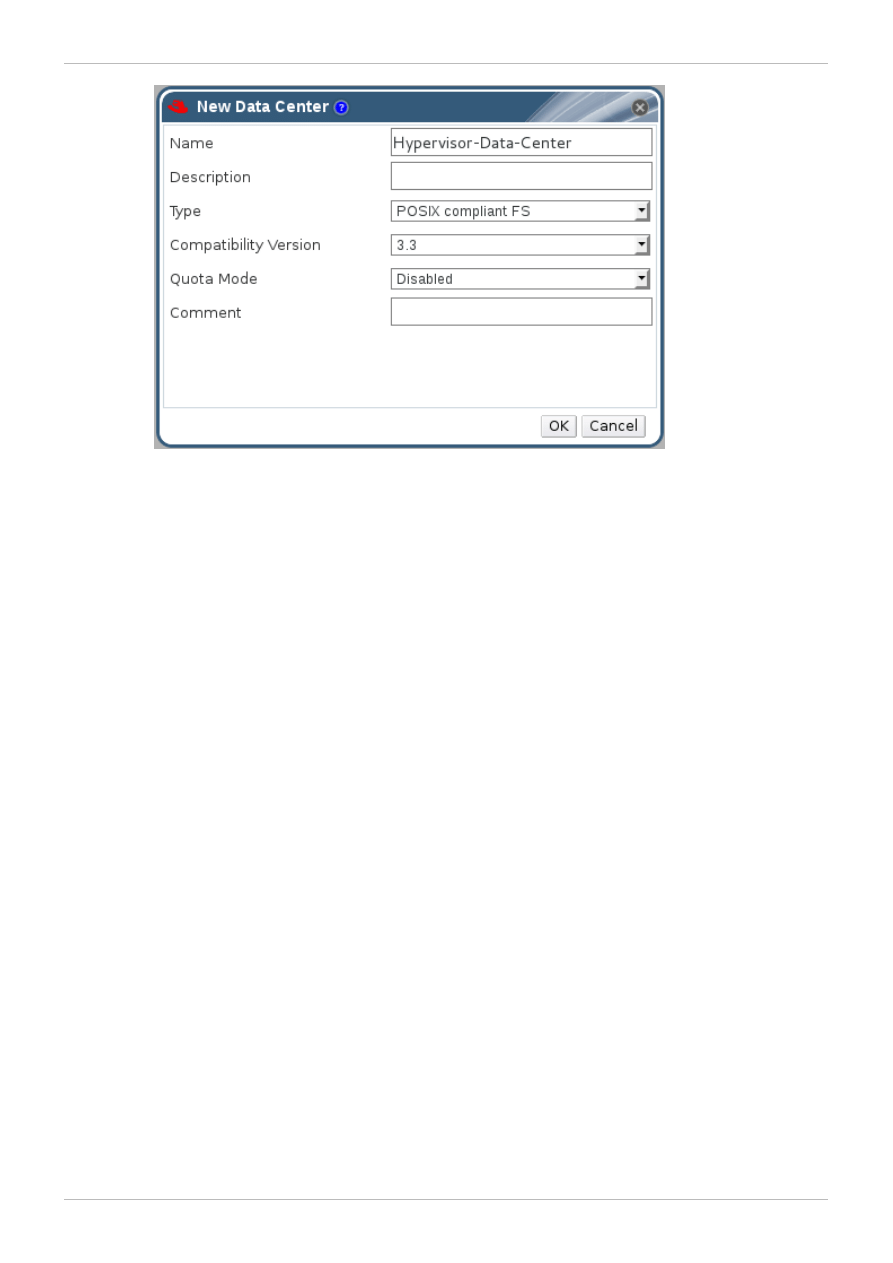
Figure 3.1. New Data Center Window
c. Enter the Name and Description of the data center.
d. Select the storage Type as POSIX compliant FS or GlusterFS from the drop-down
menu.
e. Select the Quota Mode as Disabled.
f. Click OK.
The new data center is Uninitialized until you configure the cluster, host, and storage
settings.
2. Create a cluster:
a. Select the Clusters resource tab to list all clusters.
b. Click New to open the New Cluster window.
Chapter 3. Managing Virtual Machine Images on Red Hat Storage Servers
17
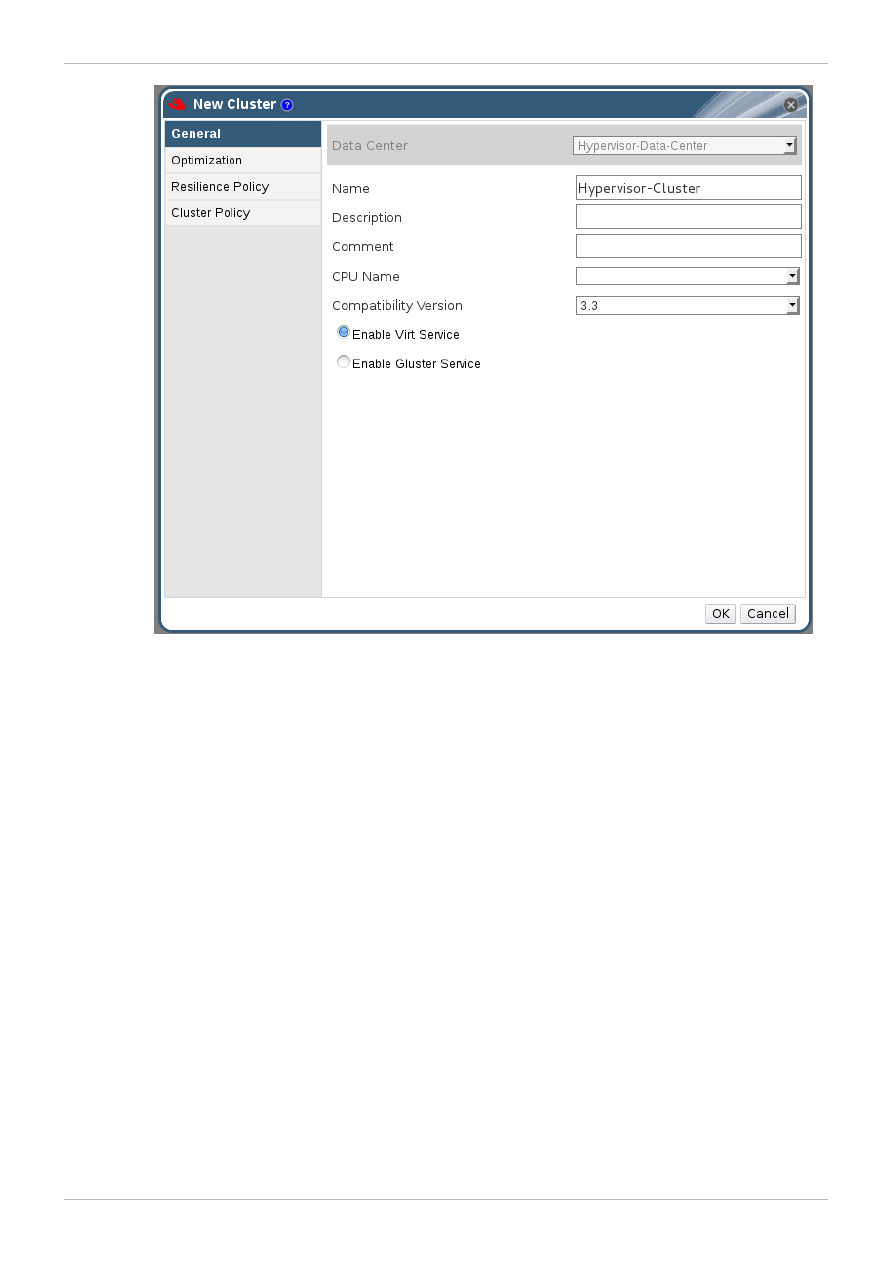
Figure 3.2. New Cluster Window
c. Select a Data Center for the cluster from the drop-down menu.
d. Enter a Name and Description for the cluster.
e. Select the CPU Name and Compatibility Version from the drop-down menus.
f. Check Enable Virt Service.
g. Click OK.
3. Add hosts:
a. Select the Hosts resource tab to display a list of all hosts in the system.
b. Click New to open the New Host window.
Red Hat Storage 2.1 Quick Start Guide
18
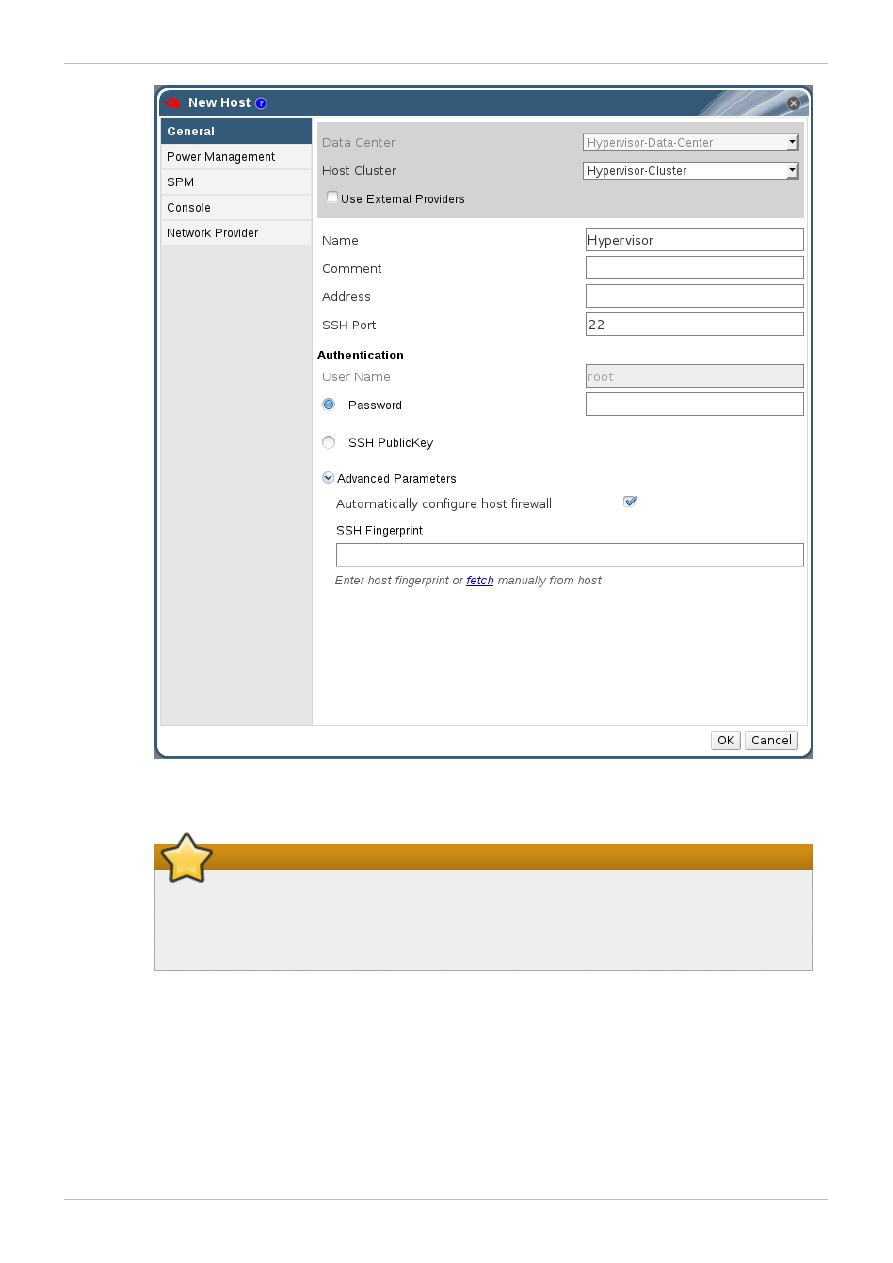
Figure 3.3. New Host Window
Important
A Red Hat Enterprise Linux hypervisor and Red Hat Enterprise Virtualization
hypervisor on a single VDSM cluster accessing the same virtual machine image
store is not supported.
c. Select the Data Center and Host Cluster for the new host from the drop-down menus.
d. Enter the Name, Address, and Root Password of the new hypervisor host.
e. Check Automatically configure host firewall if required.
f. Click OK.
The new host appears in the list of hypervisor hosts with the status Installing. After the host
is activated, the status changes to Up automatically.
4. Create and configure volumes on the Red Hat Storage cluster using the command line interface.
For information on creating and configuring volumes, see Setting up Red Hat Storage Volumes in
Chapter 3. Managing Virtual Machine Images on Red Hat Storage Servers
19
For information on creating and configuring volumes, see Setting up Red Hat Storage Volumes in
the Administration Guide and
Section 3.1, “Configuring Volumes Using the Command Line
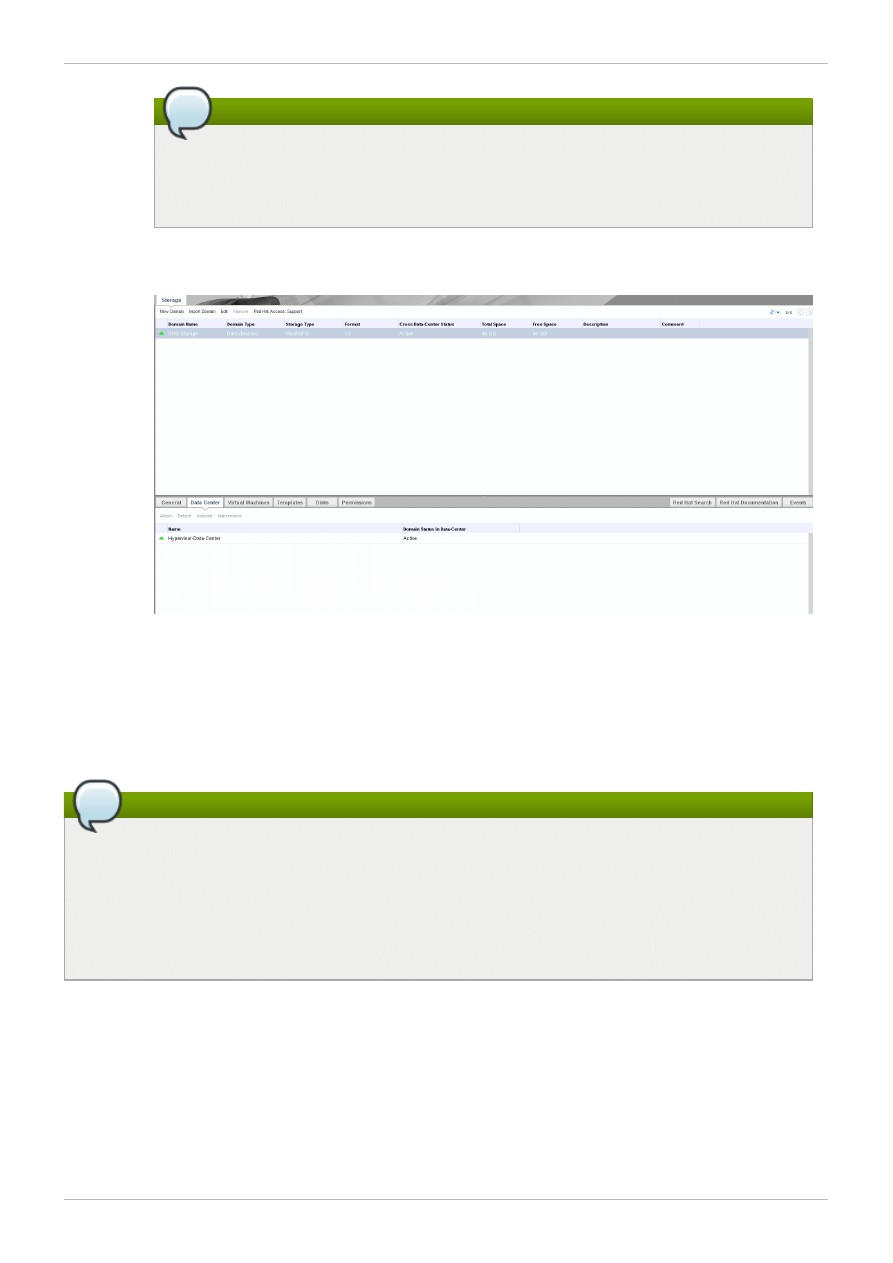
5. Add a storage domain using Red Hat Enterprise Virtualization Manager:
a. Select the Storage resource tab to list existing storage domains.
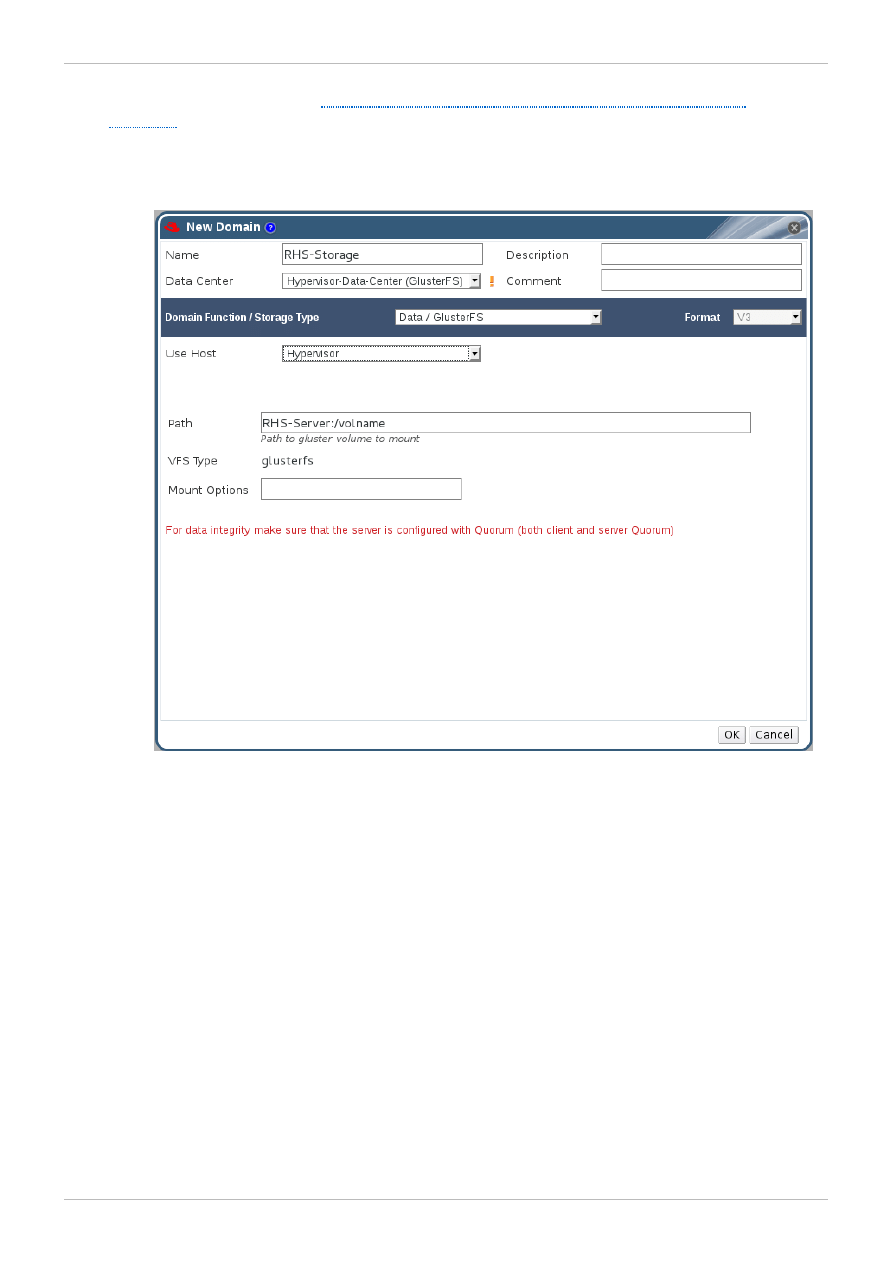
b. Click New Domain to open the New Domain window.
Figure 3.4 . New Domain Window
c. Enter a Name for the storage domain.
d. Select a POSIX compliant FS Data Center to associate with the storage domain.
e. Select Data / POSIX compliant FS from the Domain Function/Storage Type
drop-down menu.
f. Select a host from the Use Host drop-down menu.
g. Enter the Path of a Red Hat Storage server in the cluster. For example, RHS-
Server:/VOLNAME
h. Enter glusterfs as VFS Type. This selection is made by default if the data center is of
type glusterFS.
i. Enter the applicable Red Hat Storage native client Mount Options. Enter multiple mount
options separated by commas. For more information on native client mount options, see
Accessing Data - Setting up Clients in the Red Hat Storage Administration Guide.
Red Hat Storage 2.1 Quick Start Guide
20
Note
If you select the GlusterFS type of data center in Red Hat Enterprise Virtualization
Manager, you cannot add the mount options while creating a Data Domain with
glusterFS volumes.
j. Click OK.
k. Click Activate to activate the new Red Hat Storage domain.
Figure 3.5. Activated Red Hat Storage Domain
You can now create virtual machines using Red Hat Storage as storage domains. For more information
on creating virtual machines, see Virtual Machines in the Red Hat Enterprise Virtualization 3.3
Administration Guide.
Note
To prevent the risk of split brain incidents on Red Hat Storage domains, the use of shareable
disks on Red Hat Storage domains is disabled. Attempting to create a shareable disk brings up a
warning in the administration portal which recommends the use of Quorum on the Red Hat
Storage server to ensure data integrity.
This policy is not enforced on Red Hat Storage domains created on a POSIX domain with
GlusterFS specified as the virtual file system type.
Chapter 3. Managing Virtual Machine Images on Red Hat Storage Servers
21
Chapter 4. Creating and Configuring Volumes using Red Hat
Enterprise Virtualization Manager
You can create and configure Red Hat Storage volumes using Red Hat Enterprise Virtualization
Manager 3.3 and above by creating a cluster with the Enable Gluster Service option selected.
A volume is a logical collection of bricks where each brick is an export directory on a server in the
trusted storage pool. Most of the management operations for Red Hat Storage happen on these
volumes. You can use Red Hat Enterprise Virtualization Manager 3.3 to create and start new volumes
featuring a single global namespace.
Note
With the exception of the volume operations described in this section, all other Red Hat Storage
functionality must be executed from the command line.
To create and configure volumes using the Red Hat Enterprise Virtualization Manager:
1. Create a data center.
a. Select the Data Centers resource tab to list all data centers in the results list.
b. Click the New button to open the New Data Center window.
Figure 4 .1. New Data Center window
c. Enter the Name and Description of the data center.
d. Set Type to POSIX compliant FS from the drop-down list.
Set Quota Mode as Disabled.
e. Click OK.
The new data center is added to the virtualization environment. It will remain Uninitialized
until a cluster, host, and storage are configured.
2. Create a cluster with the gluster service enabled.
Red Hat Storage 2.1 Quick Start Guide
22
For more information on creating a cluster, see Step 2 of
Chapter 4, Creating and Configuring
Volumes using Red Hat Enterprise Virtualization Manager
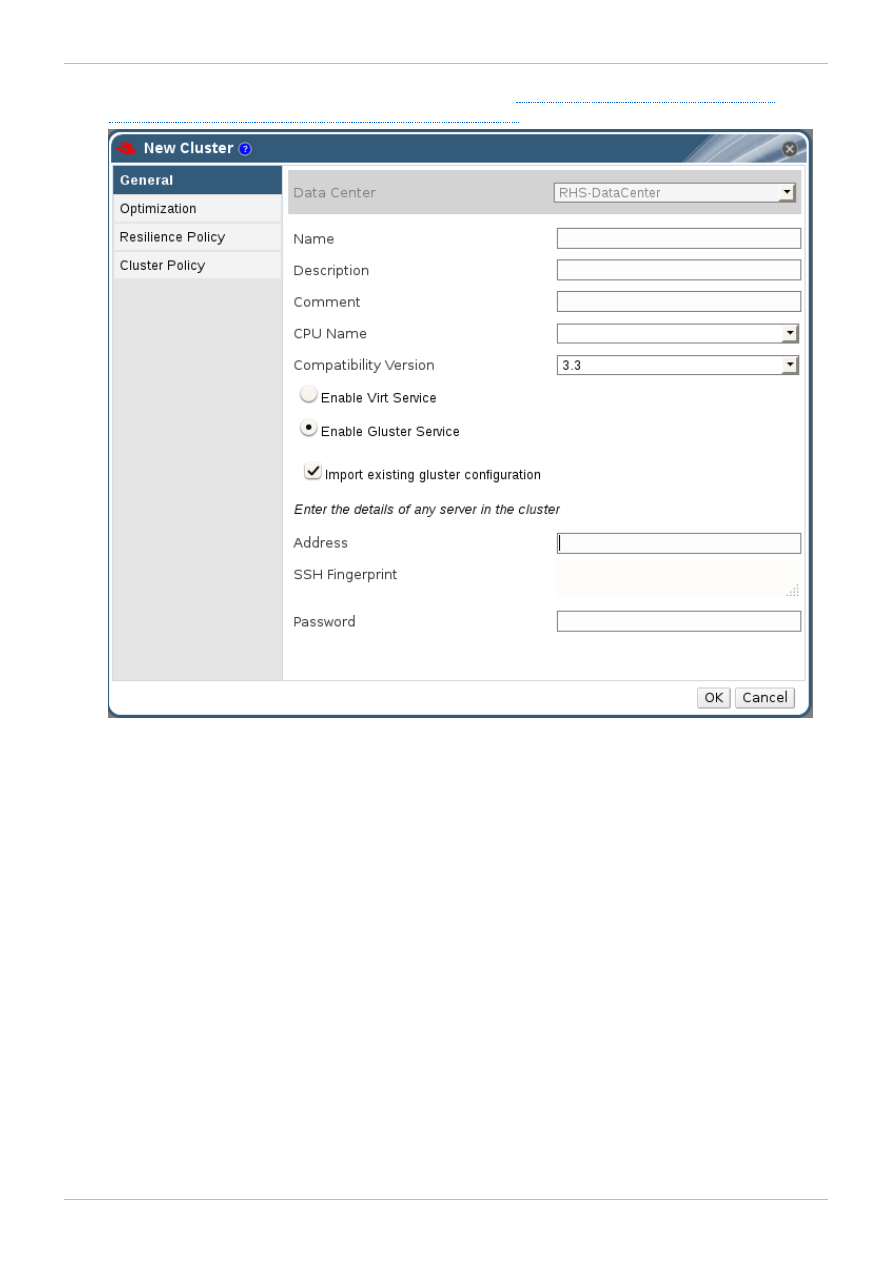
Figure 4 .2. New Cluster window
Select the Compatibility Version from the drop-down lists.
Click OK.
3. Add hosts. There are two ways to add hosts. You can either add new hosts or import the existing
gluster configuration into a cluster.
To import an existing gluster configuration:
a. Select Enable Gluster Service.
b. Select Import existing gluster configuration. With this option you can import
the existing Gluster configurations into a cluster.
c. Provide the IP address of one of the hosts.
To add new hosts:
a. Use the drop-down lists to select the Data Center and Host Cluster for the new host.
b. Click OK.
The new host displays in the list of hosts with a status of Installing. The host is
activated and the status changes to Up automatically.
You can manage the lifecycle of a volume using hook scripts. For more information, see chapter
Managing Gluster Hooks in the Red Hat Storage Console Administration Guide
Chapter 4. Creating and Configuring Volumes using Red Hat Enterprise Virtualization Manager
23
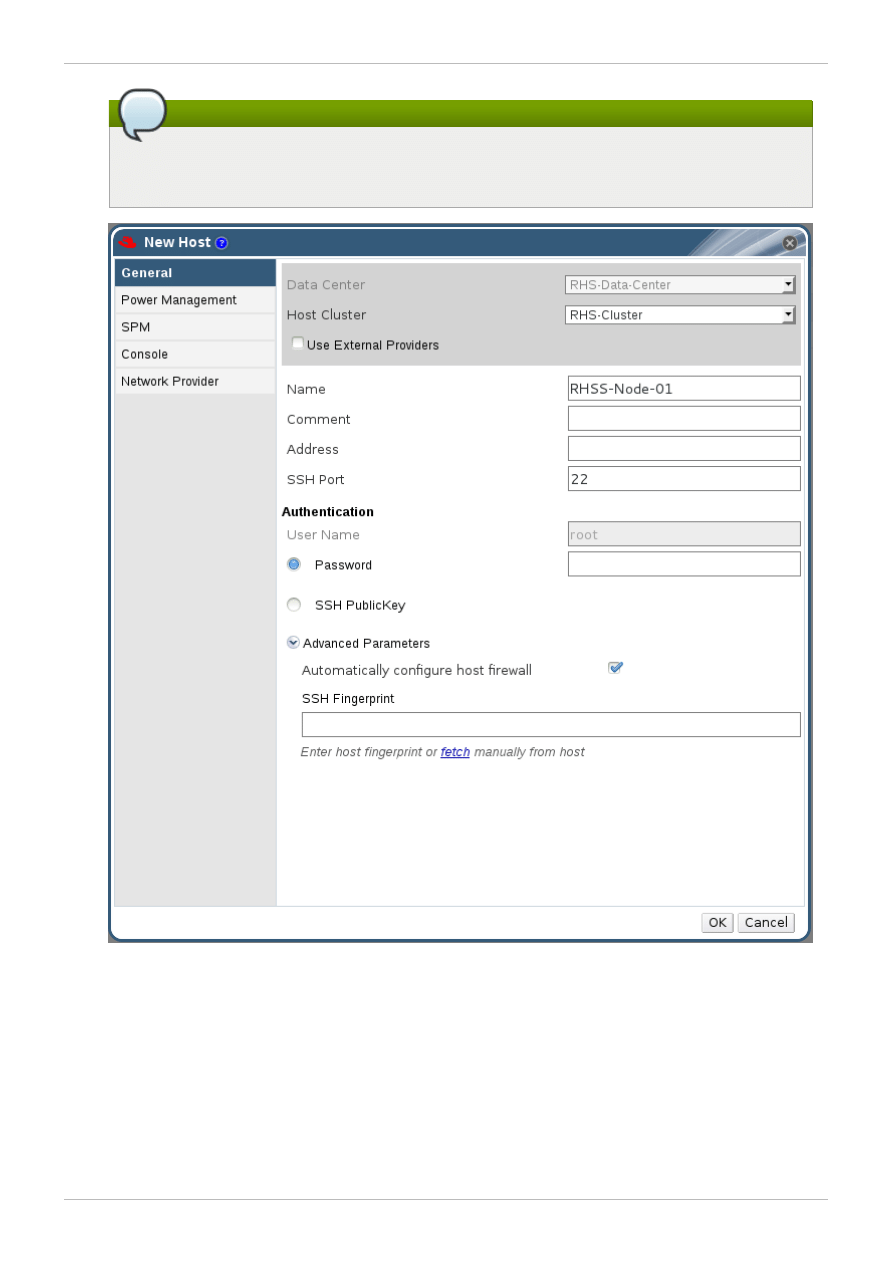
Note
To add multiple servers to a cluster, you must first add a Red Hat Storage server to the
cluster. An error message will display if you attempt to add multiple servers first.
Figure 4 .3. New Host window
4. Click Volumes node from the left tree of the console window. Click Create Volume to open the
Create Volum e window.
Red Hat Storage 2.1 Quick Start Guide
24
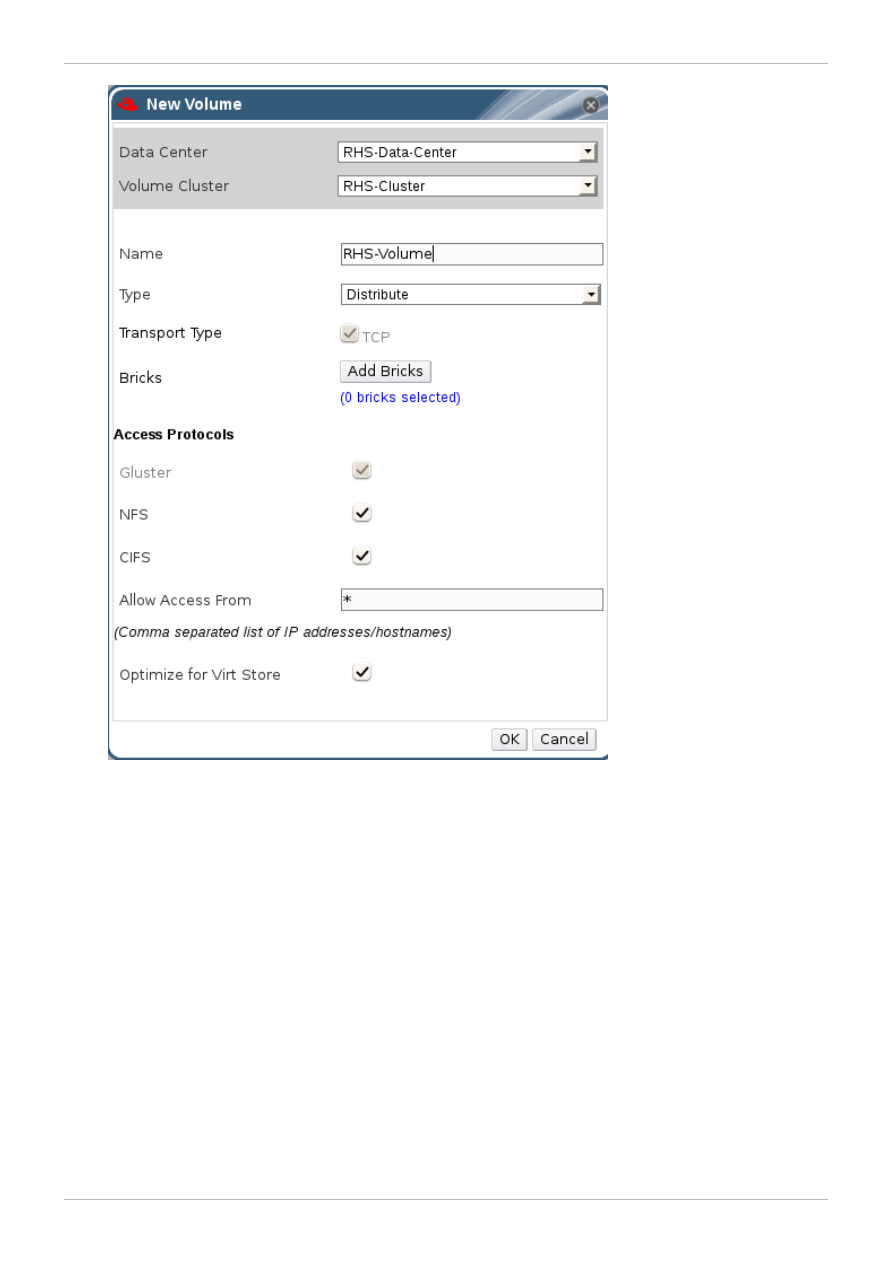
Figure 4 .4 . Create Volume window
5. Enter the name of the volume in the Name field.
6. Select the type of the volume from the Type drop-down list. You can set the volume type as either
Distribute, Replicate, or Distribute Replicate.
To host virtual machines, configure the volume type as Replicate or Distributed
Replicate.
Chapter 4. Creating and Configuring Volumes using Red Hat Enterprise Virtualization Manager
25
Important
Stripe and Distributed Stripe volume types are under Technology Preview.
Technology Preview features are not fully supported under Red Hat subscription level
agreements (SLAs), may not be functionally complete, and are not intended for production
use. However, these features provide early access to upcoming product innovations,
enabling customers to test functionality and provide feedback during the development
process. As Red Hat considers making future iterations of Technology Preview features
generally available, Red Hat will provide commercially reasonable efforts to resolve any
reported issues that customers experience when using these features.
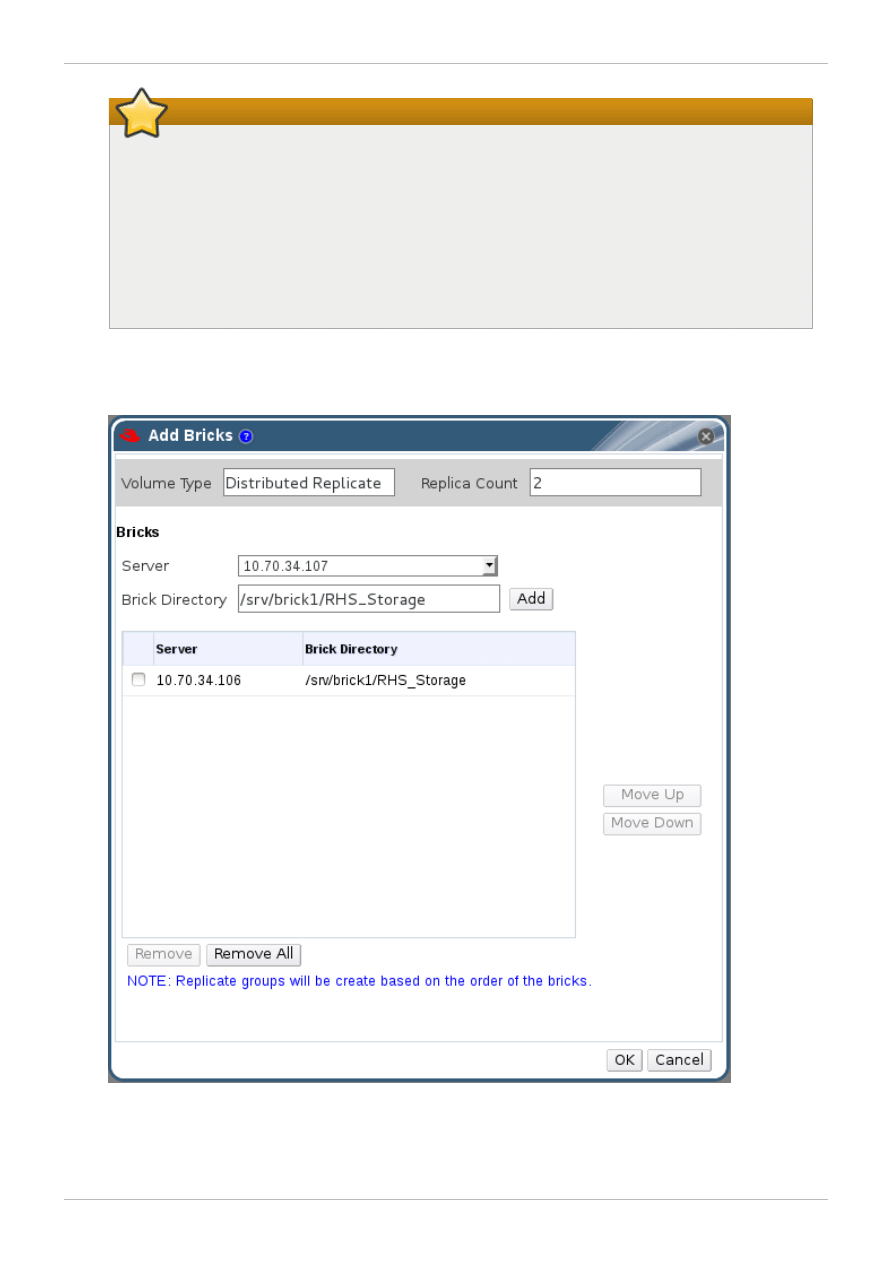
7. Click Add Bricks to add bricks to your volume.
A brick is the basic unit of storage, represented by an export directory on a server in the storage
cluster. You can expand or shrink your cluster by adding new bricks or deleting existing bricks.
Figure 4 .5. Add bricks
Enter the path for the brick and click OK.
Red Hat Storage 2.1 Quick Start Guide
26
8. In the Allow Access From field, specify volume access control as a comma-separated list of IP
addresses or hostnames.
By default, an asterisk (*) is used as a wildcard to specify ranges of addresses such as IP
addresses or hostnames. You need to use IP-based authentication for Gluster and NFS exports.
9. Click OK to create the volume.
The new volume is added and displays on the Volumes tab.
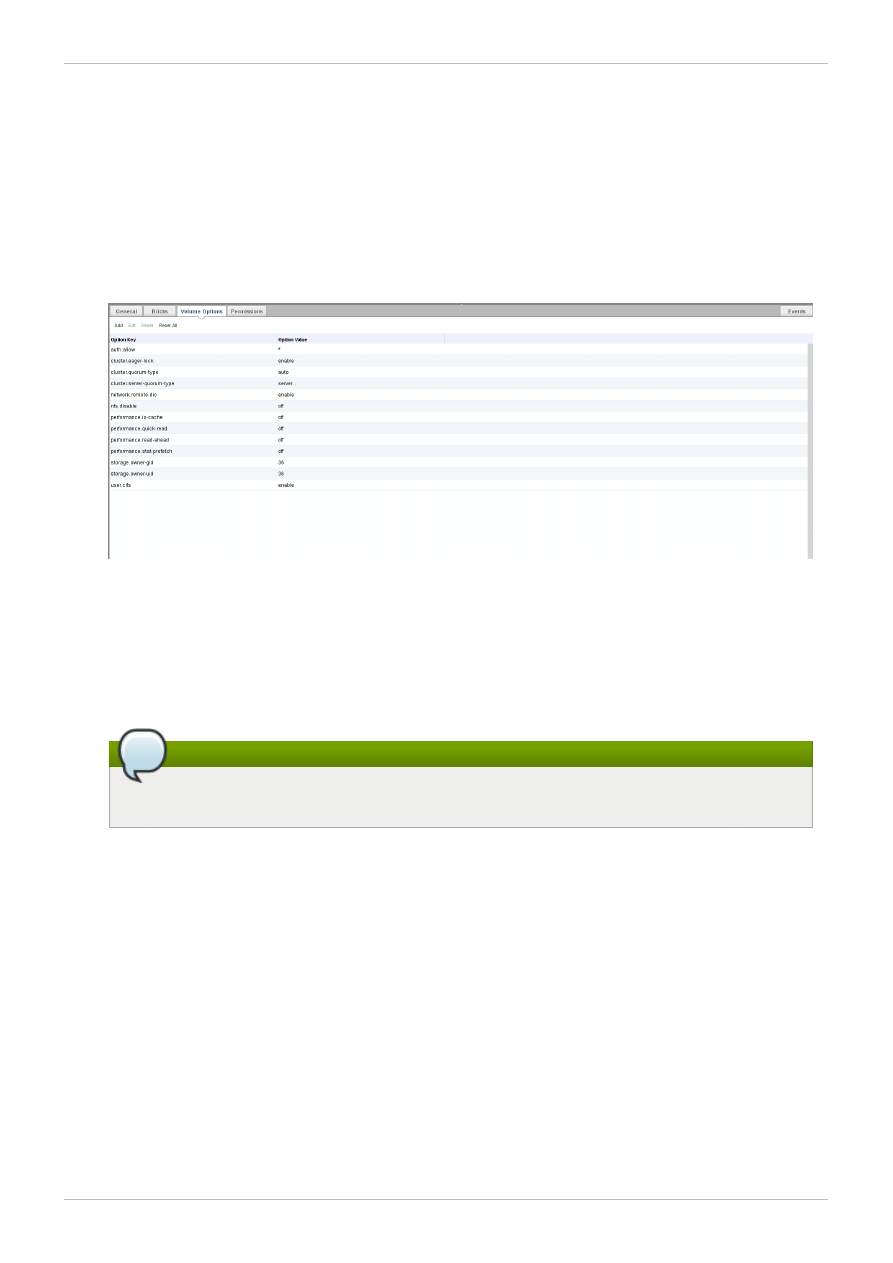
10. Select the volume to configure and click Optimize for Virt Store.
The volume is configured and group, storage-owner-uid, and storage-owner-gid
options are set.
Figure 4 .6. Volume options
For more information on each volume set tunable option, see Managing Red Hat Storage
Volumes in the Red Hat Storage 2.1 Administration Guide.
11. In the Volumes tab, select the new volume and click Start to start the volume.
The volume status changes to Up.
Note
You must optimize the volume before you can attach the volume to the storage domain.
Chapter 4. Creating and Configuring Volumes using Red Hat Enterprise Virtualization Manager
27

Figure 4 .7. New volume
You can create a storage domain using the optimized volume and manage it using Red Hat Enterprise
Virtualization Manager. See Red Hat Storage 2.1 Console Administration Guide for more information on
managing volumes such as start, stop, expand, shrink, add and edit volume options.
4.1. Compatible Versions
Each of the Red Hat Storage versions are compatible with specific versions of the Red Hat Enterprise
Virtualization Manager. The table lists the compatible versions.
Table 4 .1. Compatibility Matrix
Red Hat Storage Server version
Red Hat Enterprise Virtualization version
2.1
3.2
2.1 Update 1
3.2
2.1 Update 2
3.3
Red Hat Storage 2.1 Quick Start Guide
28

Revision History
Revision 2.1-24
Mon February 17 2014
Anjana Suparna Sriram
Incorporated review comments.
Revision 2.1-21
Thu February 06 2014
Pavithra Srinivasan
First draft.
Revision History
29
Document Outline
- Table of Contents
- Preface
- Chapter 1. Introduction to Red Hat Storage for Virtualization
- Chapter 2. Enabling Red Hat Storage in Red Hat Enterprise Virtualization Manager
- Chapter 3. Managing Virtual Machine Images on Red Hat Storage Servers
- Chapter 4. Creating and Configuring Volumes using Red Hat Enterprise Virtualization Manager
- Revision History
Wyszukiwarka
Podobne podstrony:
Red Hat Storage 2 0 Quick Start Guide en US
Red Hat Storage 2 1 2 1 Update 2 Release Notes en US
Red Hat Enterprise Linux 5 5 4 Release Notes en US
Red Hat Enterprise Linux 6 6 0 Release Notes en US
Red Hat Enterprise Linux 5 5 0 Release Notes en US
Red Hat Enterprise Linux 4 4 8 Release Notes en US
Red Hat Enterprise Linux 6 6 5 Release Notes en US
Red Hat Enterprise Linux 6 6 3 Release Notes en US
Red Hat Storage 2 0 Installation Guide en US
Red Hat Storage 2 1 Console Command Line Shell Guide en US
Red Hat Storage 2 0 Installation Guide en US(1)
Red Hat Enterprise Virtualization 3 2 Command Line Shell Guide en US
AF104114261 en us quick start guide store and share documents
Red Hat Storage 2 0 2 0 Release Notes en US
Red Hat Storage 2 0 2 0 Update 4 and Update 5 Release Notes en US
AF104114265 en us quick start guide lists
Red Hat Enterprise Linux 6 Beta Virtualization Getting Started Guide en US
Red Hat Enterprise Virtualization 3 1 User Portal Guide en US
AF104114273 en us quick start guide create a team site
więcej podobnych podstron