Technical notes of interest to Marine Engineers
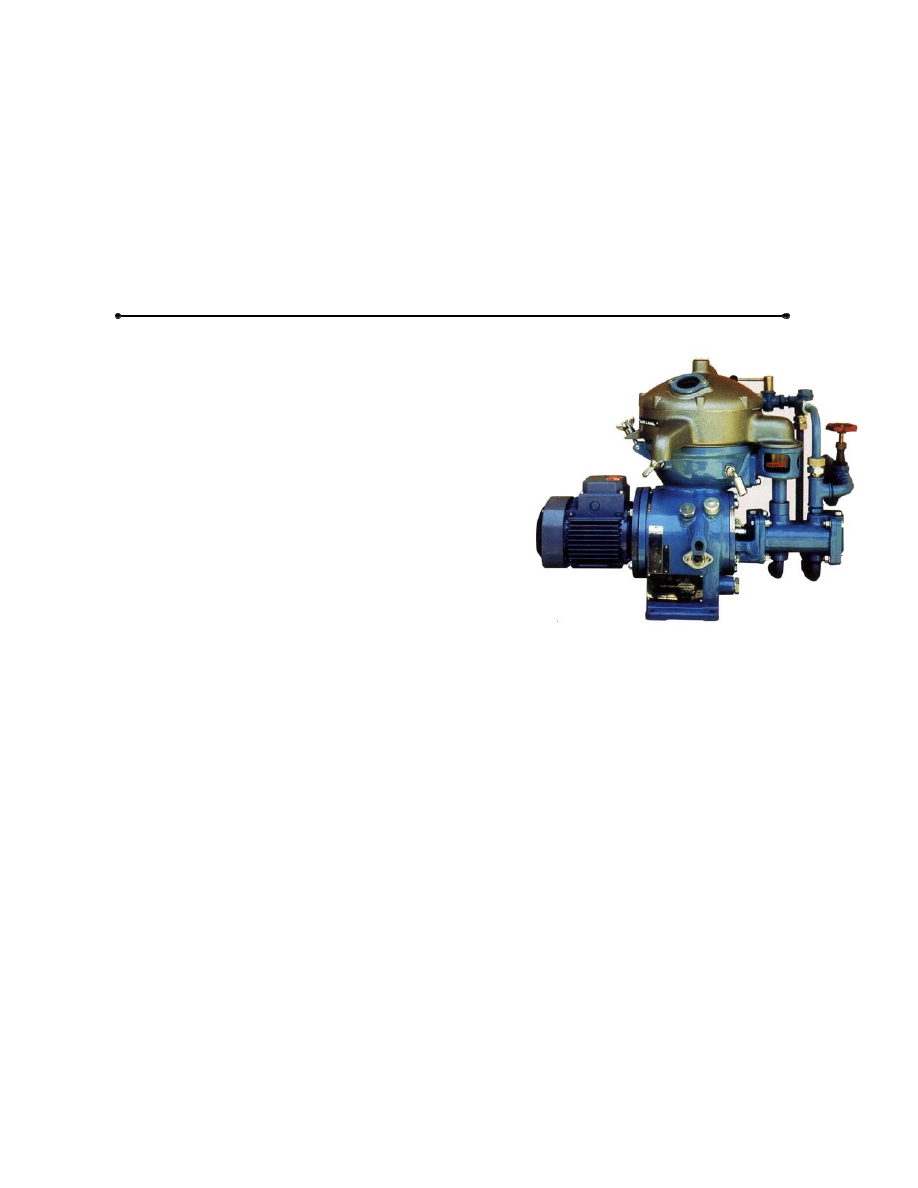
The Alfa Laval MAB separator
A practical maintenance guide
Authored by: Martin Leduc – 11.2002
Brought to you by www.dieselduck.net, comments to webmaster@dieselduck.net
These units are used extensively on the smaller
ships, larger boats and yachts. I have worked on
several in my short time at sea. One day we were
bored and a bit un-impressed with the cleaning
manual we had, so we made our own guide to
cleaning them. Following the brief introduction
from the Alfa Laval MAB brochure, below, you will
find a, hopefully, helpful illustrated guide to routine
maintenance on these units.
Application
Purification or clarification of mineral oils used in
marine installations and power stations (fuel and
lubricating oils).
Working principle
Separation takes place in a solids-retaining bowl that can be arranged for either
clarification or purification. In both cases, the contaminated oil is fed into the separator
through the centre, and it is separated by centrifugal force into its various phases, the
heaviest phase (sludge and water) being forced outwards to the periphery of the bowl. The
accumulation of sludge is periodically removed from the bowl by hand.
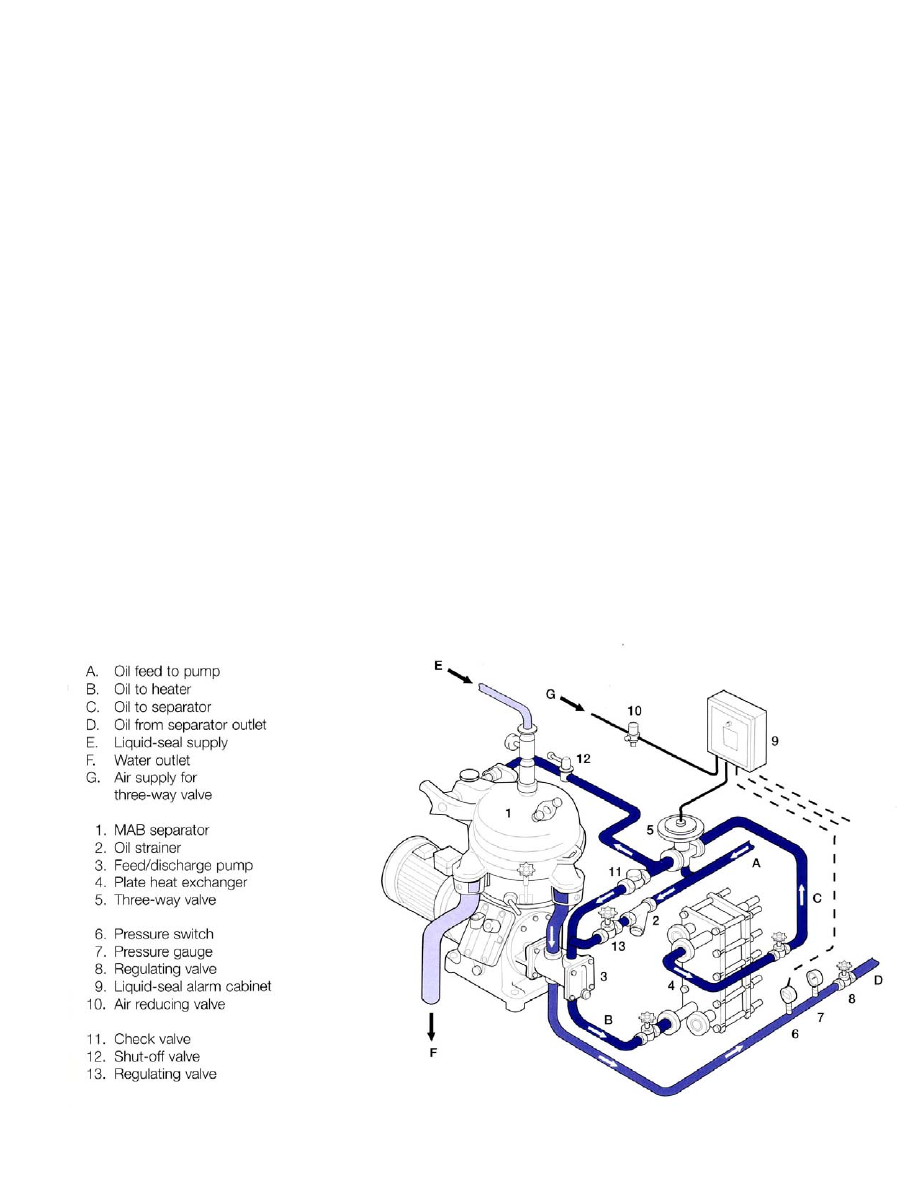
Installation
The oil is pumped, heated, and separated as shown in the figure. A liquid seal in the
separator bowl prevents the oil from escaping through the water outlet. If this seal is
broken, an alarm device is activated. With unmanned engine rooms, the signals are
transmitted to a remote control unit. When the seal is broken, the three-way valve shuts
off the oil feed and the oil is recirculated until the fault is corrected.
Standard design
Solids- retaining separator comprising a frame containing in its lower part a horizontal
drive shaft with friction clutch and brake, worm gear and a vertical bowl spindle. The
worm gear is placed in an oil bath.
The bowl is fixed on the top of the spindle inside the space formed by the upper part of
the frame and the frame hood which also carries the feed and discharge systems. The
frame hood is hinged to facilitate easy access for cleaning the bowl which is of the
solidwall disc type.
Basic equipment
Dirty oil inlet device. Clean oil outlet device with sight glass. Water outlet spout. Liquid
seal water inlet. Set of gravity discs. Clarifier parts comprising discharge collar, top disc
without neck, and bottom disc without holes. Revolution indicator. Set of resilient
mountings. Set of Standard Spare Parts. Built-on gear type pump (combined feed/discharge
pump).
Extra equipment
Electric motor. Starter. Set of tools. Set of recommended additional spares for long-time
service. Flexible connections. Preheater. Alarm device for broken liquid seal.
Fuel Oil Purifier Cleaning
Text: M. Leduc, Pictures: J.Gibas.
The Alfa Laval MAB104 is a fuel oil purifier that
purifies marine diesel oil. The fuel is then stored
in the day tank prior to consumption. Depending
on the delivered quality of the fuel, the fuel oil
purifier – FOP, undergoes schedule cleaning
every 25 hours of operations. This document serves to illustrate the procedure
for those unfamiliar with it and perhaps re-iterate some points of the
maintenance to those who are familiar with its maintenance.
The objective of the task is to remove the build up of sludge, dirt, grim that
gathers on the individual disc during the separation procedure. This debris must
be physically taken off.
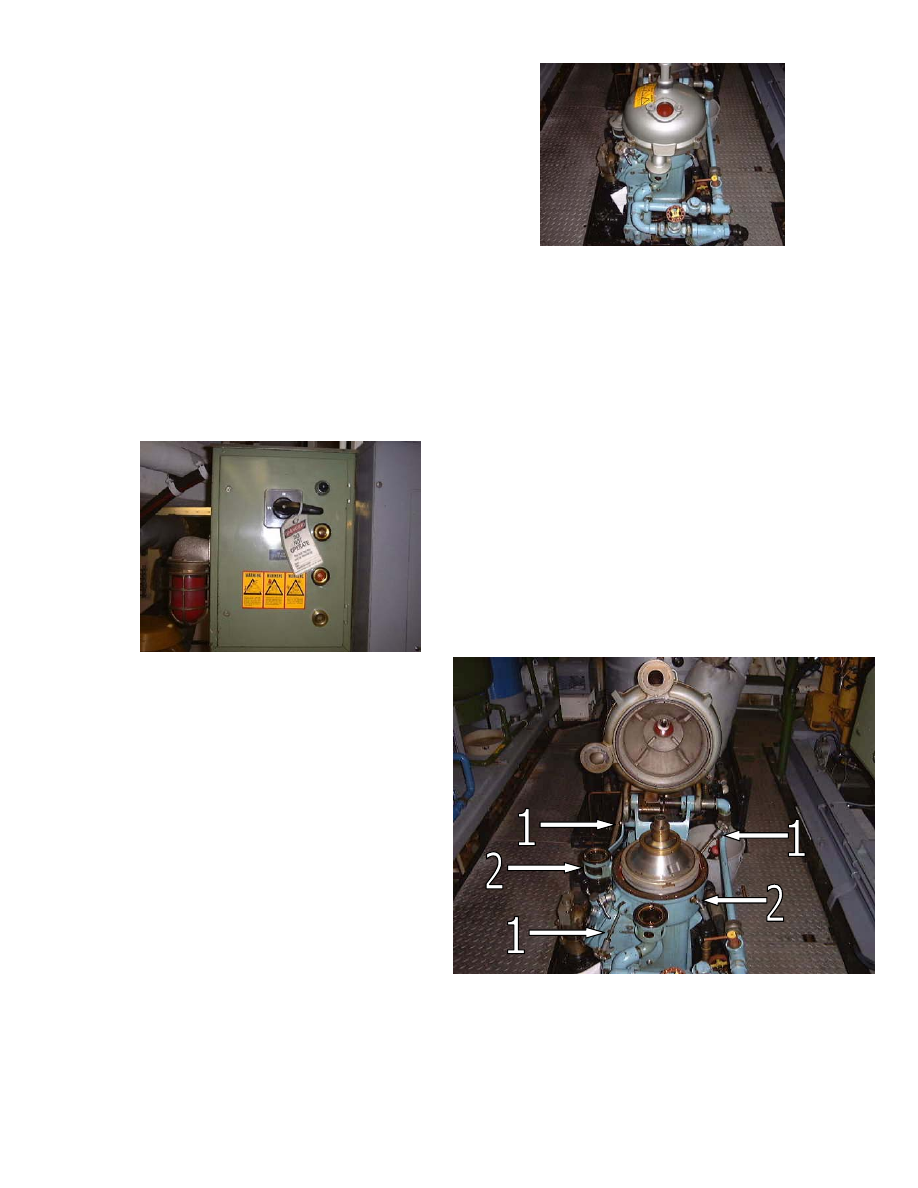
Before starting, be sure you are ready:
Make sure you do not need the purifier for
two hours (day tank full). You have all the
tools; on the board above #1 SSG. The
cleaning basin is empty and ready to place
parts in. Having two 15l. Pails filled half
way with diesel oil will make sure things go
smoothly. Hunt down the Silicon (lube for
o-rings) and Molykote (lube for threads).
1) Once unit is lock out with no
chances of starting, the lid should
be unfastened and open by
undoing the two clamp bolts –
look at its pivot point for the lock,
which keeps the lid open.
2) Secure the bowl assembly by
screwing in the two lock screws.

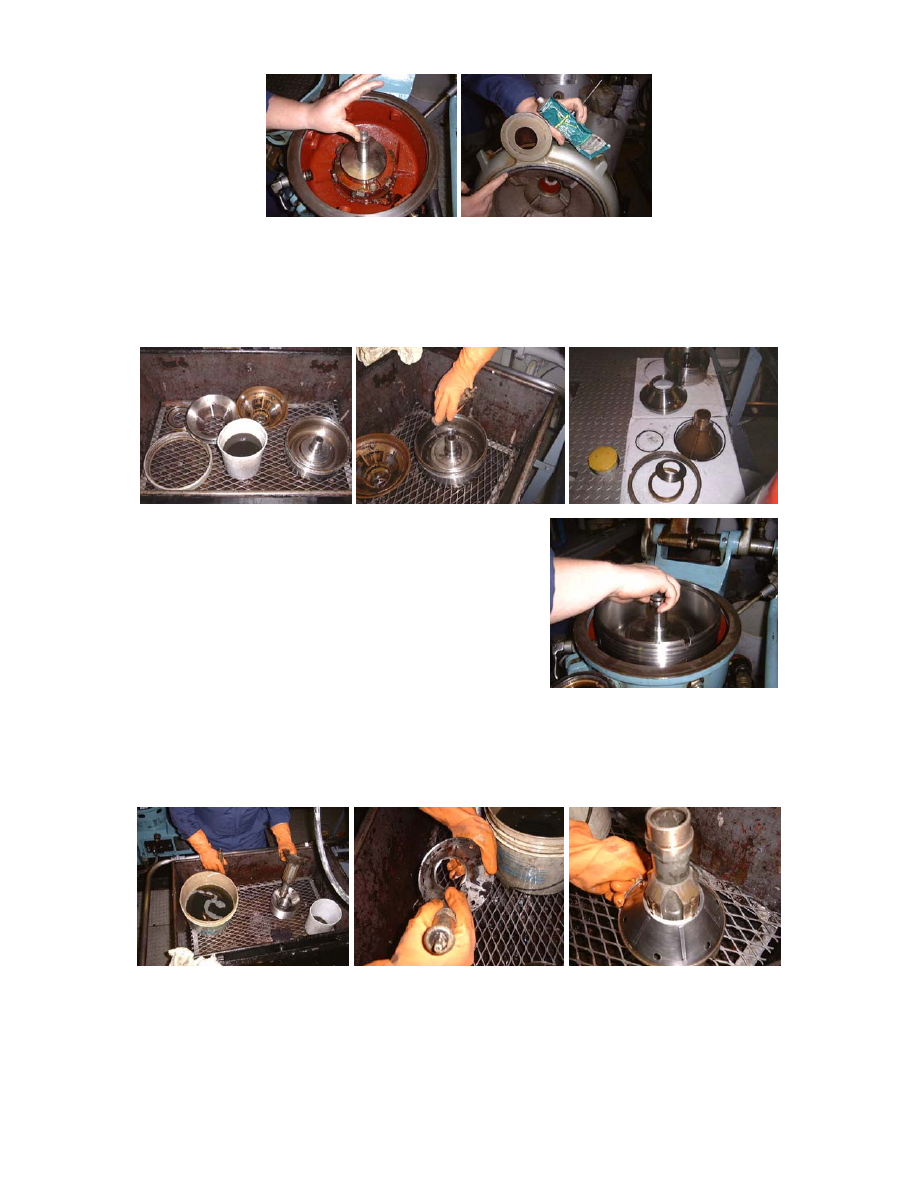
3) Using the smaller Alfa Laval spanner, remove the gravity disk-locking ring by
turning clockwise to remove. Hand power should be enough force. Remove
gravity disk and o-ring; take them to the cleaning bin.
4) Using the larger Alfa Laval spanner remove the bowl’s lock ring. Using a lead
hammer (dead blow) from the Oil Purifier station, tap handle of tool in a
clockwise fashion. Remove bowl hood and take it to the cleaning bin with
the lock ring, paying attention to the o-ring around the bowl’s hood
5) Remove the top disc and take to cleaning bin. Then grab the disk stack and
lift straight up and into one of your buckets half filled with clean fuel oil. The
disc soaking in diesel will make cleaning them easier.
6) Empty the bowl of the oily water using the small suction hand pump or cup.
Remove the spindle lock nut (not shown) using the wrench on the FOP tool
board. Then in its place, screw in the puller; also on the FOP tool board, until
you feel a slight rise in the bowl (becomes unseated). With the puller secure,
the bowl may now be lifted and carried over to the cleaning bin.
7) Take this time to prepare for re-assembly by cleaning the inside of the unit
with a rag. Then checking spindle “wobble”, there should be very little.
Carefully take out the lid’s o-ring and the two sights glass o-ring; clean and
inspect for damage. Lube o-rings with Silicone and place in grooves. The FOP
is now ready for re-assembly, once cleaning is complete.
8) At the cleaning bin, using gloves; clean the
gravity disc, hood, top disc and locking rings
with a plastic brush and clean fuel oil from
your second bucket. Place the above items on
the rag-covered deck to drip dry. Clean and
inspect o-rings. Then clean the purifier’s bowl.
Once clean, dry and carefully place it back on
the spindle in the purifier and tightened the
lock nut. The important thing to remember
while cleaning purifier parts is to not scratch, gouge or dent the surfaces.
Therefore, no metal instruments, steel wool or the likes should be used. If
you have a stubborn spot that the brush cannot get, use a stiff piece of
plastic, such as a kitchen spatula or the likes.
9) Take the stack of disc out of your first bucket, tip up side down and place it
in the cleaning bin. Carefully remove base, clean and stand upright to the
side of the bin. Then, one by one, take a disc, clean it using the soaking fuel
oil to rinse them. Once clean, place it on the base without losing it’s stacking
order.
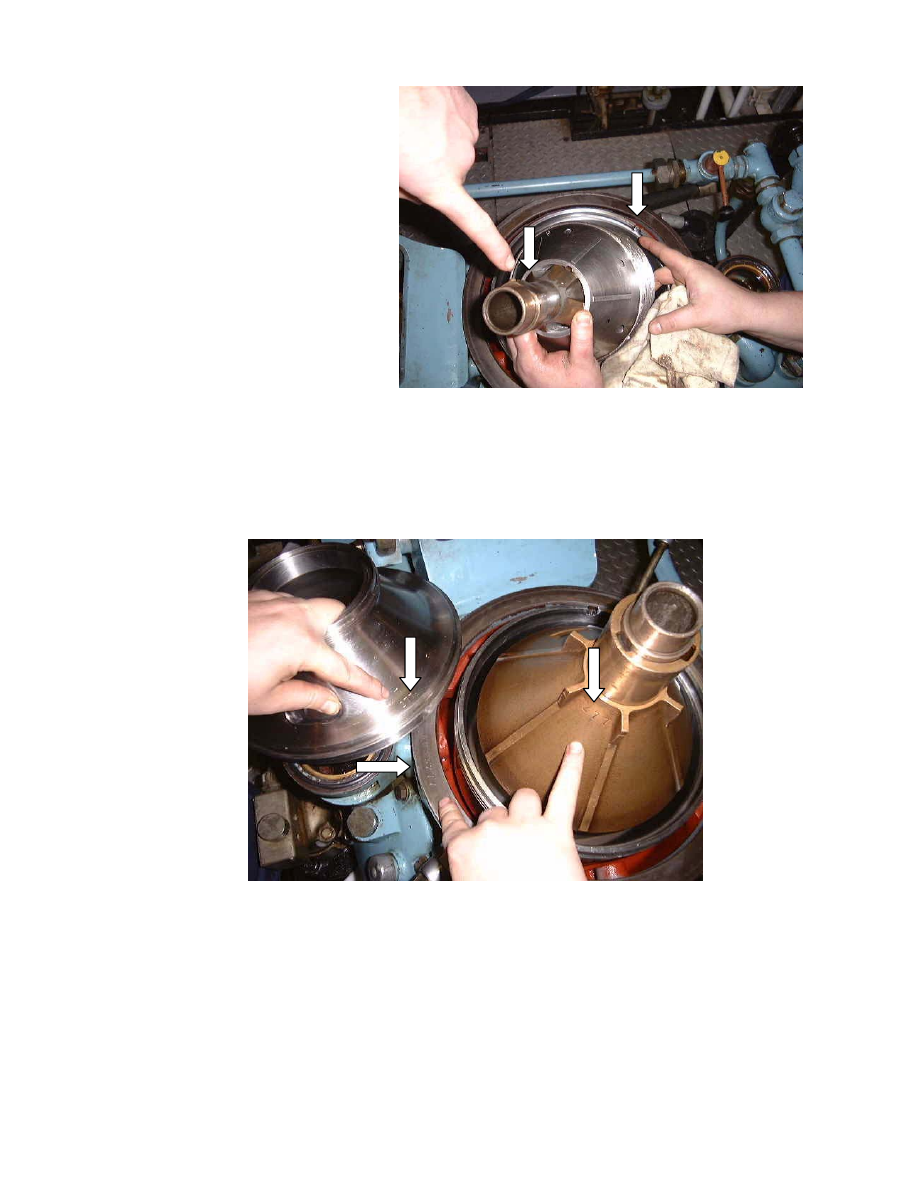
10) With all the disc on the
base, take the lot and re-
install it in the bowl in the
purifier. The disc set is
matched with the bowl, so
rotate the stack until it falls
(~¼”) into place. In the
picture you can see the flat
area of the base lines up
with the notch in the bowl.
11) Then place the top disc on
the stack of disk (not
pictured). It too, is aligned
with the bowl, so rotate the top disc until it falls (~¼”) into place.
12) The complete bowl unit is balanced at the factory, so it is crucial for the
parts that were balance together, be put back together. Check for the factory
stamping of the pieces; they should all be the same. On this purifier it’s 277,
the last three digits of the purifier’s serial number.

13) Lubricate large o-ring with silicon and set it in the groove of the hood. Place
hood on the bowl, aligning the tab on the hood (picture above) with the
notch in the bowl. Do not force anything; the entire piece up to this point
should have “fallen” into place without force. Lightly lubricate the large
locking ring with Molykote and install. Using the dead blow hammer, the large
spanner and medium force, drive the locking ring counter clockwise until
the “O” marks on the ring match up to the “O” marks on the hood. Should
the marks line up and the ring still be loose, keep driving it until it stops. The
angle between the two marks is an indication of wear. Should the angle be
too much (~25 degrees) the whole bowl should be sent to Alfa Laval for
servicing.
14) Clean and lubricate small o-ring and
insert it in the hood’s top groove.
Place gravity (aka Paring) disc and
installed small locking ring after
lubricating threads with Molykote.
Moderately tighten it using the small
spanner.
15) Release locking screws and rotate
bowl assembly to check for trouble
(grinding, roughness etc) it should
be smooth. Close the unit’s lid and secure both clamps hand tight.
16) Remove lockouts and test your handy
work. See, that’s not so hard!
ΩΩΩ
Document Outline
- Technical notes of interest to Marine Engineers
- fop_cleaning_procedure.pdf
Wyszukiwarka
Podobne podstrony:
Brenda Shoshanna Ph D Ph D Jewish Dharma A Guide to the Practice of Judaism and Zen(2008)
[Proulx & Heine] Death and Black Diamonds Meaning, Mortality & the Meaning Maintenance Model
Dream Yoga and the Practice of Natural Light Namkhai Norbu
The Symposium A Philosophers Guide to Love
Dream Yoga and the Practice of Natural Light Namkhai Norbu
Dane Rudhyar THE PRACTICE OF ASTROLOGY AS A TECHNIQUE IN HUMAN UNDERSTANDING
Men & Supermen The Brand X Hero's Guide
Halley RF Troubleshooting and Maintenance Guide V1 0
Nijs L , de Vries The young architect’s guide to room acoustics
Manovich The Practice of Everyday Media Life
The Monk study guide?br
Feehan, Christine Dark The Carpathian Reading Guide
The Essential Psychedelics Guide by DM Turner
Fabregas (2007) Ordered Separationism the Morphophonology of ir
The How To Guide by Stavanger1 & Kinolaughs (Incomplete 1 6)
Dream Yoga and the practice of Natural Light by Namkhai Norbu
The Ultimate Fretboard Guide
więcej podobnych podstron