
FIT A TOILET AND BIDET
A good knowledge of plumbing techniques and some
understanding of building construction would be an
advantage.
Be careful not to strain yourself whilst manoeuvring the
appliances. Ensure that all metal pipes and fittings are cross-
bonded with 6mm
2
sheathed earthing wire. Protective
goggles and gloves may be needed at some stages.
If you are changing your toilet, you may also want to
consider re-styling the whole bathroom.
Before taking any action, plan your new installation
thoroughly. If you have only one toilet in the house, the
work must be carried out efficiently to minimise the time
that the amenities are unavailable. If you have any concerns
about your own ability, ask professionals to carry out the
work.
2
- Removing the old WC
Check all goods carefully prior to installation and before the
old suite is disconnected.
The first task is to remove the old pan and cistern. With the
cold supply turned off, flush the toilet to empty the cistern.
Use a sponge to soak up any surplus water left after
flushing.
Disconnect the supply pipe and overflow pipe from the
cistern. If they are corroded, cut them free. Disconnect or
cut away the flush pipe. Remove the cistern and any
brackets fixed to the wall.
Remove the screws holding the base of the pan to the floor.
Chip out the old putty sealant or mortar from the soil-pipe
joint, and work the pan free to remove it.
If the joint cannot be freed,
break the pan outlet with a
hammer and lift the pan
clear. If the pan is bonded to
a concrete floor, use a cold
chisel to free it. Stuff paper
or old cloth in the pipe.
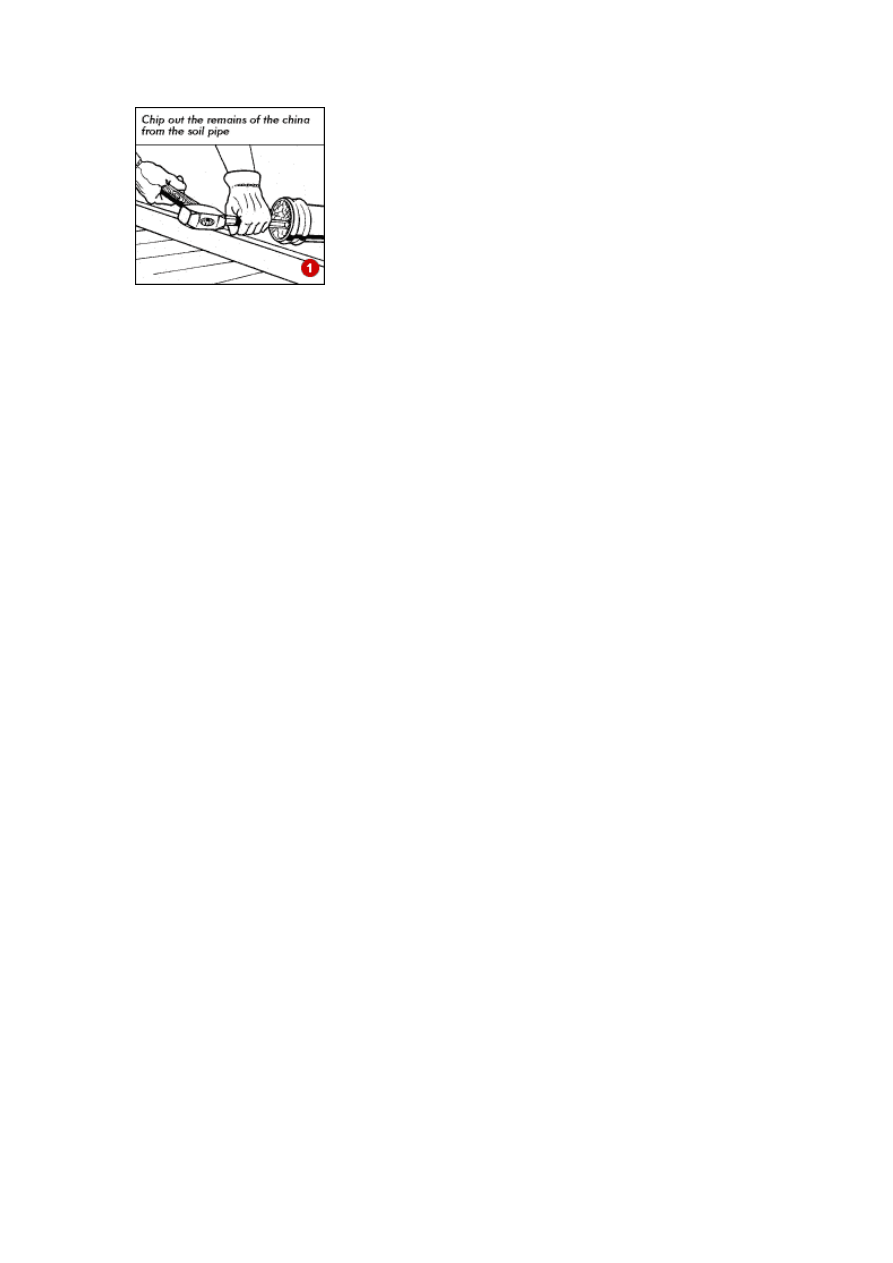
Carefully chip out the
remains of the china from t
soil pipe using the chisel (1).
he
Wear protective goggles and gloves during these operations.
If a wooden floor shows signs of rot, cut out the damaged
material and replace it with new flooring. Treat the new and
surrounding wood with preservative.
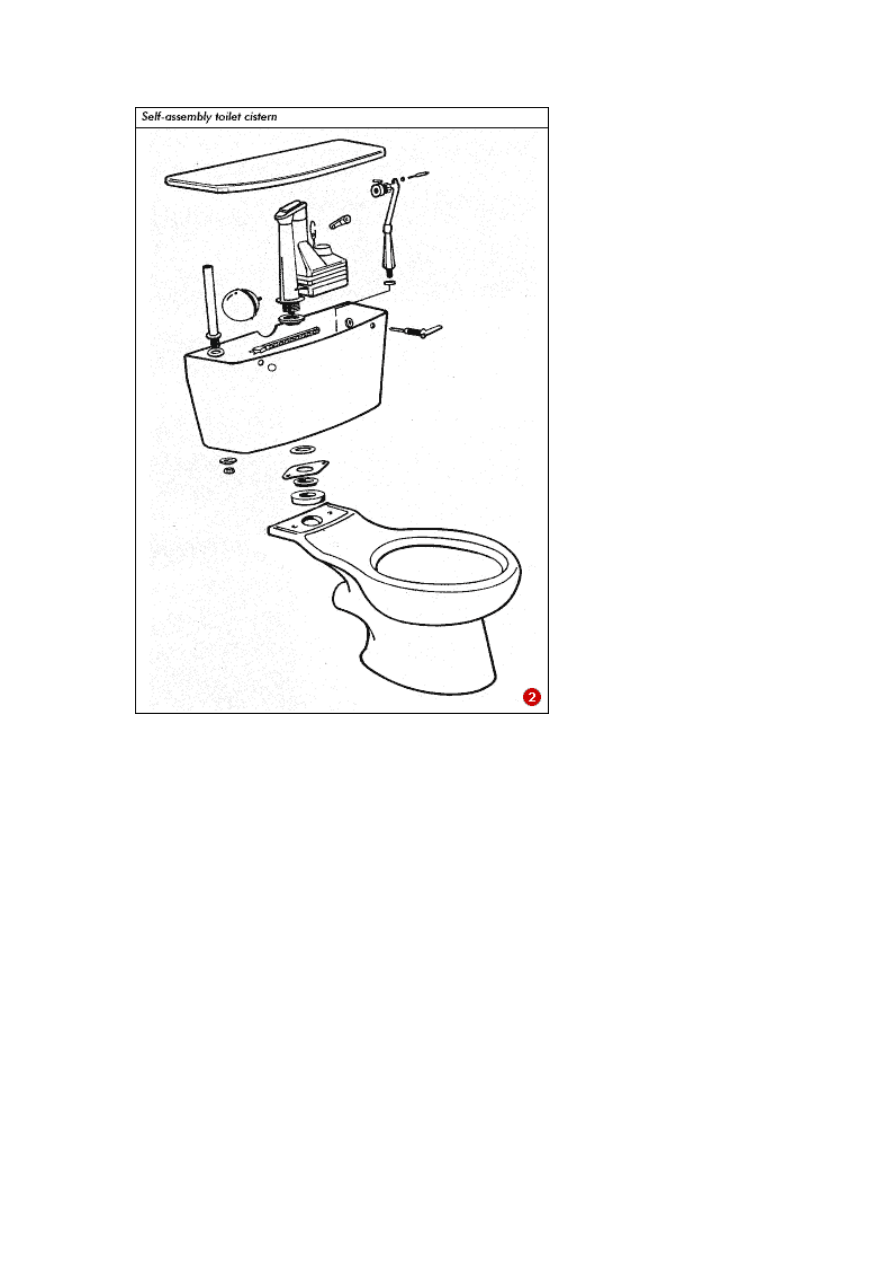
3 - Fitting a new close-coupled WC
Toilet cisterns are supplied with a siphon kit and lever handle
for self assembly (2). The cistern sometimes has two holes in
the front to enable you to set the lever on the left or right-hand
side.
Check that the pan and cistern are level, and pack out as
required. Mark the positions of the floor and wall fixings. Also
mark the overflow position.
Assemble the siphon and lever mechanism, following the
manufacturer's instructions.
Fit the cistern to the pan, using the assembly kit provided with
the WC. Do not overtighten the fixings.
Use a push-fit flexible connector to join the new pan to the soil
pipe. These are available in straight, off-set, angled and bent
forms to fit different installations (3a and 3b).
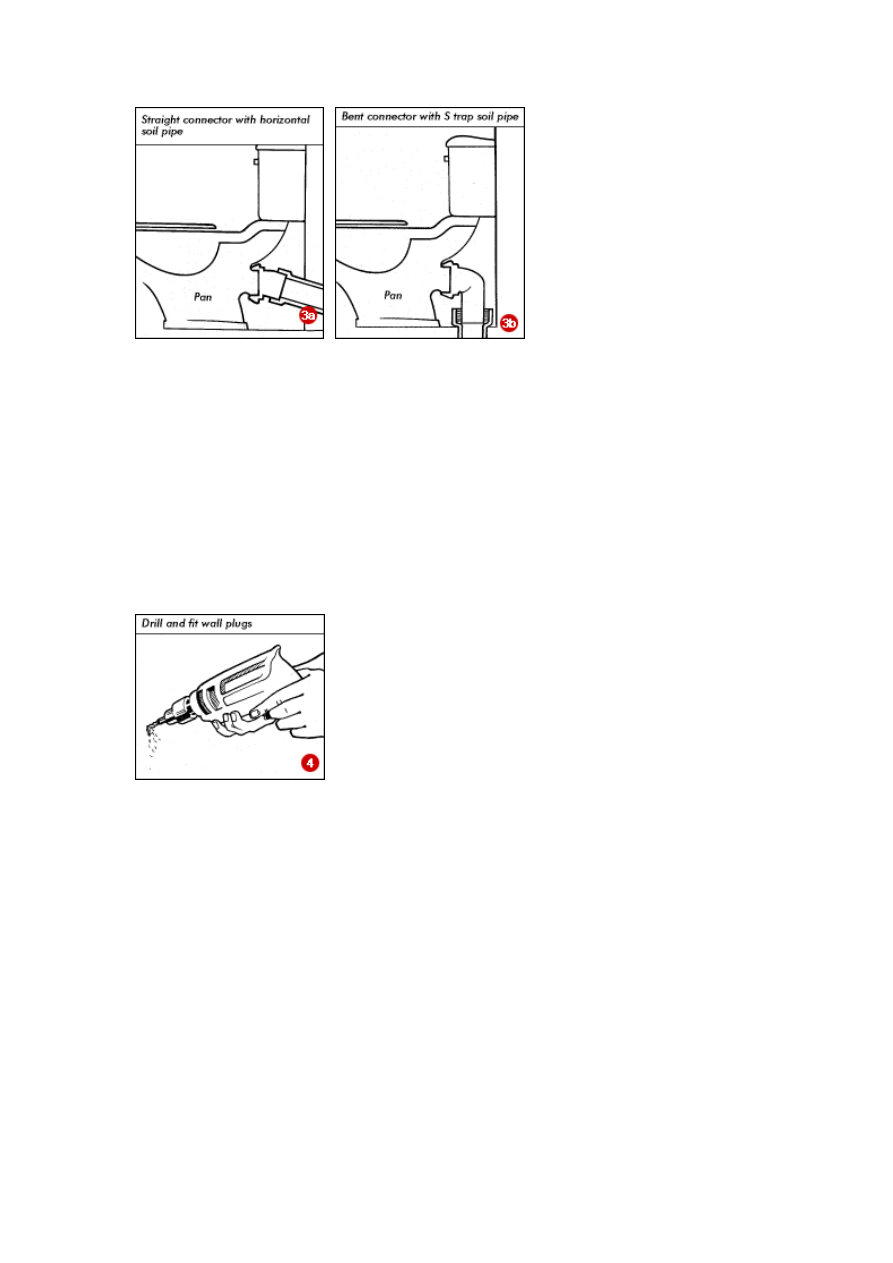
Place the WC in the position required to suit the type of
connector you will need.
Push the connector onto the pan outlet, then push the pan into
position with the connector firmly pressed into the soil pipe.
Use a silicone-grease lubricant to make fitting easier.
Remove the assembly, then drill
and plug the wall-fixing holes
(4). Also drill a hole for the
21mm (3/4in) overflow pipe,
allowing for a fall to the outside.
For solvent-welded wastepipe joints, use the solvent supplied by
the pipe manufacturer to ensure compatibility.
Refit the assembly and check it is level. Fix the cistern and pan
with brass screws and flexible washers.
Do not use a cement mortar to embed the pan, as this can
cause stress-cracking in the china.
Fit an isolating valve in the water-supply pipe and connect the
pipe to the float-valve tail with a tap connector.
Cut and fit the new overflow pipe, using a connector and elbow
as required. The end of the overflow should extend beyond the
face of the wall by at least 100mm (4in).

Fit the toilet seat and cover and adjust the fittings to allow the
urn on the water supply and check the water level in the
nless you are experienced with electrical installations, ask an
- Fitting a bidet
bidet is relatively straightforward,
seat to stay up when open.
T
cistern - it should be about 25mm (1in) below the overflow
outlet. Adjust the float arm if necessary.
U
electrician to fit supplementary bonding to all metal fittings and
pipework.
4
itting an over-rim supply
F
as the supply and waste plumbing is much the same as for a
washbasin. Fit the bowl in a similar way to a toilet pan.
The plumbing for the rim supply type of bidet is more
- Supply pipes and waste pipes
ipes.
ou can use copper supply pipes, connected with soldered or
complicated and is best fitted by a plumber, as it must
comply with water bylaws.
5
idets are fitted with 12mm (1/2in) taps and p
B
Y
compression joints, or plastic pipes that are usually
connected with push-fit joints. Adapter couplings are
available to join pipes of different materials and sizes.
lways follow tap manufacturers' instructions when
quire
lastic pipe is used for wastes: 32mm (11/4in) for bidets;
A
connecting supply pipes, as some tap installations re
check valves to be fitted.
P
and 21mm (3/4in) for overflows. Solvent-welded joints,
push-fit connectors or compression joints are used to join
plastic wastepipes.
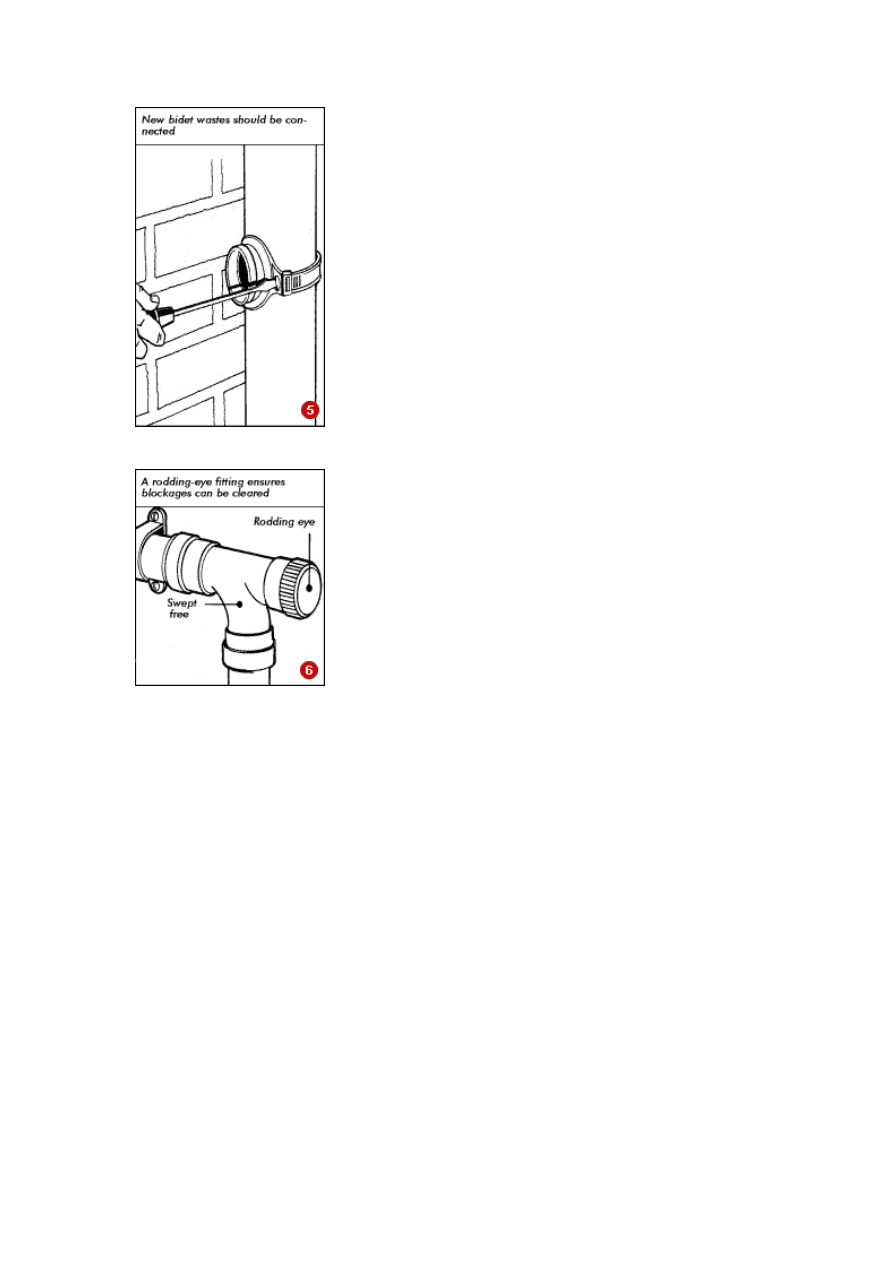
Unless you are connecting to
existing wastepipes, new
bidet wastes should be
connected to a soil-stack w
boss fittings (5).
ith
dding-
If a trap cannot be removed
to provide access to the
wastepipe, include a ro
eye fitting so that any
blockages can be cleared (6).
Wyszukiwarka
Podobne podstrony:
How to fit a toilet & bidet
Fit a bath and wash basin
Skin Deep The Essential Guide to Whats in the Toiletries and Cosmetics You Use
COSMETICS AND TOILETRIES CHROMATOGRAPHY
Fit sphere unwrapping and performance analysis of 3D fingerprints
Bibliography Athenian Political Art from the Fit h and Fourth Centuries BCE
sens 5 2011 Fit and eat 2
sens 6 2011 Fit and eat 3
sens 7 2011 Fit and eat 4
the ties that bind social networks person organization value fit and turnover intention
Postmodernity and Postmodernism ppt May 2014(3)
Scoliosis and Kyphosis
L 3 Complex functions and Polynomials
4 Plant Structure, Growth and Development, before ppt
Osteoporosis ľ diagnosis and treatment
05 DFC 4 1 Sequence and Interation of Key QMS Processes Rev 3 1 03
więcej podobnych podstron