
MANUALE DʼUSO - USERʼS MANUAL - BEDIENUNGSANLEITUNG
- MANUAL DEL USUARIO
������������
ALAN 42 MULTI

IT
ALIANO
1
INDICE
INTRODUZIONE ................................................................................... 1
DESCRIZIONE COMANDI .................................................................... 2
USO DELL’APPARATO ......................................................................... 5
SELEZIONE BANDE DI FREQUENZA ............................................... 5
TABELLA BANDE DI FREQUENZA .................................................... 6
CARATTERISTICHE TECNICHE ........................................................... 7
INTRODUZIONE
ALAN 42 MULTI è un ricetrasmettitore di piccole dimensioni che
garantisce ottime prestazioni nelle più svariate condizioni di utilizzo. È un
apparato innovativo in quanto è l’unico CB portatile che offre all’utente
la possibilità di
selezionare qualsiasi banda CB europea tramite una
semplice ed immediata procedura. ALAN 42 MULTI è controllato da un
sintetizzatore di frequenza (PLL) e da un dispositivo automatico di
risparmio delle batterie.
Dispone di un
ampio display, che può essere illuminato con l’apposito
tasto, per consentire la sua visualizzazione anche in condizioni di scarsa
luminosità. La presa esterna per un microfono parla/ascolta permette il
collegamento con microfoni accessori.
L’apparato viene consegnato secondo la banda “EC“ CEPT 40CH
FM 4W.
2
IT
ALIANO
2
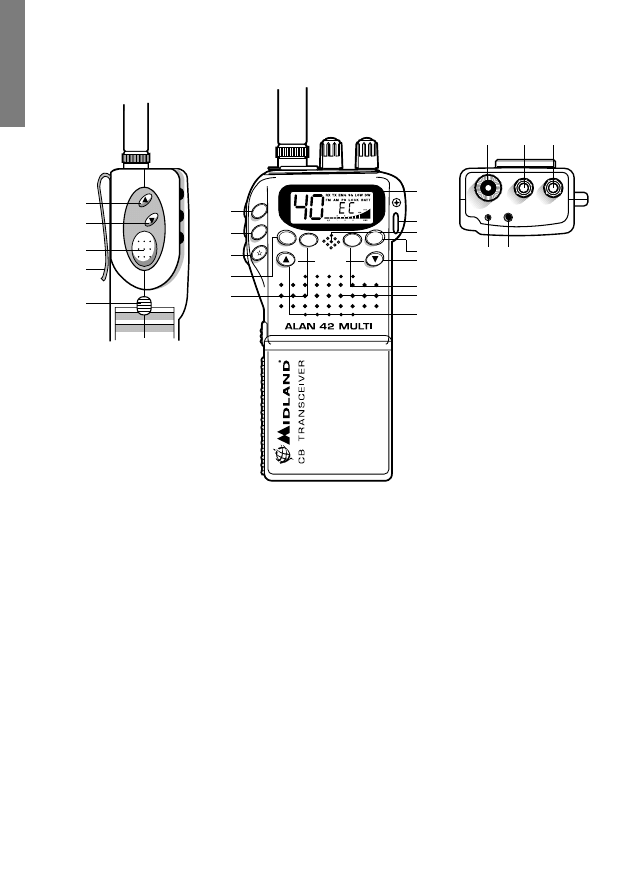
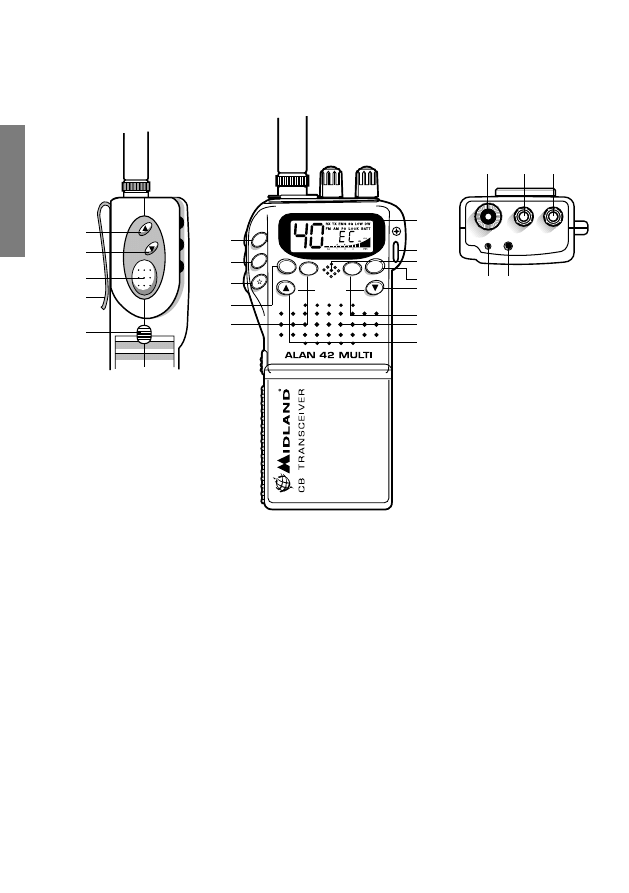
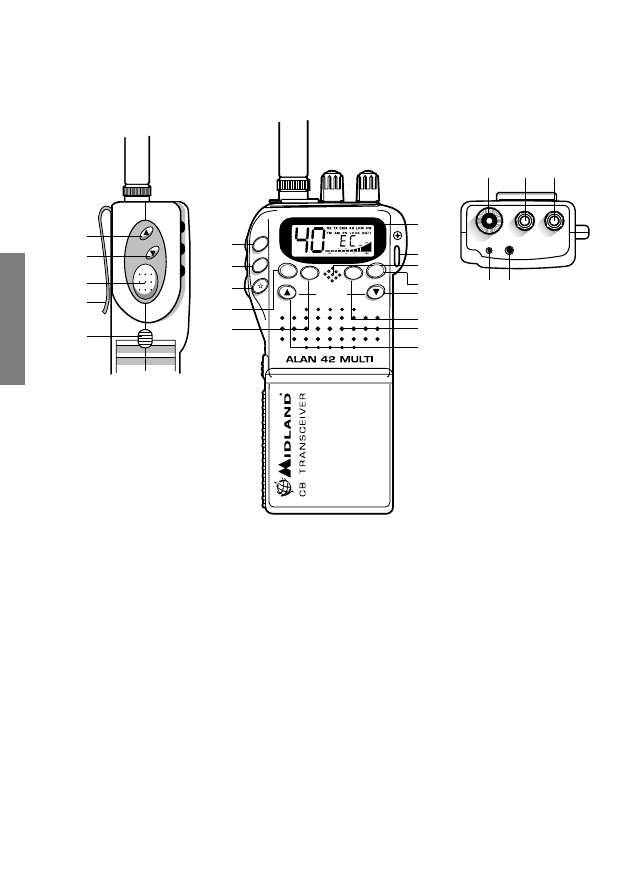
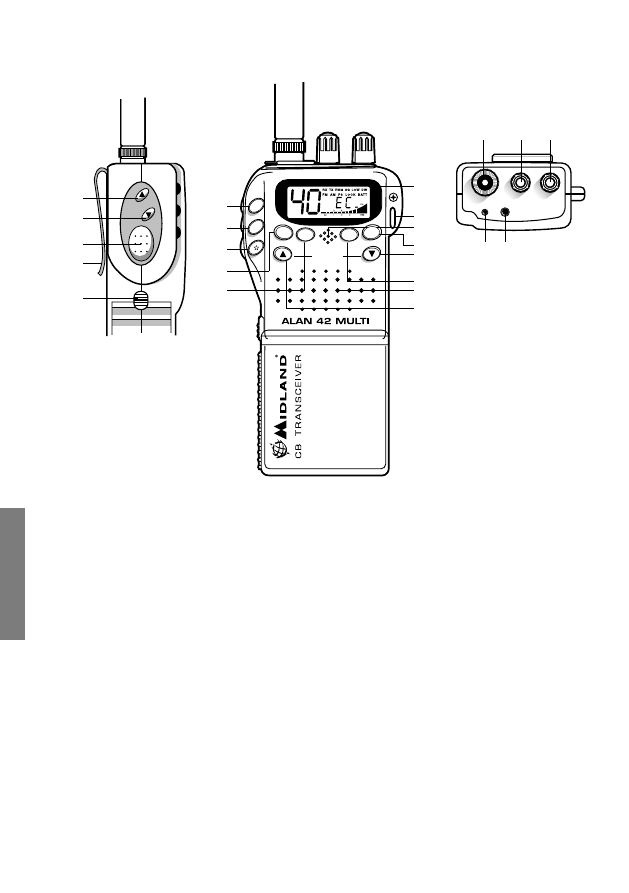
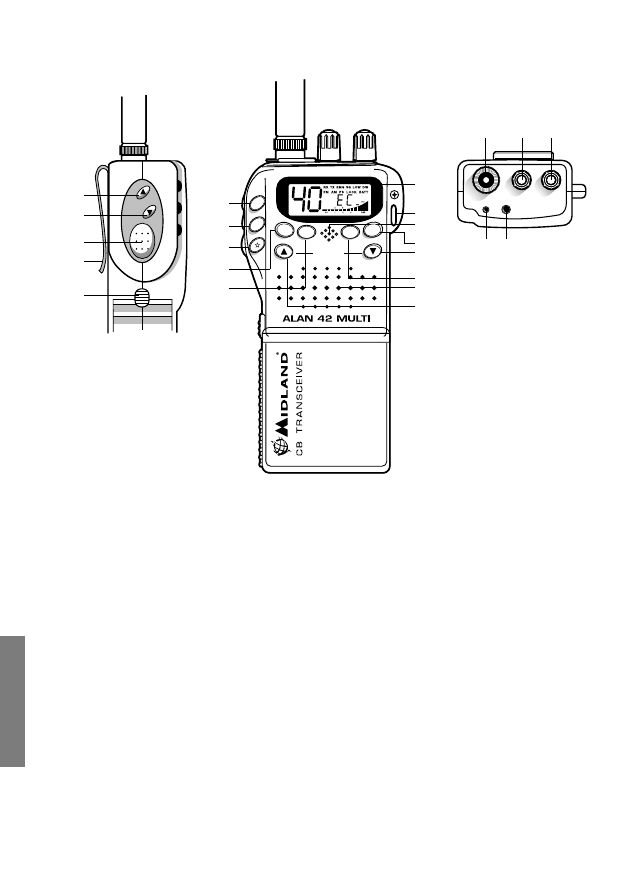
DESCRIZIONE COMANDI
1.
Connettore antenna: A questa presa va inserita l’antenna in dotazione con
l’innesto a baionetta. Per estendere il raggio di copertura, si possono utilizzare
antenne esterne veicolari o più efficienti.
2.
Manopola Squelch: Questo controllo serve per eliminare il rumore di fondo del
ricevitore. Girando la manopola verso destra viene attivata la funzione, girandola
verso sinistra la funzione viene disattivata.
Per la massima sensibilità del ricevitore è preferibile che il comando sia regolato
solo al preciso livello in cui viene eliminato il rumore di fondo del ricevitore.
3.
Manopola Off-Volume
Posizione
OFF: Apparato spento
Posizione
Volume: Ruotando la manopola, regolare il volume al livello
desiderato.
Ruotando la manopola verso destra, il volume viene alzato, ruotando la stessa
manopola verso sinistra, il volume viene abbassato.
4.
Presa microfono esterno: Collegare inserendo nell’ apposito spinotto il microfono
altoparlante (o vox) accessorio.
5.
Presa altoparlante esterno: Collegare inserendo all’apposito spinotto il microfono
altoparlante (o vox) accessorio.
6.
Attacco cintura
MIC
SPK
SQL
OFF/VOL
1
2
3
5
4
CHANNEL
21
22
18
6
23
15
16
17
8
9
7
20
10
12
13
11
13
14
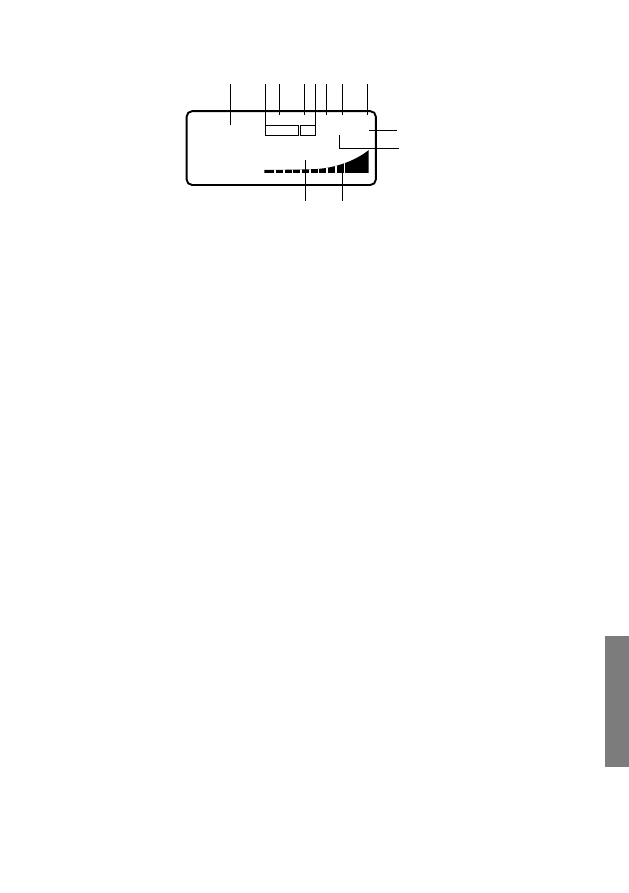
LCD
EMG
A/F
H/L
LOCK
MIC
CHANNEL
DW
SC
Q.UP
Q DOWN
LCR

IT
ALIANO
3
7.
Display retroilluminato multifunzione
Il display a cristalli liquidi è stato espressamente progettato per indicare la modalità
operativa.
a.
EMG: indicatore lampeggiante canale d’emergenza attivato
b. Numero canali selezionati (da 1 a 40)
c.
LOCK: indicatore funzione blocco tastiera attivata
d.
BATT: indicatore batterie scariche
e.
AM/FM: indicatore del modo di emissione
f.
SC: indicatore funzione SCAN attivata
g.
DW: Dual Watch
h.
P. S.: indicatore funzione SAVE attivata
i.
LOW: indicatore di bassa potenza
j. Indicatore di intensità del segnale ricevuto e di potenza di segnale trasmesso.
k.
RX/TX: indicatore ricezione (RX) e trasmissione (TX)
l. Banda di frequenza selezionata
8.
Pulsante EMG: canale d’emergenza. Premendo questo tasto l’apparato si
posizionerà automaticamente sul canale 9 canale d’emergenza. Sul display
lampeggerà
EMG e non sarà possibile cambiare accidentalmente il canale. Per
disinserire questa funzione, premere di nuovo il tasto.
9.
Pulsante A/F-LCR:per selezionare il modo di emissione (AM/FM). La relativa
scelta sarà visualizzata sul display. Se inoltre si seleziona una banda di frequenza
che opera solamente la modalità FM, il tasto
�A/F-LCR� attiva la funzione LCR
(richiamo ultimo canale utilizzato).
10.
Microfono: durante la trasmissione, avvicinare l’apparato alla bocca (4 cm circa)
e parlare con un tono di voce normale verso il microfono
11.
Pulsante H/L: Selezione livello di potenza in trasmissione. All’accensione l’apparato
trasmette sempre con il livello più alto (“HIGH”) di potenza. Premendo questo
tasto l’apparato trasmetterà con potenza ridotta, visualizzando nel contempo sul
display la scritta “LOW”. Premere nuovamente questo tasto per tornare in alta
potenza. In alta potenza l’apparato eroga 4W, in bassa potenza 1W
12.
Pulsante LOCK: tramite questo tasto è possibile bloccare la tastiera evitando
accidentali pressioni dei tasti.
13.
Pulsanti QUICK UP/DOWN: per spostarsi di dieci canali verso l’alto (UP) o verso
il basso (DOWN).
14.
Altoparlante
15.
Dual Watch: con questo tasto si ha la possibilità di rimanere sintonizzati
contemporaneamente su due canali a scelta dell’utente.
Con tale funzione si monitorizzerà ciclicamente un secondo canale. In presenza
40
0,5
1
2
3
PWR
E C
RX TX EMG SC LOW DW
FM AM PS LOCK BATT
516
430
5
3
a
k
e
b
h f i g
d
c
j
l
4
IT
ALIANO
4
di un segnale sul secondo canale, la conversazione sul canale prescelto si
interromperà e il ricevitore commuterà automaticamente sul secondo canale. Il
monitoraggio riprenderà dopo 4 secondi dal cessare del segnale.
Per attivare questa funzione, operare come segue:
- Selezionare il canale desiderato mediante il selettore canali
- Premere il tasto
DW
- Selezionare il secondo canale
- Ripremere il tasto
DW
- Per annullare la funzione premere il tasto
DW o il PTT.
16.
Pulsante SCAN
Tramite questo comando si potrà ricercare automaticamente un canale sul quale
ci sono comunicazioni (occupato). Operare come segue:
• Ruotare lo squelch in senso orario fino a quando non sparisce il rumore di
fondo in un canale libero.
• Premere il pulsante
SCAN. Il ricetrasmettitore scansionerà automaticamente e
ripetutamente tutti i canali fino a quando non troverà un canale in uso.
• Quando trova il canale in uso si ferma e riparte alcuni secondi dopo la fine della
comunicazione sul canale.
• Mandando in trasmissione la radio, la funzione
SCAN si disattiva.
17.
Pulsante ✩: Tasto illuminazione display (temporizzata) che consente di poter
operare anche in condizioni di oscurità. Questo tasto permette l’illuminazione del
display per 5 secondi.
18.
Interruttore PTT: tasto di commutazione RX/TX. Premendolo si attiva il
trasmettitore, rilasciandolo viene attivato il ricevitore.
19.
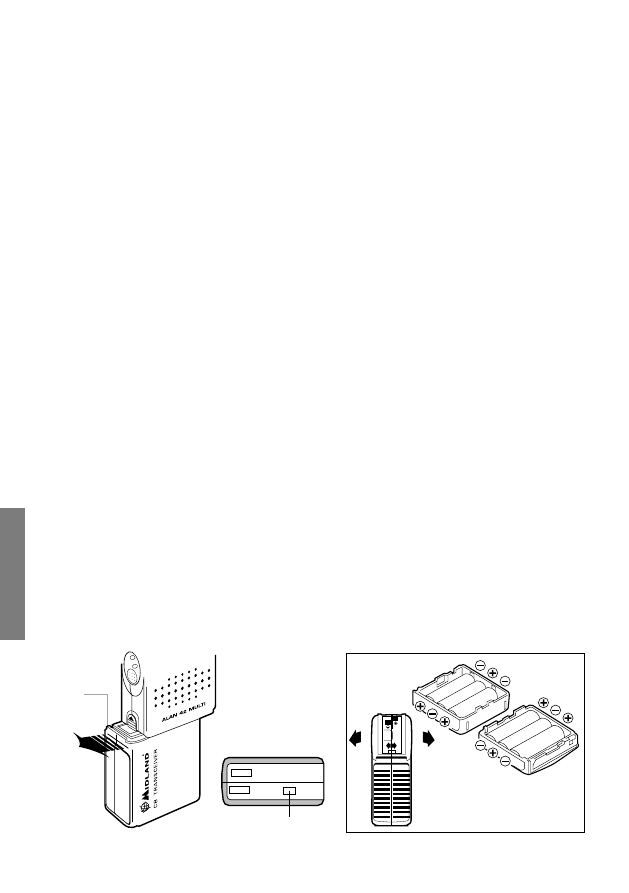
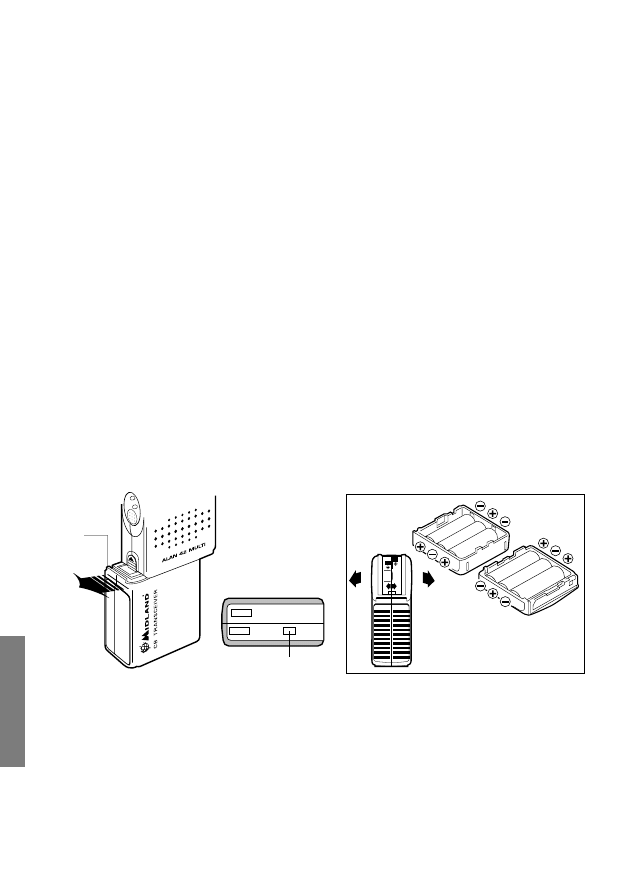
Vano batterie: l’apparato funziona con 6 batterie alcaline o Ni-Cd ricaricabili.
20.
Foro per cinghia da polso
21.
Pulsante Channel UP: Permette di sintonizzarsi al canale successivo. Mantenendo
premuto questo tasto si ottiene la funzione di autorepeat.
22.
Pulsante Channel DOWN: Permette di sintonizzarsi al canale precedente.
Mantenendo premuto questo tasto, si ha la funzione di autorepeat.
23.
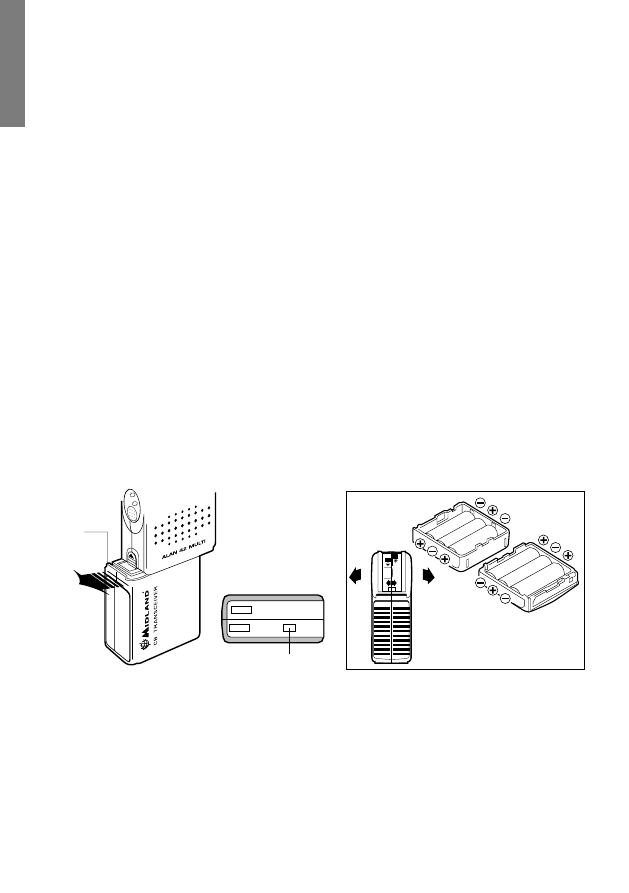
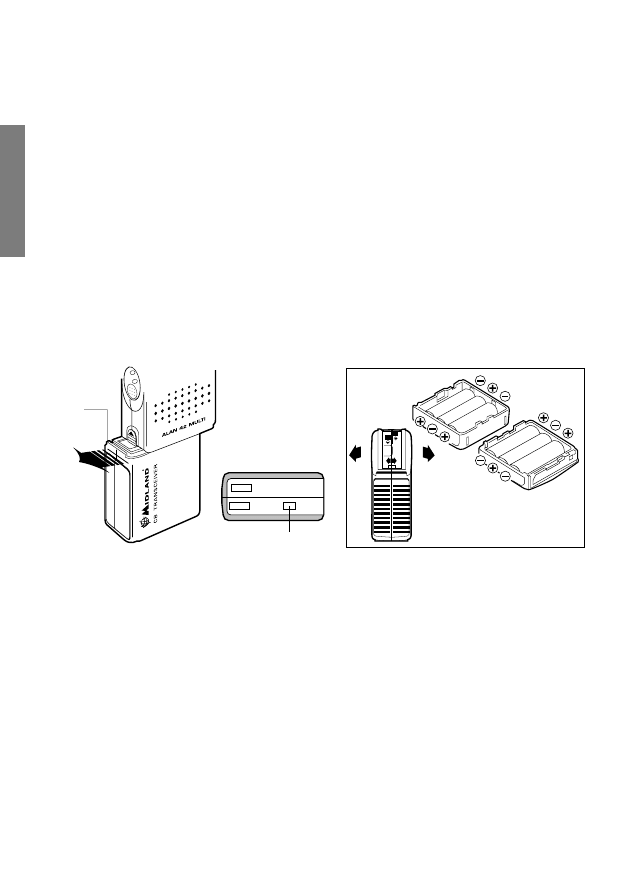
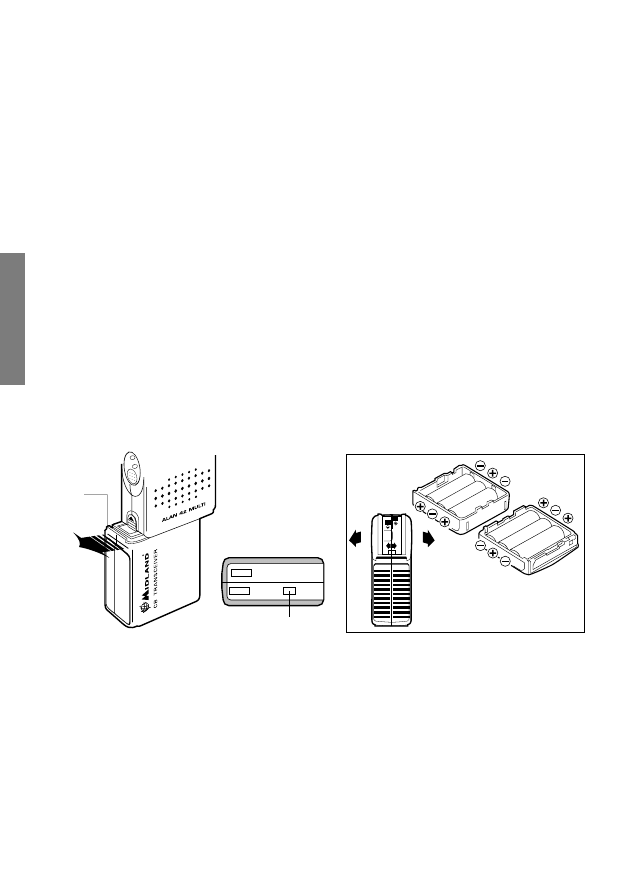
Aggancio pacco batterie: sollevare il pulsante e sfilare le batterie (vedi
disegno).
24.
Contatto antenna ausiliare: per il collegamento all’adattatore veicolare.
24
CHAN
NEL
19

IT
ALIANO
5
USO DELL’APPARATO
1. Collegare l’antenna al ricetrasmettitore
2. Inserire 6 batterie alcaline Ni-Cd nell’apposito vano, facendo attenzione alla giusta
polarità ( le batterie alcaline non sono ricaricabili).
3. Ruotare la manopola di accensione in senso orario, quindi regolare il volume per
un livello normale di ascolto.
4. Regolare lo squelch come descritto al punto 2.
5. Selezionare il canale desiderato mediante i tasti
UP/DOWN (oppure QUICK UP
/QUICK DOWN)
Nota: se il canale non cambia, controllare che non sia stato premuto il tasto
EMG o LOCK. In tal caso premere di nuovo il tasto EMG o LOCK per disattivare
la funzione d’emergenza.
Per le altre funzioni fare riferimento alle istruzioni precedentemente descritte.
Per trasmettere: premere e mantenere premuto il tasto PTT situato sul lato sinistro
dell’apparato. Avvicinare l’apparato alla bocca e parlare verso il microfono con
normale tono di voce .
Per ricevere: rilasciare semplicemente il tasto PTT.
ATTENZIONE: NON ESPORRE IL DISPLAY A TEMPERATURE TROPPO ALTE O
TROPPO BASSE.
SELEZIONE BANDE DI FREQUENZA
La scelta delle bande di frequenza deve essere eseguita a seconda del paese nel
quale si intende operare.
Procedimento:
1. Spegnere la radio.
2. Accendere l’apparecchio premendo contemporaneamente i tasti
A/F-LCR e SC.
3. Tramite i tasti ▲ e ▼, selezionare la banda di frequenza desiderata (vedi tabella
bande).
4. Premere il tasto
A/F-LCR per terminare la selezione.
NOTA: Se si seleziona una banda di frequenza che opera solamente in
modalità FM, il tasto A/F-LCR attiva la funzione LCR (richiamo ultimo canale
selezionato).

6
IT
ALIANO
6
TABELLA BANDE DI FREQUENZA
Sigla sul display Paese
I
Italia 40 CH AM/FM 4Watt
I2
Italia 34 CH AM/FM 4Watt
D
Germania 80 CH FM 4Watt / 12 CH AM 1 Watt
D2
Germania 40 CH FM 4Watt / 12 CH AM 1 Watt
EU
Europa 40 CH FM 4Watt / 40 CH AM 1 Watt
EC
CEPT 40 CH FM 4Watt
E
Spagna 40 CH AM/FM 4Watt
F
Francia 40 CH FM 4Watt / 40 CH AM 1 Watt
UK
Inghilterra 40 CH FM 4Watt frequenze inglesi +
EC 40 CH FM 4Watt frequenze CEPT
ATTENZIONE:
Lo standard sicuramente riconosciuto in tutti i paesi europei è 40CH FM 4W
(EC) - Vedi tabella “Restrizioni all’uso”

IT
ALIANO
7
CARATTERISTICHE TECNICHE
Canali ...................................................................................40 FM (vedi tabella bande)
Gamma di frequenza .......................................................................25.615-30.105 MHz
Modulazione ...................................................................................F3E (FM), A3E (AM).
Impedenza antenna ...........................................................................................50 ohm.
Altoparlante .................................................................................................8 ohm 0.5W.
Microfono ..............................................................................................a condensatore.
Alimentazione .................................................................................. 7.2 ÷ 13,2 nom 12V
Dimensioni ............................................................................................ 30x70x140 mm.
Peso ..........................................................................................220 gr. (senza batterie).
RICEVITORE
Sensibilità 10dB S/N ............................................................... 0.5µV (AM), 0.25µV (FM)
Selettività .......................................................................................... maggiore di 60 dB
Gamma squelch .........................................................................................0.25V-500µV
Potenza d’uscita audio ..................................................0.5W 8 ohm (10% distorsione)
Distorsione con un’ingresso di 1000µV .................................................................... 3%
Risposta in frequenza ................................................................................ 400-2400 Hz
Frequenze intermedie .............................................................................. I° 10.695 MHz
.......................................................................................................................II° 455 KHz
Reiezione alle risposte spurie ........................................................... maggiore di 60 dB
Corrente assorbita in standby .............. 100 mA quando é disinserita la funzione save
...................................................................... 45 mA quando é inserita la funzione save
TRASMETTITORE
Potenza d’uscita ............................................................... duty cycle 10% 4W AM/FM
Tolleranza di frequenza ...................................................................................... 0.005%
Soppressione emissioni armoniche ................................................. maggiore di 70 dB
Corrente assorbita ............................................................................................. 900 mA
Modulazione .......................................................................................... AM 90% (± 5%)
............................................................................................................... FM dev. 2.0KHz
Le specifiche sono soggette a variazione senza preavviso.


ENGLISH
1
INDEX
INTRODUCTION ................................................................................... 1
FUNCTION AND LOCATION OF THE CONTROLS ............................. 2
HOW TO OPERATE WITH YOUR ALAN 42 MULTI .............................. 5
FREQUENCY BAND SELECTION ..................................................... 5
FREQUENCY BAND CHART ............................................................. 6
TECHNICAL SPECIFICATIONS ............................................................ 7
INTRODUCTION
ALAN 42 MULTI is a small-size portable transceiver which guarantees
the best performance during the years even under heavy conditions.
What is unique to this innovative transceiver is the capability
to select
any of the European CB bands with an easy and fast procedure.
ALAN 42 MULTI has a built-in
Channel Phase Loop synthesizer (PLL)
circuit and an automatic
battery economy circuit.
The
wide display can be illuminated and allows the night use. Optional
microphones can be connected to the equipment thanks to the external
mike plug situated on the upper side of the radio.
The unit is preset at the factory on the “EC“band , CEPT 40CH FM
4W.
2
ENGLISH
2
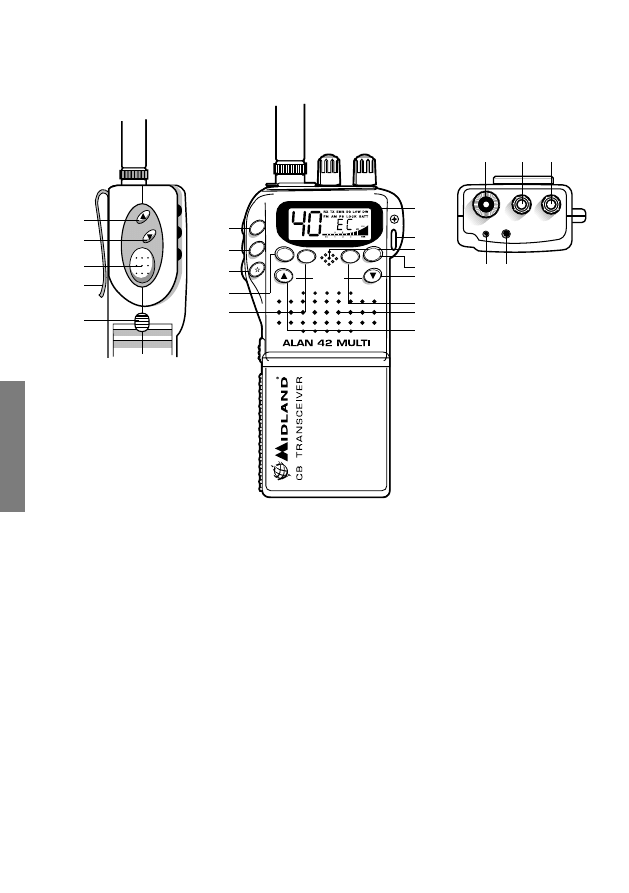
FUNCTION AND LOCATION OF THE CONTROLS
1.
Antenna connector: insert into this plug the antenna supplied with the radio. It is
possible to use external vehicular antennas to obtain a better performance.
2.
Squelch Control: this control cancels the background noise of the receiver. By
turning the knob to the right the function is activated, by turning the knob to the
left the function is deactivated. The knob should be regulated exactly at the point
where the receiver background noise disappears.
3.
On/Off Volume Control.
In ‘’off’’ position your transceiver is off. Turn this control clockwise to switch on
the unit. Turn the knob clockwise a little more to set the audio level, until you get a
comfortable reception.
4.
MIC jack: connect by inserting the loudspeaker mike to the plug.
5.
External loudspeaker jack: connect by inserting the loudspeaker mike to the
plug.
6.
Belt clip
MIC
SPK
SQL
OFF/VOL
1
2
3
5
4
CHANNEL
21
22
18
6
23
15
16
17
8
9
7
20
10
12
13
11
13
14
LCD
EMG
A/F
H/L
LOCK
MIC
CHANNEL
DW
SC
Q.UP
Q DOWN
LCR

ENGLISH
3
7
Multifunction backlighted display.
This liquid crystal display has been projected to show the operative modality:
a.
EMG function activated
b. Channel selected number( from 1 up to 40)
c.
Lock: keyboard lock function activated
d.
BATT: Run-down batteries indicator
e.
AM/FM mode
f.
SC: SCAN function activated
g.
DW: DUAL WATCH function
h.
P. S.: Save function activated
i.
LOW function activated
j. The received signal strength and the power of the transmitting signal
k.
RX/TX: TX=transmit mode; RX=receive mode
l. Frequency band selected
8.
EMG button: emergency channel. By pressing this button, the unit automatically
skips to Channel 9 (emergency channel). The display will shows
EMG. It will not
be possibile to change accidentally the channel. To cancel this function, press the
button again.
9.
A/F–LCR button: to select AM mode or FM mode; the modulation you choose will
appear on the display. If you select a frequency band operating in FM mode only,
the
A/F–LCR button will activate the LCR function (Last Channel Recall).
10.
Microphone: during transmission, keep your mouth 4 cm far from the unit, and
speak with a normal tone of voice to the microphone.
11.
H/L button: it selects the output power level during trasmission.When the unit is
turned on, it always transmits with high power (4W). By pressing this button, the
unit will transmit with low power (1W). The display will show “LOW”. Press again
the H/L button to return to “HIGH” power level.
12.
LOCK button: it allows you to lock the keyboard, thus avoiding accidental use of
the keys.
13.
Q.UP - Q.DOWN buttons: to skip 10 channels up (Q.UP) or 10 channels down
(Q.DOWN).
14.
Loudspeaker
15.
Dual Watch: this function allows the synthonization on two different channels at
the same time. Thanks to this function, you can monitor a second channel. When
a signal on the second channel is received, the conversation on the first channel
is automatically interrupted and the receiver switches on the second channel. The
monitoring starts again 4 seconds after the signal end.
40
0,5
1
2
3
PWR
E C
RX TX EMG SC LOW DW
FM AM PS LOCK BATT
516
430
5
3
a
k
e
b
h f i g
d
c
j
l
4
ENGLISH
4
To activate this function, operate as follows:
- Select the desired channel through the channel selector
- Press the
DW button
- Select the second channel
- Press the button
DW again
- To cancel the function press again the
DW button or the PTT button.
16.
SCAN button: with this control, you can automatically seek for a busy channel.
• Turn the Squelch clockwise until the background noise is no longer heard.
• Press the ''SCAN'' button: the transceiver will scan automatically all the
channels until a carrier is being received.
• When it finds the carrier, it stops and starts again some seconds after the end
of the communication on the channel.
• When the radio is transmitting, the scan function is deactivated.
17. ✩
button: display lighting (temporized).This function allows to operate in darkness
conditions. By pressing this button, the display is lighted for 5 seconds.
18.
Push to talk button (PTT): Its pressure activates the transmission. When it is
released, the receiver is activated.
19.
Battery compartment: insert 6 Ni-Cd alkaline batteries.
20.
Hole for wrist belt
21.
Channel UP: to skip to the next channel. Keeping this button pressed, the
“autorepeat” function is obtained.
22.
Channel DOWN: to skip to the previous channel. Keeping this button pressed, the
“autorepeat” function is obtained.
23.
Battery pack contact: lift the button and take the batteries out (see drawing).
24.
Auxiliary antenna contact: for the connection to the vehicular adaptor.
24
CHAN
NEL
19

ENGLISH
5
How to operate with your ALAN 42 MULTI
1. Insert the antenna in the antenna connector.
2. Insert 6 alkaline batteries into the battery compartment, noting polarity (the alkaline
batteries are not rechargeable)
3. Rotate the
ON/OFF volume control clockwise to turn the unit on. Adjust the volume
for a normal listening level.
4. Adjust the
SQUELCH control
5. Select the desired channel by the
UP/DOWN or QUICK UP/QUICK/DOWN
buttons
Note: if the channel does not change,control that the EMG or LOCK button has
not been pressed. In this case, press the EMG or LOCK button to deactivate
this function.
As far as the other functions are concerned, refer to previous instructions.
To transmit: press and hold the PTT button, then talk to the microphone.
To receive: simply release the PTT button.
CAUTION: DON’T EXPOSE THE DISPLAY TO EXTREME TEMPERATURES.
FREQUENCY BAND SELECTION
The frequency bands must be chosen according to the country you are in.
Procedure:
1. Switch off the unit.
2. Turn it on while pushing the “
A/F-LCR” and “SC” buttons.
3. By pushing the ▲ e ▼ buttons, select the desired frequency band (see the chart
here below).
4. To fix your selection, press the “
A/F-LCR” button.
NOTE: If you select a frequency band which operates in FM mode only, the “A/F-
LCR” control activates the LCR function (Last Channel Recall).

6
ENGLISH
6
FREQUENCY BAND CHART
Displayed digits Country
I
Italy 40 CH AM/FM 4Watt
I2
Italy 34 CH AM/FM 4Watt
D
Germany 80 CH FM 4Watt / 12 CH AM 1 Watt
D2
Germany 40 CH FM 4Watt / 12 CH AM 1 Watt
EU
Europe 40 CH FM 4Watt / 40 CH AM 1 Watt
EC
CEPT 40 CH FM 4Watt
E
Spain 40 CH AM/FM 4Watt
F
France 40 CH FM 4Watt / 40 CH AM 1 Watt
UK
England 40 CH FM 4Watt English frequencies
+ EC 40 CH FM 4Watt CEPT frequencies
ATTENTION!
The frequency band allowed all over Europe is 40CH FM 4W (EC) – See the
“Restrictions on the use” table.

ENGLISH
7
TECHNICAL SPECIFICATIONS
Channels ......................................................... 40 FM (see the Frequency band chart)
Frequency Range ............................................................................25.615-30.105 MHz
Operating mode .............................................................................F3E (FM), A3E (AM).
Antenna impedance ......................................................................................... 50 Ohm.
Loudspeaker ..............................................................................................8 Ohm 0.5W.
Microphone ........................................................................................... condenser type
Power supply ................................................................................... 7.2 ÷ 13,2 nom 12V
Dimensions ........................................................................................... 30x70x140 mm.
Weight .................................................................................. 220 gr. (without batteries).
RECEIVER
Sensitivity at 10dB S/N ........................................................... 0.5µV (AM), 0.25µV (FM)
Selectivity ..............................................................................................more than 60dB
Squelch range ............................................................................................0.25V-500µV
Audio output power ........................................................ 0.5W 8 ohm (10% distortion)
Distortion at 1000 µV ............................................................................................... 3%
Audio frequency response ......................................................................... 400-2400 Hz
Intermediate frequency ............................................................................ I° 10.695 MHz
.......................................................................................................................II° 455 KHz
Spurious response ...............................................................................more than 60 dB
Current drain at stanby ........................................... 100 mA when the save mode is off
.................................................................................. 45 mA when the save mode is on
TRANSMITTER
RF Output Power ............................................................... duty cycle 10% 4W AM/FM
Frequency Tolerance ......................................................................................... 0.005%
Harmonic Suppression ........................................................................more than 70 dB
Current Drain ...................................................................................................... 900 mA
Modulation ............................................................................................ AM 90% (± 5%)
............................................................................................................... FM dev. 2.0KHz
All specifications are subject to change without notice.


DEUTSCH
1
INHALTSVERZEICHNIS
EINLEITUNG ......................................................................................... 1
BESCHREIBUNG DER BEDIENELEMENTE ......................................... 2
BEDIENUNG DES FUNKGERÄTES ...................................................... 5
AUSWAHL DER FREQUENZBÄNDER .............................................. 5
FREQUENZBANDTABELLE ............................................................... 6
TECHNISCHE DATEN .......................................................................... 7
EINFÜHRUNG
Ihr
ALAN 42 MULTI ist ein besonders vielfältiges und leistungsfähiges
CB-Handfunkgerät. Es verkörpert den aktuellen Stand der Entwicklung
auf dem Gebiet der Funkgerätetechnik und ist mit vielen Funktionen
ausgestattet, die Ihnen vielseitige Anwendungsmöglichkeiten erlauben.
Das
ALAN 42 MULTI ist z.Zt. das wohl einzige CB-Handfunkgerät,
das durch eine Tastenkombination auf die jeweilige Landesnorm
umschalten kann. Über Tastendruck kann die Hintergrundbeleuchtung
für das große Display aktiviert werden, die eine Anpassung an schlechte
Sichtverhältnisse erlaubt. Durch externe Anschlussmöglichkeiten
ist eine vielfache Erweiterung durch beliebiges Zubehör (z.B. Vox,
Lautsprechermikrofon, etc.) möglich.
Ab Werk wird das Gerät auf dem Frequenzband „EC“ CEPT 40
Kanäle FM, 4 W eingestellt.
2
DEUTSCH
2
MIC
SPK
SQL
OFF/VOL
1
2
3
5
4
CHANNEL
21
22
18
6
23
15
16
17
8
9
7
20
10
12
13
11
13
14
LCD
EMG
A/F
H/L
LOCK
MIC
CHANNEL
DW
SC
Q.UP
Q DOWN
LCR
BESCHREIBUNG DER BEDIENELEMENTE
1.
Antennenanschluss BNC
Zum Anschluss der mitgelieferten Flexantenne oder einer anderen geeigneten CB-
Funk Antenne an das ALAN 42 MULTI.
2.
Squelchregler
Mit dem Squelchregler stellen Sie die Empfangs-Signalstärke ein, ab der Sie
Stationen (oder Rauschen) im Lautsprecher hören.
Um die höchstmögliche Empfangsempfindlichkeit zu nutzen, muß der Regler so
eingestellt werden, daß das Hintergrundrauschen gerade unterdrückt wird.
3.
Ein-/Ausschalter, Lautstärkeregler OFF-VOL
Über diesen Drehregler wird das Gerät ein- und ausgeschaltet sowie die Lautstärke
eingestellt. Drehen im Uhrzeigersinn erhöht die Lautstärke.
4.
Mikrofonbuchse: Hier können Sie ein externes Mikrofon mit Sendetaste (PTT)
oder VOX-Funktion anschließen.
5.
Externer Lautsprecheranschluss: An diese Buchse kann ein externer
Wiedergabelautsprecher angeschlossen werden.
6.
Gürteltrageclip
7.
Multifunktions-Display mit Hintergrundbeleuchtung

DEUTSCH
3
In dem Display werden die folgenden Informationen angezeigt:
a)
EMG: Direktschaltung auf den Notrufkanal
b) Kanalanzeige (von 1 bis 40)
c)
LOCK: Tastatursperre ist eingeschaltet
d)
BATT: Batteriezustandsanzeige
e)
AM/FM: Anzeige der gewählten Betriebsart
f)
SC: Kanalsuchlauf aktiviert
g)
DW: Zweikanalüberwachung (Dual Watch)
h)
P. S.: Energiesparmodus aktiviert
i)
LOW: erscheint, wenn das Funkgerät auf niedrige Sendeleistung schaltet
j) Anzeige für relative Empfangs- und Sendeleistung
k)
RX-/TX-Anzeige, TX=Sendebetrieb, RX=Empfangsbetrieb
l) Anzeige des gewählten Frequenzbandes.
8.
Taste EMG: Auf Knopfdruck läßt sich der Notrufkanal 9 direkt einschalten. In
der Anzeige erscheint der Schriftzug EMG. Die manuelle Kanalumschaltung ist
gesperrt, solange die EMG-Funktion aktiv ist. Zum deaktivieren dieser Funktion,
drücken Sie erneut die Taste „EMG“.
9.
Taste A/F–LCR: Auswahl der gewünschten Betriebsart (AM/FM). Die eingestellte
Betriebsart wird entsprechend im Display angezeigt. Wird ein Frequenzband
gewählt, das nur in der Betriebsart FM arbeitet, übernimmt die Taste “A/F-LCR”
statt der Betriebsartwahl die LCR-Funktion (Last Channel Recall – Aufruf des
zuletzt genutzten Kanals).
10.
Mikrofon: Sprechen Sie beim Senden aus etwa vier Zentimetern Entfernung mit
normaler Lautstärke in das Mikrofon.
11.
Taste H/L: Mit diesem Schalter läßt sich die HF-Sendeleistung umschalten. Im
Display wird die aktuell eingestellte Sendeleistungsstufe angezeigt: High (hohe
Leistung, 4 W) oder Low (niedrige Leistung, 1 W).
12.
Taste LOCK: Drücken dieser Taste sperrt alle Funktionstasten. Dadurch ist eine
versehentliche Betätigung von Tasten ausgeschlossen. Erneutes Drücken der
LOCK-Taste entriegelt die Tastatur.
13.
Tasten QUICK UP/DOWN’: Die Taste QUICK UP schaltet 10 Kanäle höher,
während die Taste Quick DOWN 10 Kanäle tiefer schaltet.
14.
Lautsprecher
15.
Taste Dual Watch: Taste zum Aktivieren der Zweikanalüberwachung (DUAL
WATCH), die eine zeitgleiche Überwachung von zwei beliebigen Kanälen Ihrer
Wahl erlaubt.
Sobald auf einem dieser Kanäle ein Empfangssignal anliegt, das die eingestellte
Schwelle der Rauschsperre überschreitet, stoppt das Funkgerät auf diesem
40
0,5
1
2
3
PWR
E C
RX TX EMG SC LOW DW
FM AM PS LOCK BATT
516
430
5
3
a
k
e
b
h f i g
d
c
j
l
4
DEUTSCH
4
24
CHAN
NEL
19
Kanal und Sie hören das empfangende Signal. Fällt das Signal für längere Zeit
aus, schaltet das Funkgerät nach ca. 4 Sekunden wieder zwischen den beiden
eingestellten Kanälen hin und her. Einstellen der Zweikanalüberwachung:
- Schalten Sie das Funkgerät ein.
- Stellen Sie den Squelch Regler auf die gewünschte Ansprechschwelle.
- Mit dem Kanalwahltasten den ersten gewünschten Kanal einstellen.
- Taste „DW“ drücken.
- Mit dem Kanalwahltasten den zweiten Kanal einstellen
- Taste „DW“ erneut betätigen.
- Zum Ausschalten der Zweikanalüberwachung drücken Sie erneut die Taste
„DW“ oder betätigen Sie die Sendetaste (PTT).
16.
Taste SC
Taste zum Aktivieren der Kanalsuchlauffunktion “SCAN”. Durch Einschalten des
Suchlaufbetriebs lassen sich belegte Kanäle automatisch finden.
- stellen Sie die Rauschsperre so ein, daß das Hintergrundrauschen gerade
unterdrückt wird.
- Drücken Sie die Taste “SC”. Das CB-Funkgerät startet den Suchlauf.
- Der Suchlauf stoppt, sobald ein belegter Kanal gefunden ist.
- Im Sendemodus ist die Funktion „SCAN“ deaktiviert.
17.
Taste ✩: Einmaliges Drücken dieser Taste schaltet die Hintergrundbeleuchtung
des Displays für ca. 5 Sekunden ein.
18.
Sendetaste PTT: Durch Drücken der PTT-Taste wird der Sender des ALAN 42
Multi aktiviert.
19.
Batterie-/Akkufach: Batterie-/Akkufach für 6 Alkali oder NiCD-Zellen.
20.
Aufnahme für die Trageschlaufe
21.
Taste Channel UP: Durch Drücken der Kanalwahltaste „CHANNEL UP“ schalten
Sie einen Kanal höher. Längeres Drücken aktiviert den Schnelldurchlauf.
22.
Taste Channel DOWN: Durch Drücken der Kanalwahltaste „CHANNEL
DOWN“ schalten Sie einen Kanal niedriger. Längeres Drücken aktiviert den
Schnelldurchlauf.
23.
Batterie-/Akkufachentriegelung
Zur Entriegelung des Batterie-/Akkufachs den Knopf nach oben schieben.
24.
Kontakt für Zusatzantenne: Antennenanschluss über Bordspannungsadapter
für den Mobilbetrieb.

DEUTSCH
5
BEDIENUNG DES FUNKGERÄTES
1. Stecken Sie die mitgelieferte Flexantenne oder eine andere geeignete CB-Funk-
Antenne mit BNC-Anschluss auf die auf der Oberseite befindliche Antennenbuchse
und arretieren Sie den BNC-Anschluss durch drehen im Uhrzeigersinn.
2. Legen Sie 6 Alkali oder NiCd-Zellen polaritätsrichtig in das Batterie-Akkufach ein.
3. Schalten Sie das Gerät ein und stellen Sie den gewünschten Lautstärkelevel ein.
4. Vergewissern Sie sich, dass die Rauschsperre (Squelch) geöffnet ist, d. h. der
Regler bis zum Anschlag gegen den Uhrzeigersinn gedreht ist.
5. Stellen Sie über die Taste
UP/DOWN oder QUICK UP/QUICK DOWN den
gewünschten Funkkanal ein.
Hinweis:
Sollte keine Kanalwahl möglich sein, prüfen Sie bitte, ob der Notrufkanal (EMG)
oder die LOCK-Funktion eingeschaltet ist. Sollte dies der Fall sein, drücken Sie
erneut die Tasten
EMG oder LOCK um die Direktschaltung auf den Notrufkanal zu
deaktivieren.
Senden
Zum Senden drücken Sie die
PTT-Taste auf der linken Seite des Funkgerätes.
Sprechen Sie aus etwa vier bis zehn Zentimetern Entfernung in das Mikrofon. Ihr
Funkgerät befindet sich solange auf Sendung, bis Sie die
PTT-Taste des Mikrofons
wieder loslassen.
Empfangen
Sendetaste loslassen.
Achtung!
Setzen Sie das Display niemals Feuchtigkeit oder extremen Temperaturen aus,
beispielsweise direkter Sonneneinstrahlung durch Ablegen des Gerätes auf der
Hutablage oder auf dem Armaturenbrett im Auto.
AUSWAHL DER FREQUENZBÄNDER
Bei der Auswahl der Frequenzbänder sind die Vorschriften der Länder zu beachten, in
denen das Funkgerät betrieben wird.
Umschalten der Ländereinstellung:
1. Schalten Sie das Funkgerät aus.
2. Schalten Sie das Funkgerät wieder ein und halten Sie dabei gleichzeitig die Tasten
A/F-LCR und SC gedrückt.
3. Wählen Sie über die Tasten ▲ und ▼ das gewünschte Frequenzband aus (siehe
Frequenzbandtabelle).
4. Drücken Sie die Taste
A/F-LCR zum Bestätigen der Auswahl.
Anmerkung: Wird ein Frequenzband gewählt, das nur in der Betriebsart FM
arbeitet, übernimmt die Taste “A/F-LCR” statt der Betriebsartwahl die LCR-
Funktion (Last Channel Recall – Aufruf des zuletzt genutzten Kanals).

6
DEUTSCH
6
Frequenzbandtabelle
Anzeige im
Display
Land
I
Italien 40 Kanäle, AM/FM, 4 Watt
I2
Italien 34 Kanäle, AM/FM, 4 Watt
D
Deutschland 80 Kanäle FM, 4 Watt / 12 Kanäle AM, 1 Watt
D2
Deutschland, 40 Kanäle FM, 4 Watt / 12 Kanäle AM, 1 Watt
EU
Europa 40 Kanäle FM, 4 Watt / 40 Kanäle AM, 1 Watt
EC
CEPT 40 Kanäle FM, 4 Watt
E
Spanien, 40 Kanäle AM/FM, 4 Watt
F
Frankreich 40 Kanäle FM, 4 Watt / 40 Kanäle AM, 1 Watt
UK
England 40 Kanäle FM 4 Watt Englische Frequenzen + EC 40
Kanäle FM 4 Watt CEPT Frequenzen
ACHTUNG:
In den meisten europäischen Ländern wird die Standardeinstellung 40 Kanäle
FM, 4 W (EC) – akzeptiert. Einstellungen mit AM sind nur in bestimmten Ländern
gestattet. Beachten Sie hierzu auch die “Nutzungshinweise” im Anhang.
Bitte beachten Sie, dass zur Zeit Österreich das Benutzen von
länderumschaltbaren CB Funkgeräten generell nicht gestattet. Lassen Sie, um
Missverständnisse zu vermeiden, das Funkgerät beim Aufenthalt in Österreich
bitte ausgeschaltet.

DEUTSCH
7
Technische Daten
Allgemein
Kanäle .................................................... 40 FM bzw. entspr. der Frequenzbandtabelle
technisch möglicher Frequenzbereich ............................................25.615-30.105 MHz
Modulationsarten ...........................................................................F3E (FM), A3E (AM).
Antennenimpedanz ............................................................................................ 50 Ohm
ext. Lautsprecher ......................................................................................8 Ohm, 0,5 W
Mikrofon ....................................................................................... Elektret-Kondensator
Spannungsversorgung 7,2 bis 13,2 V, je nach Batteriefach, sowie nominell 12V extern
Abmessungen ....................................................................................... 30x70x140 mm.
Gewicht .....................................................................................220 gr. (ohne Batterien)
Empfänger
Empfindlichkeit bei 10dB S/N ................................................. 0.5µV (AM), 0.25µV (FM)
Spiegelfrequenzunterdrückung ..........................................................besser als 60 dB
Squelchempfindlichkeit .............................................................................0.25V-500µV
NF-Wiedergabeleistung an 8 Ohm ........................................ 0.5W bei 10 % Klirrfaktor
Wiedergabeverzerrung bei 1000mV ......................................................................... 3%
NF-Bandbreite ........................................................................................... 400-2400 Hz
Zwischenfrequenzen ...........................................................................1. ZF:10.695 MHz
................................................................................................................. 2. ZF: 455 KHz
Nachbarkanaldämpfung ......................................................................besser als 60 dB
Ruhestromaufnahme ................................................................ 100 mA, Normalbetrieb
............................................................................................. 45 mA, Energiesparmodus
Sendeleistung ........................................................4 Watt bzw. 1 Watt AM/ 4 Watt FM
Frequenztoleranz ............................................................................................... 0.005%
Geräuschspannungsabstand ..............................................................besser als 70 dB
Stromaufnahme ................................................................................................. 900 mA
Modulation .........................................................................Mod-Grad AM: 90% (± 5%)
............................................................................................................. Hub FM: 2.0 KHz
Die Änderung der Technischen Daten ohne vorherige Ankündigung im Zuge der
Weiterentwicklung bleiben vorbehalten.
.


ESP
AÑOL
1
ÍNDICE
I
NTRODUCCIÓN .........................................................................PAG. 1
FUNCIONES Y SUS CONTROLES ..............................................PAG. 2
FUNCIONAMIENTO DEL TRANSCEPTOR .................................PAG. 5
SELECCIÓN BANDAS DE FRECUENCIAS ..............................PAG. 5
TABLA BANDAS DE FRECUENCIA ..........................................PAG. 6
CARACTERÍSTICAS TÉCNICAS .................................................PAG. 7
INTRODUCCIÓN
El ALAN 42 MULTI representa el estado del arte en alta ingeniería.
Diseñado para operar en los 40 canales de la Banda Ciudadana, este
compacto transceptor es fruto de la mas avanzada tecnología y ha
sido construido utilizando los mejores componentes, lo que garantiza
el máximo de prestaciones y rendimiento en cualquier condición.
Asimismo, es el único portátil CB que puede
operar en todas las
bandas europeas. Controlado por un microprocesador de última
generación, visualiza en un
gran display todas sus funciones. Está
dotado de
circuito economizador de baterías automático. La toma
exterior para el micro-altavoz facilita el uso de micrófonos opcionales
(vox, etc...). Las reducidas dimensiones y la sencillez de manejo hacen
del ALAN 42 el más versátil e innovador de los portátiles CB.
“CTE International SRL. declara, bajo su responsabilidad, que
este aparato cumple con lo dispuesto en la Directiva 99/05/CE,
del Parlamento Europeo y del Consejo de 9 de marzo de 1999,
transpuesta a la legislación española mediante el Real Decreto
1890/2000, de 20 de noviembre”
2
ESP
AÑOL
2
FUNCIONES Y SUS CONTROLES
1.
Conector de antena: con un conector del tipo BNC. Para mejorar sus
comunicaciones, utilice una antena telescópica (AT-38) o bien de ganancia (CB-
FLEX B).
2.
Control SQUELCH (silenciador): Este control sirve para eliminar el ruido de
fondo del receptor. Girando el mando a la derecha se activa la función; girándola
a la izquierda la función se desactiva. Para obtener la máxima sensibilidad del
receptor, este control debe regularse exactamente en el punto en que desaparece
el ruido de fondo.
3.
Control ON/OFF-Volume (encendido y volumen): En la posición OFF el transceptor
está apagado. Gire este control hacia la derecha para encender la unidad. Gírelo
todavía un poco más hacia la derecha para alcanzar el nivel de audio deseado.
4.
Toma Micrófono exterior: para conectar el micro-altavoz (o vox) opcional.
5.
Toma altavoz exterior: para conectar el micro-altavoz (o vox) opcional.
6.
Soporte cinturón.
7.
Pantalla retroiluminada multifunción: Esta pantalla de cristal líquido permite
visualizar todos los parámetros operativos:
MIC
SPK
SQL
OFF/VOL
1
2
3
5
4
CHANNEL
21
22
18
6
23
15
16
17
8
9
7
20
10
12
13
11
13
14
LCD
EMG
A/F
H/L
LOCK
MIC
CHANNEL
DW
SC
Q.UP
Q DOWN
LCR

ESP
AÑOL
3
a.
EMG: indicador intermitente de canal de emergencia activado
b. Número de canal seleccionado (de 1 a 40)
c.
LOCK: función de bloqueo del teclado activada.
d.
BATT: Indicador de batería descargada
e.
AM/FM: indicador del tipo de modulación
f.
SC: indicador de función SCAN activada
g.
DW: Dual Watch (doble escucha)
h.
P. S.: indicador función ahorro activada
i.
LOW: indicador de baja potencia activada
j. Indicador de intensidad de señal recibida y de potencia de la señal en
transmisión
k.
RX / TX: TX = modo de transmisión; RX = modo de recepción
l. Banda de frecuencia seleccionada (vea tabla Bandas de Frecuencias)
8.
Botón EMG: Canal de emergencia. Pulse este botón para posicionarse
automáticamente en el CH 9 (canal de emergencia). La pantalla muestra
EMG y
no será posible cambiar accidentalmente de canal. Para inhabilitar esta función,
pulsar de nuevo
EMG.
9.
Botón A/F-LCR: Para seleccionar el tipo de modulación AM o FM. Si selecciona
una banda de frecuencia que sólo opera en FM, la tecla “A/F-LCR” activa la
función LCR (rellamada último canal utilizado).
10.
Micrófono: Durante la transmisión, mantenga la boca a unos 4 centímetros de la
unidad y hable en un tono de voz normal.
11.
Botón H/L: selecciona el nivel de salida de potencia durante la transmisión. Al
encenderse la unidad, ésta siempre transmite con potencia alta (4 W). Pulsando
este botón, la unidad transmitirá con potencia baja (1 W). La pantalla mostrará
LOW (baja). Pulse el botón H/L de nuevo para volver al nivel de potencia alta
(HIGH).
12.
Botón LOCK (bloqueo): Permite bloquear el teclado y evitar el uso accidental de
las teclas.
13.
Botones QUICK UP/DOWN: Para saltar diez canales hacia arriba “Q.UP” o diez
hacia abajo “Q.DOWN”. Manteniendo pulsado este botón, se consigue la función
de auto-repetición.
14.
Altavoz
15.
DUAL WATCH: habilita la función que permite monitorizar cíclicamente un
segundo canal. Con señal en el segundo canal, la conversación en el canal actual
se interrumpirá y el receptor conmutará automáticamente al segundo canal. La
monitorización reemprenderá 4 segundos después de finalizar la señal.
Para activar esta función, opere como sigue:
40
0,5
1
2
3
PWR
E C
RX TX EMG SC LOW DW
FM AM PS LOCK BATT
516
430
5
3
a
k
e
b
h f i g
d
c
j
l
4
ESP
AÑOL
4
• Seleccione el canal deseado mediante el selector de canales
• Pulse la tecla
DW
• Seleccione el segundo canal
• Pulse de nuevo
DW
Para anular la función, pulse la tecla
DW o el PTT.
16.
Botón SCAN: Con este control puede buscar automáticamente cualquier canal
ocupado:
• Gire hacia la derecha el botón del silenciador (SQUELCH) hasta que
desaparezca el ruido de fondo.
• Pulse el botón SCAN: el transceptor efectuará el barrido automático de todos
los canales hasta que encuentre uno ocupado.
Cuando lo encuentra, para el barrido durante unos segundos o bien reemprende
éste algunos segundos después de la finalización de la señal en el canal.
Pulsando el PTT se desactiva esta función.
17.
Botón ✩ (luz): Iluminación de la pantalla (temporizada a 5 segundos). Esta función
permite utilizar el equipo en ambientes oscuros.
18.
Interruptor PTT (pulsar para hablar): Al pulsar este botón, se activa el transmisor.
Al soltarlo, se activa el receptor.
19.
Compartimento de baterías: El equipo funciona con 6 pilas alcalinas o NiMH
recargables.
20.
Fijación para correa de mano.
21.
Botón Channel UP: Sirve para pasar al siguiente canal. Manteniendo pulsado
este botón se consigue la función de auto-repetición.
22.
Botón Channel DOWN: Sirve para pasar al canal precedente. Manteniendo
pulsado este botón se consigue la función de auto-repetición.
23.
Fijador pack de baterías: eleve el pulsador y deslice la batería (vea el dibujo).
24.
Contacto antena auxiliar: para la conexión del adaptador móvil.
24
CHAN
NEL
19

ESP
AÑOL
5
FUNCIONAMIENTO DEL TRANSCEPTOR
1. Inserte la antena en su conector correspondiente.
2. Inserte 6 pilas de Ni-Cd o pilas alcalinas en el compartimento de baterías,
comprobando la polaridad (las pilas alcalinas no se pueden recargar).
3. Gire el botón de encendido/volumen hacia la derecha para encender la unidad.
Ajuste el volumen para un nivel de escucha normal.
4. Ajuste el nivel de silenciador (SQUELCH) tal como se indicó en el apartado 2.
5. Seleccione el canal deseado mediante los botones “UP/DOWN” o “QUICK UP/
QUICK DOWN”.
Nota: Si el canal no cambia, verifique que el botón EMG o LOCK no han sido
pulsados. En este caso, pulse de nuevo el botón EMG o LOCK para desactivar
la función.
Si desea usar el barrido, etc., consulte las instrucciones descritas anteriormente.
Para transmitir: pulse y mantenga pulsado el botón PTT y hable frente al
micrófono.
Para recibir: simplemente libere el botón PTT.
Precaución: No exponga el DISPLAY a temperaturas extremas.
SELECCIÓN BANDAS DE FRECUENCIA
La selección de las bandas de frecuencia debe efectuarse en función del país en el
que se va a utilizar el equipo.
Procedimiento:
1. Apague el equipo
2. Enciéndalo pulsando simultáneamente las teclas
A/F-LCR y SC
3. Mediante las teclas ▲ y ▼, seleccione la banda de frecuencia deseada (“E” para
España -vea la tabla de bandas-).
4. Pulse la tecla
A/F-LCR para finalizar la selección
NOTA: Si se selecciona una banda de frecuencia que sólo funciona en modo
FM, la tecla A/F-LCR activa la función LCR (rellamada último canal utilizado)

6
ESP
AÑOL
6
TABLA BANDAS DE FRECUENCIA
Siglas en el display País
I
Italia 40 CH AM/FM 4W
I2
Italia 34 CH AM/FM 4W
D
Alemania 80 CH FM 4W / 12 CH AM 1 W
D2
Alemania 40 CH FM 4W / 12 CH AM 1 W
EU
Europa 40 CH FM 4W / 40 CH AM 1 W
EC
CEPT 40 CH FM 4W
E
España 40 CH AM/FM 4W
F
Francia 40 CH FM 4W / 40 CH AM 1 W
UK
Inglaterra 40 CH FM 4W frecuencias inglesas + EC 40 CH FM
4W frecuencias CEPT
ATENCIÓN:
El estándar reconocido en todos los países europeos es 40CH FM 4W (EC) - Vea
tabla de “Restricciones al uso”

ESP
AÑOL
7
ESPECIFICACIONES TECNICAS
Generales
Canales ........................................................ 40 FM (Vea Tabla Bandas de Frecuencia)
Rango de frecuencias ...................................................................26.965 a 30.105 MHz
Modo de operación ........................................................................F3E (FM), A3E (AM)
Impedancia de la antena ................................................................................... 50 Ohm
Altavoz .......................................................................................................8 Ohm, 0.5 W
Micrófono .......................................................................................... Tipo condensador
Alimentación ..................................................................7.2 - 13.2 Vcc. Nominal 12 Vcc
Tamaño ............................................................................................... 30 x 70 x 140 mm
Peso ............................................................................................... 220 gr. (sin baterías)
Receptor
Sensibilidad a 10 dB S/N ...................................................... 0.5 µV (AM); 0.25 µV (FM)
Selectividad .......................................................................... mejor que 60 dB @ 5 KHz
Rango del silenciador ............................................................................ 0.25 V - 500 µV
Potencia salida de audio ...................................... 0.5 W a 8 Ohm (distorsión del 10%)
Distorsión con entrada 1000 µV ............................................................................... 3%
Respuesta de frecuencia de audio ............................................................ 400-2400 Hz
Frecuencia intermedia ..................................................................Primera: 10.695 MHz
.......................................................................................................... Segunda: 455 KHz
Radiación de espúreas .......................................................................menor que 60 dB
Consumo en espera ............................................... 100 mA (modo SAVE desactivado)
......................................................................................... 45 mA (modo SAVE activado)
Transmisor
Potencia de salida de RF ....................................ciclo de trabajo del 10% 4 W AM/FM
Tolerancia de la frecuencia ................................................................................ 0.005%
Supresión de armónicos ...................................................................... mejor que 70 dB
Consumo ............................................................................................................ 900 mA
Modulación ........................................................................................... AM 90% (± 5%)
...................................................................................................................... FM 2.0 KHz
Las especificaciones están sujetas a variaciones sin previo aviso


FRANÇAIS
1
SOMMAIRE
INTRODUCTION ................................................................................... 1
FONCTION ET EMPLACEMENT DES COMMANDES ......................... 2
COMMENT UTILISER VOTRE ÉMETTEUR-RÉCEPTEUR ................... 5
SELECTION DES BANDES DE FREQUENCE ................................... 5
TABLEAU DES BANDES DE FREQUENCE ....................................... 6
CARACTÉRISTIQUES TECHNIQUES .................................................. 7
INTRODUCTION
Unité compacte de petite taille qui garantit une utilisation prolongée
pendant des années, même en conditions difficiles. La caractéristique
unique de cet émetteur innovant est sa
capacité à sélectionner
n’importe quelle bande CB européenne facilement et rapidement.
ALAN 42 MULTI est muni d’un
synthétiseur de fréquence (PLL) et
d’un
dispositif automatique d’économie d’énergie. Un bouton
pratique permet d’éclairer le
large écran pour pouvoir utiliser la radio en
conditions de très faible luminosité. La prise externe pour microphone
facilite l’utilisation des accessoires de micro (vox; etc.).
L’unité est pré-réglée en usine sur la bande « EC », CEPT 40 CH
FM 4 W.
2
FRANÇAIS
2
Fonction et emplacement des commandes
1.
Connecteur d’antenne
Introduisez dans cette fiche l’antenne livrée avec l’émetteur-récepteur. Pour obtenir
les meilleures performances, vous pouvez utiliser une antenne externe montée sur
le véhicule.
2.
Commande Squelch
Cette commande supprime le bruit de fond du récepteur. Pour activer le « Squelch »,
tournez le bouton vers la droite. Pour désactiver le « Squelch », tournez le bouton
vers la gauche. Il est conseillé de positionner précisément la commande de
Squelch de manière à supprimer le bruit de fond du récepteur.
3.
Commande On/Off (Marche/Arrêt) – Volume
Lorsque cette commande est en position « Off » (Arrêt), votre émetteur-récepteur
est hors tension. Pour mettre votre CB sous tension, tournez ce bouton de
commande dans le sens des aiguilles d’une montre. Puis, continuez à tourner ce
bouton dans le sens des aiguilles d’une montre jusqu’à obtenir un niveau sonore
de réception optimal.
4.
Prise MIC
Pour connecter le microphone, insérez la fiche de ce dernier dans cette prise.
5.
Prise haut-parleur externe
Pour connecter un haut-parleur externe, insérez la fiche de ce dernier dans cette
prise.
6.
Pince de ceinture
MIC
SPK
SQL
OFF/VOL
1
2
3
5
4
CHANNEL
21
22
18
6
23
15
16
17
8
9
7
20
10
12
13
11
13
14
LCD
EMG
A/F
H/L
LOCK
MIC
CHANNEL
DW
SC
Q.UP
Q DOWN
LCR
FRANÇAIS
3
7.
Afficheur rétroéclairé multifonction
Cet afficheur à cristaux liquides vous permet de contrôler le fonctionnement de
l’émetteur-récepteur à l’aide des indications suivantes :
a. Fonction
EMG activée
b. Numéro de canal sélectionné (1 à 40)
c.
Lock : fonction de verrouillage du clavier activée
d.
BATT : Indicateur du niveau de charge de la pile
e. Mode AM/FM
f.
SC : Fonction SCAN activée
g.
DW: Fonction DUAL WATCH
h.
P. S. : fonction « SAVE » (économie d’énergie) activée
i. Fonction LOW activée
j. Niveau de signal (réception) et puissance de sortie (émission)
k.
RX/TX : TX = mode émission, RX = mode réception
l. Bande de fréquence selectionnée
8.
Touche EMG (Canal d’urgence)
Lorsque vous appuyez sur cette touche, l’appareil passe automatiquement sur
le canal 19 (canal d’urgence). L’afficheur indique alors « EMG » et l’émetteur-
récepteur est protégé contre tout changement accidentel de canal. Pour annuler
le verrouillage du canal 19, appuyez à nouveau sur la touche EMG.
9.
Bouton A/F–LCR
Ce bouton de commande permet de commuter entre les modes AM et FM. Si vous
sélectionnez une bande de fréquence opérant seulement en modulation FM, la
touche
A/F–LCR active la fonction LCR (rappel du dernier canal utilisé).
10.
Microphone
En émission, maintenez le microphone à environ 4 cm votre bouche et parlez d’une
voix normale.
11.
Bouton H/L (Haut/Bas)
Ce bouton de commande permet de sélectionner le niveau de puissance de sortie
en émission. Lors de la mise sous tension de l’émetteur-récepteur, le niveau de
puissance de sortie est automatiquement à son maximum (4 W/1 W FM). Si vous
appuyez sur ce bouton, l’émetteur-récepteur émettra à puissance réduite (1 W/0,2
W AM). L’afficheur indiquera LOW (BAS). Pour revenir au niveau d’émission HIGH
(HAUT), Appuyez à nouveau sur le bouton
H/L.
12.
Bouton LOCK
Ce bouton permet de verrouiller le clavier afin d’éviter tout déréglage intempestif
par activation involontaire des commandes.
13.
Touches Q.UP - Q.DOWN
40
0,5
1
2
3
PWR
E C
RX TX EMG SC LOW DW
FM AM PS LOCK BATT
516
430
5
3
a
k
e
b
h f i g
d
c
j
l
4
FRANÇAIS
4
Les touches permettent de vous déplacer de 10 canaux vers le haut (Q.UP) ou de
10 canaux vers le bas (Q.DOWN).
14.
Haut-parleur
15.
Dual Watch (Double veille)
Cette fonction permet d’accorder l’émetteur-récepteur simultanément sur deux
canaux différents. Ainsi, vous pouvez « surveiller » un deuxième canal. Lorsqu’un
signal est reçu sur le deuxième canal, la communication en cours sur le premier
canal est automatiquement interrompue et le récepteur commute sur le deuxième
canal. La surveillance reprend 4 secondes après la fin du signal.
Pour activer cette fonction, procédez de la façon suivante :
- Sélectionnez le canal souhaité à l’aide du sélecteur de canal
- Appuyez sur le bouton
DW
- Sélectionnez le deuxième canal
- Pour annuler cette fonction, appuyez à nouveau sur le bouton
DW ou sur la
touche
PTT
16.
Bouton SCAN
Cette fonction permet de rechercher automatiquement un canal « occupé ».
• Tournez le bouton
Squelch dans le sens des aiguilles d’une montre jusqu’à ce
que le bruit de fond disparaisse.
• Appuyez sur le bouton
SCAN: l’émetteur-récepteur balaye automatiquement
tous les canaux jusqu’à réception d’une porteuse.
• Lorsque l’émetteur-récepteur rencontre une porteuse le balayage est interrompu
quelques secondes, puis il reprend après la fin de la communication sur ce
canal.
• Lorsque l’émetteur-récepteur est en émission, la fonction de balayage est
désactivée.
17.
Touche ✩
Cette touche commande l’éclairage temporisé de l’afficheur et permet d’utiliser
l’émetteur-récepteur dans des conditions d’éclairage difficiles (lumière
insuffisante). Lorsque vous appuyez sur cette touche, l’afficheur est éclairé
pendant 5 secondes.
18.
Touche Push to talk (PTT)
Cette touche permet d’activer ou de désactiver l’émetteur. Pour activer l’émetteur,
appuyez sur cette touche et maintenez-la enfoncée. Pour désactiver l’émetteur,
relâchez cette touche.
19.
Compartiment des piles
Cet émetteur-récepteur fonctionne avec 6 piles alcalines / accumulateurs NiCd.
24
CHAN
NEL
19

FRANÇAIS
5
20.
Orifice pour sangle de poignet
21.
Bouton Channel UP
Ce bouton de commande permet de passer au canal suivant. Pour obtenir un
défilement automatique des canaux, laissez ce bouton enfoncé.
22.
Bouton Channel DOWN
Ce bouton de commande permet de passer au canal précédent. Pour obtenir un
défilement automatique des canaux, laissez ce bouton enfoncé.
23.
Bouton de contact des piles
Pour retirer les piles de leur logement, soulevez ce bouton (voir illustration).
24.
Contact pour antenne auxiliaire
Ce contact permet le raccordement à un adaptateur pour véhicule.
Comment utiliser votre émetteur-récepteur
1. Introduisez l’antenne dans le connecteur d’antenne.
2. Insérez 6 piles alcalines dans le compartiment prévu à cet effet, en veillant à
respecter la polarité (Attention : les piles alcalines ne sont pas rechargeables)
3. Tournez le bouton
ON/OFF (Marche/Arrêt) - Volume dans le sens des aiguilles
d’une montre pour mettre l’émetteur-récepteur sous tension. Réglez le volume
sonore à un niveau d’écoute confortable.
4. Ajustez la commande de
Squelch.
5. Sélectionnez le canal souhaité à l’aide des commandes
UP/DOWN et Q.UP/
Q.DOWN.
Remarque: si vous ne parvenez pas à changer de canal, vérifiez que les boutons
EMG et LOCK ne sont pas enfoncés. Si l’un de ces boutons est enfoncé, appuyez
dessus afin de désactiver la fonction correspondante.
Pour toute information sur les autres fonctions, reportez-vous aux instructions
précédentes.
Pour émettre: maintenez la touche PTT enfoncée et parlez dans le microphone.
Pour recevoir: relâchez simplement la touche PTT.
Attention : n’exposez pas l’afficheur à des températures extrêmes
SELECTION DES BANDES DE FREQUENCE
Les bandes de fréquence doivent être choisies selon le pays ou vous voulez opérer.
1. Eteignez l’appareil.
2. Allumez la radio et appuyez en même temps les touches
A/F-LCR et SC.
3. Avec les touches ▲ et ▼, sélectionnez la bande de fréquence désirée (voir le
tableau des fréquences).
4. Appuyez sur la touche
A/F-LCR pour terminer la sélection.

6
FRANÇAIS
6
NOTE: Quand vous sélectionnez une bande de fréquence seulement en mode FM, la
touche
A/F-LCR active la fonction LCR (rappel du dernier canal utilisé).
TABLEAU DES BANDES DE FREQUENCE
Sigle sur le
display
Pays
I
Italie 40 CH AM/FM 4Watt
I2
Italie 34 CH AM/FM 4Watt
D
Allemagne 80 CH FM 4Watt / 12 CH AM 1 Watt
D2
Allemagne 40 CH FM 4Watt / 12 CH AM 1 Watt
EU
Europe 40 CH FM 4Watt / 40 CH AM 1 Watt
EC
CEPT 40 CH FM 4Watt
E
Espagne 40 CH AM/FM 4Watt
F
France 40 CH FM 4Watt / 40 CH AM 1 Watt
UK
Angleterre 40 CH FM 4Watt fréquences anglais
+ EC 40 CH FM 4Watt fréquences CEPT
ATTENTION!
La bande de fréquence reconnue sûrement dans tous les pays européens est
40CH FM 4W (EC) - voir le tableau pour les restrictions à l’usage.

FRANÇAIS
7
Caracteristiques techniques
Nombre de canaux ............................................................40 FM (voir tableau bandes)
Gamme de fréquence ......................................................................25.615-30.105 MHz
Mode de fonctionnement ...............................................................F3E (FM), A3E (AM)
Impédance de l’antenne ...................................................................................50 ohms
Haut-parleur .............................................................................................8 ohms, 0,5 W
Microphone .............................................................................. Modèle à condensateur
Alimentation ......................................................................... 7,2 - 13,2 V – 12 V nominal
Dimensions ........................................................................................ 30 x 70 x 140 mm
Poids ...........................................................................................220 gr. (sans les piles)
RÉCEPTEUR
Sensibilité à 10 dB S/B ..........................................................0,5 µV (AM), 0,25 µV ‘FM)
Sélectivité .........................................................................................Supérieure à 60 dB
Plage de suppression du bruit de fond ................................................. 0,25 V - 500 µV
Puissance de sortie audio ........................................... 0,5 W 8 ohms (distorsion 10 %)
Distorsion à 1000 µV ................................................................................................ 3 %
Bande passante audio ............................................................................. 400 - 2400 Hz
Fréquence intermédiaire ............................................................................I 10,695 MHz
.........................................................................................................................II 455 kHz
Suppression des parasites ..............................................................Supérieure à 60 dB
Consommation électrique en veille ................... 100 mA lorsque le mode économique
................................................................................................................... est désactivé
............................................................. 45 mA lorsque le mode économique est activé
EMETTEUR
Puissance de sortie ..............................................................cycles à 10% 4 W AM/FM
Tolérance en fréquence .................................................................................... 0,005 %
Suppression des harmoniques ........................................................Supérieure à 70 dB
Consommation électrique ................................................................................. 900 mA
Modulation .......................................................................................... AM 90 % (± 5 %)
............................................................................................................... FM dev. 2,0 kHz
Toutes les caractéristiques peuvent être modifiées sans préavis


POR
TUGUÊS
1
ÍNDICE
INTRODUÇÃO ...................................................................................... 1
DESCRIÇÃO DOS COMANDOS .......................................................... 2
USO DO APARELHO ............................................................................ 5
SELECÇÃO DAS BANDAS DE FREQUÊNCIA ................................... 5
TABELA DAS BANDAS DE FREQUÊNCIA ........................................ 6
CARACTERÍSTICAS TÉCNICAS .......................................................... 7
INTRODUÇÃO
ALAN 42 MULTI é um radiotelefone de pequenas dimensões que
garante um óptimo desempenho nas mais variadas condições de
uso. É um aparelho inovativo, pois é o unico CB portátil que oferece
ao utilizador a possibilidade de
seleccionar qualquer banda CB
européia de modo simples e rápido. ALAN 42 MULTI é controlado por
um
sintetizador de frequência (PLL) e por um dispositivo automático
de
economia de baterias.
Dispõe de um
amplo display, que pode ser iluminado com uma tecla,
consentindo a visualização mesmo em condições de luminosidade
escassa. A tomada externa para um microfone fala/escuta permite a
conexão com microfones acessórios.
O aparelho é fornecido com a banda “EC“ CEPT 40CH FM 4W.
2
POR
TUGUÊS
2
DESCRIÇÃO DOS COMANDOS
1.
Conector da antena. Nesta tomada se insere a antena fornecida com entrada de
encaixe. Para prolongar o alcance da cobertura, podem ser utilizadas antenas
externas veiculares ou mais eficientes.
2.
Botão Squelch. Este controlo serve para eliminar o ruído de fundo do receptor.
Girando o botão para a direita é activadata a função, girando-o para a esquerda a
função é desactivadata.
Para obter a máxima sensibilidade do receptor é preferível que o comando
seja regulado somente no nível exacto em que o ruído de fundo do receptor é
eliminado.
3.
Botão Off-Volume
Posição OFF. Aparelho desligado
Posição Volume. Girando o botão, regular o volume no nível desejado.
Girando o botão para a direita, o volume aumenta, girando-o para a esquerda, o
volume diminui.
4.
Tomada do microfone externo. Conectar inserindo no pino o microfone altifalante
(ou vox) acessório.
5.
Tomada do altifalante externo. Conectar inserindo no pino o microfone altifalante
(ou vox) acessório.
6.
Clip para cinto
MIC
SPK
SQL
OFF/VOL
1
2
3
5
4
CHANNEL
21
22
18
6
23
15
16
17
8
9
7
20
10
12
13
11
13
14
LCD
EMG
A/F
H/L
LOCK
MIC
CHANNEL
DW
SC
Q.UP
Q DOWN
LCR
POR
TUGUÊS
3
7.
Display multifunção com iluminação traseira
O display de cristais líquidos foi projetado especialmente para indicar a modalidade
operativa corrente.
a.
EMG: indicador piscante do canal de emergência activado
b. Número de canais seleccionados (de 1 a 40)
c.
LOCK: indicador da função bloqueio do teclado activada
d.
BATT: indicador de baterias descarregadas
e.
AM/FM: indicador do modo de transmissão
f.
SC: indicador da função SCAN activada
g.
DW: Dual Watch
h.
P. S.: indicador da função SAVE activada
i.
LOW: indicador de baixa potência
j. Indicador da intensidade do sinal recebido e da potência do sinal transmitido.
k.
RX/TX: indicador de recepção (RX) e transmissão (TX)
l. Banda de frequência seleccionada
8.
Botão EMG: canal de emergência: premindo esta tecla o aparelho se posicionará
automaticamente no canal 9, canal de emergência. No display piscará “EMG”
e não será possível mudar acidentalmente o canal. Para desinserir esta função,
prima novamente a tecla.
9.
Botão A/F–LCR: para seleccionar o modo de emissão (AM/FM). A relativa
escolha será visualizada no display. Se for seleccionada uma banda de frequência
que opera somente em FM, a tecla
A/F–LCR activará a função LCR (chamada do
último canal utilizado).
10.
Microfone: durante a transmissão, aproxime o aparelho da boca (cerca de 4 cm)
e fale com um tom de voz normal, na direção do microfone.
11.
Botão H/L. Selecção do nível de potência em transmissão. Ao ser ligado o
aparelho transmite sempre com o nível mais alto (“HIGH”) de potência. Premindo
esta tecla o aparelho transmitirá com potência reduzida, mostrando ao mesmo
tempo no display a escrita “LOW”. Prima novamente esta tecla para voltar à alta
potência. Em alta potência o aparelho emite 4W, em baixa potência emite 1W.
12.
Botão LOCK: com esta tecla é possível bloquear o teclado evitando pressões
acidentais das teclas.
13.
Botões QUICK UP/DOWN: para mover-se de dez canais para cima (UP) ou para
baixo (DOWN).
14.
Altifalante
15.
Dual Watch: com esta tecla pode-se permanecer sintonizado contemporaneamente
em dois canais à escolha do utilizador.
Com esta função um segundo canal será monitorado ciclicamente. Em presença
40
0,5
1
2
3
PWR
E C
RX TX EMG SC LOW DW
FM AM PS LOCK BATT
516
430
5
3
a
k
e
b
h f i g
d
c
j
l
4
POR
TUGUÊS
4
de um sinal no segundo canal, a conversa no canal inicial se interromperá e o
receptor comutará automaticamente para o segundo canal. A monitoragem
reiniciará 4 segundos depois que cessar o sinal.
Para activar esta função, proceda da seguinte maneira:
- Seleccione o canal desejado com o selector de canais
- Prima a tecla
DW
- Seleccione o segundo canal
- Reprima a tecla
DW
- Para anullar a função prima a tecla
DW ou o PTT.
16.
Botão SCAN
Com este comando pode-se buscar automaticamente um canal no qual haja
comunicação (ocupado). Proceda da seguinte maneira:
• Gire o squelch no sentido horário até desaparecer o ruído de fundo em um
canal livre.
• Prima o botão ‘’SCAN’’. O radiotelefone fará o scanning automático e repetido
de todos os canais até encontrar um canal em uso.
• Quando encontrar um canal em uso, se interromperá e recomeçará alguns
segundos após o fim da comunicação no canal.
• Efectuando uma transmissão com o rádio, a função SCAN se desactiva.
17.
Botão ✩: Tecla da iluminação do display (temporizada) que permite operar mesmo
no escuro. Esta tecla permite que o display se ilumine por 5 segundos.
18.
Interruptor PTT: tecla de comutação RX/TX. Premindo-a se desactiva o
transmissor, soltando-a se activa o receptor.
19.
Vano para baterias: o aparelho funciona com 6 baterias alcalinas ou Ni-cd
recarregáveis.
20.
Furo para pulseira
21.
Botão Channel UP: Permite sintonizar-se no canal sucessivo. Mantendo premida
esta tecla obtém-se a função autorepeat.
22.
Botão Channel DOWN: Permite sintonizar-se no canal precedente. Mantendo
premida esta tecla obtém-se a função autorepeat.
23.
Gancho para baterias: levantar o botão e deslizar as baterias (ver desenho).
24.
Contacto da antena auxiliar: para a conexão ao adaptador veicular.
24
CHAN
NEL
19

POR
TUGUÊS
5
USO DO APARELHO
1. Conecte a antena ao radiotelefone
2. Insira 6 baterias alcalinas Ni-Cd no o vano, prestando atenção na correcta
polaridade (as baterias alcalinas não são recarregáveis).
3. Gire o botão liga/desliga no sentido horário, em seguida regule o volume no nível
adequado para escuta.
4. Regule o squelch como descrito no ponto 2.
5. Seleccione o canal desejado com as teclas
UP/DOWN (ou QUICK UP/QUICK
DOWN)
Nota: se o canal não mudar, certifique-se que não foi premida a tecla EMG ou
LOCK. Neste caso prima nuovamente a tecla EMG ou LOCK para desactivar a
função de emergência.
Para as outras funções refira-se às instruções descritas precedentemente.
Para transmitir: prima e mantenha premida a tecla PTT situada no lado esquerdo do
aparelho. Aproxime o aparelho da boca e fale na direção do microfone.
Para receber: simplesmente solte a tecla PTT.
ATENÇÃO: NÃO EXPONHA O DISPLAY A TEMPERATURAS MUITO ALTAS OU
MUITO BAIXAS.
SELECÇÃO DAS BANDAS DE FREQUÊNCIA
A escolha das bandas de frequência deve ser efectuada de acordo com o país em
que se pretende operar.
Procedimento:
1. Desligue o rádio.
2. Ligue o aparelho premindo contemporaneamente as teclas
A/F-LCR e SC.
3. Com as teclas ▲ e ▼, seleccione a banda de frequência desejada (ver tabela de
bandas).
4. Prima a tecla
A/F-LCR para terminar a selecção.
NOTA: Se for seleccionada uma banda de frequência que opera somente em FM, a
tecla
A/F-LCR activará a função LCR (chamada do último canal seleccionado).

6
POR
TUGUÊS
6
TABELA DAS BANDAS DE FREQUÊNCIA
Sigla no display País
I
Itália 40 CH AM/FM 4Watt
I2
Itália 34 CH AM/FM 4Watt
D
Alemanha 80 CH FM 4Watt / 12 CH AM 1 Watt
D2
Alemanha 40 CH FM 4Watt / 12 CH AM 1 Watt
EU
Europa 40 CH FM 4Watt / 40 CH AM 1 Watt
EC
CEPT 40 CH FM 4Watt
E
Espanha 40 CH AM/FM 4Watt
F
França 40 CH FM 4Watt / 40 CH AM 1 Watt
UK
Inglaterra 40 CH FM 4Watt frequências inglesas +
+ EC 40 CH FM 4Watt frequências CEPT
ATENÇÃO:
O standard seguramente reconhecido em todos os países europeus é 40CH FM
4W (EC) – Ver tabela “Restrições de uso”

POR
TUGUÊS
7
CARACTERÍSTICAS TÉCNICAS
Canais ............................................................................40 FM (ver tabela das bandas)
Gama de frequência ........................................................................25.615-30.105 MHz
Modulação ......................................................................................F3E (FM), A3E (AM)
Impedância da antena ........................................................................................50 ohm
Altifalante .................................................................................................... 8 ohm 0.5W
Microfone ............................................................................................... a condensador
Corrente ........................................................................................... 7.2 ÷ 13,2 nom 12V
Dimensões ............................................................................................. 30x70x140 mm
Peso .............................................................................................220 gr. (sem baterias)
RECEPTOR
Sensibilidade10dB S/N ........................................................... 0.5µV (AM), 0.25µV (FM)
Selectividade ....................................................................................... maior que 60 dB
Gama squelch ............................................................................................ 0.25V-500µV
Potência de saída audio ...................................................0.5W 8 ohm (10% distorsão)
Distorsão com uma entrada de 1000µV ................................................................... 3%
Resposta na frequência ............................................................................. 400-2400 Hz
Frequências intermediárias ..................................................................... I° 10.695 MHz
.......................................................................................................................II° 455 KHz
Rejeição às respostas espúrias .......................................................... maior que 60 dB
Corrente absorvida em standby .............100 mA quando é desinserida a função save
.........................................................................45 mA quando é inserida a função save
TRANSMISSOR
Potência de saída ............................................................. duty cycle 10% 4W AM/FM
Tolerância de frequência ................................................................................... 0.005%
Supressão de emissão harmônicas ...................................................... maior de 70 dB
Corrente absorvida ............................................................................................ 900 mA
Modulação ............................................................................................ AM 90% (± 5%)
............................................................................................................... FM dev. 2.0KHz
As especificações estão sujeitas a variações sem pré-aviso.


POLSKI
1
SPIS TRESCI
WPROWADZENIE ................................................................................ 1
FUNKCJE I ELEMENTY STEROWANIA ............................................... 2
UZYTKOWANIE ALANA 42 MULTI ....................................................... 5
WYBOR STANDARDU CZESTOTOLIWOSCI .................................... 5
TABELA CZESTOTLIWOSCI .............................................................. 6
DANE TECHNICZNE ............................................................................ 7
WPROWADZENIE
ALAN 42 MULTI jest niewielkich wymiarow przenosnym radiotelefonem
CB z mozliwoscia szybkiej adaptacji w samochodzie. Aktualna wersja
pozwala na latwa zmiane zakresu czestotliwosci na jeden z kilku
europejskich stanardow CB. Synteza czestotliwosci realizowana za
pomoca petli fazowej PLL, a pobor pradu redukuje automatyczny uklad
oszczedzania baterii.
Duzy,
wielofunkcyjny,
podswietlany
wyswietlacz
pokazuje
informacje o parametrach pracy urzadzenia. Zewnetrzny, opcjonalny
mikrofonogłosnik, popraiajacy komfort obslugi, moze byc podlaczony
do gnazda akcesoryjnego.
Urzadzenie fabrycznie ustawione jest w stanardzie “EC“band ,
CEPT 40CH FM 4W, a sprowadzane do Polski 40CH AM/FM 4W
“0”.
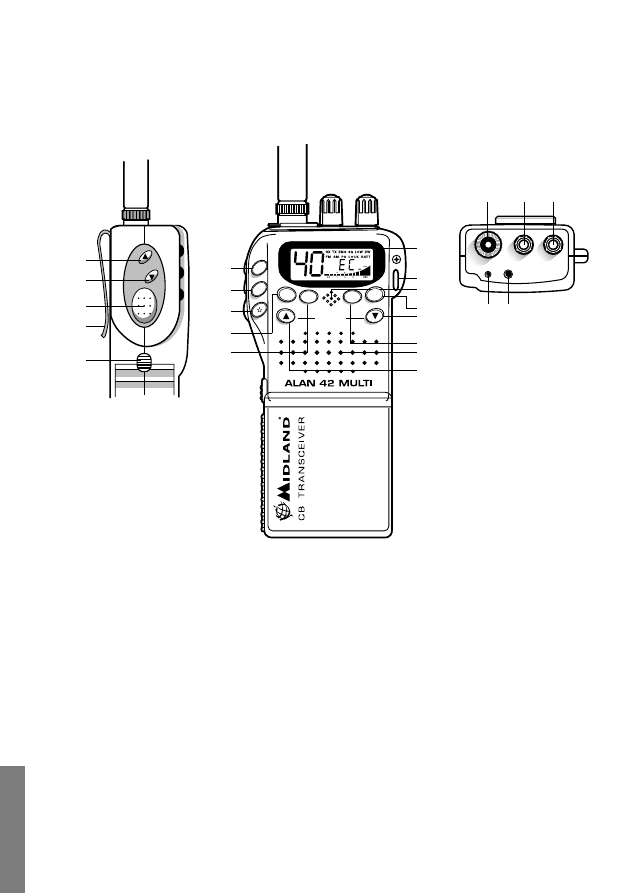
2
POLSKI
2
FUNKCJE I ROZMIESZCZENIE ELEMENTOW
STEROWANIA
1.
Gniazdo antenowe: Sluzy do podlaczenia anteny bedacej na wyposazeniu
radiotelefonu. Istnieje mozliwosc korzystania z zewnetrznej anteny samochodowej,
znacznie poprawiajacej zasieg, opisana w dalszej czesci instrukcji.
2.
Pokretlo blokady szumow Squelch: Reguluje blokade szumow. Krecac w prawo
zwiekszamy jej poziom tzn., ze beda slyszalne tylko silniejsze sygnaly. Obracanie
nalezy przerwac w chwili, kiedy znikna szumy tla.
3.
Pokretlo On/Off Volume:
Wlacza/wylacza radiotelefon i reguluje sile glosu.
4.
Gniazdo mikrofonowe:. sluzy do podlaczenia dodatkowego mikrofonu
5.
Gniazdo glosnika: umozliwia podlaczenie zewnetrznego glosnika.
6.
Zaczep do paska
7
Wielofunkcyjny wyswietlacz.
MIC
SPK
SQL
OFF/VOL
1
2
3
5
4
CHANNEL
21
22
18
6
23
15
16
17
8
9
7
20
10
12
13
11
13
14
LCD
EMG
A/F
H/L
LOCK
MIC
CHANNEL
DW
SC
Q.UP
Q DOWN
LCR

POLSKI
3
Cieklokrystaliczny wyswietlacz pokazuje nastepujace informacje o stanie i
funnkcjonowaniu radiotelefonu:
a.
EMG uzywany kanal ratunkowy
b. numer wybranego kanalu (od 1 do 40)
c.
LOCK: aktywna blokada klawiatury
d.
BATT: Wyczerpane baterie
e.
AM/FM : rodzaj emisji (modulacji)
f.
SC: wlaczona funkcja skanowania
g.
DW: wlaczony rownoczesny nasluch dwoch kanalow
h.
P. S.: akktywna funkcja oszczedzania pradu
i.
LOW: mala moc nadawania
j. moc sygnalu odbieranego i emitowanego
k.
RX/TX: TX=nadawanie; RX=odbior
l. wybrany standard czestotliwosci
8.
Przycisk EMG: przelacza radiotelefon na kanal 9, uznawany powszechnie za
ratunkowy. Na wyswietlaczu pojawia sie symbol “EMG”.Zmiana kanalow nie
bedzie mozliwa. Ponowne wcisniecie wylacza funkcje EMG.
9.
Przycisk A/F–LCR: sluzy do wyboru rodzaju emisji (modulacji) AM lub FM. Na
wyswietlaczu pojawia sie stosowna informacja. Jezeli radio pracuje w standardzie
“tylko FM” przycisk aktywuje funkcje LCR - przywolanie ostanio uzywanego
kanalu.
10.
Mikrofon: chcac nadawac wcisnij przycisk PTT i mow normalnie trzymajac radio
4 cm od ust .
11.
Przycisk H/L: sluzy do wyboru mocy nadawania. Po kazdorazowym wlaczeniu
radio ustawia sie zawsze w pozycji H czyli duzej mocy nadawania wynoszacej 4 W.
Naciskajac przycisk obnizamy skokowo moc nadawania do 1 W, co sygnalizowane
jest na wyswietlaczu komunikatem LOW. Kolejne wcisniecie zmienia moc na
duza.
12.
Przycisk LOCK: Aktywuje blokade przyciskow.
13.
Przyciski Q.UP - Q.DOWN: szybkie przelacznie kanalow co 10 w gore (Q.UP) lub
w dol (Q.DOWN).
14.
Glosnik
15.
Dual Watch (podwojny nasluch): funkcja DW pozwala na rownoczesny nasluch
dwoch kanalow. Radio przechodzi na odbior jesli na jednym z nich pojawi sie
sygnal i wraca do monitorowania po 4sek. gdy transmisja ustaje.
Fnkcje DW uruchamia sie w sposob nastepujacy:
- Wybierz kanal uzywajac przyciskow przelaczania.
- Wcisnij przycisk “DW”:
40
0,5
1
2
3
PWR
E C
RX TX EMG SC LOW DW
FM AM PS LOCK BATT
516
430
5
3
a
k
e
b
h f i g
d
c
j
l
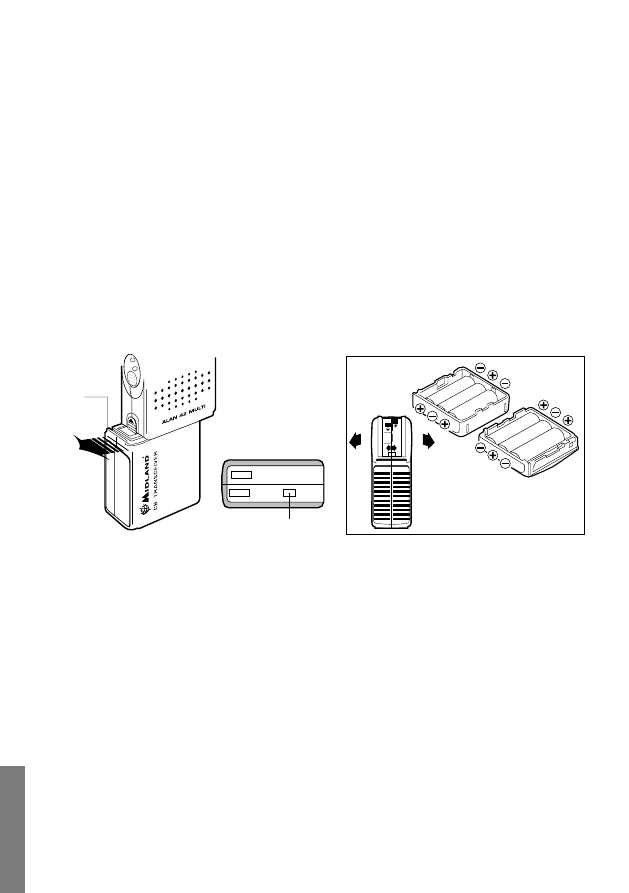
4
POLSKI
4
- Wybierz nastepny kanal, ktory chcesz monitorowac;
- Wcisnij ponownie “DW”:
- Kolejne nacisniecie “DW” lub przycisku nadawania PTT wylacza te funkcje.
16.
Przycisk SCAN: steruje funkcja skanowanie czyli szybkiego przeszukiwania
kanlow:
• Obracaj w prawo pokretlo blokady SQELCH az szumy stana sie nieslyszalne.
• Nacisnij przycisk “SCAN”: “SCAN” pojawi sie na wyswietlaczu i radio bedzie
szybko zmieniac kanaly do czasu odnalezienia fali nosnej o poziomie wyzszym
od szumu.
• Przeszukiwanie zostaje wznowione w kilka sekund po ustaniu odbioru
transmisji
• Podczas nadawania funkcja jest nieaktywna
17.
Przycisk podswietlania ✩: nacisniecie podswietla wyswietlacz na 5 sekund.
18.
Przycisk nadawania (PTT): wcisniecie i trzymanie umozliwia nadawanie.
Puszczenie przycisku przelacza radio w tryb odbioru.
19.
Pojemnik na baterie: miesci 6 bateri laklicnych typ R6 (AA).
20.
Mocowanie petli
21.
Przycisk Channel UP: przelacza radio na nastepny kanal o wyzszym numerze.
22.
Przycisk Channel DOWN: przelacza radio na sasiedni kanal o nizszym
numerze.
23.
Zatrzask pojemnika baterii: wymiana baterii wymaga podniesienia zatrzasku i
wysuniecia pojemnika.
24.
Zlacze anteny zewnetrznej: laczy sie z adaptorem samochodowym.
24
CHAN
NEL
19

POLSKI
5
UZYWANIE ALANA 42 MULTI
1. Podlacz antene dostarczana razem z radiem do gniazda antenowego.
2. Wloz 6 baterii zachowujac ich wlasciwa polaryzacje (batrii alkalicznych nie laduje
sie).
3. Przekrec pokretlo
ON/OFF zgodnie z ruchem wskazowek zegara i ustaw wlasciwy
poziom dzwieku.
4. Wyregukuj
SQUELCH blokade szumow
5. Wybierz kanal przyciskami
UP/DOWN lub QUICK UP/QUICK/DOWN
Uwaga!: Jezeli nie mozna zmienic kanalu uaktywniona jest funkcja EMG lub
LOCK. Nacisnij przycisk sterujacy dana funkcja aby ja wylaczyc.
Nadawanie: Wcisnij i trzymaj PTT mowiac do mikrofonu.
Odbior: Po prostu pusc PTT
Korzystanie z anteny samochodowej podlaczonej do adaptora wymaga odlaczenia
krotkiej, fabrycznej anteny helikalnej.
UWAGA!:
WYSWIETLACZ
JEST
WRAZLIWY
NA
EKSTREMALNE
TEMPERATURY.
ZMIANA STANDARDU CZESTOTLIWOSCI
Standard czestotliwosci ma byc wybrany zaleznie od kraju w ktorym radio jest
uzywane
Procedura:
1. Wylacz radiotelefon.
2. Wlacz radiotelefon trzymajac wcisniete przyciski
A/F-LCR i SC.
3. Uzywajac przyciskow ▲ i ▼ wybierz odpowiedni standardbuttons, (patrz tabela).
4. Potwierdz wybor przyciskiem
A/F-LCR.
Uwaga: Jezeli wybierzesz standard dopuszczjacy prace tylko w modulacji FM
przycisk zmiany emisji A/F-LCR pelni funkcje przywolania ostatnio uzywanego
kanalu.

6
POLSKI
6
TABELA CZESTOTLIWOSCI
Wyswietlany
symbol
Panstwo
I
Italy 40 CH AM/FM 4Watt
I2
Italy 34 CH AM/FM 4Watt
D
Germany 80 CH FM 4Watt / 12 CH AM 1 Watt
D2
Germany 40 CH FM 4Watt / 12 CH AM 1 Watt
EU
Europe 40 CH FM 4Watt / 40 CH AM 1 Watt
EC
CEPT 40 CH FM 4Watt
E
Spain 40 CH AM/FM 4Watt
F
France 40 CH FM 4Watt / 40 CH AM 1 Watt
UK
England 40 CH FM 4Watt English frequencies + EC 40 CH FM
4Watt CEPT frequencies
Uwaga!
Standardem dopuszczonym w calej Europie jest 40CH FM 4W (EC) .
W Polsce zwyczajowo uzywa sie standardu AM/FM „0”, który nie jest dostepny
bez ingerencji autoryzowanego serwisu.
Radzimy nie zmieniac standardu w radiach z polska specyfikacja.

POLSKI
7
DANE TECHNICZNE
PODSTAWOWE
Kanaly .......................................................................................... 40 FM (Patrz tabela)
Zakres czestotliwosci .....................................................................25.615-30.105 MHz
Rodzaje emisji ...............................................................................F3E (FM), A3E (AM).
Impedancja anteny ............................................................................................ 50 Ohm
Glosnik ..................................................................................................... 0,5 W/ 8 Ohm
Mikrofon ................................................................................................ pojemnosciowy
Zasilanie ...................................................................................................... 7,2-13.2Vdc
Wymiary ................................................................................30(L) x 140(H) x 70(D)mm
Waga ..................................................................................................... 190g bez baterii
ODBIORNIK
Czulosc ......................................................0.5µV (AM), 0.25µV (FM) przy 10dB SINAD
Selektywnosc. .....................................................................................................>60dB
Moc wyjsc. audio @10% THD ..............................................................0.5 W @ 8 Ohm
Znieksztalcenia audio ........................................................................................... 3% @
Pasmo przenoszenia ......................................................................... 400 Hz ÷ 2400 Hz
Tlumienie cz. lustrzanej ......................................................................................... 60dB
czestotliwosci posrednie..................................... ................................... I°IF:10.695 MHz
....................................................................................................................II°IF:455 KHz
Separacja kanalow ................................................................................................. 60dB
Pasmo audio ............................................................... Pobor pradu podczas czuwania
................................................................................ 100mA, 45mA wlaczony tryb SAVE
NADAJNIK
Moc wyjsciowa .................................................................. cykl pracy 10% 4W AM/FM
Modulacja ...................................................................................... FM:1.8KHz ± 0.2khz
...................................................................................................................... AM: 90% ±
Tolerancja czestotliwosci ................................................................................... 0,005%
Tlumienie czestotliwosci harmonicznych ............................................................ >70dB
Pobor pradu ....................................................................................................... 900 mA
Producent zastrzega mozliwosc zmian.

Circuito stampato - Printed circuit - Platinenlayout - Circuito
impreso - Circuit imprimé - Circuito impresso - Plytka
drukowana


Schema elettrico - Electric diagram - Schaltplan - Circuito
electrico - Schéma electrique - Diagrama electrico - Schemat
ideowy


Schema a blocchi - Block diagram - Blockschalfbild - Diagrama
de bloques - Schéma a blocs - Diagrama de blocos - Schemat
blokowy
Wyszukiwarka
Podobne podstrony:
ALAN42 MULTI component side
circuit ALAN42 Multi
ALAN42 MULTI component side
ALAN42 MULTI component side
Leica M300 instrukcja manual anleitung
DC INVERTER MULTI SERVICE MANUAL
Corona inverter multi service manual
Corona inverter multi service manual
Cool Edit Pro 2 1 Multi Channel Encoder Manual
multi demultiplekser
PANsound manual
als manual RZ5IUSXZX237ENPGWFIN Nieznany
hplj 5p 6p service manual vhnlwmi5rxab6ao6bivsrdhllvztpnnomgxi2ma vhnlwmi5rxab6ao6bivsrdhllvztpnnomg
BSAVA Manual of Rabbit Surgery Dentistry and Imaging
Okidata Okipage 14e Parts Manual
Bmw 01 94 Business Mid Radio Owners Manual
Manual Acer TravelMate 2430 US EN
więcej podobnych podstron