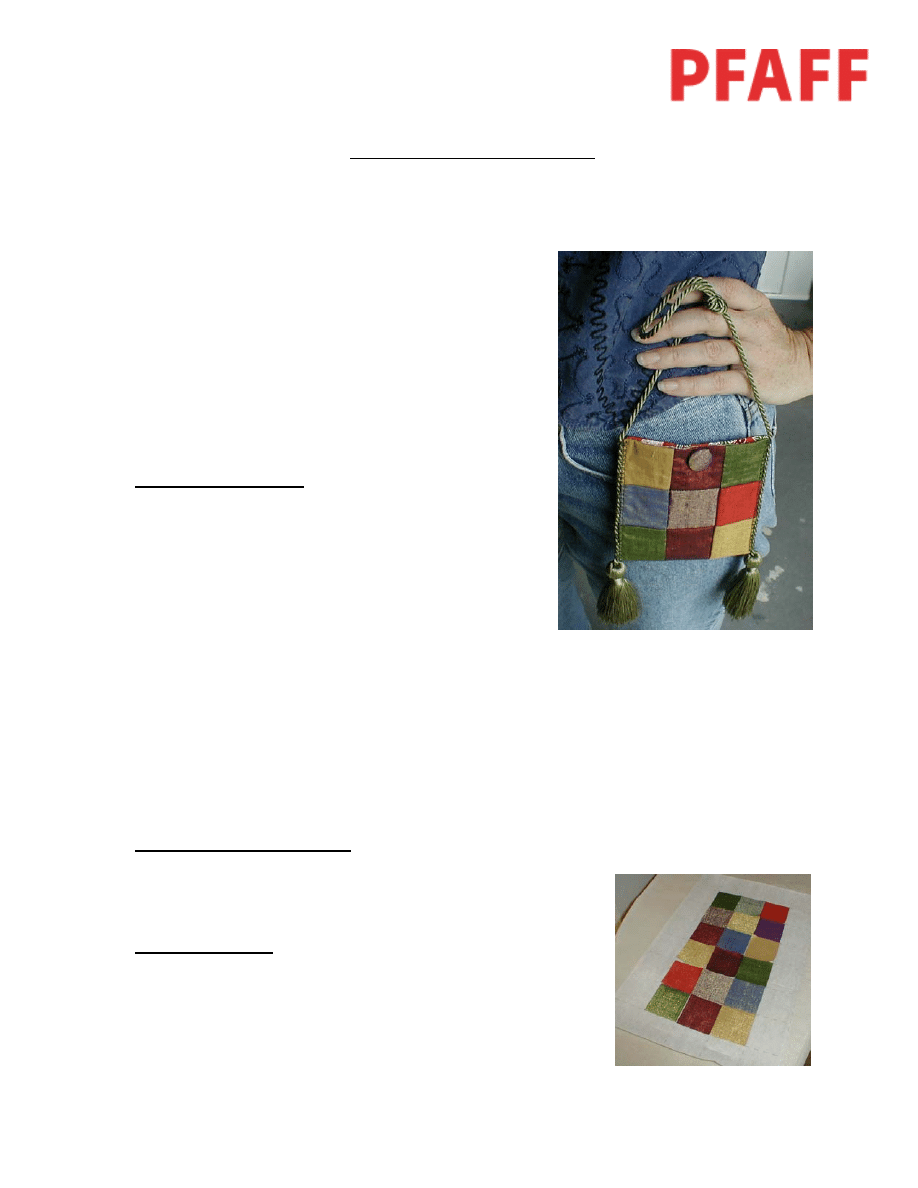
9-Patch Mini Purse
Designed and created by Kim Fillmore
This great little bag is just the right size for the
essentials – a little cash, drivers license, credit card
and lipgloss…and goes from casual with jeans to
an evening out. Having found that I’m not the best
at aligning all the corners of patchwork, I find that
Quilt Fuse™ gridded interfacing is a wonderful way
to get those perfectly aligned points! This quick,
easy project is a great way to familiarize yourself
with this excellent product…and make a versatile
bag in the process!
Supplies You’ll Need:
· Any sewing machine that has straight, zigzag and
blindhem or blanket stitches.
· Small pieces of coordinating solid fabrics – enough
to make 20 – 2” squares. For our bag, we used
silk/metallic blend fabrics…right out of the scrap
bag!
· 6” x 12” lining fabric
· 11 square x 5 square piece of Quilt Fuse™ or other 2” gridded fusible quilt interfacing.
This will be trimmed after fusing to 9 xquares x 3 squares (you can start with this size is
you feel comfortable doing so).
· 2 covered buttons
· 1 snap
· 1 double-tassled, rayon tie-back cord
· Matching sewing thread
· ¼” Quilting foot (optional)
· Teflon™ pressing sheet (optional)
Fabric Cutting Instructions:
1. Cut silk fabrics into 2” squares
2. Set aside lining fabric for trimming in a later step
Let’s Get Started:
1. Position 18 – 2” squares of fabric on fusible side of Quilt
Fuse™ to form a piece 9 squares x 3 squares. Fuse in
place using a Teflon™ pressing sheet, or carefully pressing
avoiding touching the iron to the uncovered fusible area.

2. Trim piece to 9 squares x 3 squares.
3. Fold, fabric sides together, along the first short
printed line on the Quilt Fuse™. Stitch a ¼” seam
allowance.
4. Continue folding and stitching until all short lines
are stitched with ¼” seams. Press seams in one
direction.
5. Repeat this folding and ¼” seaming to complete
the 2 long printed fold lines. Press these seams in
one direction.
6. Trim piece to edges of fabric.
7. Cut lining piece to match outer bag piece.
8. With right sides together, stitch ¼” seam allowance around outer edges, leaving an
opening along one long side for turning. Press to set stitching and turn bag right side
out. Press.
9. Fold bag in half lengthwise to form a square. Using a narrow (2mm x 2mm zigzag) stitch
together the 2 sides of the bag, leaving the top open.
10. Set blanket stitch so it is wide enough to
stitch over the edge of the bag and the
cord (without catching the cord in the
seam). Mirror image the stitch as needed
so the straight are on the fabric with the
left-right swing extending over the edge of
the cord.
11. Lay the cord close to the edge of the bag,
allowing the tassel to hang about 1” below
the bottom of the purse. This will allow
you to stitch clear to the bottom of the bag
without the tassel getting in the way of the presser foot. Once you’ve stitched from top
to bottom on both sides of the bag, gently pull the cord upwards to pull the tassel up so it
touches the bottom edge of the purse.
12. Cover 2 buttons and attach to either side of bag near top center. On inside sew a
heavy-duty snap to keep your bag closed.
Wyszukiwarka
Podobne podstrony:
Fashion Artist Drawing Techniques to Portfolio Presentation
fashion show eng
Assignment for Fashion Design o Nieznany (2)
ABZ fashion rekawiczki
Old Fashion Toys
ankieta postaw wobec reklam sisleya fashion junkie
Hats A history of Fashion in Headwear XIV Century
In Fashion or Behind The Times
FASHION
ABZ fashion szalik
clothes and fashion
111004134518 fashion
ABZ fashion kapelusz
Dressing the Man Mastering the Art of Permanent Fashion
BRITISH CULTURE (Fashion Multuculturism)
Fashion Artist Drawing Techniques to Portfolio Presentation
Love and fashion e 037w 2
Fashion
więcej podobnych podstron