87
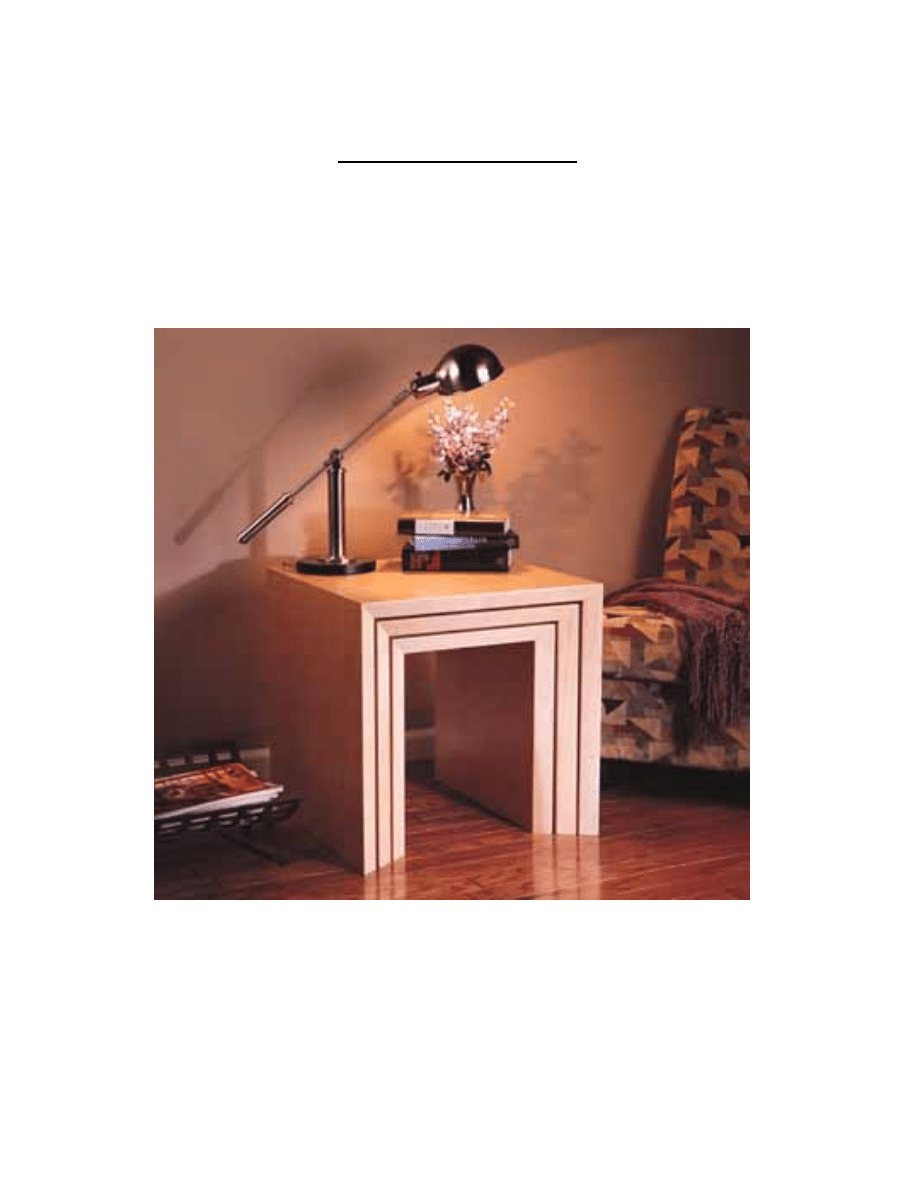
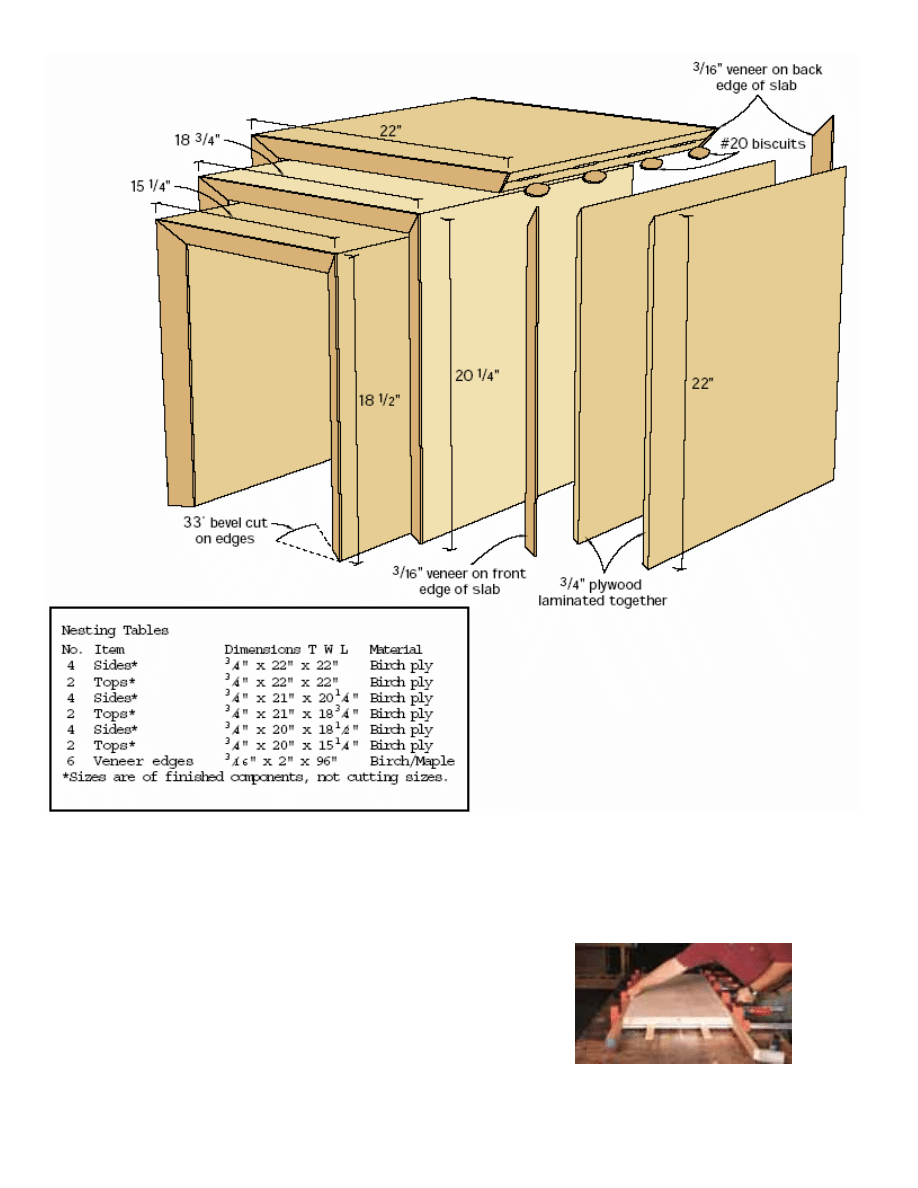
NESTING TABLES
Copyright 2004 Martian Auctions
432
Make a Slab
Start the tables by ripping three sheets of plywood in half to just under 24" in
width. You won’t need all that width, but it will come in handy later. As for the
lengths, using the full 96" is a little wasteful, but it makes gluing the two halves
together easier.
After ripping the sheets, determine which three faces are most attractive and
mark these as the outsides of the tables. Next glue the pairs together. To keep
the sheets from sliding around during glue-up, pound a nail into each slab
Glue up the Slabs • Spacers underneath
the slab allow the solid wood edging to
hang over to evenly cover the edges. It
doesn’t take a lot of pressure to clamp the
Copyright 2004 Martian Auctions
433
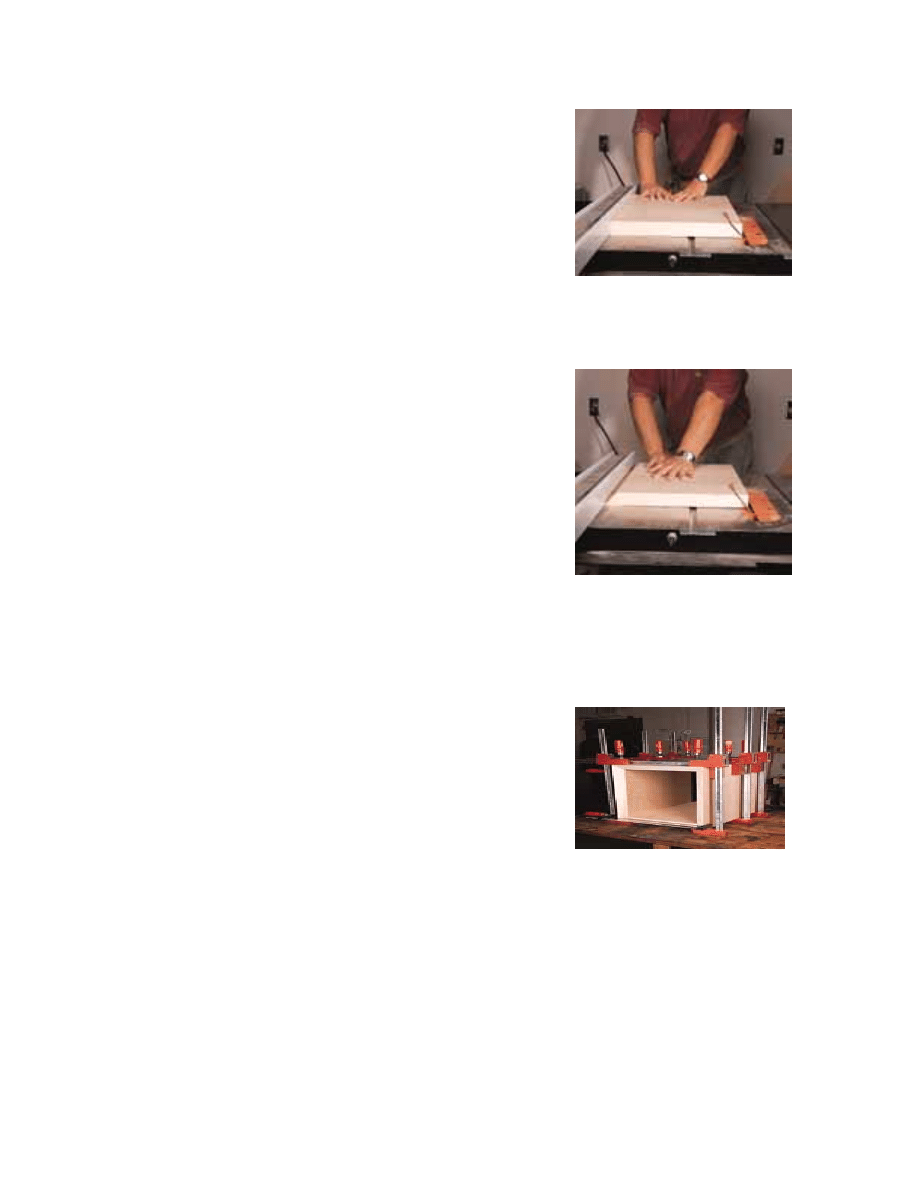
about 1" from the ends. These ends will be cut off anyway, and it makes glue-
up much easier. Stack the three pairs together, then clamp across the stack
using stout wood braces to spread the pressure.
After the glue is dry, square off one end of each slab. Then cut the slabs to
68", 62-½" and 55" in length. Don’t pitch the fall-off pieces, they’ll be useful
later. Next rip each slab to 23" wide to give you one flat edge. You could run
one edge over a jointer, but the adhesive in plywood is murder on high speed
steel knives. When you have one square edge, set the table saw’s blade to
bevel at 33? and rip the three slabs to 21-5/8", 20-5/8" and 19-5/8" wide
respectively. Again, save the fall-off.
Homemade Veneer
You’re now ready to run some solid lumber to cover the plywood edges. I
used soft maple edging on my birch ply tables.
Run out six lengths of 3/16"-thick solid wood for the edges. To plane wood
that thin, you probably will have to put an extra board over the bed of your
planer — most planers aren’t designed for wood that thin.
With the strips ready, it’s time to glue them to the slabs. Go find the fall-off
from the bevel cuts and grab a couple other sturdy solid strips. Use the fall-off
as a caul for clamping. By gluing the edges on the slabs with the bevel facing
up, gravity is on your side. I also cheated a little by tacking the edge strips in
place with a few small brads at either end. Once again, the extra inch in length
will be cut off, so the nail holes won’t show.
Glue the edging to the three slabs, then trim the edging flush to the plywood. I
used a router with a flush-cutting bit for the back edges, and I used a jack
plane to get the beveled edges nearly flush. Then I used a random orbit
sander to flush the edges perfectly. To soften the edges I used some 120 grit
paper and a block of wood to round over the sharp edges.
Make Your Miters
The tables slip inside one another with a ¼" gap between each, so accurate
cutting and spacing is important. To make the mitered corners and still
maintain the grain pattern on the table tops, first crosscut the three slabs into
three parts. Use the table saw with the blade set to 90?. Start by marking the
middle of each slab and cut the top section from the middle of each slab,
allowing the excess length to remain on the leg sections.
You’re now ready to do the precision cutting, and you’ll see quickly why a
sharp blade is important. Start with the largest top (22" x 22") and set the
blade bevel to exactly 45? and the rip fence to cut the miter exactly to the
width of the top. If you have a left-beveling table saw you’re in luck as the
inside of the table is on the tearout side. If you have a right tilt, that sharp
blade is important. Make the first bevel cut on one end, then spin the top and
make the cut on the opposite end. Again, with a right tilt you have the extra
difficulty of the first miter trying to slide under the rip fence. Adjust your cut for
any variance and consider adding an auxiliary fence that fits tight to the table
surface. Repeat this with all three tops.
You’re now ready to make the miter cuts on the legs. Start with the 22"-high
legs and work through the 20¼"- and 18½"-high legs, checking the spacing
between the tables by “dry-nesting” as you go.
edges, and too much pressure will force
the front edge caul to slide.
Center-cut Slab • The first miter cut on the
center slab (on a right-tilt saw) will balance
the fall-off piece on the blade. Be aware of
possible kickback of the scrap piece.
Disappearing Miter Trick • Unless your rip
fence is tight to the saw table, the miter will
have a tendency to slide under the fence
during the second cut (on right tilt saws).
Recheck your measurements to
accommodate this, or add a tight-fitting
auxilary fence to the standard rip fence.
A Little to the Left • Enough clamps and
careful adjustment during glue-up will
ensure tight miters and an evenly spaced
opening from top to bottom.
Copyright 2004 Martian Auctions
434

Assembly
The hard part is done. The rest is biscuits and clamps. I used four #20 biscuits
for each miter joint. With the biscuits cut, the fall-off pieces from cutting the
slabs to length come into play. You’ll stick them between the legs while gluing
up the miters. It makes glue-up much easier. First check the internal
dimension between the miters on each table top. Try to be as exact as
possible, then cut spacers from the fall-off pieces for each table. Finish sand
the interior faces of each table and the beveled front edge of each piece
before assembly. Put glue on the miters and biscuits and glue the tables. Pay
careful attention to the miter joint where the top and legs join. Unlike the
hardwood edging, you only have about 1/16" of veneer to sand to match the
joint.
With the tables assembled sand the outer faces, paying extra care with the
mitered joint. You’re now ready to finish. I chose to simply add a few coats of
clear finish to the tables, but any number of stains to match an existing decor
will work well.
Copyright 2004 Martian Auctions
435
Wyszukiwarka
Podobne podstrony:
Nesting Tables
3 Data Plotting Using Tables to Post Process Results
Boot Hill Loot Tables
Tables Vulvar recurrences
Diaspora Tables
Bluebird Nesting Box Project
6 2 2 8 Lab Viewing Host Routing Tables
Bowstring Tables
Fire and Sword Combat Tables
Fuzion Generic Weapons & Armor Tables
2b classification of consonants tables (1)
ArchJoist Tables id 68150 Nieznany
Logic Symbols Truth Tables and Equivalent Ladder Logic Diagr
GableJoist Tables
TABLES IN SAP
226 Translation Tables)
Dragon Age Reference Tables
więcej podobnych podstron